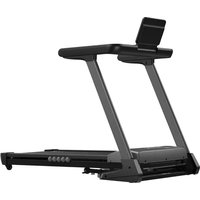
Nordik K18-S - Treadmills Skandika - Free user manual and instructions
Find the device manual for free Nordik K18-S Skandika in PDF.


| Product type | Treadmill for home use |
| Brand | Skandika |
| Model | Nordik K18-S |
| Maximum speed | 18 km/h |
| Maximum incline | 18% (adjustable via quick touch keys 3, 6, 9%) |
| Maximum user weight | 130 kg |
| Power supply | 220-240 V, grounding required |
| Display | LCD screen with automatic data cycling (time, distance, calories, heart rate, pace, incline) |
| Computer functions | Start with 3-second countdown, pause, extended stop, manual and Bluetooth heart rate measurement |
| Quick selection keys | Speed: 3, 6, 9 km/h; Incline: 3, 6, 9% |
| Connectivity | Bluetooth 2.4 GHz for optional chest strap and Kinomap app |
| Compatible apps | Kinomap Fitness (iOS and Android) |
| Safety | Safety clip, automatic stop after 10 minutes of inactivity, 2 m clearance around the device |
| Routine maintenance | Clean with a damp cloth, periodic lubrication (depending on usage frequency), motor dust removal once a year |
| Belt adjustments | Centering and tension adjustable using the supplied Allen key |
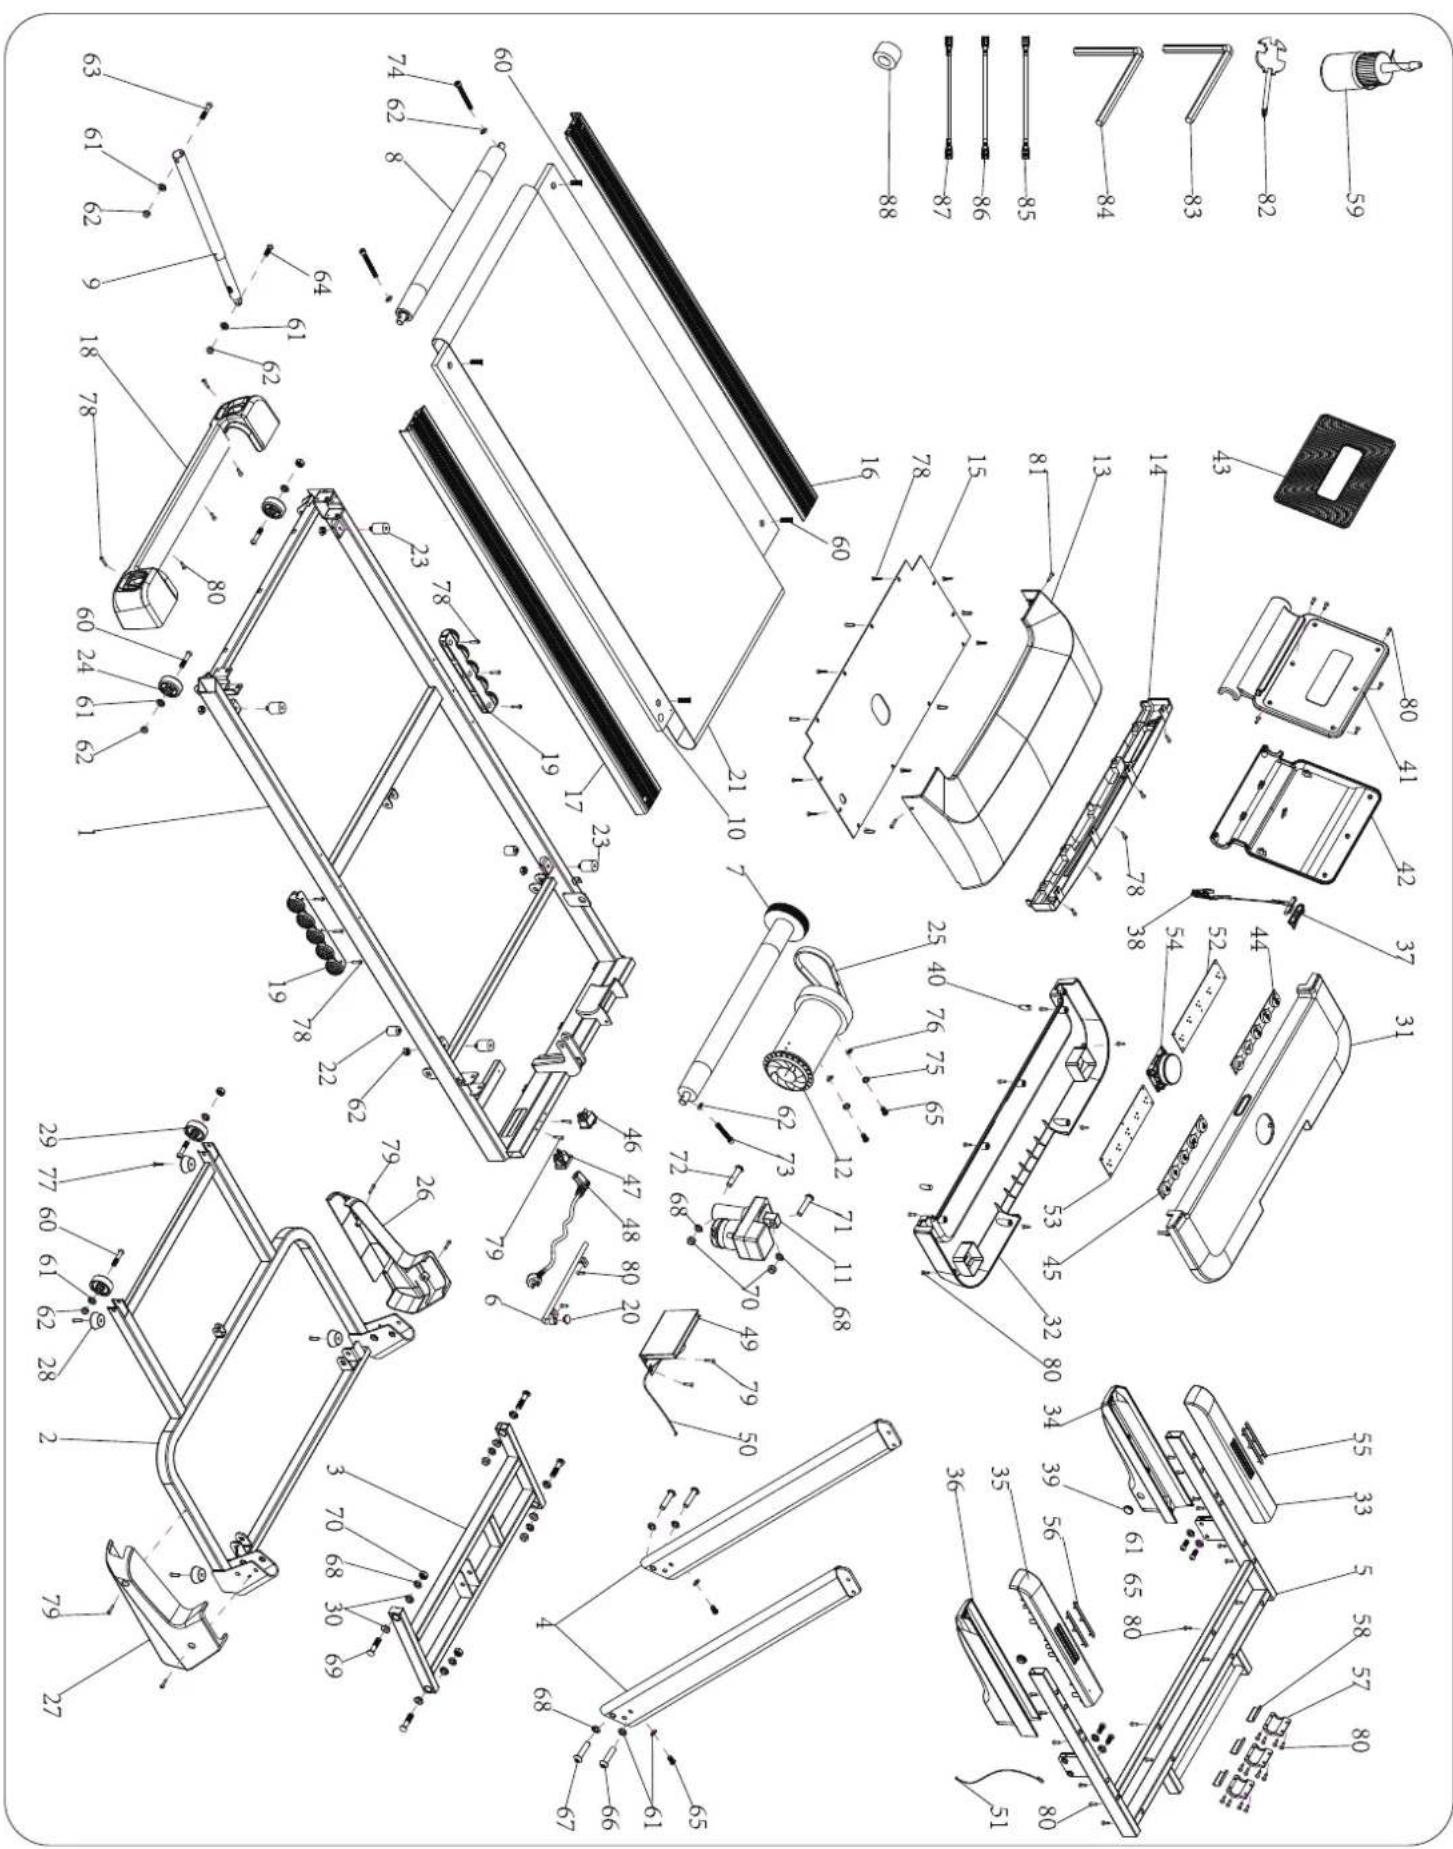
| Spare parts | Full list in the manual (numbers 1 to 88), available from customer service |
| Warranty | 24 months from delivery, home use only |
| Customer service | MAX Trader GmbH, service@skandika.de |
| Optional accessories | Skandika Bluetooth chest strap, integrated iPad holder |
Frequently Asked Questions - Nordik K18-S Skandika
User questions about Nordik K18-S Skandika
0 question about this device. Answer the ones you know or ask your own.
Ask a new question about this device
Download the instructions for your Treadmills in PDF format for free! Find your manual Nordik K18-S - Skandika and take your electronic device back in hand. On this page are published all the documents necessary for the use of your device. Nordik K18-S by Skandika.
USER MANUAL Nordik K18-S Skandika
natural_image
Black treadmill with sleek design and front panel, no visible text or symbols on the device itselfNordik K18-S
Inhalt

skandika.com/service
natural_image
Line drawing of a treadmill with adjustable arms and motion arrows indicating movement (no text or symbols)SCHRITT 1
natural_image
Line drawing of a treadmill with labeled parts (38 and 48), no text or symbols present.SCHRITT 5
natural_image
Black Bluetooth device with a strap and circular headband (no visible text or symbols on the device itself)FEHLERBEHEBUNG
natural_image
Diagram of a vehicle chassis with a curved arrow indicating rotational motion (no text or symbols)A
natural_image
Technical line drawing of a mechanical device with a curved arrow indicating rotation (no text or symbols)B
natural_image
Diagram of a vehicle chassis with two wheels and curved arrows indicating motion or movement (no text or symbols)C

19 Safety precautions
20 Set-up instructions
23 Folding and transportation
24 Computer operation manual
25 Bluetooth chest-belt / Quick selection keys
26 Cleaning and general maintenance
27 Connecting to KINOMAP app
28 Troubleshooting / training hints
29 Adjustments
30 Explosion drawing
31 Parts list
32 Warm-up and cool-down
33 Guarantee conditions
skandika.com/service
Please visit the Skandika Service portal on our website for setup & help videos, FAQs and downloadable instructions.
For more information about Skandika, simply visit our main page www.skandika.com

WARNING
To reduce risk of injury, read and understand this instruction manual before using the device! This machine is intended for home use only in accordance with the instructions provided in this manual. Read the instruction manual carefully before using this device and keep the instruction manual for future use.
SAFETY PRECAUTIONS
- Observe all warnings and precautions carefully. Do not switch on the unit until it is fully assembled and the motor protection cover is in place.
- To ensure the best safety of the device, regularly check it on damages and worn parts.
- If you pass on this device to another person or if you allow another person to use it, make sure that that person is familiar with the content and instructions in these instructions.
- Only one person should use the exerciser at a time. The maximum load of this device is 130 kg. Class: HC - not suitable for therapeutically use!
- Before the first use and regularly make sure that all screws, bolts and other joints are properly tightened and firmly seated.
- Always put on the safety clip as instructed and grasp the handles before using the treadmill!
- Do not switch on the unit when a person is standing on the treadmill. After switching on, there may be a pause at the beginning. Therefore, you must stand on the plastic steps on both sides of the treadmill until the treadmill has started moving.
- If you experience pain, cardiac arrhythmia, shortness of breath, dizziness or other discomfort during training, stop the training immediately! Always contact your doctor to discuss the further procedure professionally.
- Keep small children and pets away from the exercise equipment.
- This appliance can be used by children aged from 8 years and above and persons with reduced physical, sensory or mental capabilities or lack of experience and knowledge if they have been given supervision or instruction concerning use of the appliance in a safe way and understand the hazards involved.
• Children shall not play with the appliance. - Cleaning and user maintenance shall not be made by children without supervision.
-
Set up the unit in a dry, level place and protect it from moisture. If you want to protect the place of installation against pressure marks, dirt, etc., we recommend that you place a suitable, non-slip base under the unit. Do not use the unit near water or outdoors.
-
Always use the unit as described in this manual. If you notice any defective parts when assembling or checking the unit, or if you hear unusual noises coming from the unit during exercise, stop using the unit immediately and do not use it again until the problem is solved. Contact the customer service.
- Always wear appropriate clothing and shoes which are suitable for your workout on the device. The clothes must be designed in a way so that they will not get caught in any part of the device during the work-out due to their form (for example, length). Be sure to wear appropriate shoes which are suitable for the work-out, firmly support the feet and which are provided with a non-slip sole.
- Make sure that you and other persons never place any parts of your body (e.g. fingers) in the area of moving parts. In addition, there should be no objects in the immediate vicinity that could interfere with the training process.
- If faults occur in the electronic system, immediately pull the safety clip and contact the customer service. Defective parts (incl. power cable) may only be replaced by the authorised customer service.
- This unit is intended for indoor and home use only, it is not intended for commercial use!
- Disconnect the appliance from the mains if you are not going to use it for a long time. Do not pull on the cable, but grasp the plug and pull it out of the socket.
- Do not work out immediately after meals (wait at least 40 minutes)!
- Do not insert any objects in the appliance.
- The pulse rate determined with this device may only be
used as a reference value and not as a medical indication. If you feel unwell, stop exercising immediately and contact your doctor.
- Please only exercise with a minimum clearance area of 2 meters around the device.
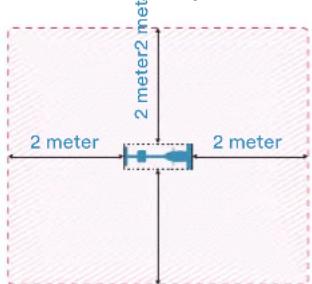
Be sure to consult a physician before
you start any device program. He may give you proper hints and advice with respect to the individual intensity of stress for you, your workout and sensible eating habits. This is especially important for individuals over the age of 35 or persons with pre-existing health problems.
IMPORTANT NOTES ON GROUNDING
This product needs to be grounded. If the treadmill's electrical system should malfunction or breakdown, grounding provides a path of least resistance for electric current, reducing the risk of electric shock. This product is equipped with a cord having an equipment-grounding plug. The plug must be plugged into an appropriate outlet that is properly installed and grounded in accordance with all local codes and ordinances.
Caution! Incorrect connection of the earthing conductor can lead to an electric shock. Please have the appliance checked by a qualified electrician or the customer service if you cannot determine whether the appliance is earthed. Do not change the plug yourself if the plug does not match the socket. Select a correct socket and have it installed by a qualified electrician. This product is only suitable for a voltage of 220-240V.
SET-UP INSTRUCTIONS
Before you start assembling, we recommend that you find a place with sufficient free space and a flat surface for assembly.
Please check with the checklist whether all the necessary parts for assembly are present. Some parts may already be pre-assembled to make assembly easier.
We recommend using the enclosed tools to assemble the unit.
CHECKLIST
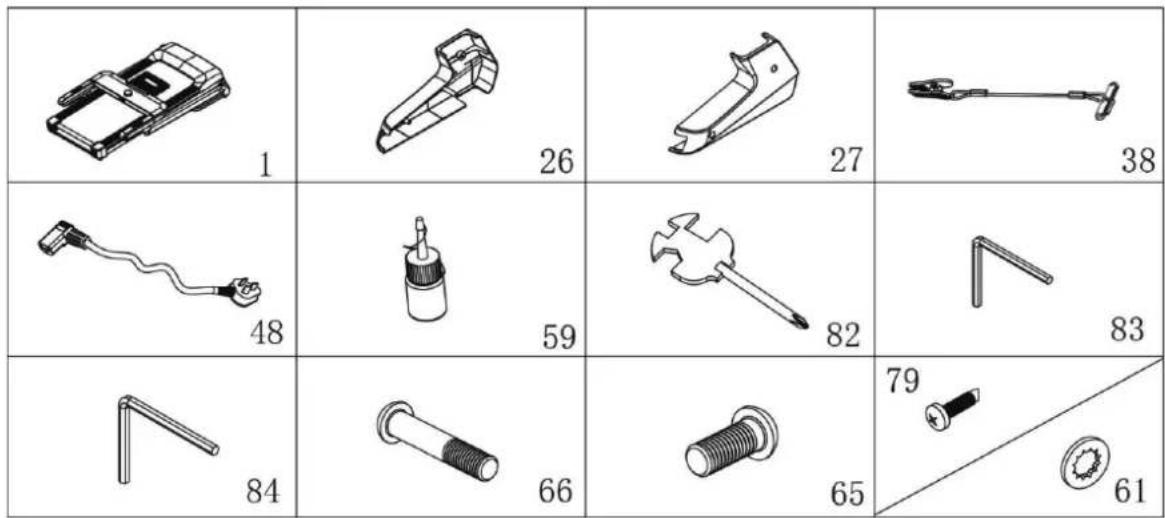
| Part no. Description Qty | ||
| 1 Main frame 1 | ||
| 26 Left cover 1 | ||
| 27 Right cover 1 | ||
| 38 Safety clip 1 | ||
| 48 Mains cable 1 | ||
| 59 Lubrication 1 | ||
| 82 Open-end spanner /Screwdriver 1 | ||
| 83 Allen key 5mm 1 | ||
| 84 Allen key 6mm 1 | ||
| 66 Screw M8×45 2 | ||
| 65 Screw M8×16 | 4 | |
| 79 Screw ST4.2×19 | 4 | |
| 61 Safety washer 8mm | 6 | |
natural_image
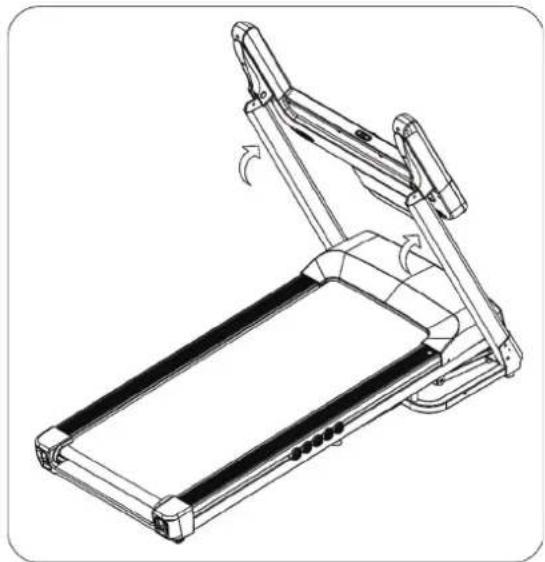
Line drawing of a treadmill with motion arrows indicating changes (no text or symbols)STEP 1
After unpacking, fold up the front linkage of the main frame as shown. Make sure that the boom does not accidentally fall down during the first two steps by always keeping one hand on the tubes.

STEP 2
Now fix the screws (65) and (66) and the safety washers (61) on both sides of the base as shown.
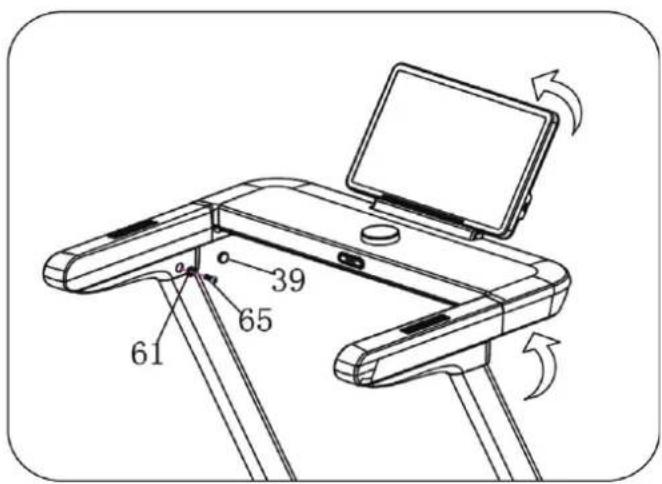
STEP 3
Now fix the computer bracket as shown. First take out the plug (39) on each side, then fix the bracket with the screws (65) and safety washers (61) and push the plugs (39) back into the hole. Take special care not to damage the computer cable during this step.
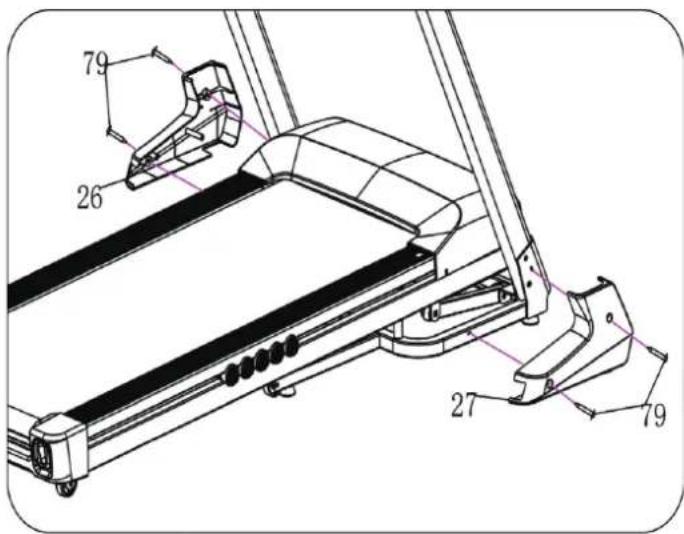
STEP 4
Now fix the covers (26) and (27) with the screws (79) as shown.
natural_image
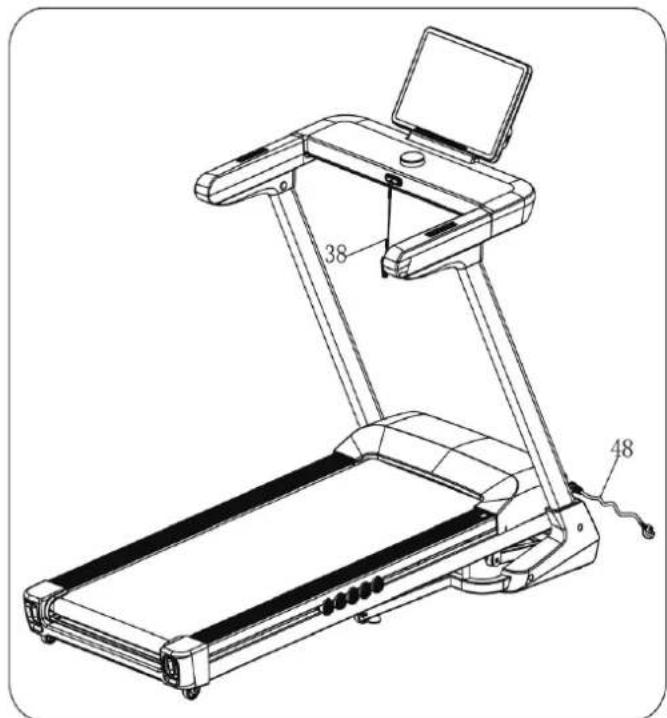
Line drawing of a treadmill with labeled parts (38 and 48), no text or symbols present.STEP 5
Place the safety clip (38) on the console and use the power cable (48) to connect the unit to a power socket.
CHECK IF ALL BOLTS AND NUTS ARE TIGHTENED BEFORE USING THE DEVICE!
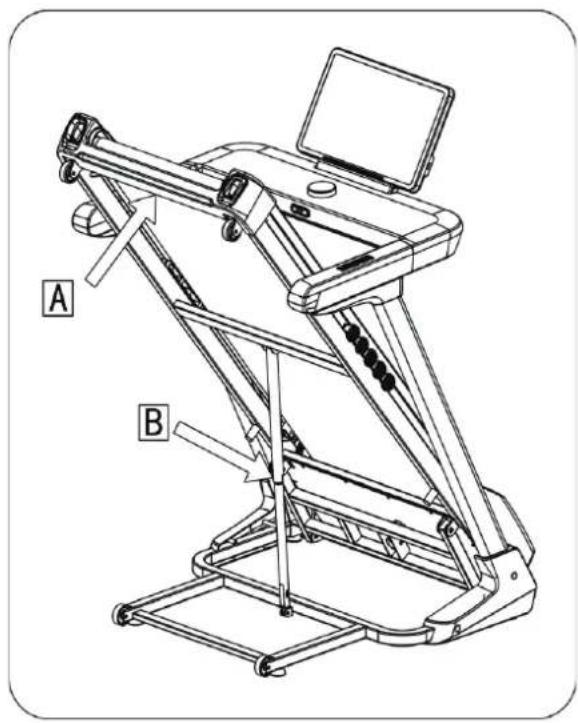
FOLDING
Switch off the unit and make sure that the belt is no longer moving before folding the unit. Guide the running deck (A) upwards until the latch (B) audibly engages.
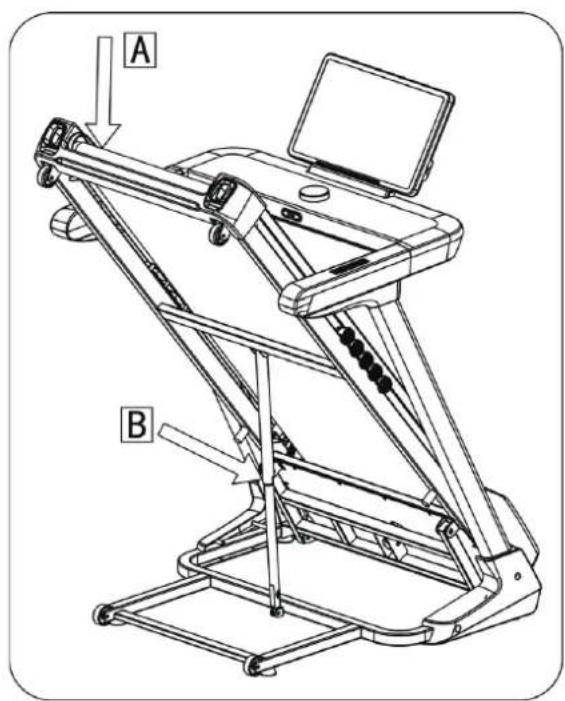
UNFOLD
Press on the tube with your foot to release the latch and carefully guide the running deck (A) down from above with both hands.
TRANSPORTATION
The treadmill has two transport wheels (29). Fold the treadmill before moving it. Tilt the treadmill backwards so that the transport wheels touch the floor. Then you can move the unit freely.
CAUTION: Do not move the unit unless it is folded and secured. Remove the power cable from the front of the unit to avoid possible damage. Use both handrails to move the unit to the desired position.
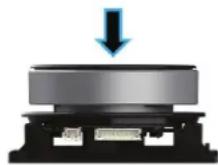
- After switching on, all display elements appear briefly (see fig. above) and a beep is emitted. The initial resistance is set to level 1 (light). The computer is then ready for operation.
- By pressing the computer, the treadmill will start at the lowest speed after a countdown of 3 seconds, the treadmill will start at the lowest speed.
- During the training and activated SCAN mode, the various function values are displayed in continuous alternation: speed, time, steps, distance, calories, heart rate and incline. These data are displayed alternately every 3 seconds while the corresponding function symbol is lit. If the Bluetooth connection is successful, the Bluetooth symbol lights up constantly.
- If pressed briefly during the workout, the treadmill slows down to a standstill. The computer is then in pause mode. When pressed again, the belt will restart at the last set speed after a countdown of 3 seconds.
- If you press for more than 2 seconds (whether during the training or the pause), the belt may slow down to a standstill and all training data will be deleted. The computer is then in standby mode.
- To increase the running speed (max. 18 km/h), the rotary knob must be turned clockwise; turning it counterclockwise reduces the speed (down to 0 km/h). If a buzzer sounds, the maximum or minimum speed has been reached. The speed can also be adjusted with the quick selection keys („Speed“ 3, 6 and 9 km/h) or with the arrow keys.
- For slope adjustment, there are also shortcut keys („Slope“ 3, 6 and 9 %), as well as arrow keys. The maximum adjustable slope is 18 % and the minimum = 0 % (level). When a key is pressed, a short acoustic confirmation always sounds.
- If there is no training and no computer operation for approx. 10 minutes, the unit switches off automatically. You can then press any key to switch the computer on again.
- If you pull the safety clip, the treadmill will stop and all data will be reset to 0 („---“ will appear).
- To measure and display the pulse rate, the two hand pulse sensors on the right and left of the handles must be embraced or you have to wear an optional chest-belt [see next page]. It may take up to 30 seconds before a value is displayed. Please note that the pulse measurement on this device cannot be compared with the accuracy of medical devices and is only intended as a basic reference.
OPTIONAL CHEST-BELT
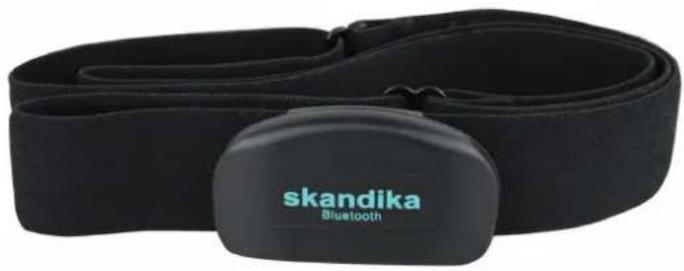
To connect to a chest-belt for heart rate measurement, you need an optional, compatible chest-belt, such as the SKANDIKA chest-belt (see QR code below).
natural_image
Black Bluetooth device with a strap and circular head cover (no text or symbols visible on the device itself)For goal-orientated training, it is important to keep a constant eye on your heart rate during your workout and adjust your performance if necessary. You can purchase this product using the following QR code:
- Bluetooth interface
- adjustable size
- suitable for using with the app KINOMAP
THE QUICK SELECTION KEYS
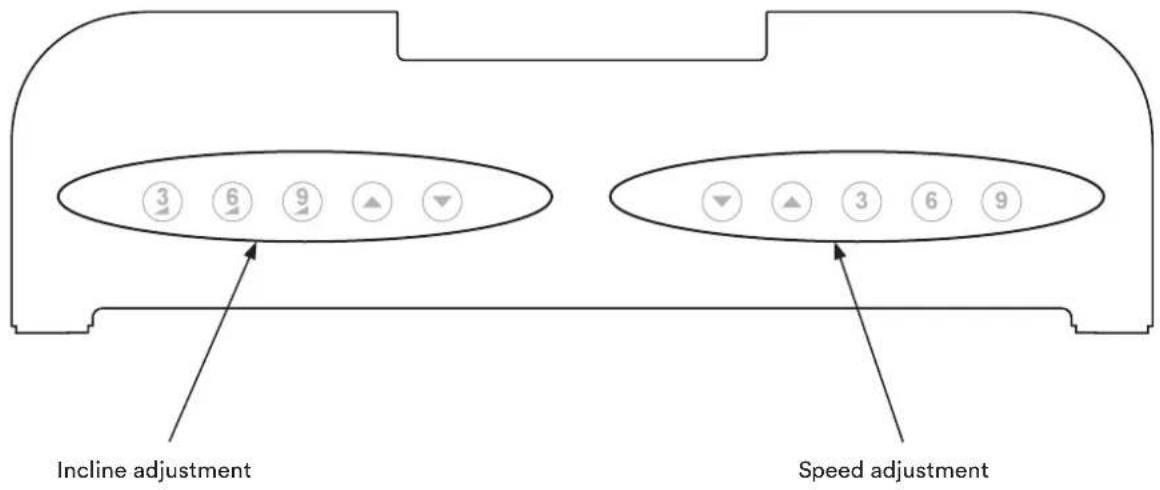
For your convenience, there are quick selection buttons on the console for quickly setting the incline (3% - 6% - 9%) and the speed (3 km/h - 6 km/h - 9 km/h).
There are also arrow buttons next to each of these for fine adjustment.
An acoustic signal sounds when a button is pressed. A long beep sounds if the parameter should be set above the limit value. If no signal tone sounds, no button press has been recognised.
CLEANING AND GENERAL MAINTENANCE
Always unplug the appliance from the mains before any maintenance or cleaning so that the appliance is without electrical power.
The unit should be cleaned at regular intervals to promote durability and operability. Be sure to keep the exposed parts on both sides of the treadmill clean to reduce the accumulation of dirt under the treadmill. Always exercise with clean trainers and avoid carrying foreign objects under the treadmill that could contaminate or damage the running board and treadmill. Wipe the surface of the running belt with a slightly damp cloth soaked in soap. Make sure that no water gets on the electrical components and under the treadmill.
Motor
Open the motor protection cover at least once a year to dust or clean the motor.
Lubrication
Special lubricant for treadmills is available in the trade (1 pack is included in the delivery). Your device is pre-treated with this. However, depending on the frequency of use, the friction between the treadmill and the running board cause a loss of the necessary sliding ability. It is therefore necessary to lubricate according to the recommendation below. If you notice any damage to the running surface during lubrication, please contact customer service.
We recommend using lubricant with the following frequency:
- Low use (less than 3 hours per week): once a year;
- Moderate use (3-5 hours per week): once every 6 months;
- Frequent use (more than 5 hours per week): once every 3 months.
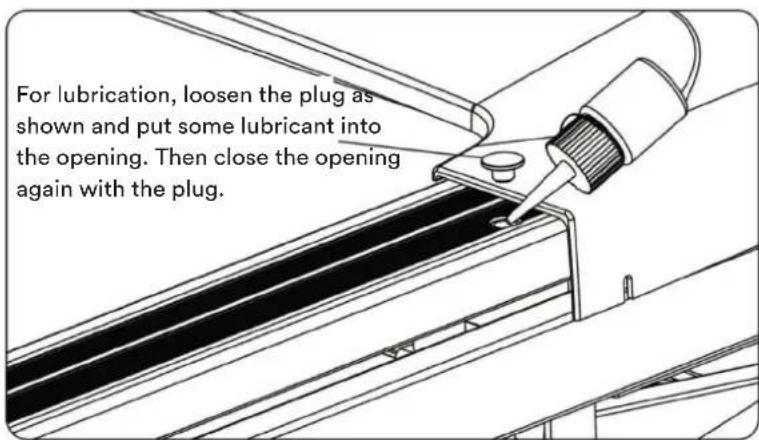
During each maintenance, carry out an additional visual inspection for damage, especially to the fasteners, rollers and all parts subject to wear. If you find any damage, stop using the unit and contact the customer service.
KINOMAP
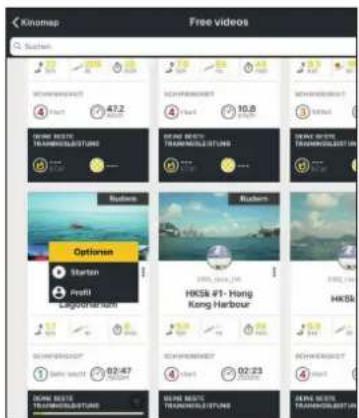
The device computer can be connected to the „KinoMap“ app via Bluetooth (frequency: 2.4 GHz) and then with the optional chest belt. The free KinoMap app turns your device into a powerful and fun fitness product! Choose from the geotagged video on Kinomap and go! Your position is shown in the video and as icon on the map. Download the Kinomap Fitness app in the app or play store by searching for ‘Kinomap Fitness’ or follow one of the links below.
Install and open the app and register resp. log in. Activate Bluetooth. Now add the training device as follows:



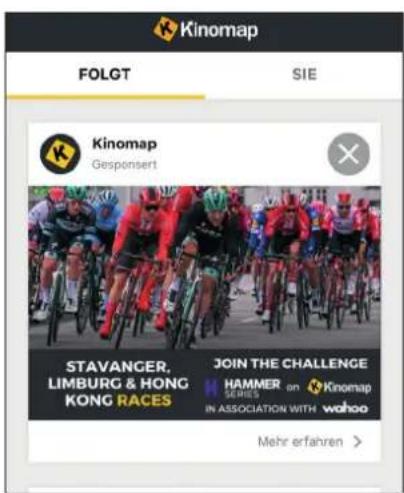
-
- Tap „+“ 3. Treadmill →
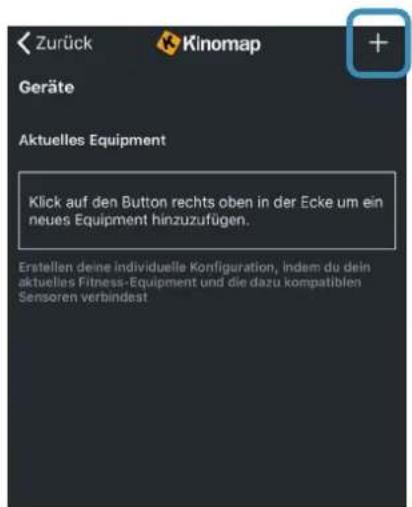
Now tap on OK and return to main menu. You can now choose a course for your exercise (depending on your type of KinoMap account maybe only some free courses). Press Start and begin to exercise!
TROUBLESHOOTING
- If „E01“ appears on the display, there is a communication error. Check the cable connections as far as possible.
- If „E02“ appears on the display, there is an electrical overshoot (abrupt change in the input value). Electrical parts of the unit may be defective or the plug may not have been plugged into a socket with a suitable output voltage. Check the specifications of the power source and try a new start-up.
- If „E03“ appears on the display, no signal is detected from the speed sensor. It could be defective or the cables are not connected correctly.
- If „E05“ appears on the display, there is an electrical overvoltage. Electrical parts of the unit could be defective or the rated load of the power supply is outside the processable range. Switch off the unit completely, wait a few minutes and then restart it.
- Motor does not start: If the motor does not start after pressing the start button, there could be a defect in the motor itself or in the fuses or control cables. In this case, you should always contact the customer service.
- If „E07“ or „E08“ appear on the display, there is a controller defect.
If you cannot solve the problem yourself, switch off the unit, disconnect it from the mains and contact customer service.
TRAINING HINTS
Depending on your training condition and experience with running training or with treadmills, you should (always after consulting your doctor) maintain appropriate speed settings for the first 5 - 10 training sessions on your device. This is to protect against injuries due to overtraining and to better prepare you for an increase in load.
Untrained / first-time users: 0.8-3.0 km/h
Casual athletes without regular training: 3.0-4.5 km/h
Walkers / beginners in running training: 4.5-6.0 km/h
Advanced walkers: 6.0-7.5 km/h
Joggers with training experience: 7.5-9.0 km/h
Racers in good training condition: 9.0-12.0 km/h
Racers / professional runners: 12.0-16.0 km/h
You can readjust the belt tension and the belt track of your treadmill. This may be necessary, for example, if it becomes „fluttery“ after a long period of use or runs too far to the right or left. As a general rule, we recommend that you allow the unit to cool down for at least 10 minutes after approx. 1.5 hours of continuous use.
Adjust the belt track
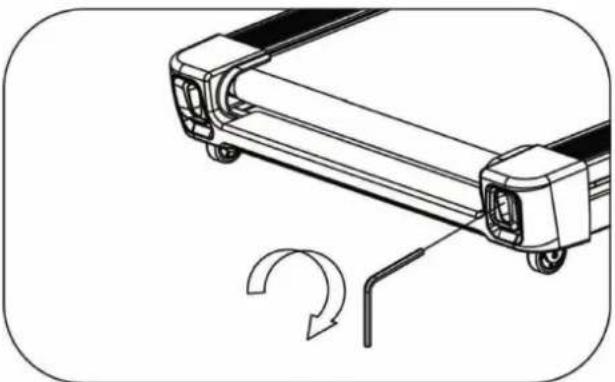
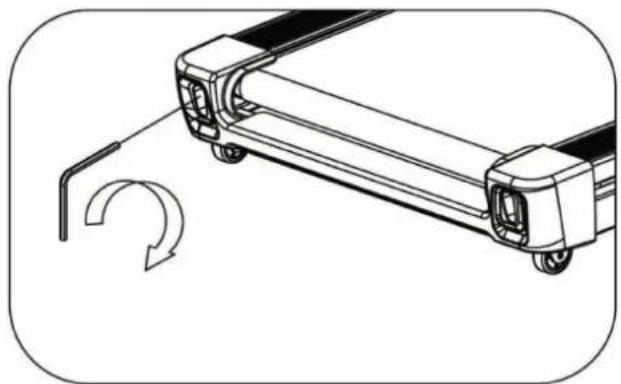
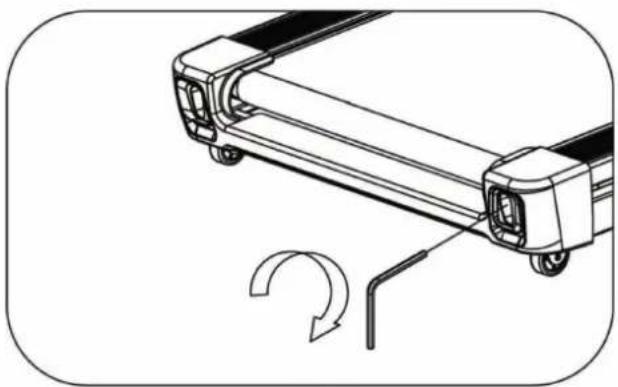
The supplied Allen key is needed for the adjustment. Make track adjustments on the left screw (see figure A). Set a speed of 6 to 8 km/h. Please note that small adjustments can cause large changes that are sometimes not directly visible.
If the belt runs too far to the left, make a 1/4 turn to the right (clockwise) and wait a few minutes for the belt to adjust. Make further 1/4 turns until the band stabilises in the middle.
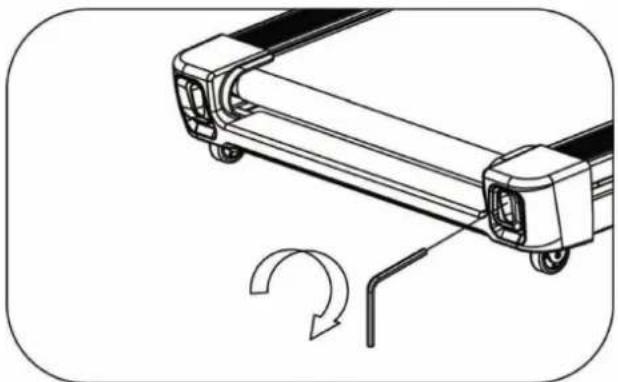
If the tape runs too far to the right, make a counterclockwise rotation. The belt may need occasional tracking adjustments depending on use and walking/running characteristics. Check the belt tracking and repeat the above steps on the right side if necessary (see figure B). Be prepared for adjustments to centre the belt. These adjustments occur less frequently if the treadmill is used regularly. Correct belt tracking is the owner's responsibility and is common maintenance on all treadmills.
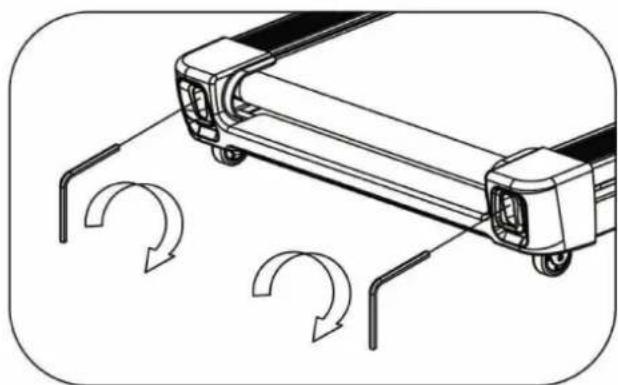
Adjust the belt tension
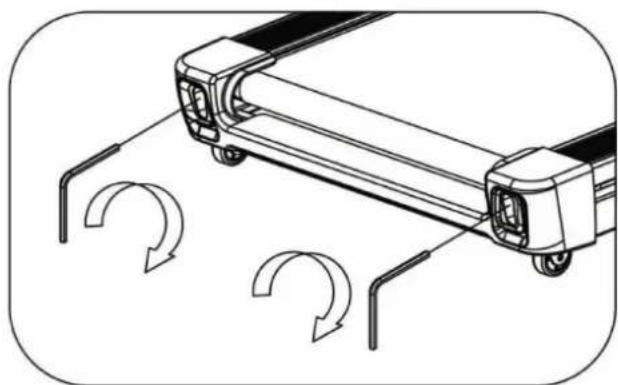
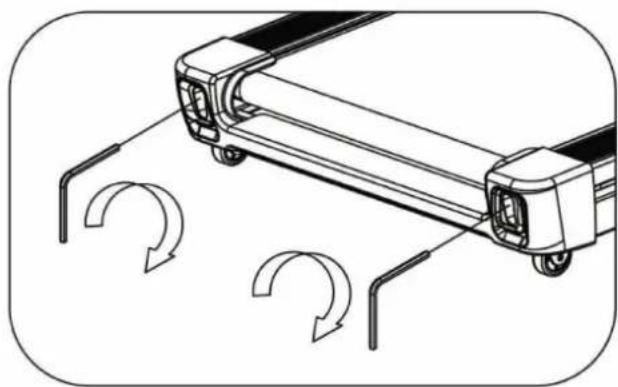
After the above adjustment of the belt track or after prolonged use, the running belt may gradually become slack and may need to be readjusted. Tighten the rear roller only enough to prevent slippage on the front roller. Turn the adjustment screws 1/4 turn each (Figure C) and check the tension by walking on the belt and making sure it does not slip or lag. When making adjustments to the belt tension, make sure that the screws are adjusted equally on both sides. Otherwise the belt may run on one side instead of in the middle. CAUTION: DO NOT OVER TIGHTEN - Overtightening can damage the belt and cause premature bearing damage. If you tighten the belt strongly and it still slips, the problem may be caused by the drive belt, which is located under the engine cover and connects the engine to the front roller. When this belt is loose, it feels similar to when the belt is loose. However, tightening the engine belt should be done by a qualified service technician.
natural_image
Technical line drawing of a mechanical device with a curved arrow indicating rotation (no text or symbols)A
natural_image
Technical line drawing of a mechanical device with a curved arrow indicating rotation (no text or symbols)B
natural_image
Diagram of a vehicle chassis with two wheels and curved arrows indicating motion or movement (no text or symbols)C
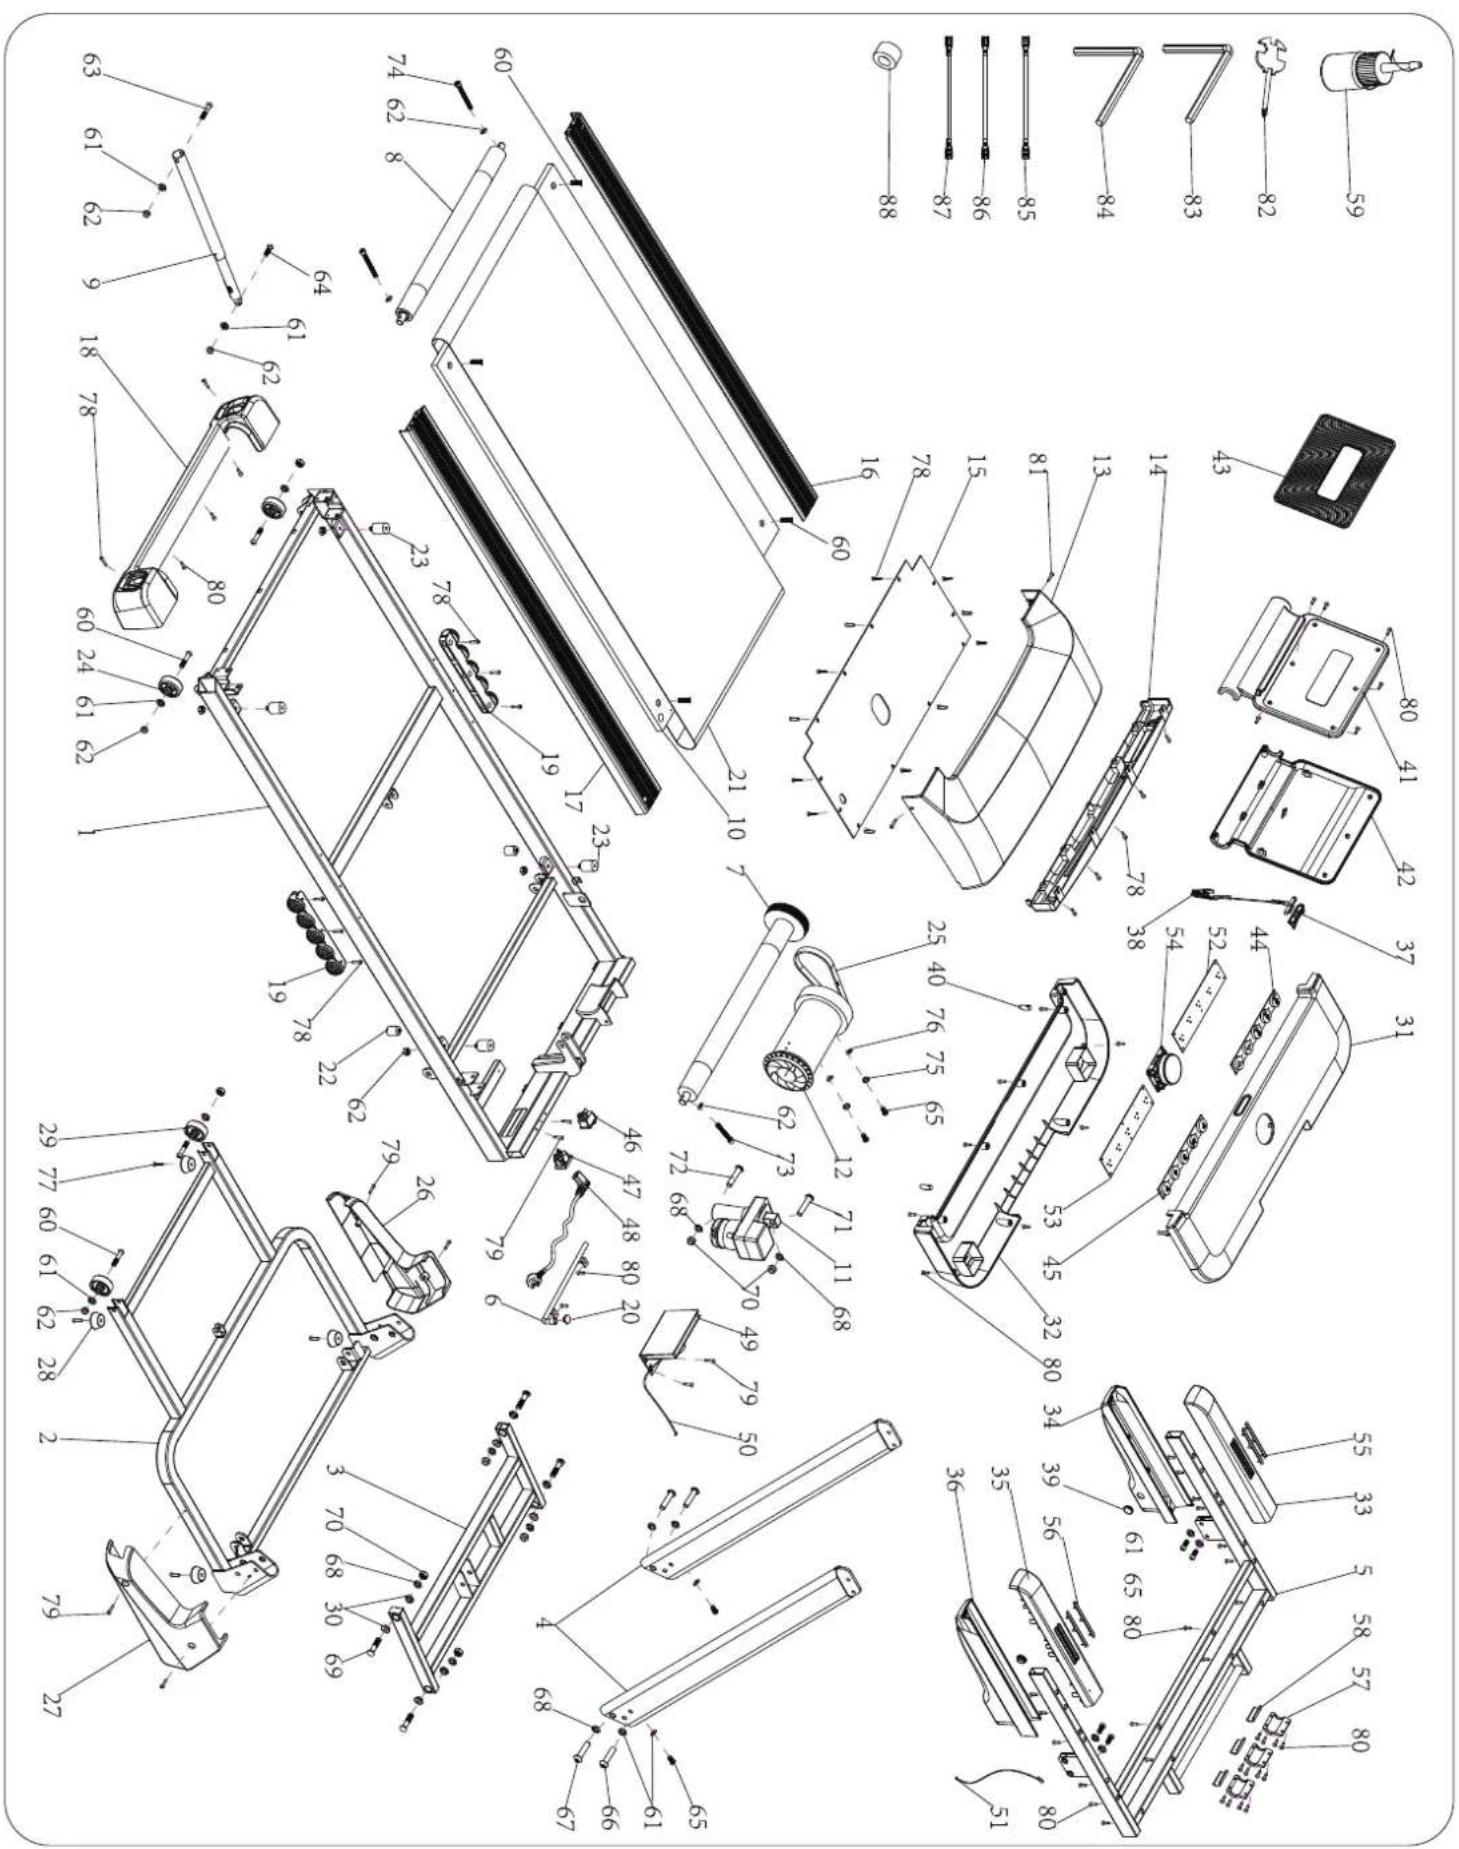
| Part no. | Description Qty | |
| 1 | Main frame 1 | |
| 2 | Base frame 1 | |
| 3 | Incline frame 1 | |
| 4 | L/R Left and right support each 1 | |
| 5 | Computer support 1 | |
| 6 | Guide rod 1 | |
| 7 | Front roller 1 | |
| 8 | Rear castor 1 | |
| 9 | Gas spring 1 | |
| 10 | Running deck | 1 |
| 11 | Gradient motor | 1 |
| 12 | Drive motor | 1 |
| 13 | Motor cover | 1 |
| 14 | Motor cover | 1 |
| 15 | Motor base 1 | |
| 16 | Left baseboard | 1 |
| 17 | Right footboard | 1 |
| 18 | Rear cover | 1 |
| 19 | Damper | 2 |
| 20 | Plug | 1 |
| 21 | V-belt | 1 |
| 22 | Buffer | 2 |
| 23 | Damper | 4 |
| 24 | Rollers | 2 |
| 25 | Belt cover 1 | |
| 26 | Left cover | 1 |
| 27 | Right cover 1 | |
| 28 | Rubber feet | 4 |
| 29 | Transport wheel | 2 |
| 30 | Spacer | 8 |
| 31 | Upper computer cover | 1 |
| 32 | Lower computer cover | 1 |
| 33 | Upper cover for left handrail | 1 |
| 34 | Lower cover for left handrail | 1 |
| 35 | Top cover for right handrail | 1 |
| 36 | Lower cover for right handrail | 1 |
| 37 | Clip socket 1 | |
| 38 | Safety clip | 1 |
| 39 | Handrail plugs | 2 |
| 40 | Computer cover plug | 2 |
| 41 | Upper part IPad holder | 1 |
| 42 | Bottom part IPad holder | 1 |
| 43 | Cushion | 1 |
| 44 | Keypad left | 1 |
| 45 | Keypad right | 1 |
| 46 | Power switch | 1 |
| 47 | Power socket | 1 |
| 48 | Mains cable | 1 |
| 49 | Lower controller | 1 |
| Part no. | Description Qty | |
| 50 | Lower cable | 1 |
| 51 | Upper cable | 1 |
| 52 | Left board | 1 |
| 53 | Right board | 1 |
| 54 | Computer/Switch | 1 |
| 55 | Left hand pulse sensor | 1 set |
| 56 | Right hand pulse sensor | 1 set |
| 57 | Bracket | 3 |
| 58 | Tile | 3 |
| 59 | Lubrication | 1 |
| 60 | Screw M8×40 | 4 |
| 61 | Safety washer 8mm | 17 |
| 62 | Nut M8 | 10 |
| 63 | Screw M8×42 | 1 |
| 64 | Screw M8×25 | 1 |
| 65 | Screw M8×16 | 8 |
| 66 | Screw M8×45 | 2 |
| 67 | Screw M10 | 2 |
| 68 | Washer 10mm | 10 |
| 69 | Screw M10 | 4 |
| 70 | Nut M10 | 4 |
| 71 | Screw M10×42 | 1 |
| 72 | Screw M10×55 | 1 |
| 73 | Screw M8×45 | 1 |
| 74 | Screw M8×55 | 1 |
| 75 | Spring washer 8mm | 2 |
| 76 | Washer 8mm | 2 |
| 77 | Screw 4.2×25 | 4 |
| 78 | Screw 4.2×19 | 26 |
| 79 | Screw 4.2×19 with cushion | 8 |
| 80 | Screw 4.2×12 | 52 |
| 81 | Screw 4.8×19 | 2 |
| 82 | Open-end spanner /Screwdriver | 1 |
| 83 | Allen key 5mm | 1 |
| 84 | Allen key 6mm | 1 |
| 85 | AC single wire | 1 |
| 86 | Blue cable | 1 |
| 87 | Brown cable | 1 |
| 88 | Magnet ring | 1 |
In the course of continuous product improvement, we reserve the right to make technical and design changes.
WARM-UP and COOL-DOWN
A successful exercise program consists of a warm-up, aerobic exercise and a cool-down. Exercise for at least two or preferably three times a week, resting for a day between workouts. After several months, you may increase the frequency to four or five times per week.
Warm-Up
This stage helps to improve the blood circulation and prepares the muscles for your workout. It additionally helps to reduce the risk of injury or cramps. It is recommended to do some stretching exercises as shown here below. Hold each stretching position for approximately 30 seconds. Never force or jerk yourself into a stretching position – if you feel pain, STOP immediately. Warm-up exercises may also include brisk walking, jogging, jumping jacks, jump rope exercises or running in place.
Stretching
Muscles can be stretched more easily when these are warm. This reduces the risk of injury. DO NOT BOUNCE.
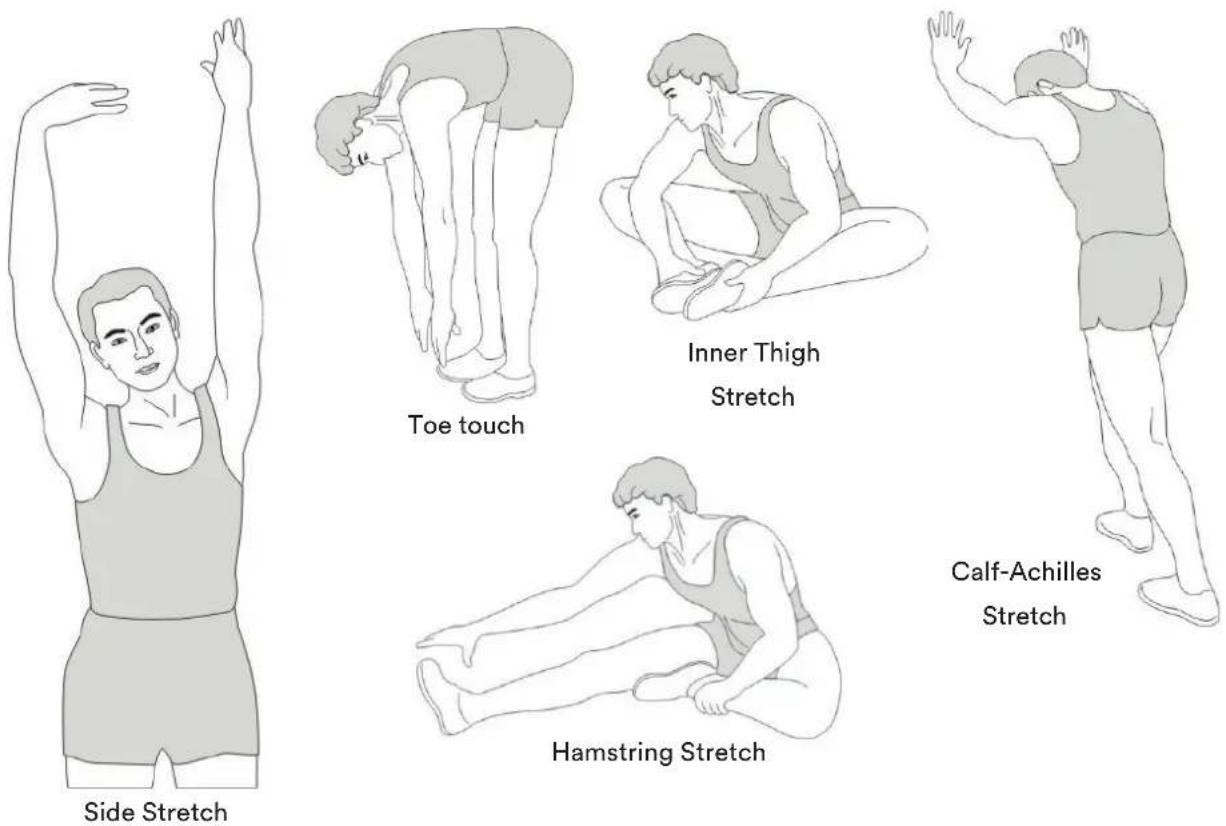
Remember always to check with your physician before starting any exercise program.
Cool-Down
This stage helps to soothe your muscles and your cardiovascular system after your workout.
At the end of your workout, reduce the speed and exercise for approximately 5 minutes at this lower speed level. Afterwards, repeat the warm-up exercises as described above.
GUARANTEE CONDITIONS
For our devices we provide a warranty as defined below.
- In accordance with the following conditions (numbers 2-5) we repair defect or damage to the device free of charge, if the cause is a manufacturing defect. Therefore, these defects / damages need to be reported to us without delay after appearance and within the warranty period of 24 months after delivery to the end user. The warranty does not cover parts, which easily break (e.g. glass or plastic). The warranty does not cover slight deviations of the product, which are insignificant for usability and value of the device and damage caused by chemical or electrochemical effects and damages caused by penetration of water or generally force majeure damage.
- The warranty achievement is the replacement or repair of defective parts, depending on our decision. The cost of material and labor will be borne by us. Repairs at customer site cannot be demanded. The proof of purchase along with the date of purchase and / or delivery is required. Replaced parts become our property.
- The warranty is void if repairs or adjustments are made,
which are not authorized by us or if our devices are equipped with additional parts or accessories that are not adapted to our devices. Furthermore, the warranty is void if the device is damaged or destroyed by force majeure or due to environmental influences and in case of improper handling / maintenance (e.g. due to non-observance of the instruction manual) or mechanical damages. The customer service may authorize you to replace or repair defective parts after telephone consultation. In this case, the warranty is not void.
- Warranty services do not extend the warranty period nor do they initiate a new warranty period.
- Further demands, especially claims for damages which occurred outside the device, are excluded as long as a liability is not obligatory legal.
- Our warranty terms - which cover the requirements and scope of our warranty conditions - do not affect the contractual warranty obligations of the seller.
- Parts of wear and tear are not included in the warranty.
- The warranty is void if not used properly or if used in gyms, rehabilitation centers and hotels. Even if most of our units are suitable for a professional use, this requires a separate agreement.
ENVIRONMENTAL PROTECTION
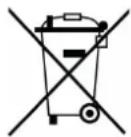
At the end of its life cycle, this product must not be disposed of with household waste but must be taken to a collection unit for the recycling of electric and electronic equipment. The symbol on the product, the instructions for use or the packaging express mention of this. The basic materials can be recycled as specified on the labelling.
When recycling the materials and finding other utilisation for used equipment, you are making a significant contribution towards protecting our environment. Ask at your council about the respective local disposal sites.
In accordance with our policy of continual product improvement, we reserve the right to make technical and visual changes without notice.
Contenu

skandika.com/service
natural_image
Line drawing of a treadmill with motion arrows indicating changes (no text or symbols)ÉTAPE 1
natural_image
Line drawing of a treadmill with labeled parts (38 and 48), no text or symbols present.ÉTAPE 5
natural_image
Black wristband device with 'skandika Bluetooth' logo, no visible text or symbols on the device itselfnatural_image
Technical line drawing of a mechanical device with a curved arrow indicating rotation (no text or symbols)A
natural_image
Technical line drawing of a mechanical device with a curved arrow indicating rotation (no text or symbols)B
natural_image
Diagram of a vehicle chassis with curved arrows indicating motion or movement, no text or symbols presentC
- Inhalt
- SCHRITT 1
- SCHRITT 5
- FEHLERBEHEBUNG
- WARNING
- SAFETY PRECAUTIONS
- IMPORTANT NOTES ON GROUNDING
- SET-UP INSTRUCTIONS
- CHECKLIST
- STEP 1
- STEP 2
- STEP 3
- STEP 4
- STEP 5
- FOLDING
- UNFOLD
- TRANSPORTATION
- OPTIONAL CHEST-BELT
- THE QUICK SELECTION KEYS
- CLEANING AND GENERAL MAINTENANCE
- Motor
- Lubrication
- KINOMAP
- TROUBLESHOOTING
- TRAINING HINTS
- Adjust the belt track
- Adjust the belt tension
- WARM-UP and COOL-DOWN
- Warm-Up
- Stretching
- Cool-Down
- GUARANTEE CONDITIONS
- ENVIRONMENTAL PROTECTION
- Contenu
- ÉTAPE 1
- ÉTAPE 5
Brand : Skandika
Model : Nordik K18-S
Category : Treadmills