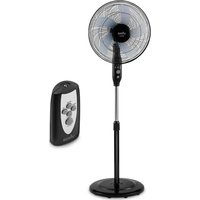
Dakota - Fan UFESA - Free user manual and instructions
Find the device manual for free Dakota UFESA in PDF.


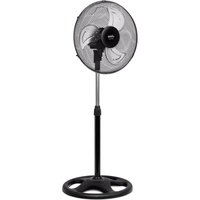
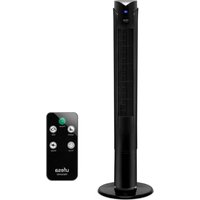
| Product Type | Pedestal Fan |
| Brand | Ufesa |
| Model | Dakota |
| Power Supply | 220-240 V ~ 50 Hz |
| Power Consumption | 43.1 W |
| Maximum Air Flow | 48.9 m³/min |
| Maximum Air Speed | 2.7 m/s |
| Sound Level | 60 dB(A) |
| Standby Power Consumption | 0.5 W |
| Number of Speeds | 3 (Low, Medium, High) |
| Operating Modes | Normal, Silent, Natural |
| Timer | From 0.5 to 7.5 hours |
| Oscillation | Yes (left-right) |
| Tilt | Manually adjustable |
| Remote Control | Yes (AAA batteries) |
| Control Panel | On pedestal with LED indicators |
| Adjustable Height | Yes (telescopic rod) |
| Main Material | Plastic and metal |
| Weight | Approximately 4.5 kg |
| Dimensions (approx.) | 35 x 35 x 120 cm |
| Cleaning | Soft damp cloth, do not immerse |
| Safety | Protective grille, automatic shut-off (tip-over not specified) |
| Spare Parts | Blade, grilles, nuts, remote control available |
| Warranty | In accordance with applicable legislation |
Frequently Asked Questions - Dakota UFESA
User questions about Dakota UFESA
0 question about this device. Answer the ones you know or ask your own.
Ask a new question about this device
Download the instructions for your Fan in PDF format for free! Find your manual Dakota - UFESA and take your electronic device back in hand. On this page are published all the documents necessary for the use of your device. Dakota by UFESA.
USER MANUAL Dakota UFESA
natural_image
Black and white photo of a Ufisa air conditioner stand with fan blades and base (no text or symbols visible)natural_image
Technical diagram of a mechanical component with internal gear and shaft, labeled Fig. 2 (no text or symbols on the diagram itself)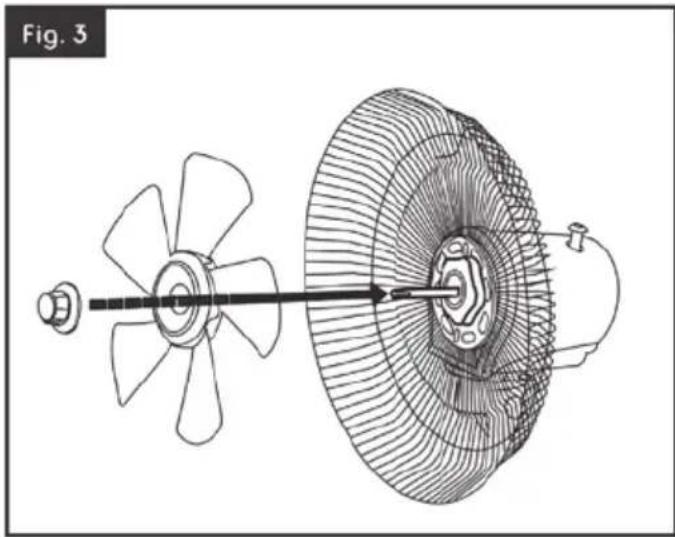
natural_image
Technical illustration of a mechanical fan assembly with internal gear and shaft (no text or symbols)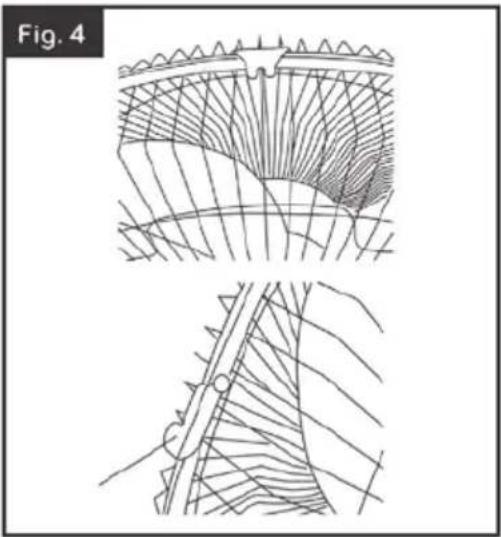
natural_image
Technical line drawing of a mechanical component with internal grooves and a central rod (no text or symbols)ESPAÑOL
AGRADECEMOS QUE HAYA DEPOSITADO SU CONFIANZA EN UFESA Y DESEAMOS QUE EL FUNCIONAMIENTO DEL PRODUCTO LE SATISFAGA PLENAMENTE.
ATENCIÓN
WE WOULD LIKE TO THANKS YOU FOR CHOOSING UFESA, WE WISH THE PRODUCT PERFORMS TO YOUR SATISFACTION AND PLEASURE.
WARNING
PLEASE READ THE INSTRUCTIONS FOR USE CAREFULLY PRIOR TO USING THE PRODUCT. STORE THESE IN A SAFE PLACE FOR FUTURE REFERENCE.
DESCRIPTION
- Front grille
- Blade mounting ring
- Fan blade
- Rear grille mounting nut
- Rear grille
- Motor shaft
- Motor cover
- Grille block nut
- Grille ring
- Control panel
- Mounting screw to join the body to the pole
- Plug
- Adjustable rod
- Stand height adjustment nut
- Main stand
- Round base
- Seal
- Mounting screw
CONTROL PANEL AND REMOTE CONTROL
A. Power
B. SPEED button
C. MODE button
D. TIMER button
E. SWING button
F. Natural mode indicator
G. Speed indicators (high-mid-low)
H. Time indicators 0.5-1-2-4 hrs
SAFETY INSTRUCTIONS
This appliance can be used by children aged from 8 years and above and persons with reduced physical, sensory or mental capabilities or lack of experience and knowledge if they have been given supervision or instruction concerning Use of the appliance in a safe way and understand the hazards involved. Children should not play with the appliance. Cleaning and user maintenance shall not be made by children without supervision.
If the supply cord is damaged, it must be replaced by the manufacturer, its service agent or similarly qualified persons in order to avoid a hazard. It is necessary to disconnect the appliance before assembling, disassembling and cleaning.
This device is designed for use at a maximum altitude up to 2000m above sea level.
IMPORTANT INFORMATION
This appliance is intended exclusively for domestic use for ventilation of rooms: do not use it for other purposes. Any other usage should be considered improper and dangerous. The manufacturer shall not be held responsible for any damage resulting from improper, incorrect and irresponsible use and/or for repairs made by unqualified technicians.
Do not insert fingers or any other objects through the fan's protector grille. The appliance must be kept out of the reach of children. Do not use the appliance if it is not working properly, or if it appears to be damaged; if in doubt, take it to a professional, qualified technician. Do not move the appliance while it is operating, When the appliance is not being used, remove the plug from the mains socketi Do not touch the appliance with wet hands or feet. Do not drag the appliance by the cable to move it. Do not pull the cable or the appliance itself to remove the plug from the mains socket. To clean the appliance, follow the instructions in the section of the manual dedicated to cleaning and maintenance.
B&B TRENDS, S.L. will not be held liable for any harm or damage which may OCCUr to people, animals or objects as a result of failure to observe the aforementioned warnings.
INSTALLATION
- After removing the packing, check the condition of the appliance; if in doubt, do not use it and take it to a professional, qualified technician. The packaging (plastic bags, polystyrene, fixtures, etc.) should be kept out of the reach of children since they are a potential source of danger, and they should be disposed of in the appropriate specific containers for selective waste collection. Warning: any stickers or leaflets attached to the grille must be removed before using the appliance.
- Before connecting the appliance check that the voltage values indicated on the characteristics plate correspond to those of the electric mains supply, In the event that the mains socket and the appliance plug are incompatible have the plug changed to one that is suitable by a professional, qualified technician, They will check that the cable part of the plug is adapted to the power used by the appliance. In general, the use of adapters or extension leads is not advisable' if this is necessary, they must be in accordance with the safety regulations and their amperage capacity must not be less than the maximum for the appliance.
- Before each usage, check that the appliance is in good condition and that the power cord is not damaged: if in doubt, check with a professional, qualified technician.
- The mains socket must be easily accessible in order to disconnect the appliance with ease in case of emergency.
- Position the appliance away from: sources of heat (e.g. open flames, gas ovens, etc.) deposits of liquids (e.g. sinks, etc.) to avoid falling into or splashing with water (minimum distance 2 met res) fabrics (curtains, etc.) or loose materials, which may obstruct the ventilation grille; in addition, check that the front part is free of volatile materials (dust, etc.).
- The supporting surface must be stable flat and even (so that the appliance does not tip over).
ASSEMBLY
Warning: the fan may be used only if it is fully and properly assembled, that is to say, complete with the base and the grille.
Warning: always disconnect the appliance from the mains supply before assembling. If in doubt, have the operation checked or carried out by a qualified technician.
ASSEMBLE OF BASE
- Set the column in place on the base and secure it using the "L" screw with washer while also engaging the counterweight.
- Make sure column and base and counterweight are firmly coupled.
- Loosen the Height Adjustment Collar on top of the Inner Tube. Pull the Inner Tube out from the Outer Tube to adjust the tube to the desired height and tighten the collar.
- If necessary, slightly loosen the Set Screw by turning it anticlockwise. Slide the Switch Box down over the Inner Tube and tighten the Set Screw. Make sure the Set Screw is tightly secured.
ASSEMBLE OF BLADE AND GRILLE
- Unscrew the plastic mounting nut from the front of the motor housing by rotating it anticlockwise.
- Position the rear grille against the front of the motor housing with the handle uppermost, ensuing that the locating pegs on the motor housing are engaged correctly in the holes of
the rear grille.
- Tighten the Rear Grille Mounting Nut clockwise. DO NOT OVERTIGHTEN IT.
- Push the fan blade onto the motor shaft, locating the slot at the back of the blade on the drive pin that passes through the motor shaft.
- Tighten the blade cap by turning it anticlockwise.
- To fasten the front grill, it is best to place the main unit on a smooth even floor. Couple the front grill to the rear and hold in place with plastic ring, (a fixing screw is good at the bottom) and secure fastening by tightening screw
- At the end of the operation check that the protective grills are firmly coupled and attached to the motor.
USE
Before each use check that the appliance is in good condition and that the electric cable is not damaged; if the electric cable is damaged, it must be replaced by the manufacturer or by the technical assistance service or in the event, by a qualified technician, in order to avoid any type of danger.
CONTROL PANEL
A. Power
B. SPEED button
C. MODE button
D. TIMER button
E. SWING button
F. Natural mode indicator
G. Speed indicators (high-mid-low)
H. Time indicators 0.5-1-2-4 hrs
l. Sleep mode indicator
- Switch on the appliance by pressing the ON/OFF button (A) on the control panel. The fan starts to blow at low speed. The low speed indicator (G) lights up,
- To change speed, press button (B) several times. Speed will change with each button stroke. The respective indicator (G) will light up.
- For oscillation, press the SWING button (E). The natural mode indicator (F) light up and the fan starts oscillating. To stop oscillation, press button (E) once again,
- Your fan has a timer function. After having switched the unit on, press the TIMER button (D) and the fan will operate for as long as you choose: Press the timer button several times and the setting will
change with every button stroke. The respective indicator lights (H) light up. When the set time has elapsed, the fan switches off automatically. The fan can set the timer function from 05-7.5 hours as specified by the sum of the Time Indicators that are lit. - The air flow can be adjusted by tilting the entire motor unit upward or downward. Loosen the neck screw (9) and adjust themotor until you have reached the desired vertical angle. Tighten the screw again.
-
To switch the fan off, press the ON/OFF button (A).
-
Always unplug the appliance when it is not used
- Ensure batteries are inserted in the correct directions Do not mix battery types, When replacing, ensure both batteries are change simultaneously, 2xAAA size batteries are required.
The remote control settings:
“ ⏻” of the remote control: to turn the fan on or turn it off in standby mode “SPEED” of the remote control: the symbol corresponding to the selected speed will light up: (✗ = mín; ✗ méd; ✘ max)
Mode: the three modes are selected by pressing the "MODE": button:
- Normal: constant ventilation
2 Silent: constant and silent ventilation (symbol) - Natural: intermittent ventilation (symbol “♠”), as shown in the diagrams shown here. Maximum speed selected
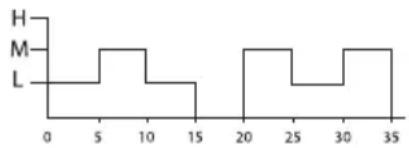
line
| Category | Value | |---|---| | H | 1 | | M | 0 | | L | 0 |Medium speed selected
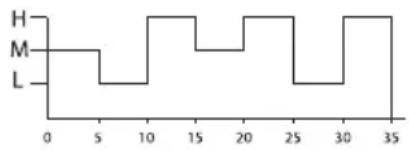
Minimum speed selected
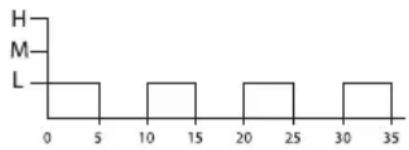
Timer: sets the operating time at which the unit shuts down. Press the "TIMER" button repeatedly: each press changes the time in 0.5 hour intervals (from 1/2 hour to 7.5 hours), and the selected duration will be shown on the control panel. To deactivate the timer, press the button until the timer turns off.
Swing (right-left): press the "SWING" button, turn it on and or turn it off to press again
During long periods of inactivity, disconnect the plug from the mains socket.
CLEANING AND MAINTENANCE
Warning: before carrying out the normal cleaning operations, remove the plug from the mains sock- et.
- To clean the appliance, use a soft, slightly damp cloth; do not use abrasive or corrosive products.
-
Do not immerse any part of the fan in water or any other liquid: if this happens, do not immerse your hand in the liquid and, first of all, remove the plug from the mains socket Dry the appliance carefully and check that all the electrical parts are not wet: if in doubt, contact a qualified technician.
-
It is essential to keep the ventilation holes of the motor free of dust and fluff.
- In case of long periods of non-use store the fan, protecting it from dust and moisture; we recommend using the original packaging.
- If you decide to stop using the appliance, it is advisable to render it inoperational by cutting the power cable (first ensuring that the plug has been disconnected from the mains socket) and making SUre that parts which could be dangerous to children (e.g. the blade) may cause no harm.
PRODUCT DISPOSAL
his product complies with European Directive 2012/19/ EU regarding electrical and electronic devices, known as WEEE (Waste electrical and electronic equipment), which establishes the applicable legal framework in the European Union regarding the elimination and recycling of electrical and electronic devices. Do not put this product in the bin. Take it to your closest electrical and electronic waste treatment centre.
The product may use batteries. Remove them before disposing of the product and deposit them in the special containers approved for this purpose We hope you are satisfied with this product.
| Description Symbol Value Unit | |||
| Maximum fan flow rate F 48,9 m | ^3 /min | ||
| Fan power input P 43,1 W | |||
| Service value SV 11 (m | ^3 /min)/W | ||
| Standby power consumption PSB 0,5 | W | ||
| Fan sound power level | LWA 60 | dB(A) | |
| Maximum air velocity | C | 2,7 | m/s |
| Measurement standard for service value | IEC60879:1986(COR1:1992) | ||
FRANÇAIS
NOUS VOUS REMERCIONS D'AVOIR ACHETÉ UN PRODUIT UFESA. NOUS ESPÉRONS QUE LE PRODUIT RÉPONDRA À VOS ATTENTES.
AVERTISSEMENT
VEUILLEZ LIRE ATTENTIVEMENT LES INSTRUCTIONS D'UTILISATION AVANT D'UTILISER LE PRODUIT. VEUILLEZ CONSERVER CES INSTRUCTIONS DANS UN ENDROIT SÛR POUR UN USA-GE ULTÉRIEUR.
DESCRIPTION
line
| Category | Value | |---|---| | H | 1 | | M | 0 | | L | 0 |ÉLIMINATION DU PRODUIT
B&B TRENDS, SL. guarantees compliance of this product, for the use for which it is, during the period established by the legislation in force in the country of sale. In the case of breakdown during the term of this warranty, users are entitled to repair or else the replacement of the product at no charge if the former is unavailable, unless one of these options proves impossible to fulfil or is disproportionate. In this case, you can then opt for a reduction in price or cancellation of the sale, which must be dealt with directly with the sales vendor. This also covers replacement of spare parts provided that the product has been used according to the recommendations specified in this manual for both cases, and has not been tampered with by any third party that is not authorised by B & B TRENDS, SL. The warranty will not cover any parts subject to wear and tear. This warranty does not affect your rights as a consumer in accordance with the provisions in Directive 1999/44/EC for member states of the European Union.
USE OF WARRANTY
Customers must contact a B&B TRENDS, SL., authorised Technical Service for repair of the product. Since any tampering of the same by anyone not authorised by B&B TRENDS, SL., or the careless or improper use of the same shall render this warranty null and void.
You must keep the purchase invoice, receipt or delivery docket in order to exercise your warranty rights.
For technical service and after-sales care outside the Spanish territory, please submit your query to the point of sale where you purchased the item.
BON DE GARANTIE
Check out your nearest service station at https://sat.ufesa.com/
ufesa
B&B TRENDS, S.L. · C.I.F. B-86880473
- ESPAÑOL
- ATENCIÓN
- WARNING
- DESCRIPTION
- CONTROL PANEL AND REMOTE CONTROL
- SAFETY INSTRUCTIONS
- IMPORTANT INFORMATION
- INSTALLATION
- ASSEMBLY
- ASSEMBLE OF BASE
- ASSEMBLE OF BLADE AND GRILLE
- USE
- CONTROL PANEL
- CLEANING AND MAINTENANCE
- PRODUCT DISPOSAL
- FRANÇAIS
- AVERTISSEMENT
- ÉLIMINATION DU PRODUIT
- USE OF WARRANTY
- BON DE GARANTIE
- ufesa
Brand : UFESA
Model : Dakota
Category : Fan