HFM 5T0.5 - Camera Kern - Free user manual and instructions
Find the device manual for free HFM 5T0.5 Kern in PDF.

| Product Type | Electronic Crane Scale |
| Brand / Model | Kern HFM 5T0.5 |
| Maximum Capacity (Max) | 5,000 kg |
| Readability (d) | 0.5 kg |
| Reproducibility | 2.5 kg |
| Linearity | ±5 kg |
| Housing Dimensions (W x D x H) | 300 x 190 x 230 mm |
| Overall Dimensions (A x B x C x D x E x F x G) | A=730 mm, B=650 mm, C=230 mm, D=300 mm, E=190 mm, F=74 mm, G=55 mm |
| Net Weight | 23 kg |
| Housing Material | Painted metal |
| Hook and Eye Material | Nickel-plated steel |
| Display | LCD, digit height 30 mm |
| Power Supply | 220-240 V AC 50 Hz, power adapter 9V/800 mA |
| Built-in Battery | Battery 6 V / 10 Ah, autonomy approx. 60 h (backlight on), charging time 14 h |
| Remote Control | Radio, range approx. 20 m, battery 23A (12V) |
| Stabilization Time | 2 seconds |
| Accuracy | 0.2 % of maximum |
| Permissible Ambient Temperature | 0 °C to +40 °C |
| Relative Humidity | 0 % to 80 % (non-condensing) |
| Main Functions | Zero setting, taring, value hold, readability change, configuration menu |
| Maintenance and Cleaning | Clean with a soft cloth and mild cleaning agent. Regularly check the dimensions of load-bearing components. |
| Safety | Do not stand under loads, use the safety catch, respect nominal loads, regular inspection by qualified personnel. |
| Spare Parts / Repairability | Repairs only by trained personnel, use original parts. Document all repairs. |
Frequently Asked Questions - HFM 5T0.5 Kern
User questions about HFM 5T0.5 Kern
0 question about this device. Answer the ones you know or ask your own.
Ask a new question about this device
Download the instructions for your Camera in PDF format for free! Find your manual HFM 5T0.5 - Kern and take your electronic device back in hand. On this page are published all the documents necessary for the use of your device. HFM 5T0.5 by Kern.
USER MANUAL HFM 5T0.5 Kern
Operating instruction
Mode d'emploi
Logbuch
Regular maintenance and care
Journal de bord
Further language versions you will find online under www.kern-sohn.com/manuals
EN We hereby declare and assume sole responsibility for the declaration that the product complies with the directives hereinafter. The object of the declaration described below is in conformity with the relevant Union harmonisation legislation.
Typ | Type |
HFM 10T1
HFM 1T0.1
HFM 3T0.5
HFM 5T0.5
Serienr. | Serial no. |
XXXXXXX
| CE Kennzeichnung CE mark applied | EU-Richtlinie EU directive | Normen Standards |
| CE | 2006/42/EC (MD) | EN 13155:2003+A2:2009 |
| CE | 2011/65/EU (RoHS) | EN 63000:2018 |
| CE | 2014/30/EU (EMC) | EN 55032:2015+A11:2020 EN 55035:2017 EN 61000-3-3:2013+A1:2019 EN 61326-1:2013 EN IEC 61000-3-2:2019 |
| CE | 2014/35/EU (LVD) | EN 61010-1:2010 EN 62368-1:2014+A11:2017 |
| CE | 2014/53/EU (RED) | EN 300 220-2 V3.1.1 EN 301 489-1 V2.1.1 EN 55032:2015+A11:2020 EN 55035:2017 |
Datum | Date |: 26.03.2021
Place of issue: Germany

KERN & Sohn GmbH
Signatur:
Signature:
Geschäftsführer
Managing director
www.kern-sohn.com/ce
- Technical Data 3
1.1 Dimensions 4
1.2 Nameplate 5
1.3 EC-Declaration of -Conformity 6 - General Safety Instructions 8
- The crane scales at a glance 11
3.1 Overview 11
3.2 Display 12
3.3 Keyboard 12
3.3.1 Numeric entry 13
3.4 Radio remote control 13
3.5 Sticker 14 - Commissioning 15
4.1 Unpacking 15
4.2 Original dimensions 15
4.3 Rechargeable battery operation 16
4.3.1 Standby mode 17
4.4 Suspend the balance 18 - Operation 19
5.1 Safety instructions 19
5.2 Loading the crane scales 20
5.3 Turn on/off 23
5.4 Setting balance to zero 23
5.5 Taring 24
5.6 Weighing 24
5.7 Record weight value (freeze) 24 - Menu 25
- Adjustment 27
- Error messages 28
- Cleaning, Repair, Maintenance and Disposal 29
9.1 Cleaning and Disposal 29
9.2 Regular maintenance and care 30
9.3 Checklist „Regular maintenance" 31
9.4 Maintenance table 32
9.5 Drawings of a hook, shackle and crane scale 33
9.6 Inspection cycles 34
9.7 Drawing with "h" dimension 35 - Enclosure 36
10.1 Checklist ,Enhanced maintenance" (General revision) 36
10.2 List ,spare parts and repair 37 - Instant help 39
1. Technical Data
| KERN | HFM 1T0.1 | HFM 3T0.5 | HFM 5T0.5 | HFM 10T1 |
| Readability (d) | 0.1 kg | 0.5 kg | 0.5 kg | 1 kg |
| Weighing range (max) | 1 000 kg | 3 000 kg | 5 000 kg | 10 000 kg |
| Taring range (subtractive) | 1 000 kg | 3 000 kg | 5 000 kg | 10 000 kg |
| Reproducibility | 500 g | 1 kg | 2.5 kg | 5 kg |
| Linearity | ±1 kg | ±2 kg | ±5 kg | ±10 kg |
| Recommended adjustment weight, not added (class) | 1 t (M1) | 3 t (M1) | 5 t (M1) | 10 t (M1) |
| Stabilization time | 2 s | |||
| Precision | 0.2 % of max. | |||
| Warm-up time | 30 min | |||
| Unit | kg | |||
| Allowable ambient temperature | 0...+40 °C | |||
| Relative humidity | 0 to 80%, non-condensing | |||
| Supply voltage | 220V - 240V AC 50 Hz | |||
| Secondary voltage powerpack | 9V, 800 mA | |||
| Rechargeable battery (standard equipment) | 6 V, 10 Ah Service life – background illumination ON - 50 h Loading time 14 h | |||
| Display | Digit height 30 mm | |||
| Housing size W x D x H, (mm) | 270 x 175 x 200 | 300 x 190 x 230 | ||
| Housing material | Metal, lacquered | |||
| Material hook and shackle | Nickel plated steel | |||
| Net weight (kg) | 16 | 18 | 23 | 35 |
| Remote control (standard equipment) | Battery Size 23A (1 x 12V) W x D x H 48 x 16 x 95 mm | |||
1.1 Dimensions
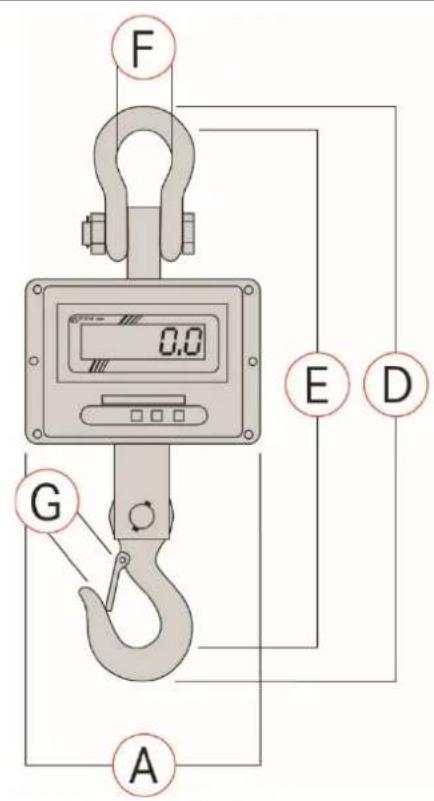
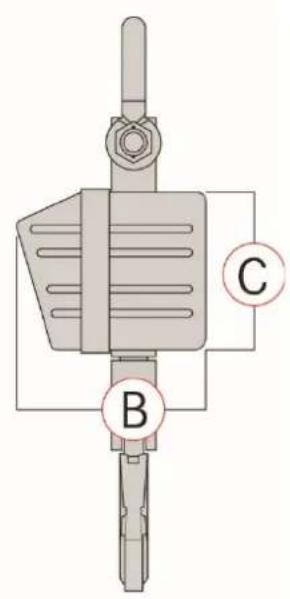
| A B | C D E | F G | |||||
| mm | mm | mm | mm | mm | mm | mm | |
| HFM 1T0.1 | 270 | 175 | 200 | 610 | 540 | 68 | 40 |
| HFM 3T0.5 | 270 | 175 | 200 | 610 | 540 | 74 | 40 |
| HFM 5T0.5 | 300 | 190 | 230 | 730 | 650 | 74 | 55 |
| HFM 10T1 | 300 | 190 | 230 | 840 | 750 | 92 | 60 |
1.2 Nameplate
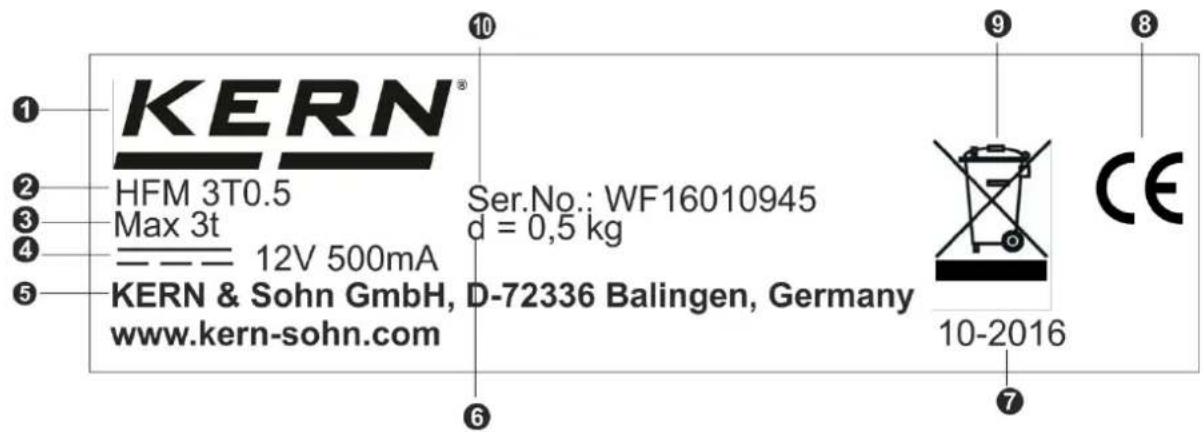
| 1 | KERN Logo |
| 2 | Model designation |
| 3 | Weighing range [Max] |
| 4 | Data for power supply |
| 5 | Company address |
| 6 | Readability [d] |
| 7 | Date of manufacture |
| 8 | CE mark |
| 9 | Disposal symbol |
| 0 | Serial number |
1.3 EC-Declaration of -Conformity

KERN & Sohn GmbH
Ziegelei 1
72336 Balingen-Frommem
Germany
www.kern-sohn.com
+0049-[0]7433-9933-0
+0049-[0]7433-9933-149
info@kern-sohn.com
EU Declaration of Conformity | EU-Konformitätserklarung
EN We hereby declare and assume sole responsibility for the declaration that the product complies with the directives hereinafter. The object of the declaration described below is in conformity with the relevant Union harmonisation legislation.
Place of issue: 72336 Balingen,
Further language versions you will find online under:
www.kern-sohn.com/ce
2. General Safety Instructions
Duties of the owner-operator
Follow the national accident prevention regulations as well as the working, operating and safety regulations of the owner-operator.
- Observe all safety regulations of the crane manufacturer.
- The balance may only be used for the proposed purpose. Any type of use which is not specified in these operating instructions, will be considered as improper use. The customer is solely responsible for material damage and injury of persons resulting from an improper use, Messrs. KERN & Sohn will not be liable under any circumstance.
Messrs. KERN & Sohn cannot be held liable, if the crane scales are modified or used improperly and if damage is resulting from such use.
- Carry out regular maintenance and care of the crane scales, the crane and the load suspension devices (see chapter 9).
- Log the test result and keep it in the logbook.
Organizational measures
- Only trained and instructed staff may operate the balance.
- Make sure that the operating instructions are kept nearby the operation site of the crane scales.
Assembly, commissioning and maintenance should only be carried out by trained specialists. - Use original spare parts only.
- All repair work must be carried out by trained specialists. Repairs and spare parts must be documented. (see list ,spare parts and repair of safety-relevant parts)
- All maintenance must be documented (see checklist „Regular maintenance" chap. 9.3).
- Load suspending components may only be exchanged as a complete spare parts set. The dimensions of the new components must be recorded (see checklist „Regular maintenance" chapter 9.3).
Ambient conditions
- Never operate the crane scales in explosive environment. The serial version is not explosion protected.
- Operate the crane scales only under environmental conditions as specified in these operating instructions (especially in chapter 1 „Technical data").
- Do not expose the crane scales to strong humidity. Non-permitted condensation (condensation of air humidity on the appliance) may occur if a cold appliance is taken to a considerably warmer environment. In this case, acclimatize the disconnected appliance for ca. 2 hours at room temperature.
- Do not operate the crane scales in corrosive environment.
- Protect the crane scales against high humidity, vapours and dust.
- Avoid extreme heat as well as temperature fluctuations e.g. caused by direct sun light..
- Major display deviations (incorrect weighing results) may be experienced should electromagnetic fields (e.g. due to mobile phones or radio equipment), static electricity accumulations or instable power supply occur. Change location or remove source of interference.
Proper use
The balance you purchased is intended to determine the weighing value of material to be weighed. It is intended to be used as a "non-automatic" balance, i.e. the material to be weighed is suspended on the crane hook only vertically, manually, carefully and without jerks. As soon as a stable weighing value is reached the weighing value can be read.
- Use the crane scales only for lifting and weighing of freely movable loads.
-
Danger of injury due to improper use. Not allowed are e.g.:
-
Exceeding the allowed nominal load of crane, crane scales or any type of load attachment devices
- Conveying persons,
- Pulling loads over an inclined surface,
-
Tearing-off, pulling or towing loads.
-
Modifications or reconstructions of the crane scales or of the crane are not allowed.
Intended use of rotating load hooks
- The rotatable load hook has been provided for a simple and comfortable hooking of the weighed material.
- The rotating function of the load hook under load is out of function. The load on the crane scales must not be swiveled. Any turning movement must be done ba a rotatable crane hook.. A loaded crane scales generally must not be rotated. (static loading and unloading of a load).
Improper Use
Do not use balance for dynamic weighing. In the event that small quantities are removed or added to the material to be weighed, incorrect weighing results can be displayed due to the "stability compensation" in the balance. (Example: Slowly draining fluids from a container suspended on the balance.) Do not leave permanent load suspended on the balance. This may damage the measuring system as well as safety-relevant parts.
The balance may only be used according to the described conditions. Other areas of use must be released by KERN in writing.
Warranty
Warranty claims shall be voided in case
Our conditions in the operation manual are ignored
The appliance is used outside the described use
The appliance is modified or opened
- Mechanical damage and damage caused by media, liquids,
Natural wear and tear
- The appliance is improperly set up or incorrectly electrically connected
The measuring system is overloaded
Safe working
- Do not stand underneath suspended loads!
Position the crane in a way that the load is lifted vertically. - When working with the crane and crane scales wear personal safety equipment (helmet, safety shoes etc.).
Monitoring of Test Resources
In the framework of quality assurance the measuring-related properties of the balance and, if applicable, the testing weight, must be checked regularly. The responsible user must define a suitable interval as well as type and scope of this test. Information is available on KERN's home page (www.kern-sohn.com) with regard to the monitoring of balance test substances and the test weights required for this. In KERN's accredited DKD calibration laboratory test weights and balances may be calibrated (return to the national standard) fast and at moderate cost.
Testing upon acceptance
When receiving the appliance, please check packaging immediately, and the appliance itself when unpacking for possible visible damage.
Initial Commissioning
In order to obtain exact results with the electronic balances, your balance must have reached the operating temperature (see warming up time chap. 1).
During this warming up time the balance must be connected to the power supply (mains, accumulator or battery).
The accuracy of the balance depends on the local acceleration of gravity.
Strictly observe hints in chapter Adjustment.
Check the original dimensions, see chap. 4.2.
Shutdown and storage
- Take off the crane scales from the crane and dismantle all load attachment devices from the crane scales.
- Do not store the crane scales at open air
3. The crane scales at a glance
The crane scales are a multi-purpose and cost-saving solution for overhead weighing applications such as e.g. recycling, metal processing, machine engineering, transport and logistics.
With the radio remote control, operation will be more comfortable yet.
3.1 Overview
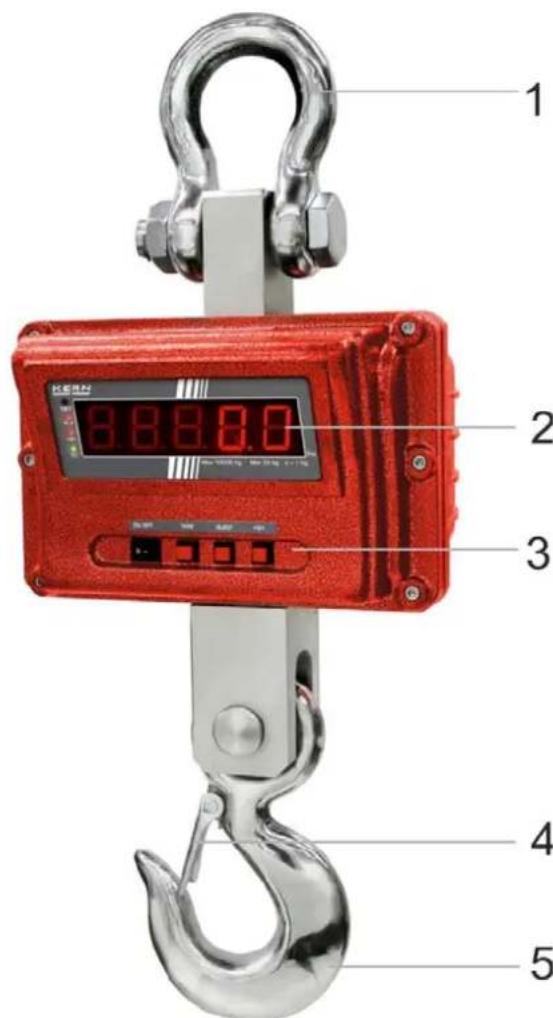
Fig. 1: Front view of balance
1 Shackle 6 Antenna
2 Display 7 Keyboard,
3 Keyboard
4 Safety bracket
5 Hook, revolvable
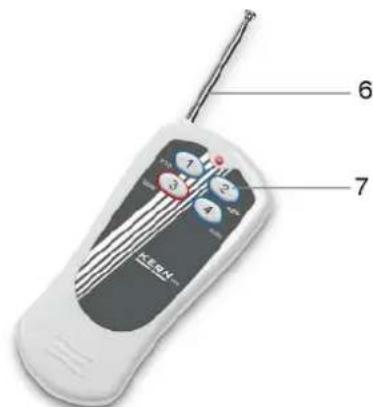
Fig. 2: Radio remote control
see chapter 3.4
3.2 Display
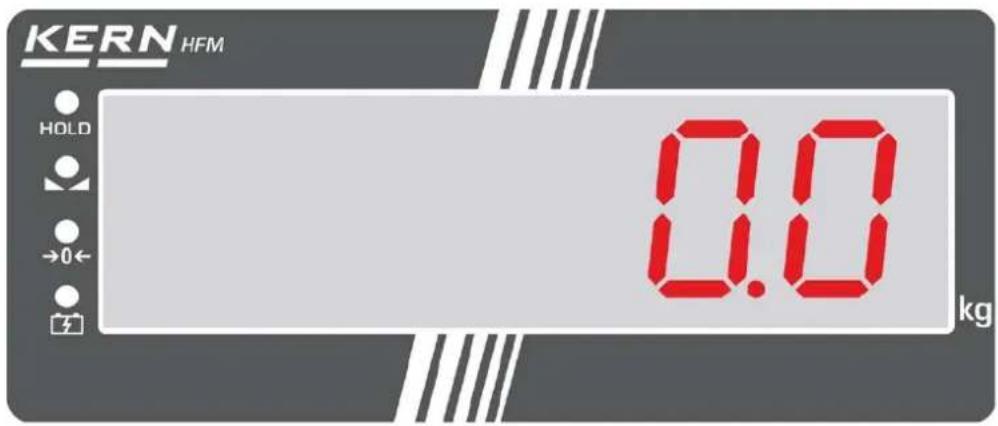
| LED The LED lights up, if |
| HOLD the data-hold function is active |
| the weight display is stable |
| a the weight is in the area around the zero point |
| when the battery is being recharged |
3.3 Keyboard

| Button | Description of function |
| ON/OFF | • Turn on or off the balance |
| d=1/2/5 kg←→ | • Modification of readability HFM 1T0.1: 100g⇒200g⇒500g HFM 3T0.5: 500g⇒1 kg⇒2 kg HFM 5T0.5: 500g⇒1 kg⇒2 kg HFM 10T1: 1 kg⇒2 kg⇒5 kg • Scroll forward in menu |
| HOLD | • Record weight value (freeze) • Exit menu |
| a | • Taring • Zeroing • Confirm entry |
3.3.1 Numeric entry
| Button Function | |
| d=1/2/5 kg | Increase flashing digit |
| HOLD Digit selection | |
| a | Terminate input |
3.4 Radio remote control
The balance can be operated by the radio remote control like by a keyboard. All functions (excepted ON/OFF) can be selected.
The red LED must light up when any button is pressed. If it does not light up, the batteries in the remote control must be exchanged.
Range on free surface (free of buildings) approx. 20m
| TARE | Taring |
| ZERO | Zeroing |
| ←→ | Modification of readability |
| HOLD | Record weight value (freeze) |
3.5 Sticker
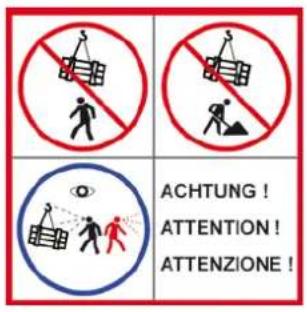
Do not stand or go under suspended loads.
Do not use on building sites.
Suspended loads have to be observed constantly.
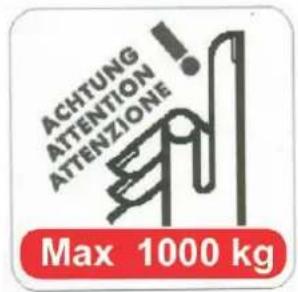
Do not exceed the nominal load of crane scales.
(Example)

The product meets the requirements of the German Equipment and Product Safety Act.
4. Commissioning
Attention: Always observe chapter 2 „General Safety Instructions“!
4.1 Unpacking
| SAFETY INSTRUCTIONS for protection against break | Once delivered and unpacked, crane scales will not be taken back. |
| The crane scales have been sealed by Messrs. KERN. → Shackles and hooks are sealed by Sella tape. → The packaging is also sealed by adhesive tape. + Broken seal obliges to purchase. KERN Fig.: Seal | |
| Thanks for your comprehension. Your KERN Quality assurance team | |
| CAUTION Danger for the back! | The crane scales are compact and quite heavy. → Remove the scales from packaging only with the help of a second person. → Use a lifting device such as a crane or a forklift truck. → Secure the scales that they cannot fall down when they are lifted. |
Make sure that all parts are completely present.
- Crane scales
- Mains adapter
Remote control - Operating instructions (logbook)
Only use original packaging for returning.
4.2 Original dimensions
- Determine the dimensions prior to the first use and document them in the checklist.
For that purpose enter the dimensions into the checklist „Regular maintenance" according to the drawings in chap. 9.5. For this purpose use suitable test equipment.
4.3 Rechargeable battery operation
| ATTENTION → The rechargeable battery and the charging unit match to each other. Only use the delivered mains adapter. → Do not use the crane scales during the loading process. → The rechargeable battery can only be replaced by the same or by a type which has been recommended by the manufacturer. → The rechargeable battery is not protected against all environmental conditions. If the rechargeable battery is exposed to certain environmental influence, the rechargeable battery may set on fire or explode. Persons can be severely injured or material damage may occur. → Protect the rechargeable battery against fire and heat. → Do not bring the rechargeable battery in contact with liquids, chemicals or salts. → Do not expose the rechargeable battery to pressure or microwaves. → The rechargeable battery and the charger may not be modified or manipulated under any circumstances. → Do not use a defective, damaged or deformed rechargeable battery → Do not connect or short-circuit the electrical contacts of the rechargeable battery with metallic objects. → From a damaged rechargeable battery may escape liquids. If the liquid comes into contact with skin or eyes, the skin and the eyes may be irritated. → Ensure the correct polarity when inserting or exchanging the rechargeable battery (see instructions in the rechargeable battery compartment) → The rechargeable battery operation is overridden when a mains adapter is being connected. If weighing more than 48 hours with mains operation, the rechargeable batteries have to be removed! (Danger of overheating). → If the rechargeable battery starts to smell, being hot, changing the colour or being deformed, it must be immediately unplugged from mains supply and from the balance if possible. |
Loading the rechargeable battery:
Before the first use, the rechargeable battery should be charged by connecting it to the mains power cable for at least 24 hours. The operating time of the rechargeable battery is approx. 50 hours.
The capacity of the rechargeable battery will soon be exhausted, when the display begins to flicker. If „bat lo“ appears, the balance will remain operable for approx. 30 minutes more, then it switches off automatically. Connect the power cable as soon as possible to load the rechargeable battery.
During loading the LED display above informs you about the loading status of the rechargeable battery.
red: Voltage has dropped below prescribed minimum.
green: Rechargeable battery is completely charged
yellow: Capacity of rechargeable battery almost exhausted
When the crane scales are out of operation for a longer period, remove the rechargeable battery.
4.3.1 Standby mode
The crane scales change into the standby mode when any key is pressed or when for 5 minutes (factory setting) no weight change has been measured. Only one segment remains lighting. In order to finish the standby mode, press any key on the keyboard or on the remote control.
Switch-off time selectable after 0, 5, 10, 20, 30 minutes, see chap. "F6 sl".
4.4 Suspend the balance
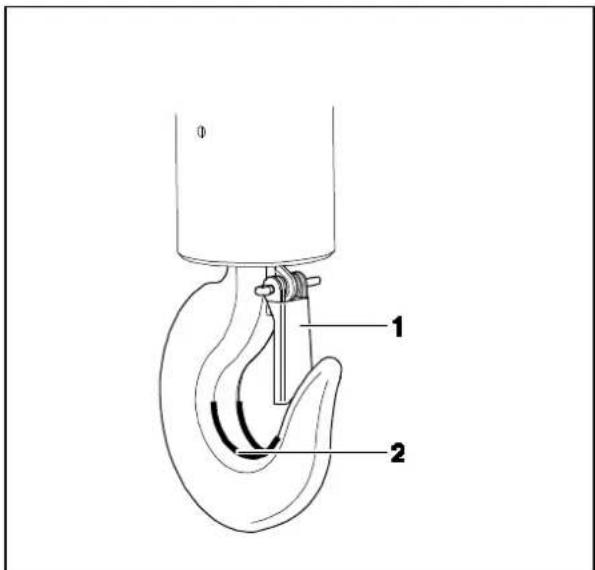
Condition
The crane needs a safety bracket (1) that the unloaded crane scales cannot fall down.
If the safety bracket is missing or damaged, please contact the crane manufacturer in order to receive a hook with this safety equipment.
+The hook scales can be used solely with a crane equipped with a swivel joint
Suspend the crane scales on the lower hook of a crane and close the safety bracket.
The crane scale's upper eyelet should rest in the saddle (2).
5. Operation
5.1 Safety instructions
| DANGER Risk of injury due to falling loads! | |
| → Always work with particular care according to the general rules for crane operation. → Check all parts (hook, eyelet, rings, rope slings, cables, chains etc.) for excessive wear or damage → If faults can be seen on the safety bracket of the hook or if it is missing completely, the scales must not be used. → Work only with appropriate speed. → Always avoid vibrations and horizontal forces. Avoid any kind of shock, torsion and oscillating (e.g. caused by inclined suspending). → Do not use the crane scales for transport of loads → Do not stand or go under suspended loads. → Do not use on building sites. → Suspended loads have to be observed constantly. → Do not exceed the nominal load of crane, crane scales or any kind of load attachment devices at the crane scales. → For weighing dangerous goods (e.g molten masses, radioactive materials) the “Dangerous Goods Regulations” are to be regarded! |
5.2 Loading the crane scales
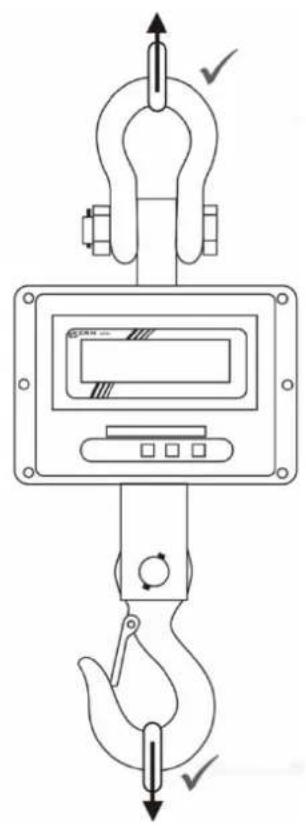
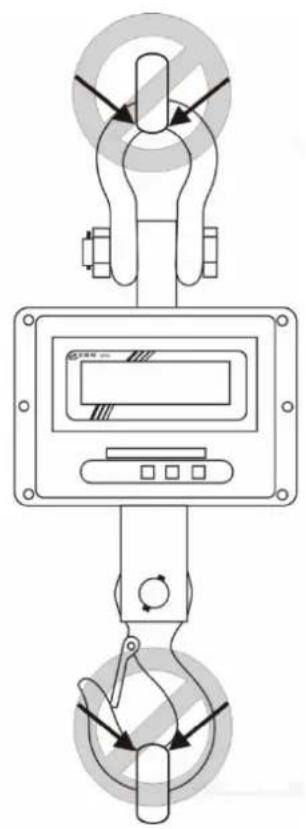
For good weighing results observe the following, illustrations see next page:
Only use load attachment devices which guarantee a one-spot suspension and where the scales can be suspended freely.
Do not use too large load attachment devices which do not guarantee any one-spot suspension.
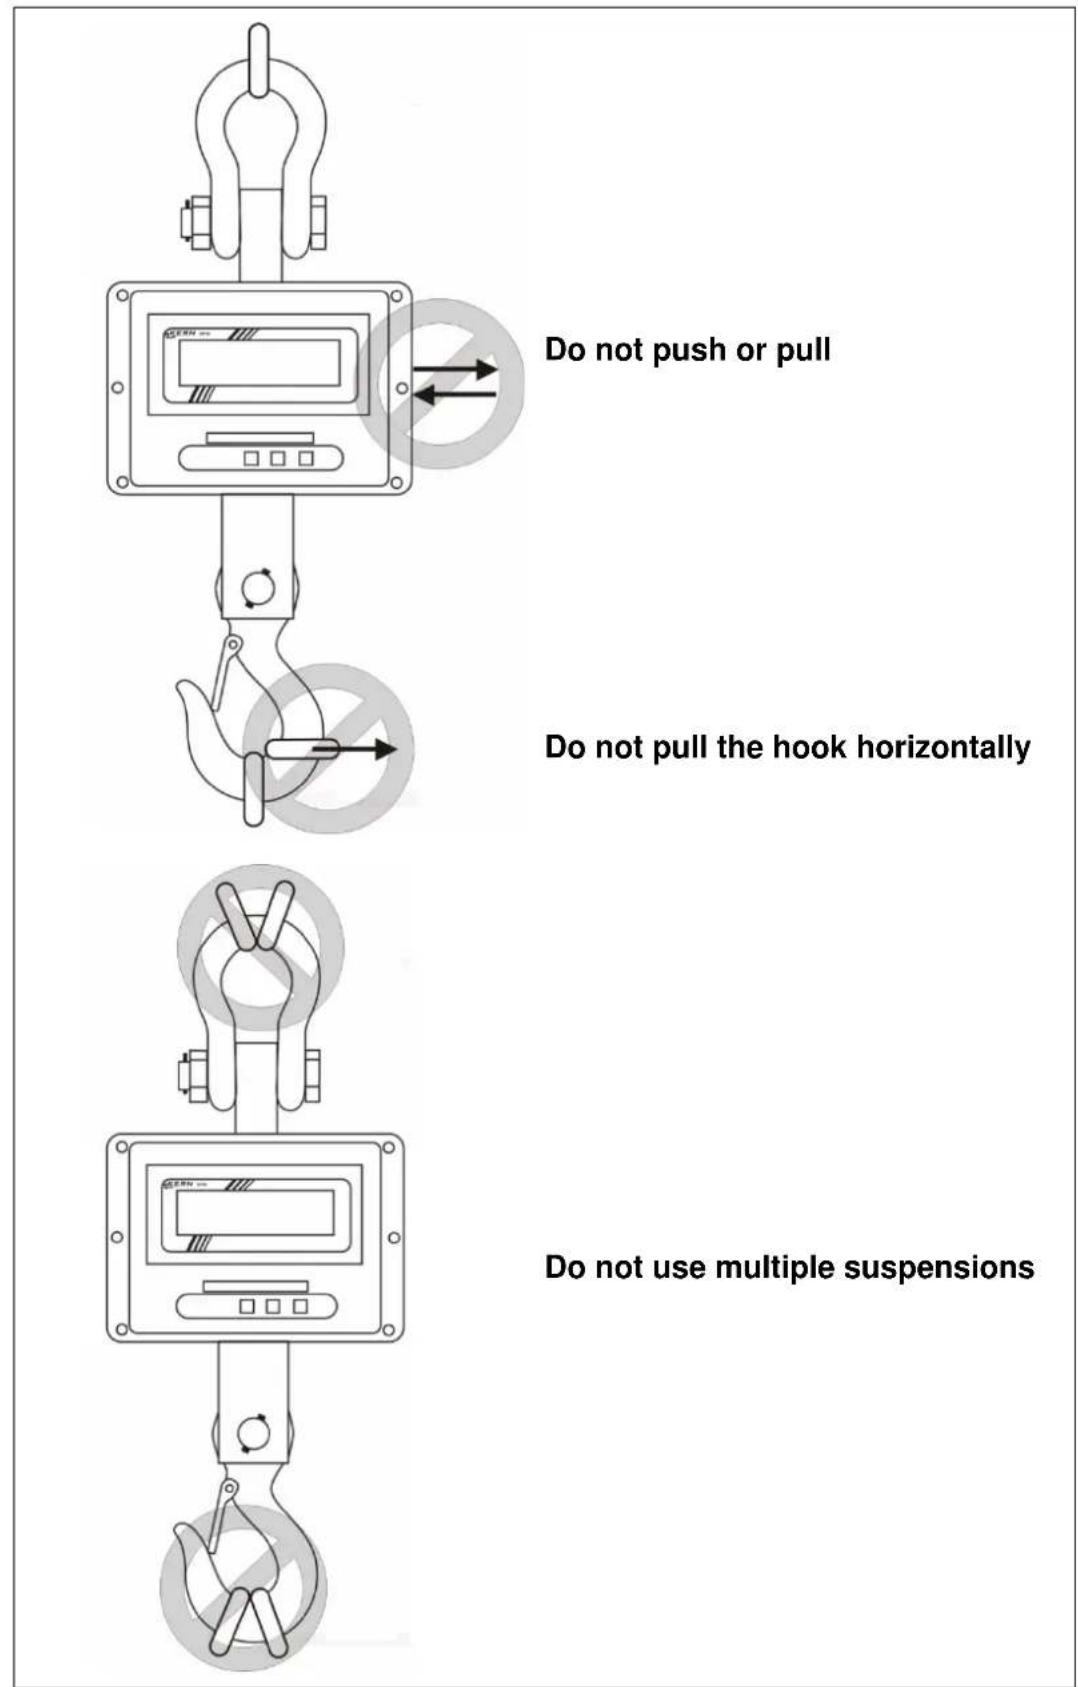
Do not use multiple suspensions.
Do not pull or push the load or the loaded balance.
Do not pull the hook horizontally.
Loading the balance
- Position the hook of the crane scales over the load.
- Move downwards the crane scales until the load can be suspended on the hook of the balance. Reduce the speed when the respective height is going to be reached.
- Suspend the load on the hook. Ensure that the safety bracket is closed. If the load is fixed by slings, ensure that the slings rest completely on the saddle of the balance hook.
- Lift-off the load slowly.
When the load is fixed by slings, ensure that the load is well balanced on both sides and that the slings are correctly positioned
Only use load attachment devices which guarantee a one-point suspension and where the scales can be suspended freely.
Do not use too large load attachment devices which cannot guarantee a one-point suspension.
5.3 Turn on/off
Start-up
Press the ON/OFF button on the balance keyboard. The display lights up and the balance carries out a selftest. The selftest is completed when the weight value 0 appears on the display.

Switch on only possible at the keyboard of the balance.
Switching Off
Press the ON/OFF button on the balance keyboard.
5.4 Setting balance to zero
In order to obtain optimal weighing results, reset to zero the balance before weighing.
Manual
Unload the balance
Press the ZERO button.
In the display appears 0 (kg) and the LED a lights up.
Automatic
In the menu the amount of the automatic zero point correction can be changed, see chapter 6 / Function „F1 az".
5.5 Taring
Suspend preload.
Press the ZERO button. In the display appears 0 (kg) and the LED a lights up.
The weight of the container is now internally saved.
Weigh the material, the net weight will be indicated.
After removing the preload weight appears as negative display.
To delete the hare value, remove load from crane scales and press the ZERO button.
5.6 Weighing
Load the crane scales.
The weight value will be displayed at once. After standstill control the LED lights up.
i Overload warning Overloading excess
Overloading exceeding the stated maximum load (max) of the balance, minus a possibly existing tare load, must be strictly avoided. This could cause damage to the balance.
Exceeding the maximum load is indicated by the display „--ol-". Unload balance or reduce preload.
5.7 Record weight value (freeze)
Press the HOLD button to „freeze“ or to record the current weight value. It remains displayed until it is deleted. The LED HOLD lights up
In order to delete the "frozen" or the recorded weight, press the HOLD button. The LED HOLD extinguishes.
6. Menu
Navigation in the menu:
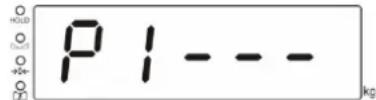
| Call function | → Switch on the balance and during the selftest press the ZERO and the d=1/2/5 kg button at the same time. „P1 -- “is displayed. → Enter password: or select standard password „0000“ with HOLD number, increase the flashing number using d=1/2/5 kg or personal password, see function F8 ci → Confirm with ZERO button. The first function „F0 di“ is displayed. |
| Select function | → The d=1/2/5 kg button allows to select the individual functions one after the other. |
| Select setting | → Confirm the selected function by the ZERO button. The current setting will be displayed. |
| Change settings | → Use the d=1/2/5 kg button to switch over into the available settings. |
| Confirm setting | → Press the ZERO button, the balance returns into the menu. |
| Exit menu / Return to weighing mode | → Press the HOLD button. |
Overview:
| Function | Available settings | Description | ||||||
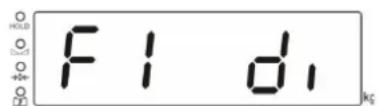
| F0 diModification of readability | LowHigh* | Modifications may only be carried out by a specialist with competent knowledge. | ||||||
| cap | d (low)d=1/2/5 kg | d (high)d=1/2/5 kg | ||||||
| 1 t | 2kg | 1kg | 500g | 500g | 200g | 100g | ||
| 3 t | 10kg | 5kg | 2kg | 2kg | 1kg | 500g | ||
| 5 t | 10kg | 5kg | 2kg | 2kg | 1kg | 500g | ||
| 10 t | 20kg | 10kg | 5kg | 5kg | 2kg | 1kg | ||
| F1 azAutomatic zero point correction(zero tracking) | AZn 0 0.5 dAZn 1* 1 dAZn 2 2 dAZn 3 4 d | |||||||
| F2 bt | Not documented | |||||||
| F3 sp | Not documented | |||||||
| F4 ip | Internal A/D converter value | |||||||
| F5 ut Not documented | ||||||||
| F6 slStandby modesee chap. 4.3.1 | SLP 0SLP 1*SLP 2SLP 3SLP 4 | Standby mode switched offStandby mode after 5 minutesStandby mode after 10 minutesStandby mode after 20 minutesStandby mode after 30 minutes | ||||||
| F7 gv | Not documented | |||||||
| F8 ciPassword entry | In „P1- - - “ display increase the flashing number usingd=1/2/5 kg, select number using HOLD. Confirm entry byZERO button. | |||||||
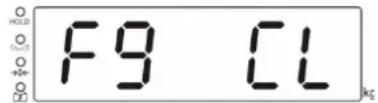
| F9 CL | Adjustment, see chapter 7 | |||||||
* = default setting
7. Adjustment
Switch-off balance and attach a carrying help if necessary.
Switch-on balance with attached carrying help and during the selftest press the ZERO and the d = 1 / 2 / 5 ~kg button at the same time. P1 - - - "is displayed.
Use the number keys to enter password:
or
select standard password ,0000" with HOLD number, increase the flashing
number using d = 1/2/5 kg
or personal password, see function F8 ci
Confirm with ZERO button, the first function „F0 di" is displayed.
Press the d = 1 / 2 / 5 ~kg button repeatedly until „F9 CAL" will be displayed.
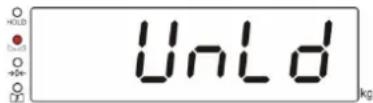
Press the ZERO button, „UnLD“ will be displayed.
Unload the balance and wait until the LED lights up.
Press the ZERO button, the currently set adjustment weight is displayed.
In order to change, select the number to be changed using the HOLD button and set the desired value using the button, the respective active digit flashes.
Confirm by the ZERO button, „Load“ will be displayed.
Attach the adjustment weight and wait until the LED lights up.
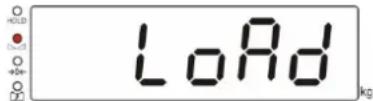
Press the ZERO button.
After successful adjustment the balance carries out a selftest, then it automatically returns to weighing mode. An adjusting error or incorrect adjusting weight will be indicated by the error message; repeat adjustment procedure
8. Error messages
| Error message | Description | Possible causes |
| --ol- | Maximum load exceeded | Reduce loadCheck whether the balance has been damaged |
| Err 5 | Keyboard error | Improper operation of the balance |
| Err 6 | Value outside the A/D changer range | Weighing plate not installedDamaged weighing cellDamaged electronics |
| Ba lo | Capacity of rechargeable battery exhausted | Recharge battery |
Should other error messages occur, switch balance off and then on again. If the error message remains inform manufacturer.
9. Cleaning, Repair, Maintenance and Disposal
Prior to any maintenance, cleaning and repair work disconnect the device from the operating voltage.
Risk of injury and risk of material damage! The crane scales are part of a hoisting device! For a safe operation please observe the following:
Employ trained specialists for the regular maintenance, according to chapter 9.2 „Regular maintenance and care“ and „Checklist Regular maintenance“
Have the parts exchanged only by trained specialized staff.
If there arose discrepancies with the checklist, the balance must not more be put into operation.
Do not repair the crane scales by yourself. Repairs may only be carried out by trained specialised personnel.
9.1 Cleaning and Disposal

Damage on the crane scales!
Do not use any industrial solutions or chemicals
Clean the keyboard and the display with a soft cloth soaked in mild window cleaning agent.
Disposal of packaging and appliance must be carried out by operator according to valid national or regional law of the location where the appliance is used.
9.2 Regular maintenance and care
Regular checks and maintenance must be carried out within the periods defined in chap. 9.6, Check intervals
The regular 3-month maintenance may only be carried out by trained specialists with competent knowledge of working with crane scales. Thereby adhere to the national regulations for prevention of accidents as well as to the working, operation and safety regulations of the owner-operator.
To check the dimensions only use suitable test equipment / feeler gauges.
The regular 12-month maintenance must only be carried out by trained specialized staff.
Enter the results of the regular and enhanced maintenance into the respective checklists.
Enter the replaced spare parts into the list ,Spare parts and repairs".
Regular maintenance:
| Initial start-up, every 3 months | ·Enter and check all dimensions, see checklist „Regular maintenance”. ·Check the scales and the eyelet for wear and tear, such as e.g. plastic deformation, mechanical damage (unevenness), notches, striation, cracks, corrosion, thread damage and torsions. ·Visual and functional check of the articulated joint. ·Check the application of the safety bracket on the hook, moreover check for fault and correct function ·For balances of big construction size: Check that the split pin and the nut on the shackle are not loose If a dimension exceeds the admitted deviation from the original dimension or if other discrepancies have been found, the balance must be repaired by trained specialized staff. Never do repair it by yourself! Take balance out of operation immediately! All repair work and spare parts must be documented by trained specialists. See list „Spare parts and repairs“ |
| Every 12 months | ·All load suspending components must be checked by trained specialists and documented in the checklist „Enhanced maintenance“. |
Hint
During the revision watch out for wear and tear according to the following drawings (see chap. 9.5)
9.3 Checklist „Regular maintenance“

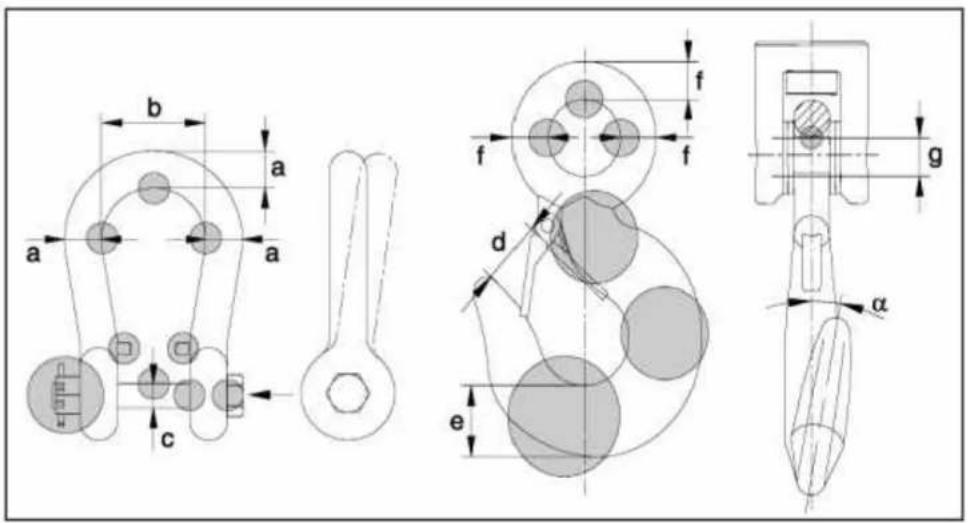
Additional information on the maintenance works can be found in the table below (see chapter 9.4 ) and in figures in chapter 9.5 .
| Shackle | Hook | |||||||||||||||||
| a | b | c | Wear(see grey fields) | Cotter pinand nut | d | e | f | g | h | Angleα | Wear(see grey fields) | Detent | Articulated joint | Date | Inspector | |||
| Max. acceptable deviation | 5% | 0% | 5% | No deformations or cracks | Well fixed | 10% | 5% | 5% | 5% | ±1 mm | 10° | No deformation s or cracks | Correct operation | Check function | ||||
| Dimensions before first use | ||||||||||||||||||
| 3 months | ||||||||||||||||||
| 6 months | ||||||||||||||||||
| 9 months | ||||||||||||||||||
| 12 months | ||||||||||||||||||
"Maintenance work must be carried out by trained specialists."
9.4 Maintenance table
| Part | Drawing | Component | Inspection | Limits |
| Hook | d | Detent | Inspection concerning operation and damage | No damage is acceptable, operation must be ensured. |
| Articulated joint | Check function | Correct operation | ||
| Eye and hook | Inspection concerning dimensions and damage | As per Table 9.3 | ||
| Shackle | b a a c | Locking bolt | If it is not loose | It must not be loose. |
| Shackle | Inspection concerning dimensions and damage | As per Table 9.3 | ||
| Cotter pin + nut | Inspection concerning damage and positioning | Correct positioning as per Table 9.3 | ||
| Crane scale | F E D C A | Screw connections | Loose | It must not be loose. |
| Crevice between the hook and the enclosure | Dimension check | As per Table 9.3 |
9.5 Drawings of a hook, shackle and crane scale
HFM-BA-e-2215
9.6 Inspection cycles
| Inspection | Every day | Every 7 days | Every 3 months | Every 12 months |
| Presence of all crane scale parts | × | |||
| Visual inspection for damage | × | |||
| Visual inspection and operation inspection of the hook detent | × | |||
| Visual inspection and checking the function of the articulated joint | × | |||
| Inspection of the shackle cotter pin and nut | × | |||
| Impurities × | ||||
| Marking inspection (legible nameplate) | × | |||
| Inspection of all dimensions as per the checklist 9.3 | × | |||
| Enhanced maintenance (see chap. 10.1) by trained specialists | × |
HFM-BA-e-2215
9.7 Drawing with "h" dimension
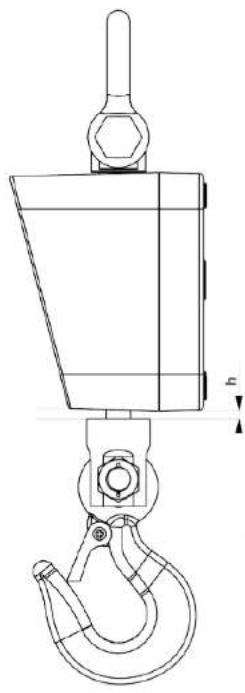
HFM-BA-e-2215
10. Enclosure
10.1 Checklist ,Enhanced maintenance" (General revision)
The enhanced maintenance must be carried out by trained specialists.
| Crane scales | Model Serial no. | |||||
| Interval Hooks Shackle | Screwed connections | Date Name Signature | ||||
| 12 months | ||||||
10.2 List ,spare parts and repair
Repairs must be carried out and documented by trained specialists.
| Crane scales | Model Serial no. | |||
| Part | Action | Date | Name | Signature |
HFM-BA-e-2215
| Crane scales | Model Serial no. | |||
| Part | Action | Date | Name | Signature |
HFM-BA-e-2215
11. Instant help
Possible causes of errors:
In case of an error in the program process, briefly turn off the balance and disconnect from power supply. The weighing process must then be restarted from the beginning.
Fault Possible cause
The displayed weight does not glow.
The balance is not switched on.
The balance cannot be switched on
- Load/replace the rechargeable battery
- On/Off button defective
- On/Off button not correctly actuated
The display does not react to load change
- Load cell defective
- Load cell cable defective
Loading display does not glow during loading
- Power supply unit defective
- Power supply unit not correctly connected
The displayed weight is permanently changing
- Vibrations on the hook
- Suspended load does not stand still
- Load cell defective
The weighing result is obviously incorrect
- The balance has not been reset to zero before weighing
- The adjustment does not match with the installation place or has been misadjusted.
- Wrong weighing unit selected
The desired weighing unit cannot be called by UNIT key.
Unit was not activated beforehand.
Error message „-ol-"
Maximum load of the balance exceeded
The menu settings cannot be changed.
- The menu is locked Remove the menu lock.
The remote control does not work
- Batteries empty, insert new batteries
- Too much distance between balance and remote control
- Obstacles block the reception
Sommaire
EN We hereby declare and assume sole responsibility for the declaration that the product complies with the directives hereinafter. The object of the declaration described below is in conformity with the relevant Union harmonisation legislation.