TBC 32010 TTC - Cooker TEKA - Free user manual and instructions
Find the device manual for free TBC 32010 TTC TEKA in PDF.

| Product type | Ceramic hob |
| Brand | Teka |
| Model | TBC 32010 TTC |
| Dimensions (W x D x H) | 510 x 300 x 62 mm |
| Cutout dimensions (L x W x D) | 490 x 270 x 58 mm |
| Total power | 3000 W |
| Supply voltage | 230 V ~ 50/60 Hz |
| Number of cooking zones | 2 |
| Zone type | Radiant plates |
| Zone 1 (front or rear) | Radiant plate 1200 W |
| Zone 2 | Radiant plate 1800 W |
| Control | Touch controls |
| Child lock function | Yes |
| Programmable timer | Yes (1 to 99 minutes) |
| Automatic safety shut-off | Yes |
| Residual heat indicator | Yes (display 'H') |
| Surface material | Ceramic glass |
| Color | Black (BK) |
| Recommended cleaning | Scraper and special ceramic glass cleaner |
| Installation | Built-in, with sealing gasket and brackets supplied |
Frequently Asked Questions - TBC 32010 TTC TEKA
User questions about TBC 32010 TTC TEKA
0 question about this device. Answer the ones you know or ask your own.
Ask a new question about this device
Download the instructions for your Cooker in PDF format for free! Find your manual TBC 32010 TTC - TEKA and take your electronic device back in hand. On this page are published all the documents necessary for the use of your device. TBC 32010 TTC by TEKA.
USER MANUAL TBC 32010 TTC TEKA
natural_image
Modern kitchen interior with dark wood-paneled cabinets and ovens, featuring a 'TEKA' logo in the top-right corner (no other text or symbols visible)User Manual
ES FR FI
PT EL RO
EN SV NL
DE NO
ES INSTRUCCIONES PARA LA INSTALACIÓN Y RECOMENDACIONES DE USO Y MANTENIMIENTO ENCIMERAS VITROCERÁMICAS TOUCH CONTROL....10
PT INSTRUÇÕES DE INSTALAÇÃO E RECOMENDAÇÕES PARA A UTILIZAÇÃO E MANUTENÇÃO PLACAS DE COZINHA VITROCERÂMICAS TOUCH CONTROL....20
EN INSTALLATION INSTRUCTIONS AND RECOMMENDATIONS FOR USING AND MAINTAINING CERAMIC HOT PLATES TOUCH CONTROL....30
DE MONTAGEANLEITUNG UND EMPFEHLUNGEN ZUR VERWENDUNG UND WARTUNG GLASKERAMIK-KOCHFELDER MIT TOUCH CONTROL....40
FR INSTRUCTIONS POUR L'INSTALLATION ET CONSEILS D'UTILISATION ET D'ENTRETIEN PLAQUES DE CUISSON VITROCÉRAMQIUE TOUCH CONTROL....50
EL ODHΓIEΣ EΓΚΑΤΑΣΤΑΣΗΣ ΚΑΙ ΣΥΣΤΑΣΕΙΣ ΓΙΑ ΤΗ ΧΡΗΣΗ ΚΑΙ ΣΥΝΤΗΡΗΣΗ ΤΩΝ ΚΕΡΑΜΙΚΩΝ ΕΣΤΙΩΝ ΠΛΗΚΤΡΑ ΑΦΗΣ....60
SV INSTALLATIONSANVISNINGAR OCH REKOMMENDATIONER FÖR ANVÄNDNING OCH UNDERHÅLL KERAMIKHÄLLAR MED TOUCHKONTROLL....70
NO INSTALLASJONSANVISNINGER OG ANBEFALT BRUK OG VEDLIKEHOLD BER∅RINGSSTYRT KJERAMISK KOMFYR....80
FI ASENNUSOHJEET JA KÄYTTÖÄ JA HUOLTOA KOSKEVAT SUOSITUKSET KERAAMISET KEITTOTASOT KOSKETUSPAINIKKEILLA....89
RO INSTRUCTIUNI DE INSTALARE ŞI RECOMANDĂRI DE UTILIZARE ŞI ÎNTRETINERE PLITE DE GĂTIT INCORPORABILE VITROCERAMICE TOUCH CONTROL....98
NL AANWIJZINGEN VOOR DE INSTALLATIE EN RAADGEVINGEN VOOR GEBRUIK EN ONDERHOUD KERAMISCHE KOOKPLATEN TOUCH CONTROL....107
Presentación / Apresentação / Introduction /Einführung / Présentation /Εισαγωγή / Introducere /Johdanto/ Inleiding/ Innledning/ Inledning
ES
Notes about the cookware to use on your induction hob
The size of the bottom of the cookware to be used should be big enough to completely cover the cooking area drawn on the glass.
Depending on the type of cookware (material and size), the induction areas can work with smaller cookware.
Please remember that the induction elements only work with cookware that has a ferromagnetic (material attracted by a magnet) bottom..
Always use pans with a smooth, flat base on the induction hotplates. Using pans with a deform concave or undulating base will cause overheating that may damage the glass or the pan itself.
Bear in mind that the pan being used may have a considerable influence on the performance of any induction hotplate. You may come across pans on the market that, although specified as suitable for induction, perform poorly or present problems when comes to being recognised by the induction hotplate due to the lack of or poor quality of the ferromagnetic material on the base of the pan.
PT
- Residual heat indicator (H)
- Maximum electric power: 3.000 Watts.
- Supply power: 230 Volts.
- Frequency: 50/60 Hertzs.
Modelo TBC 32010 BK TTC
natural_image
Technical diagram of a two-circular electrical component with crosshair indicators, no readable text or symbols[NO TEXT]
Malli TBC 32010 BK TTC
1 1.800* W. induktiokeittotaso. 2 1.200 W. induktiokeittotaso.
natural_image
Technical diagram of a two-circled electrical stove burner with TEKA control panel (no text or symbols on main elements)
natural_image
Technical line drawing of a mechanical component with internal channels and mounting base (no text or symbols)natural_image
Technical line drawing of a mechanical component with internal layered structure (no text or symbols)Información Técnica
Datos técnicos
Guide to Using the Instructions Booklet
Dear customer,
We are delighted that you have put your trust in us.
We are confident that the new hob that you have purchased will fully satisfy your needs.
This modern, functional and practical model has been manufactured using top quality materials that have undergone strict quality controls throughout the manufacturing process.
Before installing and using it, we would ask that you read this Manual carefully and follow the instructions closely, as this will guarantee better results when using the appliance.
Keep this Instruction Manual in a safe place so that you can refer to it easily and thus abide by the guarantee conditions.
In order to benefit from this Guarantee, it is essential that you submit the purchase receipt together with the Guarantee Certificate.

You should keep the Guarantee Certi
or, where relevant, the technical datasheet, together with the Instruction Manual for the duration of the useful life of the appliance. It has important technical information about the appliance.
Safety instructions
Before first use, you should carefully read the installation and connection instructions.
These hob models may be installed in the same kitchen furniture units as TEKA brand ovens.
For your safety, installation should be carried out by an authorised technician and should comply with existing installation standards. Likewise, any internal work on the hob should only be done by TEKA's technical staff, including the change of the flexible supply cable of the appliance.
Safety warnings
⚠️ If the ceramic glass breaks or cracks, immediately unplug the stovetop to avoid electric shocks.
⚠ This appliance is not de- signed to work with an exter-
nal timer (not built into the appliance) or a separate remote control system.
⚠️ Do not steam clean this device.
⚠ The device and its accessible parts may heat up during operation. Avoid touching the heating elements. Children younger than 8 years old must stay away from the stovetop unless they are permanently supervised.
This device may solely be used by children 8 years old or older, people with impaired physical, sensory or mental abilities, or those who lack experience and knowledge, ONLY when supervised or if they have been given adequate instruction on the use of the device and understand the dangers its use involves. User cleaning and maintenance may not be done by unsupervised children.
Children must not play with the device.
⚠ Precaution. It is dangerous to cook with fat or oil without being present, as these may catch fire. Never try to extinguish a fire with water! in this event disconnect the device and cover the
flames with a lid, a plate or a blanket.
⚠ Do not store any object on the cooking areas of the stovetop. Prevent a possible fire hazard.
⚠ When the hotplates are in operation or have recently been in operation, some areas will be hot and can burn. Children should be kept well away.
⚠ Do not place metal objects, such as knives, forks, spoons or lids on the surface of the hob, as they may get very hot.
⚠️If you are frying oil, keep an eye on the cooking as the induction hobs heat up very quickly and they could ignite.
⚠ It is advisable not to use the induction hob during the pyrolitic cleaning function in the case of the pyrolitic ovens, due to the high temperature reached by this appli-ance.
Installation
INSTALLATION AND SETUP SHOULD BE CARRIED OUT BY AN AUTHORISED TECHNICIAN IN LINE WITH CURRENT INSTALLATION STANDARDS.
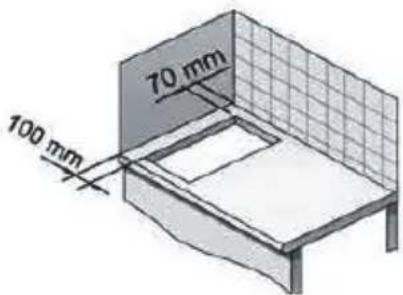
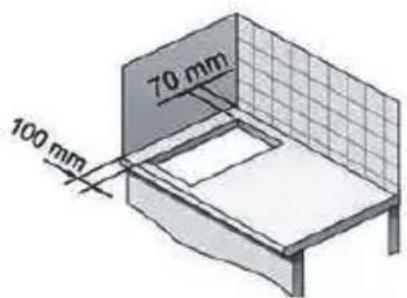
Positioning the hob
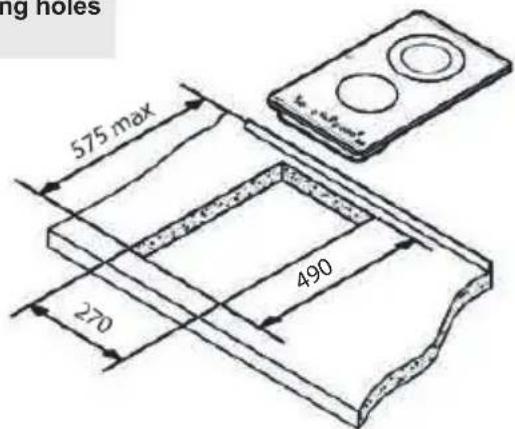
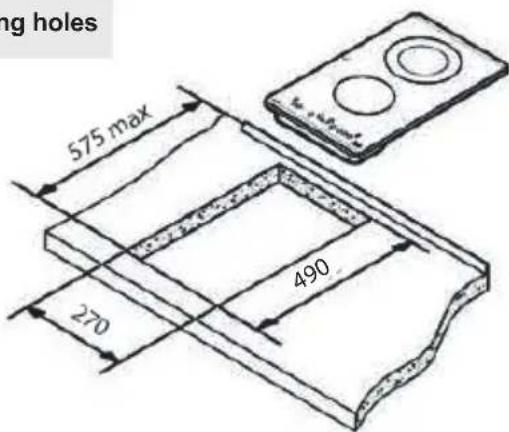
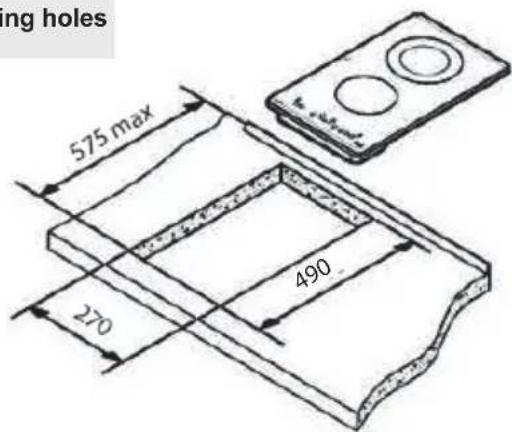
To install these models, an opening with the dimensions shown in figure 2 will be cut into the unit's worktop.
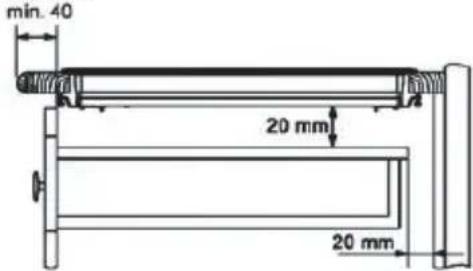
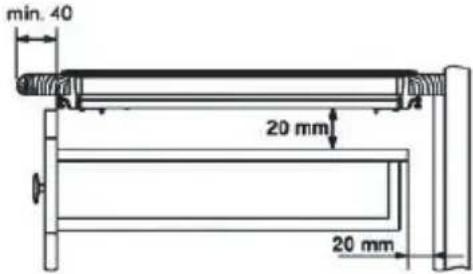
The worktop fastening system is suitable for units 20, 30 and 40 mm thick.
The minimum distance between the surface supporting the cooking pans and the lower part of the kitchen unit or the hood located above the hob should be 650 mm. If the hood's installation instructions recommend that the gap is greater than this, you should follow this advice.
The unit where the hob and oven will be located will be suitably fixed.
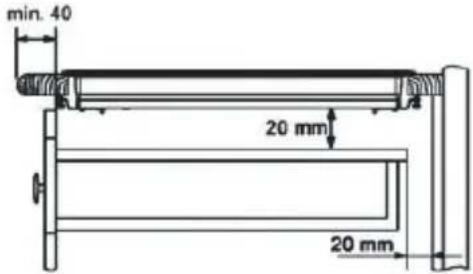
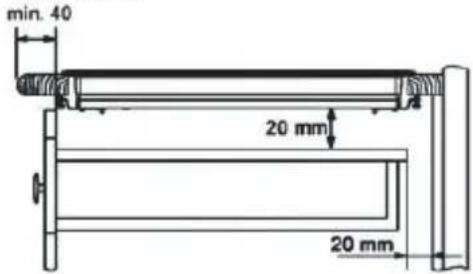
INSTALLATION WITH CUTLERY DRAWER OR LOWER CABINET
In mixed induction - vitroceramic hobs, if you would like to have a cabinet or a cutlery drawer under the hob, it is necessary to put a separation board in between the two. The board should be situated 20 mm below the underside of the hob, leaving a free space of at least 20 mm until the end of the cabinet (figure 1).
This prevents accidental contact with the hot surface of the casing of the heating elements under the apparatus (figure 1).

Please do not store objects that can obstruct the fans or possibly flammable materials in the draw-
INSTALLATION WITH FAN OVEN UNDER THE HOB
The oven should be installed according to the corresponding manual.
An opening of 20 mm should be made in the back part of the cabinet in order to allow cold air to enter (see figure 1).

When hobs are handled before being installed, should be taken in case there is any protruding or sharp edge which could cause injury.

When installing units or applian ces above the the hob should be protected by a board so that glass cannot be damaged by accidental blows or by weights.
fig. 1
Minimum distance to wall
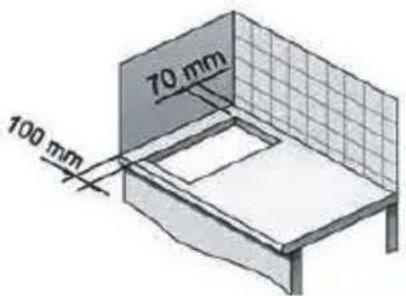
Minimum ventilation distances
TBC 32010 BK TTC-TZC 32320 BK TTC
Fitting holes
The glues used in manufacturing the kitchen unit and in the adhesive on the decorative laminate of the worktop surface should be made to tolerate temperatures of up to 100°C.
TEKA assumes no responsibility for any malfunction or damage caused by faulty installation.
PLEASE REMEMBER THAT THE GUA RANTEE DOES NOT COVER THE GLASS IF IT SUFFERS A VIOLENT BLOW OR IF IT IS USED IMPROPERLY.
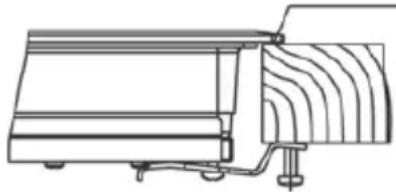
Fastering the hob
When the gap has been properly sized, the sealing washer should be put on the lower face of the glass. Silicone should not be applied between the glass and the unit worktop because if it becomes necessary to remove the hob from its position, the glass could break when trying to detach it.
To secure the hob to the cabinet, four brackets should be fastened to the existing hole son the bottom part of the casing (two in the front and two in the back). There are two possibilities of where the brackets may be placed, just as is shown in figure 3.
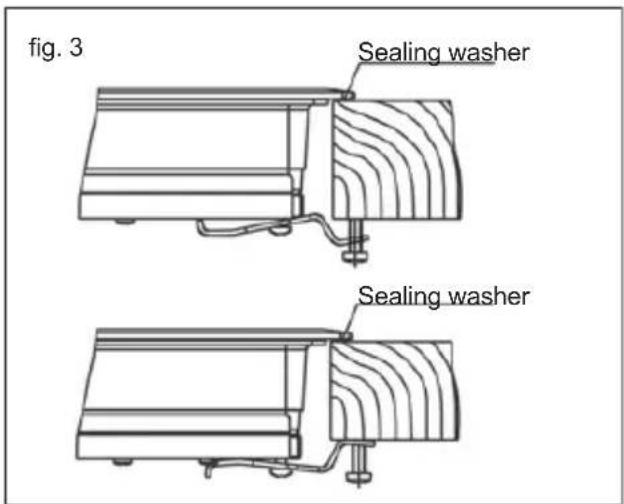
Depending on the thickness of the cabinet, it may be necessary to use the self tapping screws that are provided as compliments for securing; insert them in the circular holes of the bracket. The thread of this hole will be made when the screw is inserted inside of it. The thread should be made before fastening the bracket to the hob.
Connecting the electricity
The electric connection is made via an omnipolar switch or plug where accessible, which is suitable for the intensity to be tolerated and which has a minimum gap of 3 mm between its contacts, which will ensure disconnection in case of emergency or when cleaning the hob.
The connection should include correct earthing, in compliance with current norms. If the flexible supply cable fitted to these appliances ever needs to be changed, it should be replaced by TEKA's official service.
The input cable should not be in contact either with the body of the hob or with the body of the oven, if the oven is installed in the same unit.
Technical Information
Technical details
Class 3 hob.
The supply voltage and frequency will be as shown on the rating plate.
Dimensions and characteristics
| Model TZC 32320 BK TTC TBC 32010 BK TTC | ||
| Hob dimensions | ||
| Height (mm) 62 62 | ||
| Length (mm) 510 510 | ||
| Width (mm) 300 300 | ||
| Dimensions of the placement in the unit | ||
| Length (mm) 490 490 | ||
| Width (mm) 270 270 | ||
| Depth (mm) 58 58 | ||
| Configuration | ||
| Induction hotplate 2,300 / 3,200* W | ||
| Induction hotplate 1,400 / 1,800* W | ||
| Radiant hotplate 700 / 1,700 W 1 | ||
| Radiant hotplate 1,200 W 1 1 | ||
| Radiant hotplate 1,800 W 1 | ||
| Electrics | ||
| Nominal Power (W) for 230 V 2900 3000 | ||
| Supply voltage (V) | 230 V | 230 V |
| Frequency (Hz) | 50/60 | 50/60 |
* Induction power with the Power function enabled.
Use and Maintenance
User instructions of the Touch Control
HANDLING ELEMENTS (fig. 2)
① On/off touch key.
② Hot plate selection touch keys.
③ **Power and/or residual heat displays.
④ "Decrease" power touch key.
⑤ "Increase" power touch key.
⑥ Double burner selection touch key (double hot plate).
⑦ Locking touch key for the rest of touch keys.
⑧ **Hot plate double zone indication (only next to double burner hot plates).
⑨ **Lock icon.
⑩ Timer touch key.
11* **Time set hot plate icon.
12 **Timer display
13* The timed cooking surface indicator
* Depending on model
** Only visible while running.
The manoeuvres are done by means of the touch keys. You do not need to exert force on the desired touch key, you only need to touch it with your fingertip to activate the required function.
Each action is notified by a beep.
SWITCHING ON THE DEVICE
When the hob is connected for the first time, it will be locked and the related pilot light (9) will be on. To unlock it, first touch locking touch key Ⓞ(7) until the pilot light (9) switches off.
1 Touch the switching on touch key ① (1) for at least one second.
The Touch Control is activated and a 0 appears with 50% brightness on all the power displays (3).
If any zone has residual heat indication before switch on, the display continue
s showing "H" instead of 0.
If you do not take any action in the next 10 seconds the touch control will switch off automatically.
SWITCHING ON A HOT PLATE
Once the Touch Control has been activated by means of the touch key ① (1), the power indicators of the hot plates will display a 0 (3).
1 Press the touch key for the selected hot plate (2). The related power indicator (3) will be activated and brightness of indicator will increase.
2 Using the touch key ⊖ or (4/5), choose the desired power level.
The ⏻ and ⚠touch keys are repetitive, so if you keep them pressed they increase or decrease with a 0.5 second interval.
Only one hot plate can be selected at the same time
Warning:
To operate a hot plate, it must be selected first. When you want to use a hot plate, check the brightness of the power indicator. After choosing hot plate, brightness of power indicator should increase.
Quick switch-on at maxim power: Once you have selected the hot plate, press the touch key (4) once. The hot plate will be activated at full power.
SWITCHING OFF THE HOT PLATE
1 The hot plate must previously be selected.
2 Using the touch key ⊖ (4), lower the power level to 0.
Quick switch-off alternatives :
i) If user keep finger on the selection sensor for 2 seconds, the related zone will be switched off.
ii) When you press touch keys ⊖ and ⊕ (4/5) simultaneously, the hot plate will switch off quickly.
RESIDUAL HEAT INDICATOR
The power indicator of the hot plate will display an H when the glass surface reaches a temperature that could cause burning.
When this risk disappears,
i) the display switches off (if the device is in stand by),
ii) or displays 0 (if the appliance is still running).

Warning:
In a first run, H indication may appear in a short time on the power display. This showing is related with setup operation and it does not mean the cooking zone is hot.

Warning:
H indication is used for the safety purposes in any case. Even if the power is cut off for a long time, after power on, H indication appears.

flowchart
graph TD
    A["③"] --> B["⑧"]
    B --> C["②"]
    C --> D["⑪*"]
    D --> E["④"]
    E --> F["⑬*"]
    F --> G["⑤"]
    G --> H["⑪*"]
    H --> I["②"]
    I --> J["⑧"]
    J --> K["③"]
    K --> L["⑥"]
    L --> M["⑦"]
    N["⑩"] --> O["12"]
    O --> P["10"]
    P --> Q["12"]
    R["8:●"] --> S["⊕"]
    T["—"] --> U["+"]
    V["8:"] --> W["●"]
    X["8:"] --> Y["●"]
    Z["1"] --> AA["1"]
    AB["6"] --> AC["7"]
EN
SWITCHING OFF THE DEVICE
The device can be switched off at any time by pressing the general on/off touch key ①(1). In standby mode an H will appear in the zones that are hot. The rest of the displays will not light up.
Double burner hot plate
If your cooker has this option, the double burner hot plate offers the possibility of using the inside ring or also, in addition, the outside one, depending on the size of the pot or pan.
SWITCHING ON THE DOUBLE HOT PLATE
1 The related hot plate must be selected.
2 Select the desired power (from 1 to 9) using the touch key ⊖ or ⊕ (4/5).
3 Press the double hot plate touch key (6) to activate the double burner. When the double zone will be activated, double zone indicator (8) light on.
SWITCHING OFF THE DOUBLE HOT PLATE
1 The key, by which its double burner hot plate was switched on previously is selected.
2 Press the double hot plate touch key Ⓞ(6) to deactivate the double burner. The double burner indicator (8) will light off and the outer ring will be deactivated
Locking of the touch keys of the cooking hob
To prevent undesired manipulation you can lock the entire unit, except for the on/off touch key, using the locking touch key (7). This function is useful for child safety. When the lock is activated, the lock indicator light (9) comes on.
However, remember when the touch control is on, the on/off touch key ⏻ (1) allows you to switch it off, even if the lock is activated (the lock indicator light (9) on).
On the other hand, if the touch control is switched off, the locking function does not allow the on/off touch key ①(1) to be used.
To deactivate the locking function, press the locking touch key Ⓞ(7) once again. Lock indicator (9) light off and touch control will be ready for use.
CHILD LOCK
The child lock is different and more complicated than key lock. User can activate key lock via one sensor. But child lock need a sensor sequence. The Child Lock is being used to prevent children from turning on the hob.
Activating Child Lock :
- The hob is switched on via Ⓐ(1) On/Off touch key,
- Any zone should not be selected. When any zone is not selected, ④ (5) Increase power touch key and ⑦ (4) decrease power touch key and minus sensors is hold for 3 seconds at same time. At the end of this period, a short buzzer sound is heard
- After buzzer signal, the Ⓞ(7) locking touch key is touched (there is no need to keep press for a long time) and a long buzzer sound is heard and the Child Lock will be activated and all power display shows "L".
During Child Lock, if user touch any sensor (Main sensor included), "L" will flash on display.
Warning : Child lock status is not being stored. If the energy of the hob is butted, child lock status could not be preserved.
Deactivating Child Lock :
To be able to deactivate Child Lock, the Child Lock should be activated before and all power display show "L"
- ⊕(5) Increase power touch key and ⊖(4) decrease power touch key and minus sensors is hold for 3 seconds at same time. At the end of the this period, a short buzzer sound is heard,
- After buzzer signal, is touched to the Ⓞ(7) locking touch key (there is no need to keep press for a long time) and a long buzzer sound is heard and the Child Lock will be de activated and "Indication will be light off.
Flash Cooking (Automatic cook start)
This function facilitates cooking as you do not need to be present while it is being done. The touch control pre-programmes the chosen hot plate at the maximum power and subsequently lowers it to the desired power level (which you have selected) after an approximate amount of time (see table 1).
Table 1
| Selected power | Automatic Cook Start Function |
| 0 | 0 |
| 1 | 60 |
| 2 | 180 |
| 3 | 288 |
| 4 | 390 |
| 5 | 510 |
| 6 | 150 |
| 7 | 210 |
| 8 | 270 |
| 9 | - |
SWITCHING THE AUTOMATIC COOK START FUNCTION ON
1 The hot plate must be selected.
2 Select power 9 and then press power touch key ⊕ (5). After using the touch key you must lower the continuous cooking power to the desired level, (for example 6). When the automatic cook function starts "A" indication flashes with desired power level on the display.
SWITCHING THE AUTOMATIC COOK START FUNCTION OFF
After at least 10 seconds have elapsed since the beginning of the automatic cook start function:
1 The hot plate must be selected.
2 Press touch key ⊕ (5) till the indicator reaches level 9 and the automatic cook start function will be deactivated.
Timer Function
This function makes it easier to cook, as you do not need to be present throughout the process: the timed hot plate(s) will switch off automatically after the set time has lapsed. There is a separate timer for each hot plate, which allows all of the hot plates to be timed simultaneously.
With these models you can use the clock as a timer for the hotplates for times ranging from 1 to 99 minutes. All the cooking areas can be programmed individually and in a simultaneous manner.
TIMING ONE HOTPLATE
1 The cooking zone to be timed must be selected.
2 Select a power level for the hotplate from 1 to 9 using the touch keys ⊕ or ⊖(5/4).
3 Press clock touch key ⏻(10). Timer indicator (12) will display 00. Depending on the model, the timed cooking surface indicator (13) will flash.
On the power indicator (3), t will flash during the time set.
4 Immediately afterwards, enter a cooking time between 1 and 99 minutes, by using the touch keys or ⊖ (5/4).
When the power indicator (3) stops flashing, it will start to count down the time automatically. The respective
timed hotplate disolay (11) will continue flashing.
Or, when the countdown starts, the relevant power level and t will flash alternately on the power indicator (3) of the relevant heater area.
When the clock reaches 01, it will switch from counting down minutes to seconds.
Once the selected cooking time has elapsed, the heating zone being timed is turned off and the clock series of beeps for several seconds. The timer indicator will display a flashing 00 beside the hotplate has been disconnected.
If you wish to time another hotplate at the same time, repeat steps 3 and 4.
If the heating zone turned off is hot, its indicator displays an H or otherwise an 0. To turn off the audible signal touch any sensor.
CHANGING THE PROGRAMMED TIME
To change the programmed time, you must press the touch key of the timed hotplate (2) to select it and then the clock ⏻(10). You may then read and change the time.
DISCONNECTION OF THE TIMER
If you want to stop the timer before the programmed time is up
1 First select the hotplate and then press clock touch key ⏻ (10).
2 Use the touch key (4) to recude the time to 00. The clock is cancelled.
Alternative method :
After zone selection if timer touch key is pressed for two seconds, the related timer will be cancelled.
Safety switch off function
If due to an error one or several hot plates do not switch off, the appliance will be automatically disconnected after a set amount of time (see table 2).
Table 2
| Selected power level | MAXIMUM OPERATION TIME (in hours) |
| 1 | 10 |
| 2 | 5 |
| 3 | 5 |
| 4 | 4 |
| 5 | 3 |
| 6 | 2 |
| 7 | 2 |
| 8 | 2 |
| 9 | 1 |
that
When the "safety switch off" function has been triggered, a 0 is displayed if the glass surface temperature is not dangerous for the user or an H if there is a burn risk.
To reconnect the appliance, switch it off by pressing the on/off key (1) and then switch it on again.

Keep the control panel of the g areas clean and dry at all times.

In case of operating problems, incidents not mentioned in this usual, disconnect the appliance contact the TEKA technical ice.
Recommendation for the good use of vitroceramic hobs
* Use pots or pans with thick, completely flat bottoms.
* Pans with a smaller diameter than the shown heating area are not recommended.
* Do not slide pots and pans over the glass as they may scratch it.
* Although the glass can withstand knocks from large pots and pans without sharp edges, try not to knock it.
* To prevent damage to the ceramic glass induction surface, try not to slide the pots and pans over the glass, and keep the bottoms of the vessels clean and in good condition.

Try not to spill sugar or
EN
products containing sugar on the glass while the surface is hot as these could damage it.
Cleaning and maintenance
To keep the appliance in good condition, clean it using suitable products and implements once it has cooled down. This will make the job easier and avoid the build-up of dirt Never use harsh cleaning products or tools that could scratch the surface, or steam-operated equipment.
Light dirt not stuck to the surface can be cleaned using a damp cloth and a gentle detergent or warm soapy water. However, for deeper stains or grease use a special cleaner for ceramic hot plates and follow the instructions on the bottle. Dirt that is firmly stuck due to being burned repeatedly can be removed using a scraper with a blade. Slight tinges of colour are caused by pots and pans with dry grease residue underneath or due to grease between the glass and the pot during cooking. These can be removed using a nickel scourer with water or a special cleaner for ceramic hot plates. Plastic objects, sugar or food containing a lot of sugar that have melted onto the surface must be removed immediately using a scraper.
Metallic sheens are caused by dragging metal pots and pans over the glass. They can be removed by cleaning thoroughly using a special cleaner for ceramic glass hot plates, although you may need to repeat the cleaning process several times.
A pot or pan may become stuck to the glass due to a product having melt between them. Do not try to lift the pot while the hot plate is cold! This could cause the glass break.
Do not step on the glass or lean on it as it could break and cause injury. Do not use the glass as a surface for putting objects.
TEKA INDUSTRIAL S.A. reserves the right to make changes to its manuals that it deems necessary or useful, without affecting the product's essential features.
Environmental considerations

The symbol on the product or its packaging means that this pro cannot be treated ordinary household waste. This product must be taken to a recycling collection point for electrical and electronic appliances. By ensure that this product is disposed of correctly, you will harm the environment and public health, which could happen if this product is not handled properly. For more detailed information about recycling this product, please contact your local authority, household water service or the store where you purchased the product.
The packaging materials used are environmentally-friendly and can be recycled completely. Plastic components are marked >PE<, LD<, >EPS<, etc.
Dispose packaging materials, like household waste, in your local container.
If something does not work
Before calling the technical service, perform the verifications specified below.
The appliance does not work: Ensure that the power cable is plugged in.
The pot sticks to the glass: If there is molten material between the pot and the glass, set the hot plate to maximum power and try to separate them.
Single Sensor Error :
If any of the sensors is active more than 10 seconds, this error situation occurs and error code "F1" is showed. This error can be related with different defects. One of them is that there may be an object (fork, knife...) on the any of the sensor.
Make sure that there is no any object on the control unit, hob glass is wiped with a dry cloth. If error situation continue after void solution, please take out plug or switch off fuse switch for 10 second.
Plural Sensor Error:
If more than 2 sensors are sensed at same time, this error situation occurs and error code"F2" is displayed.
Potential root reasons of the problem :
- There may be an bebject(pot...) or water accumulation(overflow liquid edfrom pot...) that cover more
than 2 sensors
- Touch control location may exposure more heat or steam (from oven bottom of the hob...)
Please be sure that there is no any object on the sensors and switched off all steam and heat sources. Then, hob glass is wiped with a dry cloth. If error situation continue after this solution, please take out plug or switch off fuse switch for 10 second.
FC Error:
Fc message on the control and the hot plates switch off: Overheating in the electronics. Let thestove cool for a while.
DE
Multi-Sensor Failure:
Minimum distance to wall
Placering av hällen
Minimum ventilation distances
TBC 32010 BK TTC- TZC 32320 BK TTC
INSTALLATION MED LÅDA FÖR PANNOR, ELLER NEDRE SKÅP
Minimum distance to wall
Minimum ventilation distances
TBC 32010 BK TTC-
TZC 32320 BK TTC
Fitting holes
tunge vekter.
KJ∅RING MED DOBBEL BRENNER
Minimum distance to wall
Minimum ventilation distances
TBC 32010 BK TTC-
TZC 32320 BK TTC
Fitting holes
FI

TEKA Industrial A.S.
pidättää
itsellään oikeuden
muuttaa
natural_image
Pure technical line drawing of a mechanical component with no text or symbolsGarnitura de etansare
natural_image
Technical line drawing of a mechanical component with internal channels and mounting base (no text or symbols)Locking of the touch keys of the cooking hob
4 Immediately afterwards, enter a cooking time between 1 and tactic 99 minutes, by using the touch de keys sau + (5/4).
Minimum distance to wall

Minimum ventilation distances
TBC 32010 BK TTC-
TZC 32320 BK TTC
Fitting holes

The dimensions L and W are shown in the table "Dimensions and characteristics" of the Technical Information section.
NL

STARTEN VAN AUTOMATISCHE G E P R O G R A M M E E R D E K O O K F U N C T I E
GEDEACTIVEREN VAN AUTOMATISCHE G E P R O G R A M M E E R D E K O O K F U N C T I E
Country Subsidiary Address City Phone
| AustriaKüppersbusch Austria | Eitnergasse, 13 | 1231 Wien | +43 18 668 022 |
| BelgiumKüppersbusch Belgium S.P.R.L. | Doomveld Industrie, Asse 3, No. 11 - Boite 7 | 1731 Zellik | +32 24 668 740 |
| BulgariaTeka Bulgaria EOOD | Blvd. “Tsarigradsko Shosse” 135 | 1784 Sofia | +359 29 768 330 |
| ChileTeka Chile S.A. | Avd El Retiro Parque los Maitenes, 1237. Parque Enea | Pudahuel, Santiago de Chile | + 56 24 386 000 |
| ChinaTeka International Trading (Shanghai) Co. Ltd. | No.1506, Shengyuan Henghua Bldg. No.200 Wending Rd. | Xuhui, Dist. 200030 Shanghai | +86 2 153 076 996 |
| Czech RepublicTeka CZ S.R.O. | V Holesovickách, 593 | 182 00 Praha 8 - Liben | +420 284 691 940 |
| EcuadorTeka Ecuador S.A. | Parque Ind. California 2, Via a Daule Km 12 | Guayaquil | +593 42 100 311 |
| FranceTeka France | 30 rue Maubec 33000 | Bordeaux | + 05 57 80 60 03 |
| GreeceTeka Hellas A.E. | Thesi Roupaki - Aspropyrgos | 193 00 Athens | +30 2 109 760 283 |
| HungaryTeka Magyarország Zrt. | Terv u. 92 | 9200 Mosonmagyaróvár | +36 96 574 500 |
| IndonesiaPT Teka Buana | Jalan Menteng Raya, Kantor Taman A9 Unit A3 | 12950 Jakarta | +62 215 762 272 |
| MalaysiaTeka Küchentechnik (Malaysia) Sdn Bhd | 10 Jalan Kartunis U1/47, Temasya Park, Off Glenmarie | 40150 Shah Alam, Selangor Darul Ehsan | +60 376 201 600 |
| MexicoTeka Mexicana S.A. de C.V. | Blvd Manuel A. Camacho 126, Piso 3 Col. Chapultepec | 11000 Mexico D.F. | +52 5 551 330 493 |
| MoroccoTeka Maroc S.A. | 73, Bd. Slimane, Depôt 33, Route de Ain Sebaa | Casablanca | +212 22 674 462 |
| PeruTeka Küchentechnik Perú S.A. | Av. El Polo 670 local A 201, CC El polo, Surco | Lima | +51 14 363 078 |
| PolandTeka Polska Sp. ZO.O. | ul. 3-go Maja 8 / A2 | 05-800 Pruszkow | +48 227 383 270 |
| PortugalTeka Por tu gal S.A. | Estrada da Mota - Apdo 533 | 3834-909 Ilhavo, Aveiro | +35 1 234 329 500 |
| RomaniaS.C. Teka Küchentechnik Romania S.R.L. | Sevastopol str., no 24, 5th floor, of. 15 | 010992 Bucharest Sector 1 | +40 212 334 450 |
| Russia/PоссияTeka Rus LLC/OOO "Teka Pyc" | Neverovskogo 9, Office 417, 121170, Moscow, Russia | 121087 Россия, Москва | +7 4 956 450 064 |
| SingaporeTeka Singapore PTE Ltd | Clemenceau Avenue, 83, 01-33/34 UE Square | 239920 Singapore | +65 67 342 415 |
| SpainTeka Industrial, S.A. | C/ Cajo,17 | 39011 Santander | +34 942 355 050 |
| ThailandTeka (Thailand) Co. Ltd. | 364/8 Sri-Ayuttaya Road, Phayathai, Ratchatavee | 10400 Bangkok | +66 -26 424 888 |
| TurkeyTeka Teknik Mutfak Aletleri Sanayi Ve Tic A.S. | Levent Mah. Comert Sk. Yapı Kredi Bloklari Sit. C Blok Apt. No.1 C/32 | 34330 Besiktas, Istanbul | +90 2 122 883 134 |
| UkraineTeka Ukranie LLC | 86-e, Bozhenko Str .2nd floor,4th entrance | 03150 Kyiv | +380 444 960 680 |
| United Arab EmiratesTeka Middle East Fze | Building LOB 16, Office 417 | P.O. Box 18251 Dubai | +971 48 872 912 |
| United Arab EmiratesTeka Küchentechnik U.A.E LLC | Bin Khedia Centre | P.O. Box 35142 Dubai | +971 42 833 047 |
| VenezuelaTeka Andina S.A. | Ctra. Petare-Santa Lucia, km 3 (El Limoncito) | 1070 Caracas | +58 2 122 912 821 |
| VietnamTEKA Vietnam Co., Ltd. | 803, Fl 8th, Daiminh Convention Center, 77, Hoang Van | Thai, Tan Phu Ward, District 7, Ho Chi Minh | +84 854 160 646 |

TEKA