
TASSIMO TAS2005 - Coffee maker BOSCH - Free user manual and instructions
Find the device manual for free TASSIMO TAS2005 BOSCH in PDF.

| Product type | Capsule coffee maker |
| Brand | BOSCH |
| Model | TASSIMO TAS2005 |
| Dimensions (W x D x H) | Approx. 30 x 20 x 35 cm |
| Weight | Approx. 3 kg |
| Power supply | 220-240 V, 50/60 Hz |
| Power | 1500 W |
| Water tank capacity | 1.3 L |
| Capsule type | Exclusive T DISC |
| Main functions | Automatic barcode reading, one-touch preparation, beverage customization (intensity and volume), automatic shut-off |
| Indicator lights | Standby (orange), Automatic (green), Manual (green), Fill water (flashing red), Descale (red) |
| Cup support | Height-adjustable, removable |
| Safety | Automatic shut-off after 20 seconds, orange light for opening, do not open during brewing |
| Daily maintenance | Cleaning of the reading window, removable parts (T DISC holder, piercing crown, spout) dishwasher safe |
| Descaling | Automatic program with service T DISC, duration approx. 20 minutes |
| Available spare parts | Service T DISC, piercing crown, spout, front cover, cup support |
| Warranty | According to distributor's terms |
| After-sales service | Bosch, phone 09 69 39 29 39 (France) |
Frequently Asked Questions - TASSIMO TAS2005 BOSCH
User questions about TASSIMO TAS2005 BOSCH
0 question about this device. Answer the ones you know or ask your own.
Ask a new question about this device
Download the instructions for your Coffee maker in PDF format for free! Find your manual TASSIMO TAS2005 - BOSCH and take your electronic device back in hand. On this page are published all the documents necessary for the use of your device. TASSIMO TAS2005 by BOSCH.
USER MANUAL TASSIMO TAS2005 BOSCH
natural_image
Colorful abstract flower-like pattern with eight colored petals (no text or symbols)TQSSIMO
TAS 20xx
de Gebrauchsanleitung
en Instruction manual
fr Mode d'emploi
es Instrucciones de uso
pt Instruções de serviço
it Istruzioni per l'uso
sv Bruksanvisning
da Brugsanvisning
no Bruksanvisning
el Oδηγίες χρήσης
natural_image
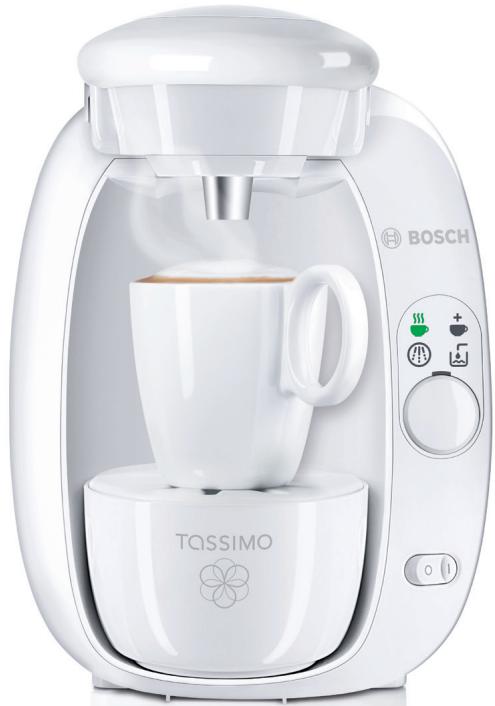
White Bosch coffee maker with Tassimo cup and coffee mug, no visible text or symbols on device body
BOSCH
de Gebrauchsanleitung......2
en Instruction manual....17
fr Mode d'emploi ....31
es Instrucciones de uso...... 46
pt Instruções de serviço 62
it Istruzioni per l'uso 77
SV Bruksanvisning....93
da Brugsanvisning.... 107
no Bruksanvisning....121
el Oδηγίες χρήσης.... 135
text_image
9c 9b 9d 9a 3a 3 max TASSIMO 3b 8 10 11 12 1 4b TASSIMO BOSCH 2 7 7b 7c 7e 7d 7a 4 5text_image
Diagram showing the installation of a Bosch air purifier with labeled components and directional arrows indicating process flow.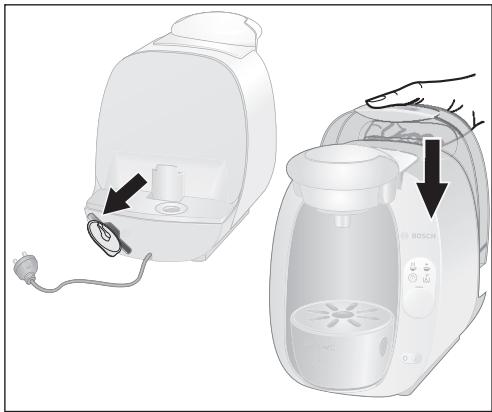
natural_image
Illustration of a Bosch washing machine with a hand operating the lid (no text or symbols visible)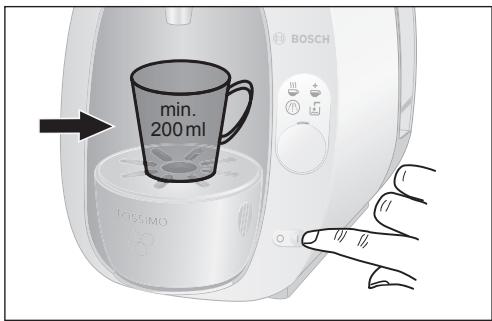
text_image
min. 200 ml BOSCH TOSSIMO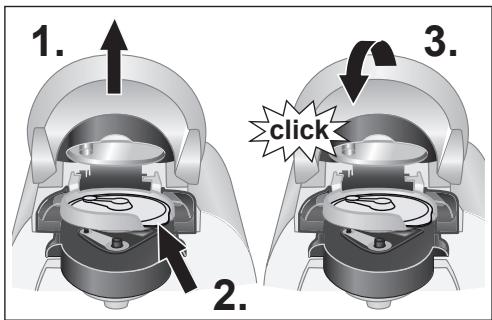
text_image
1. 2. 3. clicknatural_image
Diagram showing a device being processed from a motor, with a close-up view of the internal components (no text or symbols present)natural_image
Illustration of a hand pressing a button on a device with icons for heating, cooling, and water (no text or symbols)natural_image
Illustration of a remote control with icons for temperature, water, and heat (no text or symbols)7b
natural_image
Illustration of a computer mouse with icons for heating, cooling, and water usage (no text or symbols)7c
natural_image
Illustration of a remote control with icons for heating, cooling, and water use (no text or symbols)7d
natural_image
Illustration of a remote control with alarm icons and a magnifying glass (no text or symbols)7e
natural_image
Illustration of a remote control with icons for heating, cooking, and water (no text or symbols)Anzeigeelemente
7a Standby ⏻
natural_image
Illustration of a Bosch electric oven and its corresponding coffee maker with airflow arrows (no text or symbols)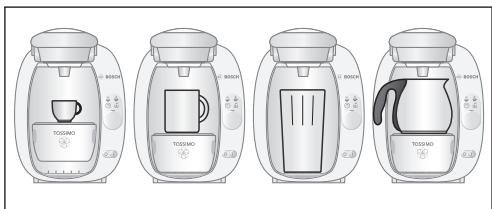
text_image
TOSOANO BOSOANO TOSOANO BOSOANO TOSOANO BOSOANOTassengröße
text_image
Diagram comparing a Bosch microwave oven with its base and its coffee maker, showing internal components and heat transfer arrows.text_image
Illustration showing various types of household appliances including a BOSCH electric kettle, a TOSIMO heater, and a box with a crossed-out box.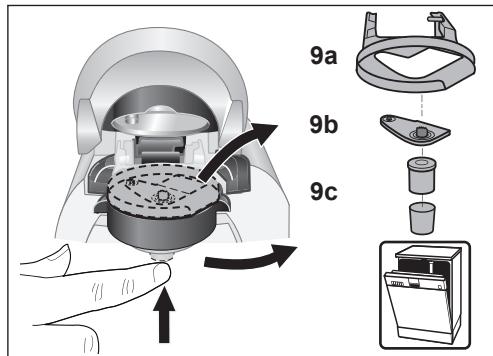
text_image
9a 9b 9cnatural_image
Diagram showing a device inside a chamber and its cable being inserted into a motor (no text or symbols present)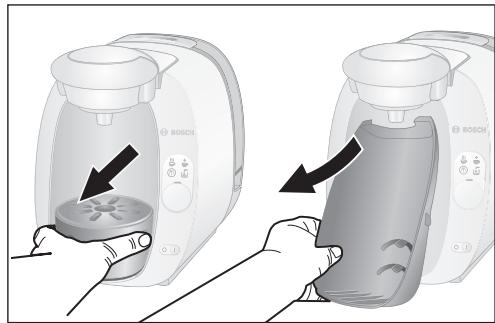
natural_image
Two-step illustration of a Bosch air fryer being opened, showing the lid and handle (no text or symbols present)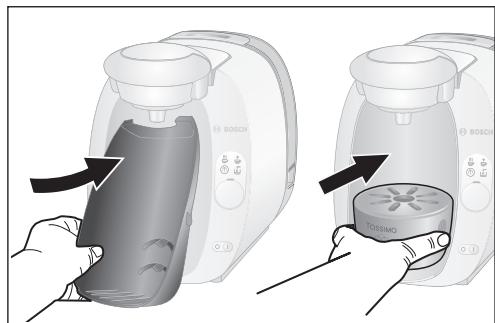
natural_image
Two-step illustration of a Bosch washing machine being placed on its side, showing the device's internal structure and handle (no text or symbols present)! Wichtig:
Thank you for choosing a TASSIMO machine. With TASSIMO, you can enjoy your favourite drink at any time. Aromatic coffee, strong espresso, tasty caffe crema, creamy cappuccino or latte macchiato, or even a cup of tea or hot chocolate: they're all waiting for you at the push of a button.
Your TASSIMO machine works exclusively with specially developed capsules known as TASSIMO T DISCs. When you insert the T DISC, the machine automatically reads the bar code printed on the label. This contains exact details of the amount of water needed, as well as the brewing time and temperature required to prepare the chosen beverage. T DISCs are specially designed for use with the TASSIMO brewing system and offer perfect enjoyment, cup after cup. To ensure long-term enjoyment, please only use the T DISCs specially developed for the TASSIMO machine.
Table of contents
Safety instructions.... 18
Your TASSIMO machine at a glance.... 19
First use of your TASSIMO machine...... 19
Controls and displays....21
Cup size 22
How to use your TASSIMO machine ..... 23
Maintenance and day to day care....25
Descaling 26
Interchangeable colour set....28
Disposal....28
Troubleshooting....29
Guarantee 152
TASSIMO careline.... 156
! Important:
- Please read this instruction manual and the short instructions carefully and keep for future reference.
Safety instructions
Risk of electric shock!
- This appliance is designed for preparation of small amounts of coffee for domestic use or for use in non-commercial, household-like environments, such as staff kitchens in shops, offices, agricultural and other small businesses or for use by guests at bed-and-breakfast establishments, small hotels and similar residential facilities.
- Connect and operate the appliance only in accordance with the specifications on the rating label situated on the base of the machine.
- Do not use your TASSIMO machine if either the power cord or appliance is damaged.
- Use indoors at room temperature only and not above 2000m sea level.
- Do not let children or persons with reduced mental or sensory abilities or limited knowledge and experience use the appliance, unless they are supervised or have been instructed in the use of the appliance by a person who is responsible for their safety.
- Keep children away from the appliance.
– Supervise children to ensure that they do not play with the appliance. - In the event of malfunction, unplug the appliance immediately.
- To avoid potential hazards, repairs such as replacing a damaged cord should only be performed by our service personnel.
- Never immerse the appliance or power cord in water.
Risk of scalding!
- Wait until the orange light lights up before opening the brewing unit.
- Never open the brewing unit during the brewing process.
- Please note that the beverages are very hot when dispensed.
Your TASSIMO machine at a glance
Before reading further, please open the folded diagram page at the start of the manual out to the left.
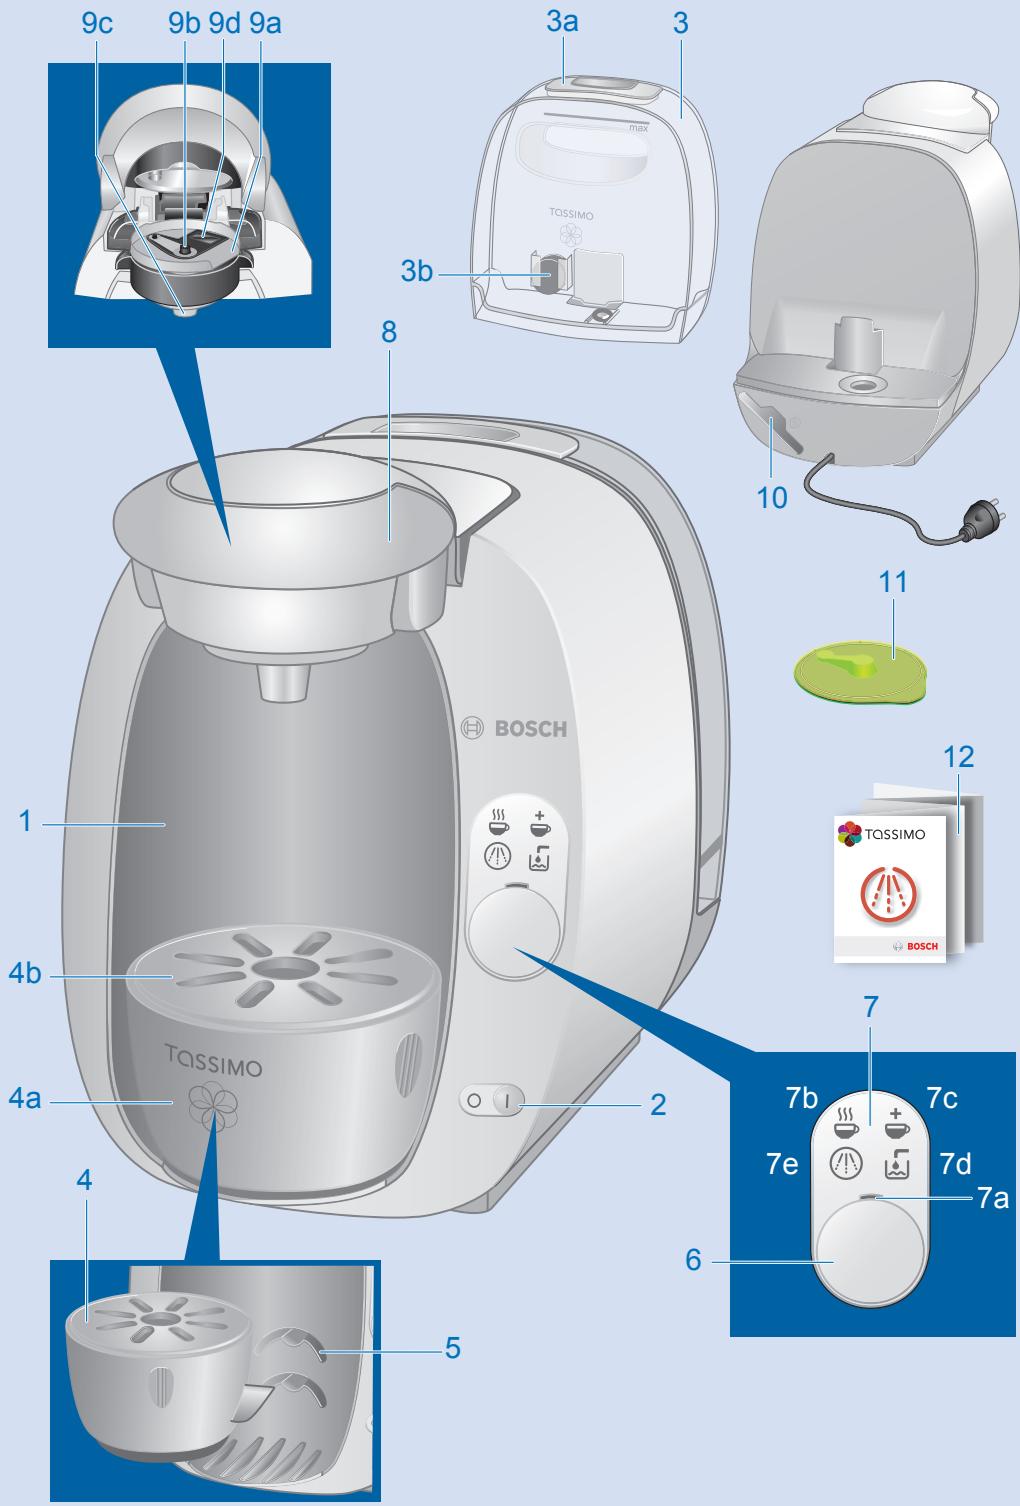
1 Back splash
2 On/off switch
3 Removable water tank
a Lid for water tank
b Float
4 Cup stand
a Drip tray
b Cup shelf
5 Height adjustment
6 Start/stop button
7 Indicator lights
a Stand-by ⏻
b Automatic 🌐
c Manual
d Fill tank
e Descale
text_image
Diagram showing the installation of a Bosch air purifier with labeled components and directional arrows indicating process flow.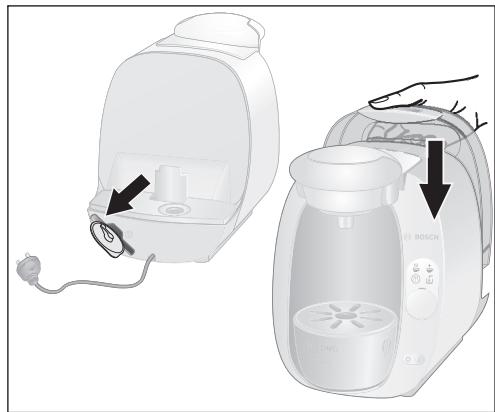
natural_image
Illustration of a Bosch electric oven with attached power plug and control panel (no text or symbols)8 Clamp
9 Brewing unit
a T DISC holder
b Piercing unit
c Drink outlet
d Bar code reading window
10 Storage compartment for Service T DISC and cleaning / descaling programme short instructions
11 Service T DISC
(For first use, cleaning and descaling)
12 Cleaning / descaling programme short instructions
i Note:
We recommend that you store the Service T DISC and the cleaning / descaling programme short instructions in the compartment provided at the back of the appliance (10).
First use of your TASSIMO machine
Before using your TASSIMO machine for the first time, please proceed as follows:
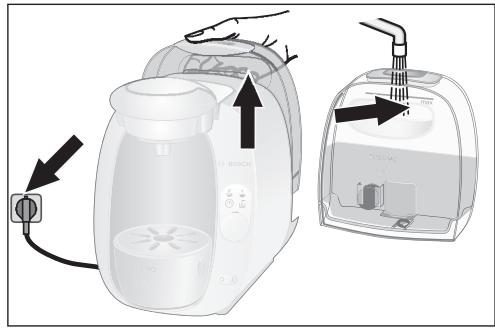
▶ Plug the power cord into the electrical socket.
▶ Remove and rinse the water tank thoroughly under running water, and fill it with cool fresh water up to the MAX mark.
▶ Now replace the water tank and push it firmly down into place.
text_image
min. 200 ml BOSCH TOSSIMO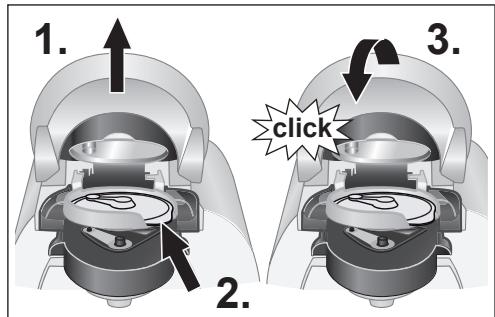
text_image
1. 2. 3. click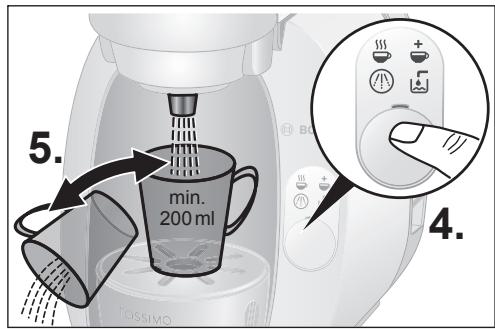
text_image
5. min. 200 ml 4.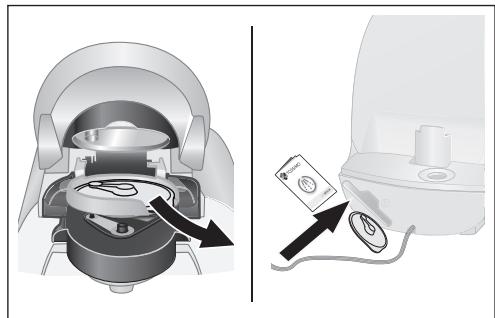
natural_image
Diagram showing a device being inserted into a motor (left) and then placed on a device with a cable (right), no text or symbols present.▶ Remove the Service T DISC from its compartment at the back of the appliance.
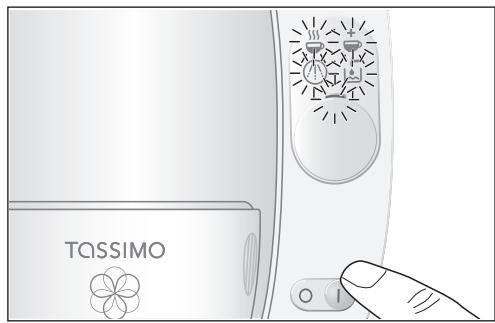
▶ Turn the on/off switch on (I).
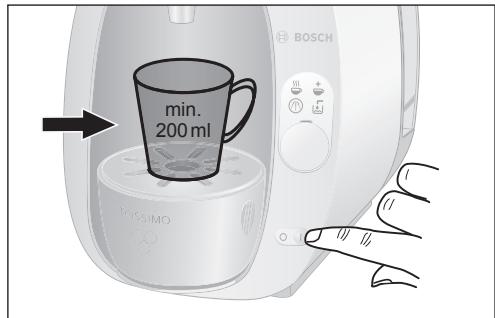
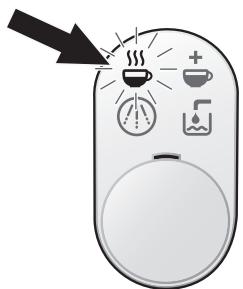
All display items will light up briefly and then ⏻ Stand-by stays lit.
▶ Select a large cup (min. 200 ml) and place it on the cup shelf.
▶ 1. Open the brewing unit by lifting the lid.
-
Place the Service T DISC on the T DISC holder with the barcode facing down. Make sure that the flap of the T DISC is secured in the slot to the right.
-
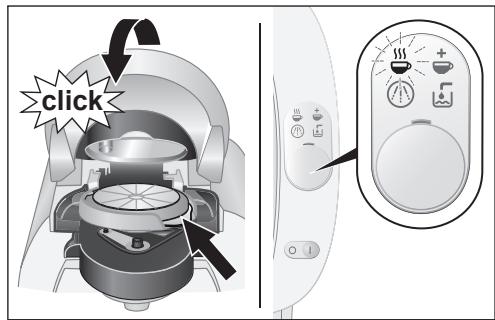
Now close the brewing unit by pushing the lid down firmly until it audibly clicks into place.
-
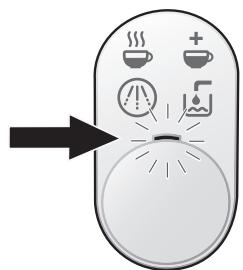
Press the start/stop button. The cleaning process starts and dispenses water into the cup.
-
When the process is complete, empty the cup and put it back on the cup stand.
! Important:
- Please complete steps 4 and 5 four times.
▶ Open the brewing unit, remove the Service T DISC and store it in the compartment at the back of the machine.
Your TASSIMO machine is now ready for use.
Controls and displays
text_image
TASSIMO
natural_image
Illustration of a hand pressing down on a control panel with icons for steam, coffee, and water (no text or symbols)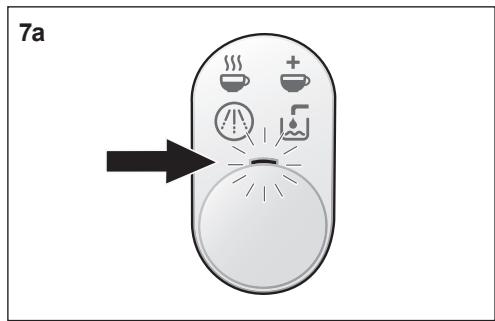
text_image
7a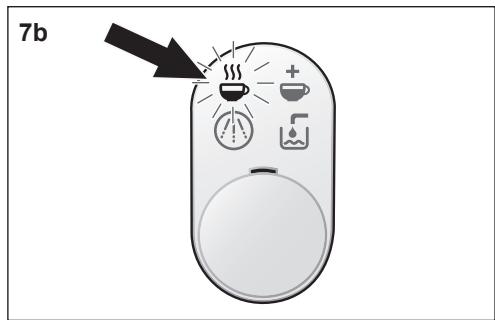
text_image
7bControls
Power switch
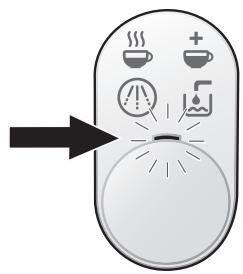
The on/off switch turns your TASSIMO machine on ⏻ Stand-by and off. When it is switched on, all 5 display items light up briefly. The stand-by light will then remain on until the appliance is in use.
i Note:
To save energy, the appliance should be switched off after each use.
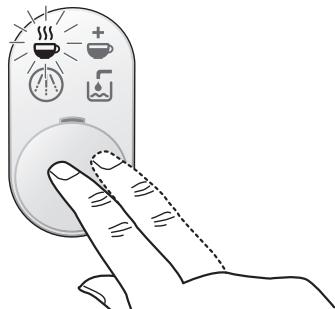
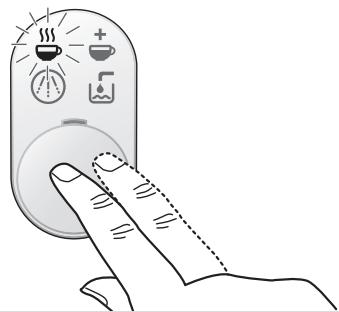
Start/stop button
Once the T DISC of your choice is properly secured in your TASSIMO machine, you may start brewing it by pressing the start/stop button. Press again to stop the brewing process early, in order to adjust the drink to your individual taste.
Display Items
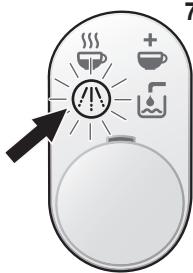
7a Stand-by ⏻
Stand-by icon lights up (orange) when the power switch is switched on. You can now open the brewing unit and remove the T DISC or insert a new one.
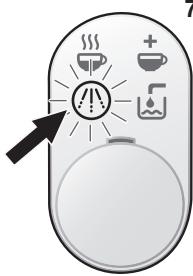
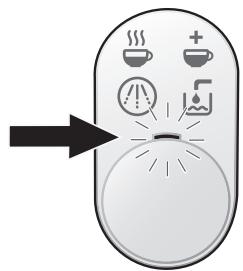
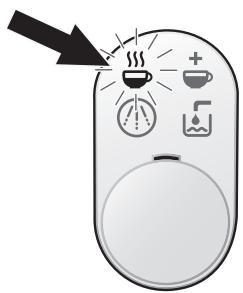
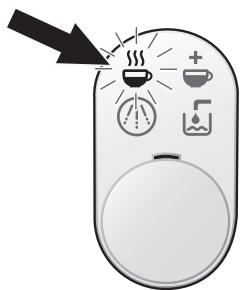
7b Automatic 🤒
Automatic icon lights up (green) when your TASSIMO machine is ready for use. Automatic icon will flash during a brew cycle after the start/stop button is pressed. Never open the brewing unit during the brewing process.
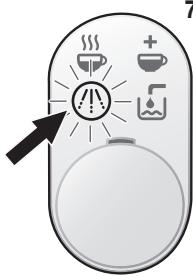
7c

natural_image
Illustration of a remote control with icons for heating, cooling, and alarm (no text or symbols)7d
natural_image
Illustration of a remote control with icons for temperature, steam, and alarm (no text or symbols)7e

natural_image
Illustration of a remote control with icons for heating, water, and alarm (no text or symbols)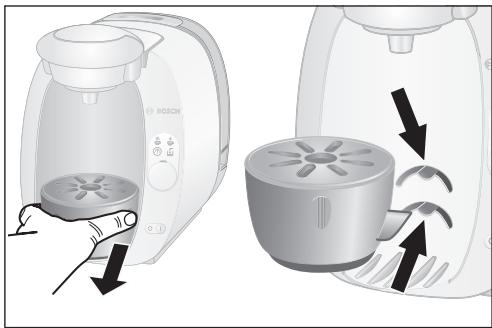
natural_image
Illustration of a Bosch electric oven and its side view showing internal components (no text or symbols)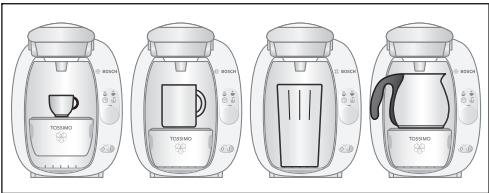
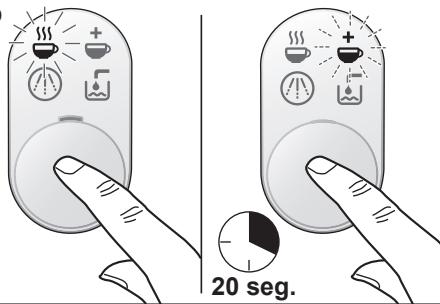
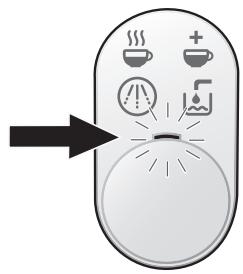
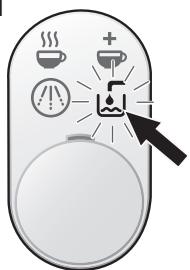
Manual icon lights up (green) when the brewing process is almost complete. If you press and hold the start/stop button within 20 seconds of the manual icon lighting up, you can extend the brewing process in order to adjust the strength of your drink. Using this manual operation will result in a milder tasting drink.
Manual icon flashes during this time. Never open the brewing unit during the brewing process.
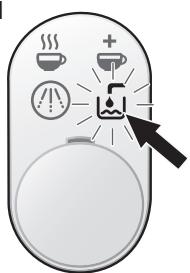
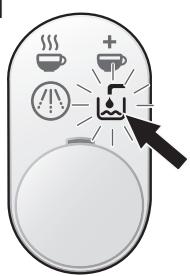
7d Fill tank
Fill tank icon flashes (red) when the removable water tank needs to be refilled. Remove the water tank, fill the water tank and replace it on your TASSIMO machine.
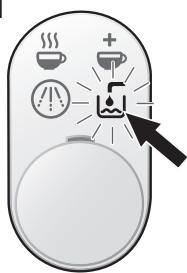
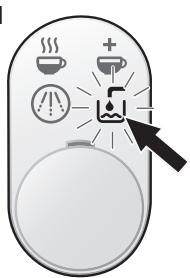
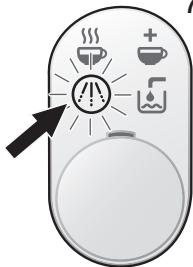
7e Descale
☑ Descale icon lights up (red) when your TASSIMO machine needs to be descaled. Descale your appliance in accordance with the instructions provided under “Descaling”.
Cup size
By adjusting the height of the cup stand, different sized cups and glasses can be used depending on your choice of drink. Use the default position for normal cups. You can adjust the cup stand for smaller cups (e.g. espresso cups) by pulling the cup stand up and out and replacing it into the higher slot on the back splash.
Note:
For large cups or glasses, the cup stand can be removed completely. To avoid overflowing, select the appropriate cup size for each type of drink. The respective cup size is printed on the T DISC wrapper.
How to use your TASSIMO machine
! Important:
- For optimum results, fill the tank only with cool, fresh, non-carbonated water each day. Do not use chemically softened water.
Your TASSIMO machine is ready for use. When ready, the ⏻ Stand-by icon is lit.
text_image
click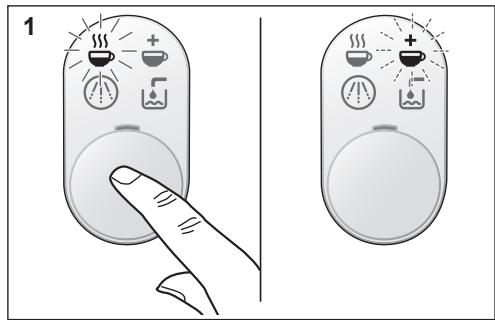
text_image
1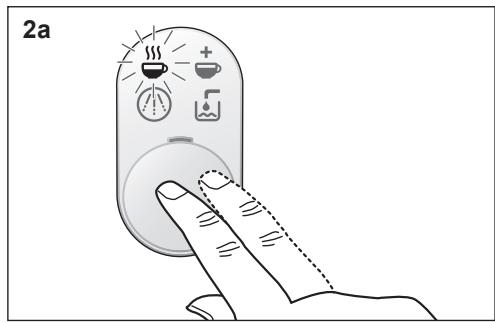
text_image
2a▶ Place a suitable cup on the stand according to the type of drink required. Make sure the distance between the top of the cup and the brewing unit is small to avoid spattering.
▶ Open the brewing unit by lifting the lid.
▶ Select a T DISC and insert it in the T DISC holder with the printed side down. Make sure that the flap of the T DISC is secured in the slot to the right.
▶ Close the brewing unit by pushing the lid down firmly until it clicks into place.
Stand-by flashes while the machine reads the barcode.
Automatic icon lights up (green) when your TASSIMO machine is ready to brew your drink.
Your TASSIMO machine is designed to make the optimal drink every time. It automatically brews your favourite drink, however you can also customise your beverage with TASSIMO following the process below.
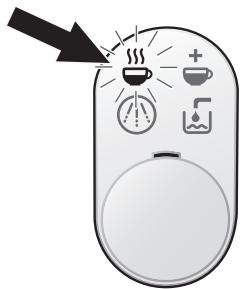
1. Automatic:
Start the brewing process by pressing the start/stop button. 🎨 Automatic icon will flash. When the automatic brewing process is complete, the ✕ Manual icon lights up. Your drink has been brewed for optimum flavour according to predefined settings.
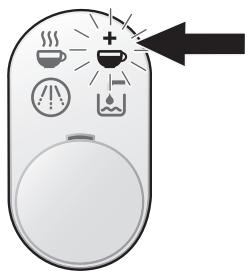
2. Customised (manual operation):
a For a stronger taste and a smaller drink: Start the brewing process by pressing the start/stop button. Automatic icon will flash. Press the start/stop button at any stage during the brewing process to stop the process early and adjust the drink to your individual taste. Your drink is now ready. Manual icon lights up for 20 sec.
2b
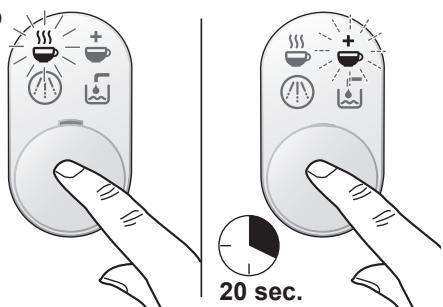
text_image
20 sec.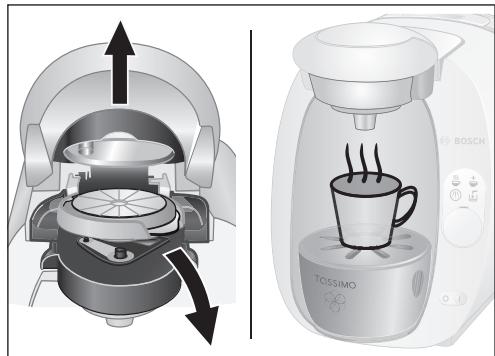
natural_image
Illustration of a Bosch coffee maker with its side view showing its internal processing process (no text or symbols present)
Risk of scalding!
- Wait until the orange light lights up before opening the brewing unit.
- Never open the brewing unit during the brewing process.
- Please note that the beverages are very hot when dispensed.
T DISC storage
T DISCs may be stored in their own packaging or in other containers of your choice. They should be stored in a cool, dry place. It is not necessary to store T DISCs in the refrigerator. Do not keep them in the freezer. Provided the outer packaging is intact, T DISCs may be used until the Best Before date provided. The Best Before date is printed on the T DISC foil wrapper. Otherwise use the T DISCs within six weeks.
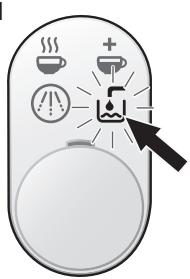
b For a milder flavour and a larger drink: Start the brewing process by pressing the start/stop button.
Automatic icon flashes. When the automatic brewing process is complete, Manual icon lights up. If you press and hold the start/stop button within 20 seconds, you can extend the brewing process to get your desired drink strength.
Your drink is now ready.
▶ 20 seconds after the end of each brewing process, your TASSIMO machine returns to stand-by mode.
▶ Do not open the brewing unit before the ⏻ stand-by icon lights up. The T DISC can then be removed. Now you can sit back and enjoy your hot drink. If you wish, you can prepare the next drink immediately.
▶ If you do not wish to prepare more drinks, we recommend that you turn off your TASSIMO machine using the on/off switch.
i Note:
- There may be short pauses during the brewing process. This is so the drink flavour is optimised.
- Always remove the used T DISC after the brewing process. Be careful and hold it by the flap because the T DISC is hot after brewing your drink. When removing the T DISC, quickly flip it over so that the printed side is face up to avoid any dripping.
Maintenance and day to day care
Risk of electric shock!
- Switch off and unplug the appliance before cleaning.
– Never immerse the appliance in water. - Do not use a steam cleaner.
text_image
BOSCH TOISSIMO 9d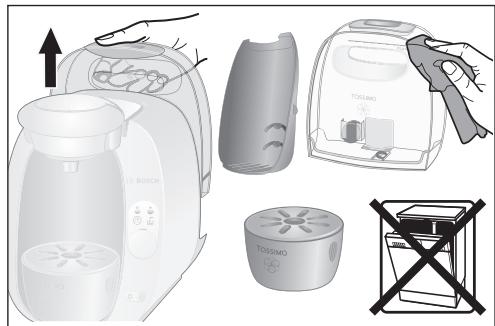
text_image
Illustration showing various household appliances including a Bosch blender, Tin Kosovo blender, and a TOSIMO water heater with a warning box.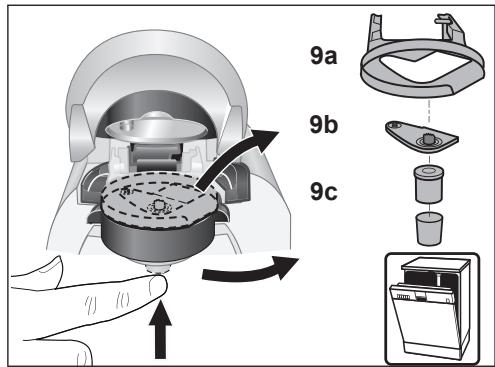
text_image
9a 9b 9cClean your TASSIMO machine regularly to ensure that it continues to produce the optimal quality drinks. If the appliance has been unused for a long time, always run the cleaning process with the Service T DISC several times to ensure that the drinks it produces are of its normal high quality (see "First use of your TASSIMO machine"). Do not use scouring agents or steam cleaners.
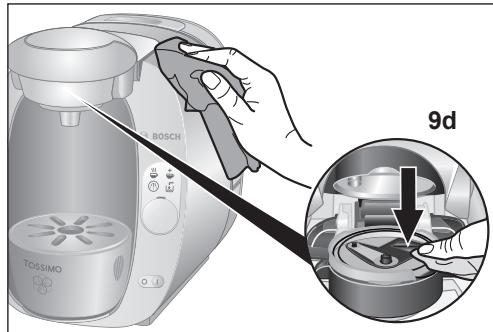
▶ Clean the barcode scanner regularly (9d) with a soft, damp cloth, so that the TASSIMO machine can scan the barcode on the T DISC properly.
▶ Wipe the outside of the appliance with a soft, damp cloth.
▶ Rinse out the water tank, the back splash and all parts of the cup stand by hand and with water only, and do not place them in the dishwasher.
▶ Remove the T DISC holder (9a), the piercing unit (9b) and the drink outlet (9c) and clean thoroughly. All these parts can also be cleaned in the dishwasher. When preparing a number of drinks one after another, the piercing unit may be manually cleaned quickly and easily under running water.
▶ We recommend that you clean the brewing unit regularly using the Service T DISC as described under “First use of your TASSIMO machine”.
Attention:
- Piercing unit can be very hot immediately after brewing.
- Clean the back panel by hand only and do not place it in the dishwasher.
! Important:
- After use, we recommend that the Service T DISC be stored in its compartment at the back of the appliance (10).
i Note:
After dispensing a milky drink or hot chocolate drink, we recommend that you first clean the piercing unit and then the brewing unit using the Service T DISC before making another drink.
Descaling
Your TASSIMO machine has an automatic descaling programme. If Ⓐ Descale icon lights up while the appliance is on, the descaling programme must be run immediately. If the descaling process is not run as instructed, the appliance may become damaged.
! Important:
- If you have very hard water, notice an unusual amount of steam or if the beverage volume is not what it should be, descale the machine before the Descale icon lights up.
Special descaling agents can be obtained from www.tassimo.com, the Bosch customer service department (article no. 310967, for contact details, see page 154) or from your retailer.
i Note:
- Never interrupt the descaling programme.
- Do not drink the liquids.
- Never use vinegar or vinegar-based products.
text_image
11 BOSC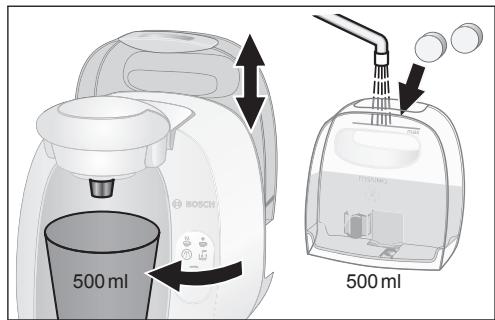
text_image
BOSCH 500 ml 500 mlRunning the descaling programme
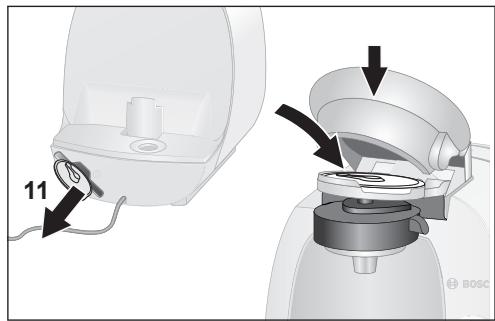
▶ Remove the water tank from your TASSIMO machine and take the Service T DISC out (11). Insert it in the brewing unit with the barcode face down, and close the clamp down firmly.
- Fill the water tank up to the descaling mark (0,5l) and add the descaling agent in accordance with the manufacturer's instructions.
Note:
If you have hard water, increase the amount of the descaling agent.
▶ Now replace the water tank and push it firmly down into place.
▶ Remove the cup stand and place a suitable container (min. 500 ml capacity) under the drink outlet.
text_image
approx. 20 min. 5 sec. 500 ml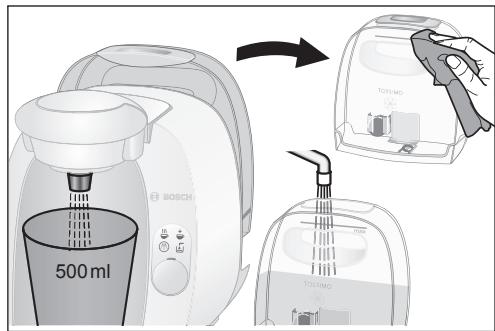
text_image
BOSCH 500 ml TOSIMO TOSIMO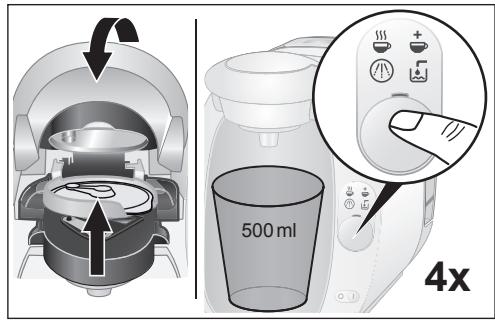
text_image
500 ml 4x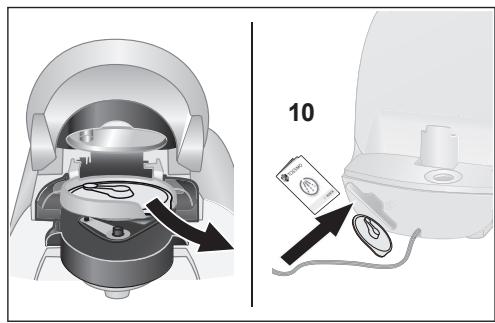
text_image
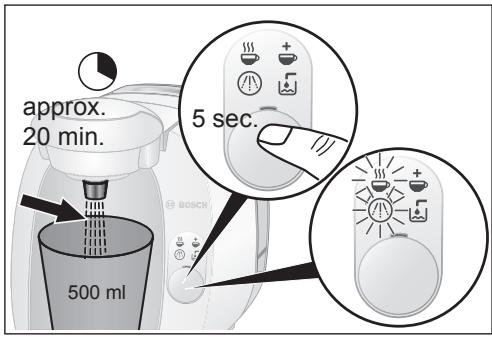
Diagram illustrating a device operation with labeled components and directional arrows, including a numbered step '10'▶ Press and hold the start/stop button for at least 5 seconds to start the descaling programme.
The programme now proceeds automatically and ⏻ Descale and 🕒 Automatic icons flash. (Duration approx. 20 minutes). The descaling solution is pumped through the appliance at intervals and then runs into the container until the water tank is almost empty. A little liquid is always left in the tank.
▶ Stand-by icon lights up after approx. 20 minutes of running descaling programme.
▶ Empty the container and replace it under the drink outlet.
▶ Rinse the water tank thoroughly and fill up to the MAX mark with fresh water.
▶ Replace it back onto your TASSIMO machine.
▶ Open and close the brewing unit keeping the Service T DISC in place on the T DISC holder and press the start/stop button. The machine will rinse itself. Repeat this step four times. The descaling process is complete.
▶ Now open the brewing unit, remove the Service T DISC and store it in the compartment at the back of the machine (10).
▶ Your TASSIMO machine is ready for use again.
natural_image
Illustration of a Bosch air conditioner being placed on its side, showing the lid and handle (no text or symbols present)
text_image
BOSCH TOSIMOInterchangeable colour set
You have the option of purchasing the cup stand and back panel in a range of colours from the Bosch customer service department (for contact details, see page 154) or from your retailer.
To switch the interchangeable colour set:
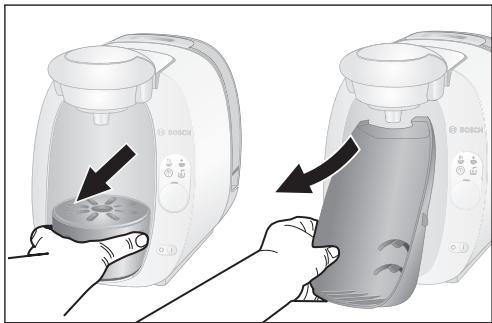
▶ First remove the cup stand.
▶ Grasp the back panel by the rounded part at the bottom and pull it out.
▶ Take the new back panel, again holding it by the rounded part, and position it in the appliance by the two indentations at the top.
▶ Now insert the new cup stand.
Disposal

This appliance is labelled in accordance with the European Directive 2002/96/EG relating to waste electrical and electronic equipment – WEEE. The directive provides the framework for the EU-wide take-back and disposal of end-of-life appliances. Please ask your retailer about current disposal facilities.
All rights reserved.
! Important:
- Bosch only manufactures the TASSIMO brewer. It therefore does not guarantee the availability of TASSIMO T DISCs.
- To find out where to purchase beverage T DISCs go to www.tassimo.com
Troubleshooting
The following table provides solutions for problems and glitches that may arise as you use your TASSIMO machine. If you do not find a solution for your specific problem, or the problem persists after troubleshooting please contact our customer service department
| Problem | Possible cause | Solution |
| Appliance not working; no symbols light up. | There is no power supply. | Check that the appliance is properly plugged into the power supply. |
| Machine brews but no drink dispensed. | The water tank was removed during the brewing process or there is air in the system. | Replace the water tank in the appropriate position in your TASSIMO machine. Start a cleaning process with the Service T DISC. |
| The float in the water tank is stuck. | Clean the water tank and ensure the float can move. | |
| Automatic mode not working, appliance remains in stand-by mode. | No T DISC inserted. | Check if T DISC has been inserted. |
| The barcode could not be detected. | Clean the bar code reading window and try again or smooth the barcode on the T DISC out with your thumb. | |
| Use another T DISC. | ||
| If problems persist contact the TASSIMO careline. | ||
| Automatic mode skipped, appliance goes straight to Manual mode. | The barcode could not be detected. | Clean the bar code reading window. |
| Use another T DISC. | ||
| You can still prepare the drink by holding down the start/stop button. | ||
| The quality of the crema has deteriorated. | The drink outlet is clogged or dirty. | Remove the drink outlet from the brewing unit and detach the piercing unit. After cleaning everything thoroughly, reassemble the parts and replace them in the brewing unit. |
More Customer Service information is available online at www.tassimo.com
| Problem | Possible cause | Solution |
| Brewing unit cannot be securely closed. | Piercing unit / T DISC holder is not properly inserted. | Insert the T DISC holder and piercing unit properly. |
| The T DISC is not inserted properly. | Re-insert the T DISC and make sure it is properly positioned. | |
| The brewing unit is not properly closed. | Push the clamp down firmly until it audibly clicks into place. | |
| Water dripping from the brewing unit. | The T DISC is damaged or leaky. | Stop the brewing process, remove the T DISC and clean the brewing unit. |
| The piercing unit is either not inserted or not inserted properly. | Check to ensure that the piercing unit is inserted properly. | |
| Water on the surface under the cup stand. | Water from condensation. | Condensation may occur and is not a fault. Remove it by wiping with a cloth. |
| Service T DISC is damaged or lost. | The Service T DISC must always be used for cleaning and descaling processes. | Look for the Service T DISC in the storage compartment at the back of the appliance. |
| The Service T DISC can be obtained from the Bosch customer service department (article no. 611632, for contact details, see page 154). | ||
| “Fill tank” lights up even though there is sufficient water in the tank. | The float in the water tank is stuck. | Clean the water tank and ensure that the float can move. |
| 7d and 7e are flashing simultaneously and it is not possible to prepare drinks. | There is a fault on the machine. | Turn the machine off using the on/off switch, wait approximately 5 minutes and turn the machine back on. If 7d and 7e are still flashing, please contact the TASSIMO careline. 0800 0328833 (UK only). |
| “Descale” flashes even though you are using soft water. | Even soft water contains small amounts of dissolved lime. | Descale the appliance. Special descaling agents can be obtained from www.tassimo.com, the Bosch customer service department (article no. 310967, for contact details, see page 154) or from your retailer. |
More Customer Service information is available online at www.tassimo.com
text_image
Diagram showing the installation of a Bosch air purifier with labeled components and directional arrows indicating process flow.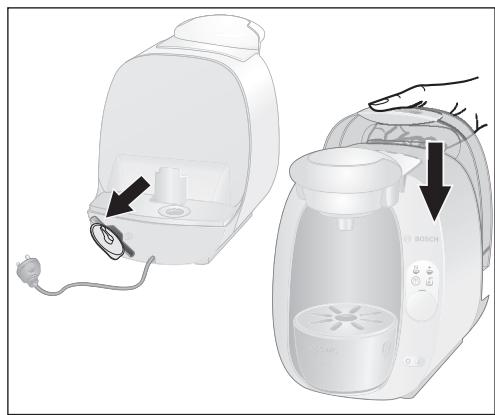
natural_image
Illustration of a Bosch electric oven with a hand inserting a plug into it (no text or symbols present)natural_image
Diagram showing a gas stove interior and its electrical outlet with a close-up of its device (no text or symbols present)natural_image
Illustration of a hand pressing a button on a device control panel with icons (no text or symbols)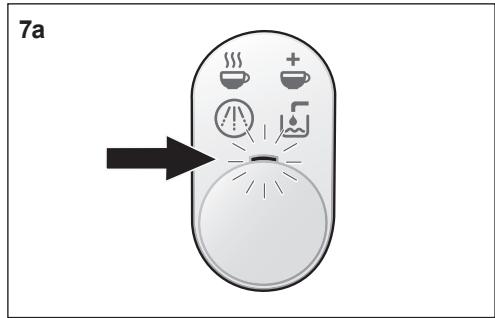
text_image
7a
text_image
7bnatural_image
Illustration of a remote control with icons for heating, alarm, and water (no text or symbols)7d
natural_image
Illustration of a computer mouse with icons for heating, cooling, and alarm (no text or symbols)7e

natural_image
Illustration of a remote control with icons for heating, water, and alarm (no text or symbols)7c Manuel
natural_image
Illustration of a Bosch electric oven and its side view showing the process of cooling air (no text or symbols present)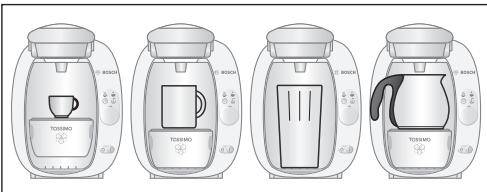
text_image
Illustration of four different types of Japanese food cookers with labeled designs and control buttons.Taille de la tasse
text_image
2b 20 sec.
natural_image
Illustration of a Bosch toaster oven and its corresponding Toissimo coffee maker with steam rising (no text or symbols)text_image
Illustration showing various types of kitchen appliances including a Bosch blender, a Tissimo blender, and a toaster with a crossed-out box.natural_image
Two-step illustration of a Bosch air fryer being opened, showing the lid and handle (no text or symbols present)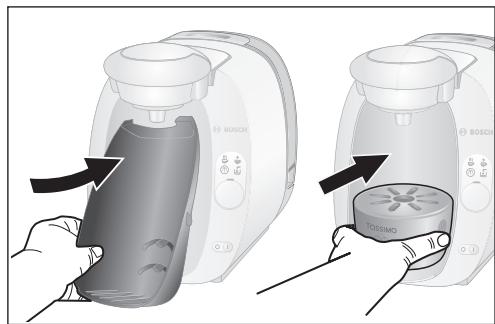
text_image
BOSCH TOSIMOKit Couleur
text_image
Diagram showing the installation of a Bosch air purifier with labeled components and directional arrows indicating process flow.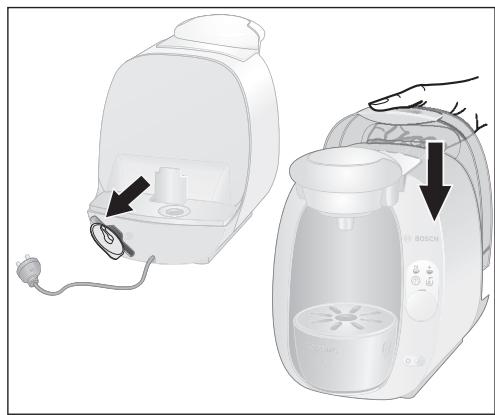
natural_image
Illustration of a Bosch electric oven with a hand inserting a plug into the lid (no text or symbols present)natural_image
Diagram showing a device inside a microwave oven and its internal components with a close-up view of the lid (no text or symbols present)natural_image
Illustration of a hand pressing a button on a device control panel with icons (no text or symbols)7a
text_image
Diagram of a remote control with icons for heating, cooling, and water usage, showing a directional arrow pointing to the button.7b
natural_image
Illustration of a computer mouse with icons for heating, cooling, and water usage (no text or symbols)Controles
Interruptor principal
natural_image
Illustration of a remote control with icons for heating, cooling, and water use (no text or symbols)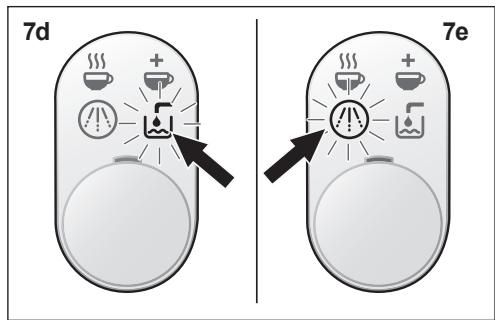
text_image
7d 7e7c + Manual
natural_image
Illustration of a Bosch electric oven and its base appliance with directional arrows indicating process flow (no text or symbols)Tamaño de la taza
text_image
Diagram showing a hand pointing at a control panel with icons for heating, cooling, and water usage, alongside a separate view of the same device.2a
natural_image
Illustration of a hand pressing a button on a remote control with icons for heating, cooking, and water (no text or symbols)2b
text_image
20 seg.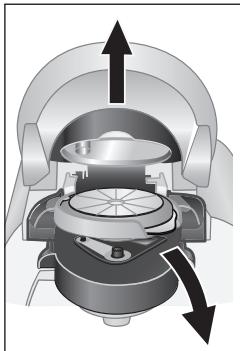
natural_image
Cross-sectional diagram of a mechanical device showing internal components and directional arrows (no text or labels)
natural_image
Illustration of a Bosch coffee maker with a steaming cup and control panel (no text or symbols)1. Automático:
text_image
Illustration showing various household appliances including a blender, blender, and toaster with accompanying safety symbols.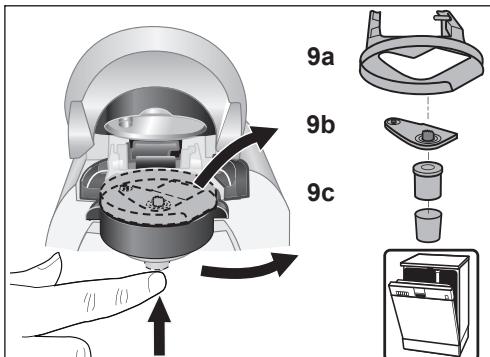
text_image
9a 9b 9cnatural_image
Illustration of a Bosch air conditioner being placed on its side, showing the lid and handle (no text or symbols present)
text_image
BOSCH TOSIMOAccesorios de color
text_image
Diagram showing the installation of a Bosch air purifier with labeled components and directional arrows indicating process flow.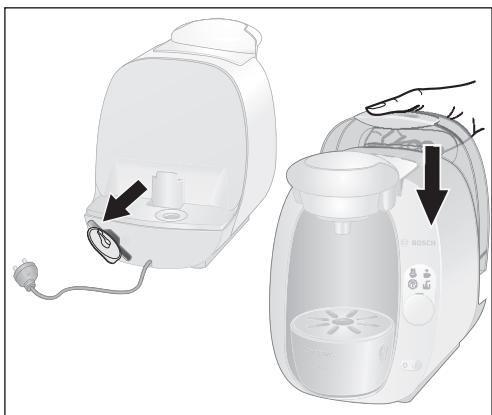
natural_image
Illustration of a Bosch washing machine with a hand inserting a plug into it (no text or symbols present)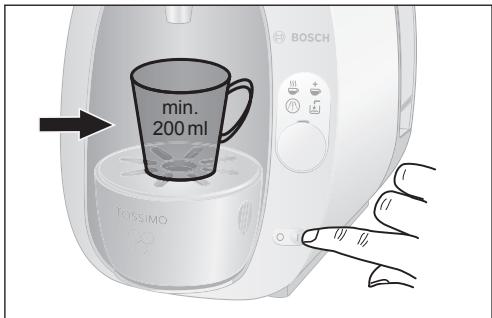
text_image
min. 200 ml BOSCH Toissimo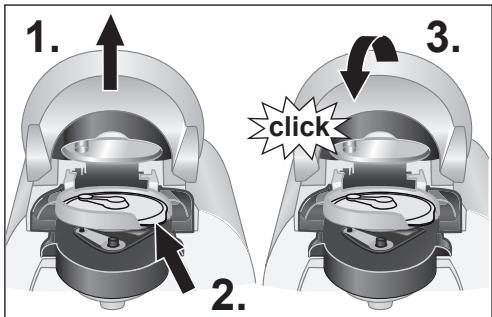
text_image
1. 2. 3. clicknatural_image
Diagram showing a device inside a chamber and its electrical connection to a device (no text or symbols present)natural_image
Illustration of a hand pressing down on a control panel with icons for steam, coffee, and water (no text or symbols)natural_image
Illustration of a remote control with icons for temperature, water, and heat (no text or symbols)7b

natural_image
Illustration of a computer mouse with icons for heating, cooling, and water usage (no text or symbols)7c

natural_image
Illustration of a remote control with icons for heating, cooling, and water use (no text or symbols)7d

natural_image
Illustration of a remote control with icons for temperature, alarm, and warning symbols (no text or labels)7e

natural_image
Illustration of a remote control with icons for heating, cooling, and water usage (no text or symbols)Indicadores
7a Standby ⏻
natural_image
Illustration of a Bosch electric oven and its analog microwave oven with directional arrows indicating process flow (no text or symbols)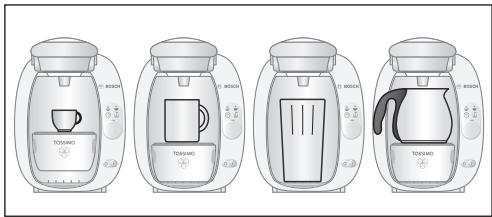
text_image
TOSBANO TOSBANO TOSBANO TOSBANOTamanho da chávena
text_image
Diagram comparing a Bosch microwave oven with its base and its coffee maker, showing internal components and heat transfer arrows.⚠️ Perigo de escaldar!
Guardar as cápsulas T DISC
text_image
Illustration showing various household appliances including a toaster, blender, and dishwasher with Chinese labels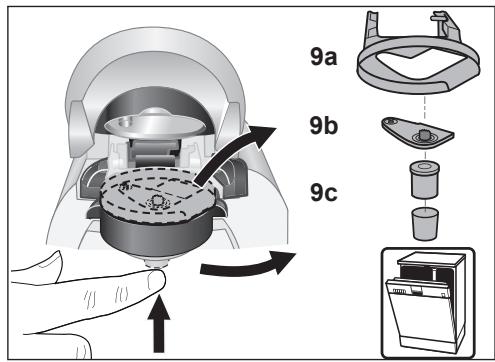
text_image
9a 9b 9ctext_image
Diagram illustrating a device operation with labeled parts and directional arrows, including a card and cable connection.natural_image
Illustration of a Bosch air fryer being opened into a bottle, showing the lid and handle (no text or symbols present)
text_image
BOSCH TOSIMOtext_image
Diagram showing hand operating a Bosch air purifier with labeled components and directional arrows indicating process flow.
natural_image
Illustration of a Bosch washing machine with a hand operating the lid (no text or symbols present)natural_image
Diagram showing a device being placed on top of a motor or scanner, with an arrow indicating motion direction (no text or symbols present)natural_image
Illustration of a hand pressing a button on a device with icons for heating, cooling, and water (no text or symbols)7a
natural_image
Illustration of a remote control with icons for temperature, humidity, and water (no text or symbols)7b
natural_image
Illustration of a computer mouse with icons for heating, cooling, and water usage (no text or symbols)Elementi di comando
Interruttore on/off
natural_image
Illustration of a remote control with icons for heating, cooling, and water (no text or symbols)7d
natural_image
Illustration of a computer mouse with icons for temperature, heat, and alarm (no text or symbols)7e
natural_image
Illustration of a remote control with icons for heating, water, and alarm (no text or symbols)7c Manuale

natural_image
Illustration of a Bosch electric oven and its corresponding power cord device (no text or symbols present)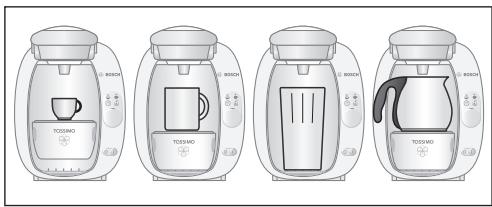
text_image
TOSBMO TOSBMO TOSBMO TOSBMO TOSBMOtext_image
2b 20 sec.
text_image
Diagram comparing a Bosch toaster with its standard model to illustrate the heat transfer process.text_image
Illustration showing various household appliances including a blender, blender, and TOSSMO device with accompanying safety symbols.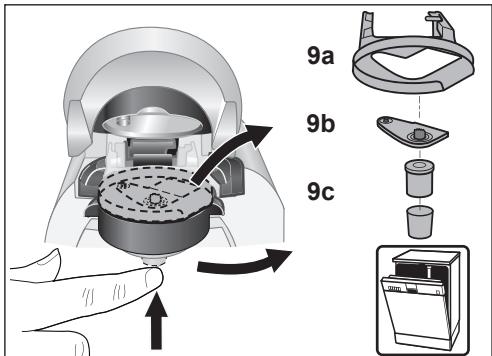
text_image
9a 9b 9ctext_image
ca. 20 Min. 5 sec. 500 ml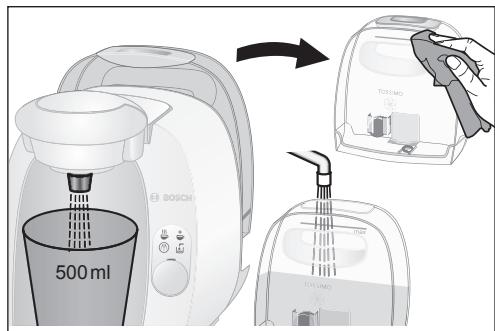
text_image
BOSCH 500 ml TOSIMO TOSIMO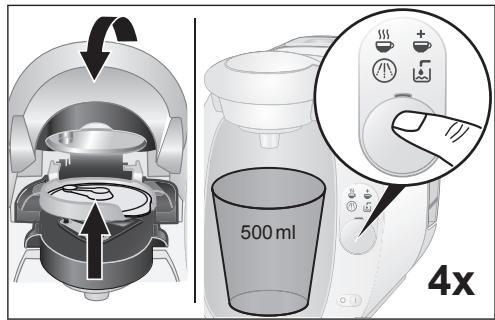
text_image
500 ml 4x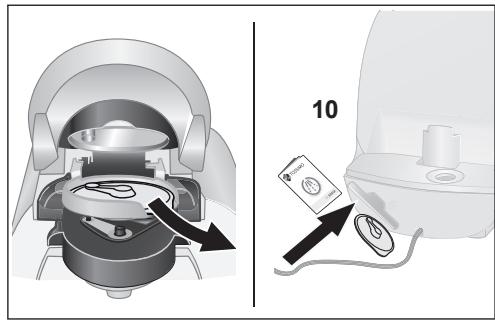
text_image
Diagram illustrating a device operation with labeled parts and directional arrows, including a card and plug.natural_image
Illustration of a Bosch air fryer being opened into a bottle, showing the lid and handle (no text or symbols present)
text_image
Diagram showing two steps of a Bosch washing machine, one being filled with liquid and the other holding a Tossimo brand.! Importante:
text_image
Diagram showing a hand inserting a Bosch air conditioner into a second-order washing machine, with Chinese labels indicating component placement.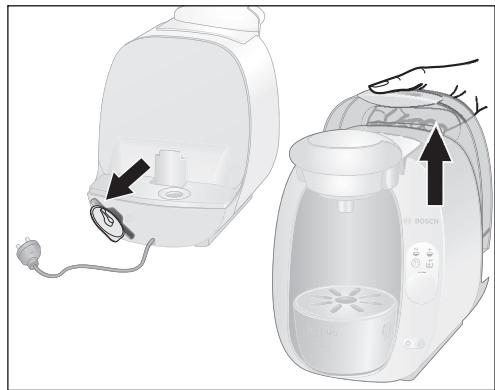
natural_image
Illustration of a Bosch washing machine with a hand operating the lid (no text or symbols visible)natural_image
Diagram showing a device being placed on top of a motor, with an arrow indicating the motion direction (no text or symbols present)natural_image
Illustration of a hand pressing down on a control panel with icons for steam, coffee, and water (no text or symbols)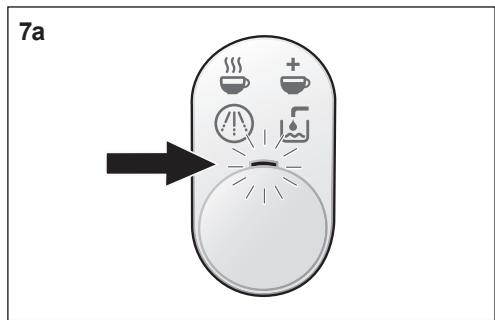
text_image
7a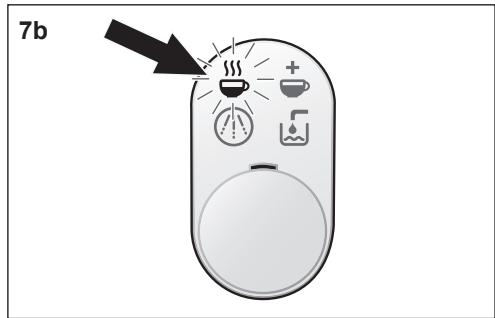
text_image
7bReglage
Strömbrytare
natural_image
Illustration of a remote control with icons for heating, alarm, and water (no text or symbols)7d

natural_image
Illustration of a computer mouse with icons for heating, cooling, and alarm (no text or symbols)7e

natural_image
Illustration of a remote control with icons for heating, water, and alarm (no text or symbols)7c Manuell
natural_image
Illustration of a Bosch air fryer and its side view showing the interior components (no text or symbols)
text_image
TOSMO TOSMO TOSMO TOSMOKoppstorlek
natural_image
Cross-sectional diagram of a mechanical device showing internal components and directional arrows (no text or labels)
natural_image
Illustration of a Bosch coffee maker with a steaming cup inside (no text or symbols on the device itself)
Risk för skållning!
text_image
Illustration showing various household appliances including a toaster, blender, and TOSSEMO device with warning symbols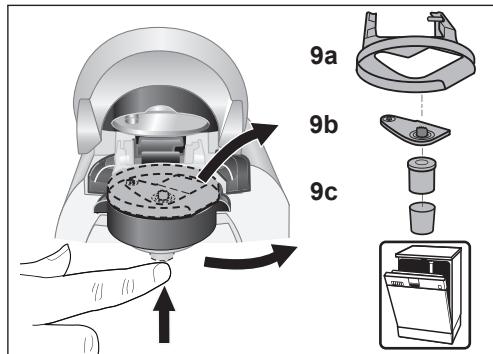
text_image
9a 9b 9cnatural_image
Two-step illustration of a Bosch washing machine, showing hand positioning and cooling process (no text or symbols)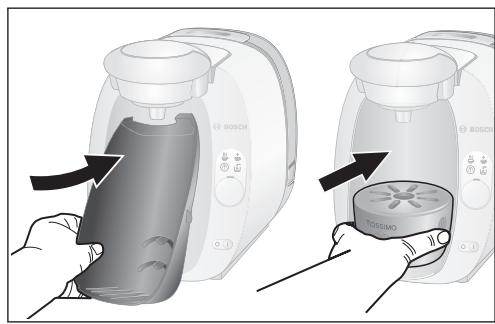
natural_image
Two-step illustration of a Bosch air purifier being placed on its side, showing internal components and airflow direction (no text or symbols)text_image
Diagram showing the installation of a Bosch air purifier with labeled components and directional arrows indicating process flow.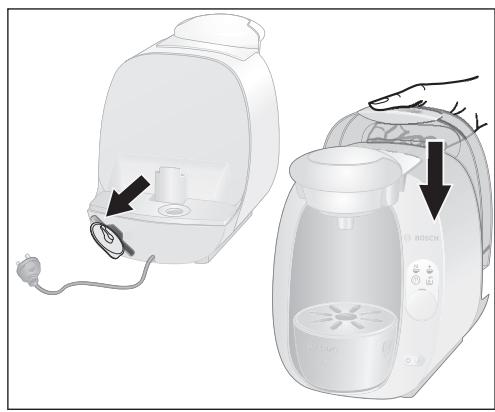
natural_image
Illustration of a Bosch washing machine with a hand inserting a cable to its side (no text or symbols present)natural_image
Diagram showing a device being processed from a fan or scanner, with no visible text or symbols.natural_image
Illustration of a hand pressing down on a control panel with icons for steam, coffee, and water (no text or symbols)7a
natural_image
Illustration of a remote control with icons for heat, steam, and water (no text or symbols)7b
natural_image
Illustration of a computer mouse with icons for heating, cooling, and water usage (no text or symbols)Betjeningselementer
Tænd/Sluk-knap
natural_image
Illustration of a remote control with icons for heating, alarm, and water (no text or symbols)7d

natural_image
Illustration of a remote control with icons for temperature, alarm, and warning symbols (no text or labels)7e
text_image
Diagram of a remote control with icons for heating, cooking, and water usage, featuring a warning symbol and an arrow pointing to it.7c Manuel
natural_image
Illustration of a Bosch electric oven and its side view showing the process of cooling and heat transfer (no text or symbols present)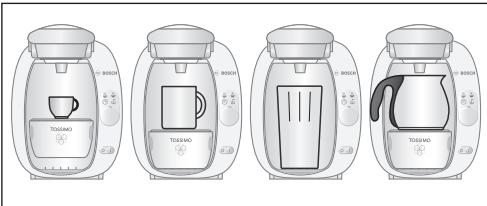
text_image
TOSOANO TOSOANO TOSOANO TOSOANO TOSOANOKopstørrelse
natural_image
Illustration of a hand pressing down on a remote control panel with icons for heat, water, and cups (no text or symbols)2a
natural_image
Illustration of a hand pressing down on a remote control with icons for heating, cooking, and water (no text or symbols)1. Automatisk drift:
natural_image
Illustration of a Bosch coffee maker and its corresponding product (TCISSIMO) showing internal processing and heat transfer (no text or symbols)⚠ Risiko for skoldning!
text_image
Illustration showing various types of kitchen appliances including a BOSCU, blender, and TOSIMO with accompanying safety symbols.
text_image
9a 9b 9cnatural_image
Illustration of a Bosch air fryer being opened into a bottle, showing the lid and handle (no text or symbols present)
natural_image
Two-step illustration of a Bosch air purifier being opened, showing hand placement and control buttons (no text or symbols)Udskifteligt sæt
⚠️ Fare for skålding!
text_image
Diagram showing the installation of a Bosch air purifier with labeled components and directional arrows indicating process flow.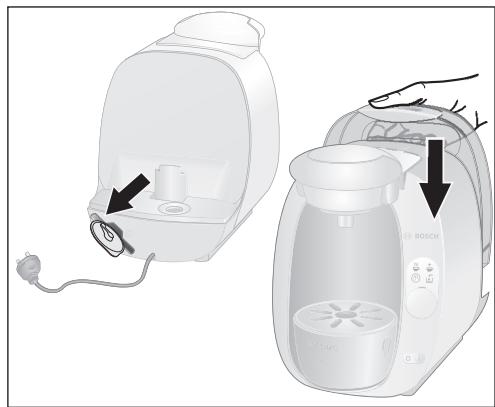
natural_image
Illustration of a hand inserting a fan into a Bosch washing machine (no text or symbols present)natural_image
Diagram showing a device being placed on top of a motor or scanner, with an arrow indicating motion (no text or symbols present)▶ Trykk på/av-bryteren til I-stilling.
Alle symbolene lyser kort, deretter lyser ⏻ Standby-symbolet.
▶ Finn fram en stor kopp (minst 200 ml) og sett den på koppeholderen.
natural_image
Illustration of a hand pressing a button on a device with icons for heating, cooling, and water (no text or symbols)7a
natural_image
Illustration of a remote control with icons for heat, water, and air (no text or symbols)7b

natural_image
Illustration of a computer mouse with icons for heating, cooling, and water (no text or symbols)Betjeningselementer
På/av-bryter
Knapp for start/stopp
natural_image
Illustration of a remote control with icons for heating, alarm, and water (no text or symbols)7d
natural_image
Illustration of a remote control with icons for temperature, steam, and alarm (no text or symbols)7e

text_image
Icon of a computer mouse with alarm clock and icons for heating, cooking, and water usage7c Manuell
natural_image
Illustration of a Bosch electric oven and its side view showing internal components (no text or symbols)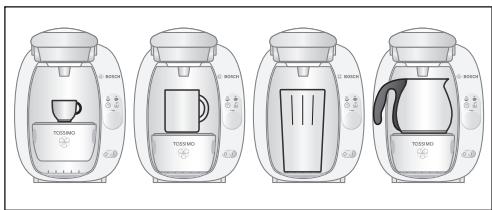
text_image
TOSBMO TOSBMO TOSBMO TOSBMOKoppestørrelse
text_image
Diagram comparing a Bosch-based portable coffee maker with its Tcissimo water heater, showing internal components and heat transfer mechanism.⚠️ Fare for skålding!
text_image
Illustration showing various household appliances including a blender, blender, and TOSIMO device with warning symbols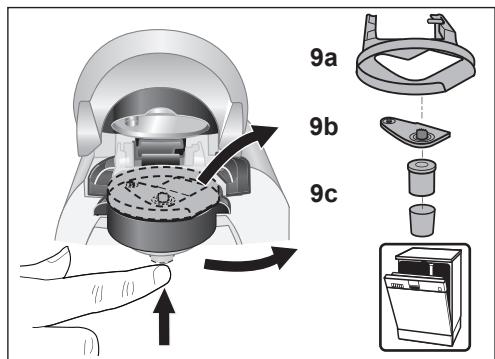
text_image
9a 9b 9ctext_image
Diagram illustrating a device operation with labeled parts and directional arrows, including a magnified view of the internal structure.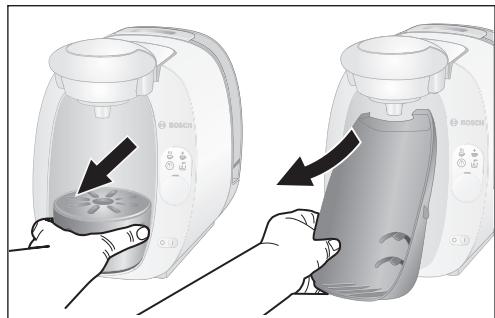
natural_image
Two-step illustration of a Bosch air fryer being opened, showing the lid and lid being inserted (no text or symbols present)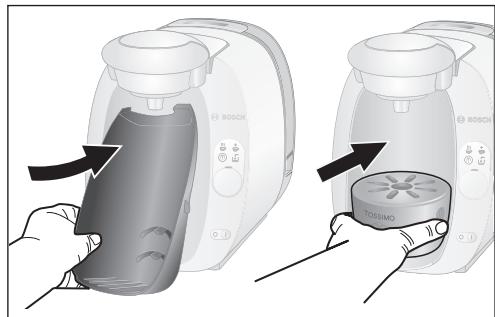
natural_image
Two-step illustration of a Bosch air conditioner being placed on its back, showing the device's internal structure and airflow direction (no text or symbols)! Viktig:
text_image
Diagram showing hand inserting a Bosch air conditioner into a vacuum cleaner, with Chinese labels indicating component placement.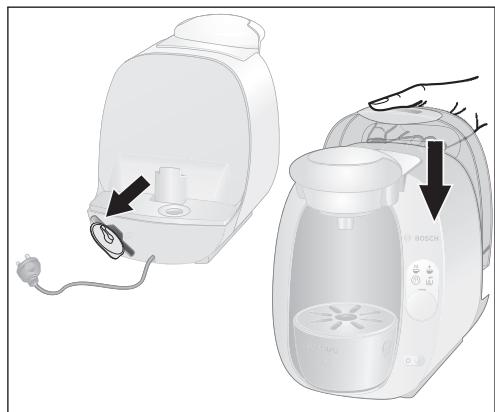
natural_image
Illustration of a Bosch washing machine with a hand operating the lid (no text or symbols present)natural_image
Diagram showing a device being placed on top of a motor, with an arrow indicating motion direction (no text or symbols present)natural_image
Illustration of a hand pressing down on a control panel with icons for steam, coffee, and water (no text or symbols)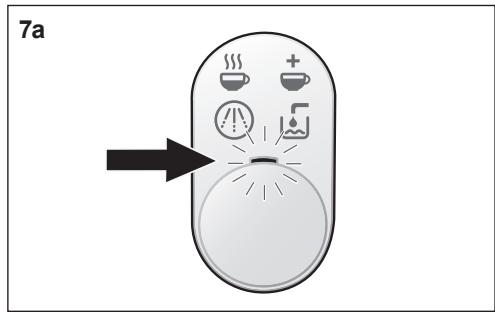
text_image
7a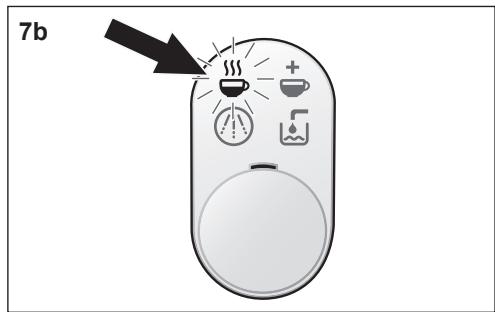
text_image
7bΧειριστήρια
Διακόπτης On/Off
natural_image
Illustration of a remote control with icons for heating, cooling, and water use (no text or symbols)7d
natural_image
Illustration of a remote control with icons for temperature, alarm, and function buttons (no text or symbols)7e
text_image
Diagram of a computer mouse with icons for heating, cooking, and water usage, featuring a warning symbol and an arrow pointing to it.natural_image
Illustration of a Bosch electric mixer with two views showing the device's internal components and airflow direction (no text or symbols)Μέγεθος φλιτζανιού
natural_image
Illustration of a Bosch coffee maker and its baseplate with a steaming cup (no text or symbols)text_image
Illustration showing various types of household appliances including a BOSCH brand blender, a TOSIMO blender, and a box with a crossed-out box.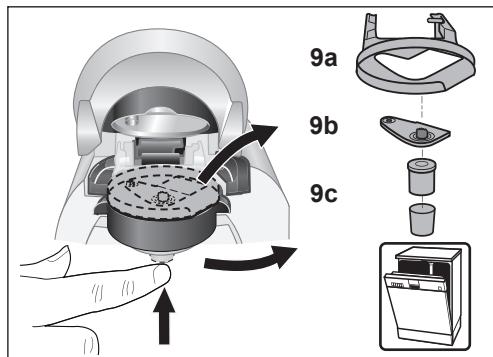
text_image
9a 9b 9ctext_image
Diagram illustrating a device operation with labeled parts and directional arrows, including a card icon and magnified view.natural_image
Illustration of a Bosch air fryer being opened into a smaller fan (no text or symbols visible)
text_image
BOSCH TOSSIMOΑπτοκομιδή

The guarantee conditions for this appliance are as defined by our representative in the country in which it is sold. Details regarding these conditions can be obtained from the dealer from whom the appliance was purchased. The bill of sale or receipt must be produced when making any claim under the terms of this guarantee.
es Garantía
To arrange an engineer visit, to order spare parts and accessories or for product advice please visit www.bosch-home.cu.uk
Or call
*Calls from a BT landline will be charged at up to 3 pence per minute. A call set-up fee of up to 6 pence may apply.
GR Greece, Ελλάς
BSH Ikiakes Siskeves A.B.E.
Central Branch Service
17 km E.O. Athinon-Lamias &
Potamou 20
14564 Kifisia
Greece - Athens
Tel.: 2104 277 701
Fax: 2104 277 669
North-Greece - Thessaloniki
Tel.: 2310 497 200
Fax: 2310 497 220
South-Greece - Heraklion/Kreta
Tel.: 2810 325 403
Fax: 2810 324 585
Central-Greece - Patras
Tel.: 2610 330 478
Fax: 2610 331 832
mailto:cs_gr_helpdesk@bshg.com
www.bosch-home.gr
IE Republic of Ireland
BSH Home Appliances Ltd.
Unit F4, Ballymount Drive
Ballymount Industrial Estate
Walkinstown
Dublin 12
Service Requests, Spares and
Accessories
Tel.: 01450 2655
Fax: 01450 2520
www.bosch-home.cu.uk
NO Norge, Norway
For all other countries: www.tassimo.com

TASSIMO Infoline
For information, questions or locations of authorised Bosch service centres nearest you, please contact TASSIMO:
Phone: 0800 0328833 (UK only. Freephone - calls made from a mobile phone might be charged) Mail: Freepost SWC3320, Cheltenham, GL50 3ZZ
Kraft Foods Ireland, Malahide Road, Coolock, Dublin 5
