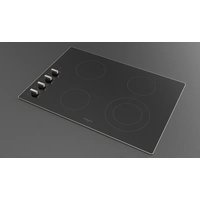
F3RK24S2 - Cooker Fulgor Milano - Free user manual and instructions
Find the device manual for free F3RK24S2 Fulgor Milano in PDF.

User questions about F3RK24S2 Fulgor Milano
0 question about this device. Answer the ones you know or ask your own.
Ask a new question about this device
Download the instructions for your Cooker in PDF format for free! Find your manual F3RK24S2 - Fulgor Milano and take your electronic device back in hand. On this page are published all the documents necessary for the use of your device. F3RK24S2 by Fulgor Milano.
USER MANUAL F3RK24S2 Fulgor Milano
natural_image
Four black circles arranged in a 2x2 grid within a white square frame (no text or symbols)F3RK24**
F3RK30**
F3RK36**
ELECTRIC COOKTOP
Safety Instructions....4
COOKTOP SAFETY....4
PERSONAL SAFETY....5
Models and Part Identification......6
Element and Control Setting......7
SINGLE RADIANT ELEMENT....7
DUAL RADIANT ELEMENT 7
Electric Cooktop Operation ....8
BEFORE USING THE COOKTOP FOR THE FIRST TIME ....8
Cookware....9
GENERAL....9
COOKWARE CHARACTERISTICS ....9
OBSERVE THE FOLLOWING POINTS IN CANNING 9
Cleaning the Cooktop....11
Troubleshooting....12
Assistance or Service....12
Pay attention to these symbols present in this manual:

WARNING
- This is the safety alert symbol. This symbol alerts you to potential hazards that can kill or hurt you and others.
- You can be killed or seriously injured if you don't follow these instructions.
READ AND SAVE THESE INSTRUCTIONS.
WARNINGS FOR ELECTRIC INSTALLATION

WARNING
• Installation and service must be performed by a qualified installer or service agency.
- The models may be powered at 240V or 208V.
CAUTION
• Always disconnect the electrical plug from the wall receptacle before servicing this unit.
- For personal safety, this appliance must be properly grounded.
Do not under any circumstances cut or remove the third (ground) prong from the power cord plug.

IMPORTANT
Safety Instructions
Please read all instructions before using this appliance.
COOKTOP SAFETY

WARNING
Proper Installation
- Be sure your appliance is properly installed and grounded by a qualified technician.
Never Use Your Appliance for Warming or Heating the Room
Do Not Leave Children Alone
- Children should not be left alone or unattended in area where appliance is in use. They should never be allowed to sit or stand on any part of the appliance.
Wear Proper Apparel
- Loose-fitting or hanging garments should never be worn while using the appliance.
User Servicing
- Do not repair or replace any part of the appliance unless specifically recommended in the manual. All other servicing should be referred to a qualified technician.
Storage in or on Appliance
- Flammable materials should not be stored in an oven or near surface units.
Do Not Use Water on Grease Fires
- Smother fire or flame or use dry chemical or foam-type extinguisher.
Use Only Dry Potholders
- Moist or damp potholders on hot surfaces may result in burns from steam. Do not let potholder touch hot heating elements. Do not use a towel or other bulky cloth.
Use Proper Pan Size
- This appliance is equipped with one or more surface units of different size. Select utensils having flat bottoms large enough to cover the surface unit heating element. The use of undersized utensils will expose a portion of the heating element to direct contact and may result in ignition of clothing. Proper relationship of utensil to burner will also improve efficiency.
Never Leave Surface Units Unattended at High Heat Settings
- Boil over causes smoking and greasy spillovers that may ignite.
Make Sure Reflector Pans or Drip Bowls Are in Place
- Absence of these pans or bowls during cooking may subject wiring or components underneath to damage.
Protective Liners
- Do not use aluminum foil to line surface unit drip bowls or oven bottoms, except as suggested in the manual. Improper installation of these liners may result in a risk of electric shock, or fire.
Glazed Cooking Utensils
- Only certain types of glass, glass/ceramic, ceramic, earthenware, or other glazed utensils are suitable for range-top service without breaking due to the sudden change in temperature.
Utensil Handles Should Be Turned Inward and Not Extend Over Adjacent Surface Units
- To reduce the risk of burns, ignition of flammable materials, and spillage due to unintentional contact with the utensil, the handle of a utensil should be positioned so that it is turned inward, and does not extend over adjacent surface units.
Do Not Soak Removable Heating Elements
- Heating elements should never be immersed in water.
Do Not Cook on Broken Cook-Top
- If cook-top should break, cleaning solutions and spillovers may penetrate the broken cook-top and create a risk of electric shock. Contact a qualified technician immediately.
Clean Cook-Top With Caution
- If a wet sponge or cloth is used to wipe spills on a hot cooking area, be careful to avoid steam burn. Some cleaners can produce noxious fumes if applied to a hot surface.
PERSONAL SAFETY

WARNING
To reduce the risk of injury to persons, in the event of a grease fire, observe the following:
- Grease is flammable and should be handled carefully.
- Do not use water on grease fires.
- Never pick up a flaming pan. Smother sheet or flat tray.
- Flaming grease outside of utensil can be extinguished with baking soda or, if available, a multipurpose dry chemical or foam type extinguisher.
- Let fat cool before attempting to handle it.
- Wipe up spill over immediately.
- If you are "flaming" liquors or other spirits under an exhaust, turn the fan off. The draft could cause the flames to spread out of control.
- Never leave the surface area unattended at high heat setting. Boil over cause smoking and greasy spill over, which may ignite.
CAUTION
Do not allow aluminum foil, plastic, paper or cloth to come in contact with a hot Surface. Do not allow pans to boil dry.
- Be careful to prevent burns. If the flames do not go out immediately, evacuate and call the fire department.
• Always have a working smoke detector near the kitchen. - Leave the hood ventilator on when flambéing food only if there is smoke without flames.
Use an extinguisher only if
- You know you have a Class ABC extinguisher, and you already know how to operate it.
- The fire is small and contained in the area where it started.
• The fire department is being called. - You can fight the fire with your back to an exit.
- Never use water on cooking fires.
- In the event that personal clothing catches fire, drop and roll immediately to extinguish flames.

WARNING
To reduce the risk of burn injuries during cooktop use, observe the following:
- Never use the cooktop to warm or heat a room.
- Children or pets should not be left alone or unattended in an area where appliances are in use. They should never be allowed to sit or stand on any part of the appliance.
CAUTION
Do not store items of interest to children in cabinets above a range or on the backguard of a range; children climbing on the range to reach items could be seriously injured.
When using the cooktop
- Do not touch surface units or areas near units. Surface areas may become hot enough to cause burns. Surface elements may be hot even though they are dark in color. During and after use, do not touch or let flammable materials contact heating elements until they have had time to cool.
When using the cooktop installed over oven
- Do not touch heating elements or interior surfaces of oven. Heating elements may be hot even though they are dark in color. Interior surfaces of an oven become hot enough to cause burns. During and after use, do not touch, or let clothing or other flammable materials contact heating elements or interior surfaces of oven until they have had sufficient time to cool. Other surfaces of the appliance may become hot enough to cause burns – among these surfaces are (identification of surfaces – for example, oven vent openings and surfaces near these openings, oven doors, and windows of oven doors).
- To minimize the possibility of burns, ignition of flammable materials and spillage, the handle of a container should be turned toward the center of the cooktop without extending over any nearby surface units.
- Use only certain types of glass, heatproof glass ceramic, ceramic, earthenware, or other glazed utensils that are suitable for cooktop use
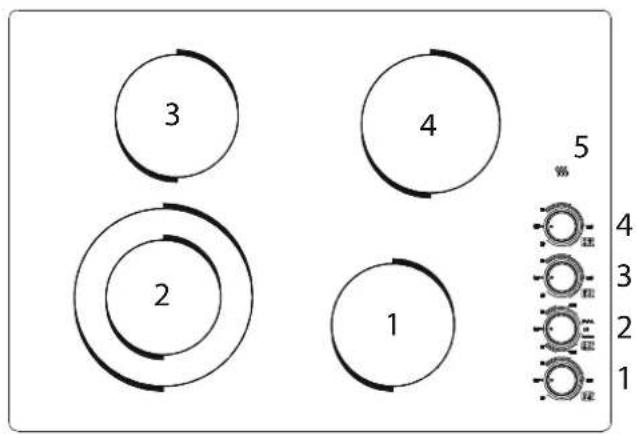
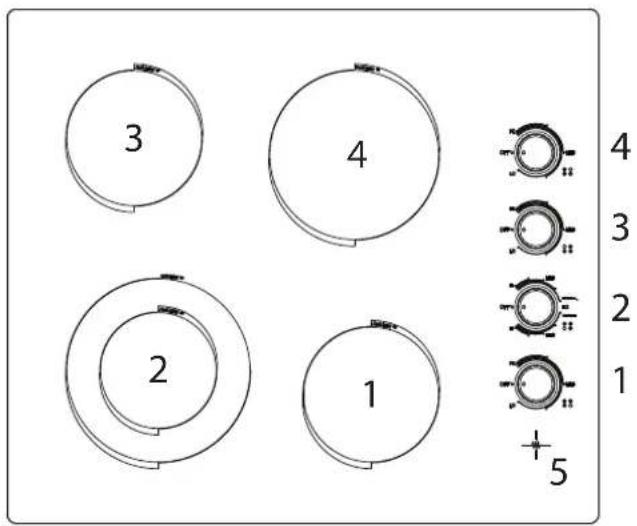
Models and Part Identification
(Energy regulator) models
text_image
3 4 2 1 5 4 3 2 1Position 1- 1200W 6" single circuit element and control
Position 2- 1100W / 2500W 5"/9" dual circuit element and control
Position 3-1200W 6" single circuit element and control
Position 4-1800W 7" single circuit element and control
Position 5- "ON" and hot surface indicator lights
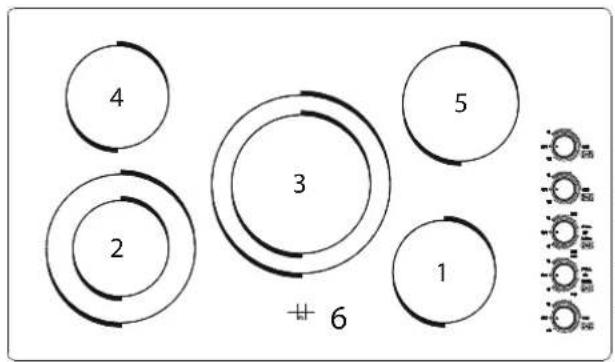
text_image
4 2 3 5 1 6Position 1- 1200W 6" single circuit element and control
Position 2-1100W / 2500W 5"/9" dual circuit element and control
Position 3-1800W / 2700W 8"/11" dual circuit element and control
Position 4-1200W 6" single circuit element and control
Position 5-1800W 7" single circuit element and control
Position 6- "ON" and hot surface indicator lights
text_image
3 4 2 1 + 5 4 3 2 1 +5Position 1- 1200W 5 1/2" single circuit element and control
Position 2-800W / 1900W 4 3/4" - 7 3/4" dual circuit element and control
Position 3-1200W 5 1/2" single circuit element and control
Position 4-1800W 7" single circuit element and control
Position 5- "ON" and hot surface indicator lights
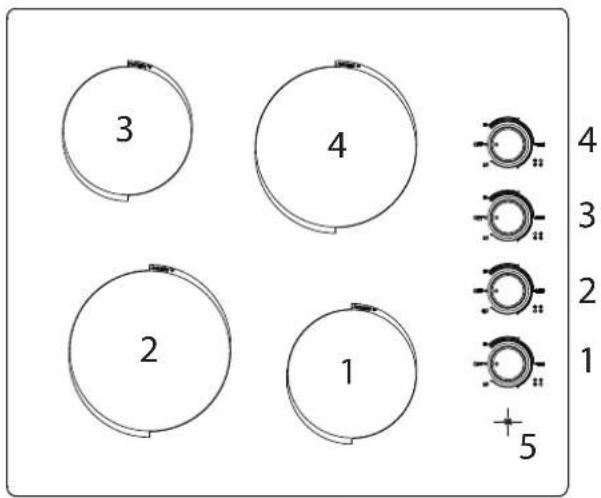
text_image
3 4 2 1 4 3 2 1 + 5Position 1- 1200W 5 1/2" single circuit element and control
Position 2-1800W 7" single circuit element and control
Position 3-1200W 5 1/2" single circuit element and control
Position 4-1800W 7" single circuit element and control
Position 5- "ON" and hot surface indicator lights
Element and Control Setting
SINGLE RADIANT ELEMENT
This type of electric element uses a wire ribbon located under the glass surface to provide the heat for cooking. There Elements will cycle on and off by the its own temperature limiters.
Temperature limiters
Each radiant heaters has its own sensor to protect the glass cooking surface from extreme high temperatures. The limiter will operate automatically by cycling the element the cycles as defined by knob setting (HI-LO)
DUAL RADIANT ELEMENT
The dual element consist of two radiant ribbon elements within the same heating area. Either the small (inner element) or both (inner and outer) elements may be selected for use. There are an infinite number of heat setting between the LO and HI position. Fixed position are found at LO and HI to define minimum and maximum heat setting.
To turn ON the inner element, push down on the control knob and turn it counter clockwise following the single line graphics.
To turn ON both inner and outer elements together, push down on the control knob and turn clockwise following the double graphics line.
Setting Recommended Use
All these settings are recommended without the element being preheated, a range of heat settings are listed because the actual setting depend on:
• Type and quality of pan
- Type, quantity and temperature of the food
- Element used and cook's preferences
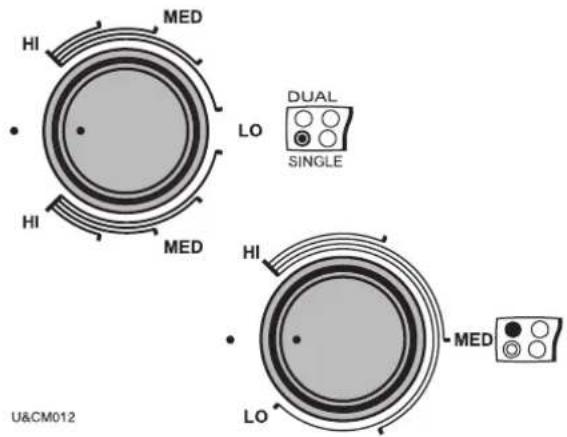
text_image
HI MED LO HI MED DUAL SINGLE HI MED LO U&CM012| TYPE OF FOOD | HEAT SETTINGS RADIANT ELEMENTS |
| Energy regulator | |
| Melting butter, chocolate LO | |
| Delicate sauce, rice, simmering sauces with butter and egg yolk | LO to Medium |
| Cooking vegetables, fish broths, eggs -fried or scrambled-, finishing cereals, pasta, milk, pancakes, pudding, simmering meats, steaming vegetables, pop corn, bacon, stewing meet soup, sau-teed vegetables, spaghetti sauces | Medium |
| Braising meet, pan frying meet, fish, eggs, stir frying, quickly brown or sear meats, hold rapid boil | Medium to HI |
| Boiling water for vegetables, pasta | HI |
Control knobs (pos. 1 to 4)
The placement of each knob corresponds to the placement of the heating element that it controls. To turn on any element, PUSH DOWN on the knob and TURN in either direction to desired heat setting.
Hot surface indicator light
Each element features a hot indicator light to show when the cooking area is ON or hot. The signal light will turn on automatically in the area marked with cross. The light remains on until the cooking area has cooled to a safe to touch temperature (approximately 150°F). If a hot surface light is ON use caution when working around the cooktop as the cooktop is still hot.
Electric Cooktop Operation
BEFORE USING THE COOKTOP FOR THE FIRST TIME
- All products are wiped clean with solvents at the factory to remove any visible signs of dirt, oil, and grease which may have remained from the manufacturing process.
- If present, remove all packing and literature from the cooktop surface.
- Clean your glass top before the first time you use it. A thorough cleaning with a glass top cleaner is recommended. It only takes a minute and puts a clean, shiny coating on the glass top before its initial use.
- There may be a slight odour during the first several uses: this is normal and will disappear.
-
Optimum cooking result depends on the proper cookware being selected and used.
-
The cooking surface will hold the heat and remain hot over 20 minutes after the elements have been turned off.
- The glass ceramic cooking surface is a durable material resistant to impact but not unbreakable if a pan or other object is dropped on it.
- Do not use aluminum foil directly on the glass; it will melt and damage the glass surface.
- Do nor allow pans to boil dry. This can damage the pan, element and /or cooktop.
- Never cook food directly on the glass.
- Do not slide cookware across cooking surface it may scratch the glass
- Using cast iron cookware on the glass cooktop is not recommended. Cast iron retains heat and may result in cooktop damage.
Cookware
GENERAL
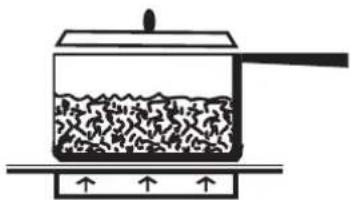
The choice of pan directly affects the cooking performance (speed and uniformity) for best result select pans with the following features.
Flat base
When a pan is hot, the base (pan bottom) should rest evenly on the surface without wobbling (rocking). Ideal cookware should have a flat bottom, straight side, a well fitting lid and the material should be of medium to heavy thickness.
Rough finishes may scratch the cooktop.
Match Pan Diameter to radiant element
The base of the pan should cover or match the diameter of the element being used.
! WARNING
natural_image
Simple line drawing of a cooking pot with upward arrows indicating heating or movement (no text or symbols)BALANCED PAN
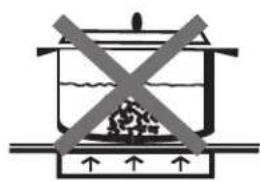
natural_image
Simple line drawing of a cooking pot with crossed X marks indicating resistance or crossed-out (no text or symbols)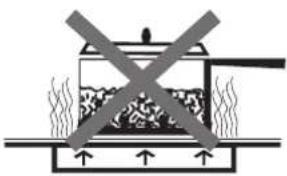
natural_image
Diagram of a cooking pot with steam rising and crossed out by a horizontal line (no text or symbols)UNBALANCED PAN
U&C014-2
COOKWARE CHARACTERISTICS
Cooking Utensil Guidelines
- Aluminium: heats and cools quickly frying, braising, roasting. May leave metal markings on glass.
- Cast Iron: heats and cools quickly Not recommended. Retains excessive heat and may damage cooktop.
• Copper: tin heats and cools quickly gourmet. cooking, lined wine sauces, egg dishes. - Enamel ware: response depends on base Not recommended, metal Imperfections in enamel may scratch cooktop.
- Glass Ceramic: heats and cools slowly not recommended. Heats too slowly. Imperfections in enamel may scratch cooktop.
- Stainless Steel: heats and cools at moderate soups, sauces, rate vegetables, general cooking.
OBSERVE THE FOLLOWING POINTS IN CANNING
Pots that extend beyond 1 of the surface unit's circle are not recommended for most surface cooking. However, when canning with water-bath or pressure canner, larger-diameter pots may be used.
This is because boiling water temperatures (even under pressure) are not harmful to the cooktop surfaces surrounding the surface units.
However, do not use large diameter canners or other large-diameter pots for frying or boiling foods other than water.
Most syrup or sauce mixtures, and all types of frying, cook at temperatures much higher than boiling water. Such temperatures could eventually harm the glass cooktop surfaces.
Be sure the canner fits over:
- the center of the surface unit. If your cooktop or its location does not allow the canner to be centered on the surface unit, use smaller diameter pots for good canning results.
-
Flat-bottomed canners must be used. Do not use canners with flanged or rippled bottoms (often found in enamelware) because they don't make enough contact with the surface units and take a long time to boil water.
-
When canning, use recipes and procedures from reputable sources. Reliable recipes and procedures are available from the manufacturer of your canner; manufacturers of glass jars for canning, such as Ball and Kerr brand; and the United States Department of Agriculture Extension Service.
- Remember that canning is a process that generates large amounts of steam. To avoid burns from steam or heat, be careful when canning.
CAUTION
Safe canning requires that harmful micro organisms are destroyed and that the jars are sealed completely. When canning foods in a water-bath canner, a gentle but steady boil must be maintained for the required time. When canning foods in a pressure canner, the pressure must be maintained for the required time.
After you have adjusted the controls, it is very important to make sure the prescribed boil or pressure levels are maintained for the required time.
Since you must make sure to process the canning jars for the prescribed time, with no interruption in processing time, do not can on any cooktop surface unit if your canner is not flat.
Special pans
Special pans, such as griddles, roasters, pressure cookers, woks, water (Use only a flat-bottom wok).
CAUTION
Food packaged in aluminum foil should not be placed directly on the glass ceramic surface for cooking; aluminum foil can melt and cause permanent damage.
CAUTION
Plastic, paper, and cloth can melt or burn when in contact with a hot surface. Do not let these items come in contact with the hot glass.
Cleaning the Cooktop
CAUTION
Be sure electrical power is off and all surfaces are cool before cleaning any part of the cooktop.
Apply a small amount of cooktop cleaning specific ceramic crème on a daily basis. this provides a protective film that makes it easy to remove water spots or food spatters. The temperature of the cooking surface reduces the protective qualities of this cleaner.
It must be reapplied before each use. Use a clean cloth and apply cooktop cleaning crème before each use to remove dust or metal marks that can occur on the counter level surface between uses.
CONTROL KNOBS
Pull up to remove the knob using the towel for leverage. Wipe with hot, soapy cloth, rinse and dry. Do not soak!
FRAME
(Stainless steel models)
Always wipe with the grain when cleaning. For moderate/ heavy soil, use BonAmi ^® or Soft Scrub ^® (no bleach).
Wipe using a damp sponge or cloth, rinse and dry.
DAILY CLEANING TECHNIQUES
Clean the surface when it is completely cool with the following exception.
Remove these soils immediately with the razor blade scraper:
- Dry Sugar
- Sugar Syrup
- Tomato Products
- Milk

natural_image
Line drawing of a hand holding a tool or device, no text or symbols presentUSE DAILY
Wipe off spatters with a clean, damp cloth; use white vinegar if smudge remains; rinse.
Apply a small amount of the Cooktop Cleaning Crème.
When dry, buff surface with a clean paper towel or cloth.
CAUTION
Do not use any kind of cleaner on the glass while the surface is hot; use only the razor blade scraper. The resulting fumes can be hazardous to your health. Heating the cleaner can chemically attack and damage the surface.
RECOMMENDED CLEANERS
• Cooktop Cleaning Crème:
Use only a small amount; apply to a clean paper towel or cloth. Wipe on the surface and buff with a clean dry towel.
- BonAmi®:
Rinse and dry.
- Soft Scrub ^ (without bleach):
Rinse and dry.
- White Vinegar:
Rinse and dry.
- Razor blade scraper
Packaged with cooktop.
Note: The recommended cleaners indicate a type of cleaner and do not constitute an endorsement.
AVOID THESE CLEANERS
• Glass cleaners which contain ammoniac or chlorine bleach
These ingredients may permanently etch or stain the cooktop.
- Caustic Cleaners
Oven cleaners such as Easy Off ^® may etch the cooktop surface.
- Abrasive Cleaners
Metal scouring pads and scrub sponges such as Scotch Brite® can scratch and / or leave metal marks. Soap-filled scouring pads such as SOS® can scratch the surface.
- Powdery cleaners
Containing chlorine bleach can permanently stain the cooktop.
- Flammable cleaners
Such as lighter fluid or WD-40.
Troubleshooting
| Problem | Cause | Possible Remedy |
| Nothing works | Cooktop not connected to proper electrical circuit.Fuse is blown or circuit breaker is tripped.No electricity to the cooktop. | Have electrician verify that the proper rated cooktop voltage is being supplied to the cooktop. Have electrician replace fuse or reset circuit breaker.Have electrician check your power supply. |
| Heating elements do not heat properly | Cooktop is connected to 120 volt power supply.Power supply connection is loose.Improper cookware is being used. | Have electrician connect cooktop to the proper rate cooktop voltage.Have electrician tighten the connections at the junction box.Select proper cookware as outlined in the Cooktop Operation section of this manual. |
| Heating elements cycle off even when elements are turned to their highest settings | Heating element temperature limiters are temporarily shutting off the elements due to exceeding the maximum allowable temperature. | This is a normal operating condition, especially during rapid heat-up operations. The element will cycle back on automatically after it has cooled sufficiently. |
| Glass ceramic surface is see-through or appears to be red in color. | Under direct or bright lighting, you will sometimes be able to see through the glass and into the chassis due to its transparent quality. You may also notice a red tint under these conditions | These are normal properties of black ceramic glass panels. |
Assistance or Service
Before calling for assistance or service, please check "Troubleshooting." It may save you the cost of a service call.
If you still need help, follow the instructions below. When calling, please know the purchase date and the complete model and serial number of your appliance. This information will help us to better respond to your request.
Service Data Record
For authorized service or parts information see "FULGOR WARRANTY for Home Appliances".
The location of the serial tag is below the cooktop box. Now is a good time to write this information in the space provided below. Keep your invoice for warranty validation.
Model Number ____
Serial Number ____
Date of Installation or Occupancy
Notes
Notes
Table des matieres
Page
AVERTISSEMENTS POUR L'INSTALLATION ELECTRIQUE.... 15
text_image
HI MED LO HI MED DUAL SINGLE HI MED LO U&CM012natural_image
Two diagrams showing a container with liquid and a side view of a tank with steam rising (no text or symbols)CASSEROLE DÉSÉQUILIBRÉE
U&C014-3