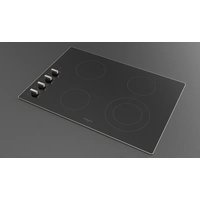
M6RT60B2 - Cooker Fulgor Milano - Free user manual and instructions
Find the device manual for free M6RT60B2 Fulgor Milano in PDF.

User questions about M6RT60B2 Fulgor Milano
0 question about this device. Answer the ones you know or ask your own.
Ask a new question about this device
Download the instructions for your Cooker in PDF format for free! Find your manual M6RT60B2 - Fulgor Milano and take your electronic device back in hand. On this page are published all the documents necessary for the use of your device. M6RT60B2 by Fulgor Milano.
USER MANUAL M6RT60B2 Fulgor Milano
natural_image
Four black circles arranged in a 2x2 grid on white background (no text or symbols)M6RT60*1
COOKING HOBS VCR 24"
TABLES DE CUISSON VCR 24"
EN INSTALLATION - USE - MAINTENANCE
FR INSTALLATION - EMPLOI - ENTRETIEN
Dear Customer,
we would like to thank you and congratulate you on your choice.
This new product has been carefully designed and built using top quality materials, and meticulously tested to ensure that it meets all your culinary requirements.
Please read and observe these simple instructions, which will enable you to achieve excellent results from the very first time you use it. This state-of-the-art appliance comes to you with our very best wishes.
THE MANUFACTURER

English


Français
THIS PRODUCT IS DESIGNED FOR DOMESTIC USE.
THE MANUFACTURER DECLINES ALL RESPONSIBILITY FOR DAMAGES TO THINGS OR PEOPLE DERIVING FROM INCORRECT INSTALLATION OR IMPROPER, ERRONEOUS OR UNSUITABLE USE.
THE APPLIANCE MUST NOT BE USED BY PEOPLE (INCLUDING CHILDREN) WITH PHYSICAL,
SENSORIAL OR MENTAL IMPAIRMENTS, OR BY PEOPLE WITHOUT THE NECESSARY EXPERIENCE OR KNOWLEDGE, UNLESS THEY ARE SUPERVISED OR INSTRUCTED IN THE USE OF THE APPLIANCE BY A PERSON RESPONSIBLE FOR THEIR SAFETY. CHILDREN MUST BE SUPERVISED TO ENSURE THAT THEY DO NOT PLAY WITH THE APPLIANCE.
Safety Instructions
Please read all instructions before using this appliance.
Cooktop safety

WARNING
Proper Installation
- Be sure your appliance is properly installed and grounded by a qualified technician.
Never Use Your Appliance for Warming or Heating the Room Do Not Leave Children Alone
- Children should not be left alone or unattended in area where appliance is in use. They should never be allowed to sit or stand on any part of the appliance.
Wear Proper Apparel
- Loose-fitting or hanging garments should never be worn while using the appliance.
User Servicing
- Do not repair or replace any part of the appliance unless specifically recommended in the manual. All other servicing should be referred to a qualified technician.
Storage in or on Appliance
- Flammable materials should not be stored in an oven or near surface units.
Do Not Use Water on Grease Fires
- Smother fire or flame or use dry chemical or foam-type extinguisher.
Use Only Dry Potholders
- Moist or damp potholders on hot surfaces may result in burns from steam. Do not let potholder touch hot heating elements. Do not use a towel or other bulky cloth.
Use Proper Pan Size
- This appliance is equipped with one or more surface units of different size. Select utensils having flat bottoms large enough to cover the surface unit heating element. The use of undersized utensils will expose a portion of the heating element to direct contact and may result in ignition of clothing. Proper relationship of utensil to burner will also improve efficiency.
Never Leave Surface Units Unattended at High Heat Settings
- Boil over causes smoking and greasy spillovers that may ignite.
Make Sure Reflector Pans or Drip Bowls Are in Place
- Absence of these pans or bowls during cooking may subject wiring or components underneath to damage.
Protective Liners
- Do not use aluminum foil to line surface unit drip bowls or oven bottoms, except as suggested in the manual. Improper installation of these liners may result in a risk of electric shock, or fire.
Glazed Cooking Utensils
- Only certain types of glass, glass/ceramic, ceramic, earthenware, or other glazed utensils are suitable for range-top service without breaking due to the sudden change in temperature.
Utensil Handles Should Be Turned Inward and Not Extend Over Adjacent Surface Units
- To reduce the risk of burns, ignition of flammable materials, and spillage due to unintentional contact with the utensil, the handle of a utensil should be positioned so that it is turned inward, and does not extend over adjacent surface units.
Do Not Soak Removable Heating Elements
- Heating elements should never be immersed in water.
Do Not Cook on Broken Cook-Top
- If cook-top should break, cleaning solutions and spillovers may penetrate the broken cooktop and create a risk of electric shock. Contact a qualified technician immediately.
Clean Cook-Top With Caution
- If a wet sponge or cloth is used to wipe spills on a hot cooking area, be careful to avoid steam burn. Some cleaners can produce noxious fumes if applied to a hot surface.
Personal safety

WARNING
To reduce the risk of injury to persons, in the event of a grease fire, observe the following:
- Grease is flammable and should be handled carefully.
- Do not use water on grease fires.
- Never pick up a flaming pan. Smother sheet or flat tray.
- Flaming grease outside of utensil can be extinguished with baking soda or, if available, a multipurpose dry chemical or foam type extinguisher.
- Let fat cool before attempting to handle it.
- Wipe up spill over immediately.
- If you are “flaming” liquors or other spirits under an exhaust, turn the fan off. The draft could cause the flames to spread out of control.
- Never leave the surface area unattended at high heat setting. Boil over cause smoking and greasy spill over, which may ignite.
CAUTION
- Do not allow aluminum foil, plastic, paper or cloth to come in contact with a hot Surface. Do not allow pans to boil dry.
- Be careful to prevent burns. If the flames do not go out immediately, evacuate and call the fire department.
• Always have a working smoke detector near the kitchen. - Leave the hood ventilator on when
flambéing food only if there is smoke without flames.
Use an extinguisher only if
- You know you have a Class ABC extinguisher, and you already know how to operate it.
- The fire is small and contained in the area where it started.
- The fire department is being called.
- You can fight the fire with your back to an exit.
- Never use water on cooking fires.
- In the event that personal clothing catches fire, drop and roll immediately to extinguish flames.

WARNING
To reduce the risk of burn injuries during cooktop use, observe the following:
- Never use the cooktop to warm or heat a room.
- Children or pets should not be left alone or unattended in an area where appliances are in use. They should never be allowed to sit or stand on any part of the appliance.
CAUTION
- Do not store items of interest to children in cabinets above a range or on the backguard of a range;
- children climbing on the range to reach items could be seriously injured.
When using the cooktop
- Do not touch surface units or areas near units. Surface areas may become hot enough to cause burns. Surface elements may be
hot even though they are dark in color. During and after use, do not touch or let flammable materials contact heating elements until they have had time to cool.
When using the cooktop installed over oven
- Do not touch heating elements or interior surfaces of oven. Heating elements may be hot even though they are dark in color. Interior surfaces of an oven become hot enough to cause burns. During and after use, do not touch, or let clothing or other flammable materials contact heating elements or interior surfaces of oven until they have had sufficient time to cool. Other surfaces of the appliance may become hot enough to cause burns – among these surfaces are (identification of surfaces – for example, oven vent openings and surfaces near these openings, oven doors, and windows of oven doors).
- To minimize the possibility of burns, ignition of flammable materials and spillage, the handle of a container should be turned toward the center of the cooktop without extending over any nearby surface units.
- Use only certain types of glass, heatproof glass ceramic, ceramic, earthenware, or other glazed utensils that are suitable for cooktop use
This will avoid permanent damage to the surface.
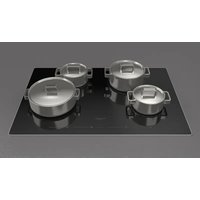
Use of the heating areas
Use proper pan size. This appliance is equipped with four surface units of different size. Select utensils having sturdy flat bottoms large enough to cover the surface unit heating element. The use of undersized utensils will expose a portion of the heating element to direct contact and may result in ignition of clothing. Proper relationship of utensil to burner will also improve efficiency. Never leave surface units unattended at high setting. Boilover causes smoke and greasy spillovers that may ignite.
Caution should be taken not to forget the heaters connected if a pot is not placed on them.
Care should be taken not to place big pots too close to any heat sensitive elements of the surface where the hob is built in.
Do not cook food directly on the surface of the hob. Your glass-ceramic hob is not a griddle and should not be used for this purpose. However attractive the idea may seem, it will only create problems that are better avoided, as the food is bound to stick to the surface.
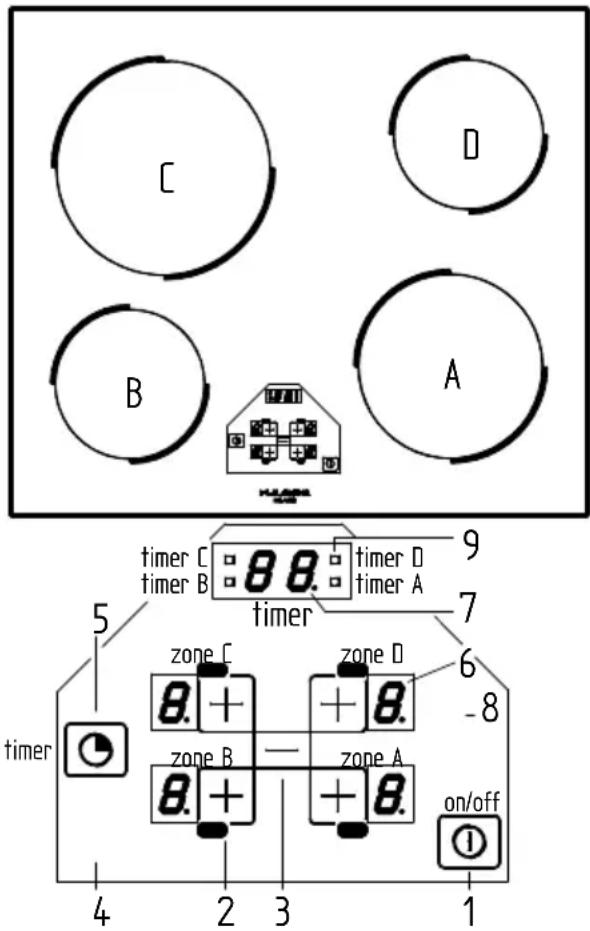
Control panel
Use proper pan size. This appliance is equipped with four surface units of different size. Select utensils having sturdy flat bottoms large enough to cover the surface unit heating element.
text_image
C D B A timer C timer B timer D timer A 9 7 5 zone C zone D 6 -8 timer zone B zone A on/off 4 2 3 11 Power ON/Power OFF
2 Cooking zone +
3 Cooking zone -
4 Dual circuit (if present)
5 Timer
6 Setting display
7 Timer display
8 Dual circuit indicator light (If present)
9 Timer indicator lights
FUNCTION
Switching the Touch Control ON/OFF
After mains voltage is applied the control initialises for approx. 1 second before it is ready for operation. After a reset all display and LEDs glow for approx. 1 second. When this time is over all displays and LEDs extinguish and the control is in the stand-by mode. By operating the ON/OFF key the control can be turned into the ON-mode. The cooking zone displays shows a static "0".
If a cooking zone is in the "hot" status, the display shows a static "H" instead of "0". The bottom right dot is blinking in 1 second intervals on all cooking zone display to indicate that no cooking zone is selected at the moment.
After switching-ON the electronic control remains activated for 20 seconds. If no cooking zone or timer selection follows within the period of time, the electronic control automatically switches back into the stand-by-mode.
The control can only be switched-ON if it identifies the ON/OFF key alone being operated. Should it recognize key activation other than that, the control remains in the stand-by-mode.
If the child safety feature is active when switching on, all cooking zone show "L" (LOKED). (also refer to 1.9).
If the cooking zones are in a "hot" status, the display shows "L" and "H" in alternation.
When the Touch Control is ON it can be switched-OFF at any time by operating the ON/OFF key. This is also valid if the control has been locked (activated child safety feature).
The ON/OFF key has always priority in the switch-OFF function.
Automatic switch-OFF
When the control is ON it automatically switches-OFF after 20 seconds if no cooking zone or select key has been operated within this period of time. If case of a cooking zone selection, the automatic switch-OFF time is composed of 10 seconds deselection time for a cooking zone at setting "0" and 10 seconds switch-OFF time.
Switching a cooking zone ON and OFF
If the control is ON the respective cooking zone can be selected by operating a cooking-zone-select-key (=PLUS-key of the respective cooking zone). There is a static dot indication in the respective display. If the cooking zone is hot "0" is displayed instead of "H". On all other cooking zone displays the blinking dot extinguishes. Then a setting will be chosen by a renewed operation of the cooking- zoneselect-key or the MINUS-key and the cooking zone begins to heat up. In order to use the cooking-zone-select-key as a PLUS-key the control has to recognize that after the selection the cooking zone has been released for 0,3 seconds.
After selection of a cooking zone the setting can be increased by continuously pressing the PLUS-key, starting at step "1" it is increased by 1 step every 0,4
seconds. When setting "9" is reached the setting will not be changed further (end stop).
If the selected cooking zone will be switched ON by means of the MINUS key, the cooking zone starts at the maximum setting "9" ("reverse switching-ON").
When the key is continuously operated, it decreases by 1 step every 0,4 seconds. When setting "0" is reached, there will be no further setting changed (end stop). Only a renewed operation of the MINUS (or PLUS) key changes the setting.
Switching OFF an individual cooking zone
To switch off an individual cooking zone, the respective cooking zone has to be selected with the cooking-zone-selectkey (= PLUS). The selection is indicated with the static dot in the respective cooking zone display. If the control recognizes that the PLUS-(cooking-zone-select-key is the PLUS-key) and the MINUSkey have been activated simultaneously the setting of the selected cooking zone will be put back to "0".
Alternatively, the MINUS-key can be used to count down the setting to "0". If all cooking zones are at "0", all decimal points in the cooking zone displays are blinking. If a cooking zone is "hot", "H" will be displayed instead of "0".
Switching-OFF all cooking zones:
Immediate switching-OFF of all cooking zones can be achieved anytime by means of the ON/OFF key. In the standby-mode an "H" appears on all cooking zones which are "hot". All other cooking zone displays are not illuminated.
Wattage settings
The output of the cooking zones can be set in 9 steps which are indicated by the figures "1" thru "9" by means of LED sevensegment-displays.
Automatic heat-up function (selectable)
When the automatic heat-up function is activated the wattage of the cooking zone is at 100 % ED for a certain heat-up time which is dependent on the selected (continuous) setting.
At the end of the heat-up time the electronic control switches back to the preselected simmering setting.
Starting process of the automatic heat-up:
- Control is ON and a cooking zone will be selected
- The automatic heat-up will be activated by operating the PLUS-key for a second time.
- The requested continuous setting will be selected with the PLUS- and MINUS-key, the chosen setting appears in the display.
- 3 seconds after the last key operation (selection of the setting) and within 16 seconds after activation of the heat-up function, the symbol "A" (which
stands for the heat-up boost) appears on the display, in alternation with the chosen setting.
- If a lower setting will be selected with the MINUS-key after the "A" has appeared in the display, the automatic heat-up function will be interrupted.
- By means of the PLUS-key a higher continuous setting can be chosen, here the duration of the heat-up boost will be automatically adapted to the actual selected setting.
- When the heat-up time is over, the selected (continuous) setting will be indicated on the display.
Residual heat indicator
It is meant to indicate to the user that the glass ceramic has a dangerous touch temperature in the circumference of a cooking zone. The temperature will be determined following a mathematical model and the remaining residual heat will be indicated by means of "H" on the corresponding 7-segmentdisplay. Heating-up and cooling down will be calculated dependent on
- the selected setting ("0" to "9")
- the ON/OFF time of the relays After switching-OFF the cooking zone the respective display shows "H" until the assigned cooking zone temperature is mathematically in a uncritical level. (≤ 60°C).
Automatic power OFF function (operating time limitation)
Dependent on the selected setting, every cooking zone will be switched-OFF after a defined maximum operation time if no operation of the assigned cooking zone follows within this time period.
Every change of the cooking zone condition (by means of the PLUS-, MINUS- or dualcircuit key for the respective cooking zone) puts back the maximum operation time of this cooking zone to the initial value of the operating time limitation.
The maximum operation time dependent on the selected cooking zone is defined in enclosure 1.14
Protection against unintended switching-ON
- If the electronic control realizes a continuous operation of keys for approx. 10 seconds, it switches OFF automatically. The control sends out an audible failure signal for 10 seconds, so that the user can remove the object which has been mistakenly placed onto the operation surface. The displays show the failure code "E R 0 3".
- If the failure carries on for more than 10 seconds, only the code "E R 0 3" will be displayed as long as the failure will be recognized by the electronic control. If the cooking zone is in the "hot" status, "H" will appear on the display in alteration with the failure notice.
-
If no cooking zone will be activated within 20 seconds after switching-ON by means of the Power-key, the control switches back from the ON-condition into the stand-by-mode. (also see paragraph 1.2)
-
When the control is switched- ON the ON/OFF-key has priority over all other keys, so that the control can be switched-OFF anytime, even in case of multiple or continuous operation of keys.
- In the stand-by mode a continuous operation will not be signalized.
However, before the electronic control can be switched-ON again, it has to recognize that all keys are not operated.
Key lock (child safety feature)
◇ Child safety feature:
Key lock:
After switching-ON the control the child safety feature can be activated. To achieve this it is necessary to simultaneously operate the front right cookingzone-select-key and the MINUS-key and then press the front right cooking-zone-selectkey again. There will be an "L", meaning LOCKED (child safety feature against unintended switching-ON). If a cooking zone is in the "hot" condition, "L" and "H" will be displayed in alternation.
This course of operation has to take place within a period of 10 seconds, no other key than described above may be operated. Otherwise the input will be interrupted because of incompleteness, the cooktop will not be locked then.
The electronic control remains in a locked condition until it gets unlocked, even if the control has been switched-OFF and -ON in the meantime. Also a reset of the control (after a voltage drop) does not cancel the key lock.
Unlocking for cooking purposes:
To unlock and operate the control it is required to operate the front right cooking-zoneselect-key and the MINUS-key simultaneously. "L" (LOCKED) in the display extinguishes and all cooking zones show "0" with a blinking dot. Should a cooking zone be "hot", "H" is displayed instead of the static "0". After switching-OFF the control, the child safety feature is active again.
Cancelling the key lock:
After switching-ON the control the child safety feature can be deactivated. Here it is necessary to simultaneously operate the front right cooking-zone-selectkey and the MINUS-key and then operate the MINUS-key alone. If all steps have been carried out in the right order within 10 seconds the key lock gets cancelled and the control is OFF. Otherwise the input will be considered incomplete, the control remains locked and switches-OFF after 20 seconds.
After a renewed switching-ON by means of the ON/OFF key all displays show "0", the display dots are blinking and the control is ready for cooking. If a cooking zone is "hot", "H" will be displayed instead of the static "0".
Multi-circuit cut-off
Depending on the design it is possible to operate dual- or triple-circuit radiant heating elements with the LITE-Touch Control.
When a multi-circuit heating element is put into operation, all heating circuits
are switched-ON at the same time. If only the inner heating circuits should be used, the outer heating circuit can be switched-OFF by means of the multi-circuit key or in individual steps.
By operating the multi-circuit key the respective outer circuit of the assigned active cooking zone (setting "0") can be cutoff anytime. An activated outer circuit will be indicated by an additional LED. A renewed operation of the multi-circuit key will add the outer circuit(s) at any time, the assigned LED's glow again (toggle-function).
If a cooking zone other than the one with multi-circuit function will be selected, the multicircuit status will be changed and all cooking zones will be deselected (the decimal point extinguishes).
Behaviour of dual-circuit cut-OFF:
If the heating element to be controlled is a triple-circuit heating element, the course of action is as follows:
- The first activation of the multi-circuit key cuts-off the outer heating circuit and the top LED extinguishes.
- A second activation of the multi-circuit-key cuts-off the middle heating circuit. (also the bottom LED extinguishes.)
- A third activation adds the middle heating circuit again. A further activation adds the third heating circuit as well and the assigned LEDs glow again.
Audible signal (buzzer)
While the control is in operation the following activities will be signaled by means of a buzzer:
- normal key activation with a short sound signal.
- continuous operation of keys over a longer period of time (_10 seconds) with a longer, intermittend sound signal.
Timer function (optional)
The timer function is realized in two versions:
- Stand-alone timer 1..99 min: sound signal when the time is over (= minute minder). This function is only available when the cooktop is not in operation, i.e. when there is no cooking.
- Cooking zone timer 1..99 min: sound signal when the time is over, four cooking zones can be programmed independently.
Timer as minute minder (stand-alone):
- If the control is OFF the standalone-timer can be operated by activating the timer key. Thetimer display shows "00". Operation of the Power-key putsthe control back into the stand-by mode and the standalone-timer will be cut-off.
- Time changes can be made with 1-minute increases using the clock key from 0 to 99 and the MINUS key from 99 to 0.
- Continuous operation of the clock key or MINUS produces a dynamic
increase of the variation speed up to a max value, without acoustic signals
- If the clock key (or MINUS) is released, the increase (decrease) speed starts again from the initial value.
- The timer can be set both with continuous operation of the clock key or MINUS or with successive-touch operation (with acoustic signal).
After the timer is set the time runs down according to the adjustment.
When the time is over there is a sound signal and the timer display blinks.
The sound signal will be stopped
• automatically after 2 minutes and/or
- by operating any key.
Then the blinking of the timer display stops and the display extinguishes.
Switching-OFF/changing the timer
- The timer can be changed or switched off at any time by operating the clock key or MINUS (with acoustic signal). The timer switches off, bringing the time to "0" with the MINUS key or operating the clock key and MINUS at the same time, which takes the timer directly to "0". For 6 seconds, the timer remains on "0" before switching off.
- If the control will be switched-ON by means of the Power-key, the stand-alone timer will be switched-off also.
Timer programming on cooking zones
When the control is switched-ON an independent timer can be programmed for every cooking zone.
- By selecting a cooking zone with the cooking-zone-selectkey, then selecting the setting and finally activating the timerselect-key, the timer can be programmed as a switch-off function for a cooking zone.
Around the timer four LEDs are arranged. These indicate for which cooking zone the timer has been activated.
- As soon as the timer has been selected, the assigned timer-LED blinks and the dot in the timer display glows. If a cooking-zone-select-key will be operated, the dot in the timer displays extinguishes and the LED does not blink any longer.
- When switching-over from one cooking zone to another, the timer display always shows the present timer value of the respective cooking zone.
However, the programmed timers of other cooking zones remain active.
- The further setting behaviour corresponds to the STANDALONE-TIMER. For increasing the adjusted time, the PLUS-key of the respective cooking zone has to be used. (setting "0")
- When the timer has run down, there is a sound signal and the timer display shows "00" statically, the assigned cooking zone timer LED blinks. The programmed cooking zone will be
cut off and "H" will be displayed if the coking zone is hot, otherwise a stroke will show in the cooking zone display. The sound signal and the blinking of the timer LED will be stopped
• automatically after 2 minutes • b y operating any key.
The timer display extinguishes.
- The basic behaviour follows the description of the "minute minder" (stand-alone-timer).
Automatic heating (or "heatup" function)
This function facilitates cooking. You don't have to be there permanently during cooking.
The hob heats up automatically to full power and then returns to the selected level after a certain time (see table 1).
Activating automatic heating
- Press the selection button (2) for the desired cooking area.
- Select power level 9 with the Minus button, then use the Plus button to select level "A" "9". Afterwards set the desired level for continuation of cooking with the Minus button, e.g. level 6. The display will show alternatively "A" and "6" during the "automatic heating" function.
Example: Select power level 9 and activate the automatic heating function with the Plus button (display 9). Then set level 6 for continuation of cooking with the Minus button.
With these settings the hob will be heated for 2.5 min. at level 9, the display will alternate "A" and "6" and will then
return to continuation cooking level 6.
| Power level | Heat-up function (Time in minutes) |
| 1 | 1 |
| 2 | 3 |
| 3 4.8 | |
| 4 6.5 | |
| 5 8.5 | |
| 6 2.5 | |
| 7 3.5 | |
| 8 4.5 | |
| 9 --- |
Safety

WARNING
- If the surface is cracked, promptly switch off the appliance to avoid the possibility of electric shock. Call the Technical Service Assistance.
- Proper installation. Be sure your appliance is properly installed and grounded by a qualified technician.
- If the mains cable is damaged, it must be changed by the authorized technical sevice or in any case by a similar competent person, to avoid any risk.
- Never use your appliance for warming or heating the room.
- Do not leave children alone. Children should not be left alone or unattended in the area where the appliance is in use. They should never be allowed to sit or stand on any part of the appliance.
- Parents and adults should pay particular attention when using the product in presence of children.
- Children should be overseen so as to ensure that they don't play with the equipment.
- This appliance is not intended for use by persons (included children) with reduced phisical sensory or mental capabilities, or lack of experience and knowledge, unless they have been given supervision or instruction concerning use of the appliance by a person responsible for their safety.
- Wear proper apparel. Loose-fitting or hanging garments should never be worn while using the appliance.
- User servicing. Do not repair or replace any part of the appliance unless specifically recommended in the manual. All other servicing should be referred to a qualified technician.
- Storage in or on appliance. Flammable materials should not be stored near surface units. Aluminium foils and plastic utensils should not stay on hot surfaces. These surfaces cannot be used to put anything over. - Do not look intensely the halogen lamps.
- Do not use water on grease fires. Smother fire or flame or use dry chemical or foam-type extinguisher.
- Use only dry potholders. Moist or damp potholders on hot surfaces may result in burns from steam. Do not let potholders touch hot heating elements. Do not use a towel or other bulky cloth.
- Utensil handles should be turned inward and not extended over adjacent surface units. To reduce the risk of burns, ignition of flammable materials, and spillage due to unintentional contact with the utensil, the handle of a utensil should be positioned so that it is turned inward, and does not extend over adjacent surface units.
- It is advisable to avoid impact of the hob surface from solid objects with sharp corners such as salt cellars, sauce bottles and so on, as these could cause damage.
It is recommended that no steam cleaning equipment are used.
Electric Cooktop Operation
Before using the cooktop for the first time
- All products are wiped clean with solvents at the factory to remove any visible signs of dirt, oil, and grease which may have remained from the manufacturing process.
- If present, remove all packing and literature from the cooktop surface.
- Clean your glass top before the first time you use it. A thorough cleaning with a glass top cleaner is recommended. It only takes a minute and puts a clean, shiny coating on the glass top before its initial use.
- There may be a slight odour during the first several uses: this is normal and will disappear.
- Optimum cooking result depends on the proper cookware being selected and used.
- The cooking surface will hold the heat and remain hot over 20 minutes after the elements have been turned off.
- The glass ceramic cooking surface is a durable material resistant to impact but not unbreakable if a pan or other object is dropped on it.
- Do not use aluminum foil directly on the glass; it will melt and damage the glass surface.
- Do nor allow pans to boil dry. This can damage the pan, element and /or cooktop.
-
Never cook food directly on the glass.
-
Do not slide cookware across cooking surface it may scratch the glass.
- Using cast iron cookware on the glass cooktop is not recommended. Cast iron retains heat and may result in cooktop damage.
Cookware
General
The choice of pan directly affects the cooking performance (speed and uniformity) for best result select pans with the following features.
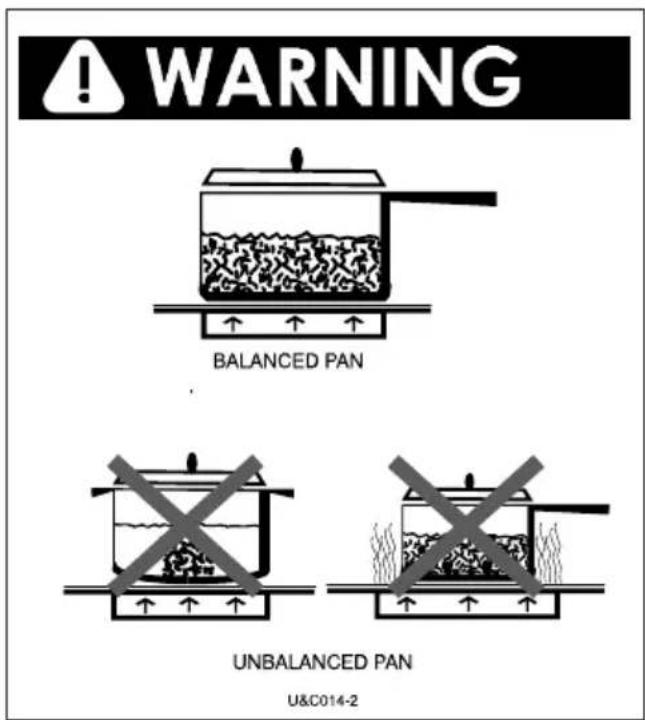
Flat base
When a pan is hot, the base (pan bottom) should rest evenly on the surface without wobbling (rocking).
Ideal cookware should have a flat bottom, straight side, a well fitting lid and the material should be of medium to heavy thickness.
Rough finishes may scratch the cooktop.
Match Pan Diameter to radiant element
The base of the pan should cover or match the diameter of the element being used.
text_image
WARNING BALANCED PAN UNBALANCED PAN U&C014-2Cookware characteristics Cooking Utensil Guidelines
- Aluminium: heats and cools quickly frying, braising, roasting. May leave metal markings on glass.
- Cast Iron: heats and cools quickly Not recommended. Retains excessive heat and may damage cooktop.
• Copper: tin heats and cools quickly gourmet, cooking, lined wine sauces, egg dishes.
- Enamel ware: response depends on base Not recommended, metal Imperfections in enamel may scratch cooktop.
• Glass Ceramic: heats and cools slowly not recommended. Heats too slowly. Imperfections in enamel may scratch cooktop.
- Stainless Steel: heats and cools at moderate soups, sauces, rate vegetables, general cooking.

Observe the following points in canning
Pots that extend beyond 1 of the surface unit's circle are not recommended for most surface cooking.
However, when canning with water-bath or pressure canner, larger-diameter pots may be used.
This is because boiling water temperatures (even under pressure) are not harmful to the cooktop surfaces surrounding the surface units.
However, do not use large diameter canners or other large-diameter pots for frying or boiling foods other than water.
Most syrup or sauce mixtures, and all types of frying, cook at temperatures much higher than boiling water.
Such temperatures could eventually harm the glass cooktop surfaces.
Be sure the canner fits over:
- the center of the surface unit. If your cooktop or its location does not allow the canner to be centered on the surface unit, use smaller diameter pots for good canning results.
- Flat-bottomed canners must be used. Do not use canners with flanged or rippled bottoms (often found in enamelware) because they don't make enough contact with the surface units and take a long time to boil water.

- When canning, use recipes and procedures from reputable sources. Reliable recipes and procedures are available from the manufacturer of your canner; manufacturers of glass jars for canning, such as Ball and Kerr brand; and the United States Department of Agriculture Extension Service.
- Remember that canning is a process that generates large amounts of steam. To avoid burns from steam or heat, be careful when canning.
CAUTION
Safe canning requires that harmful micro organisms are destroyed and that the jars are sealed completely. When canning foods in a water-bath canner, a gentle but steady boil must be maintained for the required time. When canning foods in a pressure canner, the pressure must be maintained for the required time.
After you have adjusted the controls, it is very important to make sure the prescribed boil or pressure levels are maintained for the required time.
Since you must make sure to process the canning jars for the prescribed time, with no interruption in processing time, do not can on any cooktop surface unit if your canner is not flat.
Special pans
Special pans, such as griddles, roasters, pressure cookers, woks, water (Use only a flat-bottom wok).
CAUTION
Food packaged in aluminum foil should not be placed directly on the glass ceramic surface for cooking; aluminum foil can melt and cause permanent damage.
CAUTION
Plastic, paper, and cloth can melt or burn when in contact with a hot surface. Do not let these items come in contact with the hot glass.
Fulgor Milano WARRANTY for Home Appliances
Duration of warranty:
Fulgor Milano grants for the Continental U.S and Canada a 24 month full warranty from the date of purchase indicated on the invoice. During this period Fulgor Milano will pay the cost for replaced parts and labor needed to repair the appliance.
For proof of warranty, please retain the original purchase invoice and the delivery slip.
To obtain service under this warranty, you must:
- Contact Fulgor-Milano North America Service by email at fulgor@adcoservice.com or by toll free number at 1-855-4-fulgor (855-438-5467) for guidance in receiving service for your appliance.
- Provide a copy of your original sales receipt.
- Provide Fulgor Milano reasonable opportunity to investigate the claim before the Product or any component of the Product has been removed.
Coverage:
Read the Use and Care Manual before using the appliance for the first time! This warranty applies to Fulgor Milano appliances utilized only for residential use. Our appliances are not intended for commercial use. This warranty is only valid for the original owner and is not transferable.
During the warranty period Fulgor Milano will, at its discretion, repair or exchange the product without charge for parts and labor.
EN
The warranty does not cover :
- Damage to the appliance caused intentionally or by accident.
- Improper installation or incorrect connection to the power supply.
- Damage due to the excessive heat generated by exterior sources, water damage.
- Transport damage.
- Modifications to the appliance.
- Malfunctions due to improper usage
- Breakage or normal usage scratches of the ceramic glass surface.
- Light bulbs damage or exterior fuses.
- Operation under professional or commercial conditions.
- Lightning, fire, flood damages or other Acts of God.
- Replacement or attachment of parts other than original, provided by Fulgor Milano
- Cosmetic claims such as scratches on stainless steel, handle damage, etc. are under a limited warranty only, and must be claimed within 2 weeks after the date of purchase.
This warranty covers only the appliance and its components. Damage of any items in direct contact or placed near to the appliance are excluded from

the warranty. Charges from any third parties other than Fulgor Milano authorized service agencies will not be accepted.
Should the appliance prove defective in workmanship or material, the end user shall be granted repair or replacement only. Under no circumstances shall Fulgor be liable for any loss or damage, whether it be direct, consequential, or incidental, arising out of the use or incorrect use of the appliance.
In order to obtain warranty rights, the original invoice must be provided to the Technical Services Department, Fulgor Milano to verify the date of purchase. Some states do not allow limitations of incidental or consequential damages, therefore the above named limitations or exclusions may not apply.
In case of technical claims or for service, first contact the dealer where the Fulgor Milano appliance was purchased!
Fulgor Milano
After Sales Service Support & Warranty Information:
1-855-4-fulgor (855-438-5467)
fulgor@adcoservice.com
Cleaning and care
HOW TO CLEAN YOUR GLASS- CERAMIC HOB AND KEEP IT CLEAN
Your glass-ceramic hob is probably the easiest type of cooktop to clean. However, because it looks so good, you will expect more of it than any other type. The following comments are intended to help you to ensure that it does not fall below your expectations. Clean the hob top regularly either while it is still warm – but not hot - or as soon as it has cooled down. If any food or liquid, has spilled onto the surface, remove it before using the hob again. Do not let it get burnt on the hob. The longer it is left, the harder it will be to remove later. Generally the glass-ceramic surface of the hob can be cleaned with paper kitchen towels of any good quality, non-scratch kitchen cleaner. If food has boiled over or spilled on the surface and then burnt, it is best to remove it first with a razor blade scraper of the type used for removing paint from a window panel. If the handle or blade holder is plastic, make sure that only the blade comes into contact with the hot surface. The plastic could melt and even stick to it. For the best results the hob should be cleaned regularly with a special hob cleaner-conditioner containing silicone. This provides extra protection against soiling and makes it easier to clean next time. In the event of persistent stains caused by hard water, grease or marks with a metallic sheen, which cannot be removed by any of the methods suggested above, we recommend the use of Solvol. Autosol,
which can be obtained from motoring accessory shops or the motoring section of supermarkets and do-it-yourself centres. Whatever method you choose to clean your glass-ceramic hob, always wipe it over thoroughly afterwards with a wet cloth to remove all traces of food or cleaner and then wipe it dry. The instruction with the cleaner may suggest that this is not necessary, but with some types residue left on the surface, it is better not to run the risk of this happening.
A Few Suggestions To Help You Keep Your Hob Looking Like New
- Do not clean your hob with abrasive or corrosive cleaners such as scouring powder, wire wool, oven cleaner or rust remover.
- Do not leave small particles of grit on the surface, for example sand or soil left on vegetables. If grit gets trapped under the bottom of a pan, it will scratch the surface.
- Pans or dishes may have rough edges or pitted bottoms which can cause scratching if they are slid across the surface, so it is best to avoid doing so. This is particularly true of cast-iron utensils.
- Do not let anything that may melt (plastic, kitchen foil, sugar or food with a high sugar content) come into contact with the surface of the hob while it is hot. Should anything accidentally melt on the top, remove it immediately (while still hot) with a razor blade scraper.
Electrical connection

These appliances must be installed by a competent electrician, with all electrical and installation requirements made in accordance with the regulations of the Electrical Equipment of Buildings, published by the Institution of Electrical Engineers. It must be connected to the electrical supply by a multipole switch with minimum 3 mm contact to contact gap. All current and earth conductors must be of an appropriate size.
This product must be earthed and fused in accordance with current rating of appliance (compulsory provision according to law).
Before fitting please ensure that voltage indicated on the rating plate corresponds to the mains voltage of your home.
The rating plate provides information on Model Number, Serial Number, voltage rating, power and frequency of this appliance.
No liability for damage or injury to persons or property will be accepted arising from non-observance of these requirements. If the supply cord is damaged, it must be replaced by the manufacturer, its service agent or similarly qualified per-sons in order to avoid a hazard.
The main cable must be of the right size, in compliance with the power of the hob (see plate and the following table), elastic with insulation in rubber of HO5RR-F or HO5RN-F type and of a length allowing the extraction of the appliance from the worktop.

text_image
230 V~ (2 LINES) 1 2 L1 3 4 L2 230 V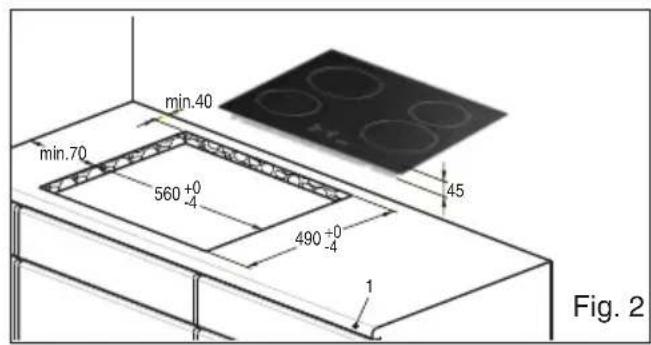
text_image
min.70 560 +0/4 490 +0/4 min.40 45 Fig. 2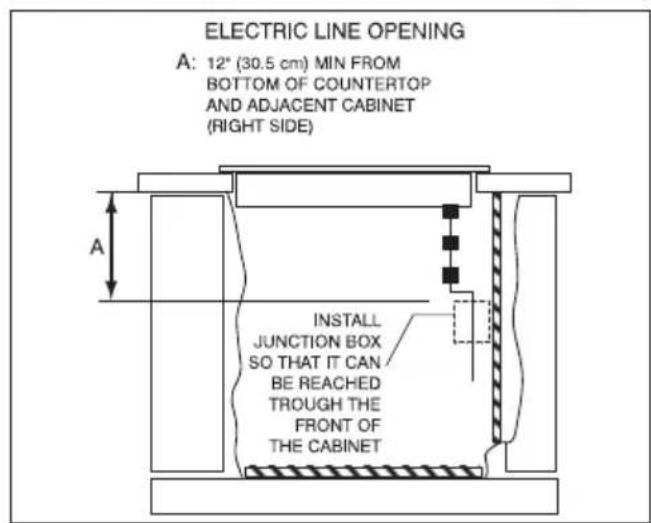
text_image
ELECTRIC LINE OPENING A: 12" (30.5 cm) MIN FROM BOTTOM OF COUNTERTOP AND ADJACENT CABINET (RIGHT SIDE) INSTALL JUNCTION BOX SO THAT IT CAN BE REACHED TROUGH THE FRONT OF THE CABINET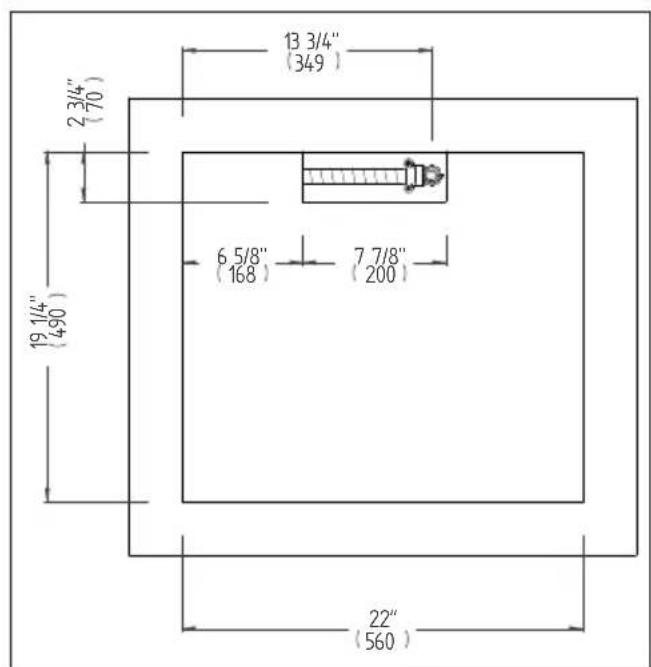
text_image
13 3/4" (349) 2 3/4" (70) 19 1/4" (490) 6 5/8" (168) 7 7/8" (200) 22" (560)Installation in the kitchen worktop
As far as fire hazard protection is concerned, this apparatus can be fitted also close to wooden walls that are higher than the surface on which it is installed, provided a minimum clearance of 70 mm is maintained between the apparatus and the side walls, and a clearance of 40 mm is maintained between it and the rear wall.
To install it in the cut-out follow these instructions:
• Make a cut-out having a size shown in fig. 2 in the kitchen worktop (fig. 2 part. 1).
- Insert the hob in the cut-out and secure it by means of the four clamps (fig. 3 part. 1) tightening the four screw (fig. 3 part. 2).
- Make sure that the rubber seals (fig. 3 part. 3) are properly in place and that the mains cable is not squeezed and has no narrow bends.

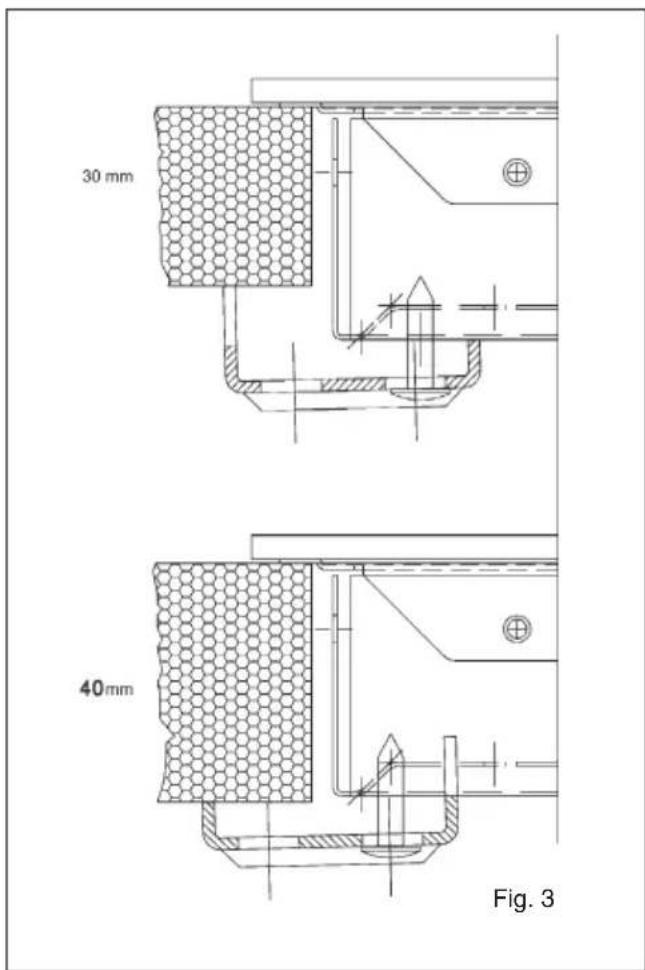
text_image
30 mm 40mm Fig. 3IMPORTANT: Save these instructions for the local electrical inspector use.
INSTALLER: Please leave this manual with owner for future reference.
OWNER: Please keep this manual for future reference.
Pay attention to these symbols present in this manual

DANGER
You can be killed or seriously injured if you don't IMMEDIATELY follow instructions.

WARNING
This is the safety alert symbol. This symbol alerts you to potential hazards that can kill or hurt you and others.
You can be killed or seriously injured if you don't follow these instructions.
Read and save these instructions To installer:
Leave these instructions with the appliance.
To customer:
Retain these instructions for future reference.

WARNING
- If the information in this manual is not followed exactly, a fire or explosion may result in personal injury or death.
- Do not store or use gasoline or other flammable vapors and liquids in the vicinity of this or any other appliance.
Special Warnings
Please read all instructions before using this appliance
Proper installation is your responsibility. Have a
qualified technician install this cooktop.
Important:
- Observe all governing codes and ordinances.
- Write down the model and serial numbers before installing the cook top. Both numbers are on the serial rating plate located on bottom of cooktop box.
Before Starting Installation

WARNING
It is the customer's responsibility to contact a qualified electrical installer. To assure that the electrical installation is Adequate and in conformity with national electrical code:
ANSI/NFPA 70-latest edition ** or CSA standards C22.1-94, Canadian Electrical Code, part No.0-M91 - latest edition*** and all local codes and ordinances.
Copies of the standards listed may be obtained from:
** National Fire Protection Association One Batterymarch Park Quincy, Massachusetts 02269
*** CSA International 8501 East Pleasant Valley Rd. Cleveland, OH 44131-5575
To eliminate the risk of burns by reaching over heated surface units, cabinet storage space located above the surface units should be avoided. If he cabinet storage is to be provided, the risk can be reduced by installing a range hood that projects horizontally a minimum of 5" (12,7 cm) beyond the bottom of cabinet.
Cher Client,
- activation normale des touches (son
bref).
After Sales Service Support & Warranty Information: 1-855-4-fulgor (855-438-5467) fulgor@adcoservice.com
text_image
13 3/4" (349) 2 3/4" (70) 19 1/4" (490) 6.5/8" (168) 7.7/8" (200) 22" (560)** National Fire Protection Association One Batterymarch Park Quincy, Massachusetts 02269
*** CSA International 8501 East Pleasant Valley Rd. Cleveland, OH 44131-5575