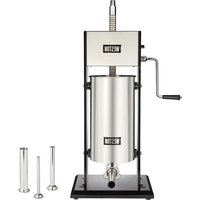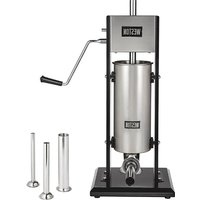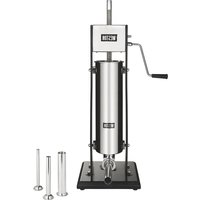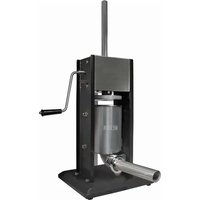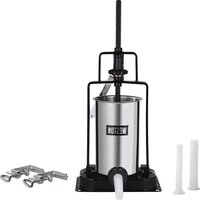
86-0501-W - Other kitchen appliances Weston - Free user manual and instructions
Find the device manual for free 86-0501-W Weston in PDF.


User questions about 86-0501-W Weston
0 question about this device. Answer the ones you know or ask your own.
Ask a new question about this device
Download the instructions for your Other kitchen appliances in PDF format for free! Find your manual 86-0501-W - Weston and take your electronic device back in hand. On this page are published all the documents necessary for the use of your device. 86-0501-W by Weston.
USER MANUAL 86-0501-W Weston
text_image
WESTON RECONNECT WITH REAL FOOD WESTON5 LB
VERTICAL SAUSAGE STUFFER
86-0501-W
DUE TO CONSTANT FACTORY IMPROVEMENTS, THE PRODUCT PICTURED MIGHT DIFFER SLIGHTLY FROM THE PRODUCT IN THIS BOX. 040317
GERNERAL SAFETY RULES 3
COMPONENT LIST 4-5
ASSEMBLY 6-7
DISASSEMBLY & CLEANING 8
STUFFING INSTRUCTIONS 8-9
FOOD SAFETY 10
SAUSAGE INFORMATION 11
WARRANTY 12
- CHECK FOR DAMAGED PARTS. Before using the Stuffer, check that all parts are operating properly and perform the intended functions. Check for binding of moving parts, mounting and any other conditions that may affect the operation.
- KEEP CHILDREN AWAY. NEVER LEAVE THE APPLIANCE UNATTENDED. The Stuffer is NOT A TOY.
- The Manufacturer declines any responsibility in the case of improper use of the Stuffer. Improper use of the Stuffer will VOID the warranty.
- NEVER store or leave the Stuffer at a temperature lower than 32°F (0°C).
- Repair must be done by an authorized dealer. Use only factory original parts and accessories. Modification of the Stuffer will VOID the warranty.
- Be sure the Stuffer is stable during use. All four feet should be secure on a level surface. The Stuffer should not move during operation.
- NEVER operate the Stuffer with the Gear Housing Cover open or removed.
- WEAR EYE PROTECTION! Everyday eye glasses are not safety glasses. Safety glasses conform to ANSI Z87.1 requirements. Note: Approved safety glasses have Z87 printed or stamped on them.
- DO NOT use while under influence of drugs or alcohol.
- Household use only.
SAVE THESE INSTRUCTIONS
ENGLISH INSTRUCTIONS
text_image
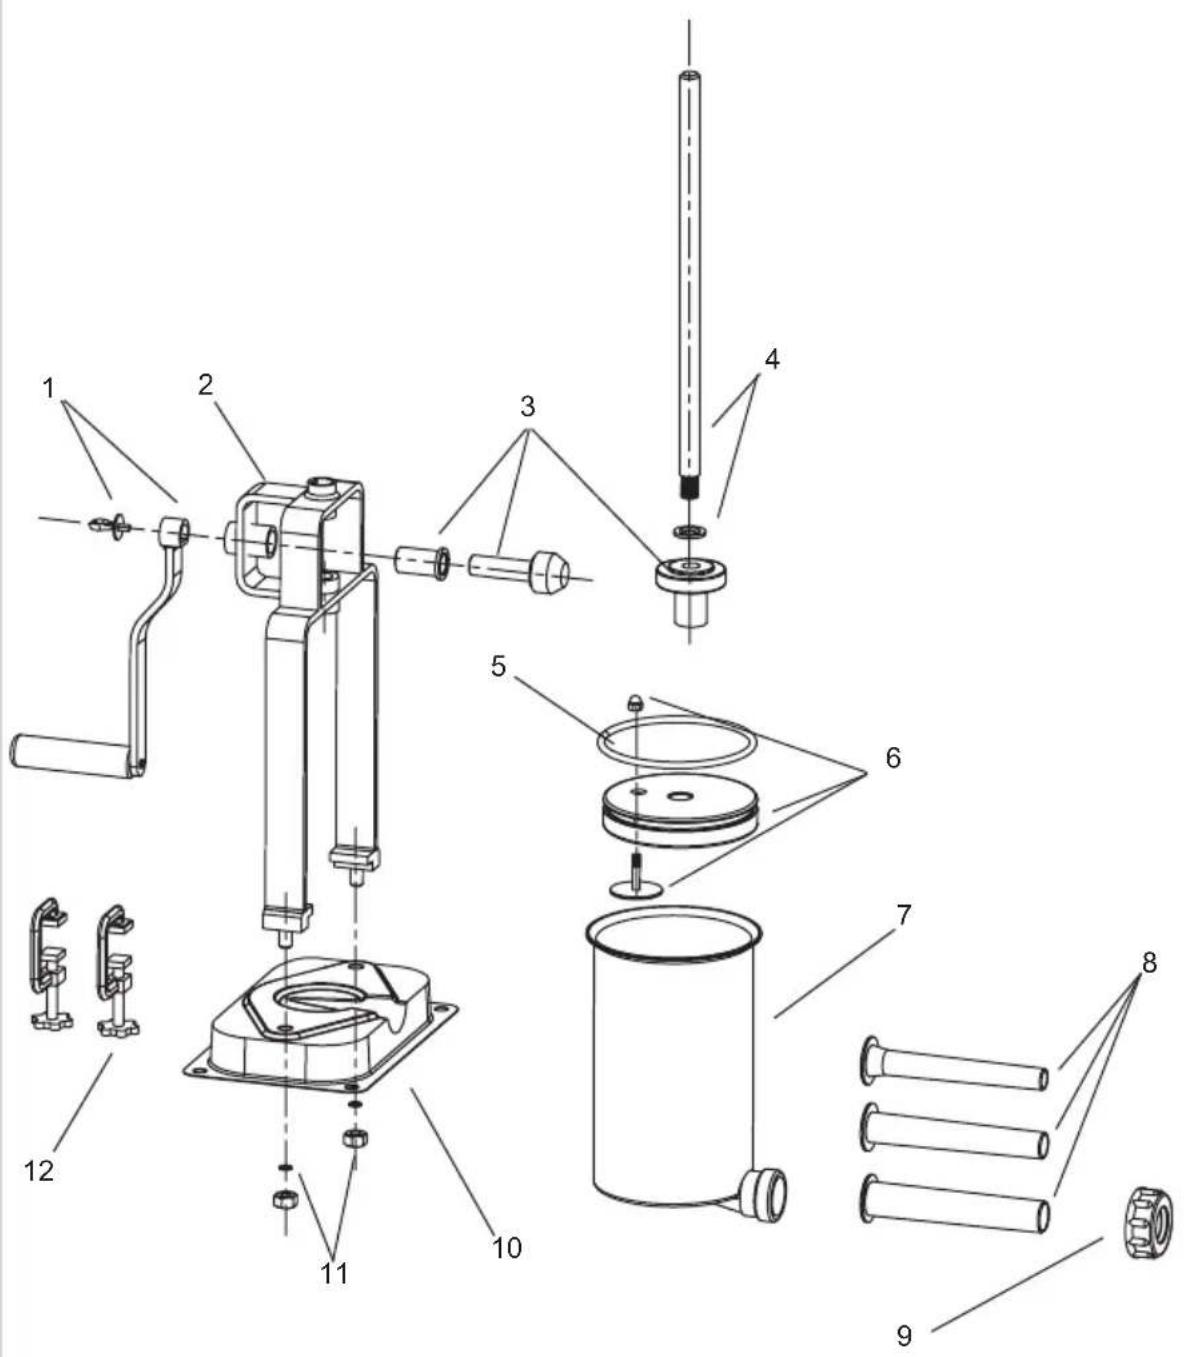
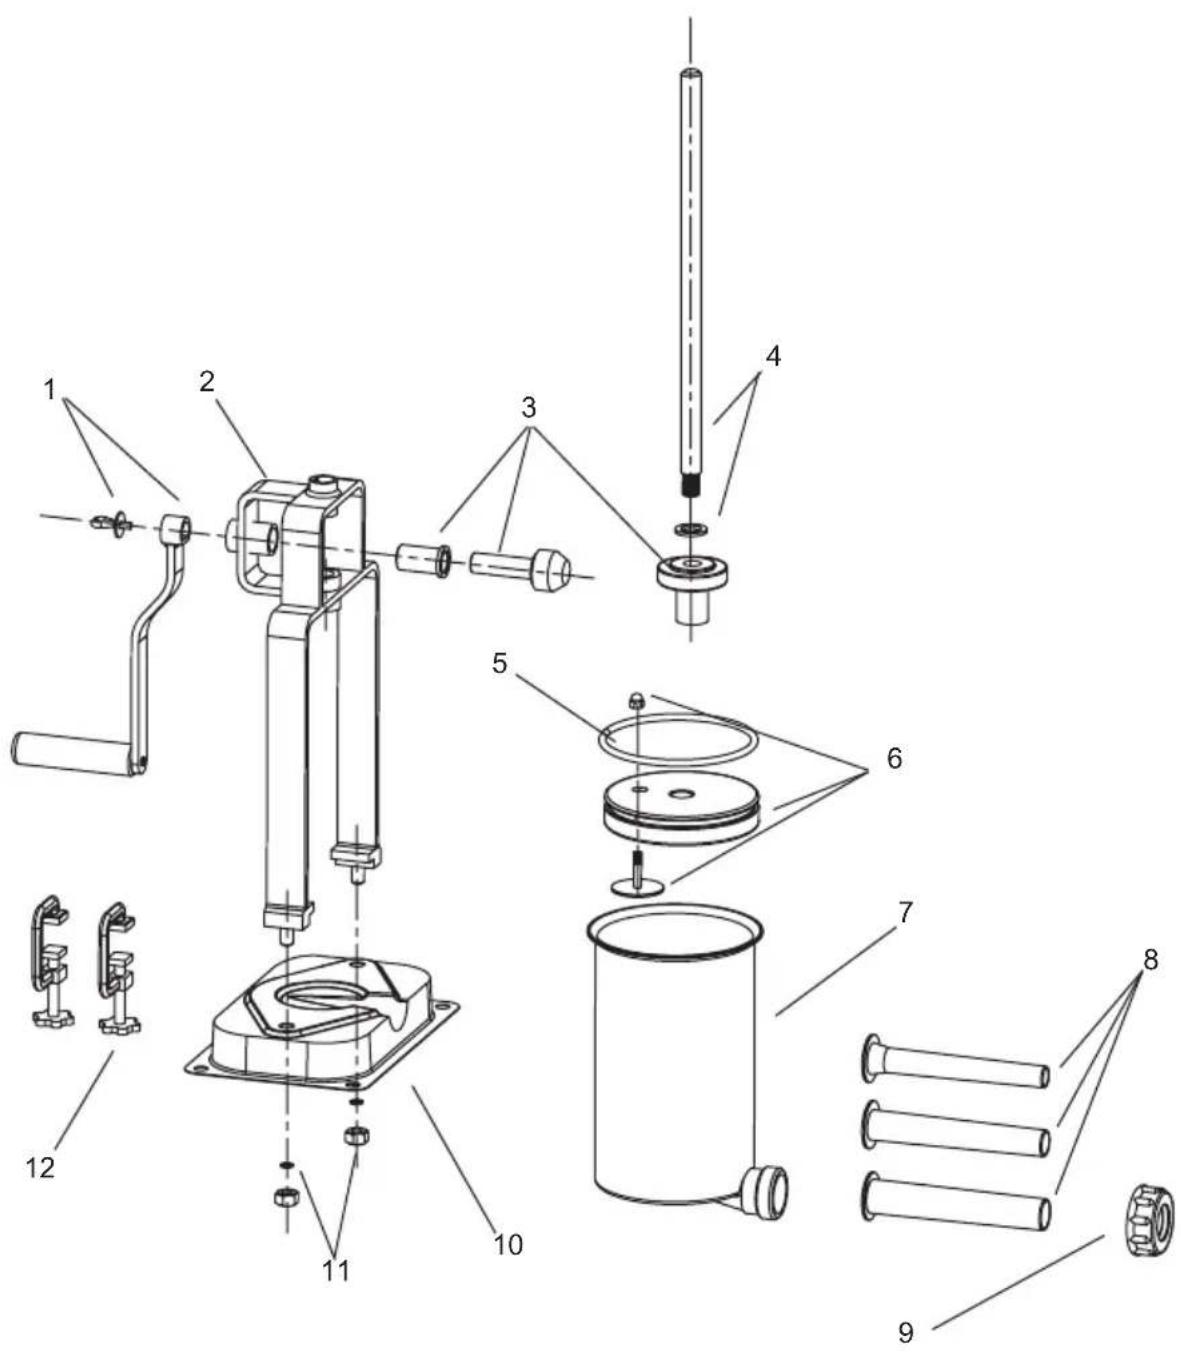
Technical diagram of a mechanical device with numbered parts for identificationCOMPONENT LIST
| DIAGRAM NUMBER PART DESCRIPTION PART NUMBER | ||
| 1 HANDLE WITH WINGNUT 73-0540 | ||
| 2 FRAME 73-0541 | ||
| 3 GEAR SET (2) AND HORIZONTALGEAR BUSHING | 73-0542 | |
| 4 PLUNGER SHAFT WITH WASTER 73-0543 | ||
| 5 PLUNGER SEAL 73-0544 | ||
| 6 PRESSURE RELEASE VALVE KIT(3 PIECE SET) INCLUDES: PISTON, MGACORN NUT, PLUNGER | 73-0545 | |
| 7 STAINLESS STEEL CANISTER 86-0532 | ||
| 8 PLASTIC FUNNEL SET (3 FUNNELS) 73-0546 | ||
| 9 | FRONT RING NUT | 73-0547 |
| 10 | BASE | 73-0548 |
| 11 | M10 BASE NUTS *2) AND M10 BASEWASHERS (2) | 73-0549 |
| 12 | CLAMPS (2) | 73-0550 |
If any components of this unit are broken, the unit does not operate properly or you need a replacement instruction manual, visit us on the web at
WestonSupply.com
Or call Weston Brands LLC Toll Free at 1-800-814-4895
Monday thru Friday 8:00am-5:00pm ET. Outside the U.S. call 001-216-901-6801
ASSEMBLY
BODY ASSEMBLY
- Align the Frame with the holes in the Base. From below the Base, slide each Base Washer onto the threaded end of the Frame. Secure each Base Washer with a Base Nut (FIGURE 1).
PLUNGER ASSEMBLY
-
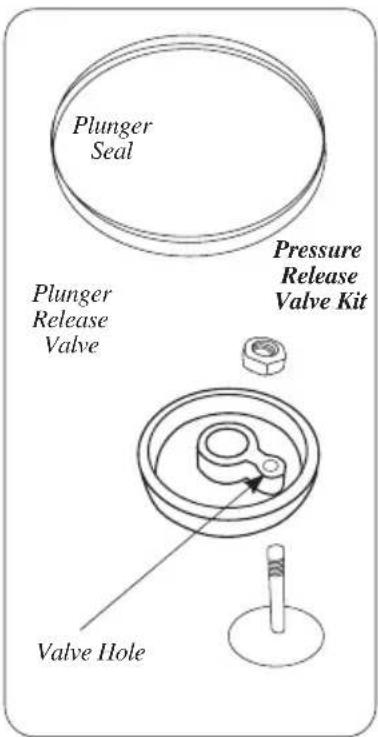
Slide the Plunger Seal onto the Plunger Release Valve (FIGURE 2).
-
Insert the piston through the valve hold. From the top of the Plunger, place the Acorn Nut on the threaded end of the piston. NOTE: The piston will feel loose in the Pressure Release Valve KIt.
-
Place the assembled Plunger Release Valve Kit onto the end of the Plunger Shaft (FIGURE 3).
FIGURE 2
text_image
Plunger Seal Plunger Release Valve Pressure Release Valve Kit Valve Hole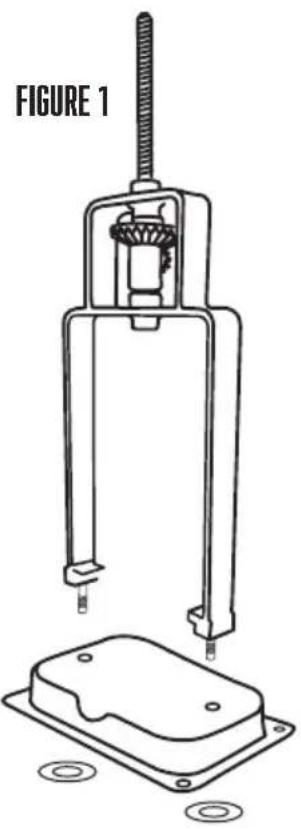
natural_image
Technical line drawing of a mechanical device with mounting base and housing (no text or symbols)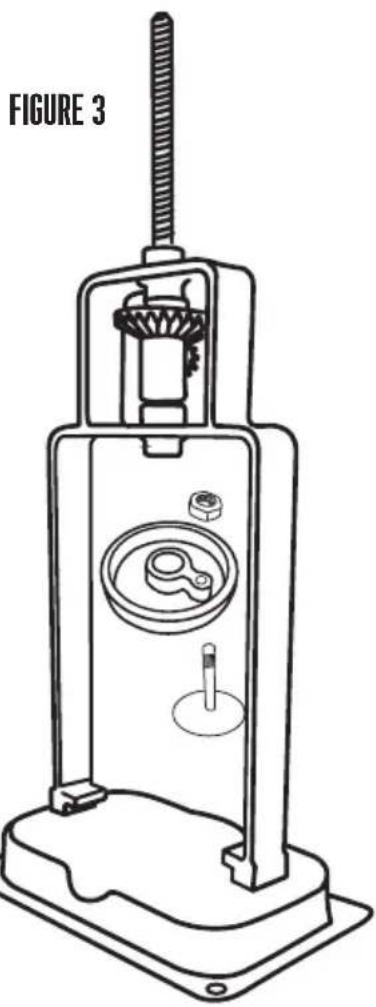
natural_image
Technical line drawing of a mechanical device labeled FIGURE 3, showing internal components and mounting base (no text or symbols beyond label)STUFFER ASSEMBLY
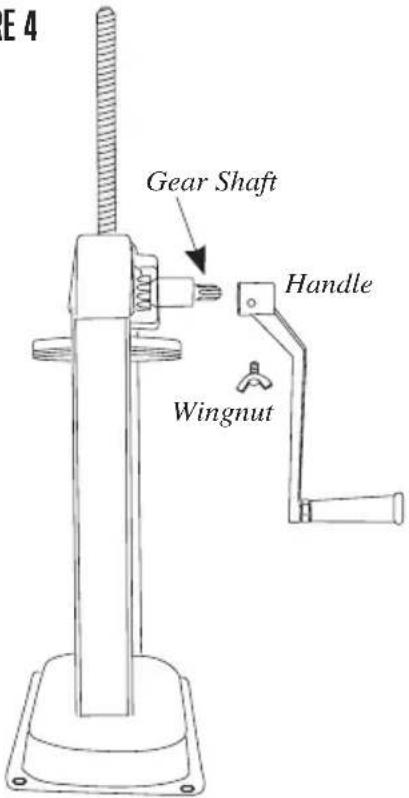
- Attach the Handle by sliding it onto the Gear Shaft and placing the Wingnut into the hole in the Handle. Twist to tighten (FIGURE 4).
- Crank the Handle counterclockwise to bring the Plunger to the top of the Stuffer.
- Slide the Notches at the bottom of the canister into the Canister Mounts at the base of the Frame (FIGURE 5).
- Insert the Stuffing Funnel of your choice through the Front Ring Nut. Screw the Front Ring Nut and Stuffing Funnel onto the mouth of the Canister until snug. DO NOT OVERTIGHTEN the Front Ring Nut, as it may damage the Funnel (FIGURE 6).
FIGURE 4
text_image
E4 Gear Shaft Handle Wingnut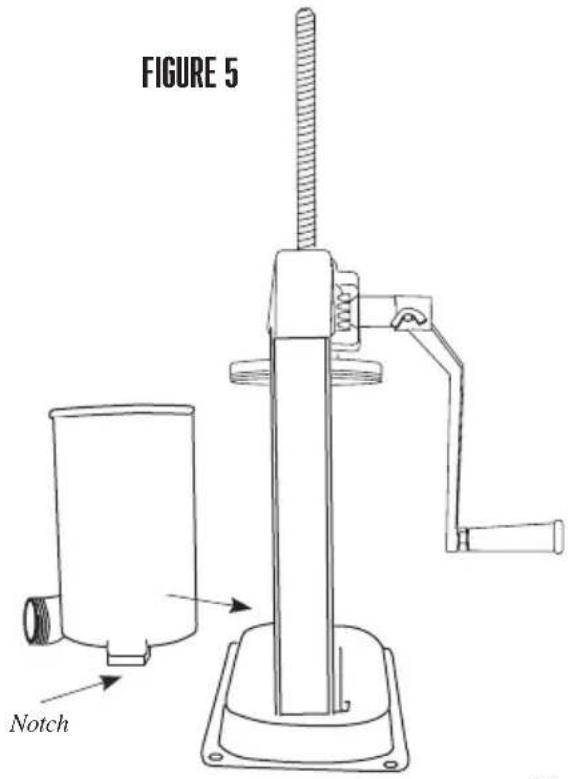
text_image
FIGURE 5 Notch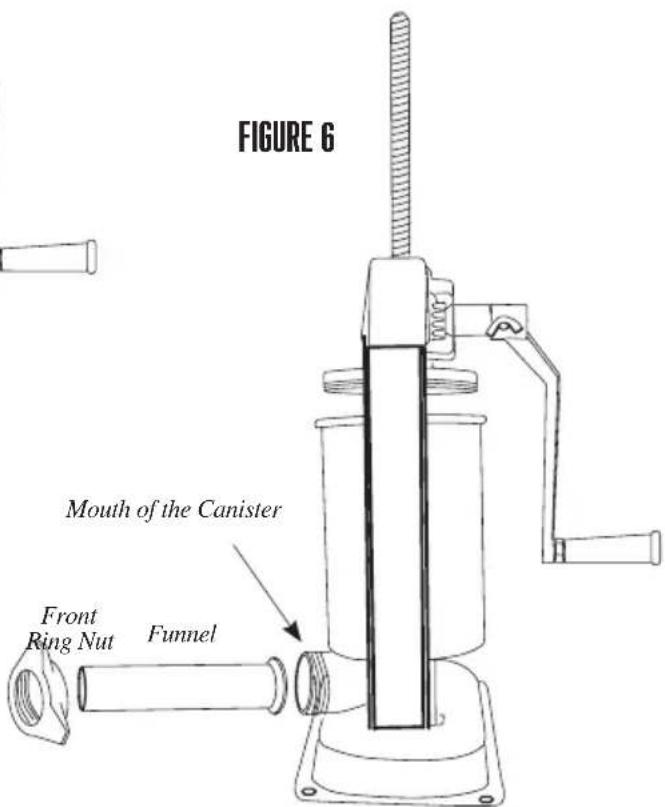
text_image
FIGURE 6 Mouth of the Canister Front Ring Nut FunnelDISASSEMBLY & CLEANING
- Remove the Stuffing Funnel by unscrewing the Front Ring Nut, and pulling the Funnel out.
- Turn the Handle counter-clockwise until the Plunger comes up and out of the Canister.
- Slide the Canister out.
- Unscrew the Plunger Release Valve Kit from the Plunger Shaft. Disassemble the Pressure-Release Valve from the Plunger. Remove the Plunger Seal from the Plunger.
- Wash all parts that have come in contact with meat in hot soapy water. BE SURE TO CLEAN THE PARTS IMMEDIATELY AFTER USE. Rinse and thoroughly dry all parts immediately. Sterilize as needed.
- Fully lubricate the Shaft, Canister, Pressure-Release Valve components and the Front Ring Nut with a food-grade lubricant before and after each use.
STUFFING INSTRUCTIONS
! CAUTION!! When the Plunger is pulled out of the Canister, RELEASE THE HANDLE SLOWLY! Pressure or gravity could cause the Handle to spin back slightly and cause injury.
NOTE: Apply a food-grade lubricant to the inside of the Canister before filling with the meat mixture.
- Slide out the Canister.
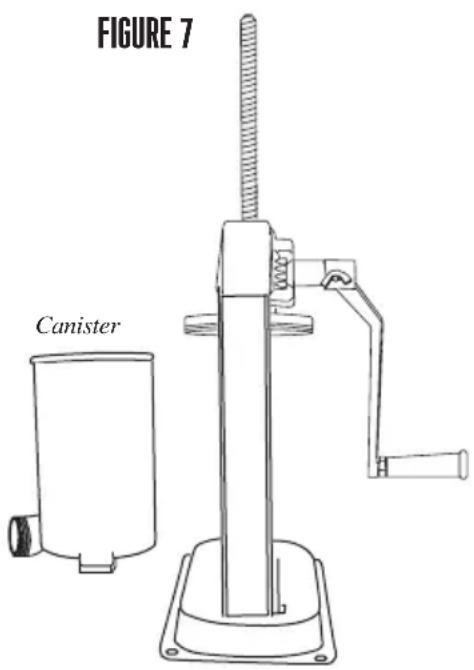
- Fill the Canister with the ground meat and seasoning mixture (FIGURE 7).
- Press the mixture down into the Canister firmly to release any trapped air.
- Slide the Notches at the bottom of the canister into the Canister Mounts at the base of the Frame.
- Turn the Handle clockwise, until the Plunger comes in contact with the meat and the mixture is ready to extrude out the end of the Stuffing Funnel.
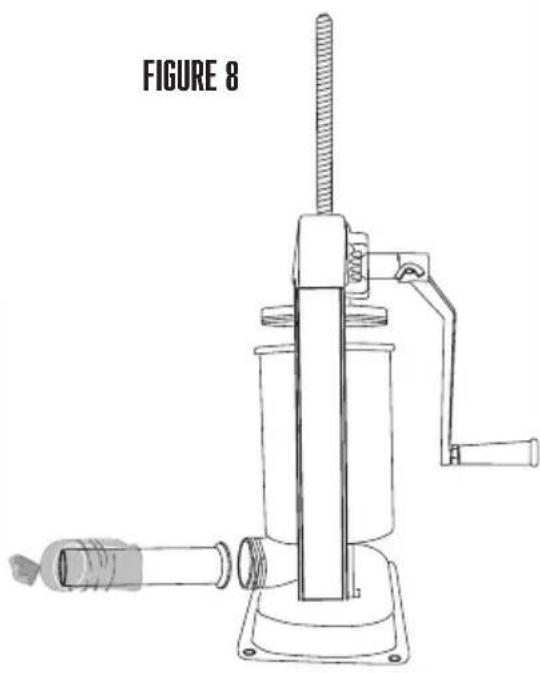
- Slip the casing on the end of the Stuffing Funnel until the entire casing has slid onto the Stuffing Funnel (FIGURE 8).
- Tie, twist or hog ring the end of the casing to seal it.
text_image
FIGURE 7 Canister- Turn the Handle clockwise to extrude the mixture into the casing. For best results, apply pressure around the casing, close to the end of the Stuffing Funnel. This will hold the casing tight and will cause the mixture to pack firmly into the casing.
- When the end of the casing has been reached, twist, tie, or hog ring the casing to seal the contents inside.
STUFFING TIPS: The following are suggestions to help reduce the resistance when stuffing with the 13 mm Stuffing Funnel.
A. Add water to the meat mixture- up to 1-1/2 cups (0.4 L) of water per every 5 lb (2.3 kg) of seasoned meat. B. Add 1/4 cup (60 ml) of vegetable or olive oil per every 5 lb (2.3 kg) of seasoned meat for better flow.
natural_image
Line drawing of a mechanical device labeled FIGURE 8, showing a lever mechanism with no text or symbols on the device itself.FOOD SAFETY
There are basic rules to follow when handling food. They are COOK, SEPARATE, CLEAN, and CHILL.
COOK
It's crucial to cook food to a safe internal temperature to destroy bacteria that is present. The safety of hamburgers and other foods made with ground meat has been receiving a lot of attention lately, and with good reason. When meat is ground, the bacteria present on the surface is mixed throughout the ground mixture. If this ground meat is not cooked to at least 160^ to 165^ (71°C to 74°C), bacteria will not be destroyed and there's a good chance you will get sick.
Solid pieces of meat like steaks and chops don't have dangerous bacteria like E. coli on the inside, so they can be served more rare. Still, any beef cut should be cooked to an internal temperature of at least 145^ (63°C) (medium rare). The safe temperature for poultry is 165^ (75°C) and solid cuts of pork should be cooked to 145^ (63°C).
SEPARATE
Foods that will be eaten uncooked and foods that will be cooked before eating MUST ALWAYS be separated. Cross-contamination occurs when raw meats or eggs come in contact with foods that will be eaten uncooked. This is a major source of food poisoning. Always double-wrap raw meats and place them on the lowest shelf in the refrigerator so there is no way juices can drip onto fresh produce. Then use the raw meats within 1-2 days of purchase, or freeze for longer storage. Defrost frozen meats in the refrigerator, not on the counter.
When grilling or cooking raw meats or fish, make sure to place the cooked meat on a clean platter. Don't use the same platter you used to carry the food out to the grill. Wash the utensils used in grilling after the food is turned for the last time on the grill, as well as spatulas and spoons used for stir-frying or turning meat as it cooks.
Make sure to wash your hands after handling raw meats or raw eggs. Washing hands with soap and water, or using a pre-moistened antibacterial towelette is absolutely necessary after you have touched raw meat or raw eggs. Not washing hands and surfaces while cooking is a major cause of cross-contamination.
CLEAN
Wash your hands and work surfaces frequently when you are cooking. Washing with soap and warm water for at least 15 seconds, then dry with a paper towel.
CHILL
Chilling food is very important. The danger zone where bacteria multiply is between 40^ F and 140^ F ( 4^ C and 6^ C). Your refrigerator should be set to 40^ F ( 4^ C) or below; your freezer should be 0^ F (-17°C) or below. Simple rule: serve hot foods hot, cold foods cold. Use chafing dishes or hot plates to keep food hot while serving. Use ice water baths to keep cold foods cold. Never let any food sit at room temperature for more than 2 hours - 1 hour if the ambient temperature is 90^ F ( 32^ C) or above. When packing for a picnic, make sure the foods are already chilled when they go into the insulated hamper. The hamper won't chill food - it just keeps food cold when properly packed with ice. Hot cooked foods should be placed in shallow containers and immediately refrigerated so they cool rapidly. Make sure to cover foods after they are cool.
NOTE: Special considerations must be made when using venison or other wild game, since it can become heavily contaminated during field dressing. Venison is often held at temperatures that could potentially allow bacteria to grow, such as when it is being transported. Refer to the USDA Meat and Poultry Department for further questions or information on meat and food safety.
SAUSAGE INFORMATION
MEAT SELECTION FOR SAUSAGE MAKING
Sausage making has evolved over many years and generations, and as a result there are countless types of sausage you can make using the basic ingredients of meat, fat and a few carefully blended spices. Following are a few simple guidelines that will help you make the best tasting sausage possible.
Any type of meat can be used for making sausage: pork, beef, bison, moose and caribou, even antelope make great sausage. It is important when preparing venison or other red game meats to trim all the fat from the meat, as red game tallow will turn rancid in as few as five days. Replace the fat with either pork or beef fat, depending on the type of product you are making, at a ratio of 1 pound (0.5 kg) of fat for every 4 pounds (1.8 kg) of game meat.
The fat content of your sausage will affect the taste, texture, cooking characteristics and shelf life of your product. Most commercially made sausage has a fat content of about 20%. Using less than 12% fat will result in a very dry tasting sausage, while using more than 20% may result in a sticky flavorless sausage that will be difficult to cook.
CURING
It is important to properly cure meats to preserve meat and poultry, and to destroy undesirable microorganisms on the meat surfaces that cause spoilage and foodbourne illnesses. There are many steps that help in this process, including smoking, cooking, drying, chilling and the addition of cure ingredients. The oldest means of accomplishing this is by introducing salt into the meat. The resistance of bacteria to salt varies widely among different types of bacteria. The growth of some bacteria is inhibited by salt concentrations as low as 3%, e.g., Salmonella, whereas other types are able to survive in much higher salt concentrations, e.g., Staphylococcus. Fortunately, the growth of many undesirable organisms normally found in cured meat and poultry products is inhibited at low concentrations of salt.
Modern curing is based on Nitrates and is very scientific. Purchase Weston Pink Curing Salt (02-0000-W) and follow the included instructions to ensure that you are properly curing your homemade sausage.
CASING
Weston offers a complete variety of casings. The right choice depends on personal preference as well as the type of sausage you wish to make. For most sausages, your choices are natural or collagen. Don't let the names fool you; collagen casings are not a synthetic. They are made from beef skin and other tissues. Collagen casings are uniform in size and texture and require almost no preparation. "Natural" casings are the intestines of lamb, sheep, hogs or beef. They are less uniform in size and require preparation. There are also fibrous non-edible casings that are most commonly used for summer sausage and ring bologna
TYPES OF SAUSAGE
Most sausages fall into one of four categories: Fresh, Smoked, Cooked or Dried. All sausages, except dried, require refrigerated storage. There is also a sub-category of uncooked smoked sausages.
Among the fresh and uncooked smoked sausages, you will find such flavors as kielbasa or Polish sausage, Italian sausage, breakfast sausage and many others. Both fresh and uncooked smoked sausages require cooking before eating and also require refrigerated storage.
Smoked and cooked sausages include salami, bologna, the ever-popular hot dogs and many others. Proper smoking requires a smokehouse or smoker. Weston offers Outdoor Propane Smokers in a variety of sizes (41-0701-W, 41-0301-W, or 41-0401-W). Most smoked sausages are warmed before serving. Many people think that a smoked sausage will last much longer without spoilage, but this is not true. Smoked sausages should be treated the same as fresh sausage in terms of storage.
Dried sausages require the longest processing time, as they are air dried over a long period of time. Dry cured sausages include salami, chorizo, pepperoni, among others. The conditions under which the meat is dried are very exacting; temperature, time and humidity must all be carefully monitored for a safe and delicious product.
STORAGE
For the best flavors, we recommend vacuum sealing your fresh sausages, then storing them in the refrigerator (short term) or freezer (long term). Weston manufactures a variety of vacuum sealers. Ask the retailer from which you purchased this unit for their selection. Store dry cured products in paper or other breathable wrapping, unrefrigerated.
LIMITED WARRANTY
This warranty applies to products purchased and used in the U.S. and Canada. This is the only express warranty for this product and is in lieu of any other warranty or condition. This product is warranted to be free from defects in material and workmanship for a period of one (1) year from the date of original purchase. During this period, your exclusive remedy is repair or replacement of this product or any component found to be defective, at our option. If the product or component is no longer available, we will replace with a similar one of equal or greater value.
This warranty does not cover unauthorized repairs or service to products, products sold “as-is” by retailers, glass, filters, wear from normal use, use not in conformity with the printed directions, or damage to the product resulting from accident, alteration, abuse, or misuse. This warranty extends only to the original consumer purchaser or gift recipient and is not transferrable. Keep the original sales receipt, as proof of purchase is required to make a warranty claim. This warranty is void if the product is subjected to any voltage and waveform other than as specified on the rating label (e.g., 120V \~ 60 Hz).
We exclude all claims for special, incidental and consequential damages caused by breach of express or implied warranty. All liability is limited to the amount of the purchase price. Every implied warranty, including any statutory warranty or condition of merchantability or fitness for a particular purpose, is disclaimed except to the extent prohibited by law, in which case such warranty or condition is limited to the duration of this written warranty. This warranty gives you specific legal rights. You may have other legal rights that vary depending on where you live. Some states or provinces do not allow limitations on implied warranties or special, incidental, or consequential damages, so the foregoing limitations may not apply to you.
Before returning the product for any repair or service: it must be clean and free from any food particles or other debris; otherwise, we will return it or impose a \$50 cleaning surcharge, at our option.
To make a warranty claim do not return this product to the store. Please go to www.WestonSupply.com/Contact; or call 1.800.814.4895 in the U.S. and 001.216.901.6801 outside the U.S., Monday – Friday, 8 am – 5 pm Eastern. You are responsible for all costs associated with shipping us the product freight prepaid. If the product qualifies for a warranty repair or replacement, we will bear the cost of returning it to you. We are not responsible for shipping damage.
For non-warranty work: call 1.800.814.4895 in the U.S. and 001.216.901.6801 outside the U.S., Monday – Friday, 8 am – 5 pm Eastern, to obtain a Return Merchandise Authorization Number (RMA Number). We will refuse all returns without an RMA Number. We charge US\$35/hour for all diagnostic, service, repair and processing work. We will not start any service or repair work without prior authorization. You are responsible for all costs associated with shipping us the product freight prepaid and our returning it to you.
text_image
WESTON RECONNECT WITH REAL FOOD WESTON5 LB (3L)
RELLENADORA VERTICAL DE SALCHICHAS
86-0501-W
DEBIDO A CONSTANTES MEJORAS EN LA FÁBRICA, EL PRODUCTO QUE SE MUESTRA PUEDE SER LIGERAMENTE DIFERENTE DEL PRODUCTO EN ESTA CAJA. 040317
natural_image
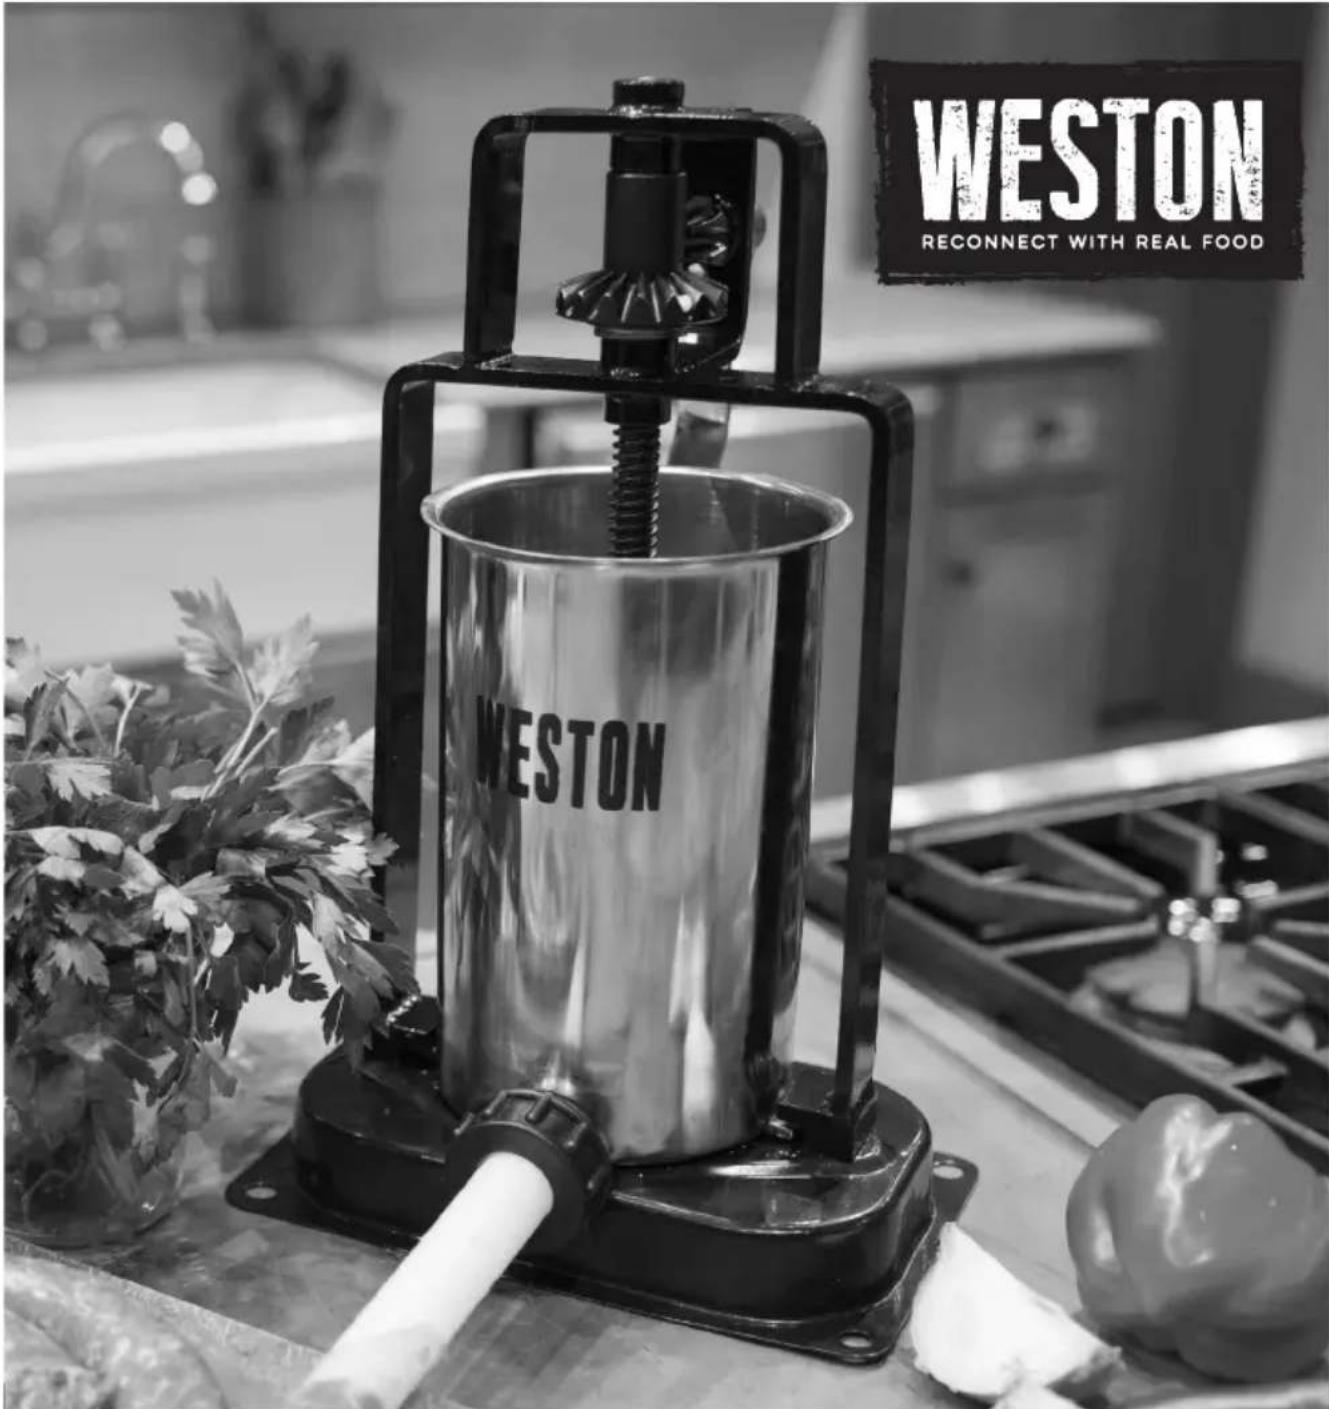
Black-and-white photo of a stainless steel feeding lamp labeled 'WESTON' on a kitchen counter with fresh ingredients like sausages and garlic nearby (no text beyond label)text_image
Technical diagram of a mechanical device with numbered parts for identificationnatural_image
Technical line drawing of a mechanical device with mounting base and housing (no text or symbols)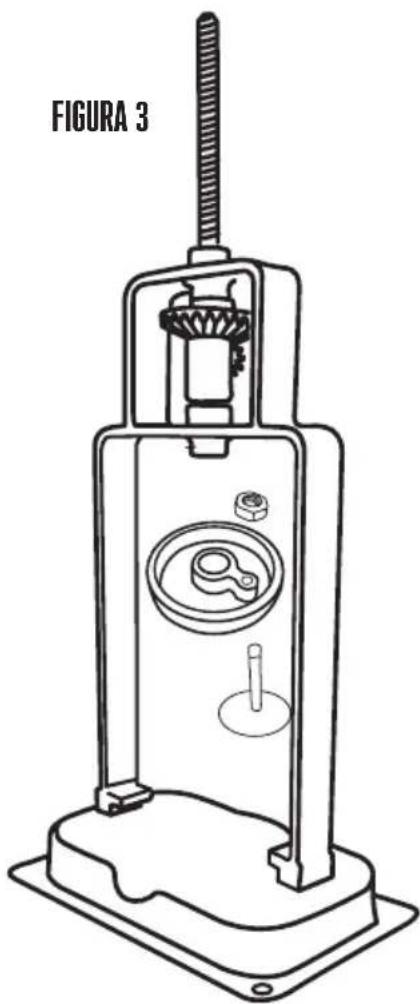
natural_image
Technical line drawing of a mechanical device labeled FIGURA 3, showing internal components and mounting base (no text or symbols beyond label)text_image
FIGURA 6 pienteDESARMADO Y LIMPIEZA
text_image
FIGURA 7 Recipientenatural_image
Line drawing of a manual hand pump device labeled FIGURA 8, showing internal components and handle (no text or symbols on the device itself)text_image
WESTON RECONNECT WITH REAL FOOD WESTON5 LB (3L)
REMLISSEUR VERTICAL DE SAUCISSES
86-0501-W
PARCE QUE NOS PRODUITS BÉNÉFICIENT DE PERFECTIONNEMENTS CONSTANTS APPORTÉS EN USINE, LES ILLUSTRATIONS PRÉSENTES PEUVENT ÊTRE LÉGÈREMENT DIFFÉRENTES DU PRODUIT REÇU. 040317
⚠️ IMPORTANTES RÈGLES DE SÉCURITÉ
LIRE ET COMPRENDRE COMPLÈTEMENT TOUTES LES DIRECTIVES ET AVERTISSEMENTS AVANT D'UTILISER CE PRODUIT. LE PLUS IMPORTANT EST VOTRE SÉCURITÉ! LE DÉFAUT D'OBSERVER LES PROCÉDURES ET MISES EN GARDE PEUT ENTRAINER DES BLESSURES GRAVES OU DES DOMMAGES MATÉRIELS. N'OUBLIEZ PAS : VOTRE SÉCURITÉ PERSONNELLE EST VOTRE RESPONSABILITE!
natural_image
Black-and-white photo of a portable stove labeled 'WESTON' with fresh vegetables and meat on a cutting board (no text beyond label)INSTRUCTIONS EN FRANÇAIS
text_image
Technical diagram of a mechanical device with numbered components for identificationDESCRIPTION DE LA PIÈCE
| NUMÉRO DE SCHÉMA DESCRIPTION DE LA PIÉCE NUMÉRO DE LA PIÉCE | ||
| 1 MANIVELLE AVEC ÉCROU À OREILLES 73-0540 | ||
| 2 CADRE 73-0541 | ||
| 3 ENSEMBLE D'ELÉMENTS DENTÉS (2)ET BAGUE D'ENGRENAGE HORIZONTAL | 73-0542 | |
| 4 AXE DU POUSSOIR AVEC RONDELLE 73-0543 | ||
| 5 JOINT DU POISSOIR 73-0544 | ||
| 6 VALVE DE SURPRESSION (JEU DE 3PIÈCES) COMPRED: PISTON, ÉCROUBORGNE MG, POUSSOIR | 73-0545 | |
| 7 CONTENANT EN ACIERS INOXYDABLE 86-0532 | ||
| 8 ENSEMBLE D'ENTONNOIRS EN PLAS-TIQUE (3 ENTONNOIRS) | 73-0546 | |
| 9 ÉCROU ANNULAIRE AVANT 73-0547 | ||
| 10 | EMBASE | 73-0548 |
| 11 | ÉCROUS À EMBASE M10 (2) ETRONDELLES D'EMBASE M10 (2) | 73-0549 |
| 12 | PINCES (2) | 73-0550 |
natural_image
Technical line drawing of a mechanical device with labeled parts, showing internal components and mounting base (no text or symbols beyond label)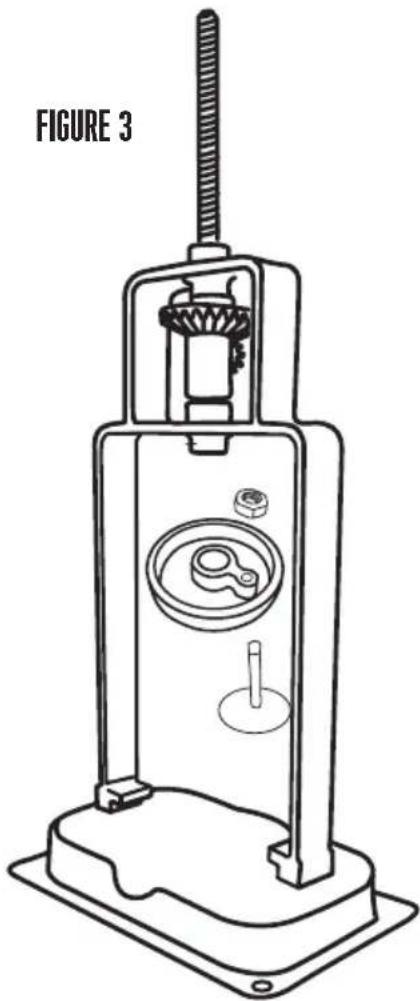
natural_image
Technical line drawing of a mechanical device labeled FIGURE 3, showing internal components and mounting base (no text or symbols beyond label)natural_image
Line drawing of a mechanical device labeled FIGURE8, showing a cylindrical component with a threaded shaft and attached plug (no text or symbols on the device itself)SÉCURITÉ ALIMENTAIRE
natural_image
Black-and-white photo of a Weston portable food stand with fresh vegetables and a glass container, no visible text or symbols on the main subject.ATTENTION!
PLEASE INSPECT THIS PACKAGE THOROUGHLY FOR MISSING PARTS OR ANY PRODUCT DAMAGE. IF YOUR PRODUCT CONTAINS SHIPPING DAMAGE, PLEASE CONTACT RETAILER FOR ASSISTANCE.
For all other questions regarding product usage, missing parts, product damage, difficulty or warranty activation, please contact the Weston Brands Customer Service Team: 8:00 am to 5:00 pm ET, Monday thru Friday
CustomerService@WestonProducts.com
U.S. Residents Customer Service Line: 1-800-814-4895 (Outside U.S. Call: 001-216-901-6801)
Weston Brands LLC, Cleveland, Ohio 44131
WestonSupply.com
Please DO NOT return this item to the retailer before contacting Weston Brands Customer Service.
SAVE THESE INSTRUCTIONS!
Refer to them often and use them to instruct others.
ATTENTION!
VEUILLEZ INSPECTER CET EMBALLAGE AVEC SOIN POUR Y DÉTECTER
TOUTE PIÈCE MANQUANTE OU ENDOMMAGÉE.
SI DES PIÈCES ONT ÉTÉ ENDOMMAGÉES PENDANT LE TRANSPORT. VEUILLEZ
COMMUNIQUER AVEC LE DÉTAILLANT POUR OBTENIR DE L'AIDE.
Weston Brands LLC, Cleveland, Ohio 44131
WestonSupply.com