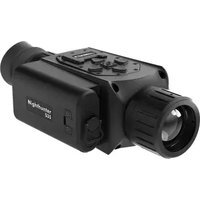
Nighthunter S35 Gen I - Binoculars Steiner - Free user manual and instructions
Find the device manual for free Nighthunter S35 Gen I Steiner in PDF.


| Product Type | Monocular thermal aiming module |
| Brand | Steiner |
| Model | Nighthunter S35 Gen I |
| Detector | Resolution 640x480 pixels, pitch 12 μm, spectrum 8–14 μm, NETD ≤50 mK |
| Lens | Focal length 35 mm, F/1.0, manual focus |
| Field of view at 100 m | 12.5 m x 9.4 m |
| Magnification | 1x to 8x (electronic zoom) |
| Frame rate | 50 Hz |
| Display | Color OLED 0.39 inch, resolution 1024x768 |
| Power supply | 2 Li-ion 18650 batteries (3.7 V, 3000 mAh each) |
| Battery life | ≥4.5 hours at 25°C (viewing only) |
| Internal memory | 16 GB (photo and video) |
| Connectivity | USB-C (data), micro HDMI, Wi-Fi (Steiner Connect app) |
| Operating temperature range | -30°C to +50°C |
| Storage temperature range | -40°C to +60°C |
| Waterproof | Yes |
| Shock resistance | 800 G / 1 ms (IEC60068-2-27) |
| Vibration resistance | 10–150 Hz, 0.15 mm (IEC60068-2-6) |
| Detection range (target 1.8 x 0.5 m) | 1800 m |
| Detection range (vehicle) | 4400 m |
| Recognition range (target 1.8 x 0.5 m) | 450 m |
| Identification range (target 1.8 x 0.5 m) | 225 m |
| Certifications | UN38.3, RoHS, CE, FCC, EAC |
Frequently Asked Questions - Nighthunter S35 Gen I Steiner
User questions about Nighthunter S35 Gen I Steiner
0 question about this device. Answer the ones you know or ask your own.
Ask a new question about this device
Download the instructions for your Binoculars in PDF format for free! Find your manual Nighthunter S35 Gen I - Steiner and take your electronic device back in hand. On this page are published all the documents necessary for the use of your device. Nighthunter S35 Gen I by Steiner.
USER MANUAL Nighthunter S35 Gen I Steiner
Bedienungsanleitung
Instruction Manual
Istruzioni d'uso
User manual Nighthunter S35 16
User manual Nighthunter S35 16
Thank you for purchasing the Steiner thermal riflescope. Please read this manual first and retain it for future reference.
IMPORTANT
Steiner reserves the right to modify product specifications at any time without prior notice.
FCC WARNING
This device complies with Part 15 FCC Rules. Operation is subject to the following two conditions: (1) This device may not cause harmful interference. (2) This device must accept any interference received including interference that may cause undesired operation.
IMPORTANT
Danger
- Please follow the method described in this Manual for charging the batteries, and follow proper charging procedures and precautions. Improper charging may cause overheating, damage and even personal injury;
- Do not attempt to open or disassemble batteries at any time.
Warning
- Do not use or store the device in an environment with the temperature higher than the permitted level;
- Do not expose the device directly to high-intensity heat sources, such as the sun, laser, spot welding machinery, etc.;
- Do not knock, throw or excessively vibrate the device and/or its accessories to avoid damage;
-
Do not attempt to disassemble the unit by yourself, which may cause damage to the device and loss of warranty rights;
-
Please observe the following rules when wiping this device:
-
Non-optical surface: if necessary, use a clean and soft cloth to wipe any non-optical surfaces of the thermal imaging camera;
- Optical surface: avoid getting dirt / debris / oils (including oil from your hands) on the optical surfaces of the thermal imaging camera. When an optical lens surface is contaminated, use a professional lens cloth to carefully clean it;
Notes
- Avoid exposing the device to excessive dust or moisture.
- The lens should be covered when the device is not in use;
List of Parts
- Micro USB 18650 Charger
- Micro HDMI Cable
PRODUCT COMPONENTS
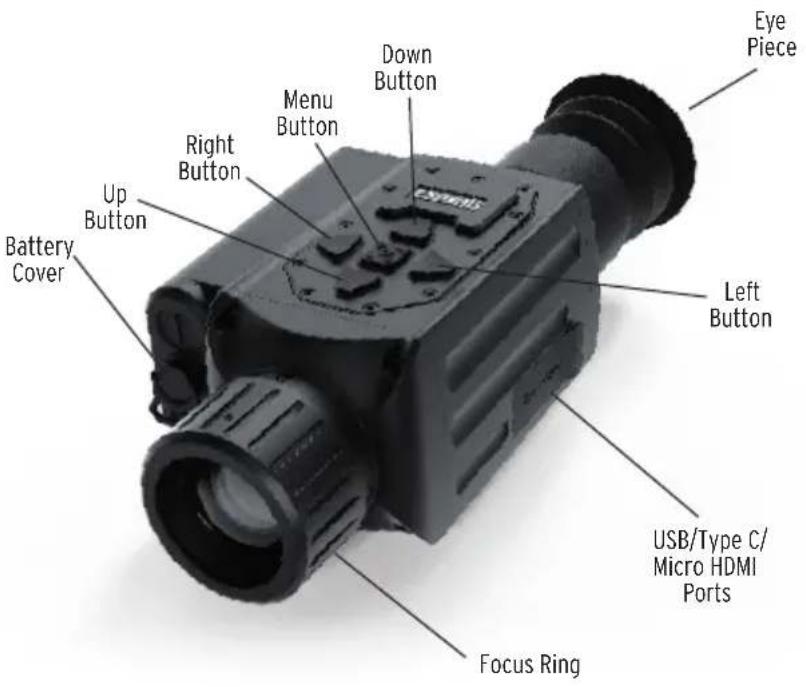
1. Focus ring
After the thermal imaging camera is turned on and aimed at the target, the focus ring should be turned until optimum image clarity is attained. When the distance to the target changes, the image may be blurred. Therefore, it may be necessary to turn the lens focus ring to refocus until the target image is clear.
2. Lens cover
Please cover the lens for protection when the unit is not in use.
3. USB Type-C port
The unit can be connected to external power, via the provided USB-C cable. When connected in this manner, the unit will operate but will NOT charge batteries inside the battery compartment. Batteries must be removed from the device in order to be recharged.
4. Micro HDMI
By attaching the provided micro-HDMI cable to the video-out port (marked "HDMI"), an external monitor may be connected. The image from the thermal camera will then be displayed on this remote monitor. Please note that only one display (internal microdisplay or external monitor) can be active at a time.
5. Battery cover
Batteries are inserted into the battery compartment, accessed via the battery cover. No tools are necessary to access this compartment. Batteries must be inserted with the proper polarity, as indicated on the outside of the battery cover.
QUICK START INSTRUCTIONS
| Buttons | Device current status | Short press Long press | |
| Power button(left button)◀ | Power on (menu not displayed) | Non-Uniformity Correction (NUC) | Display off / Power off |
| Power off / Power on | |||
| Display off Display on | When the button is lifted Display on | ||
| Power (menu displayed) | Back to previous menu / | ||
| ▲Up button | Menu bar is not displayed | Switch scene mode Zoom in | |
| Menu bar is displayed | Switch menu options / | ||
| ▶Right button | Menu bar is not displayed | Take photos Video recording | |
| Menu bar is displayed | Enter sub-menu / | ||
| Video recording Take a photo Stop recording | |||
| Menu button | Menu bar is displayed | Enter sub-menu / | |
| Menu bar is not displayed | Enter the menu / | ||
| Down button▼ | Menu bar is displayed | Confirm current option and return to previous menu | Return to or exit the menu without saving current settings |
| Menu bar is not displayed | Switch color palette Zoom out | ||
| NOTE: Users can adjust the device language according to their individual needs, English/German/French/Italian/Spanish. | |||
BUTTON DESCRIPTION
1. Power button (left button) - Power on
Press and hold the power button for 4 seconds until the startup image appears in the eye lens. At that point the imager is started successfully. The full bootup process takes approximately 18sec.
Power off
Manual power-off: press and hold the power button. The power-off progress bar will be displayed in the eyepiece, and the power will turn off when the button is released after the progress bar is full.
Automatic power-off: the user may set an automatic power-off time via the menu system. If set, in the absence of any button presses within the chosen time period, the unit will automatically power off.
Display off
Long press on the power button. The power-off progress bar will be displayed in the eyepiece. Before the progress bar is full, if the button is released, the power-off will be cancelled and Display Off mode will be entered.
Display on
In Display Off mode, press any button to wake the screen.
Non-Uniformity Correction (NUC)
During normal operation, the imager will occasionally and automatically perform a NUC. During this operation, a shutter momentarily drops in front of the sensor, freezing the image and resetting any fixed-pattern noise in the image. If excessive pattern-noise is noted in the image in between the system's automatic NUC functions, a manual NUC can be implemented. To perform this function, utilize a short press on the left button. The image will momentarily freeze and reset.
2. Record button (right button)
Take photos
With no menu displayed on the screen, utilize a short press on the right button. A photo will be stored of the current scene. The image on the display may briefly freeze while the image is saved to internal storage.
Video recording
With no menu displayed on the screen, utilize a long press on the right button. A video will start recording. Another long press will stop the recording.
During video recording, a short press may be utilized to take photos as well.
3. Up button
Switch scene mode
With no menu displayed on the screen, utilize a short press on the up button to switch between the three preset modes: standard, enhanced, and highlight (or detect*).
Zoom in
With no menu displayed on the screen, utilize a long press on the up button to electronically zoom in (enlarge) the scene. Please note that excessive zoom may result in a pixelated image.
4. Down button
Switch color palettes
With no menu displayed on the screen, utilize a short press on the down button to switch between the various color palettes: white hot, black hot, (adjustable*) red hot, iron, blue hot (or fire*), amber.
Zoom out
With no menu displayed on the screen, utilize a long press on the down button to electronically zoom out the scene.
5. Menu button
When the device is powered on and the menu is not displayed, utilize a short press on the menu button to display the menu.
Confirm and return / exit
When inside a menu, utilize a short press on the menu button to confirm the current option and return to the previous menu. When inside a menu, utilize a long press on the menu button to exit the menu without saving the current settings.
FUNCTION DESCRIPTION
These key features can be accessed via the menu system, to allow further user customization:
Scene mode: There are three preset scene modes that can be selected: standard, enhanced, and highlight (or detect*).
Color Palettes: There are multiple color palettes: white hot, black hot, (adjustable*) red hot, iron, blue hot (or fire*) and amber.
Brightness: This is the scene brightness, and is adjustable from levels 1–10. Note: the adjusted brightness value will be saved in the current scene mode.
Screen brightness: This is the amount of light coming out of the microdisplay, and is adjustable from levels 1-10. At night, it may be more comfortable to look at a dim display. During the day, the user may prefer a brighter display.
Contrast: Adjustable for user preference, from levels 1-10.
Calibration mode: This modifies how often the imager performs its Non-Uniformity Correction (NUC). The default is Automatic.
Stadiametric Rangefinder: Utilizing the distance between the two stadia lines on the screen, the distance to targets of known size can be estimated. The position of the bottom line remains unchanged. Use the up/down buttons to move the upper line, bracketing the target. Distance is then displayed in the upper left corner of the screen.
WiFi: WiFi can be used to transmit real-time video to a mobile device. Turn on WiFi using the menu system on the imager, noting the network name displayed at the top of the screen. Then, connect to this network via Settings on your mobile device.
At this point, a user can utilize the Steiner Connect App to access photos/videos on the imager, stream live video, or modify device settings.
Reticle type: There are multiple reticles to choose from, for various use cases.
Reticle color: There are several reticle colors to choose from, to suit user preference and to stand out against any chosen color palette. Reticle colors are black, white, green, red and blue.
Reticle brightness: This setting adjusts only the brightness of the reticle, without affecting other screen / display controls. Adjustable for levels 1-10.
Weapon zeroing profiles: The user can store zeroing-settings (ie reticle location) for up to five individual weapons, denoted as A, B, C, D, And E. Each storage position saves the reticle type, color, brightness, position and magnification.
Auto Stand-by: The Automatic Stand-by timer can be set to 5/10/15 minutes. If no buttons are pressed within the pre-set time, Sleep Mode will be entered. During Stand-by (Sleep Mode) the display will be off, but the thermal camera will remain on (and drawing battery power) to ensure a quick restart.
Automatic power-off: The automatic power-off timer can be set to 15/30/60 minutes. If no buttons are pressed within the pre-set time, the imager will automatically power itself off.
Energy saving (Power saving*): This mode can be turned on when the user desires extended runtime. When enabled, the internal microprocessor will switch into a low power mode, which may effect image processing speed. Additionally, the display brightness will remain fixed at 20% output (it cannot be adjusted higher) and the WiFi will be disabled.
Watermark setting: When enabled, the user can select between time only, date only, or both date and time. Watermark can also be turned off. There are several options for time and date format to suit user preference.
Time adjustment: The user can adjust the device's internal clock, setting the time and date.
Language setting: English / German / French / Italian / Spanish.
Memory (card*) formatting: The user can re-format the internal memory. CAUTION-performing this operation deletes all saved photos and videos from the device. Select "No" to cancel the operation.
Restore default: This operation restores all parameters to factory settings (but does not affect stored photos / videos). Select "No" to cancel the operation.
Battery power display: When the imager is turned on, a battery indicator will be displayed in the lower left corner of the screen highlighting an estimate of power remaining. Note: When the power is low, please replace the batteries with freshly charged ones.
* depending on firmware version
MOUNTING OF THE THERMAL SCOPE
-
To mount the S35 to the rail, turn the mount adjusters CCW until full stop is reached.
-
Place the S35 scope on the weapon's rail.
-
Turn the mount adjusters CW to secure the scope to the rail. Do not overtighten the adjusters.
ZEROING OF THE THERMAL SCOPE
Please note that for zeroing the thermal riflescope, you need to do it in a shooting range, aiming either a 100 m/y or 50 m/y target.
Attach a handwarmer or similar device to your target with tape. Aim at a specific location on the handwarmer using the reticle on the thermal scope and fire a three-shot grouping.
Once you have your shot done, it's necessary to measure in cm/inches the distance of the bullet from the aim, in both vertical and horizontal direction.
See example of a 100 m shoot:
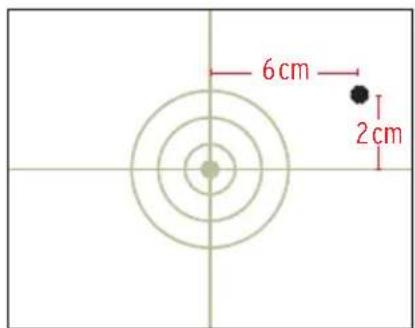
Enter the following Menu Settings: [M] Menu ▶ Zeroing
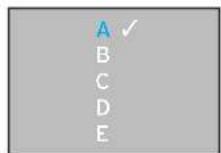
The interface will show you 5 options and you can choose between A, B, C, D, E and register to any letter a different rifle.
Example:
letter A is BENELLI LUPO letter B is BERETTA BRX1 and so on.
You will see 2 options: load and settings.
Please select settings and you will be able to see the red cross.
Up on the screen there are 2 values: X:0 Y:0
Where x strays for horizontal axis (left/right ◀ ▶) and y for the vertical axis (up/down ▲ ▼).
You can change these values easily moving up, down, left, and right using the arrows ▲ ▼ ◀ ▶.
Please note that the reticle moves in the opposite direction of the arrow press. Assuming that, every push of the button corresponds to 2 cm if you shoot 100 m or 0.8 inch at 100 yards and 1 cm if you shoot 50 m distance or .4 inch at 50 yards) in the specific case we use as example, you will need to push 1 time the ▼ arrow (circa 2 cm) and 3 times the ◀ arrow (circa 6 cm).
Afterwards push [M] Menu button again and the device will ask you to:
Zoom
Save and exit
Back
Select save and exit pushing [M] button
Do you want to save the zeroing push ▶ right arrow and [M] Menu to confirm.
To check the updated values you need to go again through [M] Menu ▶ Zeroing. Select the device between A, B, C, D, E options.
You will now see the new values at the top of the screen
Example: X: +2 Y: +1
We now recommend you shoot again to check if the bullet hits the aim if it is still distant repeat the process.
Scanning the QR code, you can also visit the following link to the "how to zeroing the Nighthunter S35 scope" video.
BATTERIES
Steiner recommends the use of two type 18650 Li-ion batteries, 3.7V, 3000 mAh or higher, with a flat top (unprotected model), between 65-68mm in length.
Note that the unit will operate but will not charge batteries inside the battery compartment when connected to USB. Batteries must be removed from the device in order to be recharged.
TROUBLESHOOTING
1. Device fails to start
Solution: Replace the battery or connect an external power supply. Ensure the power-on button is held for the full 4 seconds.
2. The device cannot take photos/record videos
Solution: the internal storage space of the device may be full. Delete photos / videos that are unnecessary, or format the memory card.
3. The device time/date does not match the actual time/date
Solution: Reset the time and date of the device in the menu.
4. Screen blacks out during use
Solution: Short-press any button to wake up the device from Standby Mode. The display will light up.
5. The image of the device is blurred during use
Solution: Check the diopter adjustment to ensure a clear view of the micro-display through the eyepiece. Then, manually turn the objective lens until objects are in clear focus.
STORAGE AND TRANSPORT
Please store and/or transport the imager within the following environmental parameters.
To prevent danger, property loss, etc., please read the manual carefully before using the device.
Storage
-
The packaged product shall be stored in a well-ventilated room at a temperature between -30°C and 60°C and relative humidity not exceeding 95%.
-
Do not store batteries inside the unit.
Transport:
The unit should be protected against rain, water immersion, severe vibrations, and impact during transportation.
STEINER CONNECT APP
Download the Steiner Connect App from the App Store or Google Play to view recorded photos and video on a connected device.


Downloadlink Steiner Connect App for iOS

Downloadlink Steiner Connect App for Android
System requirements:
- Android 8.0 and newer
- iOS 13 and newer
TECHNICAL SPECIFICATIONS
| Nighthunter S35 | ||
| Detector | Resolution 640 x 480@12 μm | |
| Spectrum 8 | ~14μm | |
| NETD | ≤50mK @ 25 °C | |
| Lens | Focal length 35mm F/1.0 | |
| Focus Manual | ||
| Field of view @ 100m 12.5 x 9.4 m | ||
| Output frame rate 50Hz | ||
| System magnification 1x-8x | ||
| Power supply | Battery | 2 x 18650, 3,7V, 2 x ~3000mAh, changeable |
| Adaptor | Standard USB power adaptor 5VDC, max, 10W | |
| Working time | Battery continuous working time ≥4.5 hours @25 °C (only watching) | |
| Interface | USB | TYPE C (USB 2.0 standard), support data transmission |
| Video interface Micro | HDMI | |
| WiFi | Support WiFi (APP) communication, realtime video transmission | |
| Display | Display 0.39 inch, colorful OLED | |
| Resolution 1024 x 768 | ||
| Max screen size with 1 meter distance | 22 inch | |
| Magnification 2x | ||
| Video output format Digital video | ||
TECHNICAL SPECIFICATIONS
| Nighthunter S35 | ||
| System Memory capacity 16GB | ||
| Environment | Working temp -30 °C | -50 °C |
| Storage temp -40 °C | -60 °C | |
| Humidity 10% | ~95%, not-condensing | |
| Shock | 800G / 1 ms semi-sinosoidalIEC60068-2-27 | |
| Vibration | 10Hz ~ 150Hz ~ 10Hz 0.15 mmIEC60068-2-6 | |
| Drop 1m drop | ||
| Waterproof Yes | ||
| Certification UN38.3, RoHS, CE, FCC, EAC | ||
| Detection | 1,8x0,5 m size target 1800 m | |
| Vehicle 4400 m | ||
| Red Deer 3200 m | ||
| Roe Deer 2000 m | ||
| Recognition | 1,8x0,5 m size target 450 m | |
| Vehicle 1100 m | ||
| Red Deer 825 m | ||
| Roe Deer 500 m | ||
| Identification | 1,8x0,5 m size target 225 m | |
| Vehicle 550 m | ||
| Red Deer 400 m | ||
| Roe Deer 250 m | ||
DISPOSAL OF ELECTRICAL AND ELECTRONIC EQUIPMENT
(applies to the EU, and other European countries with separate collection systems)

User information on the disposal of electrical and electronic equipment (private households).
This symbol on our products and/or accompanying documents means that used electrical and electronic products should not be mixed with unsorted municipal waste (ordinary household waste). For proper treatment, recovery and recycling, take these products to the appropriate collection points where they will be accepted without charge.
Before handing over the waste equipment to a collection point, please remove used batteries and accumulators and dispose of them separately from the waste equipment at the appropriate collection points.
In some countries, it may also be possible to dispose of these products at your local retailer when purchasing an equivalent new product.
Proper disposal of this product will help protect the environment and prevent potential harm to people and the environment which could result from inappropriate waste handling.
For more detailed information on the nearest collection point, please contact your local government. In accordance with provincial legislation, penalties may be imposed for improper disposal of this type of waste.
For business customers in the European Union
Please contact your dealer or supplier if you wish to dispose of electrical and electronic equipment. He will have more information for you.
Information on disposal in other countries outside the European Union
This symbol is only valid in the European Union. Please contact your local council or distributor if you wish to dispose of this product and ask for a disposal option.
User manual Nighthunter S35 16
Available on the App Store
User manual Nighthunter S35 16
User manual Nighthunter S35 16
Beretta Holding company

- USER MANUAL NIGHTHUNTER S35 16
- IMPORTANT
- FCC WARNING
- DANGER
- WARNING
- NOTES
- LIST OF PARTS
- PRODUCT COMPONENTS
- FOCUS RING
- LENS COVER
- USB TYPE-C PORT
- MICRO HDMI
- BATTERY COVER
- BUTTON DESCRIPTION
- POWER BUTTON (LEFT BUTTON) - POWER ON
- POWER OFF
- DISPLAY OFF
- DISPLAY ON
- NON-UNIFORMITY CORRECTION (NUC)
- RECORD BUTTON (RIGHT BUTTON)
- TAKE PHOTOS
- VIDEO RECORDING
- UP BUTTON
- SWITCH SCENE MODE
- ZOOM IN
- DOWN BUTTON
- SWITCH COLOR PALETTES
- ZOOM OUT
- MENU BUTTON
- CONFIRM AND RETURN / EXIT
- FUNCTION DESCRIPTION
- MOUNTING OF THE THERMAL SCOPE
- ZEROING OF THE THERMAL SCOPE
- EXAMPLE
- EXAMPLE: X: +2 Y: +1
- BATTERIES
- TROUBLESHOOTING
- DEVICE FAILS TO START
- THE DEVICE CANNOT TAKE PHOTOS/RECORD VIDEOS
- THE DEVICE TIME/DATE DOES NOT MATCH THE ACTUAL TIME/DATE
- SCREEN BLACKS OUT DURING USE
- THE IMAGE OF THE DEVICE IS BLURRED DURING USE
- STORAGE AND TRANSPORT
- STORAGE
- TRANSPORT
- STEINER CONNECT APP
- SYSTEM REQUIREMENTS
- DISPOSAL OF ELECTRICAL AND ELECTRONIC EQUIPMENT
- USER INFORMATION ON THE DISPOSAL OF ELECTRICAL AND ELECTRONIC EQUIPMENT (PRIVATE HOUSEHOLDS)
- FOR BUSINESS CUSTOMERS IN THE EUROPEAN UNION
- INFORMATION ON DISPOSAL IN OTHER COUNTRIES OUTSIDE THE EUROPEAN UNION
Brand : Steiner
Model : Nighthunter S35 Gen I
Category : Binoculars