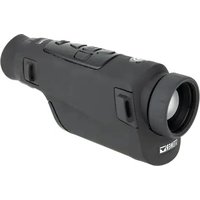
Nighthunter H35 Gen II - Binoculars Steiner - Free user manual and instructions
Find the device manual for free Nighthunter H35 Gen II Steiner in PDF.


| Product type | Handheld thermal binoculars |
| Brand | Steiner |
| Model | Nighthunter H35 Gen II |
| Detector | 640 x 512 resolution, 12 μm pixel pitch |
| Lens | 35 mm focal length, F1.0 |
| Field of view | 12.5° x 9.4° (at 100 m) |
| Magnification | 1x to 8x (digital) |
| Thermal sensitivity (NETD) | ≤ 35 mK |
| Display | OLED, 1280 x 960 pixel resolution |
| Refresh rate | 50 Hz |
| Video output | Analog (HDMI) |
| Power supply | 2 x 18650 batteries (67-71 mm), rechargeable via USB-C (5V, 2A) |
| Battery life | Up to 8.5 hours |
| Internal memory | 32 GB |
| Connectivity | WiFi for control via Steiner Connect app |
| Dimensions (L x W x H) | 210 x 80 x 68 mm |
| Weight | 514 g |
| Main features | Color palettes (white hot, black hot, red hot, iron, flame, amber), image modes (enhanced, detected, standard), zoom, stadiametric rangefinder, thermal tracking, photo/video recording, PIP |
| Maintenance and cleaning | Clean the lens with a soft dry cloth; avoid solvents; store in a dry, ventilated place |
| Safety | Do not expose to intense light sources (sun, laser); do not disassemble; charge below 40°C |
| Warranty | 2 years |
Frequently Asked Questions - Nighthunter H35 Gen II Steiner
User questions about Nighthunter H35 Gen II Steiner
0 question about this device. Answer the ones you know or ask your own.
Ask a new question about this device
Download the instructions for your Binoculars in PDF format for free! Find your manual Nighthunter H35 Gen II - Steiner and take your electronic device back in hand. On this page are published all the documents necessary for the use of your device. Nighthunter H35 Gen II by Steiner.
USER MANUAL Nighthunter H35 Gen II Steiner
Bedienungsanleitung
User Manual
Istruzioni d'uso
Congratulations on purchasing the Steiner Thermal Handheld. Read this manual thoroughly before use and save it in case you want to look anything up later.
WARNINGS
- Do not expose the thermal imaging camera directly to high-intensity light sources, such as the sun, carbon dioxide lasers, or electric welding machines.
- The thermal imaging camera is a combination of precision optical instruments and electrostatically sensitive electronics; mishandling the thermal imaging camera and its accessories may affect performance and durability and void the warranty.
- If the thermal imaging camera is not used for a long period of time, charge the thermal imaging camera at least 4 hours every two months during storage and store the thermal imaging camera in a dry and well-ventilated environment.
- Do not charge the battery in an environment above 40° C.
EN
Our company assumes no liability for errors and/or accidents caused by the fault of the user or a third party when using this product, nor for property and personal damage caused by incorrect evaluations of images.
The purpose of this guide is to give users even more knowledge about our products so they can enjoy them even more. We make every effort to ensure that the content of this guide is accurate, but we cannot guarantee the completeness of the content. As we are constantly updating and improving our products, we reserve the right to change these instructions at any time without notice.
FCC WARNING
This device can generate or use high-frequency energy. Changes or modifications to this device may cause harmful interference, unless the changes are expressly stated in the user manual. The user may lose the right to operate this device if he makes unauthorized changes or modifications.
This device meets the requirements of Part 15 of the FCC Rules. Operation is subject to the following two conditions: (1) This device must not cause harmful interference (2) This device
EN
must accept any interference received, including interference that may cause undesired operation.
The device has been rated to meet general RF exposure requirements. The device can be used without restrictions under portable exposure conditions.
NOTE: This device has been tested and meets the limits for Class B digital devices under Part 15 of the FCC Rules. These limits are designed to provide adequate protection against harmful interference when installed in residential areas. This device generates, uses, and can radiate radio frequency energy. If not installed and used in accordance with the instructions, it may cause harmful radio communications interference. However, there is no guarantee that there will be no faults with a particular installation. If this equipment interferes with radio or television reception, which can be determined by turning the equipment on and off, the user should attempt to correct the interference
by taking one or more of the following measures:
- Reorient or relocate the receiving antenna.
- Increase the distance between the device and the receiver.
- Plug the device into a power outlet that is not connected to the receiver circuit.
- Ask the dealer or an experienced radio/TV technician for help.
- The nominal data can be found on the bottom of the device.
EN
SCOPE OF DELIVERY
Included as standard:
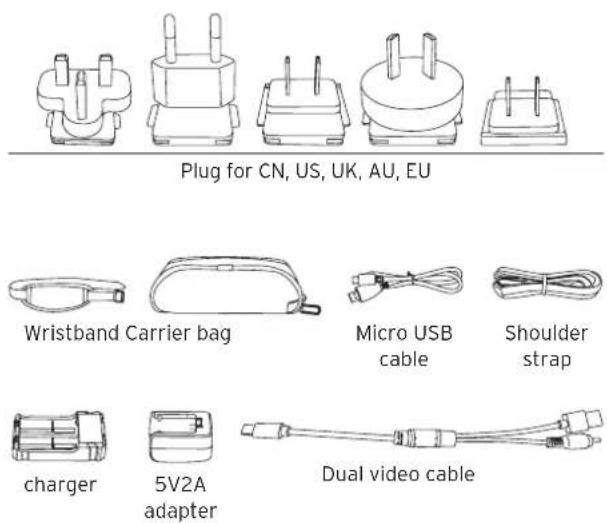
EN
INTRODUCTION TO THE PARTS
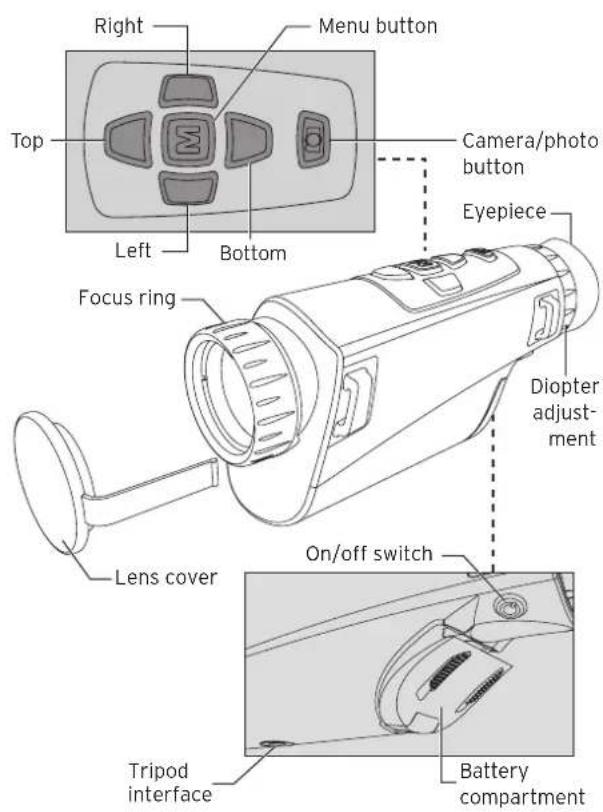
EN
EN
BUTTON FUNCTION
| Buttons Operation Effect | ||
| On/off button | Long press Switch on | |
| Short press Calibration | ||
| Long press | Power off countdown | |
| Long-term press to cancel the shutdown in the middle | Display off | |
| Release the on/off button when the power off ncountdownb has reached the fifth level. | Switch off | |
1. On/off switch
- Switch on
Hold down the power button until the power screen appears in the eyepiece to turn on the device successfully.
- Switch off
Manual shutdown: Long press the on/off button to display the shutdown progress bar, and continue until the progress bar is complete and the shutdown is successful. Automatic shut-off: If no button is pressed
within the set automatic shutdown time, the device is switched off automatically.
- Display off
Long press the on/off button to show the shutdown progress bar. Before the progress bar is complete, release the power button to cancel the shutdown, and switch the display to off mode.
- Display on
In Display Off mode, press any button to wake up the screen.
- Calibration
The device is switched on and if the menu does not end when called up, a corresponding compensation movement is carried out by briefly pressing the on/off button (except automatic compensation).
EN
EN
| Buttons Operation Effect | ||
| Up button | Short press | Enlarge image(1x, 2x, 4x or 8x) |
| Long press No zoom limit | ||
| Short press up Move menu | ||
| Long press up Move menu | ||
2. Up button
- Magnification
The device is switched on and if the menu is not in the called up state, a short press switches the image magnification in 2X/4X/8X modes one after the other. A long press results in a step-by-step magnification of 0.5x.
- Movement of menu and options
The device is switched on and if the menu is in the called up state, pressing the up arrow button briefly or for a long time will move the menu or options up.
| Buttons Operation Effect | ||
| Left button | Short press | Toggle color palette |
| Short press | Go back to previous menu | |
| Long press | Continuously return to the previous menu | |
| Select to the left Move menu | ||
3. Left button
- Switch color palette
In the real-time image, a short press of the left button switches the color palette in the order white-hot, black-hot, red-hot, red-hot, iron-red, flame, amber cyclic pseudo-color.
- Returns to previous menu
The device is switched on and when it is in menu state and there is a parent menu, a short press of the left button returns to the previous menu without saving the settings. If there is no parent menu, pressing the left button has no effect. Long press the left button to return to the previous menu without saving settings until the real-time image is displayed.
EN
- Move menus and options to the left
The device is switched on and when it is in menu mode, briefly pressing the left button moves the menu or options to the left.
| Buttons Operation Effect | ||
| Right button | Short press | Change picture mode |
| Short press | Access to the submenu | |
| Long press | Continuously switch to the next menu | |
| Move to the right Move menu | ||
EN
4. Right button
- Change picture mode
In the real-time image, briefly pressing the right button cyclically changes image mode in the order Improved, Discovered, Standard.
- Access to the sub-menu
The device is switched on, when it is in menu state and there is a next menu level, briefly press the right button to go to the next menu level. If there are no more subdirectories, this has no effect. If you hold down the right button, you will continuously move to the next menu level. When a dialog box appears, press the menu button to confirm.
- Move the menu and options to the right
The device is switched on and is in menu status. By briefly pressing the right button, you can move the menu or options to the right.
EN
EN
| Buttons Operation Effect | ||
| Bottom button | Short press Reduce image | |
| Long press | Stepless downsizing | |
| Short press down Move menu | ||
| Long press down Move menu | ||
5. Bottom button
- Reduction
The device is switched on and if the menu does not end when opened, a short press switches the image reduction in 8X/4X/2X modes one after the other. Press for a long time to gradually reduce the size by 0.5x.
- Movement of menu and options
The device is switched on and when the menu is in called up state, pressing the down arrow button briefly or for a long time will move the menu or options down.
| Buttons Operation Effect | ||
| Camera button | Short press Take a photo | |
| Short press Take a photo | ||
| Long press Video recording | ||
| Long press | Stop recording video and save | |
6. Camera button
- Take a photo
Press the photo button for a short time to save the current image. The image remains frozen for 300 ms and then returns to live view. The currently set watermark UI and Steiner logo information are saved, but other UI information is not saved.
- Video recording
Long press the photo button to start recording, long press again to stop recording. The current watermark UI and Steiner logo information is saved, other UI information is not saved. If the video file size is larger than 4GB, it is automatically split into two files. While recording, a photo can be taken by briefly pressing the photo button.
EN
EN
| Buttons Operation Effect | ||
| Menu button | Short press Enter | the main menu |
| Short press Enter | the next menu | |
| Short press Confirm | ||
| Long press | Return to previous menu/Exit menu | |
7. Menu button
The device is switched on and in menu mode, a menu option can be displayed by long pressing the menu button.
Confirm and return/exit
The device is switched on and in menu mode, briefly press the menu button to enter the submenu or confirm the current option, by long pressing the menu button the device returns to the previous menu at the same time; the current settings are not saved and the menu is returned or exited.
Vibration function when switched on:
The vibration function when switched on can be switched on or off. When switched on, the vibration function when switched on is executed immediately when the starting conditions are reached. The start image is displayed after 1 second.
Edge detection algorithm:
When activated, it draws the outline of the observed object.
EN
MAIN MENU
- Press and hold the M button to enter the main menu
- Press the Up/Down button to switch between Image quality adjustment, Calibration mode, WiFi, power saving settings, indication settings, general settings and other settings
Picture In Picture (PIP)
- With the PIP window open, select the left / middle / right for placement
• The window image is 2X magnification of the main image
Screen Brightness
- Brightness levels can be adjusted from 10 to 100 percent
Stadiametric Rangefinder
The stadiametric rangefinder lets you estimate the distance of a target. There are three reference animals available on the device - Rabbit (35 cm / 13.7 inch), Boar (90 cm / 35.4 inch.), Deer 150 cm / 59.1 inch).
How to use the stadia lines:
- Align the lower horizontal line with the bottom of the target image, press the Up/Down button to change the width between the upper and lower horizontal lines until the upper horizontal line is aligned with the top of the target icon
- The distance can now be calculated and displayed automatically
EN
- By comparing the target size with the three reference animal sizes, the user can roughly calculate the distance of the target
Hot Track
- When hot track is turned on, the active crosshair tracks the point with the highest temperature in the scene
Energy-Saving Mode
- In the energy-saving mode, screen brightness is reduced to 30 percent and the WiFi is turned off
- When the energy-saving mode is off, the screen brightness and WiFi are restored to their original state
NOTE - If WiFi cannot be turned on, please check if the energy saving mode is off.
EN
Color Palettes
- White hot - The objects with higher temperature show in white or light gray
- Black hot - The objects with higher temperature show in black or dark gray
- Adjustable red hot - The objects with higher temperature show in red. Users can adjust the intensity of range of red heat from level 1 to 10
- Iron - The objects with higher temperature show in iron red
- Blue hot - The objects with lowest temperature show in blue or dark blue, and the object with higher temperature shows in white
Brightness
- Adjustable from level 1 to 10 level
Contrast
- Adjustable from level 1 to 10 level
Calibration model
- Automatic - The device automatically corrects the image quality without any action
- Scene - The user manually corrects the image quality as needed. For manual correction, the lens cover needs to be attached before calibration
EN
- Shutter - The user manually corrects the image quality as needed and the device shutter closes for calibration
WiFi
The imager can be connected to the mobile phone via WiFi and the imager can be operated remotely via the mobile phone APP. When WiFi is turned on, but not connected, the WiFi icon flashes and the WiFi name is displayed at the top of the screen. When the WiFi is connected, the WiFi icon is always on.
- Mobile phone APP - Search and download 'Steiner Connect' APP in the mobile phone app market. Open the APP, and find the WiFi name of "STEINER Thermal Handheld" (followed by 4 digits unique identification number) in your mobile phone WiFi settings, enter the password '12345678', then after the connection is successful, the user can operate remotely
- Android: Please search and download in Google Play
- iOS: Please search and download in the APP Store
EN
Power saving settings
- Auto Stand-By - If there is no operation during the preset time, the unit enters Stand-by mode. If the work indicator is on before entering Standby mode, the work indicator will flash in Stand-by mode
- Auto Power - If there is no operation during the preset time, the unit will power off automatically
NOTE: Auto Stand-by and Auto power-off cannot be performed while WiFi is connected
Indication settings
- Charging indication - In the charging state, you can turn the charging indicator on or off
- Working indication - In the normal working state, you can turn the working indicator on or off
General settings
• Time style - Select 12-hour or 24-hour style
- Date style - Choose different date styles according to your preference
• Time setup - Adjust the current date and time
Watermark Settings
- Users can choose the display style of any watermark on the screen
EN
Language Settings
• Language choices include German / English / Italian / French / Spanish
Memory Card Formatting
- Allows the user to format and empty onboard storage
Restore Default
• This function restores the factory settings
Charging
When using the thermal imager for the first time, use the USB charger to charge the internal battery for at least four hours. When charging, insert the matching Type C USB charging cable and plug into power.
- Spezifikationen für das Laden: 5V, 2A.
- Charging indicator is red during normal charging.
- Charging indicator is green when charging is complete.
- Do not charge the battery in an environment over 40°C or 104°F.

NOTE - Charging when the thermal imager is being used does not charge the battery. This icon indicates the unit is using the external power for normal operations.

This icon indicates that the external power supply is charging the battery.
EN
Video output
There is a video output port beside the USB interface on the side of the thermal imager.
The screen image of the thermal imager can be output to an external monitor through the matching HDMI video cable. There are two display modes, either the external screen or the screen of the device, but only one mode is active.
NOTE - When HDMI is used to connect the external display screen, the real-time screen can only be viewed via the external display. When the HDMI cable is unplugged, the internal screen of the device is restored.
EN
STORAGE AND MAINTENANCE
When the thermal imager will be not used for a long time, store in a dry, well-ventilated environment and charge the unit at least four hours every two months during the storage. The infrared lens of the thermal imager is coated with an anti-reflection film. Clean the lens only when dirt or smudges are present.
Frequent scrubbing may damage the lens coating.
To clean non-optical surfaces of the thermal imager, do not scrub with chemical solvents or cleaners. On exterior surfaces, wipe with a soft and dry microfiber cloth.
WARRANTY
The Steiner thermal products are covered by the Steiner 2 year warranty and Steiner will repair or replace your product if it is defective. Do not disassemble the thermal imager as this will void the warranty. Contact your nearest Steiner dealer for assistance.
EN
TECHNICAL DATA
| Steiner Thermal Handheld | ||
| Detector Resolution 640 x 512@12 | μm | |
| Lens | Focal length 35mm F1.0 | |
| Field of view @ 100m 12.5° | x 9.4° | |
| System magnification 1 - 8x (digital) | ||
| NETD | ≤35mk | |
| Display | Display OLED | |
| Resolution 1280 x 960 Pixel | ||
| Output frame rate 50Hz | ||
| Max screen size 22 Zoll | ||
| Video output format analogue Video | ||
| Working time > 8,5 hours | ||
| Housing | Dimensions 210 x 80 x 68 mm | |
| Weight 514 g | ||
| High Performance Optics Quantum Vision" | ||
| Eyecup | ergonomic | |
| Warranty | 2 years | |
| Power supply | Battery | 2* 18650 (Please use batteries with a length of 67mm - 71mm) |
| System | Memory capacity | 32GB |
EN
DISPOSAL OF ELECTRICAL AND ELECTRONIC EQUIPMENT
(applies to the EU, and other European countries with separate collection systems)
User information on the disposal of electrical and electronic equipment (private households).
This symbol on our products and/or accompanying documents means that used electrical and electronic products should not be mixed with unsorted municipal waste (ordinary household waste). For proper treatment, recovery and recycling, take these products to the appropriate collection points where they will be accepted without charge.
Before handing over the waste equipment to a collection point, please remove used batteries and accumulators and dispose of them separately from the waste equipment at the appropriate collection points.
In some countries, it may also be possible to dispose of these products at your local retailer when purchasing an equivalent new product.
Proper disposal of this product will help protect the environment and prevent potential harm to people and the environment which could result from inappropriate waste handling.
For more detailed information on the nearest collection point, please contact your local government. In accordance with provincial legislation, penalties may be imposed for improper disposal of this type of waste.
For business customers in the European Union
Please contact your dealer or supplier if you wish to dispose of electrical and electronic equipment. He will have more information for you.
Information on disposal in other countries outside the European Union
This symbol is only valid in the European Union. Please contact your local council or distributor if you wish to dispose of this product and ask for a disposal option.

IT
CONTENUTI
STEINER Thermal Handheld Bedienungsanleitung.... 2
STEINER Thermal Handheld User Guide 28
STEINER Thermal Handheld Istruzioni per l'uso ..... 54
STEINER Thermal Handheld Instructions d'utilisation ..... 80
STEINER Thermal Handheld Instrucciones de uso ..... 106
IT
INTRODUZIONE
Spina per CN, US, UK, AU, EU
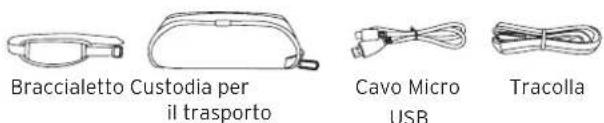
Enchufe para CN, US, UK, AU, EU


Nothing Escapes You
WWW.STEINER.DE
STEINER-OPTIK GMBH
Beretta Holding company

- WARNINGS
- EN
- FCC WARNING
- SCOPE OF DELIVERY
- INTRODUCTION TO THE PARTS
- BUTTON FUNCTION
- ON/OFF SWITCH
- SWITCH ON
- SWITCH OFF
- DISPLAY OFF
- DISPLAY ON
- CALIBRATION
- UP BUTTON
- MAGNIFICATION
- MOVEMENT OF MENU AND OPTIONS
- LEFT BUTTON
- SWITCH COLOR PALETTE
- RETURNS TO PREVIOUS MENU
- MOVE MENUS AND OPTIONS TO THE LEFT
- RIGHT BUTTON
- CHANGE PICTURE MODE
- ACCESS TO THE SUB-MENU
- MOVE THE MENU AND OPTIONS TO THE RIGHT
- BOTTOM BUTTON
- REDUCTION
- CAMERA BUTTON
- TAKE A PHOTO
- VIDEO RECORDING
- MENU BUTTON
- CONFIRM AND RETURN/EXIT
- VIBRATION FUNCTION WHEN SWITCHED ON
- EDGE DETECTION ALGORITHM
- MAIN MENU
- PICTURE IN PICTURE (PIP)
- SCREEN BRIGHTNESS
- STADIAMETRIC RANGEFINDER
- HOT TRACK
- ENERGY-SAVING MODE
- COLOR PALETTES
- BRIGHTNESS
- CONTRAST
- CALIBRATION MODEL
- WIFI
- POWER SAVING SETTINGS
- NOTE: AUTO STAND-BY AND AUTO POWER-OFF CANNOT BE PERFORMED WHILE WIFI IS CONNECTED
- INDICATION SETTINGS
- GENERAL SETTINGS
- WATERMARK SETTINGS
- LANGUAGE SETTINGS
- MEMORY CARD FORMATTING
- RESTORE DEFAULT
- CHARGING
- VIDEO OUTPUT
- STORAGE AND MAINTENANCE
- WARRANTY
- TECHNICAL DATA
- DISPOSAL OF ELECTRICAL AND ELECTRONIC EQUIPMENT
- FOR BUSINESS CUSTOMERS IN THE EUROPEAN UNION
- INFORMATION ON DISPOSAL IN OTHER COUNTRIES OUTSIDE THE EUROPEAN UNION
- IT
- CONTENUTI
- INTRODUZIONE
- NOTHING ESCAPES YOU
- WWW.STEINER.DE
- STEINER-OPTIK GMBH
Brand : Steiner
Model : Nighthunter H35 Gen II
Category : Binoculars