
DW0150 - Measuring equipment DEWALT - Free user manual and instructions
Find the device manual for free DW0150 DEWALT in PDF.

| Brand | DeWALT |
| Model | DW0150 |
| Product type | Electronic stud detector |
| Power supply | 2 AAA batteries (1.5 V) – 3 V DC |
| Battery life | Up to 20 hours of continuous use |
| Wood stud detection | Up to 38 mm (1.5 in) drywall |
| Metal stud detection | Up to 38 mm (1.5 in) drywall |
| Live wire detection | Up to 50.8 mm (2 in) drywall |
| Stud center accuracy | ± 6.4 mm (1/4 in) |
| Automatic calibration | Yes |
| Auto power off | Yes, upon releasing the On button |
| Non-marking surface | Yes |
| Indicators | LED lights and audible tone |
| Operating temperature | 0 °C to 50 °C (32 °F to 122 °F) |
| Storage temperature | -55 °C to 70 °C (-67 °F to 158 °F) |
| Relative humidity | 35% to 55% |
| Maintenance | Clean with a damp cloth, wipe with a dry, soft cloth. Do not use solvents. |
| Safety | Eye protection recommended. Do not use as a voltmeter. Turn off AC power before working near wires. |
| Repairability | Repairs by authorized service centers only. Disassembly voids warranty. |
| Warranty | 3-year limited warranty, one-year free service contract, 90-day money-back guarantee. |
Frequently Asked Questions - DW0150 DEWALT
User questions about DW0150 DEWALT
0 question about this device. Answer the ones you know or ask your own.
Ask a new question about this device
Download the instructions for your Measuring equipment in PDF format for free! Find your manual DW0150 - DEWALT and take your electronic device back in hand. On this page are published all the documents necessary for the use of your device. DW0150 by DEWALT.
USER MANUAL DW0150 DEWALT
natural_image
Line drawing of a device casing with ventilation slots and a 'DEWALT' label (no readable text or symbols beyond branding)Figures
A
B
natural_image
Technical line drawing of a mechanical component with an arrow indicating assembly or detail (no text or symbols present)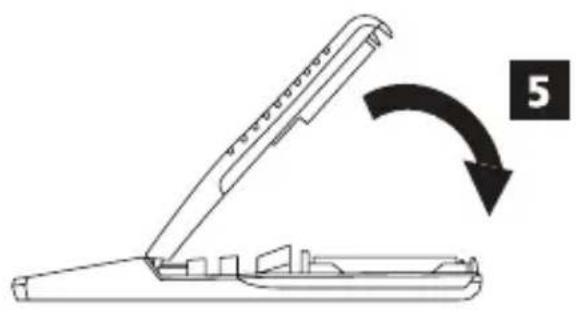
natural_image
Diagram of a mechanical device with an open lid and a curved arrow indicating rotation (no text or symbols)Figures


Contents
• Stud Sensor Information
- User Safety
- Battery Safety
• Installing AAA Batteries
• Using the Stud Sensor
- Maintenance
- Troubleshooting
• Service and Repairs
- Warranty
- Specifications
Stud Sensor Information
The Stud Sensor DW0100/DW0150 uses electronic signals to locate the center of wood or metal studs, or live AC wires through drywall or other common building materials.
PLEASE NOTE:
- The stud sensor will not detect objects in concrete, mortar, block, brick work, plaster, carpeting, foil-faced materials, metallic surfaces, or ceramic tile.
- The stud sensor is not designed to locate non-ferrous or plastic objects, such as pipes.
Once the center of a wood or metal stud has been detected in one pass across the surface, the Stud Sensor DW0100/DW0150 turns on an LED and sounds an audible tone. A marking hole allows you to easily note the stud center
User Safety
Safety Guidelines
The definitions below describe the level of severity for each signal word. Please read the manual and pay attention to these symbols.

WARNING: Indicates a potentially hazardous situation which, if not avoided, could result in serious injury.

CAUTION: Indicates a potentially hazardous situation which, if not avoided, may result in minor or moderate injury.
NOTICE: Indicates a practice not related to personal injury which, if not avoided, may result in property damage.
If you have any questions or comments about this or any DEWALT® tool, go to http://www.DEWALT.com.

WARNING:
Read and understand all instructions. Failure to follow the warnings and instructions in this manual may result in serious personal injury.
SAVE THESE INSTRUCTIONS

WARNING:
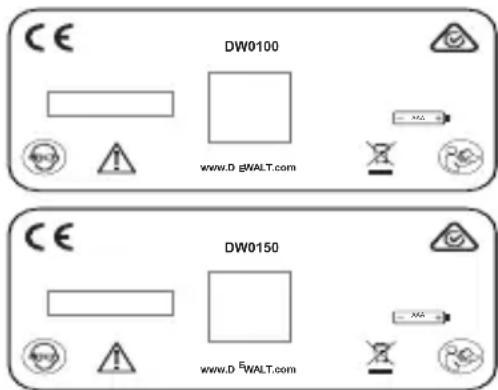
The following label information can be found on your tool for your safety.

CAUTION:
Protect your eyes. Wear safety goggles.

WARNING:
This tool is not a measuring device and should not be used as a substitute for a voltmeter.

WARNING:
The LED or Live Wire Detection symbol on the display is just an indicator and in some situations the voltage detection option may not accurately indicate the presence of voltage in a wall in the event of internal device failure or improper operation, and therefore should not be solely relied upon for identification of the presence of hazardous voltages. Other evidence, such as construction blueprints or visual identification of wiring or conduit entry points should also be utilized.
Always follow proper safety practices and use a separate detection method to verify a de-energized condition prior to commencing work.
E

WARNING:
Always turn off AC power when working near wiring.

WARNING:
Shielded wires or wires in metal conduits, casings, metalized walls, or thick, dense walls may not be detected.

CAUTION:
Use personal protective equipment. Always wear eye protection. Depending on the work conditions, wearing protective equipment such as a dust mask, non-skid safety shoes, hard hat, and hearing protection will reduce the risk of personal injury.
IMPORTANT SAFETY NOTICE
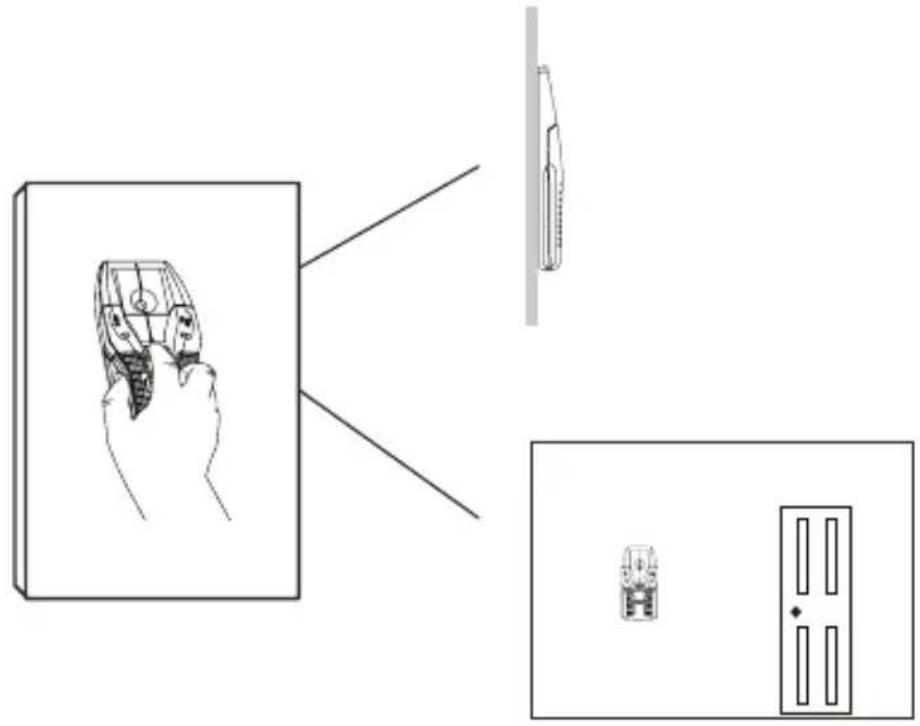
Ensure proper detection of live wires. Always hold the Stud Sensor DW0100/DW0150 in the handle area only. Grasp between fingers and thumb while making contact with your palm (Figure ©).
NOTE: Static electrical charges that can develop on drywall and other surfaces will spread the voltage detection area many inches on each side of the actual electrical wire. To aid in locating the wire position, scan holding the unit 12 " (13mm) away from the wall surface or place your other hand on the surface approximately 12" (305mm) from the sensor.
Battery Safety

WARNING:
Batteries can explode, or leak, and can cause injury or fire. To reduce this risk:
- Carefully follow all instructions and warnings on the battery label and package.
- Always insert batteries correctly with regard to polarity (+ and -), as marked on the battery and the equipment.
- Do not short battery terminals.
- Do not charge disposable batteries.
- Do not mix old and new batteries. Replace all batteries at the same time with new batteries of the same brand and type.
- Remove dead batteries immediately and dispose of per local codes.
- Do not dispose of batteries in fire.
- Keep batteries out of reach of children.
Installing AAA Batteries
Load two new AAA batteries in the DW0100/DW0150 stud sensor.
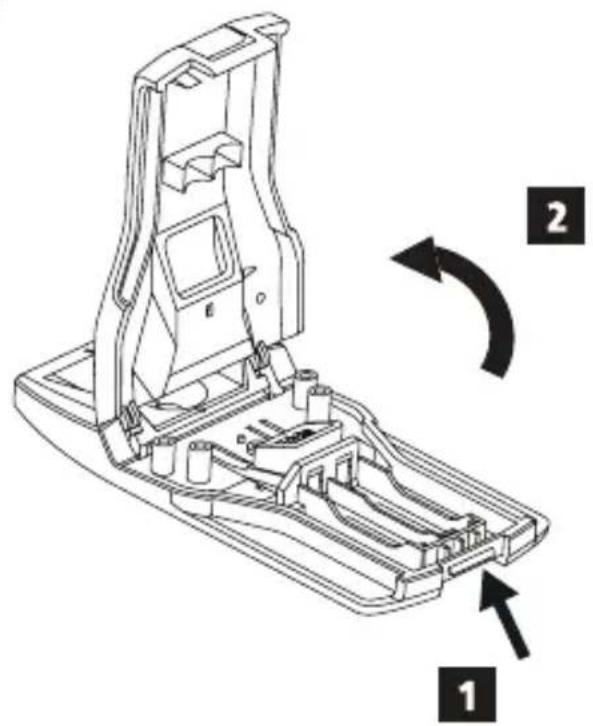
- On the bottom of the laser, lift up the latch (Figure ⑧ ①) to unlock the battery compartment cover.
- Move the cover upward (Figure ⑧②) and remove it once it separates from the stud sensor.
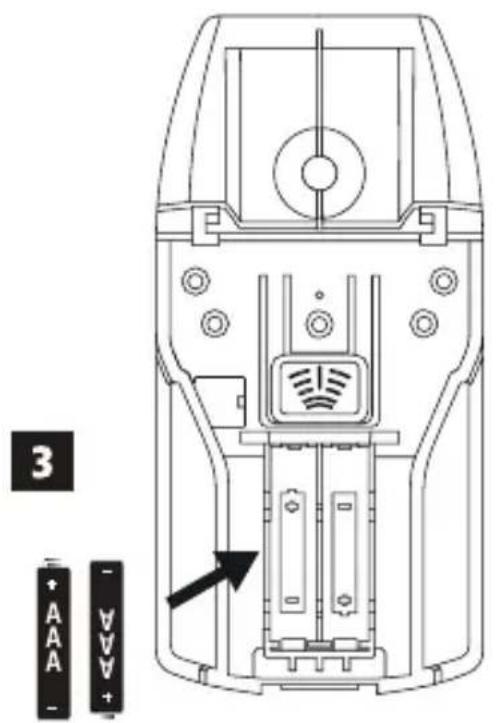
- Insert two new, high-quality AAA batteries, making sure to position the - and + ends of each battery as noted inside the battery compartment (Figure B ③).
- Place the cover back on the stud sensor.
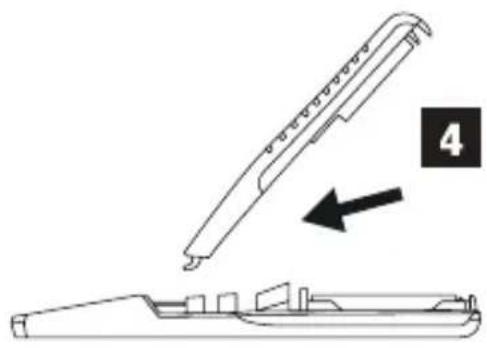
- Insert the two pins at the top of the cover into the holes in the stud sensor (Figure B 4).
- Slowly lower the cover and press down until the latch locks securely on the stud sensor (Figure B 5).
-
Press to test the stud sensor.
-
All the LEDs except the green Power ⏻ LED should illuminate for a second and then turn off.
- Whenever you press 📋, the green Power ⏻ED should illuminate to indicate that the batteries are good. If this LED blinks or does not illuminate, change the batteries.
Using the Stud Sensor
The stud sensor will help you find wood or metal studs, and AC voltage behind drywall.
- DW0100 will work on up to 3/4" (19mm) thick drywall.
- DW0150 will work on up to 1.5" (38mm) thick drywall.
- DW0100 and DW0150 will detect AC voltage through up to 2" (50.8mm) thick drywall.
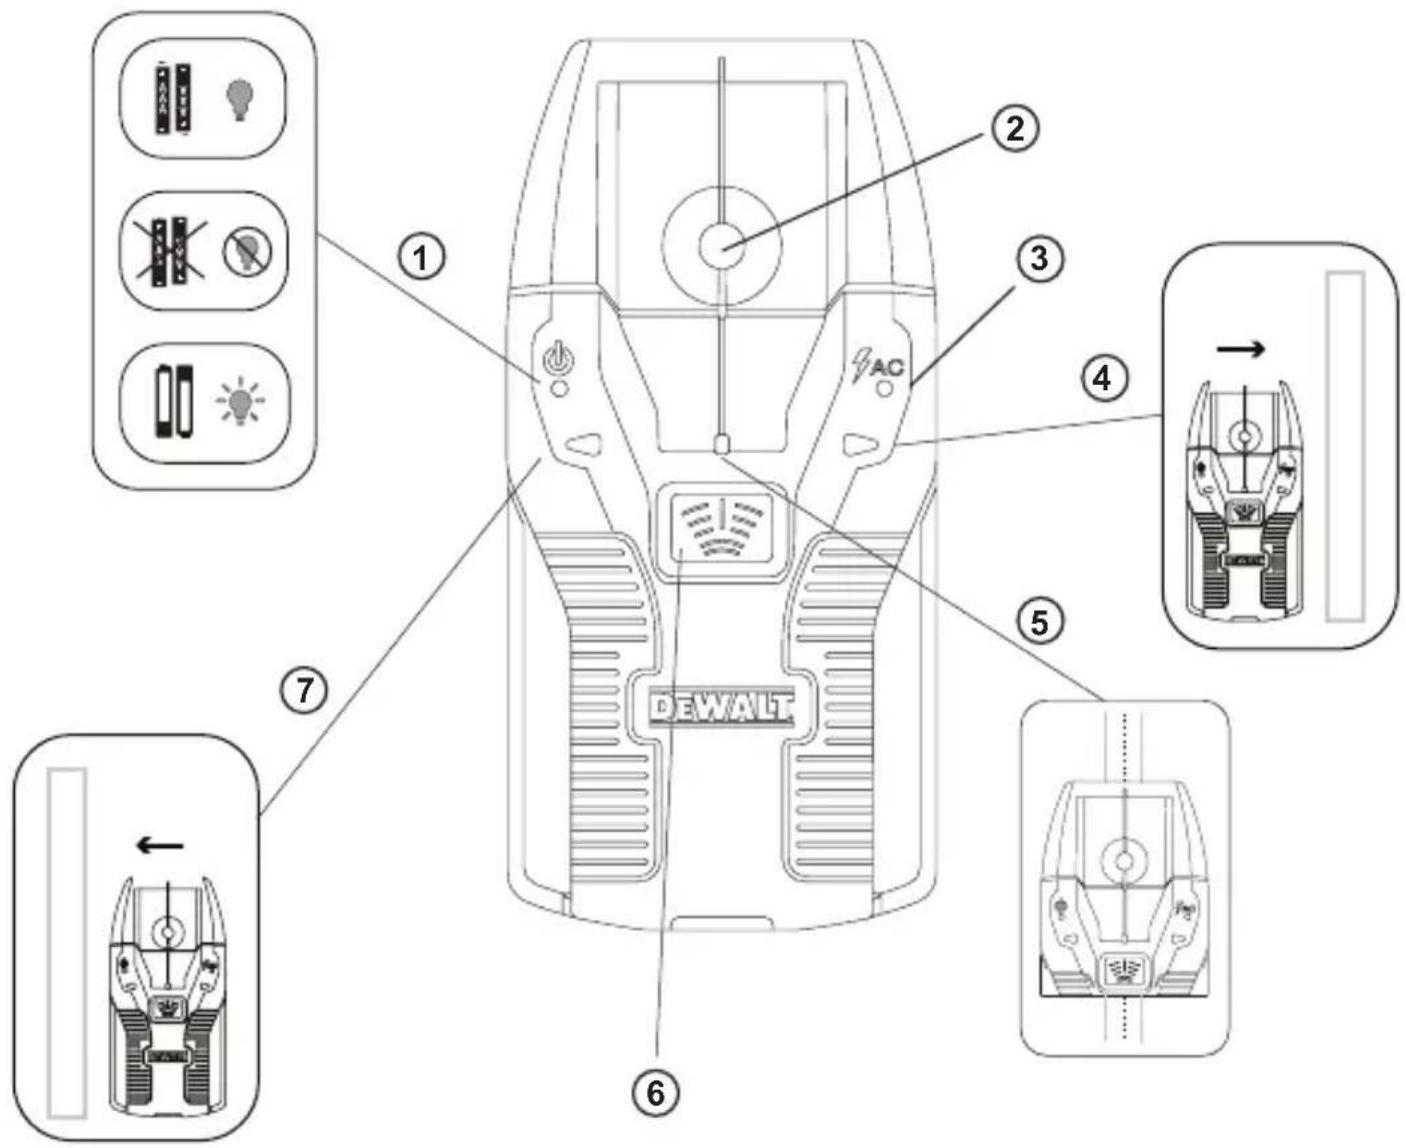
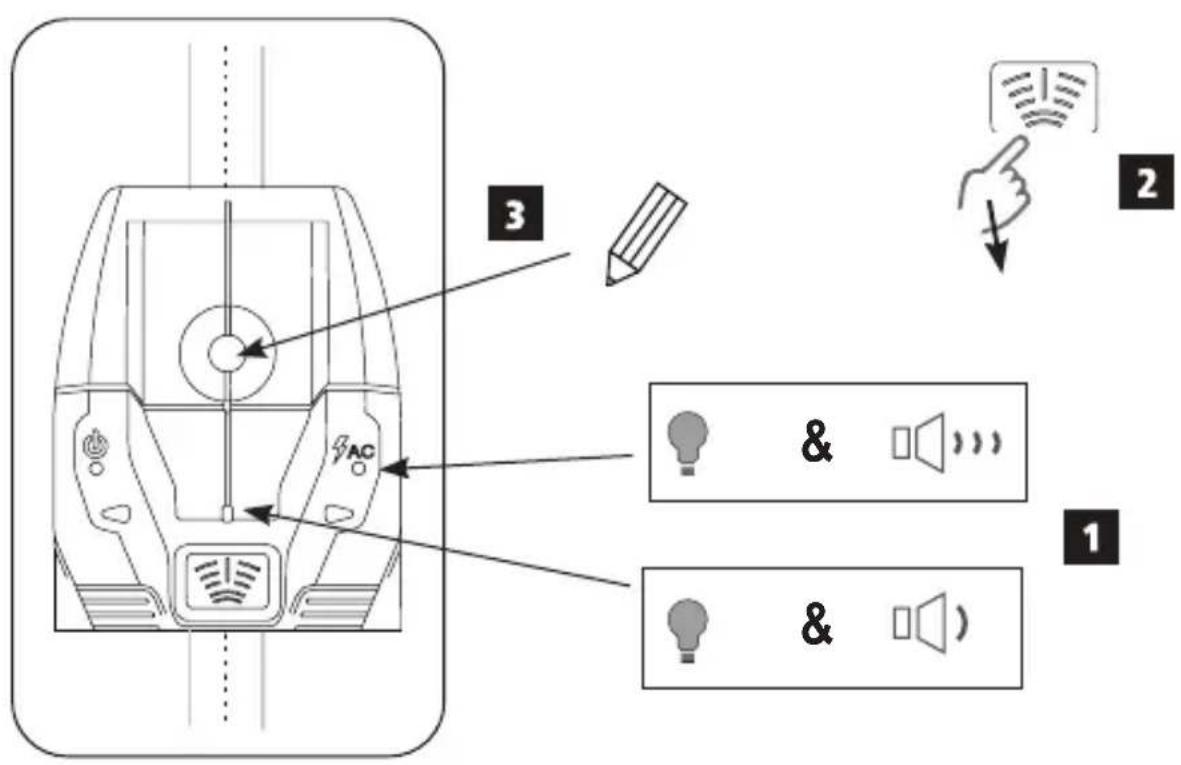
- When AC voltage is found, the stud sensor will sound a few short (alternating) beeps and light the AC LED (Figure A 3).
- When the center of a stud is found, the stud sensor will sound one longer (constant) beep and light the center LED (Figure A 5).
- When live AC and the center of a stud are both found, the stud sensor will sound both the long beep and the short beeps, and light the center and AC LEDs.
Finding a Stud
- To hold the stud sensor, place your thumb on one side of the stud sensor, your pointer finger and your palm over the center of the stud sensor, and the rest of your fingers on the same hand on the other side of the stud sensor (Figure ©).
- Position the stud sensor flat against the wall and parallel to a door or window on the same wall, which give you an indication of how the studs are positioned behind the wall.
- Without moving the stud sensor, use your pointer finger to press and hold 📋 until all the LEDs (except the green Power ⏻ LED) turn off (1 sec).
- While still pressing 📋, SLOWLY move the stud sensor to the left or the right on the wall.
-
As you move the stud sensor, watch the stud sensor LEDs.
-
If lights (Figure ⑦), move the stud sensor to the left to find the nearest stud.
-
If lights (Figure A 4), move the stud sensor to the right to find the nearest stud.
-
When the center LED (Figure A ⑤) lights and you hear a constant beep, the stud sensor has found the center of a stud (Figure D ①).
• STOP moving the stud sensor.
- STOP pressing (Figure D 2).
- Through the hole on the stud sensor (Figure ③), use a pencil to mark the current position as the center of the stud.
- To find another stud on the wall, repeat the same steps.
Finding Live AC
- To hold the stud sensor, place your thumb on one side of the stud sensor, your pointer finger and your palm over the center of the stud sensor, and the rest of your fingers on the same hand on the other side of the stud sensor (Figure ©).
-
Gently place the stud sensor flat against the wall and parallel to a door or window on the same wall, which give you an indication of how the studs are positioned behind the wall.
-
Without moving the stud sensor, press and hold until all the LEDs (except the green Power LED) turn off (1 sec).
- While still pressing ☑, SLOWLY move the stud sensor to the left or the right on the wall.
-
As you move the stud sensor, watch the LEDs and listen for beeps. The AC LED (Figure A ③) will start illuminating and the stud sensor will sound a cadenced beep from a typical distance of 6"-18" (.15m - .5m) away from the live AC. Since AC wires are usually attached to studs, the directional LEDs will help you find live AC wires that may be attached to the nearest stud.
-
If lights (Figure A 7), move the stud sensor to the left to find the nearest stud.
- If lights (Figure A 4), move the stud sensor to the right to find the nearest stud.
- If live AC voltage is found within 6"-18" (.15m - .5m) of the stud sensor's current position, the AC LED (Figure A ③) will illuminate and you will hear a few short beeps.
- If live AC voltage is found near the center of a stud, both the AC LED and the center red LED (Figure ⑤) will illuminate and the stud sensor will sound the short alternating beeps (AC found) followed by a longer constant beep (stud center found), and repeat these beeps until you stop pressing
Maintenance
- When the stud sensor is not in use, clean the exterior parts with a damp cloth, wipe the stud sensor with a soft dry cloth to make sure it is dry.
- Although the stud sensor exterior is solvent resistant, NEVER use solvents to clean the stud sensor.
- Store the stud sensor in a clean location at a temperature between -67 °F (-55 °C) and 158 °F (70 °C).
E
Troubleshooting
The LED is Blinking
The battery power is low.
- Check the AAA batteries to make sure:
- Each battery is installed correctly, according to (+) and (−) listed inside the battery compartment.
- The battery contacts are clean and free of rust or corrosion.
- The batteries are new, high-quality batteries to reduce the chance of battery leakage.
- Make sure the AAA batteries are in proper working condition. If in doubt, try installing new batteries.
The LED does not Turn On
There is no battery power.
• Install two new, high-quality, name-brand AAA batteries in the stud sensor.
- Make sure each battery is installed correctly, according to (+) and (−) listed inside the battery compartment.
The Stud Sensor is not Finding Studs
• Make sure the batteries are working.
- Make sure you have placed the stud sensor on a wall made of drywall or another common building material. The stud sensor will not work on walls made of concrete, mortar, block, brick work, plaster, carpeting, foil-faced materials, metallic surfaces, or ceramic tile.
- Make sure you have placed the stud sensor flat against the wall, the stud sensor is in a vertical position (parallel to a door or window), and you are pressing and holding the center button as you move the stud sensor SLOWLY against the wall.
- Make sure the wall is not too thick. DW0100 can be used on walls ≤ .75" (19mm) thick and DW0150 can be used on walls ≤ 1.5" (38mm) thick.
- Make sure the wall has a smooth surface.
- Make sure the temperature is within the specified Operating Range and Relative Humidity.
Service and Repairs
Note: Disassembling the tool will void all warranties on the product.
To assure product SAFETY and RELIABILITY, repairs, maintenance and adjustment should be performed by authorized service centers. Service or maintenance performed by unqualified personnel may result in a risk of injury. To locate your nearest DEWALT service center, go to http://www.DEWALT.com.
Three Year Limited Warranty
DEWALT will repair, without charge, any defects due to faulty materials or workmanship for three years from the date of purchase. This warranty does not cover part failure due to normal wear or tool abuse. For further detail of warranty coverage and warranty repair information, visit www.DEWALT.com or call 1-800-4-DEWALT (1-800-433-9258). This warranty does not apply to accessories or damage caused where repairs have been made or attempted by others. This warranty gives you specific legal rights and you may have other rights which vary in certain states or provinces.
In addition to the warranty, DEWALT® tools are covered by our:
1 YEAR FREE SERVICE
DeWALT will maintain the tool and replace worn parts caused by normal use, for free, any time during the first year after purchase.
90 DAY MONEY BACK GUARANTEE
If you are not completely satisfied with the performance of your DEWALT Power Tool, Laser, or Nailer for any reason, you can return it within 90 days from the date of purchase with a receipt for a full refund - no questions asked.
RECONDITIONED PRODUCT: Reconditioned product is covered under the 1 Year Free Service Warranty. The 90 Day Money Back Guarantee and the Three Year Limited Warranty do not apply to reconditioned product.
FREE WARNING LABEL REPLACEMENT: If your warning labels become illegible or are missing, call 1-800-4-DEWALT or visit your local service center for a free replacement.
Specifications
| DW0100 DW0150 | ||
| Detect Wood Studs up to .75" (19mm) thick drywall up to 1" (25mm) thick drywall | ||
| Detect Metal Studs up to .75" (19mm) thick drywall up to 1.5" (38mm) thick drywall | ||
| Detect Live AC Wire110V @ 60 Hz (220V @ 50Hz) | up to 2" (50.8mm) thick drywallfrom a distance of 6"-18" (.15 m- .5 m) AC LED will illuminate | |
| Accuracy - Center of Wood stud +/- 1/4" (6.4mm) under 1/2" - 3/4"(12.7mm - 19mm) thick drywall | +/- 1/4" (6.4mm) under 1/2" - 1.5"(12.7mm - 38mm) thick drywall | |
| Accuracy - Center of Metal stud +/- 1/4" (6.4mm) under 1/2" - 3/4"(12.7mm - 19mm) thick drywall | +/- 1/4" (6.4mm) under 1/2" - 1.5"(12.7mm - 38mm) thick drywall | |
| Power Source 2 AAA (1.5V) size batteries (3V DC) | ||
| Battery Life | ≤ 20 hrs of continual useat <2.4V (+/- 0.3V), Power LED will flash to indicate low battery | |
| Automatic Calibration Yes | ||
| Automatic Shutoff when release On button Yes | ||
| Non-marring Surface Yes | ||
| Relative Humidity 35% - 55% | ||
| Operating Temperature | 32°F to 122°F (0°C to 50°C) | |
| Storage Temperature | -67°F to 158°F (-55°C to 70°C) | |
E
Contenido
ES
© 2018 DEWALT Industrial Tool Co.,
701 East Joppa Road,
Towson, MD 21286
Made in China
N596253
June 2018
- Contents
- Stud Sensor Information
- PLEASE NOTE:
- User Safety
- Safety Guidelines
- WARNING:
- SAVE THESE INSTRUCTIONS
- CAUTION:
- E
- IMPORTANT SAFETY NOTICE
- Battery Safety
- Installing AAA Batteries
- Using the Stud Sensor
- Finding a Stud
- Finding Live AC
- Maintenance
- Troubleshooting
- The LED is Blinking
- The LED does not Turn On
- The Stud Sensor is not Finding Studs
- Service and Repairs
- Three Year Limited Warranty
- YEAR FREE SERVICE
- DAY MONEY BACK GUARANTEE
- Contenido
- ES
Brand : DEWALT
Model : DW0150
Category : Measuring equipment