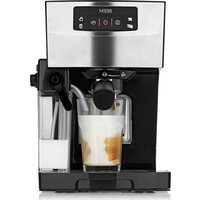
Espresso Classico II - Coffee machine BEEM - Free user manual and instructions
Find the device manual for free Espresso Classico II BEEM in PDF.


User questions about Espresso Classico II BEEM
0 question about this device. Answer the ones you know or ask your own.
Ask a new question about this device
Download the instructions for your Coffee machine in PDF format for free! Find your manual Espresso Classico II - BEEM and take your electronic device back in hand. On this page are published all the documents necessary for the use of your device. Espresso Classico II by BEEM.
USER MANUAL Espresso Classico II BEEM
21 Items Supplied
21 Device Overview
22 Information About Your Operating Instructions
23 Intended Use
23 Safety Notices
26 Before Initial Use
26 Setting Up and Connecting the Device
27 Handling and Operation
27 Inserting the Drip Tray
27 Filling the Water Tank
27 Filling the Milk Tank
28 Inserting / Removing the Sieve in the Portafilter
28 Filling the Sieve with Coffee Powder
28 Inserting / Removing the Portafi Iter
28 Cup Warmer
28 Switching On / Off
29 Programming Quantities
30 Setting the Milk/Milk Froth Ratio
30 Resetting to Factory Settings
30 Preparation
30 Espresso / Double Espresso
31 Cappuccino / Latte Macchiato
32 Milk Froth
32 Cleaning and Care
33 Self-Cleaning
34 Descaling
34 Storage
35 Troubleshooting
36 Warranty and Limitations of Liability
37 Technical Data
37 Disposal
Items Supplied
- Espresso machine
• Water tank with lid - Milk tank incl. cover
- Portafi Iter
- Sieve, small (I cup of espresso)
- Sieve, large (2 cups of espresso)
- Drip tray incl. cover
• Measuring spoon / tamper - Operating instructions
Check the items supplied for completeness and the components for transport damage. If you find any damage, do not use the device but contact our customer service department.
Remove all packaging materials and any possible protective films and transport protection. Never remove the rating plate and any possible warnings.
Device Overview
Key
(See fold-out page for illustrations)
Picture A – Device and Accessories
I Release button for the milk tank
2 Milk froth dial
3 Milk tank cover
4 Milk nozzle
5 Lever for the milk nozzle
6 Milk tank
7 Measuring spoon / tamper
8 Sieve, large (2 cups of espresso)
9 Sieve, small (I cup of espresso)
10 Portafi Iter
II Coffee outlet
12 Drip tray
13 Cover for the drip tray
14 Fold-out storage shelf
15 Control panel
16 Water tank
17 Cup warmer
18 Water tank lid
Picture B – Control Panel
19 📁 button – self-cleaning
20 Red control lamp (water shortage)
21 ⏻ button (On / Off switch)
22 Yellow control lamp (descaling)
23 🎨 button – for milk froth
24 📋 button – for cappuccino
25 button – for latte macchiato
26 📋 button – for double espresso
27 📁 button – for espresso
Congratulations!
Dear Customer,
We are delighted that you have chosen this espresso machine.
If you have any questions about the device and about spare parts/accessories, contact the customer service department via our website: www.beem.de
Information About Your Operating Instructions
Before using the device for the first time, please read through the operating instructions carefully and keep them for future reference. If the device is given to someone else, it should always be accompanied by these operating instructions. The operating instructions are an integral part of the device. The manufacturer and importer do not accept any liability if the information in these operating instructions is not complied with.
Symbols


Danger symbols: These symbols indicate risks of injury (e.g. from electricity or fire). Read through the associated safety notices carefully and follow them.
Beware of hot surfaces!
Alternating current

Supplementary information

Suitable for use with food.

Read the operating instructions before use!
Signal Words
Signal words indicate hazards if the associated notices are not followed.
DANGER – high risk, results in serious injury or death
WARNING – medium risk, may result in serious injury or death
CAUTION – low risk, may result in minor or moderate injury
NOTICE – may result in risk of damage to material
Intended Use
- This device is only intended to be used to make speciality coffees using coffee powder and milk. It can also be used to make milk froth.
- The device is for personal use only and is not intended for commercial or domestic-like applications, e.g. in hotels, bed and breakfasts, offices, staff kitchens or similar places.
- The device should only be used as described in the operating instructions. Any other use is deemed to be improper.
Safety Notices

WARNING: Note all safety notices, instructions, illustrations and technical data provided with this device.
Failure to follow the safety notices and instructions may result in electric shock, fire and / or injuries.
- This device may be used by children aged 8 and over and by people with reduced physical, sensory or mental abilities or a lack of experience and/or knowledge if they are supervised or have received instruction on how to use the device safely and have understood the dangers resulting from failure to comply with the relevant safety precautions.
• Children must not play with the device. - Cleaning and user maintenance must not be carried out by children, unless they are older than 8 years of age and are supervised.
• Children younger than 8 years of age and animals must be kept away from the device and the connecting cable.

CAUTION: hot surfaces!
The device and the accessories are very hot during and shortly after use. While the device is in operation, only ever touch the handles and the control panel. Allow the device to cool down completely before it is cleaned.
- Note the fill levels (i.e. the MIN and MAX markings) on the milk tank and water tank! Fill the milk tank and the water tank at least up to the MIN marking and no higher than the MAX marking!
- Never immerse the device and the connecting cable in water or other liquids and ensure that these components cannot fall into water or become wet.
- The device must always be disconnected from the mains when it is left unattended and before assembling, disassembling, filling or emptying the water tank or milk tank or cleaning it.
- Do not make any modifications to the device. Do not replace the connecting cable yourself. If the device or the connecting cable of the device are damaged, they must be replaced or repaired by the manufacturer, customer service department or authorised distributors in order to avoid any hazards.
- It is essential to follow the instructions in the “Cleaning and Care” chapter.

DANGER – Danger of Electric Shock!
- Use the device only in closed rooms.
- Do not use the device in rooms with high humidity.
- If the device falls into water while it is connected to the mains power, switch off the power supply immediately! Only after this should you pull the device out of the water.
- Never touch the device and the connecting cable with wet hands when it is connected to the mains power.
- Make sure that the steam which emerges is not aimed directly at electrical devices and equipment containing electrical components.

WARNING – Danger of Injury!
- Keep the packaging material away from children and animals. There is a danger of suffocation!
Danger of scalding from heat, hot steam or condensation!
- Avoid coming into contact with the rising steam. Keep your hands and head away from the steam outlet openings during the brewing process.
- The portafilter will become hot during use. Never attempt to remove the portafilter during the brewing process.
-
Do not touch the milk nozzle after use.
-
Be careful when removing the portafilter after operating the device. There may still be hot water remaining in / on the portafi lter!
- Allow the portafilter to cool down before it is emptied.
- Never pour water into the water tank when the device is switched on or during the brewing process. Allow the device to cool down before filling it again.
- Do not move the device during the brewing process.
- In the interest of your own safety, inspect the device and the connecting cable for damage each time before you use it. Use the device only if it is in working order.
- Make sure that the connecting cable does not present a trip hazard. The connecting cable should not hang down from the surface on which the device is placed in order to prevent the device from being pulled down.

WARNING – Danger of Fire
- Do not connect the device along with other consumers (with a high wattage) to a multiple socket in order to prevent overloading and a possible short circuit (fire).
- Do not operate the device in the vicinity of combustible materials. Do not place any combustible materials (e.g. cardboard, paper, wood or plastic) in or on the device.
- Do not cover the device during operation.
NOTICE – Risk of Damage to Material and Property
- The device should only be used if it has been correctly assembled! Before each use, check whether a sieve and the portafilter are inserted correctly and whether the water tank and if applicable the milk tank are filled correctly!
- Switch off the device and pull the mains plug out of the plug socket if an error occurs during operation, when there is a power cut or before a thunderstorm.
- When you pull it out of the plug socket, always pull on the mains plug and never the mains cable!
- Never pull or carry the device by the connecting cable.
- Protect the device from other heat sources, naked flames, sub-zero temperatures, persistent moisture, wet conditions and impacts.
- Use only original accessories from the manufacturer in order to guarantee that there is no interference that may prevent the device from working and to avoid possible damage.
Before Initial Use
I. Wipe the device with a clean, damp cloth. Clean all accessories with a little detergent and clear water.
2. Set up the device and connect it (see the "Setting Up and Connecting the Device" chapter).
3. Before you enjoy your first coffee, we recommend that you carry out a trial run to remove any possible production residues in the water system and in the milk tank system. To do this, follow the instructions in the “Handling and Operation” and “Preparation” chapters.

When the device is first used, production-related additives may cause a small amount of smoke and / or an odour to be produced. This is normal and not a device defect.
- Repeat this process twice. Do not drink this coffee!
- Clean the device and accessories (see the "Cleaning and Care" chapter).
Setting Up and Connecting the Device
PLEASE NOTE!
- Only connect the device to a plug socket that is properly installed and matches the technical data of the device. The plug socket must also be readily accessible after connection so that the connection to the mains can quickly be isolated.
- Lay the connecting cable in such a way that it does not become squashed or bent and does not come into contact with hot surfaces (also applies to the hot surfaces of the device!).
- Do not use the device in conjunction with extension cables.
- Always set up the device with a clear space at the sides (at least 20 cm) and clear space above it (at least 30 cm) on a flat, solid and heat-resistant surface that is resistant to splashing.
- Do not place the device below kitchen wall units or similar cupboards. The rising steam could cause damage to them!
I. Place the device on the kitchen unit or another dry, clean work surface, following the safety notices and the notices provided at the beginning of this chapter.
2. Fully unwind the connecting cable and connect it to a plug socket.
Handling and Operation
Inserting the Drip Tray
The device is supplied with a drip tray (12) to capture any excess water produced after or during the brewing process. In addition, coffee might drip out of the coffee outlet (11) or milk might drip out of the milk nozzle (4) after making coffee.

Only attach the drip tray to the device / remove it from the device when the milk tank (6) is not inserted in the device.
I. Place the cover (13) on the drip tray. Make sure that it fits correctly.
2. Place the drip tray on the surface and slide it into the device at the designated point.
Filling the Water Tank
- Open the water tank lid (18).
- Take out the water tank (16) by the handle.
- Pour the quantity of water you want (note the MAX marking) into the water tank. Only ever use water to make coffee; do not pour milk or other liquids into the water tank!
- Reinsert the water tank and flip the handle down (Picture C). Make sure that the water tank fi ts correctly.
- Close the water tank lid.

If the water in the water tank is not used within two days, pour away the remaining water and refi ll the water tank before you use it again.
Filling the Milk Tank
- Press the release button (1) and pull the milk tank (6) to the side at the same time. Do not exert any pressure on the device from above as otherwise the milk tank might become jammed.
- Press the release button on the side of the milk tank cover to open it up at the side and remove it.
- Pour the quantity of milk you want (note the MAX marking) into the milk tank. Only ever pour milk or water for cleaning into the milk tank.
- Place the milk tank cover onto the milk tank at an angle and flip it shut (Picture D). When you do this, make sure that the locking lugs sit in the recesses which are provided for them. The cover must be heard to engage in place.
- Insert the milk tank back in the device. It must engage audibly. Check that the milk tank fits correctly.

If the milk in the milk tank is not used up, pour away the remaining milk and clean the milk tank. Refi ll the milk tank before using it again.
Inserting / Removing the Sieve in the Portafi Iter
Place the sieve you want into the portafilter (10). The sieve must fit securely in the portafilter so that it cannot fall out when coffee powder is removed.
Small sieve (9) for single espresso, normal cappuccino, normal
latte macchiato
Large sieve (8) for double espresso or two espressos, strong
To remove the sieve from the portafilter, reach either with your fingernails or with a thin, hard object between the sieve and portafi iter.
Filling the Sieve with Coffee Powder
I. Use the measuring spoon (7) to pour the quantity of coffee powder you want into the desired sieve in the portafilter (10). Make sure that you do not overfill the portafilter!

One heaped measuring spoon is equivalent to roughly one filled small sieve.
- Press down the coffee powder in the sieve with the tamper.

Only ever use pure espresso / coffee powder which is not ground too fine. Coffee substitute or coffee extract contain sticky substances which can block the sieves.
Inserting / Removing the Portafi Iter
- Inserting: Insert the portafilter (10) into the device so that the two locking lugs on the portafilter sit in the recesses which are provided for them on the device. Twist the portafilter anticlockwise to fi x it in place (Picture E).
- Removing: Twist the portafilter a little clockwise and then pull it out downwards.
- Removing the used coffee powder: Tap the portafilter gently against an edge (e.g. of a dustbin, a bowl, a knock box or similar object) so that the compressed coffee powder can be released.
Cup Warmer
The device features a cup warmer (17) which is heated automatically as soon as the device is switched on. Turn over the cups which are to be heated and place them on the cup warmer for approx. 5 – 10 minutes (Picture F).
Switching On / Off
When the device is first switched on, the red control lamp (20) flashes along with the buttons
(26) and (27) and a beep is heard to indicate that the device is not yet ready for operation.
I. Fill the water tank (16) and if necessary the milk tank (6) (see the previous chapter).
2. Place a cup or a small vessel beneath the coffee outlet (II).
- Press the 🎨 button (19). The device draws water and fills the water system with liquid. A small amount of water always runs through. The device is now ready for operation. You will hear two beeps.
After it has been used several times, there is usually still water in the water system, which means that the device is soon ready for operation.
- Press the ⏻ button (21) to switch on the device and preheat the water. The control panel fl ashes during the heating process.
- Press the ⏻ button to switch off the device.
Programming Quantities
Both the quantity of espresso and the quantity of milk can be programmed for each function. This allows you to set the perfect quantity of espresso and milk to suit your own taste.

The set quantities are saved until a new quantity is set.
I. Fill the device with water and espresso or additionally with milk (see the “Preparation” chapter).
2. Fold out the milk nozzle (4) if necessary using the lever (5) (Picture G).
3. Place a suitable cup below the coffee outlet (11) or the milk nozzle.
4. Select the function that is to be reprogrammed by pressing the appropriate button (a beep sounds) and holding it (another beep sounds).
5. The device starts to prepare espresso or make milk froth.
6. Only let go of the button once the quantity of milk or espresso that you want has passed through. You will hear three beeps. This quantity is now saved under the corresponding function.
Cappuccino and Latte Macchiato

This process must be carried out twice for latte macchiato and cappuccino: once for the quantity of espresso and once for the quantity of milk.
- On the first operation, set the quantity of milk you want in the manner described in the previous section. Make sure that the milk nozzle (4) is folded out and there is a cup below the milk nozzle.
- Start a second operation by pressing the appropriate button again. A beep is heard.
- Wait until the quantity of milk has passed through.
- As soon as the device starts to make espresso, press the appropriate button again and hold it down. Another beep sounds.
- Only let go of the button again once the quantity of espresso that you want has passed through. You will hear three beeps.
Now both the quantity of milk and the quantity of espresso are saved under the appropriate function.
Setting the Milk/Milk Froth Ratio
On the milk tank cover (3) there is a dial (2) which can be used to set whether more milk froth or more hot milk should be added to the speciality coffee.
For more milk froth: Turn the dial to the top right.
For more hot milk: Turn the dial to the bottom left.
Resetting to Factory Settings
If the quantities of espresso and milk are to be reset to the quantities which are preset at the factory, proceed as follows:
I. Switch off the device using the button (21).
2. Press the buttons 📋 (27) and 📋 (26) simultaneously and keep them pressed.
3. Switch the device back on using the ⏻ button. The control panel (15) will flash five times and fi ve beeps will be heard.
4. Let go of the 📋 and Buttons. The quantities are now reset to the factory settings.
Preparation
PLEASE NOTE!
- Do not operate the device without water. If this does happen, the device issues an error message (several beeps in succession) (see the “Troubleshooting” chapter).
- Never use the device without a suitable container below the coffee outlet and the milk nozzle.

The device remains switched on and the control panel (15) is lit up for up to 30 minutes after the last action. During this time, the water pipes and the cup warmer (17) are heated. Once the 30 minutes have elapsed, the device switches to stand-by mode and may need to be switched on again using the ⏻ button (21).
If the brewing process is to be aborted prematurely, press the chosen function button again. You will hear a beep, and the control panel is fully lit up again. The device switches to stand-by mode.
The perfect amount of espresso to suit your own taste can be programmed in the device (see the "Handling and Operation" chapter – "Programming Quantities").
I. Fill the water tank (16) with water (see the “Handling and Operation” chapter – “Filling the WaterTank”).
2. Prepare the portafilter (10) for the speciality coffee you want in the manner described in the "Handling and Operation" chapter and insert it into the device.
31 EN
- Press the ⏻ button (21) to switch on the device and preheat the water. The control panel (15) flashes during the heating process.

If the milk tank is not inserted, only the button ☐(27) for an espresso or the button ☐(26) for two espressos can be selected. Accordingly, the control panel is also only lit for these buttons.
- Place one or two suitable cup(s) beneath the coffee outlet (II).

For small cups, the device has a fold-out storage shelf (14) on the housing. Simply flip this down (Picture H).
- As soon as the device has heated up, the control panel stops flashing. Press the 📋 button for one espresso or the 📋 button for two espressos or a double espresso. A beep sounds, the brewing process starts and the chosen button flashes. Hot water is poured over the coffee powder to brew it.
At the end of the brewing process, a beep sounds, the control panel is fully lit up again and the device automatically switches to stand-by mode.
The perfect amount of espresso and milk to suit your own taste can be programmed in the device (see the “Handling and Operation” chapter – “Programming Quantities”).
I. Fill the water tank (16) with water (see the “Handling and Operation” chapter – “Filling the WaterTank”).
2. Fill the milk tank (6) (see the "Handling and Operation" chapter – "Filling the Milk Tank").
3. Prepare the portafilter (10) for the speciality coffee you want in the manner described in the "Handling and Operation" chapter and insert it into the device.
4. Fold out the milk nozzle (4) using the lever (5) (Picture G).
5. If necessary, select the setting you want using the dial for the milk froth (2) (see the "Handling and Operation" chapter – "Setting the Milk/Milk Froth Ratio").
6. Press the ⏻ button (21) to switch on the device and preheat the water. The control panel (15) flashes during the heating process.
7. Place a suitable cup below the coffee outlet (II) and the milk nozzle.
8. As soon as the device has heated up, the control panel stops flashing. Press the button (24) for cappuccino or the button (25) for latte macchiato. A beep sounds, the brewing process starts and the chosen button flashes. Milk is heated with steam and frothed up. Hot water is poured over the coffee powder to brew it.
At the end of the brewing process, a beep sounds, the control panel is fully lit up again and the device automatically switches to stand-by mode.
Milk Froth

The perfect amount of milk to suit your own taste can be programmed in the device (see the “Handling and Operation” chapter – “Programming Quantities”).
I. Fill the water tank (16) with water (see the "Handling and Operation" chapter – "Filling the WaterTank").
2. Fill the milk tank (6) (see the "Handling and Operation" chapter – "Filling the Milk Tank").
3. Fold out the milk nozzle (4) using the lever (5) (Picture G).
4. Select the setting you want using the dial for the milk froth (2) (see the “Handling and Operation” chapter – “Setting the Milk/Milk Froth Ratio”).
5. Press the button (21) to switch on the device and preheat the water. The control panel (15) flashes during the heating process.
6. Place a suitable cup below the milk nozzle.
7. As soon as the device has heated up, the control panel stops flashing. Press the 🎨 button (23). A beep sounds, the process starts and the chosen button flashes. Milk is heated with steam and frothed up.
At the end of the process, a beep sounds, the control panel is fully lit up again and the device automatically switches to stand-by mode.
Cleaning and Care
PLEASE NOTE!
- Do not use any toxic, corrosive or abrasive cleaning agents or scouring sponges to clean the device. These may damage the surface.
I. Clean the milk tank (6) and the sieves (8, 9) after every use with mild detergent and warm water or in the dishwasher.
2. Empty out the drip tray (12) on a regular basis to prevent overflowing.
3. Rinse through the tube in the milk tank with clear hot water to remove milk residues after every use.
4. If necessary, clean the water tank (16) and the drip tray and the cover (13) with detergent and warm water.
5. Regularly run the cleaning programme (see "Self-Cleaning") to clean the milk tank system as well as the coffee outlet (11) on the portafilter (10).
6. Wipe the housing with a damp cloth. If necessary, use a little detergent to remove more intense soiling.
7. Thoroughly dry the device and all accessories before assembling it again.
8. Check the connecting cable regularly for any damage.
Self-Cleaning
Quick Clean of the Milk Tank System
The quick clean of the milk tank system should be carried out after every use so that no milk residues can remain in the system and dry on or go mouldy.
- Fill the milk tank (6) with water (see the “Handling and Operation” chapter – “Filling the Milk Tank”).
- Fold out the milk nozzle (4) using the lever (5) (Picture G).
- Press the button (21) to switch on the device and preheat the water. The control panel (15) flashes during the heating process.
- Place a suitable cup below the milk nozzle.
- As soon as the device has heated up, the control panel stops flashing. Press the 🎨 button (19). A beep sounds, the self-cleaning starts and the 🔊 button flashes.
- Run the programme and pour away the contents of the cup after the self-cleaning finishes.
- Repeat this process if necessary.
Intensive Clean of the Portafi Iter and Milk Tank System
During the intensive clean, the portafilter is also thoroughly rinsed through in addition to the milk tank system. This allows coffee residues which are stuck on to be rinsed out of the portafilter and the sieves if applicable.
- Fill the water tank (16) with water (see the "Handling and Operation" chapter – "Filling the WaterTank").
- Also fill the milk tank (6) with water (see the “Handling and Operation” chapter – “Filling the Milk Tank”).
-
Insert the portafilter (10) into the device (see the "Handling and Operation" chapter – "Inserting / Removing the Portafi Iter").
-
Fold out the milk nozzle (4) using the lever (5) (Picture G).
-
Press the button (21) to switch on the device and preheat the water. The control panel (15) flashes during the heating process.
-
Place a suitable cup below the coffee outlet (11) and the milk nozzle.
-
As soon as the device has heated up, the control panel stops flashing. Press the 🎨 button (19) for approx. 5 seconds. A beep sounds, the self-cleaning starts and the 🔊 button fl ashes.
-
If you want to stop the cleaning, press the ⚙ button again. The device switches to stand-by mode.
-
Pour away the water in the cup.
-
Repeat this process if necessary.
Descaling
Limescale deposits have an adverse effect not only on the quality of the espresso and the water, but they also cause power losses and shorten the lifespan of the device. The thicker a limescale layer is, the more difficult it is to remove.
We therefore recommend regularly removing limescale deposits with a descaling agent in accordance with the water quality in your area and how often the device is used (approx. every 2 – 6 weeks).
The first indications that descaling is required are a large amount of steam being produced and slower brewing of the espresso.

The device indicates that it needs to be descaled at regular intervals! When the yellow control lamp (22) is lit, a descaling process needs to be carried out. The control lamp goes out as soon as a cleaning or descaling process has been carried out. This process may require more than one water tankful. In this case, a measuring cup may need to be used to add more water to the water tank (16) during the process until the yellow control lamp goes out.
For descaling we recommend the BEEM Premium Descaler Concentrate. The efficient, food-safe and environmentally friendly BEEM Premium Descaler Concentrate is available from selected specialist stockists, via our website www.beem.de or from our customer service department on request.
Descaling with the BEEM Premium Descaler Concentrate

For careful descaling of the device, carry out the intensive clean with a concentrate/water solution of no more than 1:20 (one part concentrate to 20 parts water) (see the “Self-Cleaning” section—“Intensive Clean of the Portafi Iter and Milk Tank System”).
- Then allow the descaling solution to take effect for a little while.
- Repeat the process a second and third time if necessary.
- Remove the rest of the solution from the water tank (16) and milk tank (6).
- Fill both tanks with clear water. To rinse the device, run the same programme with clear water at least two times. The device is now descaled and ready to be used again.
Storage
Disconnect the device from the mains power when it is not going to be used for a prolonged period. Clean the device again if necessary (see the “Cleaning and Care” chapter) and let it dry completely.
Store the device and all accessories in a dry, clean, frost-free place that is protected from direct sunlight and cannot be accessed by children or animals.
Troubleshooting
If the device does not work properly, check whether you are able to rectify the problem yourself. If the problem cannot be solved with the steps that are listed, contact our customer service department.

Do not attempt to repair a defective electrical device yourself!
| Problem Possible | cause Fix | |
| The control panel (15) does not light up / the device cannot be switched on. | The mains plug is not inserted correctly in the plug socket. | Correct the fi t of the mains plug. |
| The plug socket is defective. | Try another plug socket. | |
| There is no mains voltage. | Check the fuse of the mains connection. | |
| The fuse in the fuse box is triggered. | Too many devices connected to the same circuit. | Reduce the number of devices in the circuit. |
| Water runs out of the device. | There is too much water in the water tank (16). | Do not overfi ll the water tank! |
| The water tank (16) is not placed in its mount correctly. | Correct the fi t of the water tank. | |
| A function has been selected, but the device beeps constantly and the red control lamp (20) fl ashes. The control panel (15) does not light up. | There is no water in the water tank (16). | Detach the water tank from the device and fi ll it with water. Place a cup beneath the coffee outlet (11). Press any button. Some water will run through the water system into the cup. The red control lamp will go out, the device will stop beeping and can be restarted. |
| The red control lamp (20) is lit up permanently. | The device is defective. | Contact the customer service department. |
| The yellow control lamp (22) fl ashes. | The device is furred up. Descale the device. | |
| The espresso runs very slowly into the cup. | The coffee outlet (11) or the sieve (8, 9) is clogged. | Clean the portafilter (10) and the sieve. |
| The device is furred up. Descale the device. | ||
| Problem Possible cause Fix | ||
| The espresso is too weak. | There is not enough coffee powder in the sieve (8, 9). | Pour the right quantity of coffee powder into the respective sieve. |
| The set espresso quantity is too much for the quantity of coffee powder in the sieve. | Programme the perfect amount of espresso to suit your own taste in the device. | |
| A large amount of steam is produced in the brewing process. | The device is furred up. Descale the device. | |
| Cappuccino, latte macchiato or milk froth has been selected, but there is no milk in the milk tank (6). | Wait until the programme has run through. Allow the device to cool down a little. Remove the milk tank from the device and fi ll itSelect the programme you want again. | |
| During use, an unpleasant smell is detected. | The device is being used for the fi rst time. | A smell often develops when new devices are fi rst used. The smell should disappear once the device has been used several times. |
| The device has previously been descaled. | Rinse out the device with fresh water. | |
Warranty and Limitations of Liability
The warranty does not cover faults caused by incorrect handling, calcification, damage or attempted repairs. The same applies to normal wear and tear.
We do not accept any liability for damage or consequential damage resulting from:
- failure to follow the operating instructions
• non-designated use - improper or unsuitable handling
• repairs which are not carried out properly - unauthorised modifications
• use of outside parts or spare parts - use of unsuitable additional parts or accessories

Keep the original packaging during the warranty period of the device so that the device can be properly packaged up if it needs to be returned. The warranty claim will lapse if any damage is caused during transport.
Technical Data
Article number: 07440
Model number: CJ-265A
Voltage supply: 220 - 240 V \~ 50 / 60 Hz
Power: 1240 - 1450 W
Protection class: 1
Capacity:
- Water tank: max. 1.2 litres
- Milk tank: 400 ml
ID of operating instructions: Z 07440 M BE VI 0621 uh

Disposal

Dispose of the packaging material in an environmentally friendly manner so that it can be recycled.
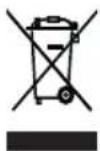
This device is governed by the European Directive 2012/19/EU on waste electrical and electronic equipment (WEEE). Do not dispose of this device as normal domestic waste, but rather in an environmentally friendly manner via an officially approved waste disposal company.
All rights reserved.