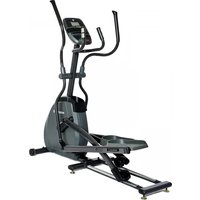
Andes 2.0 - Elliptical bike Horizon - Free user manual and instructions
Find the device manual for free Andes 2.0 Horizon in PDF.


User questions about Andes 2.0 Horizon
0 question about this device. Answer the ones you know or ask your own.
Ask a new question about this device
Download the instructions for your Elliptical bike in PDF format for free! Find your manual Andes 2.0 - Horizon and take your electronic device back in hand. On this page are published all the documents necessary for the use of your device. Andes 2.0 by Horizon.
USER MANUAL Andes 2.0 Horizon
Read the ELLIPTICAL GUIDE before using this OWNER'S MANUAL.
SAVE THESE INSTRUCTIONS
Read this ELLIPTICAL GUIDE before using the OWNER'S MANUAL. When using an electrical product, basic precautions should always be followed, including the following: Read all instructions before using this elliptical. It is the responsibility of the owner to ensure that all users of this elliptical are adequately informed of all warnings and precautions.



WARNING
TO REDUCE THE RISK OF BURNS, FIRE, ELECTRICAL SHOCK OR INJURY TO PERSONS:
- If you experience any kind of pain, including but not limited to chest pains, nausea, dizziness, or shortness of breath, stop exercising immediately and consult your physician before continuing.
- When exercising, always maintain a comfortable pace. Do not sprint above 80 RPMs on this machine. Incorrect or excessive exercise may damage your health.
• To maintain balance, it is recommended to keep a grip on the handlebars while exercising, mounting or dismounting the machine.
- Do not turn pedal arms by hand.
- Make sure handlebars are secure before each use.
- Keep the topside of the foot support clean and dry.
- Care should be taken when mounting or dismounting the equipment. Before mounting or dismounting, move the pedal on the mounting or dismounting side to its lowest position and bring the machine to a complete stop.
- Do not wear clothes that might catch on any part of the elliptical.
• Always wear athletic shoes while using this equipment.
- Do not jump on the elliptical.
- At no time should more than one person be on the elliptical while in operation.
- This elliptical is intended for in-home use only. Do not use this elliptical in any commercial, rental, school or institutional setting. Failure to comply will void the warranty.
- Do not use elliptical in any location that is not temperature controlled, such as but not limited to garages, porches, pool rooms, bathrooms, car ports or outdoors. Failure to comply will void the warranty.
• This elliptical complies with the EN957-1/9 standard, class of elliptical: HB; braking system is adjustable.
- To prevent electrical shock, never drop or insert any object into any opening.
Keep power cord away from heated surfaces. Do not carry this unit by it's supply cord or use the cord as a handle.
- Disconnect all power before servicing or moving the equipment. To clean, wipe surfaces down with soap and slightly damp cloth only; never use solvents. (See MAINTENANCE)
- Do not use other attachments that are not recommended by the manufacturer. Attachments may cause injury.
Do not operate where aerosol (spray) products are being used or when oxygen is being administered.
- Use the elliptical only as described in the elliptical guide and owner's manual.
- The equipment shall be installed on a stable base.
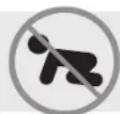
At NO time should children under the age of 13 be closer to the elliptical than 10 feet.
At NO time should children under the age of 13 use the elliptical.
Children over the age of 13 or disabled persons should not use the elliptical without adult supervision.
It is essential that your elliptical is used only indoors, in a climate controlled room. If your elliptical has been exposed to colder temperatures or high moisture climates, it is strongly recommended that the elliptical is warmed up to room temperature before first time use. Failure to do so may cause premature electronic failure.

GROUNDING INSTRUCTIONS
If an elliptical should malfunction or breakdown, grounding provides a path of least resistance for electrical current to reduce the risk of electrical shock. This product is equipped with a cord having an equipment-grounding conductor and a grounding plug. The plug must be plugged into an appropriate outlet that is properly installed and grounded in accordance with local codes and ordinances.
Improper connection of the equipment-grounding conductor can result in a risk of electric shock. Check with a qualified electrician or serviceman if you are in doubt as to whether the product is properly grounded. Do not modify the plug provided with the product. If it will not fit the outlet, have a proper outlet installed by a qualified electrician.

WARNING
Connect this exercise product to a properly grounded outlet only.
Never operate product with a damaged cord or plug even if it is working properly. Never operate any product if it appears damaged, or has been immersed in water. Contact your Locad Dealer for replacement or repair.
BASIC OPERATION
CONGRATULATIONS ON CHOOSING YOUR ELLIPTICAL!
You've taken an important step in developing and sustaining an exercise program! Your elliptical is a tremendously effective tool for achieving your personal fitness goals. Regular use of your elliptical can improve the quality of your life in so many ways.
Here are just a few of the health benefits of exercise:
- Weight loss
• A healthier heart - Improved muscle tone
• Increased daily energy levels
The key to reaping these benefits is to develop an exercise habit. Your new elliptical will help you eliminate obstacles that prevent you from exercising. Inclement weather and darkness won't interfere with your workout when you use your elliptical in the comfort of your home. This guide provides you with basic information for using and enjoying your new machine.


LOCATION OF THE ELLIPTICAL
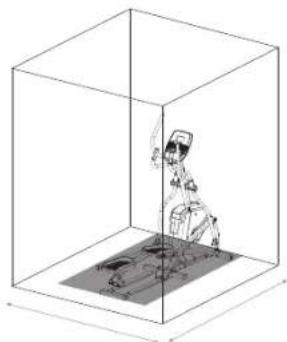
Place the elliptical on a level surface. We advice there should be clearance around your elliptical trainer (see guide). Do not place the elliptical in any area that will block any vent or air openings.
POWER
Your elliptical is powered by a power supply. The power must be plugged into the power jack, which is located in the front of the machine near the stabilizer tube. Some ellipticals have a power switch, located next to the power jack. Make sure it is in the ON position. NOTE: Some ellipticals have an ON/OFF switch located behind the console.
natural_image
Illustration of a person in traditional attire standing inside a transparent cube, with no visible text or symbols
TRAINING AREA
173 x 63.5 x 200 cm / 68" x 25" x 78.7"

FREE AREA
418 x 247.5 x 300 cm / 164.6" x 97.4" x 118"

WARNING
Never operate product if it has a damaged cord or plug, if it is not working properly, if it has been damaged, or immersed in water. Please contact our service centre for technical support, repair or new parts.
FOOT POSITIONING
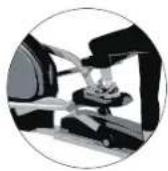
Your elliptical offers a variety of foot positions. Moving your foot to the forward most position of the foot pad increases your step height, which will create a feel similar to a step machine. Placing your foot toward the back of the foot pad decreases your step height and creates more of a gliding feel, similar to a smooth walk or run. Always make sure your entire foot is secured on the foot pad.
Your elliptical also allows you to pedal both forward and backwards to offer a variation to your workout and to focus on other major leg muscle groups such as your hamstrings and calves.
WORKOUT OPTIONS
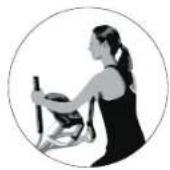
FULL BODY WORKOUT
For a full body workout, push and pull continuously on the dual action arms while pedaling.
MOUNTING THE ELLIPTICAL
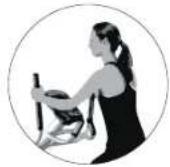
- Stand on the side of the elliptical next to the lowest foot pedal.
- While holding both of the stationary handlebars, place your foot on the lowest foot pedal and pull yourself up onto the elliptical.
- Wait until the elliptical finds its resting place and then place your other foot on the opposite pedal.

natural_image
Line drawing of a person using a robotic device to interact with a mechanical device (no text or symbols present)MOVING THE ELLIPTICAL
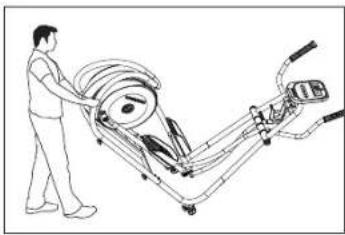
Your elliptical has a pair of transport wheels built into the front stabilizer tube. To move, first remove the power supply and firmly grasp the steel portion of the rear stabilizer bar, carefully tilt and roll. NOTE: be sure to grab the steel bar and not the plastic cover.

WARNING
Our ellipticals are heavy, use care and additional help if necessary when moving. Failure to follow these instructions could result in injury.
LEVELING THE ELLIPTICAL
Your elliptical should be leveled for optimum use. Once you have placed your elliptical where you intend to use it, raise or lower one or both of the adjustable levelers located on the bottom of the elliptical frame*. A carpenter's level is recommended. Once you have leveled your elliptical, lock the levelers in place by tightening the nuts against the frame. *NOTE: Some ellipticals do not have levelers.
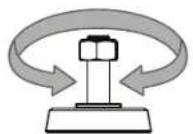
ADJUST HEIGHT

USING THE HEART RATE FUNCTION
Your elliptical could be equipped with either heart rate pulse grips or a thumb pulse sensor. To find out what your model has, refer to the beginning of the ASSEMBLY section of your OWNER'S MANUAL.
The heart rate function on this product is not a medical device. While heart rate grips or a thumb pulse sensor can provide a relative estimation of your actual heart rate, they should not be relied on when accurate readings are necessary. Some people, including those in a cardiac rehab program, may benefit from using an alternate heart rate monitoring system like a chest or wrist strap. Various factors, including movement of the user, may affect the accuracy of your heart rate reading. The heart rate reading is intended only as an exercise aid in determining heart rate trends in general. Please consult your physician.
Heart rate monitoring system is only available on Andes 2.0.
PULSE GRIPS
Place the palm of your hands directly on the grip pulse handlebars. Both hands must grip the bars for your heart rate to register. It takes 5 consecutive heart beats (15-20 seconds) for your heart rate to register. When gripping the pulse handlebars, do not grip tightly. Holding the grips tightly may elevate your blood pressure. Keep a loose, cupping hold. You may experience an erratic readout if consistently holding the grip pulse handlebars. Make sure to clean the pulse sensors to ensure proper contact can be maintained.

CAUTION
Do not press excessively hard on the sensor as this may cause damage.
ASSEMBLY

WARNING
There are several areas during the assembly process that special attention must be paid. It is very important to follow the assembly instructions correctly and to make sure all parts are firmly tightened. If the assembly instructions are not followed correctly, the elliptical could have frame parts that are not tightened and will seem loose and may cause irritating noises. To prevent damage to the elliptical, the assembly instructions must be reviewed and corrective actions should be taken.
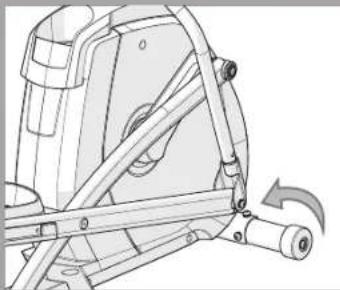
Before proceeding, find your elliptical's serial number located on the front stabilizer tube and enter it in the space provided below. Also locate the model name which is next to the serial number.
ENTER YOUR SERIAL NUMBER AND MODEL NAME IN THE BOXES BELOW:
SERIAL NUMBER:

MODEL NAME:

SERIAL NUMBER LOCATION
natural_image
Technical line drawing of a mechanical assembly with no visible text or symbols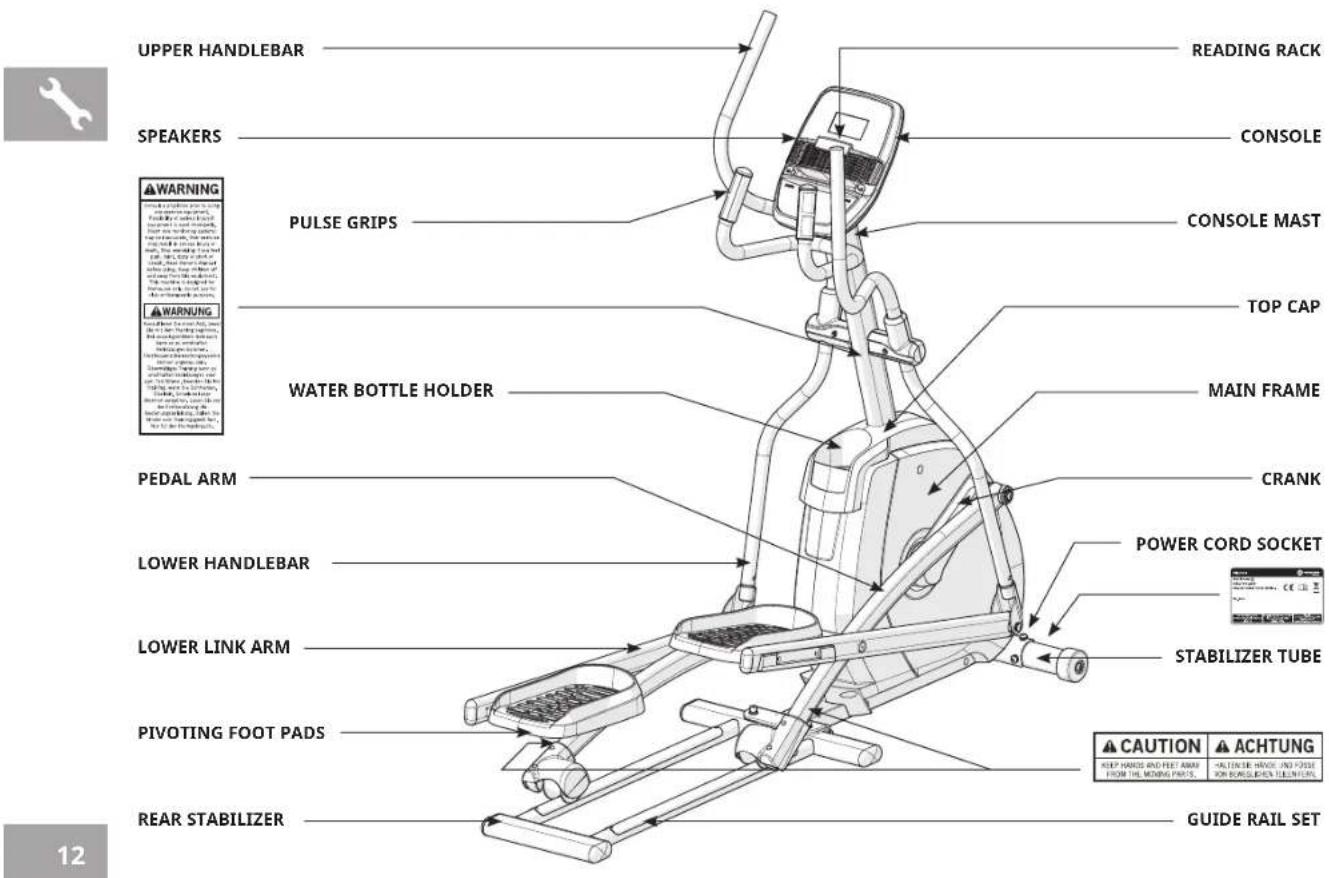
text_image
UPPER HANDLEBAR SPEAKERS WARNING WARNING PULSE GRIPS WATER BOTTLE HOLDER PEDAL ARM LOWER HANDLEBAR LOWER LINK ARM PIVOTING FOOT PADS REAR STABILIZER READING RACK CONSOLE CONSOLE MAST TOP CAP MAIN FRAME CRANK POWER CORD SOCKET STABILIZER TUBE CAUTION CAHTUNG GUIDE RAIL SET KEEP HANDS AND FEET AWAY FROM THE MOUNTING PARTS. ALTERER HAVING AND POISE FOR BOLLIGENDER TELEFICEL 12TOOLS REQUIRED:
□ 8 mm L-Wrench
□ 13/17 mm Flat Wrench
□ 5 mm L-Wrench/Screwdriver
□ Screwdriver (not included)
PARTS INCLUDED:
□ 1 Main Frame
□ 1 Stabilizer Tube
□ 1 Guide Rail Set
1 Console Mast
2 Pedal Arms
□ 2 Lower Handlebars
□ 2 Upper Handlebars
□ 2 Handlebar Cover Sets
☐ 2 Lower Link Arms With Footpads
□ 1 Front Top Cap Piece
□ 1 Rear Top Cap Piece
□ 1 Console
□ 1 Audio Adapter Cable
□ 1 Power Cord
□ 1 Hardware Kit
PRE ASSEMBLY
UNPACKING
Unpack the product where you will be using it. Place the elliptical carton on a level flat surface. It is recommended that you place a protective covering on your floor. Never open box when it is on its side.
WARNING
- It is recommended that two people work together for ease and efficiency while assembling an elliptical.
- During each assembly step, ensure that ALL nuts and bolts are in place and partially threaded. It is recommended you complete the full assembly of your unit before completely tightening any ONE bolt.
- Several parts have been pre-lubricated to aid in assembly and usage. Please do not wipe this off. If you have difficulty, a light application of lithium bike grease is recommended.
NEED HELP?
If you have questions or if there are any missing parts, please refer to safety sticker on product to contact Customer Tech Support.


ASSEMBLY STEP 1
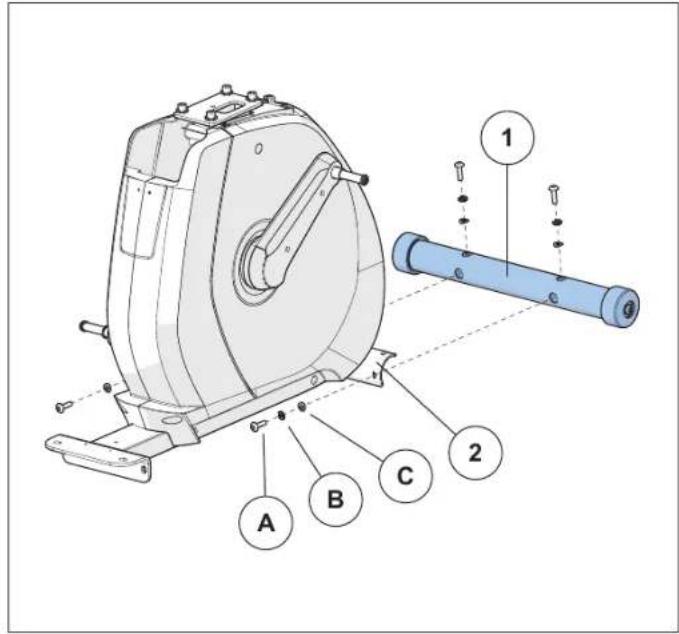
text_image
Technical diagram of a mechanical device with labeled parts A, B, C, and numbered components 1, 2, 9| HARDWARE FOR STEP 1 | |||
| PART TYPE DESCRIPTION QTY | |||
| A BUTTON HEAD BOLT M8X1.25PX30L 4 | |||
| B SPRING WASHER 8.2X15.4X2.0T 4 | |||
| C ARC WASHER 8.4X17.0X1.0T 4 | |||
A Open HARDWARE FOR STEP 1.
B Attach the STABILIZER TUBE (1) to the MAIN FRAME (2) using 2 BOLTS (A), 2 SPRING WASHERS (B) and 2 ARC WASHERS (C) on each side.
ASSEMBLY STEP 2
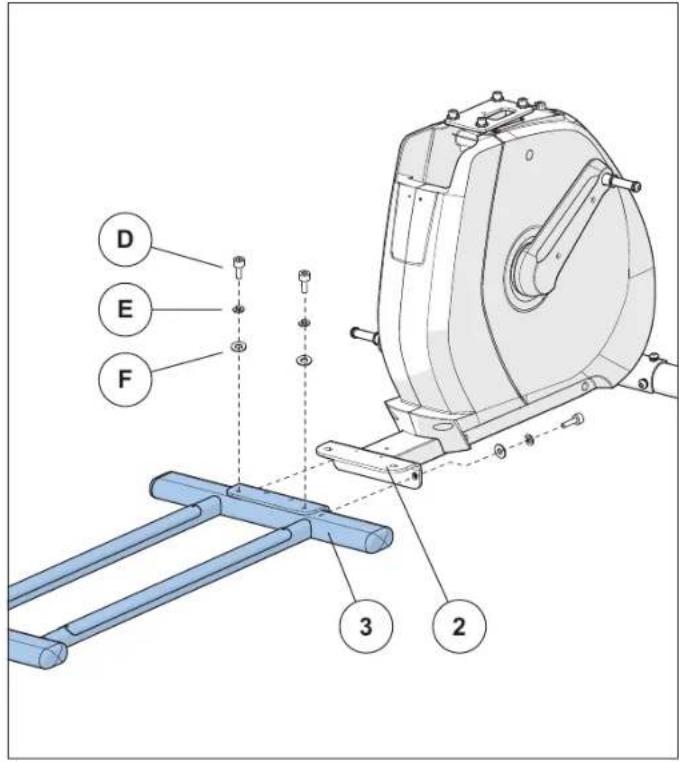
text_image
D E F 3 2| HARDWARE FOR STEP 2 | |||
| PART TYPE DESCRIPTION QTY | |||
| D SOCKET CAP BOLT M10X1.5PX2 | 0L 4 | ||
| E SPRING WASHER 10.2X18.4X2.5T 4 | |||
| F FLAT WASHER 10.2X20.0X1.5T 4 | |||
A Open HARDWARE FOR STEP 2.
B Align GUIDE RAIL SET (3) with MAIN FRAME (2) as shown.
C Attach the GUIDE RAIL SET (3) to the MAIN FRAME (2) using 4 BOLTS (D), 4 SPRING WASHERS (E) and 4 FLAT WASHERS (F).

ASSEMBLY STEP 3
text_image
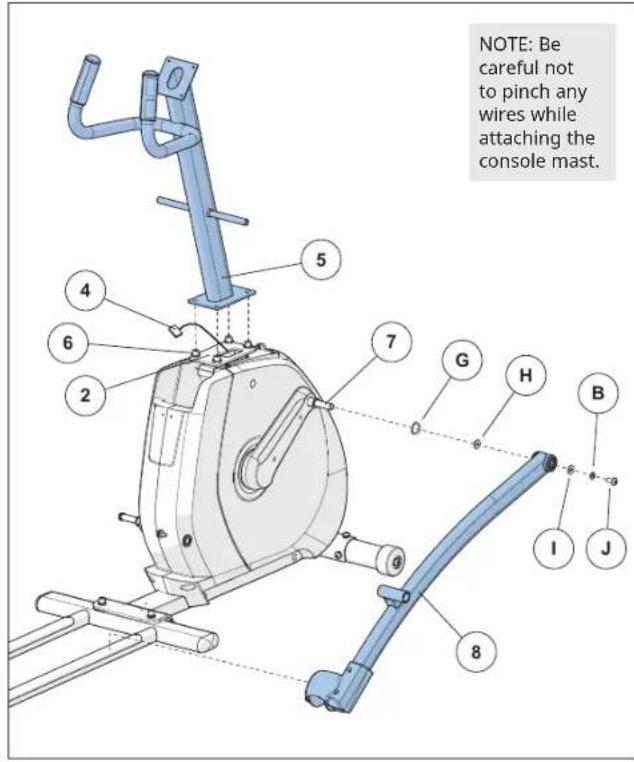
NOTE: Be careful not to pinch any wires while attaching the console mast. 5 4 6 2 7 G H B I J 8| HARDWARE FOR STEP 3 | |||
| PART TYPE DESCRIPTION QTY | |||
| G WAVY WASHER 17.2X22.5X0.5T 2 | |||
| H FLAT WASHER 16.0X25.0X1.0T 2 | |||
| I FLAT WASHER 8.2X30.0X1.5T 2 | |||
| B | SPRING WASHER | 8.2X15.4X2.0T 2 | |
| J | BUTTON HEAD BOLT M8X1.25PX15L 2 | ||
A Open HARDWARE FOR STEP 3.
B Remove PRE-INSTALLED BOLTS AND WASHERS (6) from MAIN FRAME (2).
C Carefully pull the CONSOLE CABLE (4) through the CONSOLE MAST (5) using the twist tie located inside the CONSOLE MAST (5).
D Attach CONSOLE MAST (5) to MAIN FRAME (2) using PRE-INSTALLED BOLTS AND WASHERS (6).
E Slide WAVY WASHER (G) and FLAT WASHER (H) over CRANK (7) followed by PEDAL ARM (8) as shown. Rest pedal arm wheel on guide rail.
F Attach the PEDAL ARM (8) to the CRANK (7) using 1 FLAT WASHER (I), 1 SPRING WASHER (B) and 1 BOLT (J).
G Repeat steps E–F on the opposite side of the elliptical.
ASSEMBLY STEP 4
text_image
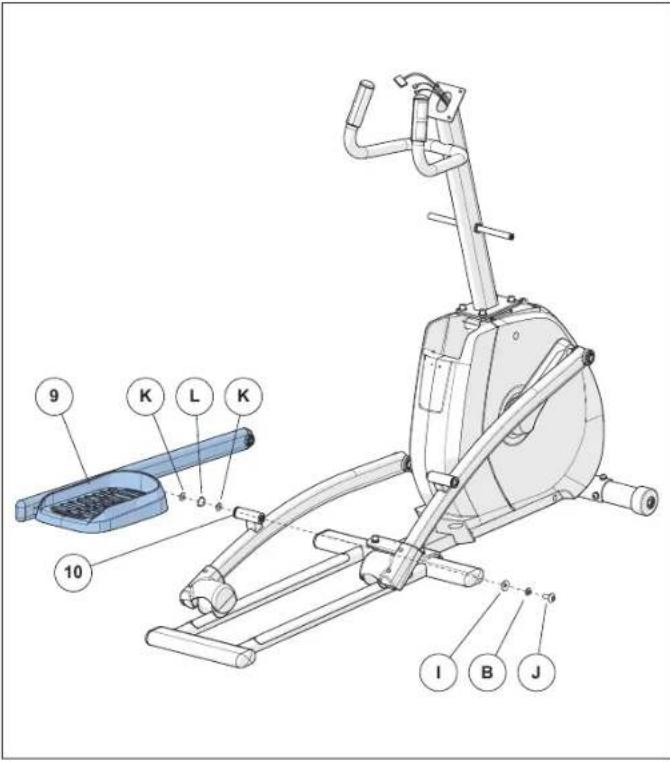
Technical diagram of a stationary exercise machine with labeled components and parts| HARDWARE FOR STEP 4 | |||
| PART TYPE DESCRIPTION QTY | |||
| K FLAT WASHER 20.2X27.2X1.5T 4 | |||
| L WAVY WASHER 20.7X29.1X0.5T 2 | |||
| I FLAT WASHER 8.2X20.0X1.5T 2 | |||
| B SPRING WASHER 8.2X15.4X2.0T 2 | |||
| J BUTTON HEAD BOLT M8X1.25PK20L 2 | |||
A Open HARDWARE FOR STEP 4.
B Slide 1 FLAT WASHER (K), 1 WAVY WASHER (L) and another FLAT WASHER (K) onto the LOWER LINK ARM (9).
C Slide the LOWER LINK ARM (9) into the PEDAL ARM BRACKET (10).
D Attach the LOWER LINK ARM (9) to the PEDAL ARM BRACKET (10) using 1 FLAT WASHER (I), 1 SPRING WASHER (B) and 1 BOLT (J).
E Repeat steps B-D on the opposite side of the elliptical.

ASSEMBLY STEP 5
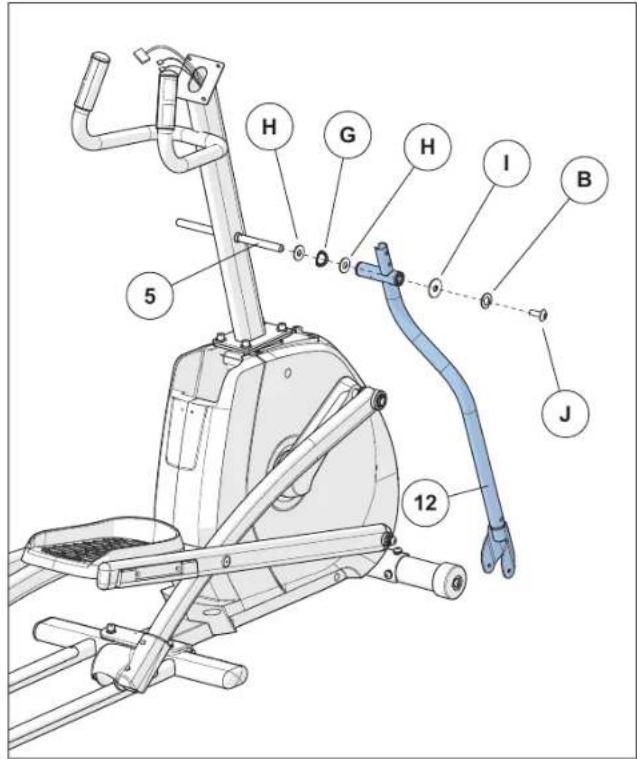
text_image
H G H I B 5 J 12| HARDWARE FOR STEP 5 | |||
| PART TYPE DESCRIPTION QTY | |||
| G WAVY WASHER 17.2X22.5X0.5T 2 | |||
| H FLAT WASHER 16.0X25.0X1.0T 4 | |||
| I FLAT WASHER 8.2X30.0X1.5T 2 | |||
| B SPRING WASHER 8.2X15.4X2.0T 2 | |||
| J BUTTON HEAD BOLT M8X1.25PX20L 2 | |||
A Open HARDWARE FOR STEP 6.
B Slide 1 FLAT WASHER (H), 1 WAVY WASHER (G) and 1 FLAT WASHER (H) onto the CONSOLE MAST (5).
C Slide LOWER HANDLEBAR (12) onto CONSOLE MAST (5) and attach using 1 FLAT WASHER (I), 1 SPRING WASHER (B) and 1 BOLT (J).
D Repeat steps B-C on the other side.
ASSEMBLY STEP 6
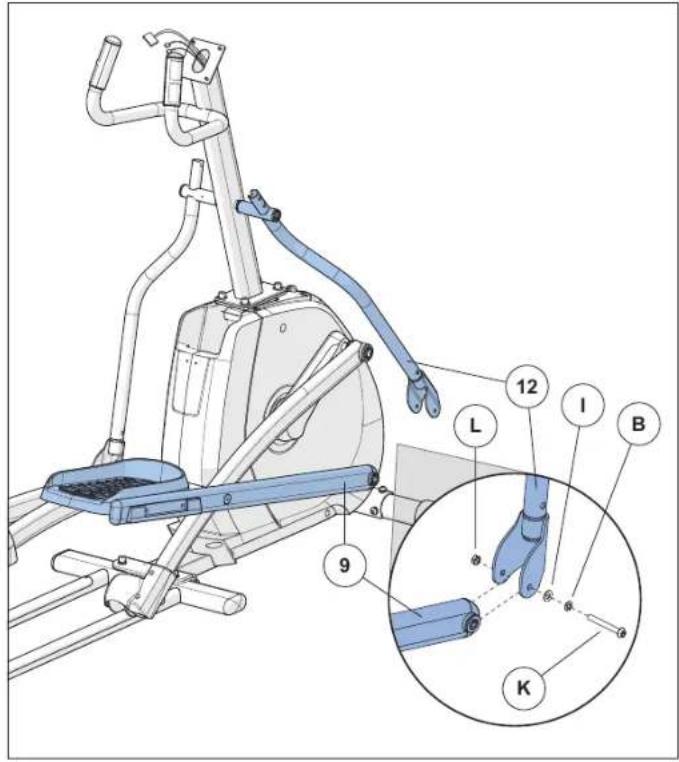
text_image
Technical diagram of a stationary exercise machine with labeled parts and an inset view showing internal components.| HARDWARE FOR STEP 6 | |||
| PART TYPE DESCRIPTION QTY | |||
| K BOLT M8X1.25PX70L-12L 2 | |||
| B SPRING WASHER 8.2X15.4X2.0T 2 | |||
| I FLAT WASHER 8.2X20.0X1.5T 2 | |||
| L NUT M8X1.25P 2 | |||
A Open HARDWARE BAG 6.
B Slide LOWER LINK ARM (9) into bottom end of LOWER HANDLEBAR (12).
C Secure the joint with 1 BOLT (K), 1 SPRING WASHER (B), 1 FLAT WASHER (I) and 1 NUT (L).
D Repeat steps B-C on the opposite side of the elliptical.

ASSEMBLY STEP 7

text_image
13 14 15 12 M 15| HARDWARE FOR STEP 7 | |||
| PART TYPE DESCRIPTION QTY | |||
| M SCREW M4X0.7PX8L 4 | |||
A Open HARDWARE BAG 7.
B Slide the right (R) UPPER HANDLEBAR (13) onto the right LOWER HANDLEBAR (12) making sure handlebars are joined together completely. Secure the UPPER HANDLEBAR (13) to the LOWER HANDLEBAR (12) using PRE-ATTACHED SET SCREWS (14).
C Slide right (R) HANDLEBAR COVERS (15) over UPPER HANDLEBARS (13) and attach using 1 SCREW (M).
NOTE: Make sure upper handlebars are as far down as possible. Handlebars can be damaged If not secured correctly.
D Repeat STEPS B-C on left side.
ASSEMBLY STEP 8
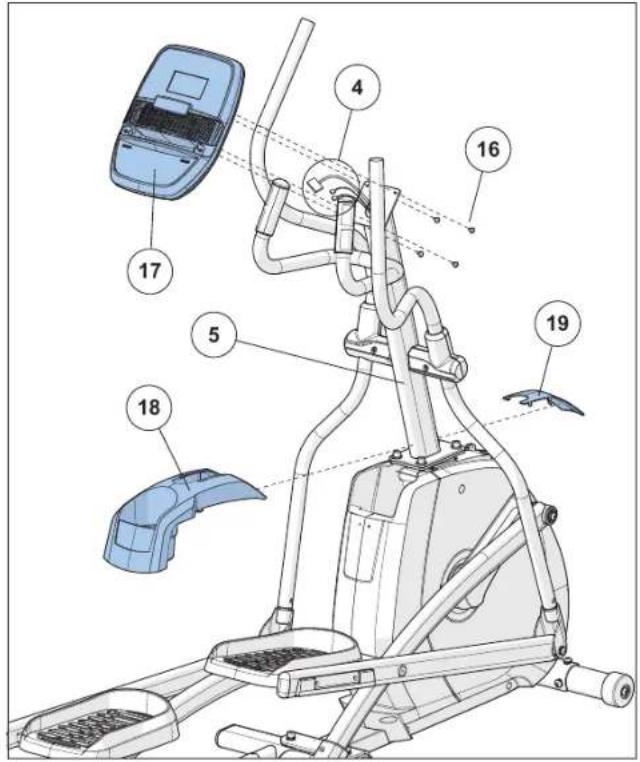
text_image
Technical diagram of a stationary exercise machine with numbered components for identificationNOTE: All hardware for this step is pre-installed.
A Remove 4 PRE-INSTALLED BOLTS (16) from the CONSOLE (17).
B Attach the CONSOLE CABLES (4) to the CONSOLE (17).
C Carefully tuck the CONSOLE CABLES (4) into the CONSOLE MAST (5) before attaching the CONSOLE. Attach CONSOLE (17) to CONSOLE MAST (5) using 4 PRE-INSTALLED BOLTS (16).
NOTE: Do not to pinch any wires while attaching the console.
D Slide FRONT TOP CAP PIECE (18) and REAR TOP CAP PIECE (19) over CONSOLE MAST (5) and snap into place.
ASSEMBLY STEP 9
natural_image
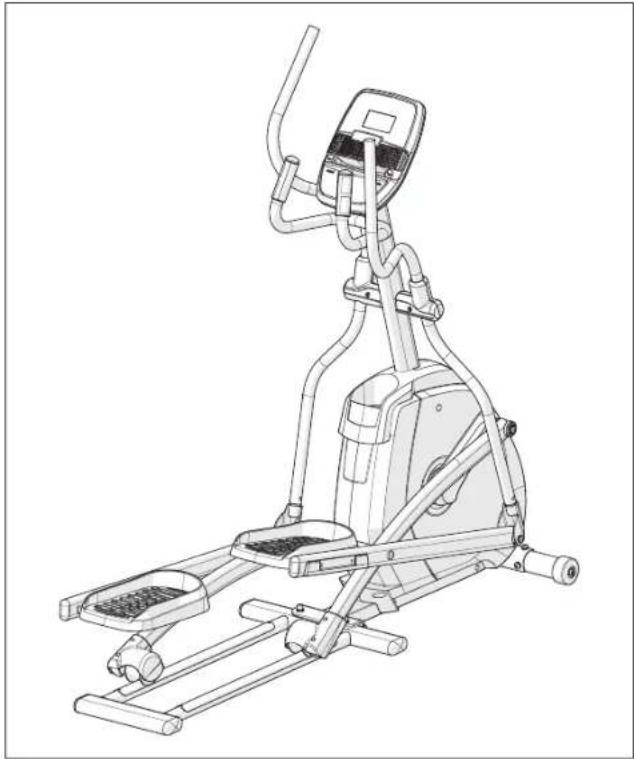
Line drawing of a stationary exercise machine with levers and control panel (no text or symbols)ASSEMBLY COMPLETE!
Andes 2.0 / EX59
Max. User Weight: 136 kg / 300 lbs.
Overall Dimensions: 173 x 63.5 x 162.5 cm / 68" x 25" x 64"
This section explains how to use your elliptical's console and programming. For the BASIC OPERATION please see the ELLIPTICAL GUIDE


text_image
A L HORIZON FITNESS I M I B K E D F START Start Time Stop Time Charge Display Stop Window 34125678010CONSOLE OPERATION
Note: There is a thin protective sheet of clear plastic on the overlay of the console that should be removed before use.
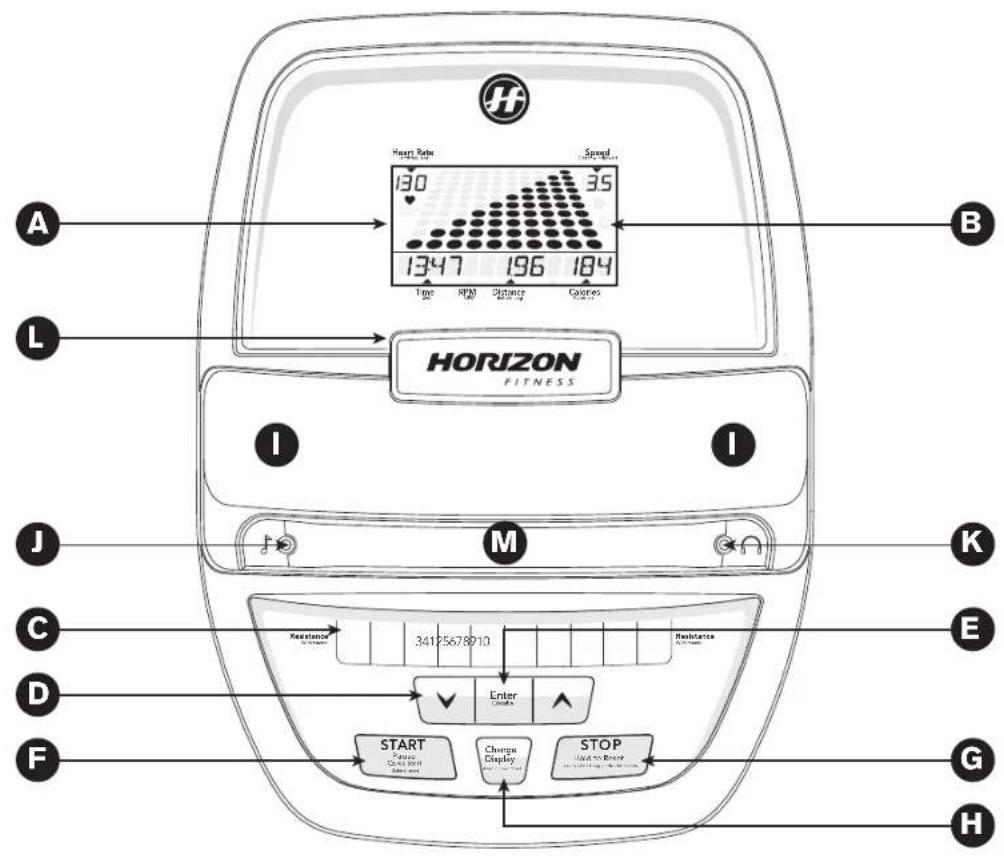
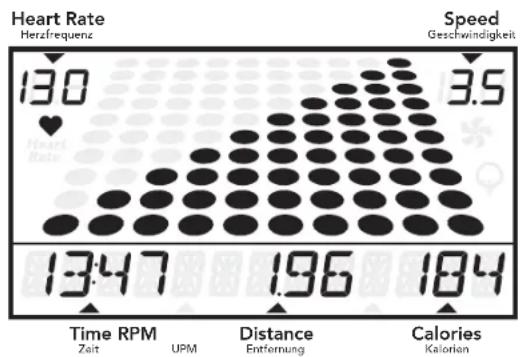
A) LCD DISPLAY WINDOW: time, RPM, distance, calories, heart rate, speed
B) ENERGY SAVER INDICATOR: indicates if the machine is in energy saver mode.
C) QUICK KEYS: used to reach desired resistance quickly.
D) KEYS: Used to adjust resistance level and to cycle through selections during program set up.
E) ENTER: used to confirm selection.
F) START / PAUSE: used to start workout, pause workout, and restart after pause.
G) STOP / HOLD TO RESET: used to stop machine and also will reset machine when held down.
H) CHANGE DISPLAY: used to change display feedback during workout.
I) SPEAKERS: plays music through speakers when connected to your media player.
J) AUDIO IN JACK: plug your media player into the console using the included audio adaptor cable.
K) AUDIO OUT JACK: plug your headphones into the console to use during workout.
L) READING RACK: holds reading material.
M) STORAGE POCKET: holds personal items, such as a small TV remote, mobile phone or media player.


bar
| Metric | Value | | :--- | :--- | | Heart Rate (Hz) | 130 | | Speed (Geschwindigkeit) | 3.5 | | Time RPM (Zahl) | 13:47 | | UPM (Uptake) | 196 | | Distance (Entfernung) | 184 | | Calories (Kalorian) | 184 |DISPLAY WINDOW
• BLUE BACKLIT LCD: Andes 2.0 only
• TIME: Shown as minutes : seconds. View the time remaining or the time elapsed in your workout.
• DISTANCE: Shown as miles. Indicates distance traveled during your workout.
• CALORIES: Total calories burned or remaining for your workout.
- RPM: Revolutions Per Minute.
- SPEED: Shown as MPH. Indicates how fast the foot pads is moving.
- HEART RATE: Shown as BPM (beats per minute). Used to monitor your heart rate (displayed when contact is made with both pulse grips).
• PROGRAM PROFILES: Represents the profile of the program being used.
- ENERGY SAVER: Indicates when machine is in Energy Saver mode to conserve power consumption.
GETTING STARTED
1) Check to make sure no objects are nearby that will hinder the movement of the elliptical.
2) Plug in the power cord to power the elliptical ON. (Switch is located at the bottom-front of the elliptical.)
3) Set User Weight using ▼ and press ENTER.
4) You have the following options to start your workout:
A) QUICK START UP
Simply press GO to begin working out. Time, distance and calories will all count up from zero. The resistance level will default to level 1.
B) SELECT A PROGRAM
1) Use ▼▲ to scroll through programs
2) Press ENTER to select your desired program.
3) Set workout level using and press ENTER.
4) Press START to begin workout.
NOTE: You can adjust the resistance level during your workout.
When your workout is complete, the console will display "workout complete" and beep. Your workout information will stay displayed on the console for 30 seconds and then reset.
TO RESET THE CONSOLE
Hold STOP key for 3 seconds.
TO CLEAR CURRENT SELECTION
To clear the current program selection or screen, hold the stop button for 3 seconds.

PROGRAM INFORMATION
MANUAL: Adjust your resistance level manually during your workout.
WEIGHT LOSS: Promotes weight loss by raising and lowering the resistance level, while keeping you in your fat burning zone. Time based program with 10 levels to choose from.
WEIGHT LOSS PLUS: Promotes weight loss by raising and lowering the resistance level, while keeping you in your fat burning zone. Time based program with 5 levels to choose from and greater intensity than the weight loss program.
INTERVALS: Improves your strength, speed and endurance by raising and lowering the resistance levels through-out your workout to involve both your heart and muscles. Time based program with 10 levels to choose from.
INTERVALS PLUS: Improves your strength, speed and endurance by raising and lowering the resistance levels through-out your workout to involve both your heart and muscles. Time based program with 5 levels to choose from and greater intensity than the intervals program.
ROLLING: Mimics the feeling of moving up and down hills by gradually increasing and decreasing the resistance. Time based program with 7 levels to choose from.
REVERSE TRAIN: Program cues you to pedal forward (F) and backwards (R) for an exciting and challenging workout.
RANDOM: Provides even more workout variety by mixing up your resistance levels. Time based program with 7 levels to choose from.
CALORIE GOAL: Allows you to set the number of calories you would like to burn. Calorie goal can range from 100-999 calories. Calories will count down. User inputs weight and sets starting resistance. Calories burned are calculated using weight input with the speed of the workout.
USING YOUR MEDIA PLAYER

1) Connect the included AUDIO ADAPTOR CABLE to the AUDIO IN JACK on the left of the console and the headphone jack on your media player.
2) Use your media player buttons to adjust song settings.
3) Remove the AUDIO ADAPTOR CABLE when not in use.

ENERGY SAVER (STANDBY MODE)
This machine has a special feature called Energy Saver™ mode. This mode is NOT automatically activated. When Energy Saver mode is activated, the display will automatically enter standby mode (Energy Saver mode) after 15 minutes of inactivity. This feature saves energy by disabling most power to the machine until a key is pressed on the console. This feature can be turned on or off in the engineering menu.
To enter the engineering menu, press and hold the key and key for 3-5 seconds. Use the keys to navigate through the menu to ENG 2. Press ENTER to select. Use ▼▲ keys to select ENRGY SVE ON or OFF. Press and hold STOP for 3-5 seconds to exit ENG 2. Press and hold STOP again for 3-5 seconds to exit the engineering menu.


Eng: Waste Disposal
VISION Fitness / HORIZON Fitness / TEMPO Fitness / TREO Fitness products are recyclable. At the end if its useful life please dispose of this article correctly and safely (local refuse sites).
natural_image
Illustration of a person in traditional attire standing inside a transparent cube, with no visible text or symbols
TRAININGSFLÄCHE
173 x 63,5 x 200 cm

FREIER BEREICH
418 x 247,5 x 300 cm

WARNUNG
natural_image
Line drawing of a person using a small cart with a motor, no text or symbols presentUMSTELLEN DES ELLIPTICAL TRAINERS
natural_image
Mechanical assembly diagram showing linkage mechanism with no visible text or symbols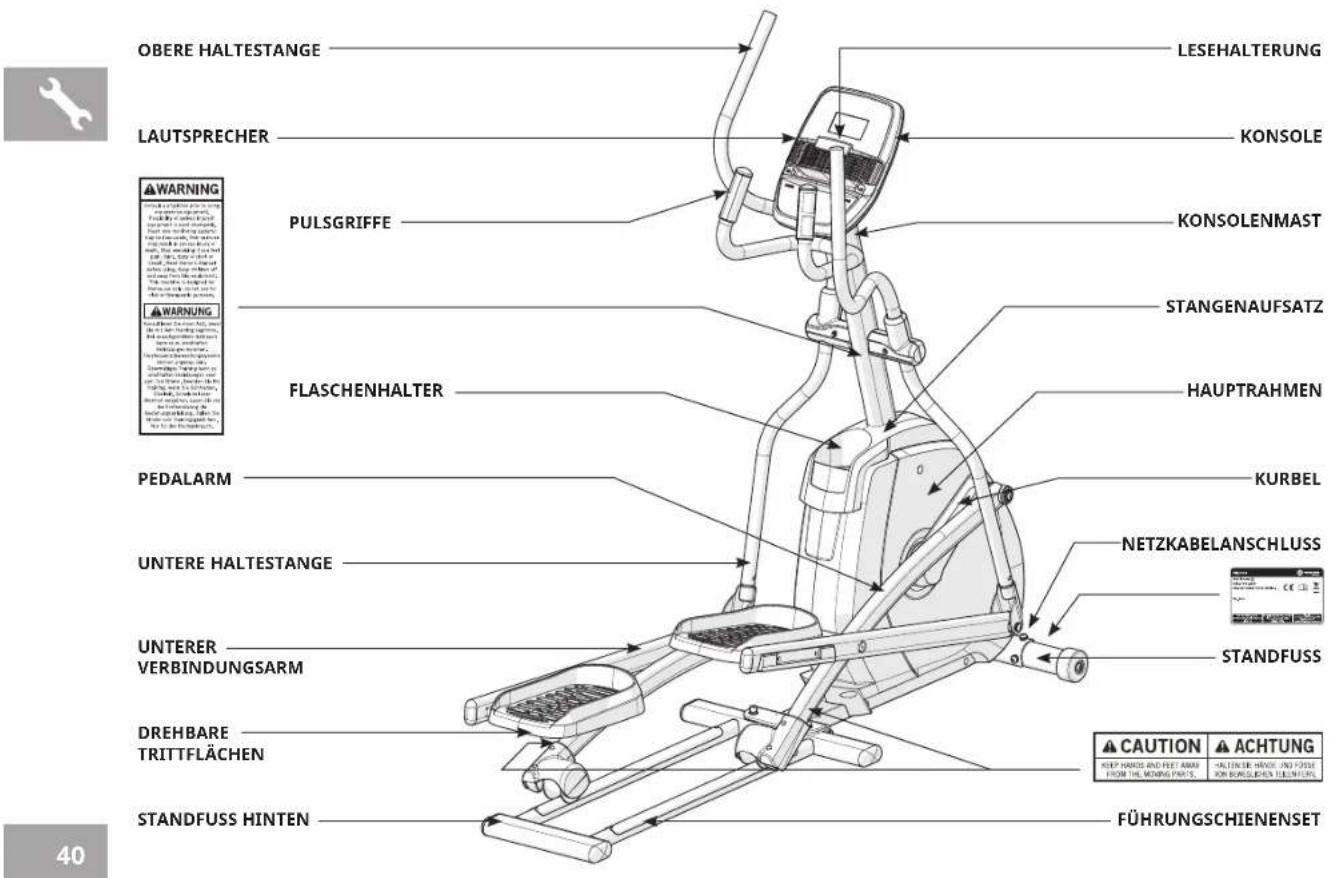
text_image
Technical diagram of a mechanical device with labeled parts A, B, C, and numbered components 1, 2, 9text_image
D E F 3 2text_image
Technical diagram of an exercise machine with labeled components and parts in Chinesetext_image
H G H I B 5 J 12text_image
Technical diagram of a stationary exercise machine with labeled components and an inset view showing mechanical parts.text_image
Technical diagram of a stationary exercise machine with numbered components for identificationnatural_image
Line drawing of a stationary exercise machine with levers and control panel (no text or symbols)PROGRAMMINFORMATIONEN
VISION Fitness / HORIZON Fitness / TEMPO Fitness / TREO Fitness products are recyclable. At the end if its useful life please dispose of this article correctly and safely (local refuse sites).
natural_image
Illustration of a person in traditional attire standing inside a transparent cube, with no visible text or symbols
TRAININGSGEBIED
173 x 63,5 x 200 cm / 68" x 25" x 78,7"

VRIJE RUIMTE
418 x 247,5 x 300 cm / 164,6" x 97,4" x 118"

WAARSCHUWING
natural_image
Line drawing of a person using a mechanical device to interact with a motor (no text or symbols present)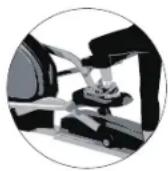

DE ELLIPTICAL VERPLAATSEN
natural_image
Technical line drawing of a mechanical assembly with no visible text or symbols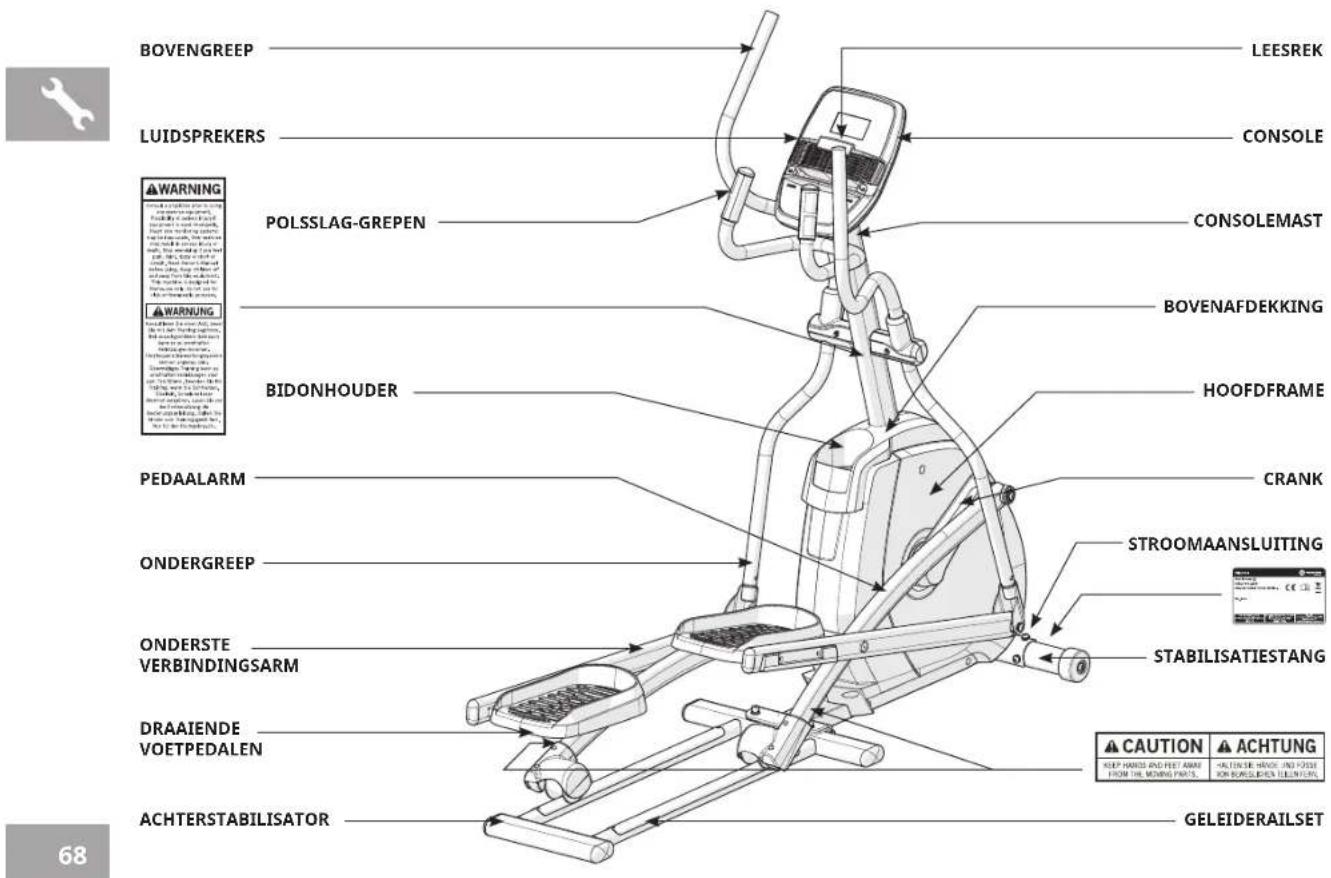
text_image
BOVENGREEP LEESREK LUIDSPREKERS CONSOLE WARNING POLSSLAG-GREPEN CONSOLEMAST BOVENAFDEKKING WARNING BIDONHOUDER HOOFDFRAME PEDAALARM CRANK ONDERGREEP STROOMAANSLUITING ONDERSTE VERBINDINGSARM STABILISATIESTANG DRAAIENDE VOETPEDALEN CAUTION CHEP HANDS AND FEET AWAY FROM THE MÔNING PARTS. ACHTERSTABILISATOR GELEIDERAILSET 68BENODIGD GEREEDSCHAP:
text_image
Technical diagram of a mechanical device with labeled parts A, B, C, and numbered components 1, 2, 9| MONTAGEMATERIAAL VOOR STAP 1 | |||
| ONDERDEEL | TYPE BESCHRIJVING AA | NTAL | |
| A BOUT | MET BOLLE KOP M8X1, | 25PX30L 4 | |
| B VEERRING | 8,2X15,4X2,0T 4 | ||
| C GEGOLFDE VEERRING | 8,4X17, | 0X1,0T 4 | |
text_image
D E F 3 2| MONTAGEMATERIAAL VOOR STAP 2 | |||
| ONDERDEEL | TYPE BESCHRIJVING AANTAL | ||
| D | BINNENZESKANT-BOUT | M10X1,5PX20L 4 | |
| E VEERR | RING 10,2X18,4X2,5T 4 | ||
| F SLUIT | RING 10,2X20,0X1,5T 4 | ||
text_image
Technical diagram of a stationary exercise machine with labeled components and parts| MONTAGEMATERIAAL VOOR STAP 4 | |||
| ONDERDEEL | TYPE BESCHRIJVING AANTAL | ||
| K SLUIT | RING 20,2X27,2X1,5T 4 | ||
| L GEGOL | FDE RING 20,7X29,1X0,5T 2 | ||
| I SLUIT | RING 8,2X20,0X1,5T 2 | ||
| B VEERR | RING 8,2X15,4X2,0T 2 | ||
| J BOUT | MET BOLLE KOP M8X1,25PX20L 2 | ||
text_image
H G H I B 5 J 12| MONTAGEMATERIAAL VOOR STAP 5 | |||
| ONDERDEEL | TYPE BESCHRIJVING AA | NTAL | |
| G GEGO | LFDE RING 17,2X22,5X0,5T 2 | ||
| H SLUIT | RING 16,0X25,0X1,0T 4 | ||
| I SLUIT | RING 8,2X30,0X1,5T 2 | ||
| B VEERR | RING 8,2X15,4X2,0T 2 | ||
| J | BOUT MET BOLLE KOP | M8X1,25PX20L | 2 |
text_image
Technical diagram of an exercise machine with labeled parts and a detailed inset showing mechanical components.| MONTAGEMATERIAAL VOOR STAP 6 | |||
| ONDERDEEL | TYPE BESCHRIJVING AANTAL | ||
| K BOUT | M8X1,25PX70L- 12L 2 | ||
| B VEERRING | 8,2X15,4X2,0T 2 | ||
| I SLUITRING | 8,2X20,0X1,5T 2 | ||
| L MOER | M8X1,25P 2 | ||
text_image
Technical diagram of a stationary exercise machine with numbered components for identificationnatural_image
Line drawing of a stationary exercise machine with levers and control panel (no text or symbols)MONTAGE VOLTOOID!
Andes 2.0 / EX59
text_image
A L HORIZON FITNESS I M I B K E D F START C: 20000000000000000000000000000000000000000000000000000000000000000000000000000000000000000000000000000 Heart Rate 13.47 Speed 35 Time RPM Distance Quickness Resistance 34125678910 Enter Charge Display STOP Stop How to Enter StartBEDIENING CONSOLE
PROGRAMMA-INFORMATIE
natural_image
Illustration of a person standing inside a transparent cube with a patterned floor (no text or symbols)ZONE
D'ENTRAÎNEMENT
173 x 63,5 x 200 cm / 68" x 25" x 78.7"
ZONE LIBRE
418 x 247,5 x 300 cm / 164,6" x 97,4" x 118"

AVERTISSEMENT
OPTIONS D'ENTRAÎNEMENT
ENTRAÎNEMENT DE LA TOTALITÉ DU CORPS
natural_image
Line drawing of a person using a robotic device with a sensor (no text or symbols)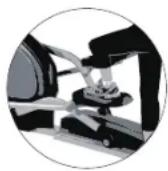

DÉPLACEMENT DE L'ÉLLIPTIQUE
natural_image
Technical line drawing of a mechanical assembly with no visible text or symbols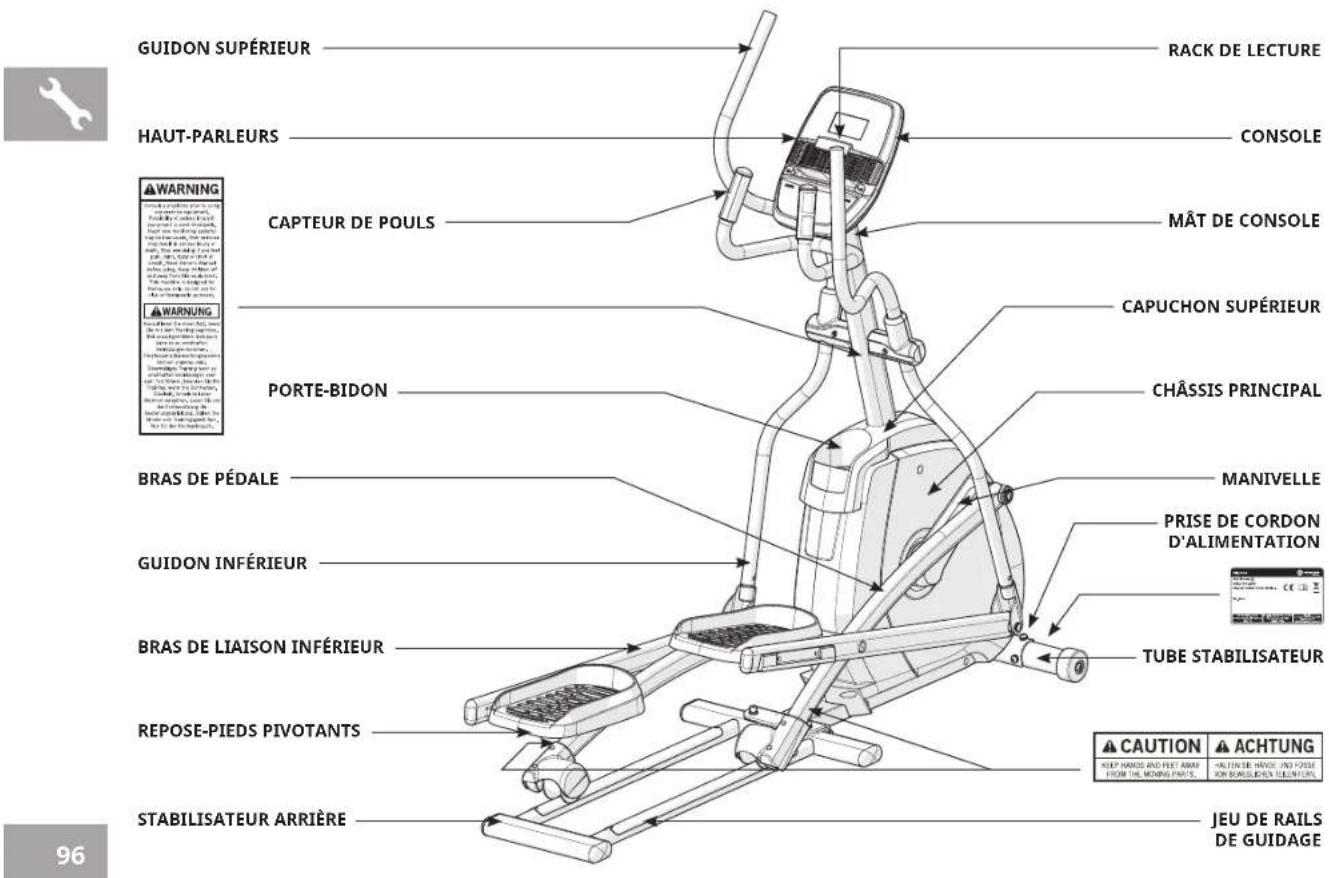
text_image
GUIDON SUPÉRIEUR HAUT-PARLEURS CAPTEUR DE POULS PORTE-BIDON BRAS DE PÉDALE GUIDON INFÉRIEUR BRAS DE LIAISON INFÉRIEUR REPOSE-PIEDS PIVOTANTS STABILISATEUR ARRIÈRE RACK DE LECTURE CONSOLE MÂT DE CONSOLE CAPUCHON SUPÉRIEUR CHÂSSIS PRINCIPAL MANIVELLE PRISE DE CORDON D'ALIMENTATION TUBE STABILISATEUR CAUTION JEU DE RAILS DE GUIDAGE KEEP HANDS AND FEET AWAY FROM THE MONING PARTS. ACHTUNG ALTERIE DES VOICE AND FOISE ON BOROLIGIER TELEFICULTtext_image
Technical diagram of a mechanical device with labeled parts A, B, C, and numbered components 1, 2, 9| MATÉRIEL POUR L'ÉTAPE 1 | |||
| PIÈCE TYPE DESCRIPTION QT2 | |||
| A BOULON À TÊTE RONDE M8X1.25PX30L 4 | |||
| B RONDELLE ÉLASTIQUE 8.2X15.4X2.0T 4 | |||
| C RONDELLE EN ARC 8.4X17.0X1.0T 4 | |||
text_image
D E F 3 2| MATÉRIEL POUR L'ÉTAPE 2 | |||
| PIÈCE TYPE DESCRIPTION QT2 | |||
| D BOULON À TÊTE CREUSE M10X | 1.5PX20L 4 | ||
| E RONDELLE ÉLASTIQUE 10.2X18.4X2.5T 4 | |||
| F RONDELLE PLATE 10.2X20.0X1.5T 4 | |||
text_image
Technical diagram of a stationary exercise machine with labeled components and parts| MATÉRLEL POUR L'ÉTAPE 4 | ||
| PIÈCE TYPE DESCRIPTION QT2 | ||
| K RONDELLE PLATE 20.2X27.2X1.5T 4 | ||
| L RONDELLE ONDULÉE 20.7X29.1X0.5T 2 | ||
| I RONDELLE PLATE 8.2X20.0X1.5T 2 | ||
| B RONDELLE ÉLASTIQUE 8.2X15.4X2.0T 2 | ||
| J BOULON À TÊTE RONDE M8X1.25PX20L 2 | ||
text_image
H G H I B 5 J 12| MATÉRIEL POUR L'ÉTAPE 5 | |||
| PIÈCE TYPE DESCRIPTION QT2 | |||
| G RONDELLE ONDULÉE 17.2X22.5X0.5T 2 | |||
| H RONDELLE PLATE 16.0X25.0X1.0T 4 | |||
| I RONDELLE PLATE 8.2X30.0X1.5T 2 | |||
| B | RONDELLE ÉLASTIQUE 8.2X15.4X2.0T 2 | ||
| J BOULON À TÊTE RONDE M8X1.25PX20L 2 | |||
text_image
Technical diagram of a stationary exercise machine with labeled components and an inset view showing mechanical parts.| MATÉRIEL POUR L'ÉTAPE 6 | |||
| PIÈCE TYPE DESCRIPTION QT2 | |||
| K BOULON M8X1.25PX70L-12L | 2 | ||
| B RONDELLE ÉLASTIQUE 8.2X1 | 5.4X2.0T 2 | ||
| I RONDELLE PLATE 8.2X20.0X1 | .5T 2 | ||
| L ÉCROU M8X1.25P 2 | |||
text_image
Technical diagram of a stationary exercise machine with numbered components for identificationnatural_image
Line drawing of a stationary exercise machine with levers and control panel (no text or symbols)L'ASSEMBLAGE EST TERMINÉ !
Andes 2.0 / EX59
VISION Fitness / HORIZON Fitness / TEMPO Fitness / TREO Fitness products are recyclable. At the end if its useful life please dispose of this article correctly and safely (local refuse sites).
| 2017 | 2016 | |
| Cost of sales | 3,459 | 3,384 |
| Gross profit | 1,080 | 1,048 |
| Net profit | 1,080 | 1,048 |

natural_image
Blank white image with no visible content, text, or symbols
natural_image
Blank white image with no visible content, text, or symbols
natural_image
Blank white image with no visible content, text, or symbols
natural_image
Blank white image with no visible content, text, or symbols
natural_image
Blank white image with no visible content, text, or symbols
natural_image
Blank white image with no visible content, text, or symbols
natural_image
Blank white image with no visible content, text, or symbols
natural_image
Blank white image with no visible content, text, or symbols
natural_image
Blank white image with no visible content, text, or symbols
natural_image
Blank white image with no visible content, text, or symbols
natural_image
Blank white image with no visible content, text, or symbols.Horizon Andes 2.0 / EX59 | Rev. 1.0 A ©2020 Johnson Health Tech