BDFH44M - Dryer BLACK & DECKER - Free user manual and instructions
Find the device manual for free BDFH44M BLACK & DECKER in PDF.

User questions about BDFH44M BLACK & DECKER
0 question about this device. Answer the ones you know or ask your own.
Ask a new question about this device
Download the instructions for your Dryer in PDF format for free! Find your manual BDFH44M - BLACK & DECKER and take your electronic device back in hand. On this page are published all the documents necessary for the use of your device. BDFH44M by BLACK & DECKER.
USER MANUAL BDFH44M BLACK & DECKER
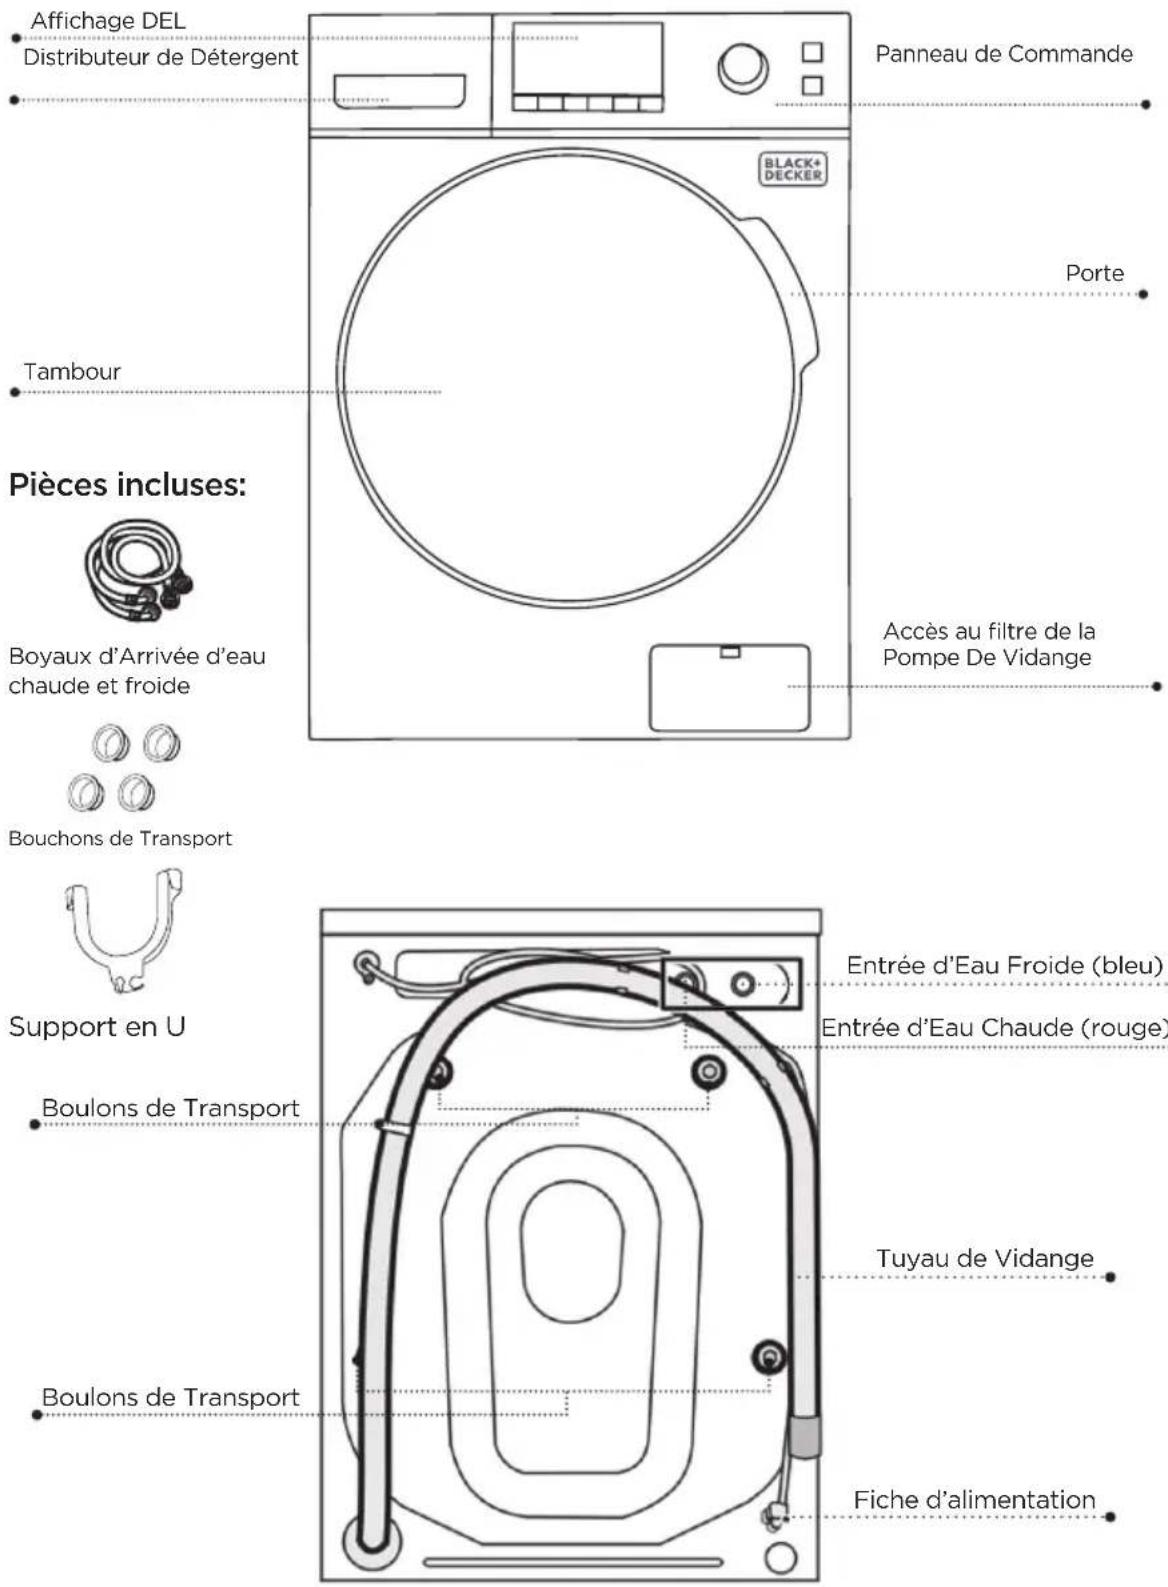
CATALOG NUMBER BCW27MW
natural_image
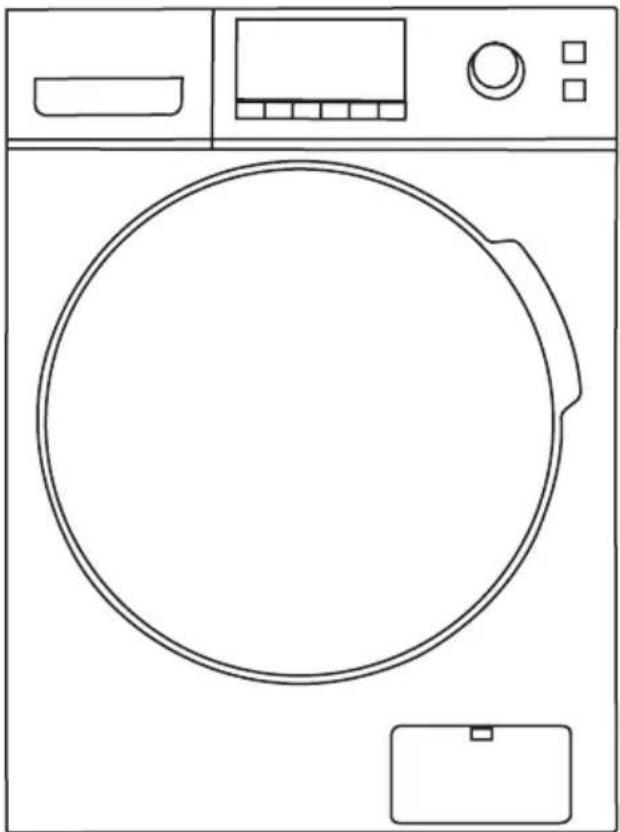
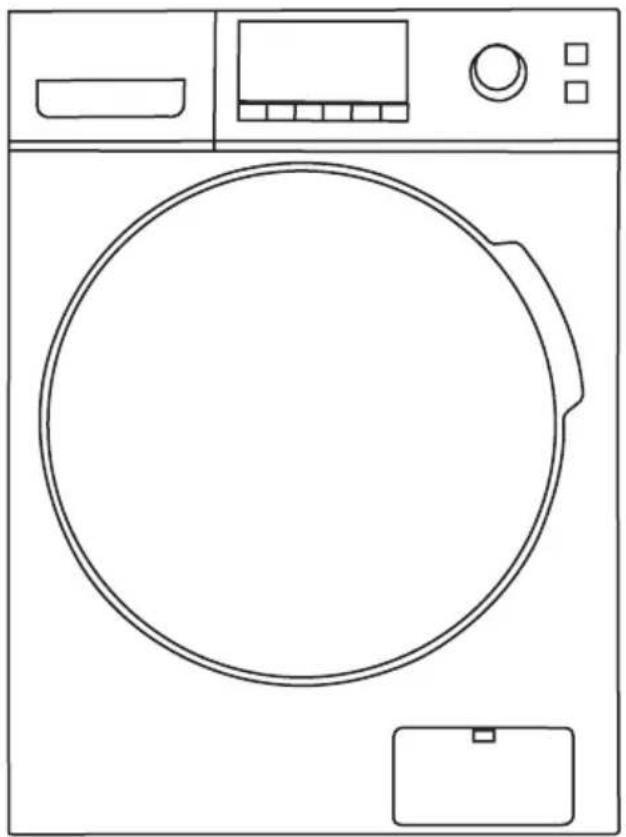
Line drawing of a washing machine with front panel, door, and control panel (no text or symbols)Thank you for choosing BLACK+DECKER!
PLEASE READ BEFORE RETURNING THIS PRODUCT FOR ANY REASON.
If you have a question or experience a problem with your BLACK+DECKER purchase, go to www.blackanddecker.com/instantanswers. If you can't find the answer or do not have access to the Internet, call 844-299-0879 from 10:30 a.m. to 6:30 p.m. EST Mon. - Fri. to speak with an agent. Please have the catalog number available when you call.
SAVE THIS MANUAL FOR FUTURE REFERENCE.
CONTENTS
SAFETY INFORMATION
Important Safety Instructions....3-5 Important Installation Information....6
SET UP & USE
Operating Instructions 7
Quick Start Guide 7
Control Panel 8-12
Operating Instructions Using the Washer Dryer Combo 12-13
Transporting the Machine 23
Removing the Transport Bolts....24
Parts and Features....25
Tools Needed....26
Choose the Proper Location....26-30
CLEANING & CARE
Cleaning and Maintenance....14-16
INSTALLATION INSTRUCTIONS
Installation Warnings and Precautions....17-18
Usage and Maintenance Warnings....19-20
Usage and Maintenance Cautions....21-22
TROUBLESHOOTING & WARRANTY
Before You Call For Service....31
Troubleshooting.... 32-34
Limited Warranty 35
PRODUCT REGISTRATION
Thank you for purchasing our BLACK+DECKER product. This easy-to-use manual will guide you in getting the best use of your product.
Remember to record the model and serial numbers. They are on a label on the back of the product.
Model number
Serial number
Date of purchase
Staple your receipt to your manual. You will need it to obtain warranty service.
SAFETY INFORMATION

DANGER
DANGER - Immediate hazards which WILL result in severe personal injury or death

WARNING
WARNING - Hazards or unsafe practices which COULD result in severe personal injury or death

CAUTION
CAUTION - Hazards or unsafe practices which COULD result in minor personal injury
IMPORTANT SAFETY INSTRUCTIONS

WARNING
when using electrical appliances, basic safety precautions should be followed, including the following: READ ALL INSTRUCTIONS BEFORE USING THE UNIT

WARNING: To reduce the risk of fire, electric shock, or injury to persons when using your appliance, follow basic precautions, including the following:
- READ ALL INSTRUCTIONS BEFORE USING THE APPLIANCE.
- Do not wash or dry articles that have been previously cleaned in, washed in, soaked in, or spotted with gasoline, dry-cleaning solvents, or other flammable or explosive substances, as they give off vapors that could ignite or explode.
- Do not add gasoline, dry-cleaning solvents, or other flammable or explosive substances to the wash water. These substances give off vapors that could ignite or explode.
- Under certain conditions, hydrogen gas may be produced in a hot-water system that has not been used for 2 weeks or more. HYDROGEN GAS IS EXPLOSIVE. If the hot-water system has not been used for such a period, before using a washing machine, turn on all hot-water faucets and let the water flow from each for several minutes. This will release any accumulated hydrogen gas. As the gas is flammable, do not smoke or use an open flame during this time.
- Always unplug the washing machine from the power supply before attempting any service. Disconnect the power cord by grasping the plug, not the cord.
- To reduce the risk of fire, any articles that have traces of any flammable substance, such as vegetable oil, cooking oil, petroleum based oils or distillates, waxes, fats, etc., must not be placed in the washing machine. These items may contain flammable substances that, even after washing, may smoke or catch fire.
- Never place items in the washer that have been dampened with gasoline or any combustible or explosive substance. Do not wash or dry anything that has been soaked in or spotted with any type of oil (including cooking oils). Doing so can result in fire, explosion, or death.
- Do not allow children to play on or in the appliance. Close supervision is necessary when the appliance is used near children.
- Pets and kids may climb into the machine. Check the machine before every operation.
SAFETY INFORMATION
- Glass door or protector may be very hot during operation. Keep kids and pets far away from the machine during operation.
- This machine is not intended for use by persons (including children) with reduced physical, sensory or mental capabilities, or lack of experience and knowledge, unless they have been given supervision or instruction concerning use of the machine by a person responsible for their safety.
- Kids should be supervised to ensure that they do not play with the machine.
- When children become old enough to operate the appliance, it is the legal responsibility of parents or legal guardians to ensure that they are instructed in safe practices by qualified persons.
- Do not machine wash fiber glass materials (such as curtains and window coverings that use fiber glass materials). Small particles may remain in the washing machine and stick to fabrics in subsequent wash loads causing skin irritation.
- Before the appliance is removed from service or discarded, remove the door and cut off the power cord.
- Do not reach into the appliance if the tub or agitator is moving.
- Do not install or store this appliance where it will be exposed to the weather.
- Do not tamper with controls.
- Do not repair or replace any part of the appliance or attempt any servicing unless specifically recommended in the user-maintenance instructions or in published user-repair instructions that you understand and have the skills to carry out.
- Never stop a tumble dryer before the end of the program and spread out so that the heat is dissipated.
- Pull out its plug from the power socket before cleaning or maintenance.
- Make sure that all pockets are emptied from articles of clothing before placing in machine.
- Sharp and rigid items such as coin, brooch, nail, screw or stone etc. may cause serious damage to this machine.
- Pull out its plug and cut off water supply after operation.
- Please check whether the water inside the drum has been drained before opening its door. Please do not open the door if there is any water visible.
- If the plug (power cord) is damaged, it shall be replaced by the manufacturer or a service agent to avoid any danger.
- Take care that power voltage and frequency shall be identical to those of washing machine.
- Do not use any socket with rated current less than that of washing machine. Never pull out power plug with wet hand.
- To ensure your safety, power cord plug must be inserted into a grounded three pole socket. Check carefully and make sure that your socket is properly and reliably grounded.
SAFETY INFORMATION
- This machine shall be repaired only by an authorized service center and only authentic accessories can be used.
- To reduce the risk of fire, do not dry articles containing foam rubber or similarly textured rubber like materials.
- If connected to a circuit protected by fuses, use time-delay fuses with this appliance.
- Do not use fabric softeners or products to eliminate static unless recommended by the manufacturer of the fabric softener or product.
- Do not use heat to dry articles containing foam rubber or similarly textured rubber-like materials. The interior of the appliance should be cleaned periodically by qualified service personnel.
- Do not place items exposed to cooking oils in your dryer. Items contaminated with cooking oils may contribute to a chemical reaction that could cause a load to catch fire.
SAVE THESE INSTRUCTIONS HOUSEHOLD USE ONLY
SET UP & USE
IMPORTANT INSTALLATION INFORMATION
- This unit must be properly installed and located according to the installation instructions before it is used.
- Store and install the washer where it will not be exposed to temperatures below freezing or exposed to outdoor weather conditions. This could damage the unit and void the warranty.
- The (red) hot water hose should be connected to the (red) hot water inlet and the (blue) cold water hose should be connected to the (blue) cold water inlet.
- The washer dryer combo unit must be plugged into an appropriate outlet that is properly installed and grounded in accordance with all local codes and ordinances. Follow all installation instructions.
- The unit should be installed on a level floor with a maximum slope of 1" (25 mm).
WHEN NOT IN USE
Turn off the water supply when the unit is not in use in case of leaking or ruptured hoses. It is recommended to replace the hoses every 5 years.
SET UP & USE
Before First Use
This unit has cycles for wash only; dry only, wash and dry.
This unit uses a condenser to dry and is not vented. Drying times will take longer than a vented dryer.
CAUTION: The temperature inside the unit can get very hot during dry cycles.
NOTE: To avoid long drying times and best performance, do not load the tub more than 34 full of dry clothes for wash cycles. The tub should not be loaded more than 12 full for wash/dry cycles and dry cycles.
DO NOT OVERLOAD
Before washing clothes for the first time, the washing machine should be operated without clothing added.
- Connect power source and water supply.
- Put a small amount of detergent into the dispenser and close the dispenser.
- Close the Door.
- Select a wash cycle using the dial.
- Press ON/OFF.
- Press the Start/Pause button.
NOTE: If water leaks while water is being supplied or drained, check the water connections.
If the washer rocks and vibrates excessively, level your washer again.
QUICK START GUIDE
Default settings can be changed. See USING THE CONTROL PANEL section for more details.
- Add HE detergent to the detergent dispenser according to detergent manufacturer's instructions. HE detergent pods can be added to the wash tub before adding clothes.
Add optional pre-wash and/or fabric softener to the detergent dispenser.
-
Load clothing, maximum 34 full for a wash only cycle, maximum 12 full of wet clothes for a wash/dry cycle or a dry only cycle.
-
Close the Door.
NOTE: Unit will not start with the door open.
-
Press ON/OFF to power on the unit.
-
Turn the selector dial to a cycle with a such as PERM PRESS.
-
Continue to touch the DRY key Dry repeatedly to select Gentle Dry - Normal Dry - Or Extra Dry . The corresponding symbol will illuminate.
-
Press the Start/Pause button.
For more details on cycles and default setting refer to the wash program chart.
SET UP & USE
CONTROL PANEL
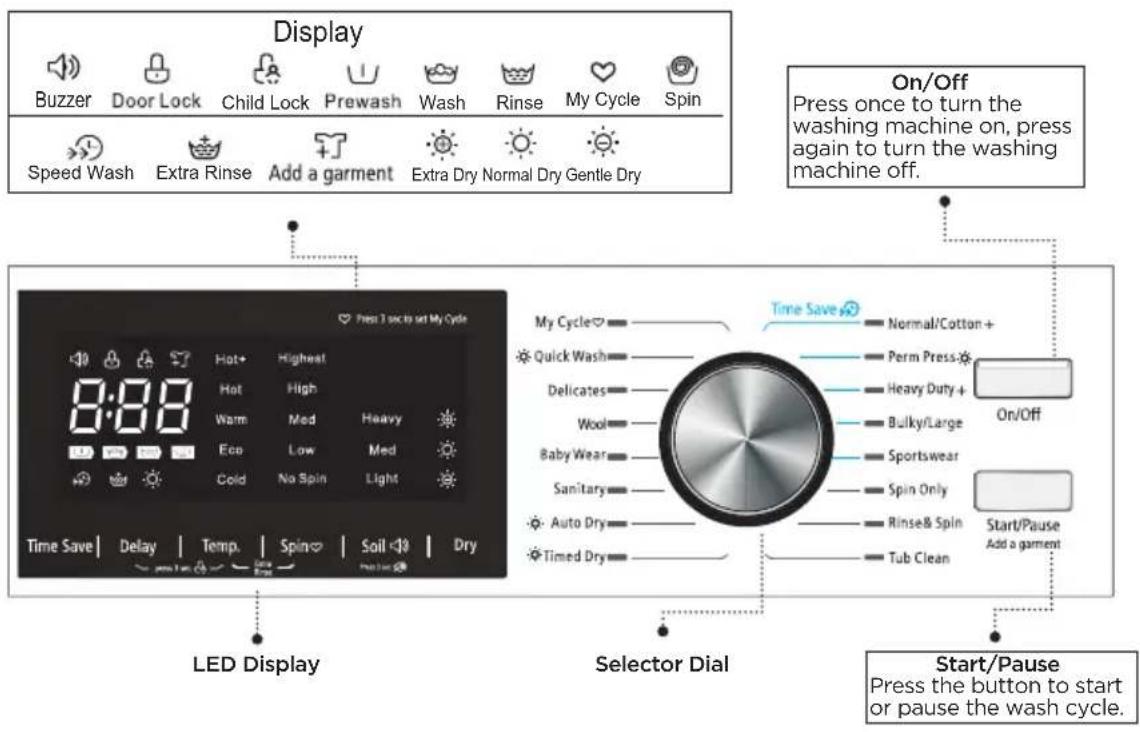
text_image
Display Buzzer Door Lock Child Lock Prewash Wash Rinse My Cycle Spin Speed Wash Extra Rinse Add a garment Extra Dry Normal Dry Gentle Dry On/Off Press once to turn the washing machine on, press again to turn the washing machine off. LED Display Selector Dial Start/Pause Press the button to start or pause the wash cycle.SET UP & USE
1. ON/OFF
Press to turn the POWER ON. Press again to turn it OFF.
2. Selector Dial
Turn the dial to select the cycle.
For cycles with a + symbol: NORMAL/COTTON or HEAVY DUTY, select the DRY setting on the control panel for the unit to dry. To use these settings as wash only do not select a DRY setting (Gentle Dry, Normal Dry or Extra Dry symbol above the DRY key will not be illuminated).
Other cycles with a symbol: PERM PRESS and QUICK WASH will automatically default to a dry setting. To use these settings as wash only, touch the DRY key repeatedly so the Gentle Dry, Normal Dry or Extra Dry symbol above the DRY key will not be illuminated.
Wash cycles without a symbol are wash only cycles.
If you wish to dry the clothes after the wash cycle is complete, turn the knob to AUTO DRY or TIMED DRY and use one of these Dry only settings as a separate cycle.
Wash Program Chart
| My cycle | This is a setting to save a frequently used program. Select the settings you wish to save. Press and hold SPIN for 3 seconds. The will illuminate on the control panel. Turn the dial to MyCycle to use the saved setting. To change the saved setting to a different program select the new settings. Press and hold SPIN again to save the new settings. | |||||||||
| Type of clothing | Dry function | Washing/Drying Load (lbs/kgs) | Temperature.Default temperature in bold | Default Time (hours) | Time save | Extra Rinse | Delay | Soil Level Default in bold | Spin Speed.Default in bold | |
| Normal/Cotton | Cotton or blends with medium soil. | + | 26.4lbs,13.2lbs/12kgs,6kgs | Hot+, Hot, Warm,Eco, cold | 1:04 0 0 0 | Light, Medium, Heavy | O, Low, Med, High, Highest | |||
| Perm Press Used to resist wrinkles in washing, 13.2lbs/6kgs | Hot+, Hot, Warm,Eco, cold | 4:27 0 0 0 | Light, Medium, Heavy | O, Low, Med, High, Highest | ||||||
| Heavy Duty | Heavy items to be washed in hot temperatures such as towels. | + | 26.4lbs,13.2lbs/12kgs,6kgs | Hot+, Hot, Warm,Eco, cold | 1:40 0 0 0 | Light, Medium, Heavy | O, Low, Med, High, Highest | |||
| Bulky/Large | Large items such as blankets. 13.2lbs/6kgs | Hot, Warm, Eco, cold | 1:23 0 0 0 | Light, Medium, Heavy | O, Low, Med, High, Highest | |||||
| Sportswear | Removes odor and soil from activewear. | 13.2lbs/6kgs | Hot, Warm, Eco, cold | 0:57 0 0 0 | Light, Medium, Heavy | O, Low, Med, High, Highest | ||||
| Spin Only | Extra spin after water has been drained. | 26.4lbs/12kgs -- | 0:13 -- - O | -- | O, Low, Med, High, Highest | |||||
| Rinse & Spin | Extra Rinse with spin to be used without detergent. | 26.4lbs/12kgs -- | 0:23 -- - O -- | O, Low, Med, High, Highest | ||||||
| Tub Clean Cleans the empty tub. | -- | Hot+ | 1:28 -- - O -- | -- | ||||||
| Sanitary | Use for heavily soiled items. | 13.2lbs/6kgs | Hot+ | 2:18 -- - O O | Light, Medium, Heavy | O, Low, Med, High, Highest | ||||
| Baby Wear | Longer rinse time to remove detergent residue. | 26.4lbs/12kgs | Hot+, Hot, Warm,Eco, cold | 1:37 -- - O O | Light, Medium, Heavy | O, Low, Med, High, Highest | ||||
| Wool | Wool items labeled as washable. | 4.4lbs/2kgs | Warm, Eco, cold | 1:01 | -- O O | Light, Medium, Heavy | O, Low, Med, High | |||
| Delicates | Uses lower temperature and low spin speed for delicates suitable for a washing machine. | 5.5lbs/2.5kgs | Warm, Eco, cold | 0:58 -- - O O | Light, Medium, Heavy | O, Low, Med, High | ||||
| Quick Wash | Short wash cycle for small quantity of lightly soiled items. | 2.2lbs/1kg | Hot, Warm, Eco, cold | 2:16 -- - O | Light | O, Low, Med, High | ||||
| NOTE:Default time is wash cycle only. | 0=Optional | |||||||||
| Timed Dry | Dry only cycle where time is selected manually. | 1.1lbs, 2.2lbs,5.5lbs/0.8kg,1kg, 3kgs | -- 1:29 -- - O | -- | O, Low, Med, High, Highest | |||||
| Auto Dry | Dry cycle is automatically set. | 13.2lbs/6kgs | -- | 4:19 | -- | -- | O | -- | O, Low, Med, High, Highest | |
| 0=Optional | ||||||||||
SET UP & USE

text_image
Press 3 sec.to set My Cycle Hot+ Highest Hot High Warm Med Heavy Eco Low Med Cold No Spin Light Time Save | Delay | Temp. | Spin♥ | Soil | Dry press 3 sec. Extra Rinse Press 3 sec.TO CHANGE DEFAULT SETTINGS ON THE LED DISPLAY
The default settings will be illuminated on the control panel.
To change the default temperature, press the Temp button on the control panel repeatedly to scroll through the selections.
To change the spin speed, press Spin button on the control panel repeatedly to scroll through the selections.
To change the Soil level, press the Soil button on the control panel repeatedly to scroll through the selections.
To change the Dry setting, press Dry button on the control panel repeatedly to scroll through the selections; Gentle Dry - Normal Dry and Extra Dry. If none of the selections are illuminated, a dry setting is not activated.
NOTE: Not all options are available for each cycle. Please note cycle chart.
3. Time Display
Indicates remaining cycle time, delay start time and error codes. For each cycle time the display will show the remaining time counting down until it reaches 0:00 indicating the end of the cycle.
4. Time Save
Decreases wash time. When selected, the new cycle time will illuminate on the time display.
5. Delay
To delay the start of your washer up to 24 hours, press the Delay button to activate after the wash cycles have been selected. The number shown on the digital display will indicate when the wash cycle will start. 1 hour will be added to the start time each time you press the Delay button up to 24 hours. Once the delay time has been selected, press Start/Pause to activate.
Pressing the Delay button to exceed 24 hours until the display indicates OH will deactivate the delay function and the display will turn off.
To cancel the Delay Start function after the wash program has started, press On/Off.
NOTE: In case of disruption of power supply while operating the program, Press Start/Pause to resume.
SET UP & USE
6. Temp
Press Temp continuously to scroll through the selections: Hot+, Hot, Warm, Eco, Cold. The selected temperature will be illuminated on the LED Display.
7. Spin
Press Spin continuously to scroll through the selections: Highest, High, Med, Low, No Spin. The selected spin speed will be illuminated on the LED Display.
8. Extra Rinse
Press and hold Temp and Spin at the same time to add approximately 17 minutes extra rinse time. The extra rinse symbol will illuminate.
9. Soil
Press Soil continuously to scroll through the selections: Heavy (For heavily soiled clothes), Med, Light. The selected soil level will be illuminated on the LED Display.
10. Mute
Press the Soil button 3 seconds to mute the buzzer at the end of the cycle. Press again for 3 seconds to unmute the buzzer.
11. Dry
Press the Dry button continuously to select Gentle Dry -Normal Dry or Extra Dry -This option is available for Normal/Cotton, Heavy Duty, Sportswear and Dry cycles.
DRY only settings can be selected using the selector dial.
Auto Dry
Uses a 12 minute spin cycle and 45 minute cool air cycle.
Timed Dry
Timed Dry programs include a 12 minute spin and 25 minute cool cycle. After selecting timed dry using the selector dial, press the DRY button on the control panel to select Gentle Dry (59 minutes), Normal Dry (1:29 minutes), or Extra Dry (3:20 minutes).
It is recommended to dry in multiple, smaller loads to allow for better performance.
NOTE: It is not necessary to disconnect water supply or remove water inlet hoses during dry cycles. This is a ventless unit that releases moisture.
The dryer is equipped with a door-locking safety feature to ensure safe temperatures and avoid burns and other safety hazards. The door will lock a few minutes after the wash cycle begins depending on water level. It will remain LOCKED during the cycle until the unit reaches a safe temperature. After a safe temperature is reached, the door should open and function normally.
12. Child Lock
Use this option to disable the controls except for the ON/OFF. This feature can prevent children from changing cycles. The washer can only be locked during a cycle. To activate this function after starting the washer, press and hold the Delay and Temp buttons at the same time for 3 seconds. There will be an audible sound and the child lock indicator light will turn on. To cancel this function select the Temp and Program buttons again.
SET UP & USE
13. Pre ss START/PAUSE to start a cycle after all settings are programmed.
Press START/PAUSE to pause a cycle and to add a garment.
Press START/PAUSE for 3 seconds to pause the washer.
To add a Garment
Wait for the tub to stop turning, then open the door. Add the item, close the door, and then press the START/PAUSE button. The cycle will resume.

CAUTION: Do not attempt this function when there is hot water in the tub. The door will not open and should not be forced. Attempting to force the door to open could cause damage to the unit.
NOTE: In case of disruption of power supply while operating the program, Press Start/Pause to resume.
USING THE WASHER DRYER COMBO

WARNING: Never insert hands inside washer until drum stops spinning.
Do not insert any fabric with gasoline, petroleum, benzene, paint thinner, alcohol or any other flammable substances.
Do not put oil soaked items in the washer.
Do not attempt to wash items with plastic, foam or rubber.
Never keep clothing in the tub for long periods of time. This can cause mildew, wrinkling etc.
Detergent
- This washer is designed for high efficiency (HE) detergent only, to avoid excessive sudsing.
- Add the recommended amount of detergent directly into the detergent compartment before starting your washer.
- Always reduce the amount of detergent if the load is small or lightly soiled, or if your water is very soft. Never use more than the maximum amount recommended by the detergent manufacturer.
Detergent Dispenser
- Pull out the drawer. The high efficiency detergent should be added to the left drawer (II). If using a detergent POD, it can be added directly into the wash tub.
- Optional prewash detergent should be added to the far right compartment for heavily soiled items (I).
- Fabric softener (optional) can be used in the middle compartment (✿).
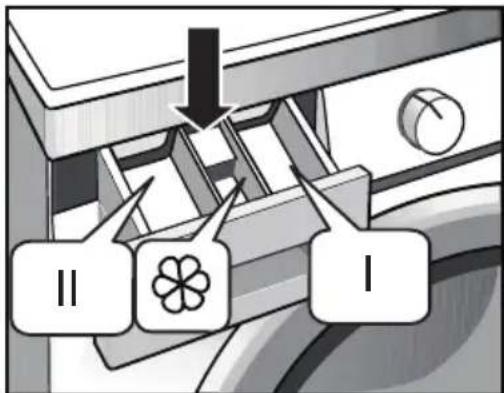
text_image
II ISET UP & USE
Sorting and Loading
- Before loading your laundry, be sure to take out coins, keys and other hard objects, and fasten all hooks and zippers.
- Follow manufacturer's instructions on clothing tag for washing and drying instructions. Sort laundry according to color (light, medium, dark), Fabric type, (delicates, permanent press items) required wash temperature, soil level etc., Washing items that are not color safe can discolor the other items in the load. Mixing colors can cause the dyes to bleed into the other clothes.
- Items with embroidery or buttons should be turned inside out.
- Clothes with hooks or zippers can be washed in a mesh bag as to not get caught on other clothing or scratch the drum.
- Items that produce a lot of lint should be washed separate.
- Single heavy items can cause the load to be unbalanced. If the washer vibrates and makes loud sound press start/pause to redistribute the load.
- Do not load more than 34 full of dry clothes for wash cycles. The tub should not be loaded more than 12 full for wash/dry cycles and dry cycles.
CLEANING AND CARE
CLEANING AND MAINTENANCE
WARNING: Unplug the power cord before cleaning any part of the unit.
The washer should be cleaned regularly. Failure to maintain the unit in a clean condition could lead to deterioration of the surface which could adversely affect the life of the appliance. Do not use harsh chemicals or solvents on any part of the machine or pour water or cleaner directly on it.
Cleaning the exterior
Clean with a soft, damp cloth or a mild soap and water solution. Do not use abrasive powders or pads. Do not spray cleaners directly onto the control panel.
Cleaning the interior
Run a Tub Clean Cycle with empty machine. Bleach or other cleaner for this purpose can be added directly into the tub.
Metal objects (safety pins, hair pins, etc.) in the tub may scratch the surface of the tub and cause it to rust. If rust appears on the surface of the tub, apply a neutral cleansing agent to the surface and use a sponge to clean it. Never use a metal brush or scouring pad to clean.
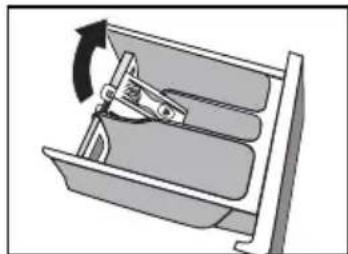
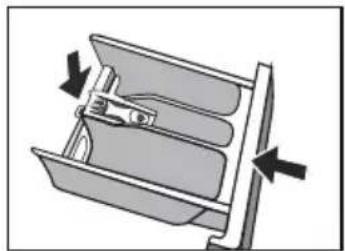
Cleaning Detergent Dispenser
- Open the Detergent dispenser and press down as shown by the arrow.

natural_image
Diagram of a mechanical device with internal components and directional arrows (no text or symbols)- Lift up the clip and remove the cover.
natural_image
Diagram of a mechanical device inside a drawer with an arrow indicating rotation (no text or symbols)-
Rinse with water.
-
Replace the cover and push the dispenser back to its original position.
natural_image
Diagram of a mechanical device with arrows indicating direction, no text or symbols presentCLEANING AND CARE
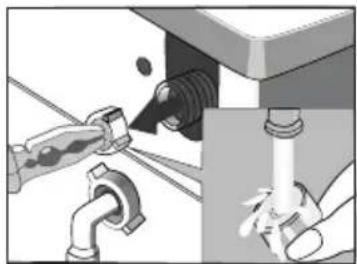
Cleaning the Inlet Filter
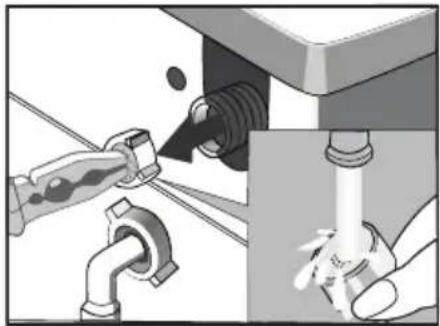
Shut off the water supply and disconnect the inlet hose. Pull out the filter with pliers, by turning and removing as shown. Clean the filter and reinstall it.
Reconnect the inlet hose.
Turn on the water supply and make sure there is no water leakage.
natural_image
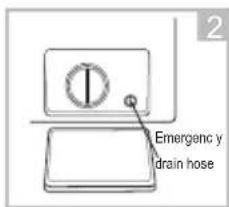
Illustration of plumbing fixtures including a pipe valve and a drain with a bulb (no text or symbols)Drain Pump Filter:
The drain pump filter collects lint and small items so it does not pass through the drain. It should be cleaned approximately once a month depending on frequency of use.
If the washer does not empty or spin properly or if it makes an unusual noise during draining, there may be an obstruction.

WARNING: The drain pump filter should not be accessed while the unit is operating or cycle has just been completed. There may be hot water in the pump. Allow time for water to cool before access.
NOTE: To avoid spills, place a tray underneath the compartment.
natural_image
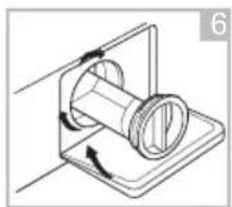
Simple line drawing of a mechanical component with a circular feature and an arrow indicating rotation (no text or symbols)To access the drain pump filter, open the compartment on the bottom right of the machine.
text_image
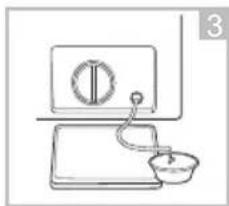
Diagram showing a valve mechanism with labeled parts and directional arrow, likely illustrating a manual or electrical setup.Remove debris. Rinse off the pump filter.
text_image
Emergenc y drain hoseTurn the cap 90° and pull out the small hose.
natural_image
Diagram of a mechanical assembly with rotating components and directional arrows (no text or labels)Reinsert the pump filter and close the compartment.
natural_image
Simple line drawing of a kitchen appliance with a scale and a bowl (no text or symbols)Drain the water from the small hose into a container (not included).
natural_image
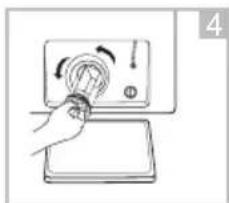
Hand holding a circular knob on a control panel, with no visible text or symbolsRemove the pump filter by turning it counterclockwise to remove it.
CLEANING AND CARE
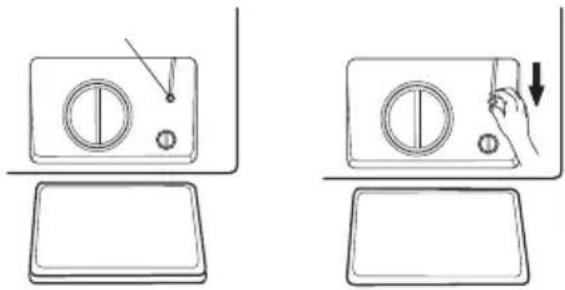
Washer Door:
The washer door cannot be opened if there is a power failure. If it is necessary to open the door, use the pull cord in the lower right compartment. Replace the pull cord in the original position after opening the door.
natural_image
Two-step diagram showing a device with circular control buttons and a hand pressing a button (no text or symbols)
WARNING: Do not use this pull cord during the wash cycle.
STORAGE:
Do not store the washer in any area that it can be exposed to outdoor weather or cold temperatures that would cause pipes to freeze.
For long term storage, or if washer will not be used for a long period of time, disconnect the power supply. Disconnect all the hoses and drain. Clean inside of the unit and keep door open until dried thoroughly. Clean all filters.
INSTALLATION INSTRUCTIONS
INSTALLATION WARNINGS AND PRECAUTIONS

WARNING:
- Plug the power cord into an AC 120V/60Hz wall socket rated at 15 amps or higher. Use the socket for this washer dryer combo unit only.
-
Do not use an extension cord.
-
Sharing a wall socket with another appliance, using a power strip, or extending the power cord may result in electric shock or fire.
- Do not use an electric transformer. It may result in electric shock or fire.
-
Ensure that the power voltage, frequency, and current match the product's specifications. Failing to do so may result in electric shock or fire.
-
Have this appliance installed by a qualified technician or service company.
- Failing to do so may result in electric shock, fire, explosion, problems with the product, or injury.
-
Remove all foreign substances such as dust or water from the power plug terminals and contact points using a dry cloth on a regular basis.
-
Unplug the power plug and clean it with a dry cloth.
-
Failing to do so may result in electric shock or fire.
-
Plug the power plug into the wall socket firmly. Do not use a damaged power plug, or loosen wall socket.
- This may result in electric shock or fire.
- Do not pull or excessively bend the power cord.
- Do not twist or tie the power cord.
- Do not hook the power cord over a metal object, place a heavy object on the power cord, insert the power cord between objects, or push the power cord into the space behind the appliance.
- This may result in electric shock or fire.
-
Do not pull the power cord when unplugging the power plug.
-
Unplug the power plug by holding the plug.
-
Failing to do so may result in electric shock or fire.
-
If the power plug or power cord are damaged, contact your nearest service center.
-
Do not install this appliance near a heater or inflammable material.
- Do not install this appliance in a humid, oily, or dusty location, or in a location exposed to direct sunlight or water (rain drops).
- Do not install this appliance in a location where gas may leak.
- This may result in electric shock or fire.
- If the washer is moved to a new location, have it checked and re-installed by a qualified service technician.
- Failing to follow this warning may result in electric shock or fire.
INSTALLATION INSTRUCTIONS

WARNING:
- Do not install on carpet. Install washer on a level and solid floor that can support its weight.
- Failing to do so may result in abnormal vibrations, noise, or problems with the product.
- The washer is heavy. Two or more people may be needed to install and move the appliance.
- Failing to do so may result in bodily or other injuries.
- Store and install the washer where it will not be exposed to temperatures below freezing or exposed to outdoor weather conditions.
- Failing to do so may result in serious leak damage.
- Position the appliance so that the power plug is easily accessible.
- Failing to do so may result in electric shock or fire due to electric leakage.
- To reduce the risk of injury to persons, adhere to all industry recommended safety instructions.
- Failing to follow all of the safety warnings in this manual may result in property damage, or injury to persons.
INSTALLATION INSTRUCTIONS
GROUNDING INSTRUCTIONS
WARNING
Improper use of the grounding plug can result in a risk of electric shock.
Consult a qualified electrician or serviceman if:
1) The grounding instructions are not completely understood.
2) You are unsure that the appliance is properly grounded.
3) You have any questions about the grounding or electrical instructions.
WARNING
Improper connection of the equipment-grounding conductor can result in a risk of electric shock. Check with a qualified electrician or serviceman if you are in doubt as to whether the appliance is properly grounded.
Do not modify the plug provided with the appliance - if it will not fit the outlet, have a proper outlet installed by a qualified electrician.
Electrical grounding is required for this washer.
This appliance must be grounded. In the event of malfunction or breakdown, grounding will reduce the risk of electric shock by providing a path of least resistance for electric current. This appliance is equipped with a power cord having a three prong grounding plug for use in a properly installed and grounded outlet. The plug must be plugged into an appropriate outlet that is properly installed and grounded in accordance with all local codes and ordinances.
WARNING: An improperly connected equipment-grounding conductor can increase the risk of electrical shock. Check with a qualified electrician or serviceman if you are not sure whether the appliance is properly grounded. Do not modify the plug provided with the appliance. If it does not fit the outlet, have a proper outlet installed by a qualified electrician. To prevent unnecessary risk of fire, electrical shock or personal injury, all wiring and grounding must be done in accordance with the National Electrical Code ANSI/FNPA, No.70 Latest Revision and local codes and ordinances. It is the personal responsibility of the appliance owner to provide adequate electrical service for this appliance. Never connect the ground wire to plastic plumbing lines, gas lines, or hot water pipes.
WARNING: Certain internal parts are intentionally not grounded and may present a risk of electric shock only during servicing. Service Personnel do not contact the following parts while the appliance is energized: Electrical Valve, Drain Pump, Door Lock, Dry Heater, Fan Motor.
WARNING: The maximum current through the unit is 12A when you are using its heating function. Make sure the power supply system (current, power voltage and wire) can meet the normal loading requirements of the electrical appliances.
INSTALLATION INSTRUCTIONS
USAGE AND
MAINTENANCE WARNINGS

WARNING:
- If the appliance is flooded, cut the power immediately and contact your nearest service center.
- If the appliance emits a strange noise, a burning smell, or smoke, unplug the power plug immediately and contact your nearest service center.
- Failing to do so may result in electric shock or fire.
-
In the event of a gas leak (such as propane gas, LP gas, etc.), ventilate the area immediately. Do not turn any appliance or light on or off.
-
Do not use a ventilating fan.
-
A spark may result in an explosion or fire.
-
Do not wash items contaminated with gasoline, kerosene, benzene, paint thinner, alcohol, dry cleaning detergent or other flammable or explosive substances.
- This may result in electric shock, fire, or an explosion.
-
Do not force the washer door open while the washer is operating (high temperature washing/drying/spinning).
-
Water flowing out of the washer may cause burns or cause the floor to be slippery. This may result in injury.
-
Forcing the door open can damage the product or cause injury.
-
Make sure to remove the packaging (sponge, styrofoam) attached to the bottom of the washer and also remove the (4) transport bolts before using the machine.
- Do not insert your hand or a metal object under the washer.
- This may result in injury.
- Do not attempt to operate this appliance if it is damaged, malfunctioning, partially disassembled, or has missing or broken parts, including a damaged cord or plug.
- This may result in electric shock, fire or death.
- Do not touch the power plug with wet hands.
- This may result in electric shock.
- Do not turn the appliance off by unplugging the power plug while the washer is in operation.
- Plugging the power plug into the wall socket again may cause a spark and result in electric shock or fire.
- Keep all packaging material well out of the reach of children, as packaging materials can be dangerous to children.
- To avoid danger of suffocation, keep out of reach of babies and children.
- Do not let children or infirm persons use this washer unsupervised.
- Failing to do so may result in electric shock, burns or injury.
INSTALLATION INSTRUCTIONS

WARNING:
-
Do not attempt to repair, disassemble, or modify the appliance yourself.
-
Do not use any fuse (such as cooper, steel wire, etc.) other than the standard fuse.
- If you need to repair or reinstall the appliance, contact your nearest service center.
-
Failing to do so may result in electric shock, fire, problems with the product, or injury.
-
If any foreign substance such as water enters the appliance in any area other than the tub, unplug the power plug and contact your nearest service center.
- Failing to do so may result in electric shock or fire.
- If the water supply hose comes loose from the faucet and floods the appliance, unplug the power plug.
- Failing to do so may result in electric shock or fire.
- Do not mix chlorine bleach with ammonia or acids such as vinegar.
- Incorrect usage can produce poisonous gas, resulting in serious injury.
- Do not reach into the washer while parts are moving. Before loading, unloading, or adding items, press the START/PAUSE button and allow the basket to come to complete stop before reaching inside.
- Failing to do so may result in electric shock, injury or fire.
- Do not allow children to play on or in the washer. Close supervision of children is necessary when the washer is used near children. As children grow, teach them the proper, safe use of all appliances.
- Failing to do so may result in serious injury to persons.
- Keep laundry products out of children's reach. Observe all warnings on product labels and follow instructions.
- Failing to do so may result in serious injury to persons.
- Disconnect this appliance from the power supply before attempting any user maintenance. Turning the controls to the OFF position does not disconnect this appliance from the power supply.
- Failing to do so may result in electric shock, injury or fire.
-
Do not clean the appliance by spraying water directly onto it.
-
Do not use benzene, thinner, or alcohol to clean the appliance.
- This may result in discoloration, deformation, damage, electric shock or fire.
-
Make sure children do not climb or sit on the unit.
-
Do not lean against the door.
INSTALLATION INSTRUCTIONS
USAGE AND
MAINTENANCE WARNINGS
WARNING:
- Unplug the power plug when the appliance is not being used for long periods of time or during a thunder/lightning storm.
- Failing to do so may result in electric shock or fire.
- Keep hands and foreign objects clear of the door and latch area when closing the door.
- Failing to do so may result in personal injury.
- If the washer is contaminated by a foreign substance such as detergent, dirt, food waste, etc., unplug the power plug and clean the washer with a damp, soft cloth.
- Failing to do so may result in discoloration, deformation, damage or rust.
- The clear portion of the door can be broken by a strong impact. Take care when using the washer.
- If the clear portion is cracked or broken, it may result in injury.
-
After a water supply failure or when reconnecting the water supply hose, open the faucet slowly.
-
Open the faucet slowly after a long period of non-use.
- The air pressure in the water supply hose or the water pipe may result in damage to a part or in water leakage.
- If a drain error occurs during an operation, check if there is a draining problem.
- If the washer is used when it is flooded because of a draining problem, it may result in electric shock or fire due to electric leakage.
- Do not insert your hand or a metal object under the washer.
- This may result in injury.
- Insert the laundry into the washer completely so that laundry does not get caught in the door.
- If laundry gets caught in the door, it may result in damage to the laundry or the washer, or result in water leakage.
- Ensure that the faucet is turned off when the washer is not being used.
- Ensure that the water supply hose connectors are properly tightened.
- Failing to do so may result in property damage or injury.
- Open the faucet and check if the water supply hose connector is firmly tightened and that there is no water leaking before using the product.
- If the water supply hose connectors are loose, it may result in water leakage.
- Do not stand on top of the appliance or place objects (such as laundry, lighted candles, lighted cigarettes, dishes, chemicals, metal objects, etc.) on the appliance.
- This may result in electric shock, fire, problems with the product, or injury.
- Do not operate the appliance with wet hands.
- This may result in electric shock.
- Do not spray volatile material such as insecticide onto the surface of the appliance.
- As well as being harmful to humans, it may also result in electric shock, fire, or problems with the product.
INSTALLATION INSTRUCTIONS

WARNING:
- Do not place an object that generates an electromagnetic field near the washer.
- This may result in injury due to a malfunction.
- Since the water drained during a high temperature wash or drying cycle is hot, do not touch the water.
- This may result in burns or injury.
- Do not wash, spin, or dry water-proof seats, mats, or clothing.
- Do not wash thick, hard mats even if the washer mark is on the care label.
- This may result in injury or damage to the washer, walls, floor, or clothing due to abnormal vibrations.
- Do not operate the washer when detergent dispenser is removed.
- This may result in electric shock or injury due to water leakage.
- Do not insert your hand into the detergent dispenser after opening it.
- This may result in injury as your hand may be caught.
- Do not place any non-laundry objects, such as shoes, food waste, or animals into the washer.
- This can cause abnormal vibrations that can damage the washer, and, in the case of pets, cause severe injury or death.
- Do not press the buttons using sharp objects such as pins, knives, fingernails, etc.
- This may result in electric shock or injury.
- Do not wash laundry contaminated by oils, creams, or lotions usually found in skincare shops or massage clinics.
- This may result in the rubber seal becoming deformed and cause water leakage.
- Ensure that the water inlet pipe is connected and the tap is opened before washing clothes.
- Do not leave metal objects (safety pins, hair pins, etc.) or bleach in the tub for long periods of time.
- This may cause the tub to rust.
- If rust appears on the surface of the tub, apply a neutral cleansing agent to the surface and use a sponge to clean it. Never use a metal brush.
- Do not use hot water from water cooling/heating devices.
- This may result in problems with the washer.
- Do not use natural hand-washing soap in the washer.
- If it hardens and accumulates inside the washer, it may cause problems with the product, discoloration, rust, or bad odors.
- Do not wash large laundry items such as bedding in the washing net.
- Failing to do so may result in injury due to abnormal vibrations.
- Place smaller items, such as lace socks and lingerie in the washing net.
- Do not use hardened detergent.
- If it accumulates inside the washer, it may result in water leakage.
- Do not wash throw rugs or doormats.
- If you wash throw rugs or doormats, the sand will accumulate inside the washer.
- It may result in error such as no draining.
- Do not close the door with excessive force.
- Do not overfill the unit. Make sure the clothes are distributed well.
INSTALLATION INSTRUCTIONS
TRANSPORTING THE MACHINE
- Transport bolts need to be reinstalled to the machine prior to moving to avoid damage to the unit.
- Accumulated water should be drained out of the machine prior to moving.
- Handle the machine carefully. The door can not be used as the handle while moving the unit.
UNPACKING AND REMOVING SHIPPING MATERIAL
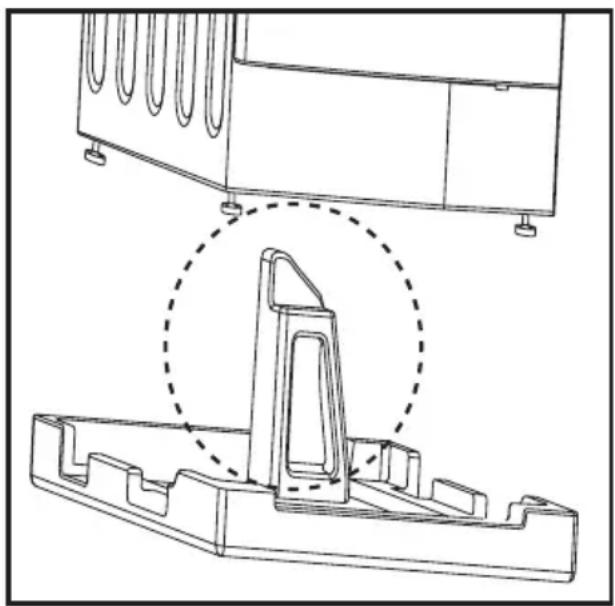
Remove the packing box and lift the washer up and away from the foam base. Open the door to remove the accessories.
NOTE: The washer should be unpacked by 2 or more people due to the weight. Remove the packing box and lift the washer up and away from the foam base. Open the door to remove the accessories. Lay the unit down on its side to make sure all the small foam triangular pieces are removed from the bottom of the unit.
WARNING: Packaging materials can be dangerous to children; Keep all packaging material (plastic bags, polystyrene, etc.) well out of children's reach.
CAUTION: Do not operate this appliance on the foam base. It should be placed on a level floor.
natural_image
Technical line drawing of a mechanical assembly with a dashed circular annotation highlighting a specific component (no text or symbols present)INSTALLATION INSTRUCTIONS
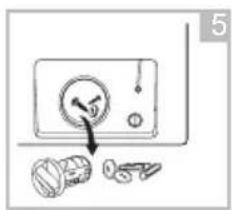
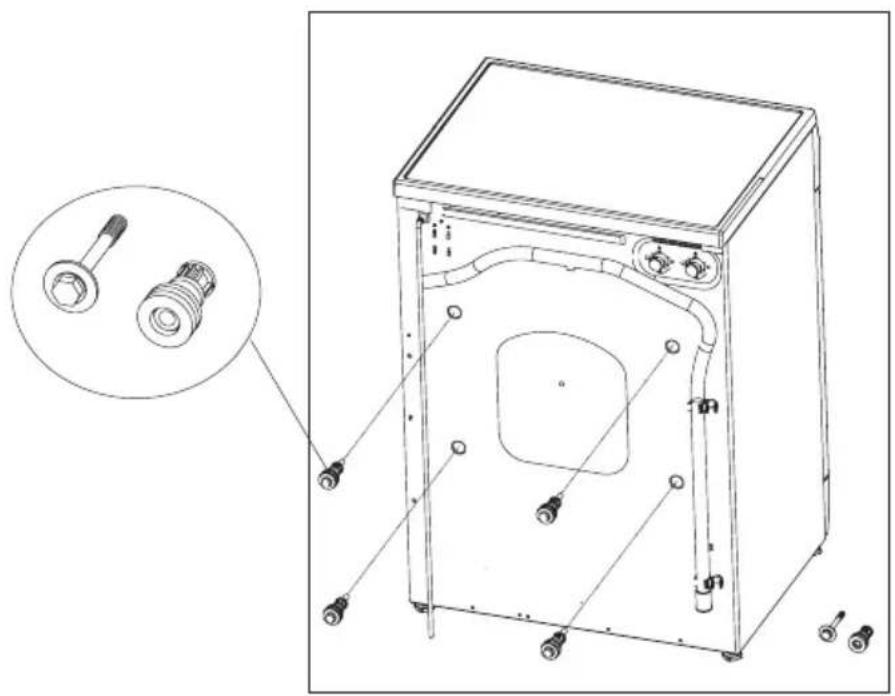
REMOVING THE TRANSPORT BOLTS
Before using this washing machine, the transport bolts must be removed from the back of this machine.
- Loosen all bolts with a wrench to remove.
- Cover the holes with transport hole plugs. (provided)
- Keep the transport bolts in a safe place for future use. If the unit needs to be transported at any time, the transport bolts should be reinserted to avoid damage to the unit.
natural_image
Technical line drawing of a washing machine with labeled components and an inset showing a separate view of the housing (no text or symbols present)INSTALLATION INSTRUCTIONS
PARTS & FEATURES
text_image
LED Display Detergent Dispenser Control Panel DRUM Door Parts Included: Hot and cold water Inlet Hoses Drain Pump filter access Transport Hole Plugs U Bracket Transport Bolts Cold Water Inlet (blue) Hot Water Inlet (red) Drain Hose Transport Bolts Power plugINSTALLATION INSTRUCTIONS
TOOLS NEEDED
Adjustable wrench
Channel-lock adjustable pliers

Level
Siphon break kit, additional hoses or other parts could be purchased separately depending on selected drainage method. Please check your local hardware store.
For best performance, you must install your washer on a rigid, dry and level surface. Wood floors may need to be reinforced to minimize vibration and/or unbalanced load situations.
- Carpeting and soft tile surfaces are contributing factors to vibration which can cause your washer to move slightly during the spin cycle.
WARNING: Do not install your washer in areas where water may freeze, since your washer will always retain some water in its water valve, pump, and hose areas. Frozen water can damage the belts, the pump, hoses, and other components. Never install on a platform or weakly supported structure.
The unit should be installed on a level floor with a maximum slope of 1" (25mm).
ELECTRIC
Use 120Volt 60Hz 15 or 20 Amps fuse or circuit breaker. Individual branch circuit serving only your washer is recommended.
The washer should be located near a grounded electrical outlet located within 6 ft. (1.8m) of where the power cord is attached to the back of the washer. See “Electrical Requirements.”

WARNING: Never use an extension cord.
INSTALLATION INSTRUCTIONS
WATER SUPPLY
To correctly fill your washer in the proper amount of time, water pressure of 20 to 100 psi (100 to 500kPa) is required. Water pressure less than 20psi may cause water valve failure, or may not allow the water valve to shut off completely, or may extend the fill time beyond what your washer controls allow, causing your washer to turn off and indicate an error. A time limit is built into the controls to prevent flooding in your home if a hose becomes loose.
The water faucet must be within 4 feet/122cm of the back of your washer to match the inlet hoses provided with your washer.
A water heater should be set to deliver 120°F (49°C) water to the washer.
To avoid the possibility of water damage:
- Have water faucets easily accessible.
- Periodically check that there is no leakage from the water inlet hose fittings.
DRAINING
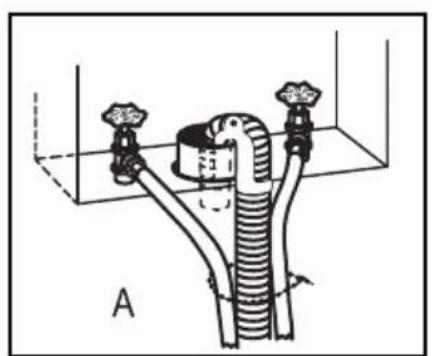
The drain hose is connected to the bottom side of the unit. The other end of the hose should be positioned using one of the following methods:
Standpipe
The standpipe must be no shorter than 23.5" (60cm) and no taller than 39" (100cm) from the bottom of the washer.
The drain hose must be routed through the drain hose clip to the standpipe. The standpipe must be large enough to accept the outside diameter of the drain hose.
natural_image
Technical diagram of a pipe fitting with two valves and a central cylinder, labeled 'A' (no text or symbols on the diagram itself)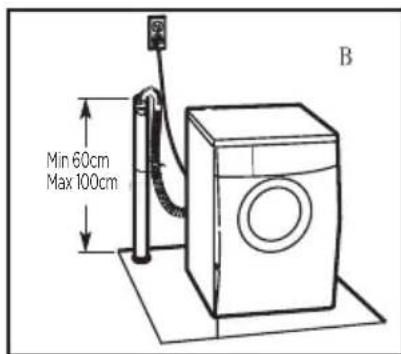
text_image
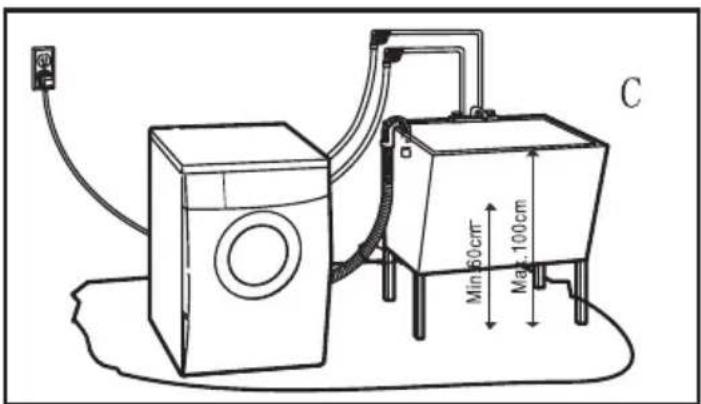
Min 60cm Max 100cm BSink
The top of the sink must be no shorter than 23.5" (60cm). The capacity of the sink should be a minimum of 20 gallons (76L).
text_image
C Min 60cm Max 100cmINSTALLATION INSTRUCTIONS
Floor Drain
A siphon break kit can be purchased separately from your local hardware store to drain the water to the floor. The siphon break must be a minimum of 28" (710 mm) from the bottom of the washer.
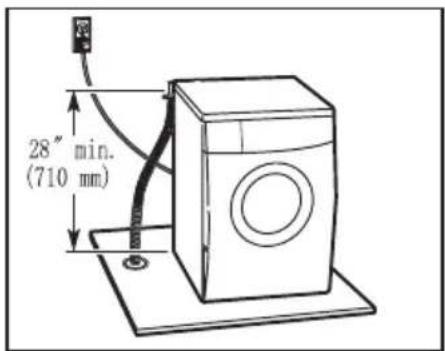
text_image
28" min. (710 mm)INSTALLATION CLEARANCES
The location must be large enough to allow the washer door to be fully opened. The door opens more than 90° and it is not reversible.
Additional spacing of approximately 1" (25mm) on all sides of the washer is recommended to reduce noise and vibration.
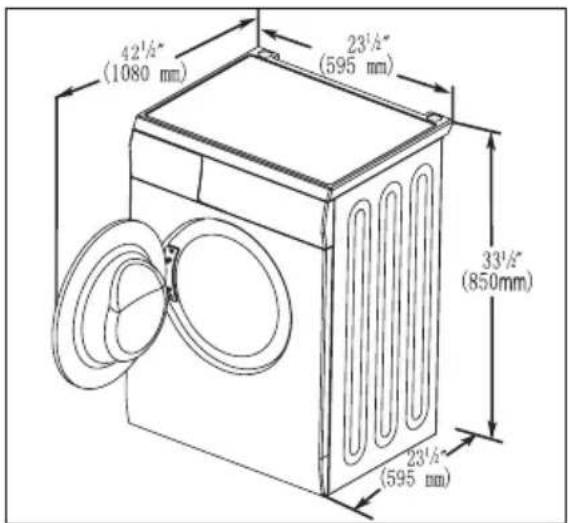
text_image
42¼" (1080 mm) 23¼" (595 mm) 33¼" (850mm) 23¼" (595 mm)CLEARANCE REQUIRED FOR BUILT-IN APPLICATION
Location and clearance should be considered for ease of installation and servicing.
text_image
2" (50 mm) 33½" min. (850 mm) 1" (25 mm) 23½" (595 mm) 1" (25 mm)INSTALLATION INSTRUCTIONS
Leveling the Washer Dryer Combo
When moving the unit to the final location make sure the leveling legs are positioned close to the washer and not extended to avoid damage to the leveling legs.
The leveling legs can be adjusted by turning them to raise or lower the leg with an adjustable wrench (not included).
natural_image
Mechanical assembly diagram showing a wrench and nut assembly (no text or symbols)After positioning the unit at its final location, it should not rock when pressing down on the top corners of the unit. A leveler can also be used. If the unit is not stable, the leveling legs should be adjusted to stabilize.
natural_image
Diagram of a device with airflow arrows indicating movement (no text or symbols)All 4 leveling legs should be pressed firmly into the ground, and the unit should be completely stable before operating the washer.
Connecting the Inlet Hoses
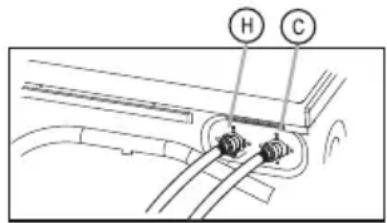
Connect (blue) inlet hose to the cold water supply. Turn clockwise to tighten.
Connect the other end of hose inlet of the cold water supply to the (blue) inlet valve on the back of the unit marked C by turning clockwise to tighten.
Connect the (red) inlet hose to the hot water supply. Turn clockwise to tighten.
Connect the other end of hose inlet of the hot water supply to the (red) inlet valve on the back of the unit marked H by turning clockwise to tighten.
natural_image
Diagram of a mechanical valve assembly with rotating components (no text or labels)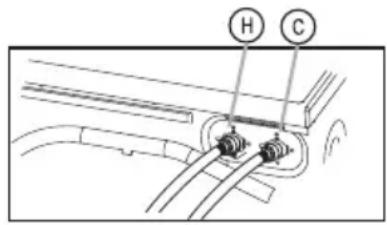
text_image
H CTurn on the water supply to make sure there is no leak in the connections. If any leakage occurs, tighten the connection by turning clockwise.
TROUBLESHOOTING & WARRANTY
BEFORE YOU CALL FOR SERVICE
IF THE UNIT FAILS TO OPERATE:
A) Check to make sure that the unit is plugged in securely. If it is not, remove the plug from the outlet, wait 10 seconds and plug it in again securely.
B) Check for a blown circuit fuse or a tripped main circuit breaker. If these seem to be operating properly, test the outlet with another appliance.
IF NONE OF THE ABOVE SOLVES THE PROBLEM, CONTACT OUR CUSTOMER SATISFACTION CENTER. DO NOT TRY TO ADJUST OR REPAIR YOURSELF.
IMPORTANT
DO NOT RETURN THIS PRODUCT TO THE STORE
If you have a problem with this product, please contact the BLACK+DECKER Customer Satisfaction Center at 844-299-0879.
DATED PROOF OF PURCHASE, MODEL # AND SERIAL # REQUIRED FOR WARRANTY SERVICE.
TROUBLESHOOTING & WARRANTY
TROUBLESHOOTING
Troubleshoot your problem by using the chart below. If the unit still does not work properly, contact W Appliance Co. customer service center or the nearest authorized service center. Customer must never troubleshoot internal components.
| SYMPTOMS POSSIBLE CAUSE SOLUTIONS | ||
| Washer will not start | Door may not be closed tightly.Power plug may not be inserted.Water supply tap may not be opened.“On/Off” may not be pressed.“Start/Pause” may be pressed. | Close the door tightly.Make sure the power plug is inserted well.Open the water supply tap.Press “On/Off”.Check if the “Start/Pause” button is pressed. If so press the button again to start. |
| Door Cannot be opened | Washer’s safety protection design is working. | Disconnect the power, restart the machine |
| Thumping sound | Heavy wash loads may produce a thumping sound.Washer load may be out of balance. | This is normal.If sound continues, washer is probably out of balance. Stop and redistribute wash load.Pause the cycle and redistribute the load. |
| Vibrating noise | Packaging materials were not removed.Wash load may be unevenly distributed in the tub.Not all leveling feet are resting firmly and evenly on the floor.Floor not level/rigid enough. | See the UNPACKING AND REMOVING SHIPPING MATERIAL section in the installation instructions.Pause the cycle and redistribute the load.See Leveling the Washer in the Installation Instructions.Make sure that the floor is solid and does not flex. See Flooring in the Installation Requirements. |
| Rattling and clanking noise | Foreign objects, such as keys, coins, or safety pins, may be in tub or pump. | Stop washer, check tub and drain filter for foreign objects.If noise continues after washer is restarted, call for service. |
TROUBLESHOOTING & WARRANTY
| SYMPTOMS POSSIBLE CAUSE SOLUTIONS | ||
| Excessive suds | Too much detergent or incorrect detergent. | HE detergents are formulated specifically for High-Efficiency washers and contain suds reducing agents. Only use detergent with the High-Efficiency (HE) logo. |
| Water leaking | Inlet hose connection is loose at faucet or washer.Drain hoses are clogged.Drain pipe has come out of drain or is not inserted far enough. | Check hoses for leaks, cracks and splits.Check and tighten hose connections.The washer pumps out water very rapidly.Check for water backing up out of the drain pipe during drain. If water is seen coming out of the drain, check for proper drain hose installation and check for restrictions in the drain. Contact a plumber to repair drain pipe.Tie drain hose to inlet hose or standpipe to prevent it from unfastening. For smaller drain pipes, insert the drain hose into the pipe as far as the drain hose flange. For larger drain pipes, insert the drain hose into the pipe 1”-2” past the flange .Stop the washer and check the load. |
| Wrinkling | Washer not unloaded promptly.Washer overloaded.Hot and cold water inlet hoses are reversed. | Always remove items from the washer as soon as the cycle is complete.The tub should not be tightly packed with items.Hot water rinse can set wrinkles in garments. Check the inlet hose. |
| Stains on fabrics | Washer was not unloaded promptly.Clothes were not properly sorted. | Always remove items from the washer as soon as possible after the cycle is complete.Always wash dark colors separately from light colors and whites to prevent discoloration.Never wash heavily soiled items with lightly soiled items. |
TROUBLESHOOTING & WARRANTY
| SYMPTOMS POSSIBLE CAUSE SOLUTIONS | ||
| Musty or mildew odor in washer | Inside of tub was not cleaned properly. | Run the Tub Clean cycle with bleach once a month to clean tub and remove any mold from inside washer. |
| The laundry is not completely dry | Incorrect settings for type of fabric and load size.Unit is overloaded.Load is out of balance. | Add additional drying time.Make sure the washer is not overloaded. If load is out of balance, redistribute and run rinse and spin. |
| The machine does not drain or spin properly | Something is blocking the pump. | Disconnect the power, make sure fabric is not stuck, Restart the machine. |
| Error Code E30 | Door is not closed properly. | Check and clean the pump filter. |
| Error Code E10 | This indicates an issue with water filling into the machine. | Make sure the water pressure is not too low. Make sure no kinks in the hoses. Make sure the inlet valve is not blocked. |
| Error Code E21 | Water is draining slowly. | Make sure the drain hose is not blocked. |
| Error Code E12 | Water overflow Restart the washer. | |
| Error Code EXX | Other Restart the washer, | if error remains, contact customer service. |
LIMITED WARRANTY
Any repair, replacement, or warranty service, and all questions about this product should be directed to W Appliance Co. at 844-299-0879 from the USA or Puerto Rico.
warrants to the original purchaser that the product will be free from defects in material, parts and workmanship for the period designated for this product. The warranty commences the day the product is purchased and covers up to a period of 1 year (12 months) for labor/1 year (12 months) for parts (manufacturing defects only).
W Appliance Co. agrees that it will, at its option, replace the defective product with either a new or remanufactured unit equivalent to your original purchase during the warranty period.
Exclusions: This warranty does not apply to the below:
-
If the appearance or exterior of the product has been damaged or defaced, altered or modified in design or construction.
-
If the product original serial number has been altered or removed or cannot be readily determined.
-
If there is damaged due to power line surge, user damage to the AC power cord or connection to improper voltage source.
-
If damage is due to general misuse, accidents or acts of God.
-
If repair attempts are done by unauthorized service agents, use of parts other than genuine parts or parts obtained from persons other than authorized service companies.
-
On units that have been transferred from the original owner.
-
On products that have been purchased as refurbished, like new, second-hand, in a "As-Is" or "Final Sale" terms.
-
To products used in a commercial or rental setting.
-
To products used in settings other than ordinary household use or used other than in accordance with the provided instructions.
-
To damages for service calls for improper installations.
-
Transportation and shipping costs associated with the replacement of the unit.
-
Service calls to instruct you how to use your product.
-
Service calls to repair or replace the house fuse, reset the circuit breaker or correct the wiring in the house.
REPAIR OR REPLACEMENT AS PROVIDED UNDER THIS WARRANTY IS THE EXCLUSIVE REMEDY OF THE CUSTOMER; W Appliance Co.. SHALL NOT BE LIABLE FOR ANY INCIDENTAL OR CONSEQUENTIAL DAMAGES FOR BREACH OF ANY EXPRESS OR IMPLIED WARRANTY ON THIS PRODUCT, EXCEPT TO THE EXTENT PROHIBITED BY APPLICABLE LAW. ANY IMPLIED WARRANTY OF MERCHANTABILITY OF FITNESS FOR A PARTICULAR PURPOSE ON THIS PRODUCT IS LIMITED TO THE DURATION OF THE WARRANTY.
Some states do not allow the exclusion or limitations of incidental or consequential damages, or limitations on how long the warranty lasts. In these cases the above exclusions or limitations may not apply to you. This warranty gives you specific legal rights and you may also have other rights which vary from state to state.
Obtaining Service: To obtain service, product literature, supplies or accessories please call
844-299-0879 to create a ticket for exchange/repair. Please make sure to provide the date of purchase, model number and a brief description of the problem. Our customer service representative will contact you or send detailed return instructions.
W Appliance Co. does not warrant that the appliance will work properly in all environmental conditions, and makes no warranty and representation, either implied or expressed, with respect to the quality, performance, merchantability, or fitness for a particular purpose other than the purpose identified within this user's manual. W Appliance Co. has made every effort to ensure that this user's manual is accurate and disclaims liability for any inaccuracies or omissions that may have occurred. Information in this user's manual is subject to change without notice and does not represent a commitment on the part of W Appliance Co.. W Appliance Co. reserves the right to make improvements to this user's manual and/or to the products described in this user's manual at any time without notice. If you find information in this manual that is incorrect, misleading, or incomplete, please contact us at 844-299-0879.
W Appliance Co.
1356 Broadway
New York, NY 10018
BLACK & DECKER, BLACK+DECKER, the BLACK & DECKER and BLACK+DECKER logos and product names and the orange and black color scheme are trademarks of The Black & Decker Corporation, used under license. All rights reserved.
Product in this box may differ slightly from that pictured. Does not affect function. Not all accessories shown in photography are included in this package.
Imported by W Appliance, Inc., 1356 Broadway, New York, NY 10018
BLACK+ DECKER®
2.7 PI. CU.
COMBINÉ LAVEUSE + SÉCHEUSE
MANUEL D'INSTRUCTIONS
NUMÉRO DE CATALOGUE BCW27MW
natural_image
Line drawing of a washing machine with front panel, door, and control panel (no text or symbols)natural_image
Diagram of a mechanical device inside a drawer with directional arrows indicating movement (no text or symbols)natural_image
Diagram of a mechanical device with an arrow indicating rotation, showing no text or symbols.natural_image
Diagram of a mechanical device with arrows indicating direction (no text or symbols)NETTOYAGE ET ENTRETIEN
natural_image
Illustration of a kitchen sink with pipe fittings and a valve, showing mechanical assembly (no text or symbols)natural_image
Simple line drawing of a mechanical component with a circular opening and rotation arrow (no text or symbols)natural_image
Hand holding a rotary dial indicator on a control panel (no text or symbols visible)text_image
Diagram showing a lock mechanism with labeled parts and directional arrow, likely illustrating a manual or mechanical operation.natural_image
Simple line drawing of a kitchen appliance with a plate, sink, and handle (no text or symbols)natural_image
Technical line drawing of a mechanical assembly with rotating components (no text or symbols)natural_image
Line drawing showing two step-by-step instructions for using a radio, with no text or symbols present.natural_image
Technical line drawing of a mechanical assembly with a dashed circular annotation highlighting a specific component (no text or symbols present)INSTRUCTIONS D'INSTALLATION
ENLEVER LES BOULONS DE TRANSPORT
text_image
Technical diagram of a washing machine with labeled parts and an inset showing a screwdriver component.INSTRUCTIONS D'INSTALLATION
PIÈCES ET CARACTÉRISTIQUES
The standpipe must be no shorter than 23.5" (60cm) and no taller than 39" (100cm) from the bottom of the washer.
The drain hose must be routed through the drain hose clip to the standpipe. The standpipe must be large enough to accept the outside diameter of the drain hose.
natural_image
Technical diagram of a mechanical assembly with hoses and a central component, labeled 'A' (no text or symbols beyond label)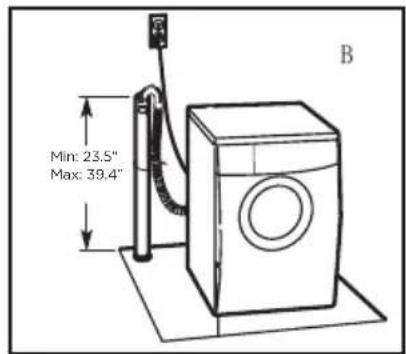
text_image
Min: 23.5" Max: 39.4" BÉvier
text_image
C Min: 23.5" Max: 39.4"INSTRUCTIONS D'INSTALLATION
Drain au sol
natural_image
Mechanical assembly diagram showing a wrench inserted into a housing component with a curved arrow indicating rotation (no text or symbols present)natural_image
Diagram of a mechanical component with directional arrows indicating movement or force (no text or symbols)natural_image
Diagram of a mechanical valve assembly with rotating components (no text or labels)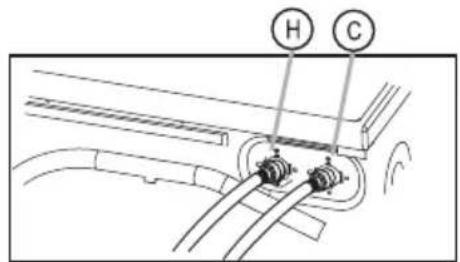
text_image
H CNE PAS RETOURNER CE PRODUIT AU MAGASIN
SYMPTÔMES CAUSE POSSIBLE SOLUTIONS
SYMPTÔMES CAUSE POSSIBLE SOLUTIONS
SYMPTÔMES CAUSE POSSIBLE SOLUTIONS
natural_image
Line drawing of a washing machine with front panel, door, and control panel (no text or symbols)BLACK+DECKER, ingrese a www.blackanddecker.com/instantanswers.
natural_image
Diagram of a mechanical device with internal components and directional arrows indicating movement (no text or symbols)natural_image
Diagram of a mechanical device with a rotating lever and handle mechanism (no text or symbols)natural_image
Diagram of a mechanical device with arrows indicating direction of movement or force (no text or symbols present)LIMPIEZA Y CUIDADOS
natural_image
Illustration of a faucet being inserted into a sink with a hand holding the drain (no text or symbols present)natural_image
Simple line drawing of a mechanical component with a circular hole and an arrow indicating rotation (no text or symbols)text_image
Diagram showing a device with a dial and three labeled parts: a knob, a key, and a gear.text_image
Emergency y drain hosenatural_image
Technical line drawing of a mechanical assembly with rotating components (no text or symbols)natural_image
Simple line drawing of a desktop computer with monitor, keyboard, and mouse (no text or symbols)natural_image
Hand pressing a button on a control panel with a circular dial indicator (no text or symbols)natural_image
Two-step diagram showing a device with circular control buttons and a hand pressing a button (no text or symbols)
natural_image
Technical line drawing of a mechanical assembly with a dashed circular annotation highlighting a specific component (no text or symbols present)natural_image
Technical line drawing of a washing machine with labeled components and an inset showing a separate view of the housing (no text or symbols present)natural_image
Technical diagram of a pipe connection with two valves and a central valve, labeled A (no text or symbols present)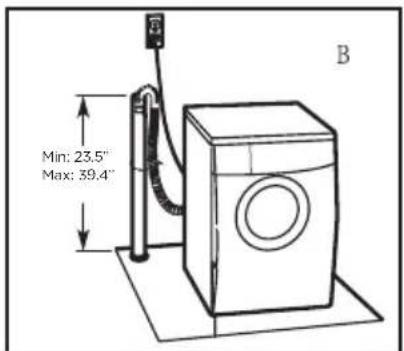
text_image
Min: 23.5" Max: 39.4" BFregadero
text_image
C Min: 235" Max: 39.2"natural_image
Mechanical assembly diagram showing a lever and gear mechanism (no text or symbols)natural_image
Diagram of a box with airflow arrows indicating direction (no text or symbols)natural_image
Diagram of a mechanical valve assembly with rotating components (no text or labels)