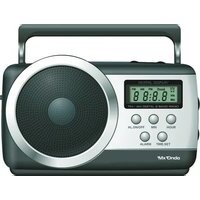
MX-RDM5240 - Radio Mx Onda - Free user manual and instructions
Find the device manual for free MX-RDM5240 Mx Onda in PDF.


| Product type | Digital alarm clock radio |
| Brand | Mx Onda |
| Model | MX-RDM5240 |
| Dimensions (W x D x H) | 230 x 80 x 138 mm |
| Weight (without batteries) | 628 g |
| Power supply | Mains 230 V ~ 50 Hz or 3 LR20/UM-1 batteries (1.5 V each) |
| Maximum consumption | 2 W |
| Frequency ranges | FM 87.5 - 108 MHz / MW 522 - 1620 kHz |
| Antennas | MW: internal directional ferrite; FM: telescopic extendable |
| Speaker | 3" (78 mm), 1 W, 4 Ω |
| Display | LCD screen with frequency and 12-hour clock |
| Clock and alarm | Adjustable clock, radio alarm with 60 min duration, manual stop |
| Headphone output | 3.5 mm jack socket (cuts off speaker) |
| Controls | Band selector (AM/FM), tuning, volume, time/alarm setting, night light |
| Cleaning | Damp cloth, do not use alcohol or solvents |
| Safety | Do not open, unplug before cleaning, do not use with wet hands |
| Compliance | European directives 2014/30/EU (EMC) and 2014/35/EU (LVD) |
| Included accessories | Mains power cable (user manual) |
| Batteries not included | 3 x LR20 (D), to be purchased separately |
Frequently Asked Questions - MX-RDM5240 Mx Onda
User questions about MX-RDM5240 Mx Onda
0 question about this device. Answer the ones you know or ask your own.
Ask a new question about this device
Download the instructions for your Radio in PDF format for free! Find your manual MX-RDM5240 - Mx Onda and take your electronic device back in hand. On this page are published all the documents necessary for the use of your device. MX-RDM5240 by Mx Onda.
USER MANUAL MX-RDM5240 Mx Onda
ANTES DE SU USO LEA ATENTAMENTE ESTE MANUAL
¡ATENCIÓN!
MANUAL DE INSTRUÇÕES
Mx Onda
RÁDIO RECEPTOR DIGITAL
MODELO: MX-RDM5240
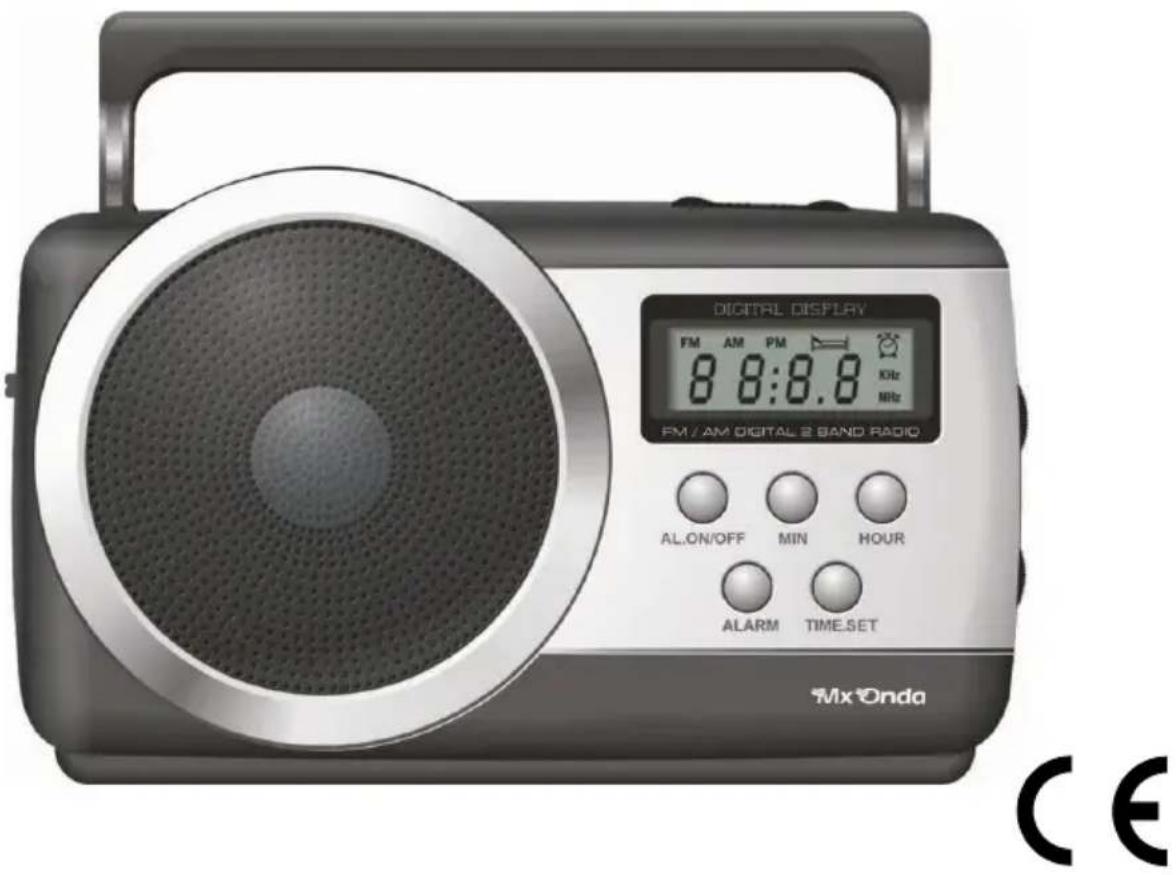
ANTES DE UTILIZAR, LEIA ATENTAMENTE ESTE MANUAL
ATENÇÃO
- Tela LCD
- Seletor de banda
- Controle de sintonia
- Definindo as horas
- Controle de volume
- Configurando o tempo
- Configurando o alarme
- Definindo os minutos
INDICAÇÕES NA TELA
PLEASE READ THIS MANUAL BEFORE OPERATION
ATTENTION!
THIS UNIT RUNS voltage 230V, TO AVOID POSSIBLE ELECTRIC SHOCK DO NOT ATTEMPT TO OPEN IT. This apparatus has no part that can be repaired by yourself, in case of a malfunction not handle, contact an authorized service MX ONDA.
Waste electrical products must not be disposed of with household waste. This equipment should be taken to your local recycling centre for safe treatment. Remove the batteries from the product before disposing of it.
This product complies with European Directives RoHS (2011/65/UE), on the restriction of use of certain dangerous substances in electrical and electronic appliances.

INTRODUCTION
The digital radio receiver MX ONDA model MX-RDM5240 has among others the following characteristics:
• FM and MW receiver.
- LCD screen.
• Digital clock with 12 hours format.
- Alarm by radio.
- Headphone jack.
- Double power: AC power and batteries.
- Manual tuning with digital indication of the tuned frequency.
BEFORE CONNECTING THE EQUIPMENT
- Read these instructions carefully and keep them for later use.
- Check that the voltage of the outlet is 230 V \~ 50 Hz.
- This product can be operated through the electrical network of 230 V and by 3 batteries (preferably alkaline) of 1.5 V type LR20, UM1, etc.
SECURITY MEASURES
- Packaging materials such as plastic bags, polystyrene foam, etc. They should not be left within the reach of children, as they are a potential source of danger.
- After removing the packaging, check that the appliance is not damaged. If in doubt, do not use the appliance; Contact the technical support staff.
- Do not bend, twist or pull excessively the power cord.
-
When handling this appliance and it is connected to the 230 V mains, never do it with wet hands or feet or inside the bathtub, shower, etc.
-
When there is a possibility of electrical storm, it is convenient to unplug the power cord from the network.
- If water or other liquid enters the appliance, disconnect the power cord from the outlet and contact your dealer.
- To unplug the mains cable, gently pull the mains plug. Never do it by pulling on the cable.
- If the appliance has been dropped or if it does not work properly, if the cord, plug or other parts are damaged, refrain from using it and do not attempt to disassemble or repair it. Contact your nearest MX ONDA Technical Service Center or distributor.
LOCATION OF CONTROLS
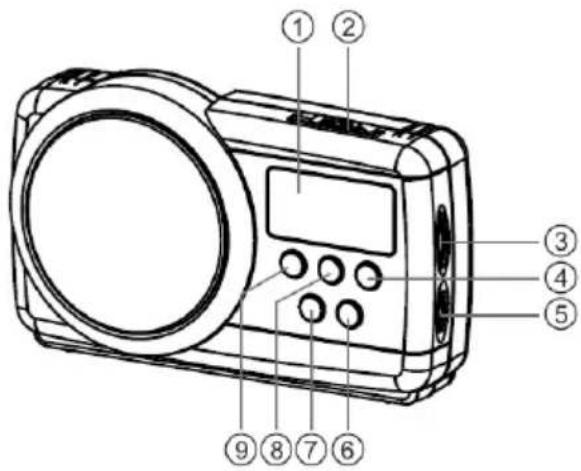
- LCD screen
- Band selector
- Tuning control
- Setting the hours
- Volume control
- Setting the time
- Setting the alarm
- Setting the minutes
INDICATIONS ON SCREEN
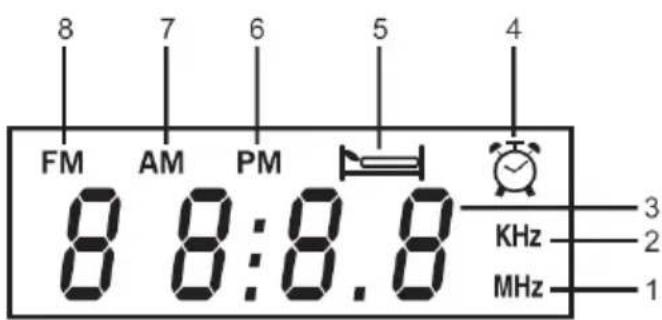
- Frequency on the FM band
- Frequency in the MW band
- Indication of frequency and time
- Alarm activated
- Alarm time indication
- Indication after noon
- MW band and indication before noon (AM)
- FM band
- Activation / deactivation of the alarm
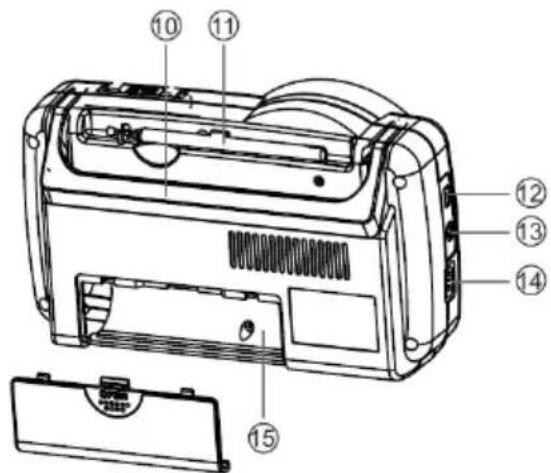
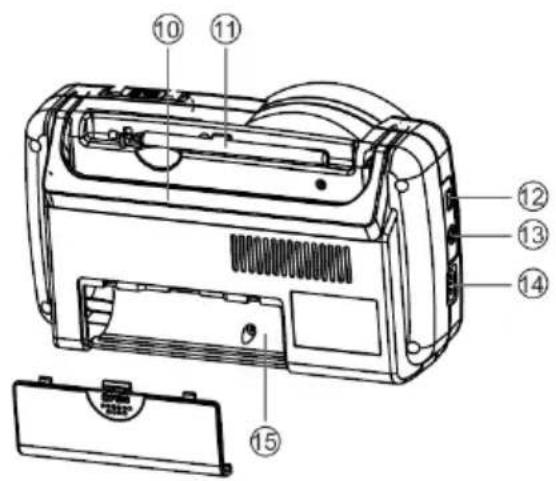
- Transport handle
- Telescopic antenna
- Switch on / off
- Headphone output
- Network power connector
- Battery compartment cover
AC EXTERNAL POWER SOURCE
- Insert the plug of the power cable into connector 14 (AC 220V), located on the left side of the device.
- Plug the other end of the cable into a 230 V mains socket.

WARNING!
While the appliance is plugged into the 230 V mains and even when it is switched off, the appliance is not disconnected from the mains, so it is advisable to ensure that there is no danger in leaving it permanently connected.
USE OF BATTERY
- Disconnect the power cable from connector 14 (AC 220V).
- Open the lid of the battery compartment 15 on the back of the appliance and insert 3 (preferably alkaline) batteries of 1.5 V type LR20, D, etc. respecting the polarity + and - indicated on the back of the device.
- Replace the battery cover.
IMPORTANT
- If you do not intend to use the appliance for a long period of time, remove the batteries and store them in a cool place.
- Do not mix old and new batteries, or different types.
- Never heat the batteries or throw them into the fire. Do not try to disassemble them and do not short them.
- The batteries that you use contain contaminant materials of the environment, for that reason, once exhausted the life of the same DO NOT throw them away, deposit them in the suitable place for their later recycling.
SETTING THE CLOCK
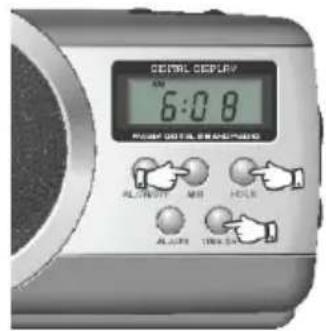
For the clock time adjustment, follow the following process:
- The radio should be off.
- Press and hold the 6 (TIME.SET) button.
- Press the 4 (HOUR) button to set the time.
- Press the 8 (MIN) button to adjust the minutes.
- Stop pressing button 6 (TIME.SET) and the time will be memorized.
SETTING IN TIME AND OPERATION OF THE ALARM
To start the alarm, you must first set the time you want it to be activated, following the steps below:
- The radio should be off.
- Press and hold the 7 (ALARM) button, the display will show the alarm activation time as well as the "■" symbol.
- Press the 4 (HOUR) button to set the time.
- Press the 8 (MIN) button to adjust the minutes.
- Stop pressing button 7 (ALARM) and the alarm time will be memorized.
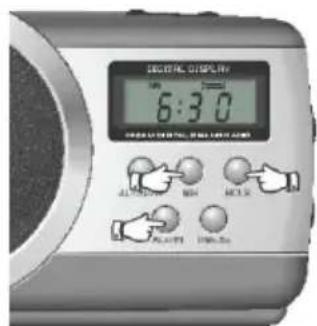
Once the automatic activation time has been set, to connect the alarm press button 9 (AL.ON/OFF) and the screen will show the symbol " 🔗" indicating that the alarm remains connected.
Once the alarm has occurred, press the 9 (AL.ON/OFF) button to stop the alarm until the next day. The duration of the alarm is 60 minutes and if it is not stopped manually, it will automatically cease after this time.
To disarm the alarm press button 9 (AL.ON/OFF) and the symbol " 🔒 " will disappear from the screen, indicating that the alarm is disconnected.
To check the alarm activation time press button 7 (ALARM) and the display will show the activation time as well as the "symbol."
VERY IMPORTANT
- The alarm is produced by the radio, for the alarm to be effective take care to pre-tune a radio station and adjust the volume level.
- When the power supply to the device is absent, the clock will take the time preset from the factory, so you must put the clock back on time.
USE OF THE RADIO
- To turn on the radio, slide the ON / OFF switch 12 (ON/OFF) to the ON position.
- Using the band selector 2 (AM/FM) choose the medium wave (AM) or frequency modulated (FM) band.
- Turn tuning control 3 (TUNE) one way or the other and tune to a radio station.
- To adjust the volume level, turn the volume control 5 (VOL) one way or the other and adjust the sound level according to your preference.
- To turn off the radio, slide the ON / OFF switch 12 (ON/OFF) to the OFF position.
Medium wave antenna (AM)
For the medium wave band (AM) this device incorporates an internal ferrite directive antenna, if the received signal is not good turn the device until you get the best possible reception.
Frequency modulated antenna (FM)
The telescopic antenna 11 is the frequency modulated (FM) antenna. To receive stations in the frequency modulated (FM) band, you must fully extend the antenna and direct it to where the radio stations are received with the minimum noise.
HEADPHONE OUTPUT
In connector 13 (EAR) you can attach headphones (not supplied) with a 3.5 mm jack. When the headphones are plugged in, the sound of the speaker will be interrupted.
Note:
When listening to music through the headphones do not set the volume level too high, as it could damage your ears.
CLEANING THE UNIT
Disconnect the unit from the mains before cleaning. Clean the plastic surface of the unit with a damp cloth and dry it with a dry one. Do not use alcohol or abrasive products and do not allow the unit to come in contact with volatile agents such as gasoline, solvents, insecticides, etc.
TECHNICAL SPECIFICATIONS
Frequency range MW 522 - 1620 KHz
FM frequency range 87.5 - 108 MHz
Sensitivity MW ≤ 3mV / m
FM sensitivity ≤ 10 μV
Selectivity ≥ 10 dB
MW antenna Ferrite inner
FM Antenna Telescopic
Speaker 3"(78 mm) / 4 / 1W Ω
Power supply 230V \~ 50 Hz
Maximum consumption 2 W
Power batteries * 3 x 1.5 V LR20, UM-1
Dimensions 230 x 80 x 138 mm (l, a, height)
Weight 628 gr. (without batteries).
* Not supplied
Specifications subject to change without notice.
This product complies with the European Directives 2014/30/EU (EMC – Electromagnetic Compatibility) and the 2014/35/EU (LVD – Low Voltage Directive) relative to Low Tension Security.
"MX, MX ONDA" and its logos are trademarks of MX ONDA, S.A.
Telephone of information and Technical Service: +34 902 551 501
MX ONDA, S.A.
Isla de Java, 37
28034 - MADRID (SPAIN)
E-MAIL: mxsat@mxonda.es
http://www.mxonda.es
MANUEL D'INSTRUCTIONS
Mx Onda
AVANT D'UTILISER CE MANUEL DE LIRE ATTENTIVEMENT
ATTENTION
PRIMA DI UTILIZZARE IL MANUALE DI LEGGERE ATTENTAMENTE
ATTENZIONE
Antenna modulata in frequenza (FM)
VOR GEBRAUCH SORGFÄLTIG LESEN SIE DIESE
ACHTUNG
natural_image
Icon of a person reading a document inside a circle (no text or symbols)E-MAIL: mxsat@mxonda.es http://www.mxonda.es
- ¡ATENCIÓN!
- MANUAL DE INSTRUÇÕES
- Mx Onda
- RÁDIO RECEPTOR DIGITAL
- ATENÇÃO
- INDICAÇÕES NA TELA
- ATTENTION!
- INTRODUCTION
- BEFORE CONNECTING THE EQUIPMENT
- SECURITY MEASURES
- LOCATION OF CONTROLS
- INDICATIONS ON SCREEN
- AC EXTERNAL POWER SOURCE
- WARNING!
- USE OF BATTERY
- IMPORTANT
- SETTING THE CLOCK
- SETTING IN TIME AND OPERATION OF THE ALARM
- VERY IMPORTANT
- USE OF THE RADIO
- Medium wave antenna (AM)
- Frequency modulated antenna (FM)
- HEADPHONE OUTPUT
- Note:
- CLEANING THE UNIT
- TECHNICAL SPECIFICATIONS
- MANUEL D'INSTRUCTIONS
- ATTENTION
- ATTENZIONE
- Antenna modulata in frequenza (FM)
- ACHTUNG
Brand : Mx Onda
Model : MX-RDM5240
Category : Radio