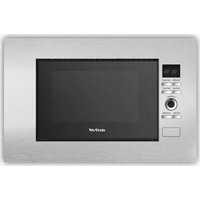
MX-MW2620 - Microwave Oven Mx Onda - Free user manual and instructions
Find the device manual for free MX-MW2620 Mx Onda in PDF.


User questions about MX-MW2620 Mx Onda
0 question about this device. Answer the ones you know or ask your own.
Ask a new question about this device
Download the instructions for your Microwave Oven in PDF format for free! Find your manual MX-MW2620 - Mx Onda and take your electronic device back in hand. On this page are published all the documents necessary for the use of your device. MX-MW2620 by Mx Onda.
USER MANUAL MX-MW2620 Mx Onda
text_image
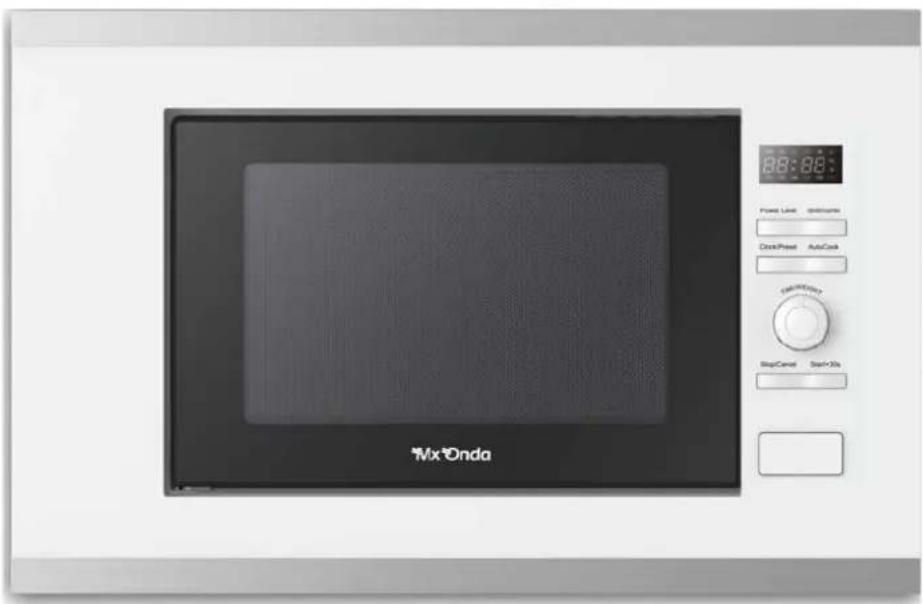
Mx Onda 88:88 Power Line 0000ms Clock/Panel AutoCook Control Panel Stop/Cancel Start/NoCE
ANTES DE SU USO LEA ATENTAMENTE ESTE MANUAL
ATENCIÓN
text_image
Labeled diagram of a microwave oven with numbered components for identificationNota:
(Guadalajara, Spain)
THIS APPLIANCE WORKS WITH HIGH VOLTAGE AND INCORPORATES A MICROWAVE GENERATOR, TO AVOID POSSIBLE ELECTRIC SHOCK OR EXPOSURE TO EXCESSIVE RADIATION OF RADIO FREQUENCY ENERGY, DO NOT ATTEMPT TO OPEN IT. This device does not have any part that can be repaired by yourself, in the event of a malfunction do not manipulate it, go to an Official MX ONDA Technical Service.
Once the useful life of this electrical product has expired, do not dispose of it with household waste.
Deposit it in the appropriate container at a clean point in your area, for later recycling.
This product complies with the European RoHS
Directive (2002/95/CE), on the restriction of the use of certain hazardous substances in electrical and electronic equipment, transposed into Spanish legislation by Royal Decree 208/2005.

INTRODUCTION
The MX ONDA microwave oven model MX-MW2620 will allow you to cook, defrost and heat food or liquids in a short time while preserving all the nutritional value.
Among others, it incorporates the following features:
• Capacity: 20 liters.
- Microwave and grill power: 700 W and 900 W respectively.
- Rotary control and safety closing system.
- 3 operating modes: microwave, grill and combined (2 modes).
- 6 power levels in microwave mode.
- 8 cooking pre-programs and programming of up to 3 sequences
- Includes glass turntable and grill.
Microwave ovens use a component called a magnetron, which operates on high voltage and produces high-frequency electromagnetic waves (microwaves). These waves are emitted into the oven through some openings and are distributed evenly throughout the oven, since they are reflected on the walls of the oven, which, being metallic, cannot be crossed. Inside the oven, the turntable ensures that food cooks evenly. Electromagnetic waves (microwaves) penetrate through the surface of food causing heat, raising the temperature as the heat disperses into the interior of the food.
One of the advantages that the microwave oven has over traditional electric or gas ovens and stoves is that the heat is generated inside the food itself. Therefore, there are no energy losses in the interior walls of the oven or in the cooking containers (glass, porcelain, etc.), since these are not affected by the action of electromagnetic waves (microwaves), although being in contact with food, they normally become hot
INDEX
Introduction....2
Operating a microwave oven.... 2
Packing contents....3
Before connecting the appliance....4
Security measures.... 5
Guide to utensils suitable for microwaves....6
How to cook in the microwave oven (basic principles).... 8
Installation....9
Controls and elements....9
Control panel.... 10
Setting the clock.... 10
Safety Lock....11
Cooking or reheating food with microwaves.... 11
- Power level.... 11
- Adjustment of the operating time.... 11
- Start-up.... 12
- Temporary stoppage or cancellation.... 12
Quick operation in microwave mode.... 12
Automatic defrosting according to weight 13
Programmed modes for cooking or reheating food.... 13
- Table with the programmed modes.... 14
Grill function.... 15
Combined microwave and grill mode.... 15
Programmable automatic connection.... 16
Multiple operation (sequence programming).... 17
Maintenance and cleaning.... 17
- Interior cleaning.... 17
- External cleaning.... 18
Technical Characteristics.... 18
PACKAGING CONTENTS
- Microwave oven
- Glass tray
- Rotating support
- Grill
- Instruction manuals
• Certificate of guarantee
BEFORE CONNECTING THE APPLIANCE
- Read these instructions carefully and keep them for later use.
- Check that the voltage of your power outlet is 230 V \~ 50 Hz and that it is earthed.
- The electrical safety of this appliance is guaranteed only if it is connected to a socket with an effective earth connection, as established by current safety standards.
- The manufacturer declines any responsibility for the damages derived from the lack of earth connection in the installation. If in doubt, consult a professional.
- If you need to use an extension cord, use only an extension cord that is in good condition, with an earthed plug, and that is suitable for the power of the appliance.
- Do not leave the power cord under the microwave oven or let it come into contact with hot surfaces.
- After removing the packaging, check that the appliance is not damaged. If in doubt, do not use it and contact technical support personnel.
- Do not leave packaging materials such as plastic bags, Styrofoam, etc. within the reach of children, as they are a potential source of danger.
- The manufacturer declines any responsibility for damages resulting from inappropriate, incorrect or imprudent use of the device.
PRECAUTIONS TO AVOID POTENTIAL EXPOSURES TO ENERGY EMISSIONS FROM THE MICROWAVE OVEN
- Do not try to start the oven with the door open, do not force or manipulate the safety lock system and do not insert any object into the door lock slots.
- Do not place any objects between the front of the oven and the door.
- Do not allow dirt or cleaning product residue to accumulate on the surfaces of the security closures. Be sure to clean the door and closing areas after each use by wiping with a damp cloth and then drying with a soft cloth.
- Do not use the microwave oven if any of the following parts are damaged:
-
Door and zones of the closing system.
-
Hinges and latches (broken or loose).
-
Power cord.
Do not attempt to tamper with or make adjustments or repairs to the door, control panel, safety lock system, or any other part of the oven. The repair and review must be carried out by an Official Technical Service.
VERY IMPORTANT!
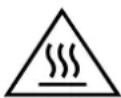
This signal warns that the area where it is located may acquire high temperatures when the oven is used in grill mode. After using the oven in this mode, do not touch this surface and wait for it to cool down.
SECURITY MEASURES
- Failure to follow these safety warnings and instructions could result in burns or serious injury.
- This appliance is designed for domestic, non-professional use only. MX ONDA will not accept any responsibility and the guarantee will not be valid in case of improper use or non-compliance with the instructions.
- To reduce the risk of fire, electric shock, or personal injury, DO NOT block or insert objects into the ventilation openings.
- Do not operate the microwave oven if it is empty, the oven walls could be damaged. You can leave a glass of water inside to absorb the microwaves in case of inadvertent start-up.
- IMPORTANT: Keep the appliance out of the reach of children, unless they have been given proper instructions on how to use the oven in a safe manner and understand the dangers that can arise from incorrect use.
- When heating or cooking food contained in disposable containers made of plastic, paper or other combustible materials, be careful as these could catch fire and frequently check that the container is not deteriorating.
- To avoid the risk of fire, remove the seals or closing wires from the bags before putting them in the oven, do not store flammable materials in the oven and do not use the microwave oven to dry newspapers or clothes, these could be charred or ignite. fire for prolonged heating. Only use the appliance for the purpose for which it has been developed.
- If you see smoke or fire inside the oven, keep the door closed to stifle the flames and turn it off or disconnect it from the mains.
- Do not put any metallic utensils inside the oven, such as containers, cutlery, skewers, tableware with gold or silver decorations, etc., and check that the used containers can be used in a microwave oven.
- When the oven is not in use, do not use its interior to store products, kitchen utensils, food, etc.
- If in doubt, select short times to cook, heat or defrost. Too long a time can consume the food and burn it. Keep in mind that small amounts of food need shorter times. If you apply the normal times, the food will overheat or burn.
- Do not heat food or liquids contained in hermetic containers, vacuum-packed or narrow-necked bottles, as they could burst. To avoid this, uncover containers, pierce containers, or open jars.
- Do not heat unopened, skin-on or shelled foods such as apples, potatoes, tomatoes, shelled nuts, sausages, eggs, etc., as increased pressure may cause them to burst. To avoid this, always pierce the skin before cooking.
- Do not heat fresh or hard-boiled eggs in their shells, as increased pressure may cause them to burst.
- Always use oven mitts when handling containers as heat from food is always transferred to the containers.
- Never heat oil, alcohol or alcoholic beverages. When heating liquids in the oven such as soups, sauces or drinks, be careful when removing the container, as due to the heat accumulated inside the liquid, it could boil without evidence of it.
- Be extremely careful when heating liquids or baby food, the content must be shaken or removed after being heated. Always check the temperature of food before giving it to the child.
- Unplug the microwave oven when you will not be using it for a long period of time, when there is a power outage, or a fuse or circuit breaker "blows".
- Ensure that the socket where the appliance is connected is easily accessible. To disconnect the microwave from the mains, gently pull the plug from the socket. Never do it by pulling on the cable.
- Place the device on a dry, stable surface and do not use it outdoors.
- In case of failure, anomalies, if the microwave oven has been dropped, the plug or other parts are damaged, or the cable is damaged, turn off the appliance and do not try to repair it yourself. Contact the nearest MX ONDA Official Technical Service.
GUIDE TO SUITABLE UTENSILS FOR MICROWAVES
Food must be removed from its packaging and placed in containers suitable for use in a microwave. If you use a suitable container, microwaves will pass through it easily and penetrate the food evenly, causing it to heat up. To find out if a container is suitable for use in the microwave, perform the following test:
- Place the container in question with water inside the microwave oven.
- Select maximum power for 1 minute.
- If after that time the water heats up and at the same time the container remains cold to the touch, then the container IS valid for use in the microwave. If the water does not vary in temperature but the container gets hot, this is an unequivocal sign that the container absorbs microwaves and is therefore NOT suitable for use in this type of oven.
You probably have many containers or utensils in your kitchen that can be used for your microwave. Below is a guide to help you select the most suitable container or utensil.
Metal or metal utensils
NEVER use metal containers or utensils or those containing metal rims, handles, or trimmings in the microwave oven. Metals do not allow microwaves to penetrate and when they bounce, they can form electric arcs or fire.
Foil
Small pieces can be used to protect certain areas of food from overcooking. If the paper is very close to the oven or if you use a lot of it, electric arcs can form. It is important to leave at least a distance of about 3 centimeters between the aluminum foil and the oven walls.
Glass
All glass containers resistant to high temperatures can be used in the microwave oven, however, do not use delicate glass containers, since when their contents are heated they could break. Also, do not use glassware with gold or silver ornamentation.
Ceramic, clay and porcelain
They can be used normally unless they have metal trim. Before use, check that they do not have a drawing, this could be destroyed due to the action of microwaves.
Plastic (specific for microwave ovens)
They can be used to quickly reheat food. Plastic containers should not be used for food that requires a long time in the microwave oven, as the container could be deformed or melt due to the temperature reached by the food.
Paper or cardboard (specific for microwave ovens)
Paper or cardboard plates and containers can be used for short cooking times and only if the food is low in fat and moisture. Kitchen paper is also very useful for wrapping or covering some foods. Do not use recycled paper, as it may contain impurities that could cause electric arcs or fire.
Wood
Wooden containers or utensils crack quite easily, for this reason they should NOT be used in the microwave oven.
Plastic bags for cooking (specific for microwave ovens)
They are suitable for use in the microwave oven as long as they are special cooking bags. However, slit the bag a little so that the steam can escape. NEVER use ordinary plastic bags, as these can melt.
Lids (specific for microwave ovens)
The use of glass or plastic lids designed for microwave ovens speed up heating and prevent food from drying out. They must have holes to allow steam to escape and thus avoid excess pressure.
Container Selection Help Chart
| CONTAINER MATERIAL | MICROWAVE GRILL COMBINED | ||
| high temperature resistant glass YES YES YES | |||
| Glass not resistant to high temperatures NO NO NO | |||
| High temperature resistant ceramic YES YES YES | |||
| high temperature resistant plastic | YES | NO NO | |
| paper/cardboard | YES | NO NO | |
| Metal grill (included) | NO | YES YES | |
| metal tray | NO | YES | NO |
| Foil | NO | YES | NO |
| Wood | NO NO NO | ||
HOW TO COOK IN THE MICROWAVE OVEN (BASIC PRINCIPLES)
- The top of large foods, especially roasts, will cook faster than the bottom. Therefore, it will be convenient to turn these foods several times while they are cooking.
- The heat generated by microwaves tends to dry out food, for this reason, drier foods such as roasts and some vegetables should be covered or sprinkled with water before cooking.
-
Microwave radiation in the oven is the same regardless of the amount of food being cooked at any one time. Therefore the more food in the oven, the longer it will take to cook it.
-
Covering food leads to a decrease in preparation time. The lid must be special for microwaves.
- Microwaves cook only the surface of the food, spreading the heat to the interior. Thick or square-shaped foods will burn on the surface before the center is hot. Food that is long and round in shape will cook much better in the microwave oven.
- When cooking irregularly shaped foods, place them so that the thinnest parts (which will cook faster) are in the center of the dish. Do not put food on top of each other.
- When you are going to cook several pieces of the same type of food, select those of a similar size and place them in a circle on the plate.
- It is convenient to prick food with the skin on several places with the help of a fork, to allow the steam to escape and prevent them from bursting.
- Microwaved foods need to be stirred to redistribute heat. It is convenient to always do it from the outside in, since the outside will heat up first.
- Sometimes you will need to cover the edges or parts of the food with strips of aluminum foil. These strips will block microwave penetration and prevent overcooking. Never use too many sheets and make sure that they are well fixed to the plate, otherwise electric arcs could occur inside the oven.
- Because food cooks very quickly in a microwave oven, you should check the condition frequently.
- Some foods should remain in the oven until cooking is complete, but others, such as meat or poultry, should be removed from the oven when they are not completely done, so that cooking will finish while they remain out of the oven. After removing the food, the cooking cycle will end outside the oven after a few minutes. One trick is to cover food during this time to retain heat. And remember that finishing cooking outside the oven favors the mixing and development of flavors, as well as the consequent saving of energy.
- Use extreme caution when heating liquids. Never fill containers to the brim. Once you have turned off the oven, always wait at least 20 seconds before removing them, this will balance the temperature.
INSTALLATION
- Place the microwave oven on a stable, level surface, away from hot places, with high humidity, or near flammable materials.
- To ensure proper ventilation allow at least 20 cm at the top, 10 cm at the back and 5 cm on each side of the oven. DO NOT block the top and side ventilation slots.
- Open the door by pulling the handle and make sure to remove all packing materials inside.
- Place the turntable on the base of the oven cavity so that it fits into the coupling and the glass plate on it.
- Fully unwind the power cord and plug the appliance plug into the mains.
ATTENTION!
The operation of the microwave ove can cause interference in radio or television devices, when this happens follow the following process:
a) Clean the gaskets on the microwave oven door and make sure it closes well.
b) Reorient the antenna of the receiving device.
c) Change the position of the oven with respect to the receiving device or vice versa.
d) Connect the microwave oven and the receiving device to different mains sockets.
CONTROLS AND ELEMENTS
- Safety lock system
- Door
- Swivel stand
- Axis
- Door button
- Control panel
- Microwave generator
- Glass plate
- Grill resistors
- Grill
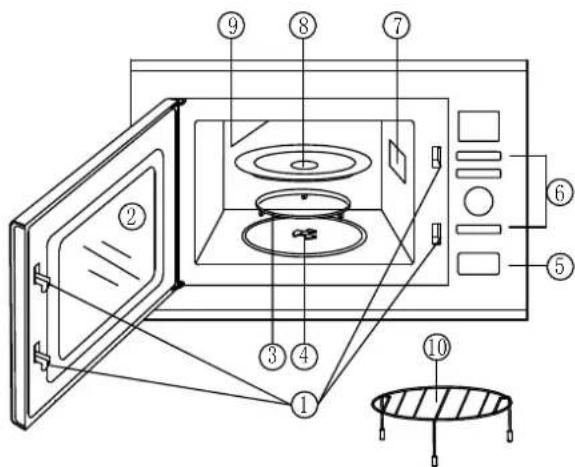
text_image
Labeled diagram of a microwave oven with numbered components for identificationNote:
The microwave oven is equipped with a safety lock system that prevents the appliance from operating with the door open.
CONTROL PANEL
1. Control panel
Cooking time, power, indicators and current time are displayed.
2. Power level selector (Power Level).
Repeatedly press this button to choose the power level in microwave mode.
3. Operating mode (Grill/Combi.)
Each time you press this button, you will select the Grill mode and the combination grill and microwave cooking mode.
4. (Clock/Preset) Press to set the clock time. Use it to set the oven to start later.
5. (Auto/Cook) Press to select the auto cook menu.
6. (Time/Weight Dial) Turn to set the time, the weight of the food or the portions.
7. Stop or cancellation (Stop/Cancel).
- Press to reset the oven before setting a cooking program.
-
Press once to temporarily stop cooking or twice to cancel cooking completely. It is also used to set the child lock.
-
(Start/+30) Press to start the cooking and defrosting programs. Press to set the express cooking program
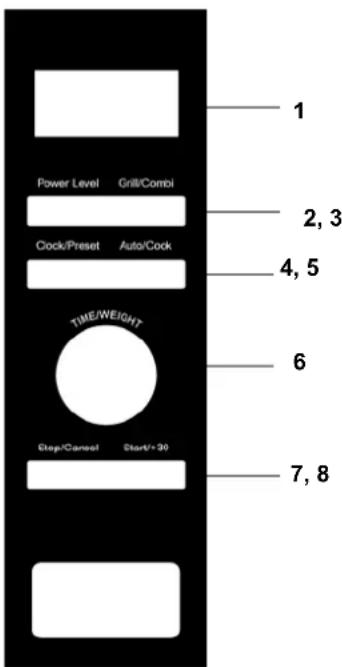
text_image
Power Level Grill/Combl Clock/Preset Auto/Cock TIME/WEIGHT Stop/Cancel Start/+30 1 2, 3 4, 5 6 7, 8Note:
Each time you press a button on the control panel, a confirmation beep will sound.
SETTING THE CLOCK
This oven incorporates a clock that is designed to indicate the time in 12 or 24 hour format; the clock can only be set when the appliance is turned off. To set the clock time, follow the steps below:
-
With the device turned off, repeatedly press button 4 (Clock/Preset) to choose the time format. The display will show the time format '12 H or 24 H'.
-
To adjust the current time, turn the control 6 (Menu/Time/Weight) to the left or right.
- To confirm the hour, press button 4 (Clock/Preset) and the display will show the digits corresponding to the minutes.
- To adjust the minutes turn the control 6 (Menu/Time/Weight) to the left or right.
- To confirm and exit the clock setting mode press button 5 (Clock/Preset).
Notes:
- When the unit is running, pressing button 4 (Clock/Preset) will display the current time for four seconds.
- In the event of a power failure, the current time as well as the automatic switch-on time will be deleted.
SECURITY LOCK
This microwave oven incorporates a safety system that prevents it from being started inadvertently or from possible use by children.
- To activate this function, with the device turned off, press and hold button 7 (Stop/Cancel) for three seconds, the device will emit a "beep" and the screen will show the lock symbol. When the security lock is activated, no buttons will work.
- To cancel this function, press and hold button 7 (Pause/Cancel) for three seconds and the lock symbol will disappear from the display..
COOKING OR REHEATING FOOD IN THE MICROWAVE
Open the door pulling the handle towards you and place the food or liquids in the center of the glass plate, the container must be suitable for use with microwave ovens. Close the door making sure that it is properly closed.
Power level
Repeatedly press button 2 (Power Level) and choose one of the six power levels according to the attached chart. The display will show you the selected power percentage.
| Push the button | POWER POWER LEVEL | |
| Once | MAXIMUM | 100 % |
| Twice | HIGH | 80 % |
| Three times | MEDIUM | 60 % |
| Four times | MEDIUM LOW AND DEFROST | 40 % |
| Five times | LOW | 20 % |
| Six times | REMINDER MODE | 0 % |
Operating time setting
Once the power is adjusted, turn the control 6 (Menu/Time/Weight) to the right or to the left to respectively increase or decrease the operating time, the maximum time is 95 minutes.
Start up
Once the power and operating time have been set, press the start button 8 (Start/+30) and the oven will start, the interior light will light up, the glass plate will start to rotate and the display will show the countdown. behind the selected time. Once the previously selected time has finished, the oven will turn off and an acoustic signal will alert you that the process has concluded.
Temporary stop or cancellation
If you want to stop the oven temporarily, to check the status or to remove the food, press button 7 (Stop/Cancel) once or open the oven door, the display will show the remaining time. To continue the oven in the selected mode and with the remaining time, close the oven door and press the start button 8 (Start/+30). In the temporary stop mode, if you want to completely stop the oven operation, press button 7 (Stop/Cancel) again and the display will show the current time.
Example: Operation in microwave mode with a power of 80% and for a time of 8 minutes
- Open the oven door by pulling the handle towards you, put the food in a suitable container and close the door by pressing gently on it.
- Press button 2 (Power Level) twice and the display will show the selected power "80%".
- Turn control 6 (Menu/Time/Weight) to the right to select the operating time 8 minutes. The display will show the selected time "B : 00".
- Press the start button 8 (Start/+30), the oven will start up and start the countdown.
- Once the previously selected time has finished, the oven will turn off and an acoustic signal will alert you that the process has concluded
This function will allow you to operate the oven in microwave mode using only button 8 (Start/+30). The power level is maximum (100%) and the maximum operating time is 10 minutes. Once the food has been inserted into the oven, repeatedly press button 8 (Start/+30) to select the operating time, when you stop pressing this button and after 2 seconds the oven will start automatically.
Example: Fast operation in microwave mode, the power is 100% (It cannot be changed) and for a time of 2 minutes
- Open the oven door by pulling the handle towards you, put the food in a suitable container and close the door by pressing gently on it.
-
Repeatedly press the button 8 (Start/+30) until the display shows the selected time "2:00", after two seconds the oven will start and start the countdown.
-
Once the previously selected time has finished, the oven will turn off and an acoustic signal will alert you that the process has concluded.
AUTOMATIC DEFROSTING ACCORDING TO WEIGHT
This function will allow you to defrost food based on their weight. Once you have selected the weight, the microwave oven will automatically calculate both the power level and the time required to defrost the food optimally. The weight of the food to be defrosted can be adjusted between 100 and 1800 grams. Proceed as below:
- Place the food to be defrosted in the oven and in a suitable container.
- In standby mode, turn the dial 6 (Time/Weight) counterclockwise once, the screen will show 1S and 100g as well as the symbol.
- Turn control 6 (Menu/Time/Weight) to the left or right to select the weight (in grams) of the food to be defrosted. The weight of the food ranges from 100 g to 1800 g.
- Press the start button 8 (Start/+30), the display will show the required defrost time and immediately the oven will start working and start the countdown.
- If you defrost large foods, we advise you to turn them around halfway through the process, in this way you will achieve even defrosting.
When approximately half of the defrosting time remains, the oven will stop automatically and an acoustic signal will alert you to turn the food over.
-
If you do not want to turn the food over or to continue the defrosting process, press button 8 (Start/+30).
-
Once the defrosting time has finished, the oven will turn off, an acoustic signal will alert you that the process has concluded.
Notes:
- We recommend that the food to be defrosted goes directly from the freezer to the microwave oven.
- When defrosting large foods, we advise you to turn them around halfway through the process, this way you will achieve even defrosting.
- Always use oven mitts when handling containers that have been in the microwave oven.
PROGRAMMED MODES FOR COOKING OR REHEATING FOOD
This function will allow you to easily reheat or cook, selecting only the type of food and its weight or portions. It will not be necessary to adjust the operating time or power level, as the microwave oven will calculate it automatically. Proceed as follows: Place the food in a suitable container in the oven.
- In standby mode, press the 5 (Auto/Cook) button repeatedly to select the food code.
- Turn control 6 (Menu/Time/Weight) to the left or right to select the weight (in grams) of the food.
- Press the start button 8 (Start/+30), the display will show the required operating time and immediately the oven will start up and start the countdown
- Once the operating time has finished, the oven will turn off, an acoustic signal will alert you that the process has concluded.
TABLE WITH PROGRAMMED MODES
| information on screen | Type of food Notes | |
| A01 Coffee. soup etc (200ml) | In options A07 (chicken) and A08 (beef or lamb), during cooking the oven will give an acoustic signal to turn the food over. Press button 8 (Start/+30) to continue.Always use oven mitts when handling containers that have been in the microwave oven. | |
| A02 Rice (150 – 600gr) | ||
| A03 Spaghetti (100 – 300gr) | ||
| A04 Potatoes (230 gr portion) | ||
| A05 Reheat (gr.) | ||
| A06 Fish (200gr, 600gr.) | ||
| A07 Chicken (800gr, 1400gr.) | ||
| A08 | Lamb or beef, roasted meat (200 gr, 600gr) | |
Example: Preparation of a roast beef of 600 grams.
- Place the piece of veal in the oven and the necessary ingredients in a suitable container.
- Press the 5 (Auto/Cook) button repeatedly to select the food code. In this case, choose the option "A08" (Lamb or beef).
- Turn control 6 (Menu/Time/Weight) to the right and choose the weight (600 grams) and press button 8 (Start/+30) to confirm.
- Press the start button 8 (Start/+30), the display will show the required operating time and immediately the oven will start working and start the countdown.
- Once the operating time has finished, the oven will turn off, an acoustic signal will alert you that the process has concluded.
Notes:
- When cooking large foods, we advise you to turn them around halfway through the process, this way you will get them to cook evenly.
- The cooking result will depend on the thickness, size and type of food or ingredients as well as their placement in the container. For this reason, on some occasions, once the process is finished, it may be necessary to add additional time to obtain the proper result.
GRILL FUNCTION
The grill function will allow you to quickly toast and gratin food, being an ideal complement to the microwave. A metal grill is supplied with the microwave oven.
To use it, proceed as indicated below:
- Place the rack 10 on the glass plate.
- Place the food on the rack 10 and close the door.
- Press button 3 (Grill/Combi.) once..
-
Turn the control 6 (Time/Weight) to the right or to the left to respectively increase or decrease the operating time, the maximum time is 95 minutes.
-
Press the start button 8 (Start/+30), the oven will start in grill mode and start the countdown.
- Once the operating time has finished, the oven will turn off and an acoustic signal will alert you that the process has concluded.
Notes:
- Some foods can expel fat, to collect it, previously place a suitable container on the glass plate.
- In order to obtain a homogeneous result, we recommend that you turn or stir the food halfway through the process.
- During grill mode operation, the door glass and oven top cover may reach high temperatures, this is normal and does not imply a malfunction. Be extremely careful not to touch the glass of the oven door and avoid touching its surface. Always use oven mitts when handling containers that have been in the oven.
COMBINED MICROWAVE AND GRILL MODE
This function allows the combined operation of the oven in microwave mode and in grill mode alternately, to cook quickly and toast or gratin at the same time. Microwaves heat the inside of the food while grilling heats the outside.
The microwave oven has two modes of combined operation:
Combi. 1: Suitable for fish, potatoes, gratins, etc. Operating time is 30% for microwave and 70% for grill.
Combi. 2: Suitable for pudding, omelettes, baked potatoes, etc. Operating time is 55% for microwave and 45% for grill.
- Place the rack 10 on the glass plate.
- Place the food on the rack 10 and close the door.
- Depending on the type of food to be cooked, press button 3 (Grill/Combi.) twice to choose Combi 1 mode or press this button three times to select Combi 2 mode, the display will show the indication "CO-1" or "CO-2" respectively.
- Turn control 6 (Time/Weight) clockwise or counterclockwise to respectively increase or decrease the run time. The maximum time is 95 minutes.
- Press the start button 8 (Start/+30), the oven will start in the chosen grill mode and the countdown will begin.
- Once the operating time has finished, the oven will turn off and an acoustic signal will alert you that the process has concluded.
Notes:
- Some foods can expel fat, to collect it, previously place a suitable container on the glass plate.
- During combined mode operation, the door glass and oven top cover may reach high temperatures, this is normal and does not imply a malfunction. Be extremely careful not to touch the glass of the oven door and avoid touching its surface. Keep children away from the oven and do not neglect their supervision.
- Use oven mitts whenever you handle containers that have been in the oven.
PROGRAMMABLE AUTOMATIC CONNECTION
The automatic connection is a very useful function that will allow you to program the start of the oven at the desired time, in this way you can have the food cooked, reheated or defrosted at a specific time. For programmable automatic connection, make sure you have previously set the clock time and proceed as indicated below:
- Place the food on the glass plate or the wire rack 10 (depending on the desired operating mode).
- Choose the operating mode (microwave, grill, etc.) in which you want the appliance to start automatically. In microwave mode you must choose the power using button 2 (Power/Level)
- Rotate control 6 (Time/Weight) clockwise or counterclockwise to select the desired run time.
- Press button 4 (Clock/Preset) and the display will show the digits corresponding to the hour flashing. Turn control 6 (Time/Weight) to the left or right and choose the time for automatic connection.
- Once the hour for automatic connection has been set, press button 4 (Clock/Preset) and the display will flash the digits corresponding to the minutes. Turn control 4 (Time/Weight) to the left or right and choose the minutes for automatic connection.
- Press button 4 (Clock/Preset) again to confirm.
- When the clock strikes the programmed time, the oven will start operating in the chosen mode and the display will show the countdown of the set time.
Notes:
- Once automatic connection is programmed, the connection time can only be checked by pressing button 4 (Clock/Preset).
- In the event of a power failure, the current time as well as the automatic switch-on time will be deleted.
MULTIPLE OPERATION
The multiple operating mode consists in the fact that up to three different operating modes or sequences can be programmed for the same process.
Notes:
Some foods may require a microwave power at the beginning of cooking and then finish the process with a different power (higher or lower), on other occasions it may be necessary to defrost the food before cooking, or end with the mode grill to toast or gratin.
To activate the multiple operation mode, proceed as follows:
Example: Start in microwave mode and finish the process in grill mode
-
Open the oven door by pulling the handle towards you, put the food in a suitable container and close the door by pressing gently on it.
-
Repeatedly press button 2 (Power Level) to select the desired power for microwave mode.
- Turn the control 6 (Time/Weight) to the right to select the operating time in microwave mode.
- DO NOT press the start button 8 (Start/+30)
- Press button 3 (Grill/Combi.).
- Turn control 6 (Menu/Time/Weight) to the right to select the operating time in grill mode.
- Press the start button 8 (Start/+30) and the oven will start operating in microwave mode, after the programmed time for microwave mode has finished, it will automatically switch to grill mode and once the previously selected time has finished, the oven it will turn off and an acoustic signal will notify you that the process has finished.
MAINTENANCE AND CLEANING
Before proceeding with cleaning, disconnect the unit from the mains. In the case of having used the grill, make sure that the oven is totally cold.
Do not use alcohol or abrasive products and do not allow the appliance to come into contact with volatile agents such as gasoline, solvents, insecticides, etc.
Cleaning inside
- It is recommended to wipe food or liquid splashes with a damp cloth immediately after each use.
- If the inside of the microwave is very dirty or has bad odors, put a container with water and lemon juice on the glass plate, operate the oven in microwave mode at maximum power for 4 minutes. The steam will soften any dirt, then wipe and dry the interior with a soft cloth.
- Do not clean the interior with a spray or spray and avoid getting water into the hole of the swivel.
- Clean the glass plate and the turntable with detergent or in the dishwasher..
Cleaning outside
- Clean the outside with a damp cloth, followed by a dry one.
- Avoid getting water through the ventilation holes.
- Always keep the door clean on both sides and the closing joints. Clean these parts with a damp cloth in warm, soapy water. Then dry them carefully.
- Open the oven door before proceeding to clean the control panel, to prevent it from starting unintentionally, then clean the front panel with a damp cloth and dry it with a dry one.
TECHNICAL CHARACTERISTICS
Supply voltage 230 V \~ 50 Hz
Maximum consumption microwave mode 1200 W
Maximum consumption grill mode 900 W
Microwave power 700 W
Microwave Frequency 2450 MHz
Capacity 20 liter
Dimensions:
External 382 x 595 x 329 mm (l, w, height)
Oven cavity 198 x 315 x 297 mm (l, w, height)
Approximate weigh 12,6 Kg
Technical specifications attached to change without notice.
This product complies with European Directives 89/336/CEE (EMC) on Electromagnetic Compatibility and 73/23/CEE (LVD) on low voltage safety, both modified by Directive 93/68/CEE.
"MX, MX ONDA" and its logos are registered trademarks of MX ONDA, S.A.
MX ONDA, S.A.
C/Matabueyes, 7 nave 1A
19171 – Cabanillas del Campo
(Guadalajara, Spain)
information phone
And Technical Service: 902 551 501
E-MAIL: info@mxonda.es
http://www.mxonda.es
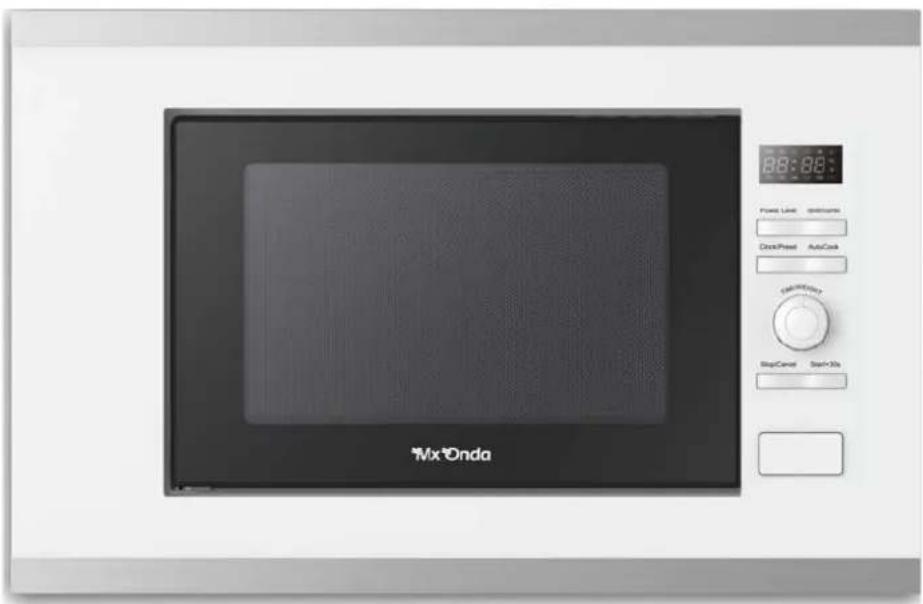
MANUAL DE INSTRUÇÕES
Mx Onda
FORNO MICROONDAS EMBUTIDO COM GRELHADOR SIMULTÂNEO
MODELO: MX-MW2620
text_image
Mx Onda 88:88 Power Line 0000ms Clock/Panel AutoCook Control Panel Stop/Cancel Start/NoCE
ANTES DE USAR, LEIA ATENTAMENTE ESTE MANUAL
ATENÇÃO
text_image
nça ① ② ③ ④ ⑤ ⑥ ⑦ ⑧ ⑨Observação:
(Guadalajara, Spain)
MANUEL D'INSTRUCTIONS
Mx Onda
FOUR MICRO-ONDES ENCASTRABLE AVEC GRIL SIMULTANÉ
MODÈLE: MX-MW2620
text_image
Mx Onda 88:88 Power Line 0000ms Clock/Panel AutoCook Control Panel Stop/Cancel Start/NoCE
AVANT UTILISATION, LIRE ATTENTIVEMENT CE MANUEL
ATTENTION
(Guadalajara, Spain)
natural_image
Exterior view of a Mx Onda microwave oven with control panel and digital display (no text or symbols on main body)CE
PRIMA DELL'USO, LEGGERE ATTENTAMENTE QUESTO MANUALE
ATTENZIONE
text_image
Labeled diagram of a microwave oven with numbered components for identificationNota:
(Guadalajara, Spain)
(Guadalajara, Spain)
Informationstelefon