EQ2-700X - Lawn mower MURRAY - Free user manual and instructions
Find the device manual for free EQ2-700X MURRAY in PDF.

User questions about EQ2-700X MURRAY
0 question about this device. Answer the ones you know or ask your own.
Ask a new question about this device
Download the instructions for your Lawn mower in PDF format for free! Find your manual EQ2-700X - MURRAY and take your electronic device back in hand. On this page are published all the documents necessary for the use of your device. EQ2-700X by MURRAY.
USER MANUAL EQ2-700X MURRAY
natural_image
Black-and-white photo of a Murray lawn mower with visible blades and mounting bracket (no text or symbols)CE

text_image
Grid of 24 occupational and safety symbols with numbered labels, including warning signs, pictograms, and hazard icons.A

text_image
MURRAY® EQ2-700X 2,61 kW 2 900/min 750EX DOV SERIES max 9,5 Nm 2 400/min 56 cm CE 2022 NAC Sp. zoo. al. Krakowska 39 05-090 Rossyn Poland www.murray.com 161 cm³ kg
text_image
LWA 98dBB
C
text_image
Collection of safety and hazard symbols including hand protection, warning sign, water drop, and Pb symbolD
text_image
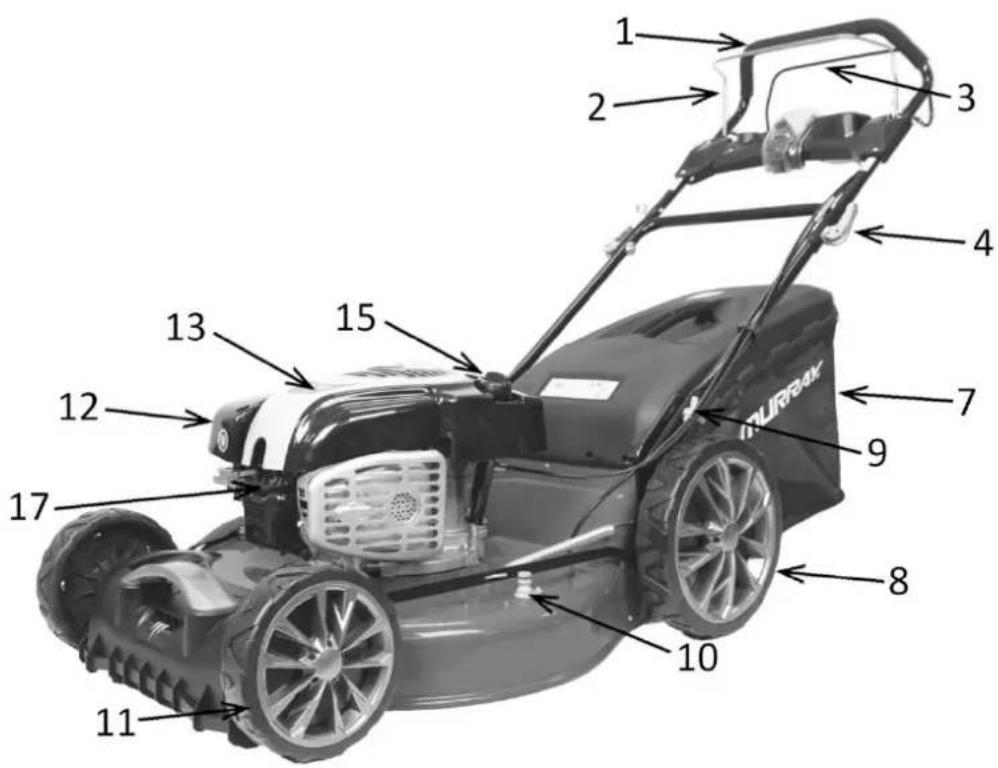
1 2 3 4 7 9 8 10 11 12 13 15 17 UNIRPAKFig. 1
text_image
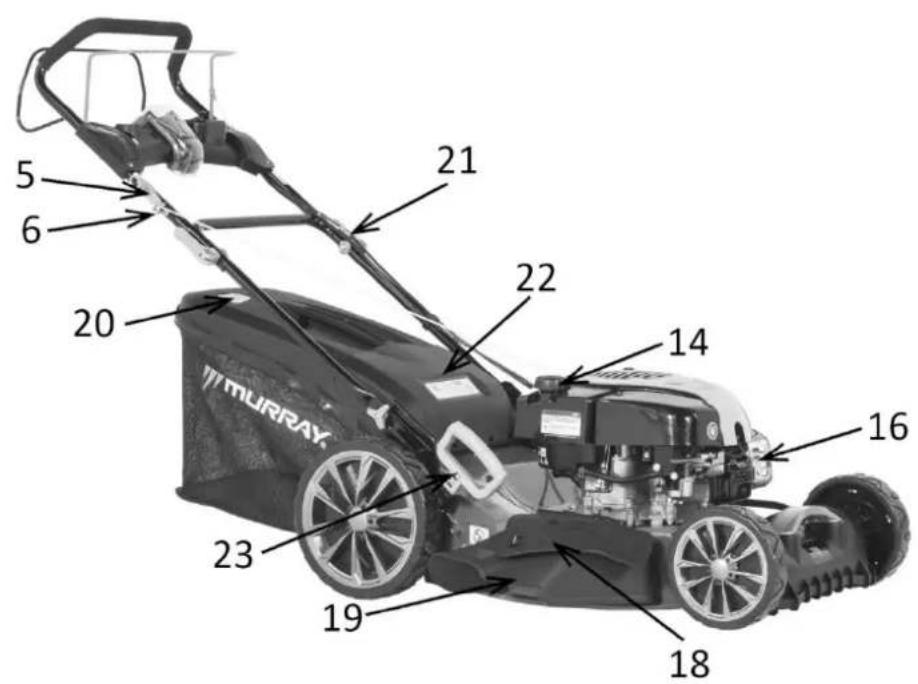
5 6 20 21 22 14 16 18 19 23 MURRAYFig. 2
natural_image
Close-up of a black lawn mower with visible components and wiring (no text or symbols)Fig. 3 Fig. 4
text_image
1 2 3
natural_image
Close-up of a person using a lawn brush and hood assembly (no visible text or symbols)Fig. 5 Fig. 6A
natural_image
Close-up of a hand using a power tool to clean or adjust a mechanical component (no visible text or symbols)
natural_image
Close-up of a car hood with a hand adjusting the engine compartment, showing no visible text or symbols.Fig. 6B Fig. 7A
natural_image
Close-up of a hand adjusting a mechanical component with visible OH logo (no text or symbols)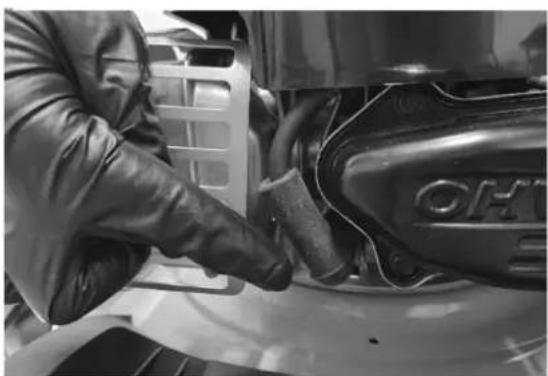
natural_image
Close-up of a person cleaning the engine compartment of a vehicle (no visible text or symbols)Fig. 7B Fig. 8A

natural_image
Close-up of a hand gripping a black bicycle brake lever (no text or symbols visible)
natural_image
Close-up of a hand gripping a black bicycle brake lever (no text or symbols visible)Fig. 8B Fig. 8C

natural_image
Close-up of hands gripping a bicycle frame and mechanical components (no visible text or symbols)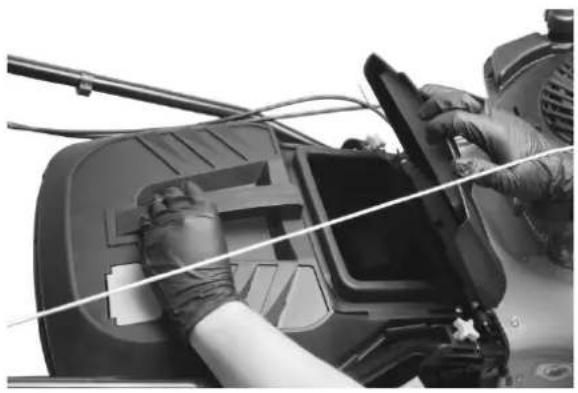
natural_image
Close-up of hands installing or adjusting a mechanical component with a tool (no visible text or symbols)
natural_image
Close-up of a black motorcycle rear bumper with visible tire and attached plastic clip (no text or symbols)Fig. 9 Fig. 10

natural_image
Close-up of a gloved hand adjusting a black automotive hood cover (no text or symbols visible)Fig. 11A Fig. 11B

natural_image
Close-up of a black plastic car hood with visible structural ribs and side blades (no text or symbols)
natural_image
Close-up of a black and white lawn mower with visible blades and wiring (no text or symbols)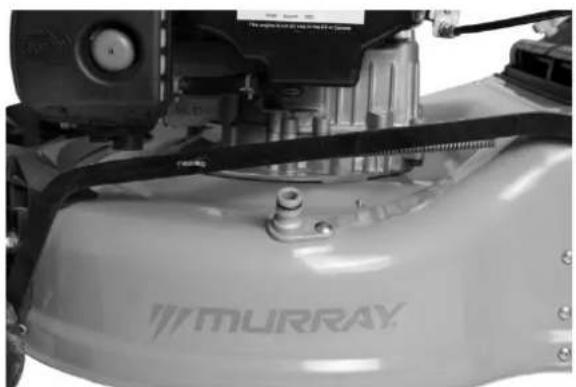
natural_image
Close-up of a utility vehicle's roof and exhaust pipe, featuring 'MURRAY' branding on the hood (no other text or symbols visible)Fig. 12 Fig. 13
natural_image
Close-up of a lawn mower with visible mechanical components and a hand icon (no text or symbols)Fig. 14A
Fig. 14B
natural_image
Close-up of a gloved hand inserting a plug into a mechanical component (no visible text or symbols)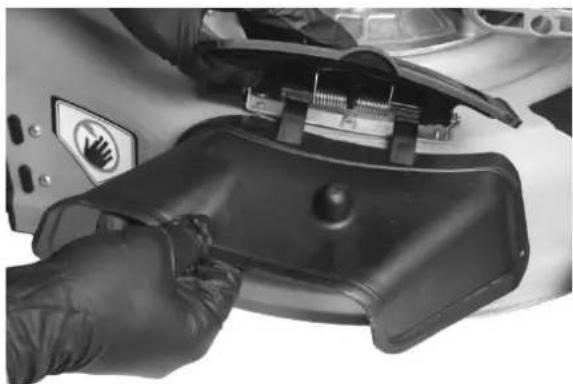
natural_image
Close-up of a hand using a handheld device to adjust or install a mechanical component (no visible text or symbols)Fig. 14C
Fig. 14D
natural_image
Close-up of a gloved hand holding a black automotive component with visible engine and fan (no text or symbols)
text_image
Technical diagram of a mechanical assembly with numbered components for identificationFig. 15A
Fig. 15B
text_image
A D B C
natural_image
Close-up of a gloved hand adjusting a mechanical component with visible 'OHV' branding (no text or symbols on the main subject)Fig. 16A
Fig. 16B

text_image
0,51 mm M92306
natural_image
Black and white photo of a lawn mower with visible blades and wheels (no text or symbols)Fig. 17
Fig. 18A

natural_image
Close-up of a lawn mower with visible blades and engine components (no text or symbols)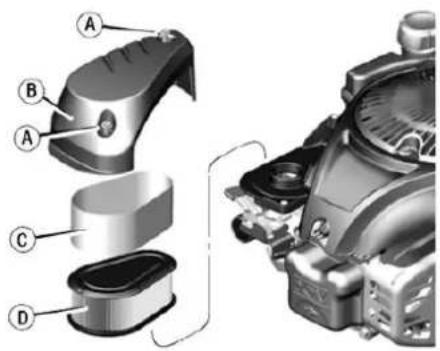
text_image
Technical diagram of a mechanical assembly with labeled parts A, B, C, D showing internal components and assembly details.Fig. 18B
Fig. 19
text_image
Instructional diagram showing two hands holding a tool with labeled parts 1 and 2, indicating a step in the process.
text_image
25 24Fig. 20
Fig. 21
text_image
26 27 25
text_image
Exploded view diagram of a mechanical assembly with numbered parts for identificationFig. 22

EN English 10 - 31
(User manual and warranty card)
DE Deutsch 32 - 55
Warning! Before assembly or operating, read the Operator's Manual.
The device is intended for household areas.
Using the device for professional, semi-professional or commercial purposes voids the warranty.
Original opera on manual, edi on 1/2022
This manual should be treated as an integral part of the device. It should be stored in the place provided for it so that it is easily accessible. Remember to pass on the opera on manual to a new owner or user if the device is resold or transferred to another person.
TABLE OF CONTENTS
| Table of contents | 10 | |
| Technical data | 11 | |
| Descrip on of graphic pages and pictograms | 11 | |
| Safety rules for machines and devices with internal combust on engine | 12 | |
| General safety regula ons | 12 | |
| Detailed safety regula ons | 15 | |
| Safety and producer's liability | 18 | |
| Residual risk | 18 | |
| Usage | 18 | |
| Preparing for opera on | 18 | |
| Construc on of a lawn mower | 19 | |
| Opera on | 21 | |
| Maintenance | 23 | |
| Transporta on | 25 | |
| Problems review and diagnosis | 26 | |
| Warranty and service | 27 | |
| Declara on of conformity | 28 | |
| Warranty condi ons | 30 | |
| Warranty card | 31 | |
TECHNICAL DATA
| Type, model | EQ2-700X |
| Engine | B&S 750EX DOV |
| Engine type | single cylinder, four-stroke, air-cooled, DOV |
| Fuel | unleaded petrol 95 Pb |
| Engine capacity | 161 cc |
| Machine rated power | 2,61 kW – 2900 rpm |
| Maximum torque | 9,5 Nm – 2400 rpm |
| Maximum rota on speed | 2900 rpm |
| Fuel tank capacity | 1 L |
| Oil pan capacity | 0,6 L |
| Housing | steel |
| Basket capacity | 75 L |
| Cu ng width | 56 cm |
| Cu ng height | 25-75 mm, 6 steps |
| Guaranteed sound power level LWA | 98 dB (A) |
| Sound pressure (acous c pressure) LpA | LpA=82,5 dB (A), K=3 dB (A) |
| The value of vibra ons transmi ed by the machine and ac ng on the operator's upper limbs | ahv=5,569 m/s ^2 , K=1,5m/s ^2 |
| Equipment mass | 34,1 kg |
| Year of manufacture | 2022 |
The device includes:
- lawn mower,
- basket,
- bolts, nuts,
-
opera on manual,
-
warranty card,
- guarantee condi ons,
• EC declara on of conformity.
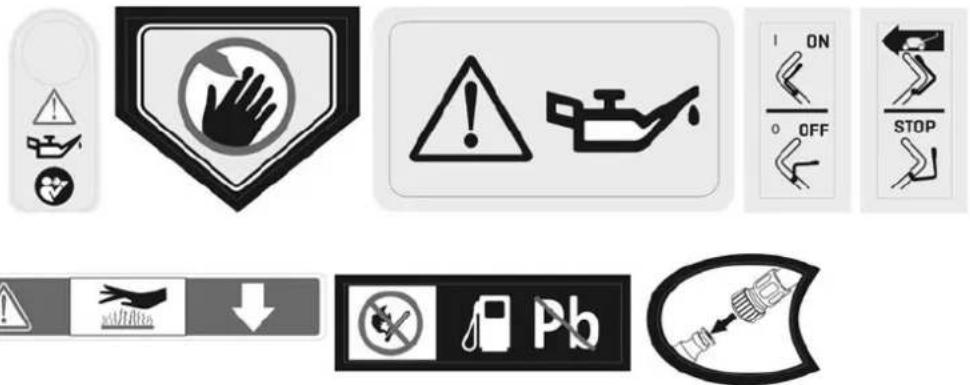
DESCRIPTION OF GRAPHIC PAGES AND PICTOGRAMS
Pictograms pages 2.A
- A en on! Danger. Cau on.
- Important! Read the opera on manual and follow the warnings.
- Danger of injury from objects thrown out by the working machine. Keep away from unauthorized persons.
- Keep a safe distance from buildings.
- Do not cut grass on slopes towards slopes.
- Note: Disconnect the high-voltage pipe from the spark plug before maintenance and / or repair.
- Keep out of the reach of children.
- It is prohibited to work in the rain.
- Note: Keep hands and feet away from the knife blades.
- Never work with the eject on ap raised. Objects picked up by the mower blade can be dangerous.
- Check and clean the area before star ng work.
- Keep unauthorized persons away from the working mower.
-
Note: Keep hands and feet away from rota ng parts.
-
Before cleaning, repairing / checking the machine, make sure that the blade and all moving parts have stopped.
- Risk of re or explosion. Gasoline is highly ammable.
- Note: A hot surface can cause burns.
- Wear safety goggles.
- Wear ear protec on.
- Use protec ve gloves.
- Wear protec ve footwear
- A en on! Four-stroke engine, do not mix gasoline and oil. The machine has two separate tanks and oil and petrol llers.
- The blade rotates for a few seconds a er switching o the mower. Do not move the mower whose blades are not completely stopped.
- Note: Exhaust gases are harmful to health. There is a danger of poisoning or su oca on. Do not use the device indoors.
- Do not dispose of used equipment. It is the user's responsibility to hand over used equipment to a designated collect on point for waste recycling.
OTHER MARKINGS ON THE MACHINE
- Name plate (page 2.B)
- The type plate is located on the rear of the mower housing. The informa on on the plate is necessary to determine the appropriate spare parts and service ac vi es
- Guaranteed sound power level (page 2.C)
- Warnings and other labels (page 2. D)
SAFETY RULES FOR MACHINES AND DEVICES WITH COMBUSTION ENGINE

Warning!
- Read this manual thoroughly. Familiarize yourself with the safety regula ons and with the control systems and the principles of proper use of the device.
- Failure to observe the following warnings and safety instructons may result in electric shock, re and / or serious injury.
- Retain this opera on manual for reference.
- This equipment is not intended for use by persons (including children) with reduced physical, sensory or mental capacity or without experience or knowledge of the equipment, unless supervised or in accordance with instructons for use given by persons responsible for their safety.
- Do not allow the device to be used by children, adolescents up to 16 years of age and people not acquainted with the device's opera on manual.
GENERAL SAFETY REGULATIONS
WORKING AREA SAFETY
- Ensure good ligh ng and order in the workplace. Clu ered and dark areas contribute to accidents.
- Keep children and observers away from places where devices with an internal combust on engine are used. Distrac ons can cause lose of control of the device. Garden equipment should be le away from unauthorized persons.
- The operator or user is responsible for accidents or hazards occurring to other people or the environment.
SAFETY DURING WORKING WITH FUEL
- The internal combust on engine is designed to run on gasoline or a fuel mixture (see type of fuel in the device's technical data).
• Gasoline should be stored only in specially prepared containers (canisters). - Store gasoline away from factors that could cause a re, e.g. bon res, open ames, where there is electric sparking, elevated temperature, welding sparks or other heat sources that can cause fuel to ignite.
- The fuel tank should only be lled outdoors.
- It is extremely dangerous to smoke cigarette or use openames when the machine is running or when lling the fuel tank.
• Always turn the engine o and cool before lling the tank with fuel. - Do not ll the tank above the lower edge of the ller neck, gasoline has a high thermal expansion.
- If you spill fuel, immediately wipe up spilled gasoline with a dry cloth.
- When lling the fuel tank, be careful not to spill fuel on clothing. Gasoline-soaked clothing can catch re and should be changed immediately.
- A er lling the tank with fuel, ghten the cap ghtly and before star ng the engine, move the fuel canister to a place at least 3 m away from the place where the lling was carried out.
- Before star ng the engine, check the ghtness of the en re fuel system, especially the fuel tank, fuel lines, connectors,ller cap and carburetor area. Do not start the engine if you detect a leaking fuel system as it may cause a re.
- The device should not be operated in explosive atmospheres, which form ammable liquids, gases or dust. The internal combust on engine may create sparks which may ignite the dust or fumes.
- Do not use the device if you have trouble turning it o. Any device that cannot be turned o is dangerous and must be repaired.
- Do not store the device with lled fuel tank indoors. Gasoline vapors are ammable and dangerous to health.

Cau on!
- Avoid breathing gasoline vapors and exhaust fumes. Gasoline, gasoline vapors and exhaust fumes can cause poisoning.
- Do not operate the device in closed or poorly ven lated rooms. In case of headache, nausea, hearing or vision impairment, stop work immediately.
PERSONAL SAFETY
- Be foresigh ul, watch what you do, and use common sense when working with the equipment. Do not use the equipment when you are red or under the in uence of drugs, alcohol or medica on. A moment of ina en on during work can cause serious personal injury.
- Protec ve equipment should be used. Always wear safety glasses. Wearing protec ve equipment such as a dust mask, non-slip shoes, helmet or hearing protectors under the right condi ons will reduce personal injury.
- Before star ng the equipment, remove all objects and keys. Leaving the key in the rota ng working part of the machine can cause personal injury.
- Do not lean too far. You should always stand rm and balance. This will allow be er control in unpredictable situa ons.
- Dress properly. Do not wear loose clothing or jewelry. Keep your hair, clothing and gloves away from moving parts. Loose clothes, jewelry or long hair can be caught in moving parts.
- When working, hold the tool by the additional handles if the tool is equipped with them. Losing control of the tool carries the risk of injury.
- Do not use the device if you have trouble turning it o . Any device that cannot be turned o is dangerous and must be repaired.

Cau on! Despite the use of a safe structure by design, the use of protec ve measures andonal protec ve measures, there is always a residual risk of injury during work.
USE AND CARE FOR EQUIPMENT
- Do not overload the tool. Use a tool with the power appropriate for the work. Properly selected equipment will enable be er and safer work under the load for which it was designed.
- Store the unused equipment out of the reach of children. Do not allow people not familiar with the tool or this manual to use the equipment. Internal combust on tools and equipment are dangerous in the hands of untrained users.
- Internal combust on tools must be maintained. Check alignment or jamming of moving parts, cracked parts and all other factors that may act the opera on of the device. If damage is found, the equipment must be repaired before use. Many accidents are caused by improper repair and/or maintenance of the equipment.
- Before using the device, replace all defective, worn and damaged parts. Replace with new warning signs on the device if they become illegible or damaged.
- Warning decals and spare parts can be ordered from Murray service and authorized dealers.
- An internal combust on tool, equipment, working tools etc. should be used in accordance with these instructors, taking into account the conditions and the type of work to be performed. Using the device in a manner not intended for it may be dangerous.
OPERATION AND EXPLOITATION OF TOOLS EQUIPPED WITH A BATTERY
- Before inser ng ba eries into the tool, make sure that its on / o switch is in the "o" posi on. Inser ng the ba eries into the device when the on / o switch is in the "on" posi on can cause serious injury.
- Use only the charger recommended by the manufacturer. Using a charger to charge other types of batteries may cause a re.
- Never use ba eries other than those recommended by the manufacturer. Use of other ba eries may result in serious injury or re.
-
When the device is not in use, remove the ba ery. The ba ery should be kept away from metal objects such as paper clips, coins, nails, screws, etc., which may short-circuit the ba ery terminals. Shoring the ba ery terminals together may cause burns or a re.
-
Under extreme conditions, liquid may escape from the battery. You must avoid contact with it. If it accidentally it comes into contact with liquid - rinse immediately with water. If liquid gets in your eyes, contact your doctor immediately. Liquids leaking from the battery may cause irritation or burns.
- It is forbidden to use chargers and power supplies outside the rooms and in rooms with high humidity such as bathrooms or basements.

Cau on! Chargers and power supplies for battery devices are intended for indoor use in a dry environment. Danger of electric shock and / or damage to the device.
REPAIR
- Before carrying out any adjustment, part replacement or storage, the spark plug wire must be removed. Such preven ve safety measures reduce the risk of accidental star ng.
- Repair should be performed by a qualified person using only original spare parts. This will ensure further safe opera on of the device. It is recommended to have any service performed by an authorized MURRAY service center.

Cau on! Danger of su oca on when children play with the packaging. The packaging, especially the foil bag, should be stored out of the reach of children.
DETAILED SAFETY PROVISIONS FOR MOWERS

Warning!
- Beware of sharp knife edges. The blades rotate even a er the engine has been turned o .
- You can only use the chain saw in good technical condi on, perform the necessary ac ons if necessary or contact the service center. It is recommended to use the services of an authorized MURRAY service.
- Before star ng, check if:
– the device is assembled according to the opera on manual;
- the cu ng tool and the whole cu ng unit (three-armed knife or head with a cu ng line, fastening elements, construc on of the cu ng unit) are in good technical condi on; regularly check their a achment, damage and wear (depressions, cracks);
- safety devices (e.g. ejector cover, housing, steering handle, engine brake lever) are in good technical condi on and work properly;
- the grass catcher is undamaged and correctly mounted, you cannot use a damaged grass basket.
- The mower must not be switched on unless the blade is correctly mounted. Danger of dangerous vibra ons!
- Cu ng tools should be sharp and clean. Properly keeping sharp edges of cu ng tools reduces the likelihood of jamming and simpli es handling.
- Before adjustment, cleaning, maintenance, switch o the device and remove the high voltage cable from the spark plug.
- Do not mow when other people, especially children or pets, are nearby.
- Do not start a damaged mower.
- Do not touch the knives until the equipment is turned on and the knives do not stop completely.
- Do not li or carry the device with the engine running.
- Turn o the mower and remove the high voltage cable from the spark plug when:
- you leave the equipment una ended,
– before adjusting the lock,
– before checking, cleaning or repairing the device, - a er hi ng with a foreign object,
– before cleaning the outlet, - if excessive vibra on occurs.
PREPARATION
- When mowing, always wear solid footwear and long pants, do not operate the device without shoes or wearing sandals.
- Check carefully the area where the device will work and remove all stones, branches, wires, bones and other foreign objects.
- In high grass, you may not no ce obstacles (e.g. stumps, roots), so before starting work with the device, mark all obstacles hidden in the grass that cannot be removed.
- Always check the blades, bolts and knife assembly for wear and damage before use. Replace worn or damaged knives and bolts in pairs to maintain balance.
- In the case of mul -knife devices, be careful, because the rota on of one knife may cause the rota on of other knives.
KNIFE SHARPENING
-
To ensure op mal working condi ons for the mower, the machine's knife should be sharpened. This seemingly simple opera on must be carried out with special care. It requires a lot of technical knowledge and necessary service equipment. The manufacturer is not responsible for any damage to the mower related to improper knife sharpening.
The recommended angle is 30^ . -
It is safe to have the knife sharpened by an authorized MURRAY service center.
- Before sharpening, the mower should be turned o , allow the engine to cool down, remove the high voltage cable from the spark plug, if necessary remove the ba ery and unscrew the knife.
- The knife can be sharpened manually, using a whetstone or a suitable metal le, it is preferable to sharpen with a professional sharpener, all the me bearing in mind that the blade may overheat, thus it will not be suitable for work. It is recommended to use liquid coolant for metalworking, it is permissible to use water all the me, bearing in mind that not all sharpening machines can work in the coolant stream. The blue surface of the blade indicates damage to the knife, which should no longer be used.
- A er each sharpening, the knife must be balanced. If the user does not have a balancing machine and the appropriate knowledge, it is necessary to return the knife to a specialized service for balancing. Working with an unbalanced knife causes excessive vibra on and, as a consequence, may cause loosening of the screw connec ons of the en re device, including the knife a achment screw, which may be dangerous to the health and life of the user.
USAGE
- Mow only in daylight or in good ar cial light.
-
Do not mow during rain, especially during a storm. Avoid mowing wet grass.
• Always make sure that your legs stand rmly on the slope. -
Come on, never run. Remember to keep a secure posi on.
- Mow across slopes, never up or down.
- Be very careful when changing the direc on of travel on a slope.
- Do not mow on excessively sloping slopes.
- Pay special a en on when reversing or pulling the device towards you.
- Turn o the machine if it is to be lted or when moving it over non-grass surfaces and when transporting it to the mowing site and back again.
- Before transporting the mower, cool the engine, drain fuel and oil.
- Do not use the device with damaged covers or housings or without safety devices, e.g. a ached covers and / or grass containers.
- Start the engine according to the instruc ons, making sure that the feet are away from the cu ng tools.
- Do not start the mower when it is lted, unless it is necessary to start in high grass. In this case, press the handle to li the front of the machine, but only as much as is necessary, and then slowly lower the mower to the ground. Make sure that both hands hold the handle securely throughout the opera on.

A en on! The B&S engines cannot operate on a slope above 15°.
- Do not keep your hands and feet near rota ng parts. For rotary mowers, make sure that the discharge opening is not blocked at all mes.
- When star ng the powered mower, do not pull on the drive start lever.
MAINTENANCE AND STORAGE

Warning!
- Before carrying out any repair or maintenance opera ons, make sure that the mower has the spark plug high voltage cable removed and there are no children or third par es nearby.
- Remember that there may be fuel in the machine's tank. Safety rules for handling fuel are described in this manual in the sec on "Safety in handling fuel".
- Keep all nuts, bolts and screws in good condi on to make sure that the device will work safely. Check the grass container o en for wear or damage.

Make sure you use the right type of knives.
A er nishing work, the mower should be cleaned. The fuel tank must be empty. Place the mower on the handle (spark plug up). Use a brush to clean the inside of the mower housing from grass and dust, and possibly protect metal parts with an -corrosive agents. You can clean the en re mower with a damp cloth and, if necessary, protect it with varnish paste.
The mower must be stored in a well-ven lated room in a dry, dust-free place. Check that the grass basket is empty and properly cleaned. Ro ng grass can damage the basket.
Only a func onal mower should be stored, if necessary, the faults must be rec ed before storage. If the mower is equipped with a ba ery, remember that the op mal storage condi ons for the ba ery are 10 to 21°C, low humidity, 50% charged battery.
IN CASE OF AN ACCIDENT OR FAILURE
In the event of an accident, stop / turn o the machine immediately and call for help (if required). In the event of a fault, stop / turn o the machine and contact an authorized service center to avoid the fault.
SAFETY AND PRODUCER'S LIABILITY
Any use of the mowers, other than described in this manual is considered improper and the manufacturer is not liable for any damage or damages resulting from such a procedure.
Proper use also includes respec ng the opera ng, maintenance, storage and repair condi ons established by the manufacturer.
To prevent accidents, all safety precautions and hazard avoidance must be followed.
Any changes in the construc on of the device made by the user may a ect the safety of use of the machine and release the manufacturer from liability for damage or injuries.
RESIDUAL RISKS
Despite the fact that the machine manufacturer bears responsibility for its construc on eliminating danger, certain elements of risk during opera on are unavoidable. The residual risk arises from the erroneous behavior of the machine's operator.
The greatest danger occurs when performing the following prohibited ac vi es:
• use of the device by children,
- use of the machine for other purposes than described in the Opera on Manual,
- when other people, especially children or animals are nearby,
• use of the device by people not acquainted with the opera on's manual,
• using the device without proper, protec ng opera ng clothing and footwear protec ng foot,
• using the device with damaged covers or casing and without properly installed safety devices.
When observing the instructions in the operating manual, the residual hazards of using the machine may be eliminated. There is a risk in case of failure to comply with the above recommendations.
USAGE
The device is intended only for mowing lawns in accordance with the descrip on and safety rules contained in these instruc ons for use. Other applica ons may be dangerous to users and may cause damage to the equipment.
The machine should not be used to:
• collecting leaves or cleaning the area of dry plants,
• leveling molehills,
- cu ng bushes,
- chopping branches.
PREPARING FOR OPERATION
The mower is supplied by the manufacturer in a cardboard packaging in a par ally disassembled state. A er reading the opera ng manual and assembly drawings, it should not be too di cult to assemble the mower. All necessary components for assembly are included in the packaging. This
opera on manual applies to various models of mowers. The mower described may die from your purchase. Read the passages that refer to the device model you have.
CONSTRUCTION OF PETROL MOWER
Illustra ve drawings can be found on page 3, Fig. 1-2
1 Handle
2 Engine brake lever
3 Drive lever with line
4 Clamp lever
5 Starter handle with cable
6 Starter cable a achment point
7 Basket
8 Rear wheel
9 Handle connec on nut with housing
10 Water cleaning system connec on
11 Front wheel
12 Air Iter cover
13 Engine
14 Fuel-ller cap
15 Oil ller cap
16 Mu er
17 Spark plug pipe
18 Side discharge cover
19 Side discharge chute
20 Basket full indicator
21 Cable adjustment
22 Grass ejec on cover
23 Cu ng height adjustment lever
ASSEMBLY
The mower handle is factory set in the storage posi on.
- Set the lower handle to the use posi on, making sure that the handle is between the stops and ghten it with the wing nut (Fig. 3).
- Set the upper handle to the use posi on and lock it with the clamping lever. Turning the nut changes the length of the clamping lever bolt, thus increasing or reducing the clamping force. Fastening occurs when the clamp is pressed against the handle in the direc on of the arrow on Fig. 4.

A en on! Too short the bolt with a nut may cause the clamping lever not to be ghtened, and consequently damage the lever.

A en on! When unfolding and folding the handle, make sure that the engine brake cable does not break or bend. A bent or otherwise damaged cord may prevent the mower from working properly.
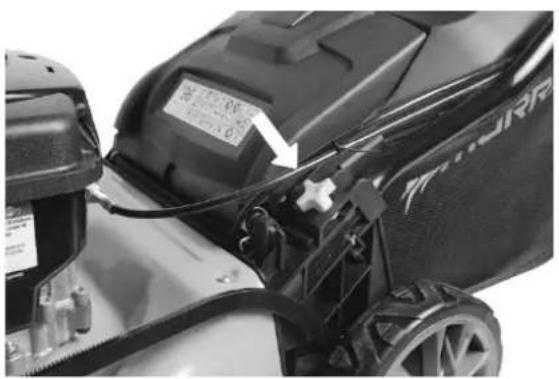
- Fasten the starter rope handle 5 (Fig. 2) at the a achment point 6 (Fig. 2).

A en on! The starter rope extends with resistance. Pull the engine brake lever towards you and slowly pull the cable out to the necessary length. Remember that pulling the starter cord vigorously can start the mower.
FILLING THE ENGINE WITH OIL
The engine is not lled with oil at the factory. There may be traces of oil remnants in the engine a er factory inspec on. Before rst start-up, pour approximately 0.6L of recommended B&S SAE30 engine oil (Fig. 6A), checking its level on the dips ck integrated with the oil ller cap (Fig. 6B).
The oil level must be between the lines: min. / max.
Original engine oil for B&S SAE30 for lawn mowers is recommended.
The rst oil change should be carried out a er 5 hours of mower opera on, a er burning about two fuel tanks. The next oil changes should be carried out every 25 hours of work, but at least once a year.
Drain the used oil while the engine is s ll hot.
Regularly check the oil level before each use.
If necessary, top up oil.

A en on! Used oil should not be disposed of by accident, dispose of it in the sewage system or directly into the environment. Take it to an oil disposal point.
REFUELING
- Before using, familiarize yourself with the safety, use, handling and storage principles contained in this Opera on Manual.
- Fuel should be poured outside, in a place where there is no risk of sparks or ames.
- Gasoline should only be stored in suitable containers (canisters) that are approved. Check the condition of fuel storage containers regularly.
- Fuel tanks must be securely closed. For safety reasons, replace damaged fuel ller caps.
- Do not use beverage bo les or similar to store consumables, e.g. fuel or oil, as other people, especially children, could drink from them.
- The fuel tank should only be lled outdoors; do not smoke while refueling.
- Gasoline should be topped up before star ng the internal combust on engine.
- Do not unscrew the fuel tank cap or add fuel while the internal combust on engine is running or when the engine is hot.
- Do not over ll the fuel tank! Due to the thermal expansion of the fuel, do not ll the tank above the lower edge of the ller neck.
- The device must not be stored with the fuel tank lled indoors. The resul ng gasoline vapors may come into contact with open ames and ignite. If the fuel tank needs to be emp ed, it should be done outdoors. Before star ng the machine, make sure that there is no spilled fuel on or near the machine. If necessary, wipe o the fuel.

A en on! Gasoline vapors are ammable. Before star ng the mower, make sure that the working machine is not less than 3m from fuel tanks.
OPERATION
BRAKE LEVER
Pull the brake lever 2 (Fig. 1) before starting the engine to the handle 1 (Fig. 1) as shown in Fig. 8A. By releasing the brake lever, the engine and cu ng knife stop.
ENGINE STARTING

Warning! When the engine is running, the cu ng blades rotate.
- Check the oil level (Fig. 6B).
- Fill the fuel tank with clean, unleaded gasoline (Fig. 5). Make sure the spark plug wire is connected to the spark plug (Fig. 7A, B).
- Stand behind the mower. Hold the brake lever with one hand 2 (Fig. 1) in the working position as shown in the Fig. 8A.
- With your other hand, grasp the starter cord handle 5 (Fig. 2), as shown in the Fig. 8C.
- Lightly pulling the cord towards you, remove the starter slack, and when you feel resistance, pull the cord hard and vigorously and let it slowly go back to its place.
- Do not release the line handle until the line is pulled through the starter return system.
- If the engine does not start a er 5-6 strokes, follow the direc ons in the "Inspec on and Troubleshoo ng" chapter.
WORKING WITH A DRIVE
To start the drive, pull it to the handle 1 (Fig. 1) drive lever 3 (Fig. 1), as show in the Fig. 8B.
You can turn o the drive at any me by releasing the drive lever and operate the device like a mower without a drive.
MOWING HEIGHT SETTING

A en on! Before changing the cu ng height, stop the engine and disconnect the spark plug
To set the desired cu ng height, change the posi on of the adjustment lever 23 (Fig. 2) located on the housing of the mower (Fig. 9).
You can choose from 6 di erent cu ng heights in the range of 25 - 75 mm.
INSTALLING THE GRASS BASKET
- Raise the mower basket cover 22 (Fig. 2).
- Insert the basket 7 (Fig. 1) a aching the hooks at the inlet to the basket on a rod designed for this purpose (Fig. 10) at the mower outlet cover, then lower the cover.
- Make sure the hooks are a ached correctly.

Warning! O en check the technical condi on of the grass basket. If any parts are worn or ed, they must be replaced with new parts that are available at authorized service centers.
EMPTYING THE GRASS BASKET
Warning! Stop the engine before emptying and removing the basket.
Basket full indicator 20 (Fig. 2) allows you to quickly assess the level of basket lling. If the indicator plate is raised while the mower is running (Fig. 11A), it means that the basket is not full yet. If the
indicator plate is in a horizontal position (Fig. 11B) during the mower's operation, it means that the basket is full and should be employed.
THE CUTTING UNIT CABINET

Warning! When the engine is running, the cu ng blades rotate.
- A er nishing work, thoroughly clean the en re device.
- Stop the engine and disconnect the spark plug wire before cleaning the housing.
- Empty the fuel tank before cleaning.
- Without 1 ng the mower to the side, lay it on the ground so that the front wheels are in the air.
- Clean the underside of the mower with a brush and water.
Do not use high-pressure cleaning devices, as high-pressure water can break the paint protec on of the housing. Do not use intensive cleaning and washing agents, e.g. aggressive detergents, they can damage plas cs and metals, which may result in deteriora on of the device's safety.
A er connec ng the hose to a special quick coupler that is already mounted in the mower housing and unscrew the water, start the mower. The device is cleaned during the rota on of the knife, on which a strong stream rinses out ushing residues of grass. (Fig. 12)
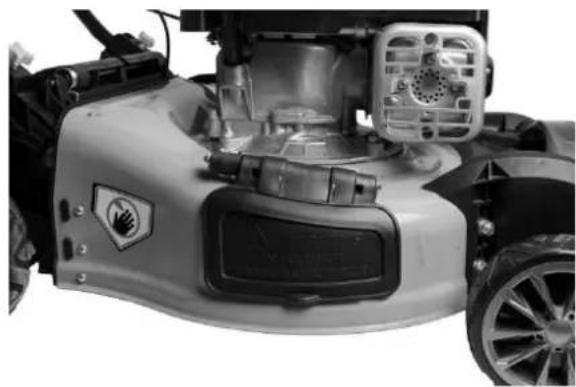
MOUNTING THE SIDE DISCHARGE CHUTE
To mount the side discharge chute:
- open the side ejector cover 18 (Fig. 2) (To unlock the cover, rst turn the axle cover (Fig. 14A, B)),
- push in the side discharge chute 19 (Fig. 2) as shown in the Fig. 14C,
- rest the side exec on cover on the side discharge chute (Fig. 14D).
GRINDING FUNCTION
Mulching is a care procedure involving the fragmenta on of cut grass. The mulching system allows it to be le completely or par ally on the soil, where it decomposes and provides nutrients.
The lawn meets the mulching conditions when the grass is no more than 4 cm. The lawn on which mulching will be carried out must be mowed regularly and quite open - even every few days. During mulching, only young and delicate blades can be le on the surface, without damaging the lawn, as they break down and do not rot.
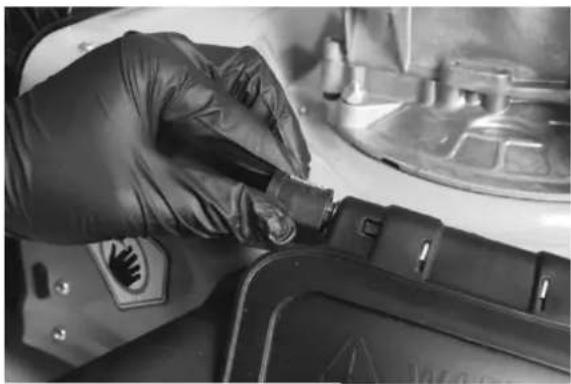
To start the grinding func on, remove the grass catcher and remove the side eject on cover (if ed), mount the grass grinding a achment /plug (Fig. 13) to the rear outlet and close the tail ap.

For mulching to be fully e ec ve, you must buy a milling knife.
SIDE EJECTION FUNCTION
To work with the side exec on:
- remove the grass basket 7 (Fig. 1) (if ed), insert the mulching plug into the rear outlet opening (Fig. 13) and close the ap 22 (Fig. 2),
- li the side discharge cover and install the side discharge chute with the catches. Note: to raise the side discharge cover, it may be necessary to use a lot of force or to open a special lock preven ng its automa c opening (if present on your model). (Fig. 14A-C),
- rest the side discharge cover on the side discharge cover (side discharge duct). (Fig. 14D).
MAINTENANCE
HANDLING THE CUTTING KNIFE

Warning:
Disconnect the spark plug wire before checking the cu ng knife or blade a achment sha. If the knife hits an object, stop the engine, disconnect the spark plug cable and check the mower for damage. Check whether the cranksha on the power take-o side or the adapter to which the knife is a ached has not been damaged (bent or cracked).
The knife adapter does not provide protec on against engine damage when the knife hits objects other than grass, e.g. stones, branches, molehills.
Check o en that the knives are not bent, that they are not excessively worn, and that there are no other damages such as cracks or deforma ons.
Damaged parts must be replaced with new ones, recommended by the manufacturer. For safety, replace the knives every two years. Knives should be well sharpened (details in chapter "Sharpening a knife"). Blunt knives tug at the grass, causing the ps to yellow.

A en on! It is impera ve to balance the knife a er each sharpening. An unbalanced blade cause dangerous vibra ons that can damage the mower and / or cause an accident.
Check the knife clamping screw o en. The screw must be rmly ghtened to a torque of 45 to 55 Nm.
REMOVING THE KNIFE (Fig. 15A)
- Addapter
- Knife
- Saddle half pad
- Screw

A en on! Cu ng knife 2 (Fig. 15A) it can be very sharp, use gloves to protect your hands
against injury.
- Empty the fuel tank.
- Use a wooden block to prevent the knife from turning.
- Loosen the screw that holds the knife.
- Check the condi on of the knife (see chapter "Opera on of the cu ng knife").
- Replace a worn or damaged knife with a new one recommended by the manufacturer.
- Tighten the screw to 45 to 55 Nm. If the clamping screw is too loose, the knife may become loose, which may cause an accident.
A en on! When installing the knife, remember about the direc on of the knife. If the knife is incorrectly fastened, it will not cut properly and may cause an accident.

A en on! When installing the knife, remember about the direc on of the knife. If the knife is incorrectly fastened, it will not cut properly and may cause an accident.
THE MOST IMPORTANT KNIFE PARAMETERS (Fig. 15B)
A - length (560 mm), shorter knives are allowed, but then you have to take into account that the e ec ve cu ng width will be smaller,
B - width (57 mm),
C - clamping hole diameter (11 mm),
D - hole center distance (27,5 mm),
Hole diameter 11x11 mm circle for safety wedges is standard and amounts to 15.5 mm. It is recommended to use MURRAY cu ng knives dedicated to the given mower model.
A en on! The shape of the knife indicates its characteris cs, depending on the shape of the knife is more suitable for: mowing with a basket, mowing with side ejec on or mulching. The universal knife used in the factory may turn out to be less e cient than we would have expected, so it is recommended to buy accessory knives for each func on, i.e. one for grinding, the other for throwing grass into the basket.
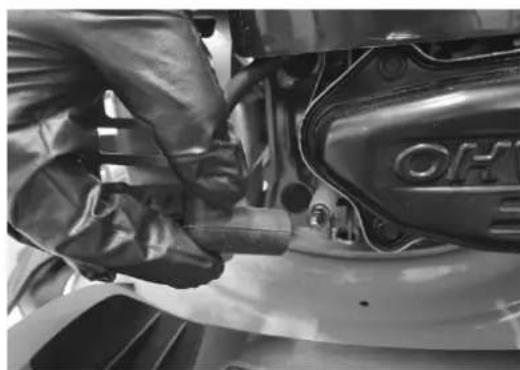
Spark plug (Fig. 16A) must be replaced at the beginning of each season or a er 100 hours of opera on.
Use original B&S QC12YC / B&S 797429 spark plugs. Recommended gap between electrodes is: 0.51 mm (Fig. 16B). Check the gap with a blade feeler gauge.
OIL REPLACEMENT
The rst oil change should be carried out a er 4 to 5 hours of engine opera on. Perform next oil changes every 25 hours of opera on or more o en. The oil drain plug may be mounted on the engine block, but this depends on the engine model. If the engine does not have a drain plug in the engine block, pour oil with the ller plug a er emptying the fuel tank:
- Unscrew the oil ller cap with the dips ck.
- Remove the air Iter to prevent it from absorbing gasoline when the mower is Ited.
- Tilt the mower to the oil ller plug side 15 (Fig. 1).
- Leave the mower in this posi on un l the oil stops owing (this may take several minutes).
A er pouring the oil out of the engine, set the mower in a at posi on and pour about 0.6L of engine oil recommended by B&S SAE30 speci ca on by checking the level on the dips ck integrated with the oil ller cap. Screw in the oil plug with the dips ck and install the air lter.
AIR FILTER REPLACEMENT (Fig. 18A, B)
Every 25 hours of opera on, check the condi on of the air Iter. The Iter must be replaced every 100 hours or earlier if it is contaminated.
Loosen the fastener A that holds the cover B (Fig. 18B).
- Open the cover B (Fig. 18B).
- Remove the pre-Iter C and air Iter D (Fig. 18B).
- If the Iter is not damaged:
- squeeze the foam element into a clean cloth.
-
do not oil the pre-Iter.
-
gently tap the Iter D (Fig. 18B) on a hard surface to remove impurities,
-
wash the Iter sponge element C with water and detergent,
-
If the Iter is damaged replace the Iter with a new one.
-
Replace the cover by sliding the catches into the slots on the 'Iter housing or ghten the screw. Reinstall all air cleaner components, replace the air cleaner cover and secure with the fastener.
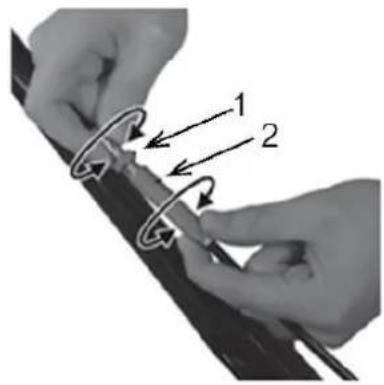
LINE ADJUSTMENT
The cables may stretch and contract during use. They should then be checked and properly adjusted (if adjustment is available on your model). To do this loosen the small locking nut 1 (Fig. 19) and then depending on your needs:
1 turn the adjus ng nut 2 (Fig. 19) counterclockwise: the cable is shortened,
2 turn the adjus ng nut 2 (Fig. 19) clockwise: the cord will be extended.
LUBRICATION
To lubricate the rear drive wheel rack 8 (Fig. 1) you should:
- Remove the rear wheel hub cap by turning the hub cap counterclockwise.
- Unscrew the drive wheel nut with a 13 mm wrench.
- Remove the drive wheel from the axle.
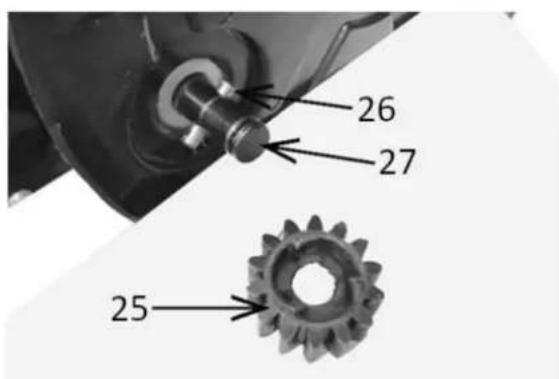
- Remove the Seger ring 24 (Fig. (20) and then slide the drive rack o 25 (Fig. 20), from the gear sha 27 (Fig. 21).
- Sprocket, drive carrier 26 (Fig. 21) and the gear sha must be cleaned of grease residues and lightly grease the above elements. The recommended grease for this opera on is MURRAY bevel gear grease.

CAUTION! Lubricate the gear wheel from the inside 25 (Fig. 21). Do not lubricate the rim on the sprocket and the drive wheel.
- Re t the en re mower drive mechanism in reverse order.
TRANSPORTATION
PREPARATION FOR TRANSPORT
- Before transporting the mower, remove oil, then: cool the engine, remove fuel from the tank, carbure or and fuel lines.
- The device can only be transported in the working position, i.e. at an angle of up to 15 degrees above the level.
- The handle may be folded.

A en on! Be careful when folding or unfolding the handle, as the cables may be damaged.
Damaged cables can cause the mower to malfunc on and in some cases reduce the safety of use of the device.
PROBLEMS REVIEW AND DIAGNOSIS
INSPECTIONS
| Inspec ons | Prior to each use | A er 5 hours of opera on | Every 25 hours of work or once a season | Before storage | A er every 100 hours of work | A er each use | |
| Engine oil | check it out | x | |||||
| replace | x (only the rst replacement) | x | |||||
| Air liter | check it out | x | |||||
| clean | x | ||||||
| replace | x | ||||||
| Spark plug | check it out | x | |||||
| replace | x | ||||||
| Cu ng blade | check it out | x | |||||
| sharpen | x | ||||||
| Lines adjustment | check it out | x | |||||
| Adapter | check it out | x | |||||
| Protec on of the drive | check it out | x | |||||
| Drive belt | check it out | X before each season | |||||
| Threaded connec ons | check it out | x | x | ||||
| Fuel | empty | x | |||||
| clean | x | ||||||
| The bo om of the mower | protect | x | x | ||||
| execute | x | ||||||
| Lubrica on | check / adjust | x | x | ||||
| Valves | check it out | x | |||||
| Annual, post- or pre-season paid checks carried out on the website will help avoid problems during the season. | |||||||
TROUBLESHOOTING
| Problem | Possible cause | Solu on |
| The device does not start. | Low fuel. | Check the fuel level and add fuel if necessary. |
| Spark plug ooded or damaged. | Check, clean or replace the spark plug. | |
| Interrup on in igni on system or contaminated fuel system. | Have the gardening equipment service repaired, it is best to entrust the mower to an authorized MURRAY service center. | |
| Engine res unevenly. | Contaminated air lter. | Replace or clean the lter. |
| Low quality fuel. | Remove fuel and refuel the mower with high-quality fuel. | |
| Clogged fuel line, no fuel or old fuel. | Clean the fuel line, check fuel delivery, add fresh fuel. | |
| Water, oil or dirt in the fuel system. | Drain the carbure or with the fuel sink screw and top up with fresh mixture. | |
| Oil ooded carbure or a er 1 ng the mower to the side. | Clean the carbure or from oil. | |
| Engine res unevenly. | Badly adjusted brake cable. | Make the appropriate adjustment. |
| Dirty air lter. | Replace the lter. | |
| Mu er ooded with oil a er 1 ng the mower to the side. | Top up oil and start the mower for 15 minutes, the oil will burn itself. | |
| Excessive vibra on. | Knife adapter damaged. | Replace it. |
| Crooked motor sha (a er impact). | Stop the engine immediately and remove the spark plug cap. Tighten all screws and make other appropriate repairs. If the vibra on does not disappear, entrust the repair to an authorized service center. | |
| Loose assembly of components. | ||
| The mower does not throw grass in the bin. | The grass is too high. | Mow twice. |
| Wet grass. | Do not mow. | |
| Inverted or worn cu ng knife. | Insert the cu ng knife correctly or replace it. | |
| Dirty lawn mower chassis. | Clean the mower chassis. | |
| A dirty or over lled basket. | Empty and clean the basket. | |
| Engine speed too low. | Adjust the turnover at the authorized service center. | |
| Wheel drive not working (drive version). | Worn or damaged drive belt. | Replace the wheel drive belt. |
| Cut grass lying down. | Clean the transmission mechanism. | |
| Incorrectly adjusted drive cable. | Adjust the drive cable. | |
| Adjust the drive cable. | Replace the gear. |
WARRANTY AND SERVICE
The product purchased by you is intended for amateur (hobby) use only. If the equipment is used for other purposes (commercial, professional), it will lose the guarantor's liability for the purchased equipment. You can nd informa on on the warranty and the MURRAY service network in the a ached warranty card.
DECLARATION OF CONFORMITY

MURRAY®
Declara on of conformity
Manufacturer:
name: NAC Sp. z o.o.
address: Al. Krakowska 39, 05-090 Raszyn, Poland
with full responsibility declares that the machine:
name: Petrol lawn mower
model: EQ2-700X
serial number: 033 22 2490745490 9000 000001 - 033 25 2490745490 9000 999999
meets the essen al requirements:
• of Machinery Direc ve MD 2006/42/EC,
- Compa bility Direc ve EMC 2014/30/EU,
- Noise Direc ve NEE 2000/14/EC Annex VI and 2005/88/EC.
meets the requirements of the following harmonized standards:
○ EN ISO 5395-1:2013+A1,
○ EN ISO 5395-2:2013+A1+A2,
○ AfPS GS 2014:01 PAK,
○ EN ISO 14982:2009,
○ EN ISO 3744:1995,
○ ISO 11094:1991
and meets the requirements:
○ 2016/1628/EU.
2000/14 / EC: the conformity assessment procedure followed according to Annex VI:
- measured maximum sound power level: LWA is 94 dB(A),
• guaranteed sound power level: LWA is 98 dB(A).
The conformity assessment procedures according to NEE 2000/14/EC were carried out with the par cipa on of a no ed body:
name: TÜV Rheinland LGA Products GmbH
address: Tillystrasse 2, 90431 Nürnberg, Germany
iden ca on number: 0197
Place of submission and storage of Technical Documenta on:
NAC Sp. z o.o.
Al. Krakowska 39,
05-090 Raszyn
Jarosław Malinowski

Technical and Cerca on Director
Raszyn, November 30, 2021
WARRANTY
Dear Sir or Madam,
Thank you for purchasing our product and congratula ons on your right choice. The device that you bought was designed and manufactured according to the latest technologies and represents global standards of quality and reliability, while being environmentally friendly. We remind you to carefully read the commissioning and opera on procedures before using the device; these procedures are contained in the Opera ng Instruc ons supplied with the device.
Our specialized service network serves you with all assistance in the eld of technical and opera onal advice.
A list of authorized service points and service ps can be found at: www.murray.com
WARRANTY CONDITIONS
In Poland, the guarantor is NAC Sp. z o.o.
- NAC company guarantees smooth opera on of the device Murray in accordance with the technical and opera onal condi ons described in the User Manual.
- The device is granted a 24-month warranty to the consumer “ (i.e. a natural person making a legal transaction with the entrepreneur not directly related to its business or professional activity) “ and a 12-month warranty when purchased by the entrepreneur “(i.e. a natural person, a legal person and an organiza onal unit opera ng in own business or professional ac vity). " A er this period, the user is en tled to paid repairs.
- All damages disclosed during the warranty period resulting from material, assembly or manufacturing defects will be removed free of charge.
- The basis for obtaining warranty protec on is proof of purchase of the device from an Authorized Distributor of MURRAY equipment together with the print of this warranty card signed on the day of sale issued by the o cial MURRAY Authorized Distributor. Warranty coverage will not be granted if the warranty print is cer ed / stamped by a company that is not an MURRAY Authorized Distributor. This warranty applies within the territory of the Republic of Poland.
- Defects of the device subject to warranty will be removed within 14 business days from the date of acceptance at the MURRAY Authorized Service. This period may be extended to 30 business days in except onal cases.
- For reasons beyond the control of the Guarantor, the aforementioned deadline may be extended, in particular if the product requires additional verications / experimise or there are circumstances in the form of force majeure preventing its behavior, e.g. oood, re, strikes, natural disasters, import restrictions, etc.
- The warranty does not include ac vi es such as: assembly, maintenance, service, periodic adjustment and cleaning, as well as inspec ons, oil and Iter changes together with materials and parts used for the above ac vi es. These ac vi es can be carried out for a fee.
- In order to remove defects or damage, the device together with the proof of purchase and a valid warranty card should be delivered to: the nearest Authorized Service Center or use a convenient "door to door" system or to the place of purchase. The device should be cleaned beforehand. The service / shop may refuse to repair an uncleaned device. If the device is to be sent, the operating uids (fuel and oil) must be emped before handing it over to the courier or seller. The packaging must ensure safe transport, original packaging is recommended.
- The method of repair is determined by the guarantor. The guarantor is not obliged to provide a replacement device during the warranty repair.
- This warranty applies provided that the device is properly used, maintained and serviced in accordance with the a ached opera ng instruc ons.
- The user is obliged to immediately cease using the damaged device. Con nued use of a damaged device may result in further faults and endanger the health or life of the user or third par es.
- The warranty does not cover damage resulting from: mechanical damage, misuse, modi ca on or repair carried out by unauthorized persons. This also applies to the installa on and use of incorrect parts and Iters, greases, oils, fuels.
- Damage to the warranty seals, if any, or the serial number plate can be the basis for rejecting the warranty.
- The warranty does not cover defects caused by lightning, re, oods and other natural disasters.
- The warranty does not cover consumables and components subject to natural wear during opera on and subject to user control such as V-belts, bulbs, Iters, spark plugs, road wheels, knives and cu ng blades, knife holders, string heads, cu ng chains, chain guides, steering cables, keys and overload pins.
- NAC is not responsible for direct or indirect damages, losses or costs resulting from the use or inability to use the device for any purpose.
- If it is necessary to carry out ac vi es related to the maintenance of the device before star ng the repair, the Service / Store may carry out such ac vi es against payment with the consent of the user / adver ser.
- If during the repair it was necessary to replace elements related to safety of use or third par es (e.g. cu ng blades, chains, guides, cu ng element covers and other safety-related elements), the service is obliged to replace these elements even if it involves this with the need to charge fees with the consent of the user / adver ser. In case of refusal, the service will return the product without any repairs.
- The warranty does not cover any damage caused to objects or persons.
- The warranty for the goods sold does not exclude, limit or suspend the rights of the buyer who is a natural person under the warranty for defects of the thing sold.
WARRANTY CARD
Equipment name*
Model *
Date of sale *
Device serial number *
Engine serial number
I declare that I have read the User Manual and the Warranty Card. I received the purchased equipment in working order, complete, along with the proof of purchase.
Legible signature of the buyer ....
Stamp and legible signature of the seller *^1
* To be completed by the seller
*1 I declare that I am o cial MURRAY Authorized Distributor.
Submission of a statement inconsistent with the facts by an en ty that is not an authorized MURRAY Distributor may result in criminal liability of the seller pursuant to art. 271 and Ar cle 267 of the Penal Code.
| No. | Dates | Repair report number | O cial Stamp |
| Equipment no ca on date | |||
| Date of comple on of repair / Date of device release | |||
| Equipment no ca on date | |||
| Date of comple on of repair / Date of device release | |||
| Equipment no ca on date | |||
| Date of comple on of repair / Date of device release | |||
| Equipment no ca on date | |||
| Date of comple on of repair / Date of device release | |||
| Equipment no ca on date | |||
| Equipment no ca on date | |||
| Date of comple on of repair / Date of device release |
The original repair report is equivalent to the entry on the warranty card.

Raszyn, 30 November 2021
GARANTIE
DÉCLARATION DE CONFORMITÉ

MURRAY®
CONDITIONS DE LA GARANTIE
BEZPIECZEŃSTWO W MIEJSCU PRACY
MURRAY is a trademark of Briggs & Stra on Power Products Group, LLC.