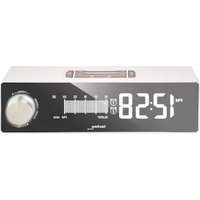
WT 483 - Alarm clock radio Techno Line - Free user manual and instructions
Find the device manual for free WT 483 Techno Line in PDF.


| Product Type | Clock Radio |
| Brand | Techno Line |
| Model | WT 483 |
| Main Power Supply | AC adapter 5V DC 1200 mA (included) |
| Backup Power Supply | Lithium battery CR2032 (not included) |
| Display | LCD digital |
| Radio | FM 87.5-108 MHz |
| Station Memory | 20 presets (automatic or manual) |
| Alarm | Dual alarm (Alarm 1 and Alarm 2) |
| Wake Source | Buzzer or Radio |
| Snooze | 5 to 60 minutes (adjustable) |
| Auto Sleep | 5, 15, 30, 45, 60, 90 minutes or off |
| Screen Brightness | High, Low, Off |
| USB Charging | Charging port for portable devices (5V) |
| Operating Temperature | 0°C to +45°C |
| Cleaning | Soft cloth with soapy water |
| Usage Precautions | Indoor use only, avoid shocks, humidity, do not open |
| Regulatory Markings | WEEE recycling, used battery |
Frequently Asked Questions - WT 483 Techno Line
User questions about WT 483 Techno Line
0 question about this device. Answer the ones you know or ask your own.
Ask a new question about this device
Download the instructions for your Alarm clock radio in PDF format for free! Find your manual WT 483 - Techno Line and take your electronic device back in hand. On this page are published all the documents necessary for the use of your device. WT 483 by Techno Line.
USER MANUAL WT 483 Techno Line
B1: ALARM 2 SET / ON-Off Taste B2: SET Taste
B3: SLEEP Taste B4: ALARM 1 SET / ON-Off Taste
B5: MEMORY / PRESET Taste B6: SNOOZE / HI-LO-OFF BRIGHTNESS
B7: RADIO Taste Taste
C – Rückseite
C1: USB (not applicable for tablet / iPad) C2: USB-Ladekabel (nicht inklusive)
C3: Backup Batterien (1 x CR2032, nicht inklusive) C4: DC Buchse
C5: 5V - 1200mA AC/DC Adapter
PFLEGE IHRES PRODUKTS
OVERVIEW
A – Front view
A1: PM icon A2: Alarm 1/2 ON icon
A3: Radio frequency / volume line bars A4: SLEEP icon
A5: Radio ON icon
A6: + TUNING - / + Volume - (adjust / confirm knob)
B - Top view
B1: ALARM 2 SET / ON-Off button B2: SET button
B3: SLEEP button B4: ALARM 1 SET / ON-Off button
B5: MEMORY / PRESET button B6: SNOOZE / HI-LO-OFF BRIGHTNESS
B7: RADIO button button
C - Back view
C1: Mobile devices (not applicable for tablet / iPad) C2: USB charging cable (not included)
C3: Backup battery (1 x CR2032, not included) C4: Insert DC jack to power up your unit
C5: 5V - 1200mA AC/DC adapter
Please read these instructions carefully and keep the manual for future reference.
INSTALLATION
Plug in the AC/DC adaptor to an AC household outlet, and then plug the DC jack to the back of the unit. Your unit is ready to work.
BACKUP BATTERY INSTALLATION
Your clock radio requires one CR2032 lithium battery (not included) to provide backup power to the clock in the event of a temporary power interruption.
- Place your unit face down on a flat and soft surface.
- Use screw driver to open the backup battery compartment door located on the bottom of the unit.
- Slide and remove the battery cover at the bottom of your unit.
- Insert one new CR2032 lithium battery into the battery compartment with the “+” side facing up as indicated.
- Close the battery compartment door and tighten the battery door screw.
If AC power is interrupted and backup batteries are being used, the time and all settings of your unit will be kept. The display backlight is off and alarm does not sound.
SET TIME, 12/24-HR TIME, CALENDAR AND SNOOZE DURATION
- Press and hold SET, the hour digits flash. Rotate the VOL / TUNING knob to set hour.
- Press VOL/TUNING knob once again, rotate the VOL/TUNING knob to set minute.
- Press VOL/TUNING knob once again: 24Hr flash, rotate the VOL/TUNING knob to select 12Hr ⇔ 24Hr. In 12Hr mode, PM will appear on the display to indicate afternoon time. There is no AM indicator.
- Press VOL/TUNING knob once again, "2018" flash, rotate the VOL/TUNING knob to set the year.
- Press VOL/TUNING knob once again, month digits flash, rotate the VOL/TUNING knob to set the month.
- Press VOL/TUNING knob once again, date digits flash, rotate the VOL/TUNING knob to set the date.
- Press VOL/TUNING knob once again, "N05" flash, rotate the VOL/TUNING knob to set the snooze duration (from 5 to 60 min.).
- Press VOL/TUNING knob again to confirm. The set time is displayed.
Note: the clock exits the set mode when no key is pressed in approximate 10 seconds.
SET ALARM 1 AND ALARM 2
- Press and hold 📋 button, 🌐 icon and alarm 1's hour digit flash, rotate the VOL/TUNING knob to set the desired hour. PM will appear on the display to indicate afternoon time if 12-Hr format is selected. There is no AM indicator.
- Press VOL/TUNING knob once again, the minute digits flash. Rotate the knob to set desired minutes.
- Press VOL/TUNING knob once again, LCD displays "bu" (buzzer), rotate the knob to select the wake-up sound sources :-
$$ \mathbf {b u} = \text { B u z z e r } $$
$$ \mathbf {r d} = \text { Radio } $$
- Press VOL/TUNING once again, "1-7" flash, rotate the knob to select:-
1-7 = Monday to Sunday (daily alarm)
1-5 = Monday to Friday (weekdays alarm)
6-7 = Saturday and Sunday (weekends alarm)
1-1 = Single day alarm only (alarm works for one day only)
- If "rd" (wake-to-radio) is selected, press VOL/TUNING knob once again, "HI" or "LO" is displayed. Rotate VOL/TUNING knob to select the volume of radio you wake up to. This selection does not apply for "bu" (wake-to-buzzer).
- Press VOL/TUNING knob once again to confirm alarm 1's setting. In the middle of your alarm setting, press SET once to store and exit the alarm set mode.
- To set Alarm 2, press and hold Ⓥ button and repeat step 1-6 above.
TURN ON OR OFF ALARM 1 AND 2 (default alarm time at 6:00 AM)
-
At normal time display, press ⏻ button once to activate Alarm 1, 📋 icon appears. Press again to deactivate Alarm 1, 🎟icon disappears.
-
Press Ⓞ button once to activate Alarm 2, Ⓞ icon appears. Press once again to deactivate Alarm 2, 📋 icon disappears.
STOP AND RESET THE ALARM TO COME ON THE NEXT DAY
When alarm 1 or 2 is sounding, the related alarm icon flashes. Press ① button to stop alarm 1 sounding or press ② once to stop alarm 2 sounding. This will reset it to come on the following day.
After that both icon and/or icon remains on the display.
ACTIVATE THE SNOOZE FUNCTION (default snooze duration is 5 minutes)
Zz • once, the alarm
When alarm is sounding, press once, the alarm will be silenced and come on again after the set snooze duration.
Note: if your second alarm activates while the first alarm is sounding or it is in the snooze mode, the second alarm overrides the first alarm (the first alarm is reset to come on the next day).
SET UP THE FM ANTENNA
Extend the FM wire antenna fully and vary the direction for best FM reception. Do not strip, alter or attach to other antennas.
LISTEN TO THE FM RADIO
- Press RADIO once to FM tuner mode, the display shows "rd".
- Press VOL/TUNING knob once, the radio frequency is displayed. You can rotate the VOL/TUNING knob slowly to tune to a FM radio or rotate quickly to scan the next radio station automatically. The line bars indicate corresponding radio frequency.
- Press VOL/TUNING knob once, the volume level "L04" is displayed. Rotate the VOL/TUNING knob to adjust volume from L00 (sound off) to L15 (maximum). The line bars indicate the corresponding volume level.
- The clock radio will switch to time display in few seconds. Rotate the VOL/TUNING knob to adjust the volume.
- Press RADIO button to turn off the radio.
Remark: keep your radio away from fluorescent lamps or other electronic devices, which may cause interference to the radio.
STORE FM RADIO STATIONS IN MEMORY
You can store up to 20 FM radio stations.
Store radio stations automatically
Press RADIO once to turn on the radio, then press and hold the VOL/TUNING knob, the clock radio will scan from 87.5 to 108 MHz frequency range once and automatically store radio stations of strongest signal from "P01" up to maximum "P20".
Store radio stations manually
- Tune to a FM radio station.
- Press and hold MEM for 2 seconds, "P01" flashes. Press VOL/TUNING knob once to confirm and store to P01.
- Press VOL/TUNING knob once, the radio frequency is displayed. Rotate VOL/TUNING knob to select another station.
- Press and hold MEM until "P01" (or last memory station) flashes. Rotate VOL/TUNING knob slowly to select "P02", press VOL/TUNING knob once to store P02.
- Repeat Step 1 to 3 to store radio stations to P03 through P20.
- To remove a pre-stored station, repeat steps 2 to 4 to store another station in its place.
SELECT A PRESET RADIO STATION
When the radio is on, press the MEM once. Rotate VOL/TUNING knob to select a preset station.
SET SLEEP TIMER
- While the radio is on, press and hold SLEEP, the sleep time "05" (5 minutes) appears on the display.
- Press SLEEP repeatedly to select a period (in minutes) from 05, 15, 30, 45, 60, 90, or OFF.
-
The clock radio reverts to time display automatically in a few seconds. Press and hold SLEEP button to see the sleep time remaining.
-
Press RADIO or press SLEEP repeatedly to OFF to deactivate the sleep function before the sleep time has elapsed.
TO USE THE HI-LO-OFF DIMMER
At normal time display mode, press of the LCD display.

once to adjust the brightness (HI / LO / OFF)
CHARGE YOUR MOBILE DEVICES
Connect the charging cable of your mobile phone to the A-type USB port at the back of the unit, then connect the other end to your mobile phone. The clock radio will charge the mobile phone automatically.
CARE OF YOUR PRODUCT
- Place your unit on a stable surface, away from sources of direct sunlight or excessive heat or moisture.
- Protect your furniture when placing your units on a natural wood and lacquered finish by using a cloth or protective material between it and the furniture.
- Clean your unit with a soft cloth moistened only with mild soap and water. Stronger agents such as Benzine, thinner or similar materials can damage the surface of the unit. Make sure the unit is unplugged before cleaning.
- Do not mix old and new batteries. Do not mix alkaline, standard (carbon-zinc), or rechargeable (nickel-cadmium) batteries.
- If the unit is not to be used for a prolonged period, such as a month or longer, remove the batteries to prevent possible corrosion. Should the battery compartment become corroded or dirty, clean the compartment thoroughly and replace the batteries.
- Do not open the inner back case or tamper with any components of this clock.
- Do not plug in any other AC/AC or AC/DC adaptor with incorrect specifications or voltage.
Precautions
- This main unit is intended to be used only indoors.
- Do not subject the unit to excessive force or shock.
- Do not expose the unit to extreme temperatures, direct sunlight, dust or humidity.
- Do not immerse in water.
- Avoid contact with any corrosive materials.
- Do not dispose this unit in a fire as it may explode.
- Do not open the inner back case or tamper with any components of this unit.
Batteries safety warnings
• Install batteries correctly by matching the polarities (+/-).
- Always replace a complete set of batteries.
- Never mix used and new batteries.
- Remove exhausted batteries immediately.
- Remove batteries when not in use.
- Do not recharge and do not dispose of batteries in fire as the batteries may explode.
- Ensure batteries are stored away from metal objects as contact may cause a short circuit.
- Avoid exposing batteries to extreme temperature or humidity or direct sunlight.
- Keep all batteries out of reach from children. They are a choking hazard.
Use the product only for its intended purpose!
Consideration of duty according to the battery law
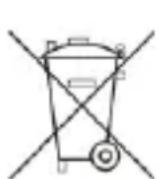
Old batteries do not belong to domestic waste because they could cause damages of health and environment. You can return used batteries free of charge to your dealer and collection points. As end-user you are committed by law to bring back needed batteries to distributors and other collecting points!
Consideration of duty according to the law of electrical devices
This symbol means that you must dispose of electrical devices separated from the General household waste when it reaches the end of its useful life. Take your unit to your local waste collection point or recycling centre. This applies to all countries of the European Union, and to other European countries with a separate waste collection system.

SPECIFICATIONS
Operation Temperature: 0°C to +45°C
Alarm Duration 1 hour
Snooze Duration 5 – 60 minutes
Sleep Timer Selections 5, 15, 30, 45, 60, 90 minutes to OFF
Volume L00 (sound off) to L15 (maximum)
Preset Memories of Radio 20
Default Settings:-
Time Format 24 hour
Time 0:00
Alarm 1 and 2 6:00
Volume 04 (Level 04)
Snooze duration 5 (5 minutes)
WT 483 - MODE D'EMPLOI
5, 15, 30, 45, 60, 90 minutes ou OFF
C5: 5V1200mA AC/DC-adapter
5, 15, 30, 45, 60, 90 minutes of UIT
5, 15, 30, 45, 60, 90 minuti a OFF
L00 (sound off) a L15 (massimo)
20
ZASTAVENÍ A RESET ALARMU NA DALŠÍ DEN
- C – Rückseite
- PFLEGE IHRES PRODUKTS
- B - Top view
- C - Back view
- INSTALLATION
- BACKUP BATTERY INSTALLATION
- SET TIME, 12/24-HR TIME, CALENDAR AND SNOOZE DURATION
- SET ALARM 1 AND ALARM 2
- TURN ON OR OFF ALARM 1 AND 2 (default alarm time at 6:00 AM)
- STOP AND RESET THE ALARM TO COME ON THE NEXT DAY
- ACTIVATE THE SNOOZE FUNCTION (default snooze duration is 5 minutes)
- Zz • once, the alarm
- SET UP THE FM ANTENNA
- LISTEN TO THE FM RADIO
- STORE FM RADIO STATIONS IN MEMORY
- Store radio stations automatically
- Store radio stations manually
- SELECT A PRESET RADIO STATION
- SET SLEEP TIMER
- TO USE THE HI-LO-OFF DIMMER
- CHARGE YOUR MOBILE DEVICES
- CARE OF YOUR PRODUCT
- Precautions
- Batteries safety warnings
- Consideration of duty according to the battery law
- Consideration of duty according to the law of electrical devices
- SPECIFICATIONS
- WT 483 - MODE D'EMPLOI
- ZASTAVENÍ A RESET ALARMU NA DALŠÍ DEN
Brand : Techno Line
Model : WT 483
Category : Alarm clock radio