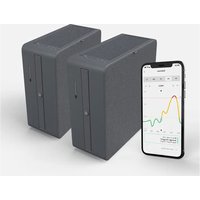
Renew Duo - Controller Airthings - Free user manual and instructions
Find the device manual for free Renew Duo Airthings in PDF.


| Product type | Air purifier |
| Brand | Airthings |
| Model | Renew Duo |
| Weight | 6 kg |
| Power supply | 100-240 V, 50-60 Hz |
| Filter type | HEPA-13 + activated carbon + washable pre-filters (fabric and mesh) |
| HEPA filter efficiency | 99.97% of particles ≥ 0.3 micron |
| Particle sensor | High-precision laser (PM₁, PM₂.₅, PM₁₀) |
| Operating modes | Auto, Boost, Silent, Sleep, 5 manual speeds |
| Air quality indicator | LED: Green (<10 µg/m³), Yellow (10-25 µg/m³), Red (>25 µg/m³) |
| Connectivity | WiFi 2.4 GHz (802.11b/g/n), Bluetooth |
| Mobile app | Airthings (iOS and Android) |
| Sound level | Silent mode: ~25 dB (whisper) |
| Wall mounting | Yes, with included hook (max height 30 cm from floor) |
| Maintenance | Clean pre-filters (vacuum/soapy water); replace HEPA and carbon filter (LED indicator) |
| Spare parts | HEPA-13 filter, activated carbon filter (available at airthings.com) |
| Repairability | User-replaceable filters; no other repairable parts, contact support |
| Safety | Automatic shut-off on obstruction; child lock; polarized plug (USA) |
| Warranty | Standard warranty per country |
| Certifications | ENERGY STAR, FCC, ISDE, CE, UKCA, Class 1 laser |
Frequently Asked Questions - Renew Duo Airthings
User questions about Renew Duo Airthings
0 question about this device. Answer the ones you know or ask your own.
Ask a new question about this device
Download the instructions for your Controller in PDF format for free! Find your manual Renew Duo - Airthings and take your electronic device back in hand. On this page are published all the documents necessary for the use of your device. Renew Duo by Airthings.
USER MANUAL Renew Duo Airthings
natural_image
Line drawing of a white rectangular electronic device with a mesh cover and ventilation grille (no text or symbols)User Manual
English
Français
Deutsch
Español
Norsk
Model: AP-1
READ AND SAVE
THESE INSTRUCTIONS

AIRTHINGS
WE LIVE AND BREATHE AIR QUALITY
In 2008, Airthings was created with the mission to help people everywhere take control of the air they breathe at home. We make a range of indoor radon and air quality monitors that give homeowners the power to see the invisible and understand what's really in their air.
Renew is our air purifier designed thoughtfully for use in bedrooms. Sound sleep is essential for health and well-being. During the night, your body repairs and renews itself, restoring your energy and helping you to wake refreshed the next morning. Renew is ultra-quiet and integrates a high-precision particle sensor to track changes in your air quality to ensure you're always breathing clean and healthy air.
This guide will help you get started using your Renew safely and effectively. If you need additional information or help, check our knowledgebase online at help.airthings.com or contact our team at support@airthings.com.
CONTENTS
Important safety information 4
Terms used in this guide 8
Your Renew air purifier 9
Getting started 10
Quick start guide 10
Getting the most out of your Renew 11
Mounting Renew on a wall 12
Set it and forget it with Auto mode 13
Fan safe feature 13
Using the control panel 14
Maintaining your Renew 16
Changing the filters 16
Keeping it clean 16
Energy efficiency 18
Warranty 18
Waste management 19
Regulatory information 20
Supplier Declaration of Conformity 23
IMPORTANT SAFETY INFORMATION
Read and save these instructions.
DANGER – To reduce the risk of fire, electric shock or injury to persons
In the event of a malfunction (sparks, burning smell, etc.), immediately stop the operation, disconnect the power cord, and contact Airthings customer support.
- Do not store or use gasoline or other flammable vapors and liquids in the vicinity of this or any other appliance.
- WARNING: Do not use this fan with any solid-state speed control device.
- Do not let water or any other liquid or flammable detergent enter the unit.
- Do not reach for a unit that has fallen into the water. Unplug it immediately.
- Do not place or store the unit where it can fall or be pulled into a tub or sink.
- Do not place in or drop into water or other liquid.
- WARNING: Do not use replacement parts that have not been recommended by the manufacturer (e.g. parts made at home using a 3D printer).
- Children under 8 years of age should be kept away from the appliance unless continuously supervised. Keep all packaging away from children.
- This appliance can be used by children aged 8 years and above and persons with reduced physical, sensory, or mental capabilities or lack of experience and knowledge if they have been given supervision or instruction concerning the use of the appliance in a safe way and understand the hazards involved. Children shall not play with the appliance. Cleaning and user maintenance shall not be made by children without supervision.
WARNING – To avoid product damage or personal injury
- To avoid fire hazards or electric shock, do not cut, remove, or bypass any prong from the power cord.
- In the event of a malfunction (sparks, burning smell, etc.), immediately stop the operation and disconnect the power cord. Contact Airthings customer support.
- This appliance can be used in a 100-240V, 50-60 Hz power supply without any change.
- Do not use an extension cord or an adapter plug.
- Keep the cord away from heated surfaces.
- Do not operate the unit with a damaged cord or plug, or after the air purifier malfunctions, or has been dropped or damaged in any manner. Contact Airthings customer support.
- Do not pinch, bend, or knot the power cord. Do not cut or damage the power cord. If the power cord is damaged. Contact Airthings customer support.
- Ensure that any electrical/electronic equipment is 12 inches (30 cm) away from the unit.
- Do not stop the unit by unplugging the power cord or turning off the power at the electrical box.
- If purchased in the US, this appliance has a polarized plug (one blade is wider than the other). To reduce the risk of shock, this plug is intended to fit only one way in a polarized outlet. If the plug does not fit fully in the outlet, reverse the plug. If it still does not fit, contact a qualified electrician.
CAUTION: DO NOT attempt to defeat this safety feature. To do so could result in an electric shock hazard.
CAUTION – To operate the appliance safely
- Do not use outdoors. This product is intended for indoor household use only.
- Do not use in rooms with high humidity like bathrooms or laundry rooms.
- Do not tilt or move the unit while it is in operation. Shut off and unplug the unit before moving.
- Turn off the unit at the power source when not in use for an extended period.
- Keep the unit at least 3.5 ft (1 m) from heat sources like stoves, radiators, or heaters.
- Do not direct airflow toward fireplaces, candles, or other sources of flame. This can cause flare-ups.
- Only operate the unit with the air filters installed or designed for this unit.
- Do not block or cover the intake area, discharge area, and outlet ports. Do not use it on any soft surface, like a bed, where openings may become blocked.
- When using the wall hanging hook ensure that the hook is securely fastened. Do not place items on top of a wall-mounted unit. Keep the wall-mounted unit and its power cable away from the reach of children.
- Do not climb on or place objects on the unit. Do not hang objects off the unit. Do not place containers with liquids on the unit.
- Always unplug the unit before changing the filters. Do not attempt to touch the fan blade when removing the filter.
- Do not operate the unit with wet hands.
- Do not insert fingers or objects into the air discharge area or top grill of the unit.
- This unit contains no user-serviceable parts other than replaceable filters. If you suspect the unit to be defective, contact Airthings customer support.
- Do not run cords under carpeting, rugs, runners, furniture, or appliances. This can cause a trip hazard.
- Do not hang onto, climb on, pull the power cord, or place any objects on top of a wall-mounted air purifier.
USE THIS AIR PURIFIER ONLY FOR ITS INTENDED USE AS DESCRIBED IN THIS MANUAL. ANY OTHER USE NOT RECOMMENDED BY THE MANUFACTURER MAY CAUSE FIRE, ELECTRIC SHOCK, OR INJURY TO PERSONS.
TERMS USED IN THIS GUIDE
CADR: The "Clean Air Delivery Rate", or CADR, describes the air purifier's effectiveness based on the volume of clean air produced per minute.
dB (A): Decibels are units that measure sound intensity. For example, 25 dB is commonly described as quiet as a "whisper" or "library quiet".
HEPA-13: HEPA, or high-efficiency particulate air, is a standard to designate the efficiency of an air filter for removing particulates. HEPA-13 filters provide particulate filtration removing 99.97% of particles over 0.3 microns in diameter. These include pollen and other fine particulates.
Pre-filter: A pre-filter removes larger particles before the air is passed through the HEPA-13 filter. Renew has two pre-filters: an audio-grade textile outer pre-filter and a mesh inner pre-filter. Both can be cleaned and help to extend the effective life of the HEPA-13 filter.
Activated carbon: Sometimes referred to as charcoal filters, these filters use activated carbon pellets that absorb and trap gasses and odors from the air. Among many other things, this filter helps to address the odors that can come from pets, cooking, and smoking.
PM_1/PM_2.5/PM_10 : These are designations that describe airborne particulate matter (PM) types in terms of their maximum diameter as measured in microns ( ). All of these are inhalable, but PM_2.5 particles are notable for being small enough to not only enter the lungs but also the bloodstream. Long-term exposure to air with high levels of PM_2.5 has been linked to several serious long-term health effects including heart disease and lung disease.
The high-precision PM sensor in Renew measures the concentration of particulates in the room's air and reports PM_2.5 levels in the Airthings app in terms of microns per cubic meter of air ( /m^3 ).
YOUR RENEW AIR PURIFIER
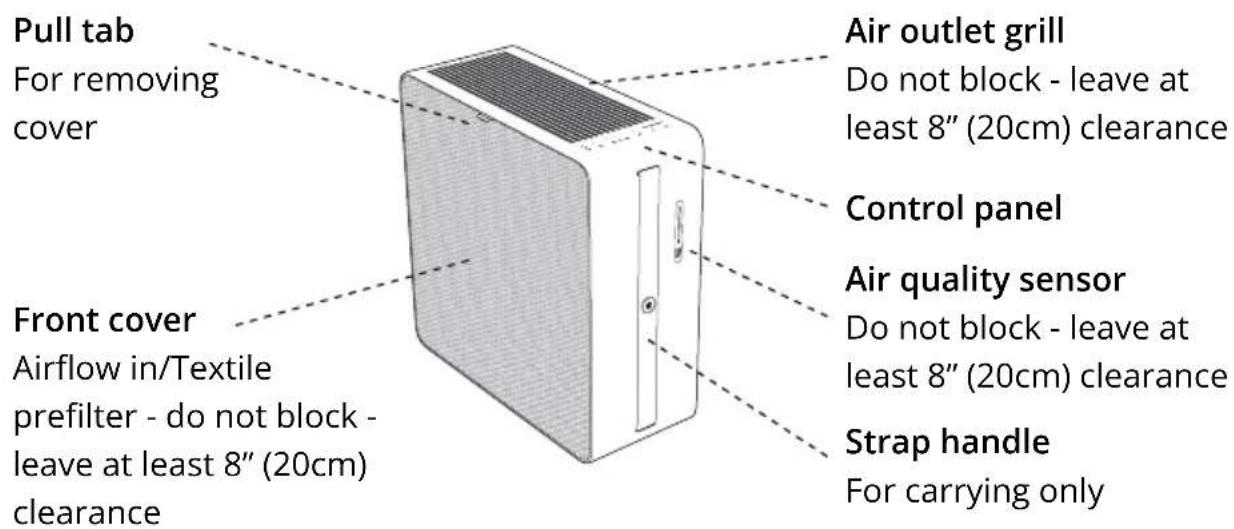
text_image
Pull tab For removing cover Front cover Airflow in/Textile prefilter - do not block - leave at least 8" (20cm) clearance Air outlet grill Do not block - leave at least 8" (20cm) clearance Control panel Air quality sensor Do not block - leave at least 8" (20cm) clearance Strap handle For carrying only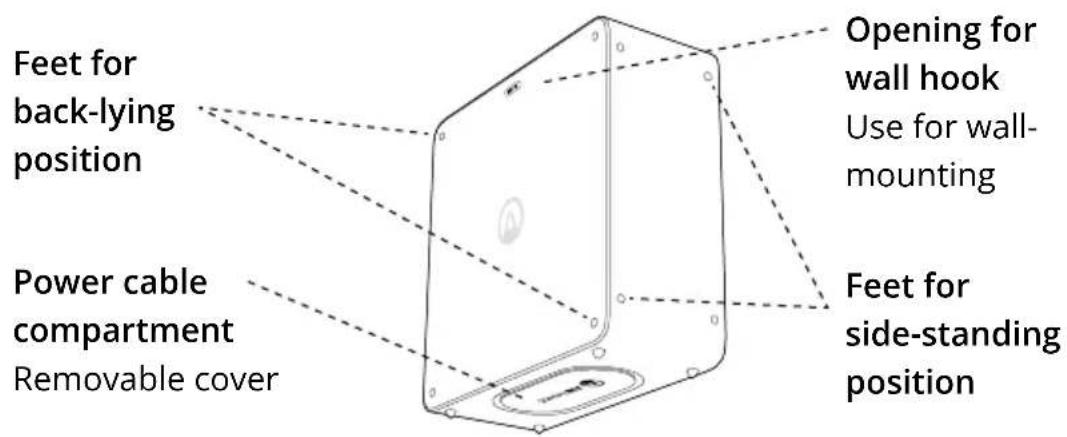
text_image
Feet for back-lying position Power cable compartment Removable cover Opening for wall hook Use for wall-mounting Feet for side-standing position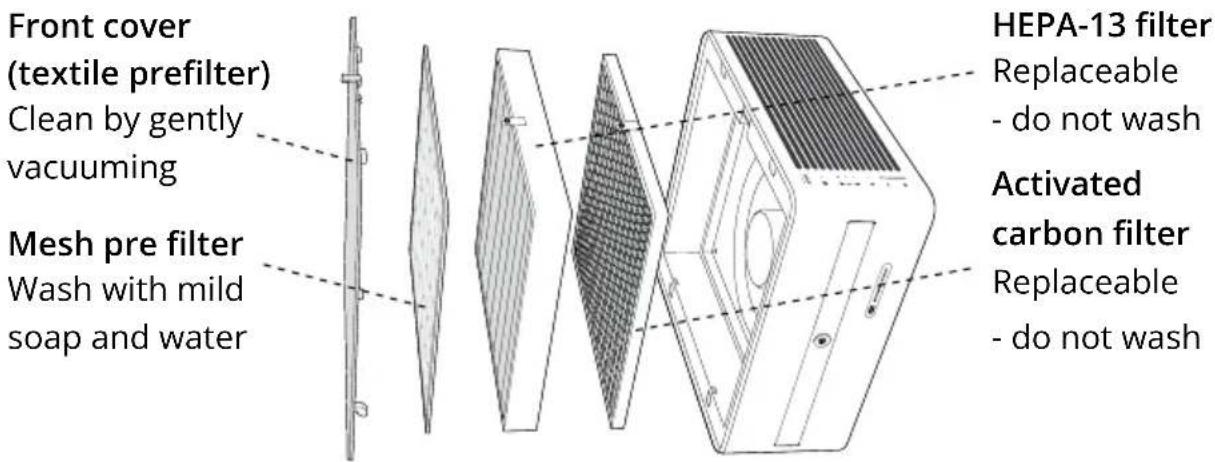
text_image
Front cover (textile prefilter) Clean by gently vacuuming Mesh pre filter Wash with mild soap and water HEPA-13 filter Replaceable - do not wash Activated carbon filter Replaceable - do not washGETTING STARTED
Remove Renew and the power cord from the box. Place the unit on the floor with the control panel facing up.
Quick start guide
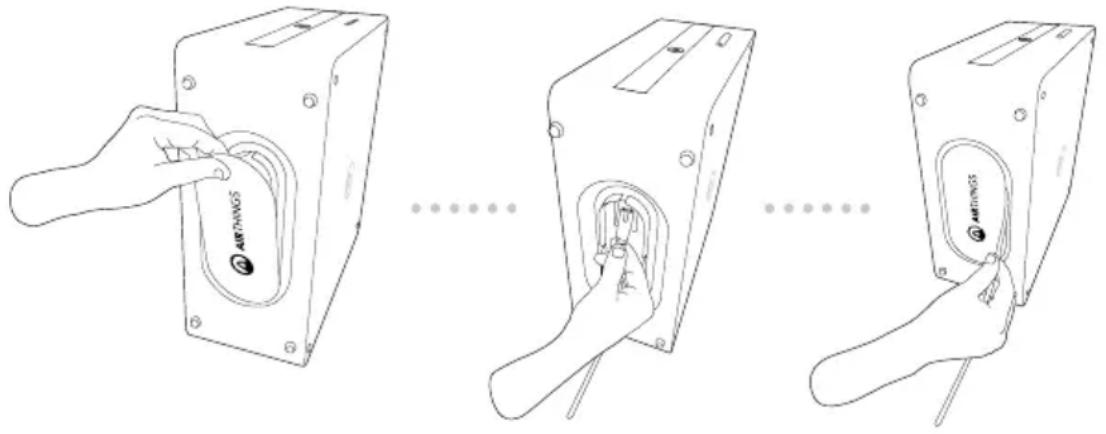
STEP 1. Connect the power cable to the unit.
Lay Renew gently on its side so you can access the cable storage compartment on the bottom side. Remove the compartment cover and connect the power cord. With the location of the power outlet and placement of the unit in mind, wind up any excess length of cable in the compartment after replacing the cover.
text_image
Diagram showing three sequential steps of a device with labeled components, likely illustrating a mechanical or electrical process.STEP 2. Connect to power
Plug the power cable into a 110V (US) 220-240V (EU/UK) electrical outlet. The unit enters Auto mode and the air quality sensor begins to sample the air.
STEP 3. Connect to WiFi
Download the Airthings app and follow the instructions to create an account, connect to your WiFi, and add Renew to your account. If you already have an Airthings account, tap Add device to add Renew and you're ready to go.
To disconnect from WiFi, go to the device settings in the app, or see instructions in this manual to "factory reset.
Note: For WiFi connectivity, Renew requires a 2.4 GHz band router and the Airthings app. The Airthings app requirements can be found in the App Store and Google Play.
Getting the most out of your Renew
Renew is designed to fit easily into your environment and offers a few different placement options.

text_image
Upright Upright with air outlet to the side Laid flatHowever you choose to place Renew in your room, we suggest you consider the following to get the best performance.
- Only place the unit on a level and stable surface.
- Don't place anything on top of Renew.
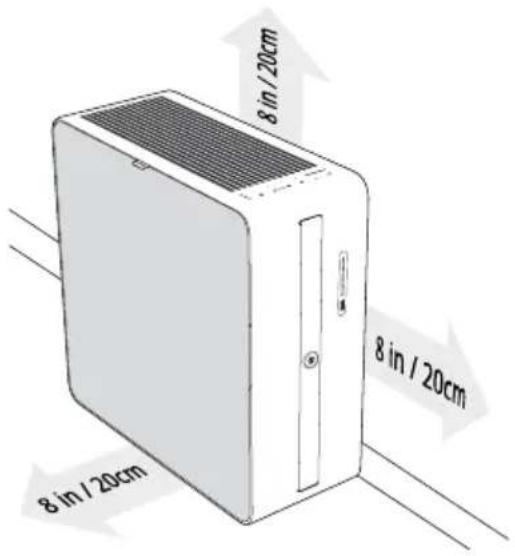
- Renew takes air in through the textile cover and blows it out through the vented surface next to the control panel. Make sure you leave at least 8" (20cm) of free space so that air enters and leaves Renew freely.
- Avoid blocking the flow of air into the particulate sensor. Leave at least 8" (20cm) around the opening for the sensor.
- Operate Renew in an enclosed space to get the quickest results and to operate efficiently.
text_image
8 in / 20cm 8 in / 20cm 8 in / 20cmMounting Renew on a wall
IMPORTANT NOTE: Make sure to use screws, drill bits, and fittings that are suitable for your type of wall material and the weight of the unit (13.5 lbs or 6 kg). Correct installation of the wall hook is essential and your responsibility. If you need help or are unsure, please contact a contractor. We do not accept any liability associated with the hanging of the Renew, including damage or injury resulting from incorrect assembly, mounting, or usage or liability due to the unit falling or the hook separating or dislodging from the wall.
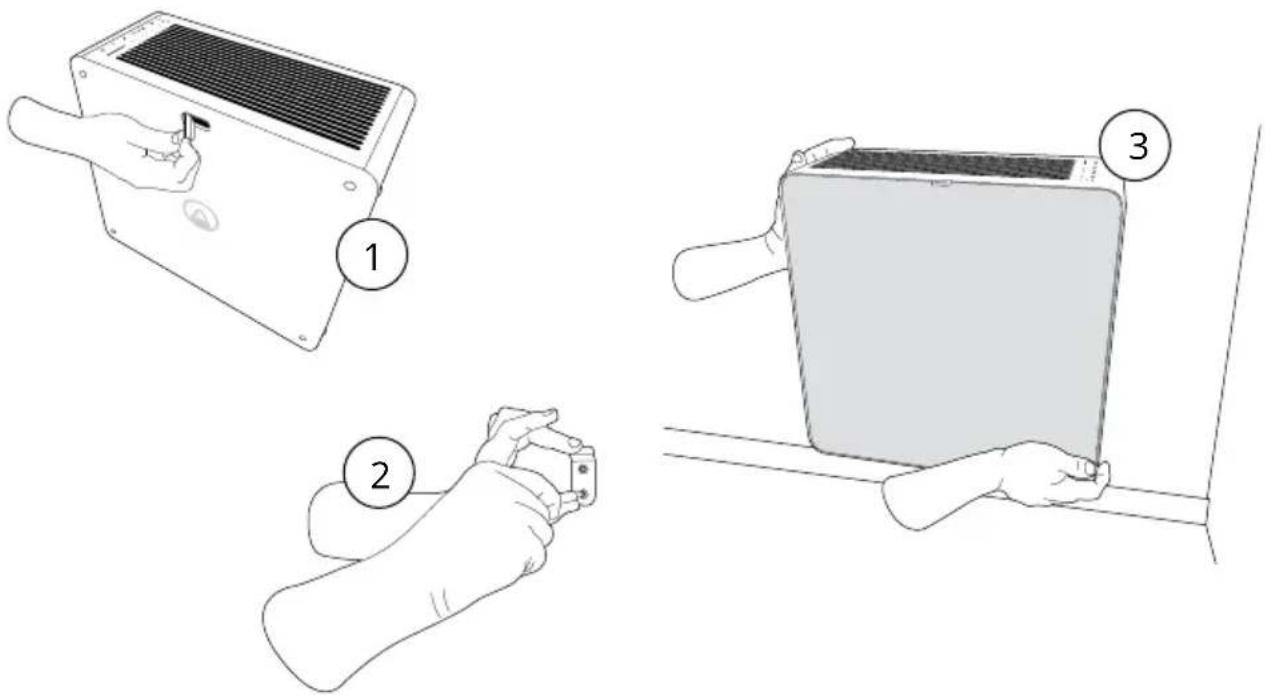
Renew can be mounted to a wall using the wall hook provided in the box. On the back side of the unit, there is an opening for this purpose. You should ONLY mount the unit with the textile cover facing out and the air outlets and control panel facing up. Never use the strap handle to hang the unit - it is not designed for that purpose.
We recommend wall-mounting the unit with the bottom side no more than 12" (30 cm) from the floor.
- On the back side of Renew, there's a small covered opening. Remove this cover and save it somewhere you can find it again. We suggest you use the cable compartment cover to store this piece.
- Using screws and other tools suitable for the wall material, attach the wall hook securely to the wall. Make sure the hook is firmly in place.
- Now hang the unit on the hook using the opening on the back side.
text_image
Illustration showing three steps of installing or adjusting a device panel, labeled 1, 2, and 3.Set it and forget it with Auto mode
You don't have to worry about when to turn Renew on or off or how fast to run the fan. We designed Renew with a high-precision, laser-based particulate matter (PM) sensor that keeps track of your room's air quality. As soon as it detects an increase in PM, it activates the appropriate fan speed to keep air quality from becoming a problem.
That's why we recommend using Auto mode during daytime hours. You can rely on great air quality while avoiding unnecessary energy use.
Fan safe feature
If Renew detects that the fan speed drops abnormally, the motor will automatically stop to avoid any further damage to the fan blades. This typically happens if items are accidentally dropped or fall into the air outlet grill.
USING THE CONTROL PANEL
The panel comprises a row of indicator lights next to control buttons for common operations. Additional operations can be activated by using a combination of buttons which are also described here.
Silent mode
Runs on the lowest speed for 8 hours with panel lights dimmed.
Child lock indicator
Press Auto and Boost together for 3 seconds to turn child lock on or off.
Air quality indicator
Indicates the room's current air quality in terms of the PM level.
$$ \mathrm{Red} = \mathrm{POOR} $$
(Over 25 g/m ^3 )
$$ \text { Yellow } = \text { FAIR } $$
(10 g/m ^3 to 25 g/m ^3 )
$$ \text { Green } = \text { GOOD } $$
(Less than 10 g/m ^3 )
Filter change indicator
Glows when it's time to replace the filters.
Check the Airthings app for easy ordering.
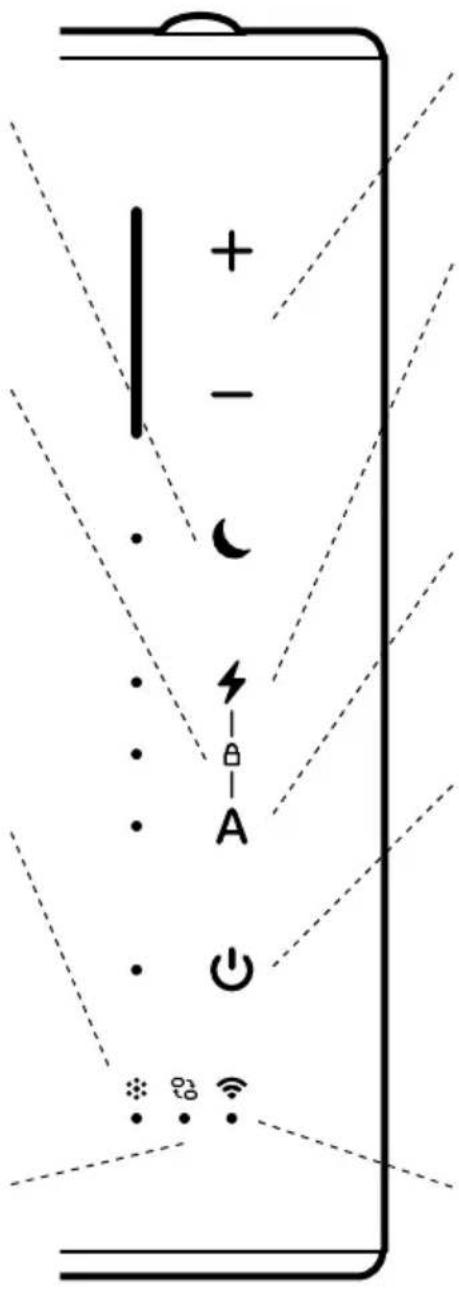
For manual operation of the 5 speeds.
Boost mode
Runs on top speed for 1 hour.
Auto mode
Set & forget. Adjusts fan speed based on current air quality.
Standby
Turns the purifier function on or off. When off, the air quality sensor continues to operate.
WiFi status
Glows steady when connected to Internet via WiFi. Is off if not connected to WiFi. Blinks if connected to WiFi but there is no Internet connection.
Here are the additional operations you can perform using the onboard control panel:
| Reset the filter change indicator | Do this right after changing the filters. Press and hold the Silent mode button for 5 seconds. This resets the filter algorithm and turns off the filter change indicator light. |
| Turn off button beeps | Press the Boost mode button for 5 seconds to turn off the beeps when the buttons are pressed. Do the same to turn the beeps back on. |
| Dim the panel's LED lights | The LED lights are always dimmed when you activate Silent mode. You can manually dim lights for ALL modes by pressing the Auto mode button for 5 seconds. Do the same to turn the lights back on. |
| Reset the unit to factory settings | Press and hold both the + and - buttons for 10 seconds to factory reset the device. When you factory reset the device all WiFi connections are erased and the device is ready to be paired to a new account in the app. The device will continue to show in your app unless you delete it, but you can no longer see new PM data or access smart functionality. |
MAINTAINING YOUR RENEW
There isn't much to do to keep your Renew running effectively for years. Along with changing the filters as needed, we recommend keeping the unit clean and free from excess dust.
Changing the filters
Renew tells you when to change the filter based on a smart algorithm. This ensures everyday filter efficiency if the air is more polluted than average. The Filter change indicator on the control panel will illuminate. You can also check the remaining filter life in the app at any time.
You can order replacement filters at airthings.com, in the Airthings app, or at selected authorized resellers.
Once you have the replacement filters on hand, here's what to do:
- Unplug the device before changing the filters.
- Remove the textile front cover (outer prefilter) and inner prefilter.
-
Now remove the old filter and replace it with the new one. Remember to insert the new filter with the pull-tab face-up and out.
Tip: Place the used filter directly into the bag the new filter comes in to prevent dust and particles from scattering. -
Reassemble the prefilters and plug the unit back in.
-
Finally, reset the filter change algorithm and turn off the Filter change indicator light. To do this, press and hold the Silent mode button for 5 seconds.
Do not try to touch the fan blades when changing the filters.
Keeping it clean
Before cleaning Renew, it's a good idea to unplug it.
Wipe the outside of the unit with a clean, dry cloth to remove any accumulated dust and dirt. Never use cleaning liquids to clean Renew - if you must, only use a lightly damp cloth. Water or moisture should never enter the unit.
The front cover (also a prefilter) should be cleaned using a vacuum at a very low and gentle speed. Be careful not to push hard on the textile or you risk damaging it.
The mesh prefilter can be cleaned with water and a small amount of mild dish soap. If you have a handheld shower attachment, that's the easiest way to do this. Use a gentle stream of water or submerge the filter and gently move it back and forth. You must let the mesh prefilter dry completely before putting it back in. Moisture can increase the risk of mold growing inside the unit.
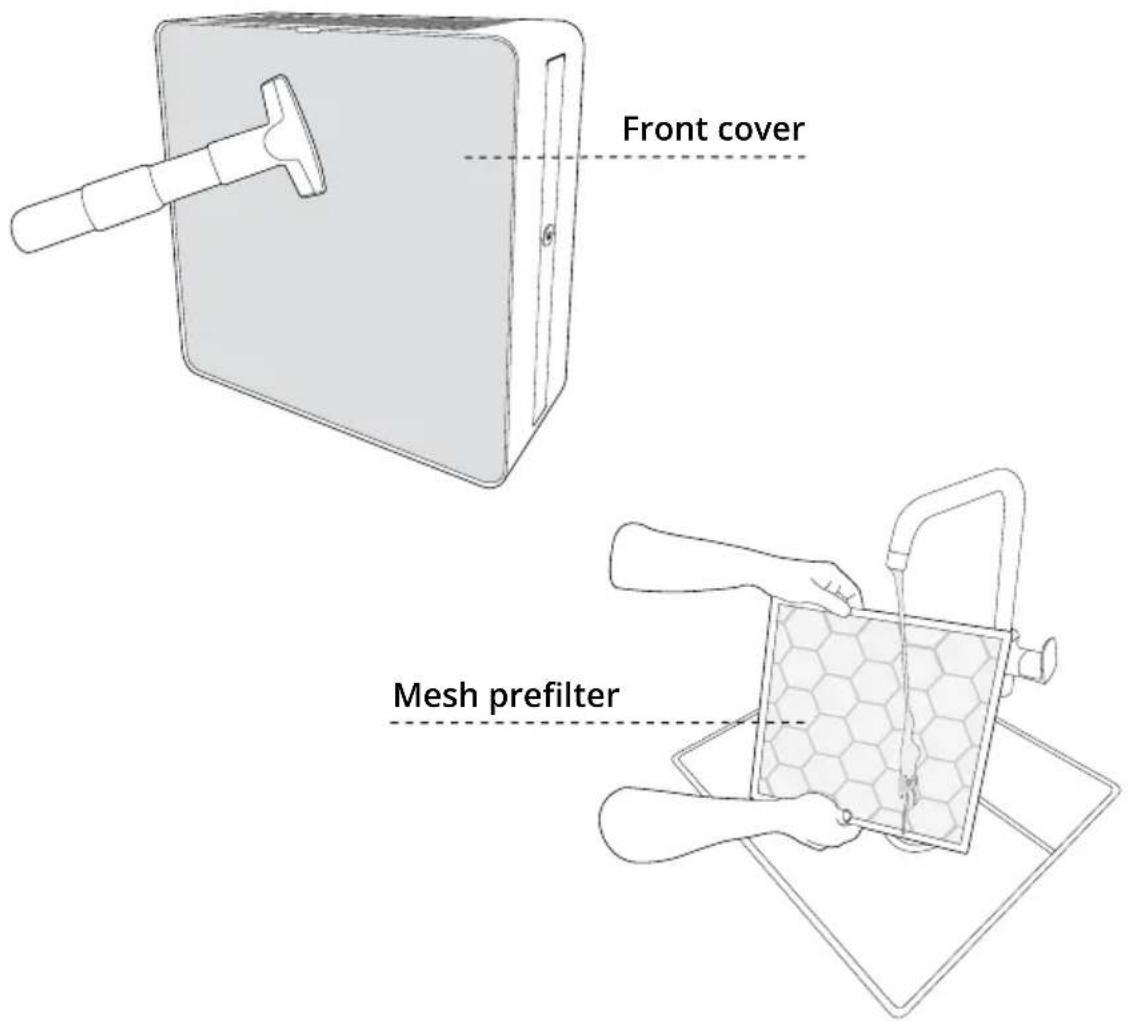
text_image
Front cover Mesh prefilterENERGY EFFICIENCY
This product earned the ENERGY STAR label by meeting strict energy efficiency guidelines set by the U.S. EPA. Room air cleaners have demonstrated the potential for improving air quality and providing health benefits. EPA does not endorse manufacturer claims regarding the degree to which a specific product will produce healthier indoor air. The energy efficiency of this ENERGY STAR-certified model is measured based on a ratio between the model's CADR for smoke and the electrical energy it consumes, or CADR/Watt.
WARRANTY
Your purchase is covered by your region's standard warranty.
WASTE MANAGEMENT
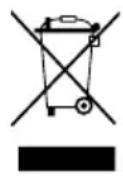
The symbol indicates that this product should not be thrown away in household waste. This product must be delivered to a recycling station or container for electrical appliances and electronic equipment. This is done to avoid health risks and prevent damage to the environment. Local businesses (or the environmental station in your neighborhood) are required by law to accept and recycle such products, as a means of environmentally friendly waste management.
NOTE! Discard the used filter as well as any plastic packaging according to local recycling guidelines.
REGULATORY INFORMATION
Regulatory information Canada
Changes or modifications not expressly approved by the party responsible for compliance could void the user's authority to operate the equipment.
This device complies with Innovation, Science, and Economic Development Canada's license-exempt RSS(s). Operation is subject to the following two conditions: (1) This device may not cause interference; and (2) This device must accept any interference, including interference that may cause undesired operation of the device.
RF exposure safety. This product is a radio transmitter and receiver. It is designed not to exceed the emission limits for exposure to radio frequency (RF) energy set by the ISED. The antenna must be installed and operated with a minimum distance of 20 cm between the radiator and your body. This transmitter must not be co-located or operating in conjunction with any other antenna or transmitter.
CAN ICES-3 (B)/NMB-3(B)
This Class B digital apparatus complies with Canadian ICES-003
Regulatory information USA
Changes or modifications not expressly approved by the party responsible for compliance could void the user's authority to operate the equipment.
This device complies with part 15 of the FCC Rules. Operation is subject to the following two conditions:
(1) This device may not cause harmful interference, and (2) this device must accept any interference received, including interference that may cause undesired operation.
Class B device notice. NOTE: This equipment has been tested and found to comply with the limits for a Class B digital device, under part 15 of the FCC Rules. These limits are designed to provide reasonable protection against harmful interference in a residential installation. This equipment generates, uses, and can radiate radio frequency energy and, if not installed and used following the instructions, may cause harmful interference to radio communications. However, there is no guarantee that interference will not occur in a particular installation. If this equipment does cause harmful
interference to radio or television reception, which can be determined by turning the equipment off and on, the user is encouraged to try to correct the interference by one or more of the following measures:
- Reorient or relocate the receiving antenna.
- Increase the separation between the equipment and receiver.
- Connect the equipment to an outlet on a circuit different from that to which the receiver is connected.
- Consult the dealer or an experienced radio/TV technician for help.
RF exposure safety. This product is a radio transmitter and receiver. It is designed not to exceed the emission limits for exposure to radio frequency (RF) energy set by the Federal Communications Commission. The antenna must be installed and operated with a minimum distance of 20 cm between the radiator and your body.
This transmitter must not be co-located or operating in conjunction with any other antenna or transmitter.
Regulatory information EU
Airthings products for sale in the EU comply with EU Directives. The full text of the EU Declaration of Conformity is available upon request by emailing support@airthings.com.
Regulatory information UK
Airthings products for sale in the UK comply with UK Statutory Instruments. The full text of the UK Declaration of Conformity is available upon request by emailing support@airthings.com.
STATEMENT OF COMPLIANCE
Product Security and Telecommunications Infrastructure, UK Statutory instruments 2023 No. 1007, schedule 1
Product: Renew Purifier, Model: AP-1, Serial #: 410xxxxxxxx
Designed by Airthings ASA, Wergelandsveien 7, 0167 Oslo, Norway
Made in China for Airthings ASA by Zhangzhou iHastek Inc., No. 10, Jinda Road, Wanlida Industry Zone, Jinfeng Industrial Estate, Zhangzhou, Fujian, China
Product is compliant to schedule 1 security requirements. Product is supported for min 2 years beyond product production date code. Security Incidents to be reported to security@airthings.com.
Place of issue Date of issue OSLO March 8th 2024
text_image
bunnan hynEmma Tryti, CEO, signature
Class 1 Laser information
Classified as Class 1 Laser products per IEC60825-1 Ed. 3. These devices comply with 21 CFR 1040.10 and 1040.11, except for conformance with IEC 60825-1 Ed.3., as described in Laser Notice No. 56, dated May 8, 2019. Caution: These devices contain one or more lasers. Use other than as described in the user guide, repair, or disassembly may cause damage, which could result in hazardous exposure to infrared laser emissions that are not visible. This equipment should be serviced by Airthings or an authorized service provider.
ISM Frequency Bands and Output Power
Frequency Range for Bluetooth, and 802.11b/g/n WiFi is 2400.0 - 2483.5 MHz Output power for Bluetooth is < 10mW Output power for 802.11b/g/n WiFi) is < 100mW
SUPPLIER DECLARATION OF CONFORMITY
The following documents are available upon request:
- Conforms to UL STD-507
• Certified to CSA STD.C22.2 No.113
• US Supplier Declaration of Conformity under FCC part 15B
• Canada Supplier Declaration of Conformity under ICES-003 - Conforms to LVD / RED / ROHS
• EU / UK Declaration of Conformity under CE / UKCA

AIRTHINGS
Need more help?
Find technical articles at help.airthings.com
Contact our team at support@airthings.com
Follow @airthings on


www.linktr.ee/airthings

AIRTHINGS
LA QUALITÉ DE L'AIR, NOTRE MISSION PREMIÈRE
text_image
8 in / 20cm 8 in / 20cm 8 in / 20cmtext_image
Illustration showing three steps of installing or adjusting a device panel, labeled 1, 2, and 3.DÉCLARATION DE CONFORMITÉ
text_image
Diagram showing three steps of a switch mechanism with labeled components and directional arrows indicating movement.text_image
8 in / 20cm 8 in / 20cm 8 in / 20cmtext_image
Illustration showing three steps of installing or adjusting a device panel, labeled 1, 2, and 3.text_image
Diagram showing three steps of a switch mechanism with labeled components and connection pointstext_image
8 in / 20cm 8 in / 20cm 8 in / 20cmtext_image
Illustration showing three steps of installing a device: panel, hand tool, and screen with labeled parts.(Less than 10 g/m ^3 )
text_image
8 in / 20cm 8 in / 20cm 8 in / 20cmAirthings America Inc.
9 Main St, Ste 2F
Sutton, MA 01590, USA
Need more help?
Find technical articles at help.airthings.com
Contact our team at support@airthings.com
Follow @airthings on


www.linktr.ee/airthings