
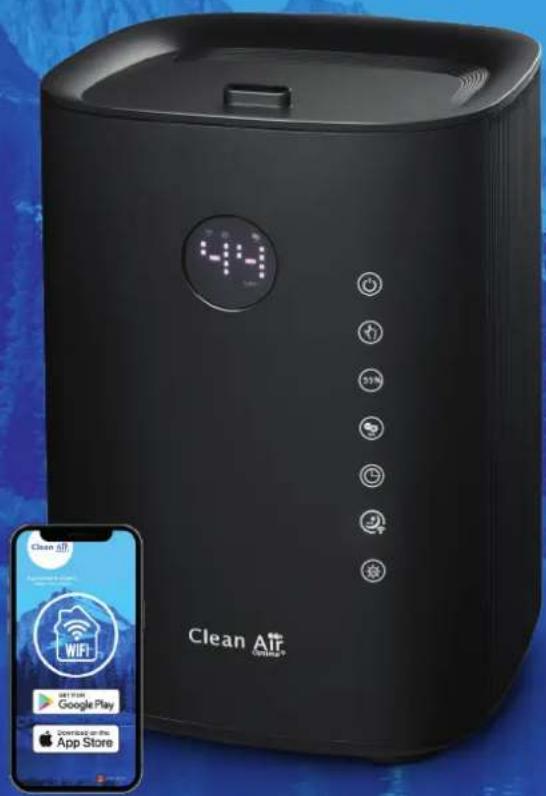
CA-605B Smart - Humidifier Clean Air Optima - Free user manual and instructions
Find the device manual for free CA-605B Smart Clean Air Optima in PDF.

| Product type | Ultrasonic humidifier |
| Brand | Clean Air Optima |
| Model | CA-605B Smart |
| Dimensions | 210 x 215 x 290 mm |
| Weight | 2.8 kg |
| Power supply | 220V - 240V, 50/60 Hz, 30 W |
| Water tank capacity | 3.8 L |
| Humidification capacity | 120 ml/h (min) - 480 ml/h (max) |
| Coverage area | Up to 65 m² / 140 m³ |
| Noise level | < 25 dB(A) |
| Mist settings | Low, Medium, High, Auto |
| Humidity control | 30% to 75% in 5% increments |
| Timer | 1 to 12 hours |
| Ionizer | Yes, > 3,000,000 ions/cm³ |
| UV sterilization lamp | Yes |
| Sleep mode | Yes |
| Built-in WiFi | Yes, compatible with CleanAirOptima app |
| Aromatherapy | Yes, with aroma box and sponge |
| Water filter | W-02 (replace every 2-3 months) |
| Automatic shut-off | Empty tank |
| Cleaning | Transducer and water tray: weekly; tank: every 3 days |
| Recommended descaling agent | Clean Air Optima Cleaner & Descaler |
| Warranty | 2 years |
Frequently Asked Questions - CA-605B Smart Clean Air Optima
User questions about CA-605B Smart Clean Air Optima
0 question about this device. Answer the ones you know or ask your own.
Ask a new question about this device
Download the instructions for your Humidifier in PDF format for free! Find your manual CA-605B Smart - Clean Air Optima and take your electronic device back in hand. On this page are published all the documents necessary for the use of your device. CA-605B Smart by Clean Air Optima.
USER MANUAL CA-605B Smart Clean Air Optima
Ultrasonic Humidifier Clean Air Optima® CA-605B Smart
(EN) User manual
(DE) Gebrauchsanweisung
(NL) Gebruiksaanwijzing
(FR) Mode d'emploi
(ES) Manual del usuario
(IT) Manuale d'uso
(PL) Instrukcja obsługi
(RO) Manual de utilizare
(CZ) Uživatelská příručka
(LT) Naudotojo vadovas
(EE) Kasutusjuhend
(LV) Lietošanas pamācība
Find more languages on:
www.cleanairoptima.com/
info/manuals
(RU) Руководство
пользователя
(MK) Прирачник
за користење
Read these instructions carefully before you start using the Ultrasonic Humidifier and keep the manual for later usage.
Clean Air Optima®
Table of contents Page
| English | 3 | |
| German | 20 | |
| Dutch | 37 | |
| French | 54 | |
| Spanish | 71 | |
| Italian | 88 | |
| Polish | 105 | |
| Czech | 122 | |
| Romanian | 139 | |
| Lithuanian | 156 | |
| Estonian | 173 | |
| Latvian | 190 |
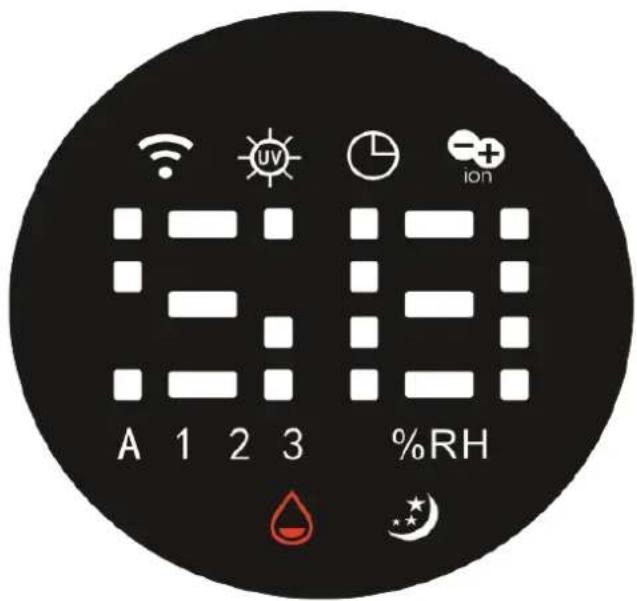
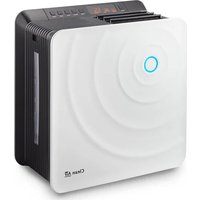
CA-605B Smart / Main unit
CA-605B Smart / Display

Clean Air Optima®
English
Thank you for purchasing the Clean Air Optima® Ultrasonic Humidifier CA-605B Smart.
We wish you many years of healthy indoor air with this efficient and effective product.
These instructions describe the safety precautions to be observed during operation. They are meant to prevent injuries and to avoid damaging the device.
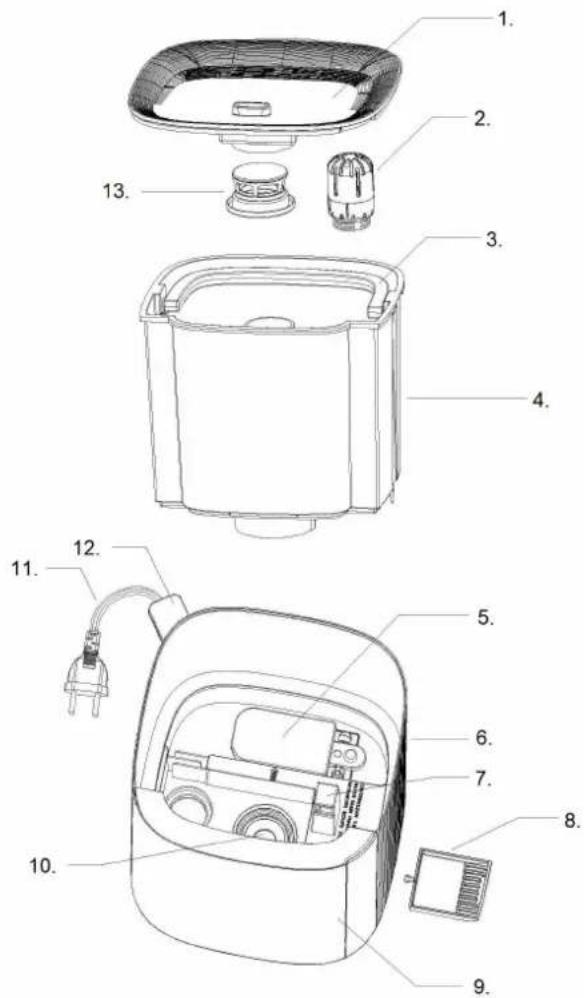
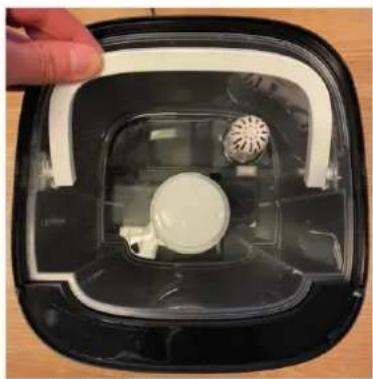
Description of the device
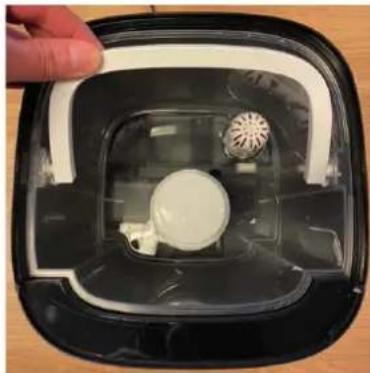
The device consists of the following main components:
- Top panel
- Water filter
- Handle
- Water tank
- Float
- Panel
- Air outlet
- Aroma box
- Front panel
- Tranducer
- Power Cord
- Sensor
- Mist nozzle
Safety warnings
This device may only be used in accordance with these safety instructions. Take the following steps to minimize the risk of personal injury caused by for example electric shocks or fire.
- Only for indoor use. Do not use or store outdoors.
- Use proper voltage: AC 220V - 240V, 50/60Hz.
- The inner ultrasonic transducer is highly sensitive. Do not touch it with bare fingers or scrape it with metal tools, or it will reduce mist output. When cleaning this area please use a small cleaning brush, cotton swab or tooth brush. Do not use hot water as it may damage the misting parts.
- The device is not intended to be used by children or persons with reduced physical-, sensory- or mental capabilities, unless they are supervised by a person responsible for their safety.
- Children should be kept away unless continuously supervised.
- To safely use the device, put it in a steady, horizontal position. Do not move while using.
- To prevent interference and damage to other electronic devices, this machine should be placed at least 1 meter away from a computer, television, radio or other electronic equipment.
- Do not use the device when there is visible damage on the electrical cord or on the device itself. Do not repair the device yourself in case of damage. Never pull the device by its cord. If the power cord is damaged, then it must be replaced by an authorized service person to prevent electric shock or fire.
- Repairs may only be performed by authorized service personal. Do not try to repair the device yourself to prevent electric shock or fire.
- Always remove the plug from the socket when the device is not being used or when you clean internal or external parts of it.
- Remove the water from the tank before moving the device.
- Only use power cords provided.
- Do not use the device in rooms where inflammable liquids or gases are stored, close to heat sources or in particularly humid rooms like the bathroom, shower or swimming pool.
- To prevent malfunctions, never insert strange objects into the device.
- Never dissemble or replace the device's inner parts.
- Do not place the device in direct sunlight, to avoid that the device discolours.
- Never immerse the unit in water or other liquids.
- Do not touch the power cord with wet hands.
- Clean and dry the device before storage (including the removal of all water from the inside of the device). Store the machine in a cool and dry place outside the reach of children.
- Do not clean the water sink when the water is still hot.
- Use, maintain and clean the device as described in this manual.
Clean Air Optima®
Operating instructions
Before getting started, remove the Clean Air Optima® CA-605B Smart from its box and allow it to become accustomed to the room temperature for at least 30 minutes especially if the machine is cold from the outside air. Place the device on a solid, level and front water-insensitive surface, approx. 60 cm from the floor and at least 20 cm from the wall.
The CA-605B Smart is designed to operate at temperatures between 5 -40 °C and relative humidity of less than 75%.
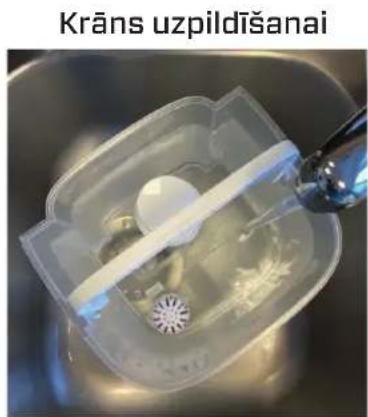
To get started, remove the top panel from the device. Grab the water tank by the handle and remove the water tank.
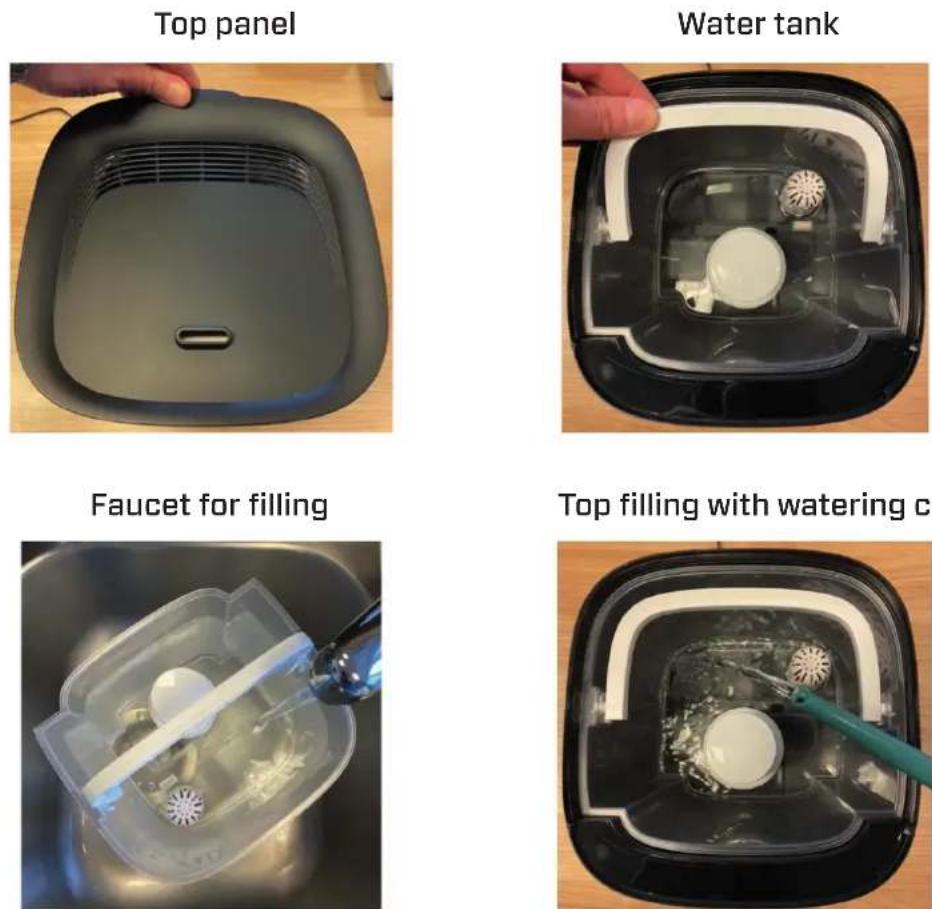
Then place the water tank under the faucet for filling, grasping it from the handle from the water tank. Fill the tank with tap water (or other clean water source with water temperature under 40°C). Ensure that the basin is clean and then carefully place the water tank back in the lower body.
Top filling: The water tank can also be refilled with a watering can.
Directly from the top of the humidifier.
Wait a few seconds until the water tank starts to release water into the basin.
Plug the power plug into a suitable power outlet, a signal sounds to indicate that your device is in standby mode.

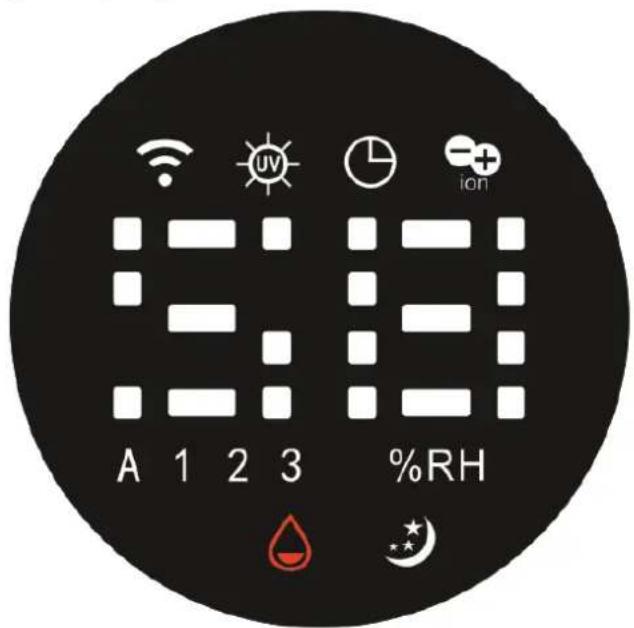
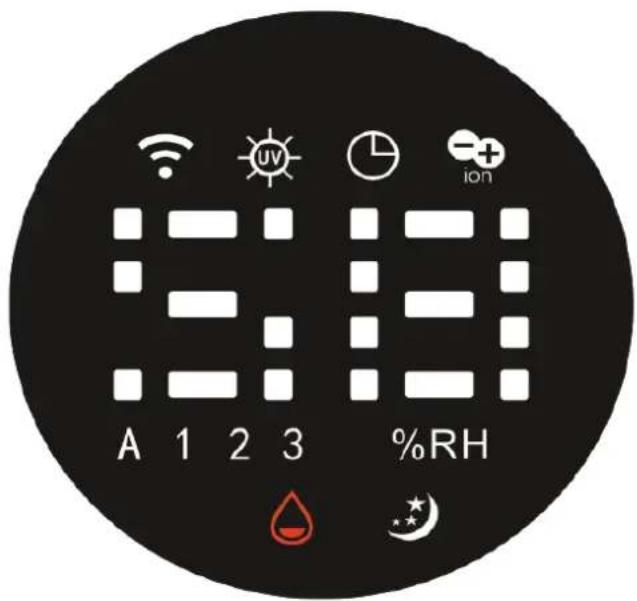
Power Button:
Press the Power Button to activate the humidifier. The machine is now operating in manual mode. It will release cool mist on a constant basis with the mist intensity level automatically set to medium.

Manual Button:
The Manual Button changes the mist level (low, medium, high, automatic). There are 3 levels of mist output available. If the device is in automatic mode, it will automatically adjust the mist intensity. You can only set the humidity in automatic mode. In mist level (low, medium, high) the device continues to emit mist regardless of the humidity setting.

Humidity Button:
Pressing the Humidity Button, you can select the desired humidity level by pressing this button repeatedly until the required humidity level is displayed (from 30% to 75% in increments of 5%). Once you select your desired humidity level, simply stop pressing the button and your humidity level will be set. The display will blink 3 times and then the setting is saved.
When the humidity level in the room reaches the set humidity level, the machine will go into automatic sleep state and stop producing mist. When the room's actual humidity level drops below your set humidity level, then the machine will start producing mist again. This only applies in automatic mode.

Negative Ion Button:
Pressing the Negative Ion Button will activate the negative ion generator with a total capacity of >3.000.000 negative ions / cm ^3 that are spread through out the entire room and thereby neutralize pollutants and smells. Negative ions attach onto dust particles, microorganisms and other unwanted particles in the air and connect them to each other. This way, the particles become heavier than air and fall onto the ground so that you can no longer breathe them in. Press the button again to turn off the Negative Ion function.
Negative ions are most found in the forest, mountains and by the sea. Negative ions ensures fresh and healthy air.

Timer Button:
Pressing the Timer Button sets the timer. The timer function determines how many hours the humidifier will operate. You can set the timer simply by pressing it once for each hour that you would like to run the device. The timer can be set from 1 hour to 12 hours. As time passes, the time value decreases until it goes to 00:00 and the device shuts off.
To turn off the timer function, press and hold the Timer Button for 3 seconds.
Clean Air Optima®

Sleep Mode:
When the sleep mode is activated, the display will turn off. Only the sleep mode light is on. The mist output from the humidifier will be operating in "low level". Press the button twice for activate and press the button twice for turning off sleep mode.

WiFi Mode:
Press the button 3 seconds to open the WiFi network.
Press the button for 3 seconds to reset the WiFi network, when the device is connected to iPhone, iPad or android device.

UV-Light Button:
Pressing the UV-Light Button, the device starts the UV Sterilization function, which kills the bacteria in the mist output airflow, bevor the mist enters into the room.
The UV-Light icon is shown on the LED display. Press the button again to stop the UV-light function.

Water tank empty indicator light:
Automatic shutdown when water tank is empty.
Should the water tank be empty, a threefold acoustic signal sounds. The corresponding symbol lights up in the display while the remaining indicators go out. The device will automatically stop humidifying. In this case, turn off the device with the ON/OFF button. Let the device cool down before pouring any more water in the tank.
Ensure that the water tank is always completely refilled.
Display:
If the device is switched on, the display will automatically dim after 15 seconds.
Touch a button first to activate the display and then touch the button again to activate the function.
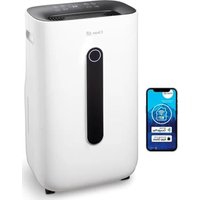
Operation with Clean Air Optima® App
Connectivity
Compatibility with smartphone and tablet:
iPhone, iPad and Android devices
Device connets via WiFi with App:
CleanAirOptima
About the Clean Air Optima® App
Set up WiFi connection
- Download and install the Clean Air Optima® App in the App Store or Google Play Store.
- Make an account and log in.
- Plug the device into the power socket and switch it on. The WiFi indicator will blink.
- Make sure that your smartphone or tablet is successfully connected to your WiFi network.
- Open the Clean Air Optima® App and click on 'Add device' + . Your device is listed and you can select it. If not choose 'Auto Scan'. Follow the on-screen instructions to connect the device to your network.
- Choose to add the Clean Air Optima ^® device on the App, follow the instructions in the App.
- When the device is paired, the WiFi indicator light stays on constantly.
- After the configuration is successful, you can use the Clean Air Optima® App to operate the device.
Note:
- If your default network has changed, reset the WiFi connection, follow step 3 to 8 in the 'Set up WiFi connection' section.
- If you want to pair multiple devices to your smartphone or tablet, you have to do this one after the other.
- Make sure that the distance between your smartphone or tablet and the device is less than 5 meters and there are no obstacles. Also make sure you are in the same room as the device.
Reset the WiFi function:
Reset the WiFi by pressing the 'Sleep Mode' button for 3 seconds, the indicator light of the WiFi will blink rapidly.
Turn off WiFi function:
The Wi-Fi function will turn off after 30 seconds if no connection is established. If you cannot connect to the humidifier, press and hold the Wi-Fi/Sleep button again for 3 to 6 seconds to turn Wi-Fi on and reconnect.

Clean Air Optima®
Connect devices to multiple phones
Note: First the other person needs to install the Clean Air Optima® App on his/her phone and create a new account.
Share the device with limited access:
You can choose to share 1 device with several persons.
This person will then have access, but will not be able to manage all the settings.
Follow the instructions below to share the device with several persons:
- Go to the relevant device.
- Go to the pencil or three dots in the top right.
- Select 'Share device.'
- Choose 'Add sharing'.
- Choose the sharing method e.g. via email, whatsapp, sms etc. and continue.
- The device will automatically appear in the Clean Air Optima® App with the other account.
Share device with full access:
You can add a person or several persons to your home management.
That person will then have access to all your devices that are already linked and has full rights and permissions. You will always remain the main administrator.
Follow the instructions below to add someone to your home management:
- Open the Clean Air Optima ^® App and go to 'Me'.
- Then choose 'Home Management'.
- Choose 'Create a home'.
- Select the relevant 'Home' and 'Add member'.
- Choose the sharing method e.g. via email, whatsapp, sms etc. and continue.
- The corresponding 'Home' will automatically appear in the Clean Air Optima® App of the person with whom you have shared your 'Home'.
- On the other account:
Go to the home screen from the Clean Air Optima® App. Go to the top left and select the 'Home'.
Preparation Clean Air Optima® Water Filter W-02
The Water Filter W-02 reduces the limescale in the water and the undesirable emission of limescale particles into the room surroundings. Effective for one to three months, depending on the water hardness. Install a new Water Filter W-02 every 2 to 3 months, depending on the water hardness.
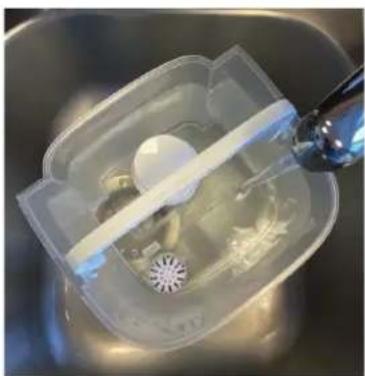
- Unscrew the Water Filter W-02 from the bottom of the water tank.
- Rinse the Water Filter W-02 for 2 minutes under cold running tap water.
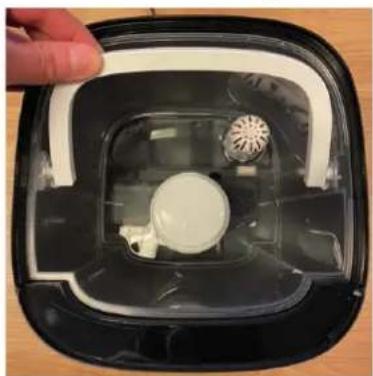
natural_image
Interior view of a clean, laboratory apparatus with a perforated material and a white fan-shaped device (no visible text or symbols)
natural_image
Close-up of a hand pouring liquid into a small white cylindrical container on a stainless steel sink (no text or symbols visible)- Screw the Water Filter W-02 to the bottom of the water tank.
Dispose of the saturated Water Filter W-02 with your regular household waste.
The Water Filter W-02 should not be used longer than specified. You can order the Water Filter W-02 in our online store at www.cleanairoptima.com.
Replacing the Clean Air Optima® Water Filter W-02
The Clean Air Optima CA-605B Smart is equipped with a filter lifespan surveillance mechanism that signals that the water filter have to be replaced after 400 working hours. To show that the
Water Filter W-02 need to be replaced, the humidifier emits a double zero indicator light. Reset the timer for the water filter by pressing and holding the power button for about 3 seconds. If the indicator light goes out, the timer has been successfully reset.
Clean Air Optima®
Aromatherapy
Activating the aroma function:
- Remove the aroma tray from the bracket by pressing the aroma box.
- Pour 5-10 drops of Clean Air Optima® essential oil onto the sponge.
- Put the aroma tray back into the bracket.
- When you turn on your air humidifier, the aroma function will be activated.
- If you want to deactivate the aroma function, or should the device not be in use for extended periods of time, remove the aroma sponge from the compartment and wash it with a little of mild soap water. Let it dry completely before placing it back in the aroma compartment. Basically the aroma sponge is reusable.
Important
In order to reach the best results and to enjoy your ultrasonic air humidifier as much as possible, we advise to read carefully the following instructions regarding the use of essential oils in the ultrasonic air humidifier CA-605B Smart.
Use of essential oils in the CA-605B Smart
Use our high quality essential oils and enjoy your personal aromatherapy! A scent sensation at its highest level!
You can find high quality essential oils with many different scents in our assortment. They perfectly fit to the ultrasonic air humidifier CA-605B Smart and have been specially developed for the use with this ultrasonic humidifier:
You can order the Essential Oils in our online store at www.cleanairoptima.com.

Warning!
The use of other essential oils not made for this air humidifier or other additives (for example: fragrances and water purification products) can damage the air humidifier and must NOT be used! Never put other pure essential oils or other additives into the water tank resp. the waterbasin! Even a small quantity can damage the plastic and cause cracks.
The material is not made for the use of additives. One drop is enough to damage the water tank/ waterbasin and disable the device. Devices that are damaged through additives are excluded from the guarantee.
Cleaning and maintenance
You can ensure that your Clean Air Optima® CA-605B Smart humidifier will provide years of trouble-free operation by following a few simple maintenance procedures. If your water is hard and contains high concentrations of calcium and other minerals, over time white dust (lime) will start to settle on the various surfaces in the room. A white deposit (lime scale) will also form in the water basin, on the transducer and on the interior of the water tank. Lime deposits will impair the proper functioning of the transducer and the efficient hygienic humidification of the unit.
We recommend the following:
-
Clean the transducer and the water basin once a week if you use the appliance daily with Clean Air Optima® Cleaner & Descaler.
-
As soon as the water tank needs refilling, pour out any remaining water and fill it with fresh water.
-
Clean the entire device and keep all parts completely dry when the device is not in use.
Specially developed for Clean Air Optima® humidifiers:
- Not aggressive
- Protects plastic and ceramic materials of the humidifier
- Odour neutral
- Cleans & descales quickly and thoroughly
- Biodegradable
You can order the Clean Air Optima ^® Cleaner & Descaler from our online shop at www.cleanairoptima.com.
Clean Air Optima®
Cleaning the transducer and water basin
Unplug the device.
During cleaning and descaling, the device must not be used.
Remove any splashes of Clean Air Optima ^® Cleaner & Descaler from work surfaces or the outside of the device with a soft, damp cloth.
natural_image
Close-up of a hand inserting a plastic clip into a device casing, with a red upward arrow highlighting the component (no text or symbols visible)Transducer
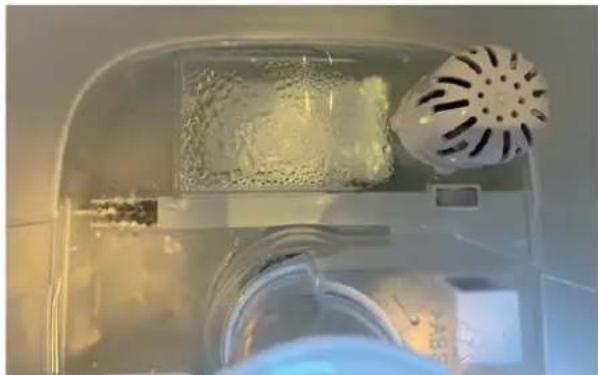
- Pour two capfuls of Clean Air Optima® Cleaner & Descaler into the water basin (one onto the surface of the transducer and one in the water basin) and leave for between two and five minutes.
- Carefully remove the mineral (lime) layer from the surface of the transducer with a small brush, cotton swab or toothbrush.
Caution: never use sharp or hard objects to clean the transducer. - Then add water up to the rim of the water basin and leave for a minimum of 30 and a maximum of 60 minutes.
- Rinse the transducer and water basin thoroughly with water.
- If there are still traces of limescale visible, we recommend that you repeat the cleaning and descaling process.
- Clean the inside of the water tank with a mild detergent and rinse with clean water.
After cleaning and descaling, your device is hygienically clean, free of limescale, free of bacteria, free of viruses and immediately ready for use again.
Please note:
For cleaning and descaling, the device must be turned off/unplugged, so that no acid is released into the air via aerosols through ultrasonic misting.
Cleaning the watertank
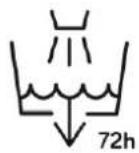
The water must be changed regularly in the water tank. The water should not remain in the water tank for more than 3 days.
- Please note that high humidity can promote the growth of biological organisms in the environment.
- Do not let the area around the humidifier get damp or wet. If moisture occurs, turn down the humidifier output. If the humidifier output volume cannot be reduced, use the humidifier intermittently. Do not allow absorbent materials such as carpeting, curtains, drapes or tablecloths to become damp.
- Pull the plug out of the socket during filling and cleaning.
- Never leave water in the tank when the appliance is not in use.
- Empty and clean the humidifier before storage. Clean the humidifier before next use.
- Clean the inside of the Water Tank with a mild detergent and rinse with clean water.
Warning: Microorganisms that may be present in the water or in the environment where the device is used can grow in the water tank and be blown into the air. This can lead to health risks if the water is not changed and the tank is not properly cleaned every 3 days.

Troubleshooting
The following is a troubling shooting guide to help you solve any issues that you may have using the Clean Air Optima® Ultrasonic Humidifier CA-605B Smart.
| Problem Possible Cause Solution | ||
| No mist diffused. | Power plug not plugged in.ON / OFF button not activated.Empty water tank.Not enough water in tank. | Plug in device.Press ON / OFF button.Fill tank with water.Refill tank with water. |
| The mist has a strange odour. | A new device.It either has dirty water or the water has been stagnant too long. | Remove the water tank, unscrew the lid and let it air out in a cool area for 12 hours.Clean the water tank and refill with clean water. |
| The volume of spray mist is too low. | Too much mineral scale in the water basin and on the transducer.Water is too dirty or water was kept too long in the tank. | Clean the water basin and the transducer with:Clean Air Optima® Cleaner & Descaler.Clean the water tank and refill with clean water. |
| Device is noisy. | Water tank not positioned correctly.Not enough water in the water tank.Device is on an unstable surface. | Correctly position water tank on the base.Refill water in the water tank.Place device on solid and even ground. |
| Spray mist is coming out of the area around the mist nozzle. | There are gaps between the housing around the nozzle and the top of the water tank/ top panel. | Remove the top panel from the water tank and clean with a damp cloth. Reattach to the water tank.Check whether the top panel is properly connected to the panel. |
| Operation with Clean Air Optima® App does not work. | Smartphone or tablet is not connected to WiFi network.The device has no connection to the network. | Switch off the device and reset the WiFi on the device by pressing the Sleep mode button for 3 seconds, the indicator light of the WiFi will blink. Than follow step 3 to 8 from chapter Operation with Clean Air Optima® App. |
If your water is very hard (containing abnormally high levels of minerals) the humidifier may produce white dust. This is not a malfunction. The solution would be to replace the Water Filter W-02 more often or use softer water, like distilled water. Or we can recommend Clean Air Optima Air Washers, more info in our online store www.cleanairoptima.com.
WARNING!
If the above recommended solutions do not work, please contact Clean Air Optima technical support at the telephone number for your region. Do not attempt to disassemble, reassemble, or repair the device as this may void the warranty.
Specifications
Model CA-605B Smart
For rooms up to 65m^2/140m^3/590ft^2
Rated voltage 220V - 240V, 50/60Hz
Rated power 30W
Capacity airhumidification Min. 120 ml/h - Max. 480 ml/h
Active oxygen <0.05 ppm
Sound level Silent fan < 25dB(A)
Dimensions 210 x 215 x 290 mm
Weight 2,8 kg
Water tank 3,8 L
Colour Black with transparent water tank
Complies with EU regulations CE/WEEE/RoHS
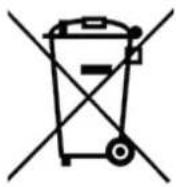
Ask your retailer or your municipality for updated information regarding the disposal of the packaging and of the device.
| Symbols | Meaning |
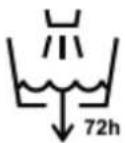
 | This symbol means that the filter must be checked and cleaned if necessary before the appliance is started up. Replace the filter every 2 to 3 months. |
 | This symbol means that the water tank should be cleaned every 3 days. Change the water in the water tank every 3 days. Remove the plug from the socket before you start cleaning. |
Clean Air Optima®
Service
Warranty Certificate for the Clean Air Optima® Ultrasonic Humidifier CA-605B Smart.
Date of purchase: ..... Customers name: ..... Address: ..... Telephone: ..... Email: ..... Seller's name: ..... Address: ....
-
Please fill in completely this Warranty Certificate. Send it with the invoice and the unit, postage pre-paid and using the original packing box, to your distributor. Make sure to include the appropriate return postage for the package.
-
Please enclose a short description of the damage, fault or malfunction, and the circumstances under which these problems arose.
The Clean Air Optima® Ultrasonic Humidifier CA-605B Smart is subjected to strict testing procedures before leaving the factory. If within 2 years from the date of purchase the product does not perform according to the specifications, because of factory defects, the purchaser is entitled to free repairs or replacement of parts upon presentation of this warranty (provided that the malfunction or damage to the device and/or parts occurred under normal operating conditions). What is covered: All parts defective in material and workmanship. For how long: two years from purchase date. What we will do: Repair or replace any defective parts.
Other Conditions
The provisions of this warranty are in lieu of any other written warranty whether express or implied, written or oral, including any warranty of merchantability or fitness for a particular purpose. The manufacturer's maximum liability shall not exceed the actual purchase price paid by you for the product. In no event shall the manufacturer be liable for special, incidental, consequential, or indirect damages. This warranty does not cover a defect that has resulted from improper or unreasonable use or maintenance, faulty assembly, accident, natural catastrophes, improper packing, or unauthorized tampering, alteration, or modification as determined solely by us. This warranty is void if the label bearing the serial number has been removed or defaced.
Never put other pure essential oils or other additives into the water tank resp. the waterbasin! Even a small quantity can damage the plastic and cause cracks.
Thank you for reading!

Share your feedback about the Clean Air Optima®
Ultrasonic Humidifier CA-605B Smart on:
www.cleanairoptima.com

For frequently asked questions about the CA-605B Smart go to:
www.cleanairoptima.com and search for the CA-605B Smart.

Download PDF instruction manual on:
www.cleanairoptima.com/info/manuals

Watch all Clean Air Optima® Product
animation video's on:
www.youtube.com
Clean Air Optima International B.V. | Rientjesoven 26 | 7621 HG Borne
The Netherlands | Phone: +31 (0) 74 - 2670145
Clean Air Optima Germany GmbH | Enschedestraße 14 | 48529 Nordhorn
Germany | Phone: +49 (0) 5921 879-121
E-mail: info@cleanairoptima.com
Internet: www.cleanairoptima.com
Clean Air Optima®
CA-605B Smart / LED-Monitor

Deutsch
natural_image
Top-down view of a gray square-shaped appliance with a ventilation grille and a small slot, held by a hand (no text or symbols visible)Wassertank
natural_image
Top-down view of a black square appliance with a white plastic component and a circular housing (no text or symbols visible)natural_image
Close-up of a plastic container with a white lid and small circular components, being stirred by a glass rod (no visible text or symbols)natural_image
Top-down view of a kitchen sink with a spatula and bowl, no visible text or symbolsnatural_image
Interior view of a clean, laboratory apparatus with a perforated material and a white fan (no visible text or symbols)
natural_image
Close-up of a hand pouring liquid into a white cylindrical container on a stainless steel sink (no text or symbols visible)Wichtig
natural_image
Close-up of a hand inserting a plastic clip into a device casing (no visible text or symbols)Transduktor
CA-605B Smart / Display

Clean Air Optima®
Nederlands
natural_image
Top-down view of a dark gray square-shaped object with a ventilation grille and a small slot, placed on a wooden surface (no text or symbols visible)Watertank

natural_image
Close-up of a black plastic appliance with a white circular component and a circular fan-like feature, held by a hand (no text or symbols visible)natural_image
Close-up of a plastic container with a white spherical object inside, being stirred by a hand mixer (no text or symbols visible)natural_image
Top-down view of a kitchen appliance with a green tool inside, showing liquid and a circular container (no text or symbols visible)WiFi-verbinding opzetten
natural_image
Interior view of a clean, laboratory apparatus with a perforated material and a white fan-shaped device (no visible text or symbols)
natural_image
Close-up of a hand pouring liquid into a white cylindrical container on a stainless steel sink (no text or symbols visible)Belangrijk
natural_image
Close-up of a hand inserting a plastic clip into a device casing, with a red upward arrow highlighting the component (no text or symbols visible)Transductor
CA-605B Smart / Affichage

Français
natural_image
Top-down view of a gray square-shaped device with a ventilation grille and a small slot, held by a hand (no text or symbols visible)natural_image
Close-up of a transparent plastic container with a white spherical object inside, being stirred by a tool (no text or symbols visible)natural_image
Close-up of a black plastic appliance with a white circular component and a circular fan-like structure, held by a hand (no text or symbols visible)natural_image
Top-down view of a kitchen sink with a spatula and water droplets, placed on a wooden surface (no text or symbols visible)natural_image
Interior view of a cleanroom or laboratory equipment unit with plastic containers and a perforated air vent (no visible text or symbols)
natural_image
Close-up of hands using a tool to clean or store water from a sink, no visible text or symbolsImportant
natural_image
Close-up of a hand inserting a white plastic clip into a black appliance casing (no text or symbols visible)Transducteur
CA-605B Smart / Pantalla
Clean Air Optima®
Español
natural_image
Top-down view of a dark gray square-shaped object with a ventilation grille and a small slot, placed on a wooden surface (no text or symbols visible)Depósito de agua

natural_image
Close-up of a black plastic appliance with a white circular component and a circular fan-like feature, held by a hand (no text or symbols visible)Grifo de llenado
natural_image
Close-up of a plastic kitchen sink with a water dispenser and a white bowl, no visible text or symbolsnatural_image
Top-down view of a kitchen appliance with a green tool inside, showing liquid and a circular container (no text or symbols visible)natural_image
Interior view of a transparent container with a white plastic bag and a circular object on top (no visible text or symbols)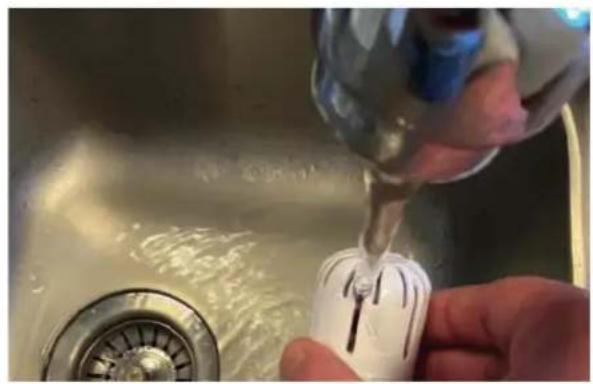
natural_image
Close-up of hands using a tool to clean or store water from a sink, no visible text or symbolsnatural_image
Illustration of a hand holding a medical or laboratory device with a blue arrow indicating direction (no text or symbols present)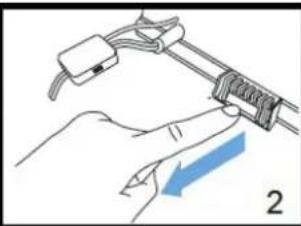
natural_image
Illustration of hands holding a cable with a blue arrow indicating direction (no text or symbols)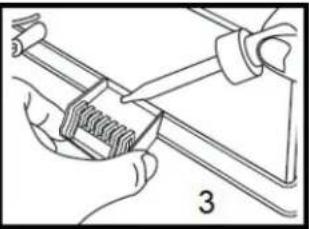
natural_image
Illustration of hands using a tool to adjust a mechanical component (no text or symbols visible)Importante
natural_image
Close-up of a hand inserting a plastic clip into a device casing, with a red upward arrow highlighting the component (no text or symbols visible)Transductor
CA-605B Smart / Display
Italiano
natural_image
Top-down view of a gray plastic tank with a ventilation grille and a small slot, placed on a wooden surface (no text or symbols visible)
natural_image
Interior view of a black square appliance with a white circular component and a fan-like pattern, held by a finger (no text or symbols visible)natural_image
Close-up of a plastic container with a side handle and internal components, partially submerged in a metal bowl (no visible text or symbols)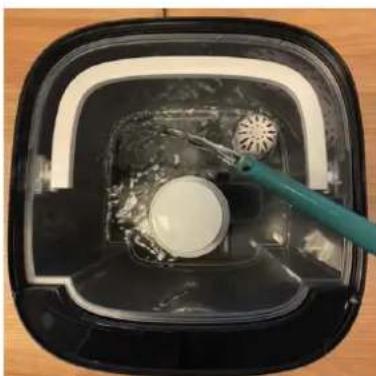
natural_image
Top-down view of a black square appliance with a white interior and a green tool inserted, showing internal components (no text or symbols visible)natural_image
Close-up of a transparent container with a white plastic bag and a circular filter-like device, no visible text or symbols.
natural_image
Close-up of a hand using a tool to clean or repair a white plastic component in a stainless steel sink (no text or symbols visible)natural_image
Illustration of a hand holding a tool with a blue arrow indicating direction (no text or symbols)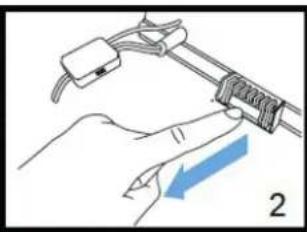
natural_image
Illustration of hands holding a cable with a blue arrow indicating direction (no text or symbols)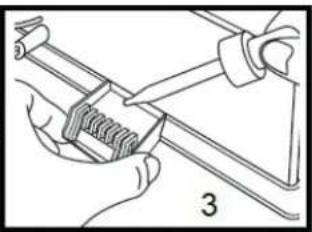
natural_image
Illustration of hands using a tool to adjust a mechanical component (no text or symbols visible)Importante:
Avvertenza!
natural_image
Close-up of a hand inserting a white plastic tool into a black appliance component, with no visible text or symbols.Trasduttore
Clean Air Optima®
Polski
natural_image
Top-down view of a dark gray square-shaped object with a ventilation grille and a small slot, placed on a wooden surface (no text or symbols visible)Zbiornik wody
natural_image
Close-up of a black plastic appliance with a white circular component and a circular fan-like feature, held by a hand (no text or symbols visible)natural_image
Close-up of a transparent plastic container with internal components and a water droplet, being stirred by a tool (no visible text or symbols)natural_image
Top-down view of a kitchen appliance with a green tool inside, showing liquid and a circular container (no text or symbols visible)natural_image
Interior view of a transparent container with a white plastic bag, a circular fan-shaped object, and a coiled cable inside (no visible text or symbols)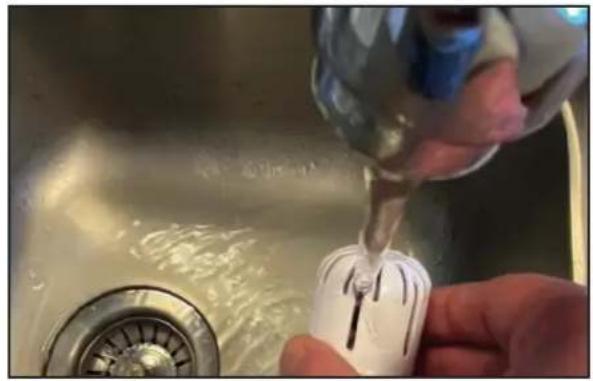
natural_image
Close-up of a hand pouring liquid into a white cylindrical container on a stainless steel sink (no text or symbols visible)natural_image
Illustration of a hand holding a tool with a blue arrow indicating direction (no text or symbols)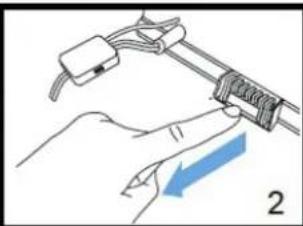
natural_image
Illustration of hands holding a cable with a blue arrow indicating direction (no text or symbols)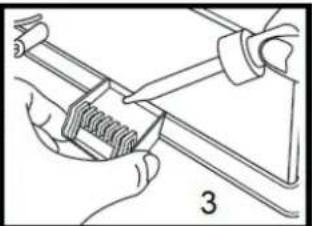
natural_image
Illustration of hands using a tool to adjust or install a mechanical component (no text or symbols visible)Ważne
natural_image
Close-up of a hand inserting a plastic clip into a device casing, with a red upward arrow highlighting the component (no text or symbols visible)Przetwornik
CA-605B Smart / Displej

Čeština
natural_image
Top-down view of a dark gray square-shaped object with a small metallic slot, placed on a wooden surface (no text or symbols visible)Víko nádržky
natural_image
Close-up of a black appliance with a white lid and circular vent, partially covered by a transparent casing (no text or symbols visible)natural_image
Close-up of a transparent plastic container with a white spherical object inside, being stirred by a glass rod (no text or symbols visible)natural_image
Top-down view of a kitchen appliance with a green spatula cleaning the interior (no text or symbols visible)natural_image
Interior view of a clean, laboratory apparatus with a perforated material and a white fan (no visible text or symbols)
natural_image
Close-up of a hand pouring liquid into a white electrical plug into a sink, with no visible text or symbols.Důležité
Varování!
natural_image
Close-up of a hand inserting a plastic clip into a device casing, with a red upward arrow highlighting the component (no text or symbols visible)
Měnič
CA-605B Smart / Displej

Clean Air Optima®
Română
natural_image
Top-down view of a gray square electronic device with a ventilation grille and a small slot, labeled 'Mâner' (no other text or symbols visible)
natural_image
Interior view of a clean, laboratory apparatus with a perforated material and a white fan-shaped device (no visible text or symbols)
natural_image
Close-up of a hand pouring liquid into a white cylindrical container on a stainless steel sink (no text or symbols visible)Important
natural_image
Close-up of a hand inserting a plastic clip into a device casing, with a red upward arrow highlighting the component (no text or symbols visible)Traductor
CA-605B Smart / Ekranas
Lietuvių kalba
natural_image
Top-down view of a gray rectangular device with a ventilation grille and a small slot, placed on a wooden surface (no text or symbols visible)Vandens bakelio

natural_image
Close-up of a black plastic appliance with a white circular component and a circular fan-like structure, held by a hand (no text or symbols visible)natural_image
Close-up of a transparent plastic container with a white spherical object inside, being stirred by a glass rod (no text or symbols visible)natural_image
Top-down view of a black square appliance with a white bowl and a green tool inserted, placed on a wooden surface (no text or symbols visible)natural_image
Interior view of a cleanroom or kitchen appliance with a perforated wall, coiled tubing, and a perforated sink (no visible text or symbols)
natural_image
Close-up of hands using a tool to clean or store water from a sink, no visible text or symbolsSvarbu
natural_image
Close-up of a hand inserting a plastic clip into a device casing, with a red upward arrow highlighting the component (no text or symbols visible)Keitiklis
CA-605B Smart / Ekraan

Clean Air Optima®
Eesti
natural_image
Top-down view of a gray square electronic device with ventilation grille and a small slot, labeled 'Käepide' above (no other text or symbols visible)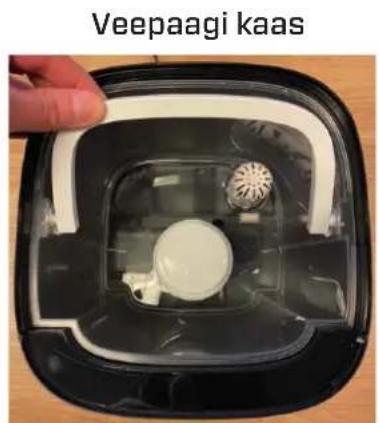
natural_image
Close-up of a black plastic container with a white inner component and a circular outlet, labeled 'Veepaagi kaas' (no other text or symbols visible)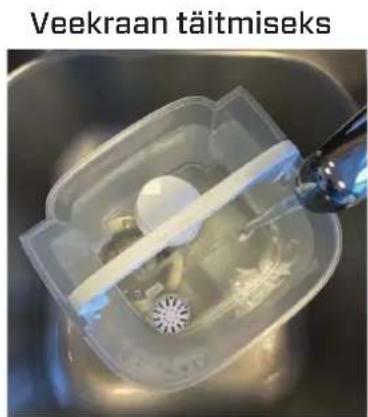
Ensure that the water tank is always completely refilled.
Näidik:
natural_image
Interior view of a transparent container with a white plastic container and a circular filter-like structure (no visible text or symbols)
natural_image
Close-up of hands using a tool to clean or store water from a sink, no visible text or symbolsnatural_image
Illustration of a hand holding a tool with a blue arrow indicating direction (no text or symbols)
natural_image
Illustration of hands holding a coiled cable with a blue arrow indicating direction (no text or symbols)
natural_image
Illustration of hands using a tool to adjust a mechanical component (no text or symbols visible)Oluline
natural_image
Close-up of a hand inserting a plastic clip into a device casing, with a red upward arrow highlighting the component (no text or symbols visible)Andur
CA-605B Smart / Displejs

Latviešu valodā
natural_image
Top-down view of a gray Rokturis device with a small metallic slot, placed on a wooden surface (no text or symbols visible on the device itself)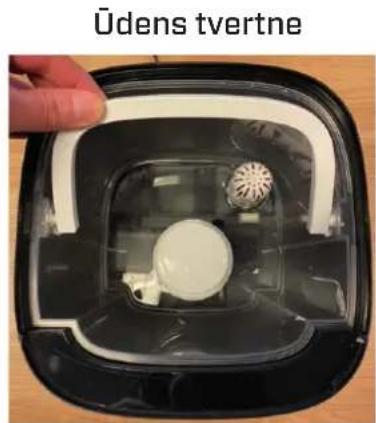
natural_image
Close-up of a transparent plastic container with internal components and a water droplet, being stirred by a tool (no text or symbols visible)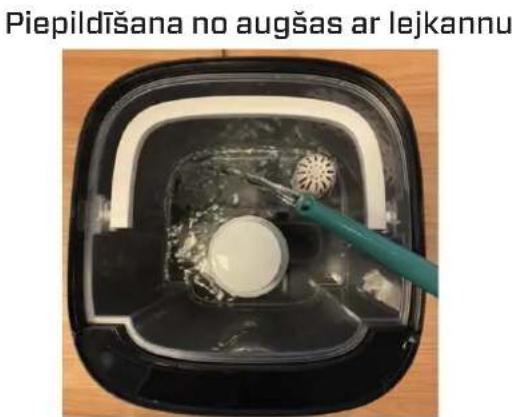
Poga Humidity (mitrums):
natural_image
Interior view of a cleanroom or kitchen appliance with a perforated wall, coiled tubing, and a perforated sink (no visible text or symbols)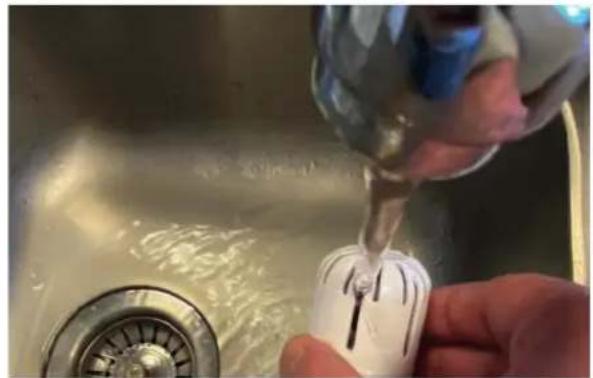
natural_image
Close-up of hands using a tool to clean or store water from a sink, no visible text or symbolsSvarīgi
natural_image
Close-up of a hand inserting a plastic clip into a device casing (no visible text or symbols)Pārveidotājs
A guarantee for healthy indoor air quality!

Designed in Germany
More info:
www.cleanairoptima.com


- Ultrasonic Humidifier Clean Air Optima® CA-605B Smart
- Clean Air Optima®
- English
- Thank you for purchasing the Clean Air Optima® Ultrasonic Humidifier CA-605B Smart.
- Description of the device
- Safety warnings
- Operating instructions
- Power Button:
- Manual Button:
- Humidity Button:
- Negative Ion Button:
- Timer Button:
- Sleep Mode:
- WiFi Mode:
- UV-Light Button:
- Water tank empty indicator light:
- Automatic shutdown when water tank is empty.
- Display:
- Operation with Clean Air Optima® App
- Connectivity
- About the Clean Air Optima® App
- Set up WiFi connection
- Note:
- Reset the WiFi function:
- Turn off WiFi function:
- Connect devices to multiple phones
- Share the device with limited access:
- Share device with full access:
- Preparation Clean Air Optima® Water Filter W-02
- Replacing the Clean Air Optima® Water Filter W-02
- Aromatherapy
- Activating the aroma function:
- Important
- Use of essential oils in the CA-605B Smart
- Warning!
- Cleaning and maintenance
- We recommend the following:
- Cleaning the transducer and water basin
- Transducer
- Please note:
- Cleaning the watertank
- Troubleshooting
- Specifications
- Service
- Other Conditions
- Thank you for reading!
- Deutsch
- Wichtig
- Transduktor
- Nederlands
- WiFi-verbinding opzetten
- Belangrijk
- Transductor
- Français
- Transducteur
- Español
- Importante
- Italiano
- Importante:
- Avvertenza!
- Trasduttore
- Polski
- Ważne
- Przetwornik
- Čeština
- Důležité
- Varování!
- Měnič
- Română
- Traductor
- Lietuvių kalba
- Svarbu
- Keitiklis
- Eesti
- Näidik:
- Oluline
- Andur
- Latviešu valodā
- Poga Humidity (mitrums):
- Svarīgi
- Pārveidotājs
- A guarantee for healthy indoor air quality!
Brand : Clean Air Optima
Model : CA-605B Smart
Category : Humidifier