
CE9.2 - Elliptical bike Horizon Fitness - Free user manual and instructions
Find the device manual for free CE9.2 Horizon Fitness in PDF.


User questions about CE9.2 Horizon Fitness
0 question about this device. Answer the ones you know or ask your own.
Ask a new question about this device
Download the instructions for your Elliptical bike in PDF format for free! Find your manual CE9.2 - Horizon Fitness and take your electronic device back in hand. On this page are published all the documents necessary for the use of your device. CE9.2 by Horizon Fitness.
USER MANUAL CE9.2 Horizon Fitness
natural_image
Silhouette of a person exercising on an outdoor bike (no text or symbols visible)CE9.2
ELLIPTICAL OWNER'S MANUAL MANUEL DU PROPRIÉTAIRE DE L'EXERCISEUR ELLIPTIQUE

Read the ELLIPTICAL GUIDE before using this OWNER'S MANUAL.
There are several areas during the assembly process that special attention must be paid. It is very important to follow the assembly instructions correctly and to make sure all parts are firmly tightened. If the assembly instructions are not followed correctly, the elliptical could have frame parts that are not tightened and will seem loose and may cause irritating noises. To prevent damage to the elliptical, the assembly instructions must be reviewed and corrective actions should be taken.
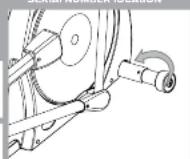
Before proceeding, find your elliptical's serial number located on a white barcode sticker on the front stabilizer tube and enter it in the space provided below.
ENTER YOUR SERIAL NUMBER AND MODEL NAME IN THE BOXES BELOW:

MODEL NAME: HORIZON CE9.2 EIIptICAL
Refer to the SERIAL NUMBER and MODEL NAME when calling for service.
SERIAL NUMBER LOCATION
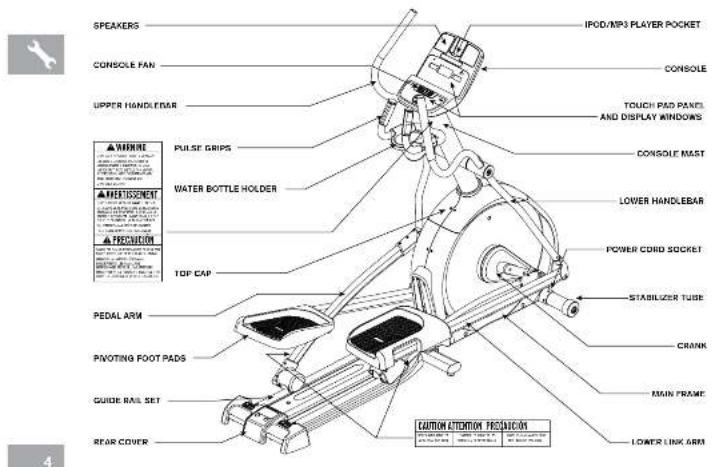
text_image
SPEAKERS IPOD/MP3 PLAYER POCKET CONSOLE FAN UPPER HANDLESAR TOUCH PAD PANEL AND DISPLAY WINDOWS CONSOLE MAST PULSE GRIPS LOWER HANDLEBAR WATER BOTTLE HOLDER POWER CORD SOCKET STABILIZER TUBE CRANK MAIN FRAME TOP CAP PEDAL ARM PINOTING FOOT PADS GUIDE RAIL SET REAR COVER CAUTION ALTERNATION PRECISION 4CE2CN-er-Sind 4570170 94548
TOOIS INCLUDED:
Screwdriver
12/15 pm Eat Wrench
5 mm L-Wrench/Screwdriver
5 mm L-Wrench
pARTS INCLUDED:
1 Stabilizer Tube
1 Guick Roll Set
2 Pedal Arts
2 Lower Handlebars
□ 2 Upper Handlebars
□ 2 Lower Link Arms With Footpads
□ 1 Top Cap (2 pieces)
1 Console Mast
□ I Console Meet Boot
□ T Console
2 Handlebar Caps
□ Water Honda Holder
□ 1 Rear Cover
□ 1 Audio Adapter Cable
□ 1 Power Cord
1. Hardware Kit
pRE ASSEMBLY
UNPACKING
Unpack the product where you will be using it. Place the elliptical carton on a level flat surface. It is recommended that you place a protective covering on your floor. Never open box when it is on its side.
NOTE: During each assembly step, ensure that ALL nuts and bolts are in place and partially threaded in before completely tightening any ONE bolt.
NOTE: A light application of grease may aid in the installation of hardware. Any grease, such as lithium bike grease is recommended.
NEED HELP?
If you have questions or if
there are any missing parts
contact Customer Tech
Support. Contact information is located on the back panel.
of this manual
of the Manus.

ASSEMBLY StEp 1
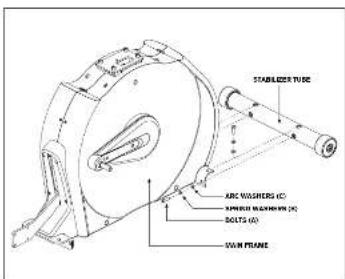
text_image
STABILIZER TUBE ARC VALVEERS (C) SPRING VEGETHERS (C) BOLTS (A) LAM PRANEHARDWARE BAG 1 CONTENTS

A Open hardWare Bag 1.
B Attach the StaBiLiZer tuBe to the main Frame using 2 BoLtS (a), 2 Spring WaSherS (B) and 2 arc WaSherS (c) on each side.
ASSEMBLY StEp 2
HARDWARE BAG 2 CONTENTS


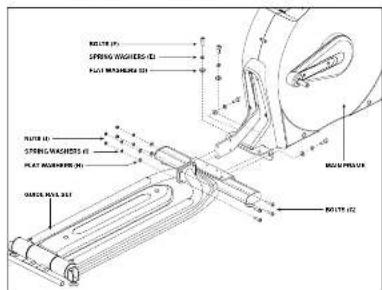
text_image
RUTTER (P) SPRING WASHERS (E) FLAT MUSHROOM 221 RUTTER (C) SPRING WASHERS (F) FLAT MUSHROOM (H) GARLIC ROLL SET RUTTER (D)A Open hardWare Bag 2.
B Attach the guide rail Set to the main Frame using 4 BoLtS (F), 4 Spring WaSherS (e) and 4 FLat WaSherS (d).
C Attach the guide rail Set to the main Frame using 4 BoLIS (g), 4 FLat WaSherS (h), 4 Spring WaSherS (i) and 4 nutS (J).
ASSEMBLY StEp 3
text_image
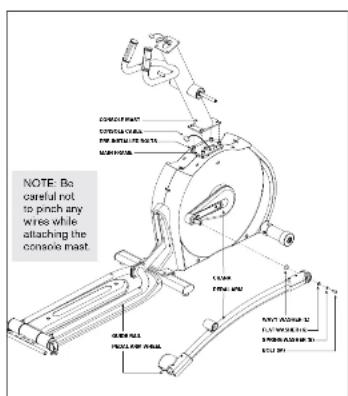
NOTE: Ba careful not to pinch any wire while attaching the console mast. CONSOFF RASS CONSOFF CABBAGE PULLER FOR BING METHIPE CABBAGE FIRELLA FIRELLA FIRELLA FIRELLA FIRELLA FIRELLA FIRELLA FIRELLA FIRELLA FIRELLA FIRELLA FIRELLA FIRELLA FIRELLA FIRELLA FIRELLA FIRELLA FIRELLA FIRELLA FIRELLA FIRELL A FIRELLA FIRELL A FIRELLA FIRELL A FIRELLA FIRELL A FIRELLA FIRELL A FIRELLA FIRELL A FIRELLA FIRELL A FIRELLA FIRELL A FIRELLA FIRELL A FIRELLA FIRELL A FIRELLA FIRELL A FIRELLA FIRELL A FURELLA FIRELL A FURELLA FIRELL A FURELLA FIRELL A FURELLA FIRELL A FURELLA FIRELL A FURELLA FIRELL A FURELLA FIRELL A FURELLA FIRELL A FURELLA FIRELL A FURELLA FIRELL A FURELLA FIRELL A FURELAA FIRELL A FURELAA FIRELL A FURELAA FIRELL A FURELAA FIRELL A FURELAA FIRELL A FURELAA FIRELL A FURELAA FIRELL A FURELAA FIRELL A FURELAA FIRELL A FURELAA FIRELL A FURELAA FIRELL A FURELAAHARDWARE BAG 3 CONTENTS

A. Open hardWare Bag 3.
B Carefully pull the conSoLe caBLE through the conSoLe maSt using the twist tie located inside the conSoLe maSt.
C Gently slide the conSoLe maSt onto the main Frame and attach conSoLe maSt to main Frame using pre-inStallled BoLts.
D Slide WaVY WaSher (L) over cranK followed by pedaL arm as shown. Rest pedaL arm Wheel on guide rail.
E Attach the pedaL arm to the cranK using 1 FLat WaSher (K), 1 Spring WaSher (B) and 1 BoLt (m).
F Repeat steps D–E on the opposite side of the elliptical.
ASSEMBLY StEp 4
text_image
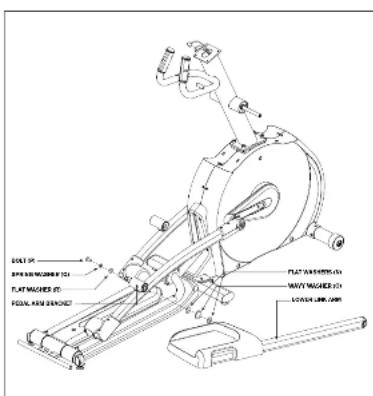
EQUITY SPRING MACHINES EQUITY MACHINES EQUITY MACHINES EQUITY MACHINES EQUITY MACHINES EQUITY MACHINES EQUITY MACHINES EQUITY MACHINES EQUITY MACHINES EQUITY MACHINES EQUITY MACHINES EQUITY MACHINES EQUITY MACHINES EQUITY MACHINES EQUITY MACHINES EQUITY MATHES EQUITY MATHES EQUITY MATHES EQUITY MATHES EQUITY MATHES EQUITY MATHES EQUITY MATHES EQUITY MATHES EQUITY MATHES EQUITY MATHES EQUITY MATHES EQUITY MATHES EQUITY MATHES EQUITY MATHES EQUITY MATHES FUTY MATHES FUTY MATHES FUTY MATHES FUTY MATHES FUTY MATHES FUTY MATHES FUTY MATHES FUTY MATHES FUTY MATHES FUTY MATHES FUTY MATHES FUTY MATHES FUTY MATHES FUTY MATHES FUTY MTHES FUTY MATHES FUTY MATHES FUTY MATHES FUTY MATHES FUTY MATHES FUTY MATHES FUTY MATHES FUTY MATHES FUTY MATHES FUTY MATHES FUTY MATHES FUTY MATHES FUTY MATHES FUTY MATHESHARDWARE BAG 4 CONTENTS
A Open hardWare Bag 4.
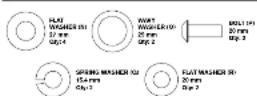
8 Slide 1 FLat WaSher (n), 1 WaVY WaSher (o) and another FLat WaSher (n) onto the LoWer LinK arm.
C Slide the LoWer LinK arm into the pedaL arm Bracket.
D Attach the LoWer LinK arm to the pedaL arm BracKet using 1 FLat WaSher (r), 1 Spring WaSher (Q) and 1 BoLt (p).
E Repeat steps B-D on the opposite side of the elliptical.


ASSEMBLY StEp 5
text_image
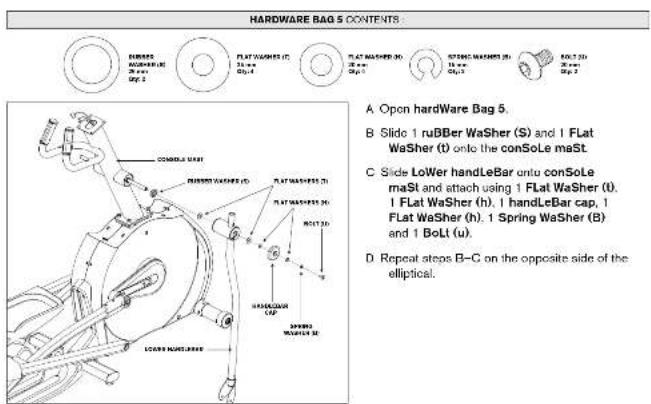
HARDWARE BAG 5 CONTENTS A. Opon hardWare Bag 5. B. Slide 1 ruBBer WaSher (S) and 1 Flat WaSher (t) onto the conSoLe maSt. C. Slide LoWer handleLeBar unto conSoLe maSt and attach using 1 FLat WaSher (t). 1 Flat WaSher (h). 1 handLeBar cap, 1 Flat WaSher (h). 1 Spring WaSher (B) and 1 BoLt (u). D. Repeat steps B-C on the opposite side of the elliptical.CE22CN-er1.Sind. 10-11/22/10 9:45 AM
ASSEMBLY StEp 6
text_image
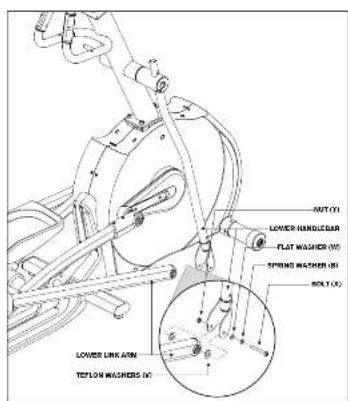
AIR (Ω) LOWER HANDULAR FLAT WASHER (W) SPRING WASHER (B) SOLY (Ω) LOWER LINK ARM TEFLON WASHERS (N)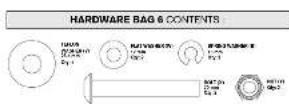
A Open hardWare Bag 6.
B Align end of LoWer LinK arm with bracket on bottom of LoWer handleLeBar.
C Place teFLon WaSherS (V) on both sides of the LoWer LinK arm. While holding teFLon WaSherS (V) slide LoWer LinK arm into bottom end of LoWer handleLeBar.
D Secure the joint with 1 FLat WaSher (W), 1 Spring WaSher (B), 1 BoLt (X) and secure with 1 nut (Y).
E. Repeat steps B-D on the opposite side of the elliptical.
ASSEMBLY StEp 7
text_image
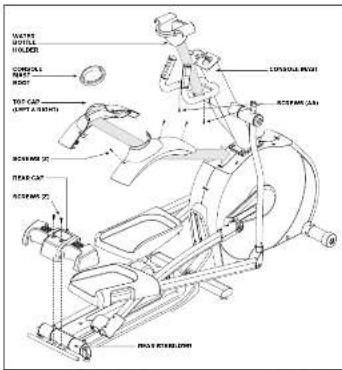
WATER MOZZLE HOLDER CONSENSUS BEAT BOARD TOT CAP (NUT TOLERI) ACSERNS 20 ACSERNS 20 ACSERNS 20 CAPSAL GEAR ACSERNS 20 CAPSAL GEAR ACSERNS 20 CAPSAL GEAR ACSERNS 20 CAPSAL GEAR ACSERNS 20 CAPSAL GEAR ACSERNS 20 CAPSAL GEAR ACSERNS 20 CAPSAL GEAR ACSERNS 20 CAPSAL GEAR ACSERNS 20 CapSAL GEAR ACSERNS 20 CAPSAL GEAR ACSERNS 20 CAPSAL GEAR ACSERNS 20 CAPSAL GEAR ACSERNS 20 CAPSAL GEAR ACSERNS 20 CAPSAL GEAR ACSERNS 20 CAPSAL GEAR ACSERNS 20 CAPSAL GEAR ACSERNS CAPSAL GEAR ACSERNS CAPSAL GEAR ACSERNS CAPSAL GEAR ACSERNS CAPSAL GEAR ACSERNS CAPSAL GEAR ACSERNS CAPSAL GEAR ACSERNS CAPSAL GEAR ACSERNS CAPSAL GEAR ACSERNS CAPSAL GEAR ACSERNS CAPSAL GEAR ACSERN CAPSAL GEAR ACSERN CAPSAL GEAR ACSERN CAPSAL GEAR ACSERN CAPSAL GEAR ACSERN CAPSAL GEAR ACSERN CAPSAL GEAR ACSERN CAPSAL GEAR ACSERN CAPSAL GEAR ACSERN CAPSAL GEAR ACSERN CAPSAL GEAR ACSER NEXELEDOMHARDWARE BAG 7 CONTENTS

A Open hardWare Bag 7
B. Slide right and LeFt top cap over conSoLe maSt and attach using 3 ScreWS (Z).
C Slide conSoLe maSt Boot around conSoLe maSt and insert into top cap.
D Slide Water Bottle hoLder over conSoLe maSt and attach using 2 ScrcWS (aa).
E Slide rear cap over rear StaBiLiZcr and attach using 2 ScreWS (Z).
ASSEMBLY StEp 8
text_image
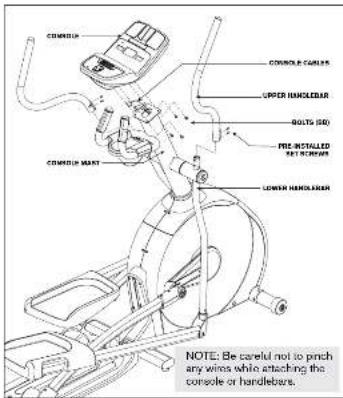
CONSOLE CONSOLE CABLES UPPER HANDLEB BOLTS ISO PRE-INSTALLED HOT RADIUM CONSOLE MUNT LOWER HANDLEB NOTE: Be careful not to pinch any wires while attaching the console or handlebars.HARDWARE BAG & CONTENTS

A Open hardWare Bag 8.
B Attach the CONSOIE CABIES to the CONSOIE.
C Carefully took the CONSOIE CABIES into the CONSOIE MAST before attaching the CONSOIE Attach CONSOIE to CONSOIE MAST using 4 BOILS (BB).
D Side Upper HANDIEBAR onto LOWER HANDIEBAR making sure handlebars are joined together completely. Secure Upper HANDIEBAR to LOWER HANDIEBAR using pre-ATTACHED SET SCREWS.
Make sure upper handlebars are as far down as possible. Handlebars can be damaged if not secured correctly.
E Repeat step D on other side.
YOU ARE FINISHED!
This section explains how to use your elliptical's console and programming.
The BASIC OPERATION section in the ELLIPTICAL GUIDE has instructions for the following
• LOCATION OF THE EIIPTICAL
• pPOWER/GROUNDING INSURCUIONS
- FOOT POSITIONING
• MOVING THE EIIpICAL
• IEVEIING THE ELLIPTICAL
• POWER/MANUAL INCIINE OPERATION
• USING THE HEART RATE FUNCTION

text_image
N Q N HORIZON O A H M L F P C T R A E 88.00 88.00 12 13 14 15 16 17 18 19 20 21 22 23 24 25 26 27 28 29 30 31 32 33 34 35 36 37 38 39 40 41 42 43 44 45 46 47 48 49 50 R C T R A E I K G D J ECE2CN-er-Sind 18-17
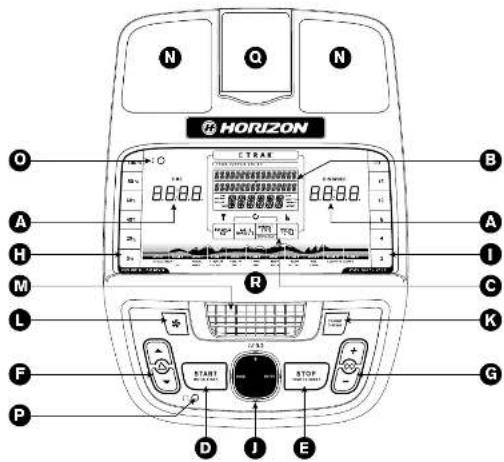
CONSOIE OPÉRATION
Note: There is a thin protective short of clear plastic on the overlay of the console that should be removed before use.
A) IED DISPLAY WINDOWS: display time and distance during workout
B) ETRAK "ICD: displays ETRAK fitness journal information. Displays heart rate, calories, pace, level and incline during workout.
C) EIRAK "CONIOIS: used to adjust ETRAK" display settings. D) START: press to begin exercising, start your workout, or resume exercising after pause.
E) Stop: press to pause/end your workout. Hold for 3 seconds to reset the console.
F) INCIINE ▲ / ▼ used to adjust incine level.
G) IEVEI + / = : used to adjust resistance level.
H) INCIINE QUICK KEYS: used to reach desired incline percentage more quickly.
I) IEVEI QUICK KEyS: used to reach desired resistance level more quickly.
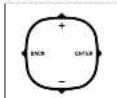
J) pPROGRAMMING BUTTON: used to select stage, level, time and other options.
K) CHANGE DISPLAY: press to change display feedback during workout.
I) FAN KEY: press to turn fan on and off.
M) FAN: personal workout fan.
N) SPEAKERS: music plays through speakers when your CD / MP3 player is connected to the console.
O) AUDIO IN JACK: plug your CD / MP3 player into the console using the included audio adaptor cable.
p) AUDIO OUT / HEADPHONE JACK: plug your headphones into this jack to listen to your music through the headphones. Note: when headphones are plugged into the headphone jack the sound will no longer come out through the speakers.
Q) Mp3 pIAyER pOCKET: used to store your MP3 player.
R) READING RACK: holds reading material.

72170 948 AM

text_image
E TRAK TIME 13:06 WATT - 100 HP - 109 10:30 PM 12:18:10 12 30 DISTANCE 1.54 PERSONAL BEST LAST S MORROUTS WORKOUT STATS WORKOUT TOTALSDISpIAy WINDOWS
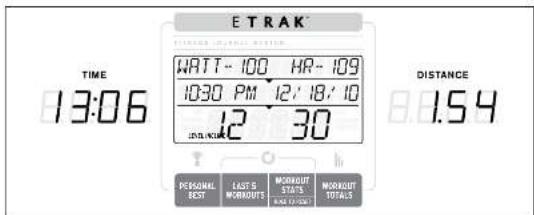
• TIME: Shown as minutes : seconds. View the time remaining or the time elapsed in your workout.
• DISTANCE: Shown as miles. Indicates distance traveled or distance remaining during your workout
- SpEED (SpD): Shown as MPH. Indicates how last the foot pedals are moving.
• CAIORIES: Total calories burned or calories remaining left to burn during your workout.
- HEART RATE (HR): Shown as BPM (beats per minute). Used to monitor your heart rate (displayed when contact is made with both pulse grip).
- EtRAK™ ICD DISPLAY: When ETRAK "is activated, the ETRAK" information is displayed in this window. Use the four buttons underneath the display to charge display information. More information is on page 23.
• IEVEI: Shows the current level of resistance. Will be displayed in the alphanumeric window.
• INCIINE: Shown as percent. Indicates the incline level of the power ramp. Will be displayed in the alphanumeric window.
• Watts: Displays current user power output.
GETTING STARTED
11 Check to make sure no objects are nearby that will hinder the movement of the elliptical.
2) Plug in the power cord and turn the elliptical ON. (Switch is located at the bottom-front of the elliptical)
5) You have the following options to start your workout:
A) QUICK START Up
Simply press START to begin working out. Time will count up from 0.00. The resistance level will default to level 1. Incline will default to 0% (LS10.0E, LS13.0E only).
B) SEIECIA SIAGE
1) Use the PROGRAMMING BUTTON to select USER 1, USER 2 or GUEST and press ENTER.
2) Select a stage using + / = and press ENTER on the PROGRAMMING BUTTON.
3; Select a level using +1 - and press ENTER.
4) Set time using + / - and press ENTER.
5) Press START or ENTER to begin the stage. NOTE: if you press START before pressing ENTER, the stage will begin and counts up from 0:00 for the Manual (S1) and Constant Watts (S4) stages, and count down from 30:00 for all other stages. The level defaults to 1.
to CIEAR SELECTION/RESET THE CONSOIE
Hold STOP key for 3 seconds.
When your workout is complete, the monitor display will flash "WORKOUT COMPLETE" and beep. Your workout information will stay displayed on the console for 30 seconds and then reset.

programming Button

PROGRAM (STAGE) INFORMATION
1) MANUAL: Adjust your level and incline manually during your workout.
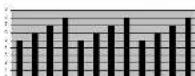
2) WEIGHT IOSS: Challenges with various combinations of hills and valleys (resistance). Time-based goal with 10 difficulty levels to choose from. Black bars represent changes in resistance level. Level 5 shown.
Vmp: 12v, vds
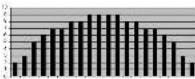
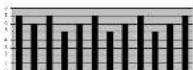
3) MUSCIE TONER: : Muscle-defining workouts with 10 difficulty levels and 20 resistance levels increase strength and build solid endurance. Black bars represent changes in resistance level. Level 5 shown.
Dargus E. Arvoni
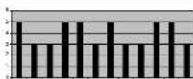
4) SIRENGIH BUILDER: Program cues you to pedal forward (F) and backwards (R) for an exciting and challenging workout (resistance levels). Time-based goal with 10 difficulty levels to choose from. Black bars represent changes in resistance level. Level 5 shown.
12.3.2017年1月1日
5) CONSTANT WATTS:
1) Select Constant Watts program using ▲/▼ and press ENTER on the PROGRAMMING BUTTON.
2) Set time using ▲ / ▼ and press ENTER.
3) Select desired watts using ▲/▼ and press ENTER.
4) Press START or ENTER to being the program.
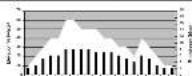
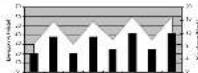
6) CABOT TRAIL: Simulates climbing mountains by increasing and decreasing the resistance. Time-based goal with 10 difficulty levels to choose from. Black bars represent changes in resistance level. Level 5 shown.
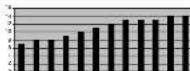
7) BANFF ASCENT: This high intensity ascending cardio program gives you a solid and varied workout with 10 different challenge levels. Black bars represent changes in resistance level. Level 5 shown.
8) BANFF DESCENT: Start strong with intense combinations of resistance and incline and take your strength and endurance to the next level. Black bars represent changes in resistance level. While area represents changes in elevation %, Level 5 shown.
9) MAX CARDIO: Keep burning fat long after your workout with high- and low-intensity intervals that keep the heart rate up while improving endurance and conditioning. Black bare represent changes in resistance level. White area represents changes in elevation 50. Level 6 shown.
Sogum Vagantia
12.4.20 18:17 D
Proven Express
Bonnier Sappini

PROGRAM (STAGE) INFORMATION CONTINUED
10) CUSTOM 1 & 2
1) Select CUSTOM 1 or 2 using ▲/▼ and press ENTER on the PROGRAMMING BUTTON.
2) Use the ▲ /▼keys to select time. Press ENTER to confirm.
(3) Set each resistance/incline profile by using ▲/▼ and press ENTER. Repeat for all 15 resistance/incline profiles.
NOTE: You may go back to the previous segment by pressing BACK on the PROGRAMMING BUTTON.
4) Press START to begin.
DATE AND CLOCK SETUp
1) Enter Setup Mode: Press and hold 2 and 4 BUTTONS for 3-5 seconds
2) Use the ENTER button to confirm settings.
3) Settings include: MONTH, DAY, YEAR, HOUR, MINUTE, and AM/PM.
4) Review Settings: You can review your settings at any time while in Setup Mode.
Use the ENTER button to scroll through settings.
5) Exit Setup Mode: To confirm the Date and Time, press and hold ENTER for 3 seconds.
6) To Reset: Simply recenter Setup Mode and adjust Date and Time to the correct setting.
USING yOUR CD / Mp3 pIAyER


1) Connect the included AUDIO ADAPTOR CABLE to the AUDIO IN JACK on
the top of the console and the headphone jack on your CD / MP3 player.
2) Use your CD / MP3 player buttons to adjust song settings.
3) Remove the AUDIO ADAPTOR CABLE when not in use.
4) If you don't want to use the SPEAKERS, you can plug your headphones into the AUDIO OUT JACK at the bottom of the console.
EtRAK™ FITNESS JOURNAL SyStEM
Congratulations! Research shows that those who journal their fitness routines or workouts, on average, achieve greater success than those who do not. Because your new elliptical is equipped with the exclusive ETRAK Fitness Journal System, you've taken an important step towards achieving your fitness goals.
ETRAK* is an innovative new software program. integrated into your electrical console, that will allow you to track your fitness progress over time, without the need for paper journals or logs. ETRAK* allows you to easily compare your current workout to your personal beats or your last five workouts. With quick access to feedback like duration of workout, distance traveled, calories burned or your total pace, you'll be able to quickly and easily see the progress you've made. You can also track your workout totals. By following your total number of workouts, distance, and calories, you'll be able to see just how fair you have come. Read further to see how ETRAK* can help motivate you to enhance your performance.
SEIUp
To activate ETRAK® fitness journal system a user MUST be chosen before the program begins. To select a USER 1 or 2, use the ARROW KEyS and press ENTER to confirm. All workout data will accumulate only for the user that is chosen. NOTE: If no user is selected data will not be tracked.
RESET
Reset all recorded information for User 1 or User 2 by selecting the user and then holding down the WORKOUT STATS/HOID TO RESET key for 10 seconds. NOTE: This step is permanent and will delete ALL previously accumulated data for the chosen user.
ETRAK

ACCUMULATED DATA
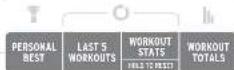
With the ETRAK® fitness journal system, you can scroll through your accumulated data in multiple formats by pressing the ETRAK® buttons. A workout is saved when: the program ends, the console is paused and not resumed within 5 minutes, or the STOP button is held to reset the console.
1) PERSONAL BEST: allows user to scroll through and view 6 personal bests for all previous workouts. They are:
- Beat Mile - fastest time in which the user has completed a mile
- Best SK - fastest time in which the user has completed a SK
- Longest Workout - (time)
- Longest Workout - (distance)
- Calories Burned - most calories user has burned in one workout
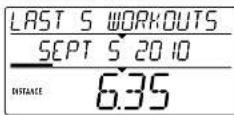
2) IAST 5 WORKOUTS: allows you to view data from your previous 6 workouts. The following data from these 5
workouts can be scrolled through and viewed by pressing the WORKOUT STAI5 key.
• Time - total time of selected workout
• Distance – total distance of selected workout
- Calories – total calories burned during selected workout
+ Pace - average pace during selected workout
- Elevation Gain (feet) – total elevation climbed, in feet, during selected workout
3) WORKOUT IOAIS: allows you to view the total accumulated workout data. Pressing the WORKOUT IOAIS
key will allow you to scroll through the following totals:
• Total Workouts
+ Total Distance
• Total Distance • Total Calories
• Total Time
+ Elevation Gain - total elevation climbed in feet
LIMITED HOME-USE WARRANTY

WEIGHT CAPACITY = 325 lbs (147 kilograms).
FRAME·LIFETIME
Horizon Fitness warrants the frame against defects in workmanship and materials for the lifetime of the original owner, so long as the device remains in the possession of the original owner. (The frame is defined as the welded metal base of the unit and does not include any parts that can be removed.)
BRAKE • LIFETIME
Horizon Fitness warrants the brake against defects in workmanship and materials for the lifetime of the original owner, so long as the device remains in the possession of the original owner. Labor or installation of brake is not covered under the motor warranty.
ELECTRONICS & PARTS • 1 YEAR
Horizon Fitness warrants the electronic components, finish and all original parts for a period of one year from the date of the original purchase, so long as the device remains in the possession of the original owner.
LABOR·1 YEAR
Horizon Fitness shall cover the labor cost for the repair of the device for a period of one year from the date of the original purchase, so long as the device remains in the possession of the original owner.
INCLINE MOTOR • 1 YEAR
Horizon Fitness warrants the incline motor against defects in workmanship and materials for a period of one year from the date of original purchase, so long as the device remains in the possession of the original owner.
EXCLUSIONS AND LIMITATIONS
Who IS covered:
• The original owner and is not transferable.
What IS covered:
- Repair or replacement of a defective motor, electronic component, or defective part and is the sole remedy of the warranty.
What IS NOT covered:
- Normal wear and tear, improper assembly or maintenance, or installation of parts or accessories not originally intended or compatible with the equipment as sold.
- Damage or failure due to accident, abuse, corrosion, discoloration of paint or plastic, neglect, theft, vandalism, fire, blood, wind, lightning, freezing, or other natural disasters of any kind, power reduction, fluctuation or failure from whatever cause, unusual atmospheric conditions, collision, introduction of foreign objects into the covered unit, or modifications that are unauthorized or not recommended by Horizon Fitness.
- Incidental or consequential damages. Horizon Fitness is not responsible or liable for indirect, special or consequential damages, economic loss, loss of property, or profits, loss of enjoyment or use, or other consequential damages of whatsoever nature in connection with the purchase, use, repair or maintenance of the equipment. Horizon Fitness does not provide monetary or other compensation for any such repairs or replacement parts costs, including but not limited to gym membership fees, work time lost, diagnostic visits, maintenance visits or transportation.
- Equipment used for commercial purposes or any use other than a single family or Household, unless endorsed by Horizon Fitness for coverage.
• Equipment owned or operated outside the US and Canada.
- Delivery, assembly, installation, setup for original or replacement units or labor or other costs associated with removal or replacement of the covered unit.
- Any attempt to repair this equipment creates a risk of injury. Horizon Fitness is not responsible or liable for any damage, loss or liability arising from any personal injury incurred during the course of, or as a result of any repair or attempted repair of your fitness equipment by other than an authorized service technician. All repairs attempted by you on your fitness equipment are undertaken AT YOUR OWN RISK and Horizon Fitness shall have no liability for any injury to the person or properly arising from such repairs.
- If you are out of the manufacturer's warranty but have an extended warranty, refer to your extended warranty contract for contact information regarding requests for extended warranty service or repair.
SERVICE/RETURNS
- In-home service is available within 150 miles of the nearest authorized Service Provider (Mileage beyond 150 miles from an authorized service center is the responsibility of the consumer).
- All returns must be pre-authorized by Horizon Fitness.
- Horizon Fitness' obligation under this warranty is limited to replacing or repairing, at Horizon Fitness' option, the same or comparable model.
- Horizon Fitness may request defective components be returned to Horizon Fitness upon completion of warranty service using a prepaid return shipping label. If you have been advised to return parts and did not receive a label, please contact Customer Tech Support.
- Replacement units, parts and electronic components reconditioned to as-new condition by Horizon Fitness or its vendors may sometimes be supplied as warranty replacement and constitute fulfillment of warranty terms.
- This warranty gives you specific legal rights, and your rights may vary from state to state.
FRANÇAIS
CE02CN-ccr1.Sindd 28-29/2/10 9:48 AM
ASSEMBLAGE

AVERTISSEMENT
text_image
N Q N HORIZON O CTRAN B A 8888 8888 H I A M C L R K F START STOP G P D J ECE2CNerSind 42-45
FONCTIONNEMENT DE IA CONSOIE
if you have any problems during assembly or if parts are missing.
For fast and friendly service, please contact one of our trained customer technicians via phone, email or our website.
Every employee at Horizon Fitness takes pride in providing you with a high quality product.
We want to know if you have a problem and we want to have an opportunity to correct it for you.
NOTE: Please read the TROUBLESHOOTING section in the TREADMILL GUIDE before contacting Customer Tech Support. Additional product information is available on our website.

text_image
STOP ATTENTIONEmail/Courriel : ctsupport@horizonfitness.com
www.horizonfitness.com

HORIZON
FITNESS
Horizon Fitness
1600 Landmark Drive,
Cottage Grove WI, 53527