FCH 302 ID TS WH - Cooker Fulgor Milano - Free user manual and instructions
Find the device manual for free FCH 302 ID TS WH Fulgor Milano in PDF.

User questions about FCH 302 ID TS WH Fulgor Milano
0 question about this device. Answer the ones you know or ask your own.
Ask a new question about this device
Download the instructions for your Cooker in PDF format for free! Find your manual FCH 302 ID TS WH - Fulgor Milano and take your electronic device back in hand. On this page are published all the documents necessary for the use of your device. FCH 302 ID TS WH by Fulgor Milano.
USER MANUAL FCH 302 ID TS WH Fulgor Milano
natural_image
Four black circles arranged in a 2x2 grid on a white background (no text or symbols)FCH 302 ID TS BK
FCH 302 ID TS WH
COOKING HOB INDUCTION
TABLES DE CUISSON INDUCTION
EINBAUKOCHGERÄT INDUKTIONSHERD
text_image
OCTA 9 Power Level: 2100W Booster (P): 3000W OCTA 9 Power Level: 2100W Booster (P): 3000WMax power: 3.7 kW

text_image
OCTA bridged 9 Power Level: 3000W Booster: 3700WFig. 1A

text_image
520 300 49 488 264 32 min. 50 R 3 268 490text_image
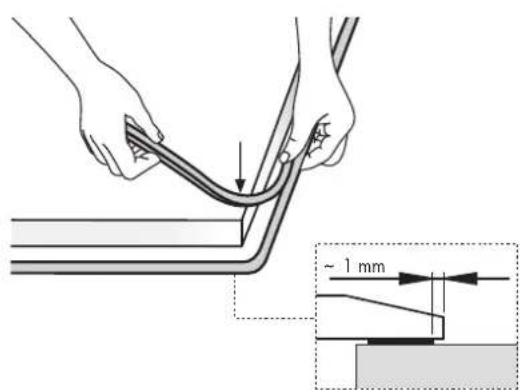
Technical diagram showing hands holding a bent pipe with a 1 mm dimension annotation and an inset detail view.Fig. 3

text_image
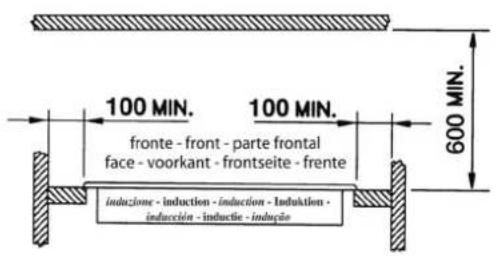
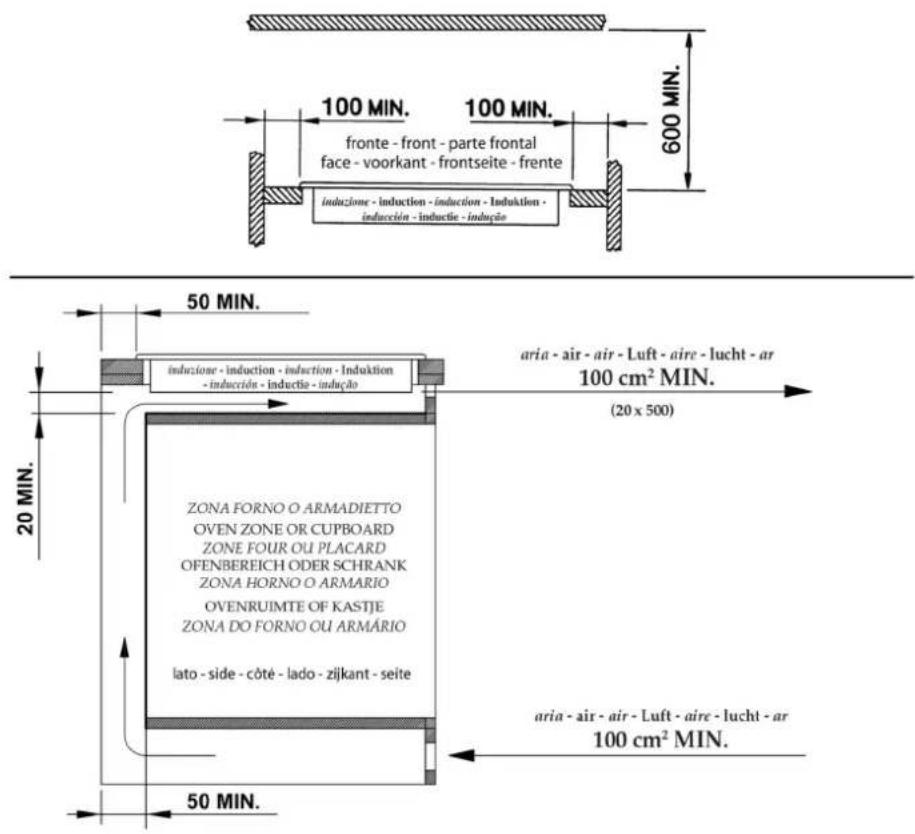
100 MIN. fronte - front - parte frontal face - voorkant - frontseite - frente induzione - induction - induction - Induktion - inducción - inductie - indução 600 MIN. 50 MIN. induzione - induction - induction - Induktion - inducción - inductie - indução aria - air - air - Luft - aire - lucht - ar 100 cm² MIN. (20 x 500) 20 MIN. ZONA FORNO O ARMADIETTO OVEN ZONE OR CUPBOARD ZONE FOUR OU PLACARD OFENBEREICH ODER SCHRANK ZONA HORNO O ARMARIO OVENRUIMTE OF KASTJE ZONA DO FORNO OU ARMÁRIO lato - side - côté - lado - zijkant - seite aria - air - air - Luft - aire - lucht - ar 100 cm² MIN. 50 MIN.Fig. 4

text_image
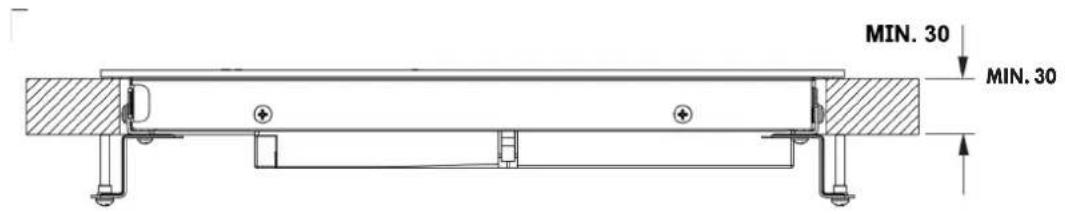
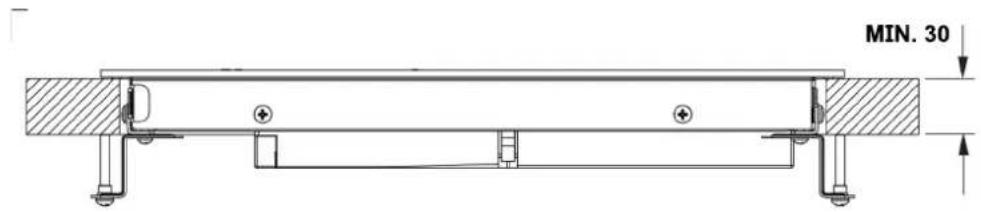
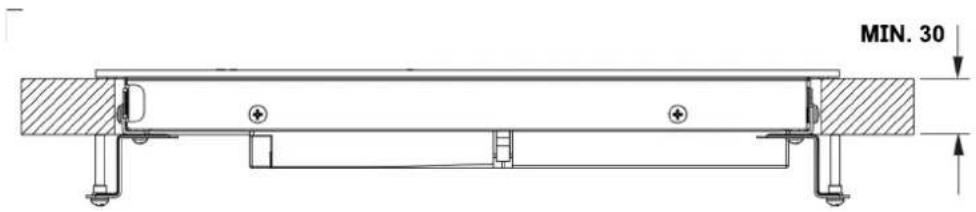
MIN. 30Fig. 5
text_image
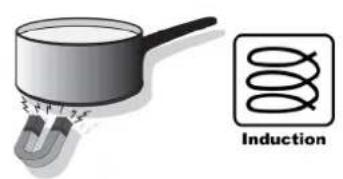
Induction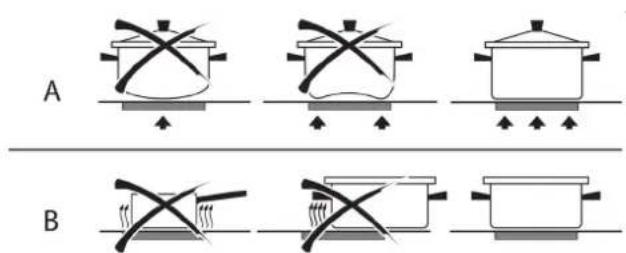
text_image
A BFig. 6A

text_image
≤ Ø 90 ≥ Ø 110Fig. 6B

text_image
≤ Ø 190 ≥ Ø 230Fig. 7
text_image
P O L M N 0 θ n G H I P O L M N 0 θ U D F E Q 000 - θ + i θ i i G H I B A CFig. 8

text_image
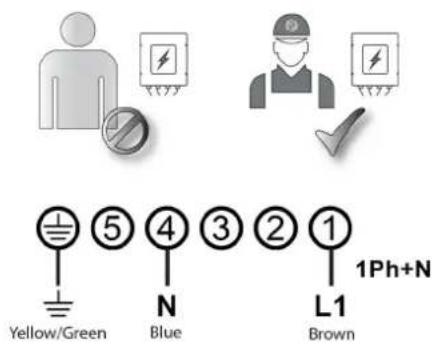
Yellow/Green Blue Brown 1Ph+N220-240 V \~ 50/60 Hz
H05V2V2-F 3x1,5 mm ^4

text_image
1 L2 L3 N2 2 3 4 5 1 L2 L3 N2 2 3 4 5 1 L2 L3 N2 2 3 4 5Fig. 9
natural_image
Illustration of a hand holding a tool near a surface with small debris, no text or symbols present
WARNING
text_image
PHR -5+ 1 0 11text_image
9 PHR - + ↓ ⊕ ↑chemical
Chemical reaction diagram showing PHR with min and + inputs, producing products A→i, O, II, and Bnatural_image
Pure electrical circuit lines without any symbolswe sincerely thank you and congratulate you on your choice.
This new product, carefully designed and manufactured from the highest quality materials, has been thoroughly tested to meet all your cooking needs.
Therefore, please read and follow the simple instructions that will enable you to achieve excellent results from the very first use. We wish you all the best with this modern appliance.
THE MANUFACTURER
TABLE OF CONTENTS PAGE
1 - Safety warnings 7
2 - User instructions 8
Installation 8
Positioning 8
Electrical connections 8
Induction cooking 8
Cooking vessels 8
Using the hob 8
Switching on the hob 8
Switching on the cooking zones 9
Cookware recognition 9
Residual heat 9
Bridge (Flexible cooking zones) 9
Power boost (Fast warm-up) 9
Automatic pre-heating 9
Keep warm 9
Timer 10
TABLE OF CONTENTS PAGE
Cooking zone timer 10
Egg Timer / Reminder 10
PAUSE 10
Function reset 10
Locking the controls 10
Child lock 10
Switching off the cooking zones 11
Switching off the hob 11
Safety shut-down 11
Power management 11
Power settings 11
Information on electric hobs for domestic use 13
Cleaning and maintenance 14
Energy saving tips 14
Decommissioning of household appliances 14
3 - Troubleshooting 15
THIS PRODUCT IS DESIGNED FOR DOMESTIC USE.
THE MANUFACTURER DOES NOT ACCEPT ANY LIABILITY FOR ANY DAMAGE TO PROPERTY OR INJURY TO PERSONS RESULTING FROM INCORRECT INSTALLATION OR FROM IMPROPER, INCORRECT OR ABSURD USE OF THE PRODUCT.
THE APPLIANCE MUST NOT BE USED BY PERSONS (INCLUDING CHILDREN) WITH REDUCED PHYSICAL, SENSORY OR MENTAL CAPABILITIES, OR BY PERSONS WHO LACK THE NECESSARY EXPERIENCE AND KNOWLEDGE, UNLESS THEY ARE SUPERVISED OR INSTRUCTED IN THE USE OF THE APPLIANCE BY A PERSON RESPONSIBLE FOR THEIR SAFETY.
CHILDREN MUST BE SUPERVISED TO ENSURE THAT THEY DO NOT PLAY WITH THE APPLIANCE.
text_image
OCTA 9 Power Level: 2100W Booster (P): 3000W OCTA 9 Power Level: 2100W Booster (P): 3000WMax power: 3.7 kW

text_image
OCTA bridged 9 Power Level: 3000W Booster: 3700WFig. 1A
text_image
520 300 49 488 264 32 min. 50 R 3 268 490Installation dimensions - raised All measurements are given in mm
Fig. 1B
text_image
520 300 49 488 264 30 min 50 490 268 302 522 R 3 R 4 1 5Installation dimensions - flush All measurements are given in mm
Fig. 2
text_image
Technical diagram showing hands tying a cable with an arrow indicating compression, and a magnified detail of a 1 mm measurement.Fig. 3

text_image
100 MIN. fronte - front - parte frontal face - voorkant - frontseite - frente induzione - induction - induction - Induktion - inducción - inductie - indução 600 MIN. 50 MIN. induzione - induction - induction - Induktion - inducción - inductie - indução aria - air - air - Luft - aire - lucht - ar 100 cm² MIN. (20 x 500) 20 MIN. ZONA FORNO O ARMADIETTO OVEN ZONE OR CUPBOARD ZONE FOUR OU PLACARD OFENBEREICH ODER SCHRANK ZONA HORNO O ARMARIO OVENRUIMTE OF KASTJE ZONA DO FORNO OU ARMÁRIO lato - side - côté - lado - zijkant - seite aria - air - air - Luft - aire - lucht - ar 100 cm² MIN. 50 MIN.Fig. 4
text_image
MIN. 30 MIN. 30Fig. 5
text_image
Induction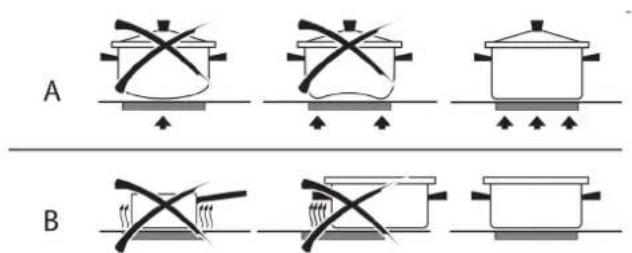
text_image
A BFig. 6A

text_image
≤ Ø 90 ≥ Ø 110Fig. 6B

text_image
≤ Ø 190 ≥ Ø 230Fig. 7

text_image
P O L M N 0 θ n G H I P O L M N 0 θ U D F E Q 000 - θ + i θ i i G H I B A CFig. 8

text_image
Yellow/Green Blue Brown 1Ph+N220-240 V \~ 50/60 Hz
H05V2V2-F 3x1,5 mm ^4

text_image
1 L2 L3 N2 2 3 4 5 1 L2 L3 N2 2 3 4 5 1 L2 L3 N2 2 3 4 5Fig. 9

natural_image
Illustration of a hand holding a tool near a surface with small debris (no text or symbols)
WARNING
Please read the contents of this booklet carefully as it contains important information for safe installation, operation and maintenance. Keep the booklet for further reference. All installation work (electrical connections) must be carried out by qualified personnel in accordance with current standards.
- The hob must always be used within normal household limits for cooking and keeping food warm. Any other use is not permitted.
- Persons who are unable to use the hob safely because of their physical, sensory or mental abilities, inexperience or lack of knowledge must not use it without the supervision and guidance of a responsible person.
- Children under the age of 8 must be kept away from the hob unless they are under the constant supervision of an adult.
- Children over the age of 8 may be able to use the appliance independently if they can use it properly. It is important that they know how to recognise the dangers that can arise from incorrect use.
- Do not allow children to play with the appliance.
- Children should not do any cleaning or maintenance work on the hob unless they are under adult supervision.
- Installation, maintenance and repairs must be carried out by qualified personnel. Incorrect work or repairs can create serious hazards for the user.
- DANGER OF ELECTRIC SHOCK! Do not switch on the hob, or switch it off immediately, if the glass-ceramic plate is damaged or cracked. Disconnect the appliance from the mains.
-
ATTENTION: If the power cord is damaged, it must be replaced by the manufacturer, an authorised service centre or qualified personnel to avoid hazards.
-
ATTENTION: The appliance and its accessible parts become hot during use. Care must be taken to avoid touching the heating elements.
- ATTENTION: Cooking with oil or fat can be dangerous and can cause fires. NEVER attempt to extinguish the fire with water. Smother the flames e.g. with a lid, a damp kitchen cloth or similar item.
- ATTENTION: The hob is very hot when it is in use and it will remain hot for some time after it has been switched off. The risk of burning no longer exists when the residual heat lamps go out.
- ATTENTION: The normal cooking process must be monitored. A short cooking process must be constantly monitored. Cookware that allows liquids to evaporate completely can damage the glass ceramic top. Overheated grease or oil can start to burn and cause a fire.
- FIRE HAZARD! Do not store objects on cooking surfaces! Metal objects such as knives, forks, spoons and lids must not be placed on the surface of the hob as they can become hot.
• Always switch off the cooking zones after use! - The unit is not designed for use with an external timer or separate remote control system.
- AVOID: spilling liquid under the cookware as this is dangerous! Cleaning instructions: Switch off the hob and remove the residue. The liquid must be removed quickly, preferably while the hob is still lukewarm (beware of "burns"!) and in any case before each use; it is recommended to use a dry cloth.
Installation
These instructions are intended for use by a professional installer as a guide to installation, adjustment and maintenance in accordance with applicable laws and regulations.
Positioning
The appliance is designed for built-in installation in a worktop, as shown in the figure (Fig.1A-1B). Place the sealing material (Fig.2) around the entire perimeter (cut dimensions (Fig.1A-1B)). Secure the appliance to the worktop using the 4 supports, taking into account the thickness of the worktop (Fig.4).
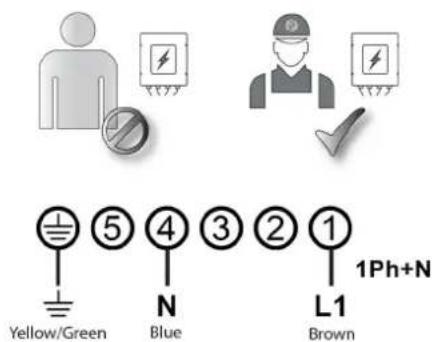
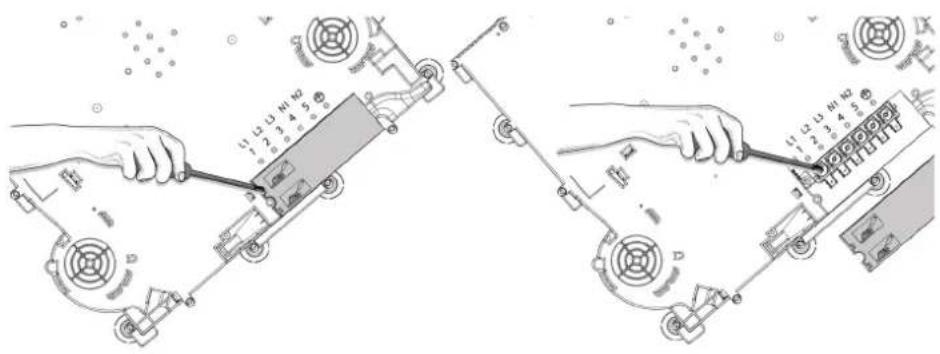
Electrical connections (Fig.8)
Before making electrical connections, ensure that: - the characteristics of the system are such that they comply with the information on the data plate attached to the underside of the worktop; - the system is equipped with an effective earthing system that complies with the standards and regulations in force. Earthing is mandatory by law. If the appliance is not fitted with a cable and/or plug, use material suitable for the absorption specified on the rating plate and the operating temperature. If direct connection to the mains is required, place an omnipolar switch with a minimum gap of 3 mm between the contacts; the switch must be suitable for the load indicated on the nameplate and comply with current regulations (the yellow/green earth conductor must not be interrupted by the switch). After the appliance has been installed, the omnipolar switch must be easily accessible.
Induction cooking
Induction cooking generates heat directly at the bottom of the pan, which gives it a number of advantages:
- Time saving while boiling or frying food, thanks to heat coming directly from the vessel.
- Energy saving.
- Easy to care for and clean. Spilled food does not burn quickly.
- Temperature control and a higher level of safety. The induction coil reacts instantly to changes in temperature, allowing power to be distributed accurately. The induction cooking zone stops producing heat as soon as the pan is removed from the hob, even if the induction coil is still on.
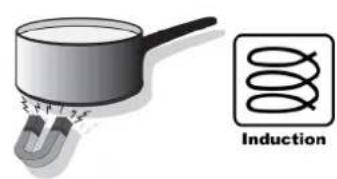
Cooking vessels
The use of suitable vessels is an essential part of induction cooking. Only ferromagnetic cookware/vessels are suitable for induction cooking and can be made from the following materials:
- Enamelled steel
- Cast iron
• Special stainless steel induction cookware.
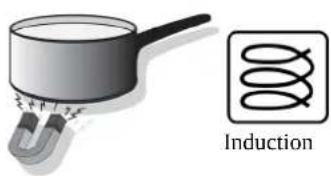
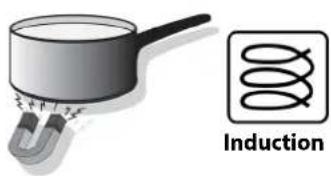
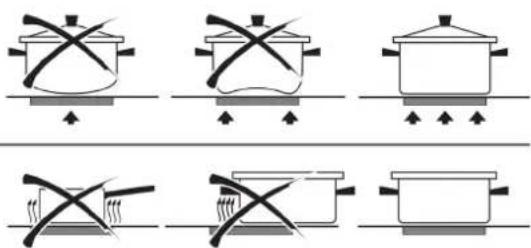
A good test to find out whether the vessels are suitable is to see if they attract a magnet. (Fig.5). There are some special induction cookware on the market whose base is not completely ferromagnetic. Use cookware with a ferromagnetic zone the same size as the pan/pot for best results.
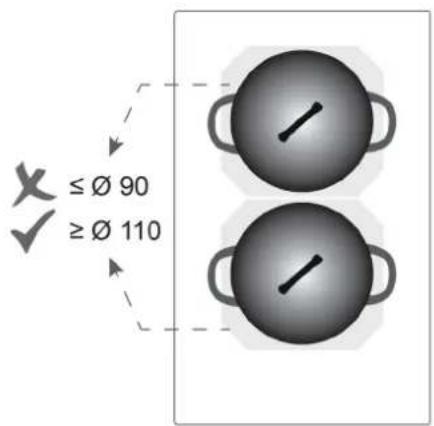
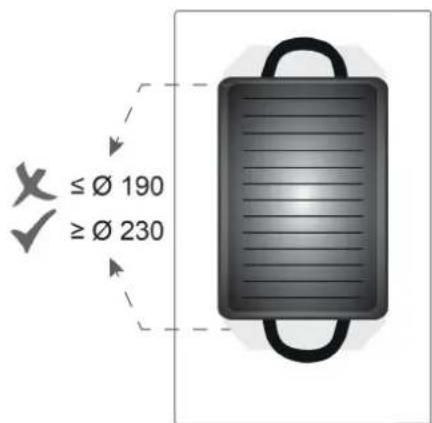
Flat-bottomed cookware is recommended (Fig.5). Do not use cookware with a rough base, to avoid scratching the thermal surface of the hob. Finally, an important factor in induction cooking is the size of the cookware in relation to the hotplate used (Fig. 6A-6B). The cooking zones allow the use of vessels with different diameters. However, it is preferable to use the cooking zone that matches the diameter of the cookware you are using.
Using the hob
This unit uses the Touch Control electronic programming system, where functions are activated by touching sensor keys and confirmed by display and audible signals. Touch the keys from above without covering them.
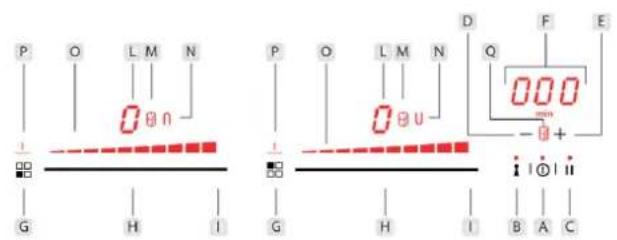
CONTROL PANEL

text_image
PONML 0 8 U G H I B A C D F E Q 000 min -9+ i i i i B A CA On/Off
B Key lock
C Pause & Function resetting
D Timer setting (-)
E Timer setting (+)
F Timer display
G Keep warm function
H Power slider that allows the user to change the cooking power setting
I Booster function
L Display of the cooking zone power setting
M Icon indicating whether the timer is active (icon visible) or not (icon not visible) in a cooking zone
N Icon indicating whether the Bridge function between two cooking zones (visible icon) is active
- Display of the cooking zone power setting
P Icon indicating whether the heating function is active (icon visible) or not (icon not visible)
Q Icon indicating whether the timer function is active (icon visible) or not (icon not visible)
Switching on the hob
Press the On/Off key (Key A) to switch on the hob. All the cooking zone indicators light up in the "0" standby position.
The command remains active for 10 seconds. If no setting is made on a cooking zone within this time, the appliance switches off automatically.
Switching on the cooking zones
The power of each individual zone can be set to 9 different levels and is indicated in the corresponding display with a number from "1" to "9".
Switch on the appliance and adjust the power setting of the cooking zone using the corresponding slider (H).
Slide your finger on the slider to the right to increase the power and to the left to decrease it (or switch it off).
Cookware recognition "4"
Each induction cooking zone has a minimum vessel detection limit that varies depending on the material of the vessel being used. For this reason,
use the cooking zone that best matches the diameter of the vessel. If the symbol "U" appears on the display of a cooking zone, this means that:
- the vessel used is not suitable for induction cooking.
- the diameter of the cooking utensil used is smaller than that allowed by the appliance.
• there is no cooking utensil on the top.
Residual heat "H"
If the temperature of a cooking zone is still high (above 65^ ) after it has been switched off, the display for that zone shows the symbol "H" (residual heat). The message will only disappear when there is no longer a risk of burning.
Bridge (Flexible cooking zones) U∩
This function combines the front and rear cooking zones into one larger cooking area.
Special care must be taken to ensure that the cooking utensil is placed correctly on the cooking zones (Fig. 5).
To activate the Bridge function, simultaneously press the two Sliders (H) of two adjacent cooking zones (1-2 /3-4).
The illuminated "bridge" function symbol (N area) "U"/"n" will appear next to the display of the two cooking zones to indicate that the function is active. At this point, the power of the "bridge" zone can be set.
NOTE: adjustments to the "bridge" zone are made using the slider and the sensor buttons on the front zone.
To deactivate the Bridge function, simultaneously press the two Sliders (H) of the two adjacent cooking zones. The illuminated "bridge" function symbol "U"/"n" goes out.
CONTROL PANEL
text_image
2 1 0.00 0.00 1 2 0.00 x 0.00Power boost (Fast warm-up) "P"
This function further reduces the cooking time of a zone by raising the temperature to the maximum power setting for 10 minutes. When this time has elapsed, the cooking zone power automatically returns to level "9". This function is suitable for heating large quantities of liquid (e.g. water for cooking pasta) or other food in a very short time.
To activate this programme, slide your finger all the way to the right on the slider (I zone) until the "P" symbol appears on the cooking zone display. To deactivate the function before the 10 minutes have elapsed, simply move the slider to a different power setting.
Power Boost cannot be selected when the Bridge function is active.
Automatic pre-heating "R"
All cooking zones feature an automatic pre-heating function. This function is suitable for heating a cold cooking utensils (cold food) in a short time (e.g. water or other food). When the function is activated, the hob is set to maximum power for a certain period of time, after which it automatically returns to the original power setting.
This function can be activated for all power settings (1 to 9), but not for Power Boost, or Warming (Keep the cooking utensil warm). The preheating time depends on the
selected cooking level. To activate the function on one of the cooking zones, press and hold the corresponding slider (I zone) for 3 seconds until the "A" symbol appears on the display (L zone), alternating with the selected power setting.
| Cooking level Automatic pre-heating(seconds) | |
| 1 | 40 |
| 2 72 | |
| 3 120 | |
| 4 176 | |
| 5 256 | |
| 6 432 | |
| 7 120 | |
| 8 192 | |
| 9 Not available | |
| P Not available | |
Keep warm
(WARMING function)
The hob has a special program that is pre-set for certain types of cooking. The "Warming" program sets the power of the selected cooking zone to 42 °C to keep cooked food warm. To activate this program, press the G key once. The "Warming" symbol lights up on the display of the cooking zone (P zone). The time limit for this function is 2 hours, after which the function is automatically deactivated.
Timer
The timer function is available in two versions:
- Egg timer / Reminder
- Cooking zone timer
It is possible to activate the timer for all cooking zones, and another timer as Egg timer/Reminder. The two timers can be used simultaneously. In addition, the hob must be switched on to activate the timers, whereas switching off the hob only activates the egg timer and automatically deactivates the individual zone timers.
Area F (Fig.8) shows the remaining time, in countdown mode, until the hob beeps to indicate that the time is up.
Cooking zone timer
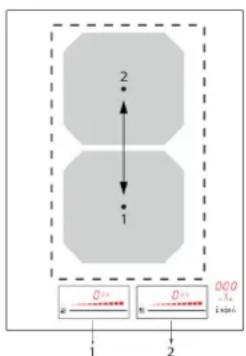
This function allows setting a time from "000" to "1.59" (1 hour and 59 minutes) for the automatic switch-off of a cooking zone.
To activate the timer on a cooking zone, select it by setting its power and press the timer's [+] and [-] keys (D-E keys) simultaneously until the clock symbol next to the cooking zone display (M zone) lights up.
Within 5 seconds, use the timer's [+] and [-] keys to set the auto-off time. The countdown will appear on the timer display (F zone) after 5 seconds. When the time has elapsed, the cooking zone switches off automatically, the display shows a flashing "000" and an acoustic signal is emitted. Press the timer's [+] or [-] keys to switch off the signals.
To deactivate the timer for a cooking zone, press the [+] and [-] keys simultaneously several times until the clock symbol appears next to the relevant display. Press the [+] and [-] keys simultaneously again, then press the [-] key within 5 seconds to reset the time to "000". The clock icon next to the cooking zone display disappears after 5 seconds, confirming that the function has been deactivated.
Egg Timer / Reminder
When no cooking zone is in use, an acoustic reminder can be set. This will remain active even after the appliance has been switched off. When the Egg timer/Reminder is active, the timer function cannot be activated.
To activate the reminder, press the [+] and [-] keys simultaneously until the clock symbol appears below the Timer display. Use the timer's [+] and [-] keys within 5 seconds to set the time. The countdown will appear on the timer display after 5 seconds. When the time has elapsed, the display shows a flashing "000" and an acoustic signal is emitted.
Press the timer's [+] or [-] keys to switch off the signals. To deactivate the active reminder, press the [+] and [-] keys simultaneously. The clock symbol appears below the Timer display. Press the [-] key within 5 seconds to reset the time to "000". Wait 5 seconds for confirmation, the clock symbol will disappear to confirm that the function has been deactivated.
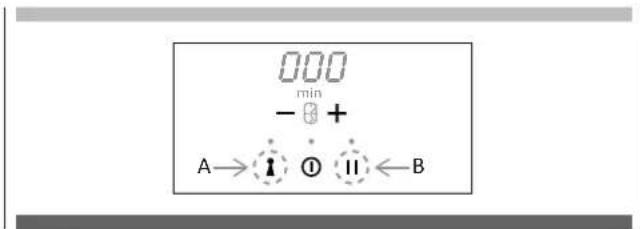
PAUSE " / "
If at least one cooking zone is active, the appliance can be paused by briefly interrupting cooking.
To activate this function, press the Pause keys (C-key). The relevant LED lights up and the displays of all cooking zones show the symbol "11". All active Timers are stopped. The maximum pause time is 10 minutes, after which the unit automatically switches off. The hob can also be switched off during the pause by pressing the ON/OFF key (A-key).
To deactivate the Pause function, press the Pause key (C-key) and slide your finger from right to left on the flashing slider within 10 seconds.
Function reset
If the appliance is accidentally switched off, you can restore the previous settings of the cooking zones by pressing the On/Off key again within 6 seconds.
If the Restore function is available, the LED of the Pause key flashes when the hob is switched on again. Restore the settings by pressing the Pause key within 6 seconds. This function can be used if at least one cooking zone was active (with a power setting greater than 0). An acoustic signal confirms that the function has been activated. The following are the information that can be restored:
- The power settings of all active cooking zones
• The active timers of all cooking zones - If Bridge was active, the function is restored
- The automatic Pre-heating and the Booster function if previously active
• The Child Lock if previously activated
Locking the controls
The controls can be locked to avoid the risk of accidental changes to settings (children, cleaning, etc.). To activate this function, press the Lock button (B-key). The corresponding LED lights up.
To unlock the controls and access the settings (e.g. stop cooking), press the Lock button again. When the control lock is active, it is still possible to switch off the hob. In this case, the control lock remains active even when the hob is switched on again.
Child Lock "L"
The purpose of this function is to prevent children from accidentally or deliberately switching on the appliance.
It can only be activated within 10 seconds of switching on the appliance if all cooking zones are switched off.
To activate the Child Lock, press the Lock and Pause keys simultaneously, and then press the Lock key again. The "L" symbol appears on all displays. The function remains active when the device is switched off and then on again.
To temporarily deactivate the Child Lock, press the Lock and Pause keys simultaneously. The function remains active each time the appliance is switched on.
To deactivate the Child Lock permanently, press the Lock and Pause keys simultaneously, then press the Pause key. When the appliance is switched on again, the function is no longer active.
Switching off the cooking zones
To switch off a cooking zone, press the relevant slider to reset the setting to "0".
Switching off the hob
To switch off the appliance completely, press the On/Off key (A-key).
Safety shut-down
The appliance is equipped with a safety system that automatically switches off the cooking zones after the time limit for switching on at a given power has elapsed. In this case, the zone display will show the remaining heat indicator "H".
| Power Max. operating time [hours] | |
| 1 8.6 | |
| 2 6.7 | |
| 3 5.3 | |
| 4 4.3 | |
| 5 3.5 | |
| 6 2.3 | |
| 7 2.3 | |
| 8 1.8 | |
| 9 1.5 | |
| P 0.083 (5 minutes) | |
Power management
The hob supports power management to avoid overloading the mains connection.
Power management is a priority, so if the user increases the heat on one zone, another zone may automatically suffer a power reduction.
Power settings
The power of the entire hob can be set from a maximum of 7.4 kW to a minimum of 1.6 kW.
Below is a table showing all the possible power set-ups for the appliance:
| Configurations Power set-up [kW] | |
| 0-1-2-3-4-5 3.7 [Max.] | |
| 6 3.7 | |
| 7 2.8 | |
| 8 21 | |
| 9 1.6 [Min.] | |
In order to change the power set-up of the entire hob, the user must follow the instructions below:
- Connect the hob to the power supply;
- Within 2 minutes of connecting the hob to the power supply, press the A - B keys simultaneously for 4 seconds;
text_image
000 min - ⑧ + A→①②II←B- Then press the two left-hand sliders simultaneously for 4 seconds;
text_image
000 - + + I II- The timer display will now show CF6. Now, press the B key;
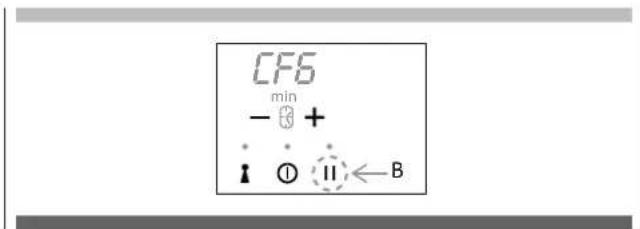
text_image
CF6 min - + I ① II ← B- The timer display will show PHA;
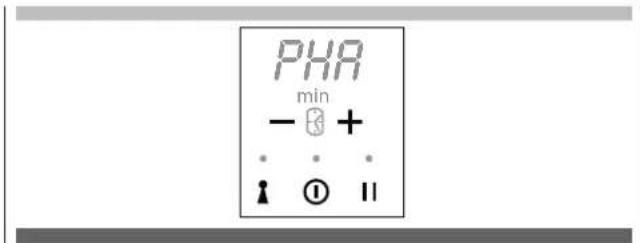
text_image
PHR min - + • • • i ① II- At this point, use the illuminated left-hand slider to choose a number from 0 to 9 (see the Configurations/Power Settings table). Here are some examples:
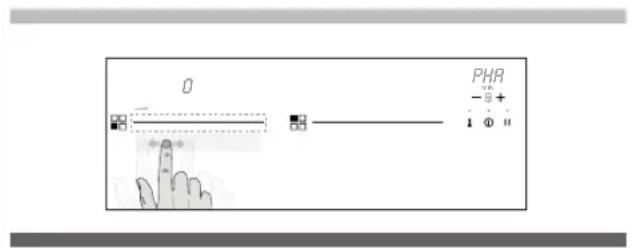
text_image
PHR -5+ 1 0 11With configuration No. 0, the hob is configured for maximum power (7.4 kW)

text_image
9 PHR - 9 + 1 0 11With configuration No. 9, the hob is configured for minimum power (1.6 kW).
- Once the power set-up has been defined, press the A and B keys simultaneously for 1 second to confirm A e B.
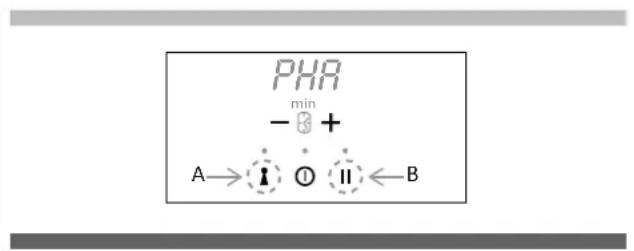
text_image
PHR - min + A→ ⚫ ① Ⅱ ←BInformation on electric hobs for domestic use pursuant to Regulation (EU) No 66/2014
| Model identifier | |
| Type of hob incassato | |
| Number of cooking zones and/or areas 2 | |
| Heating technology | 1. = Induzione |
| Induction cooking zones and cooking areas, radiant cooking zones | 2. = Induzione |
| For circular electric cooking zones: diameter of the cooking surface. For non-circular cooking zones or areas: length/width of the cooking surface/area. | 1. = Octa2. = Octa |
| Energy consumption per cooking zone or area calculated per kg (EC electric cooking) 1. = 187.3 | 2. = 187.3 |
| Hob energy consumption calculated per kg (EC electric cooking) 187.3 | |
text_image
2 1Cleaning and maintenance
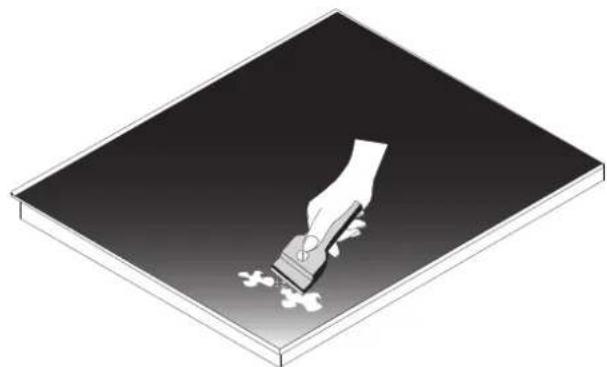
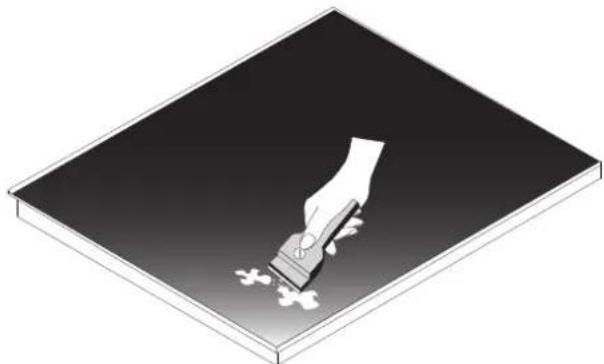
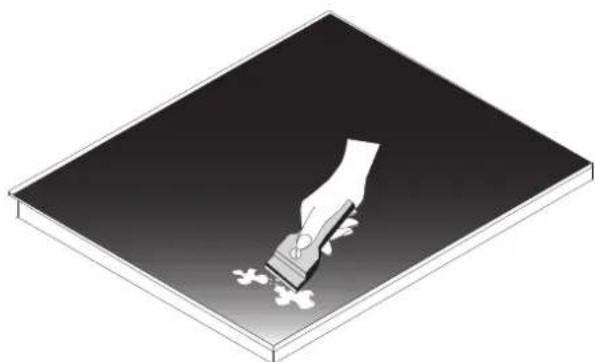
Use the special scraper supplied as an optional extra to remove food residue and grease droplets from the cooking surface.
Clean the heated area as best as possible with appropriate products and paper towels, rinse with water and dry with a clean cloth. Use the special scraper to immediately remove accidentally melted pieces of aluminium foil and plastic, sugar or high-sugar food residues, from the heated cooking area. This avoids any possible damage to the surface of the hob. Do not use abrasive sponges or harsh chemical cleaners such as oven sprays or stain removers. ATTENTION: DO NOT USE STEAM CLEANERS.
Energy saving tips
- Use a lid whenever possible to minimise heat loss.
- Use a small pan when cooking small quantities of food. A small pan uses less energy than a larger pan with little food in it.
• Cook with as little water as possible. - When the food has come to the boil or when the oil in the pan is hot enough for frying, reduce the flame to a lower level.
- Use a pressure cooker to reduce cooking time. Error codes shown by the 7-segment displays "E" "ER" plus error number.
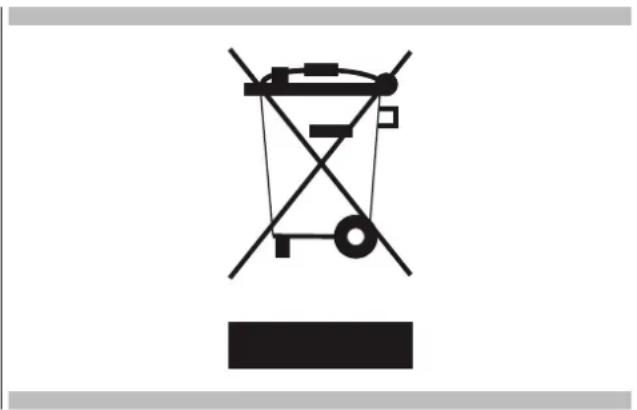
Decommissioning of household appliances
The European Directive 2002/96/EC on Waste Electrical and Electronic Equipment (WEEE) stipulates that household appliances should not be disposed of as municipal solid waste. Discarded appliances must be collected separately in order to optimise the recovery and recycling rate of its component materials and to prevent potential harm to health and the environment. The crossed-out wheeled bin symbol is displayed on all products as a reminder of separate collection. For further information on the correct disposal of household appliances, owners should contact their local authority or retailer.
WE ACCEPT NO LIABILITY FOR DAMAGE CAUSED BY FAILURE TO COMPLY WITH THE ABOVE WARNINGS. THE WARRANTY DOES NOT COVER DAMAGE RESULTING FROM FAILURE TO COMPLY WITH THE ABOVE WARNINGS.
natural_image
Pure electrical circuit lines without any symbols| Problem Possible cause Solution | ||
| It is not possible to activate or switch on the hob. | The hob is not connected to a power source or is not connected properly. | Make sure that the hob is correctly connected to the mains. Please refer to the paragraph "Electrical Connection". |
| The fuse has blown. Check whether the malfunction | is due to the fuse.If the fuse continues to blow, contact a qualified electrician. | |
| More than 10 seconds have elapsed since the hob was switched on. | Switch the hob back on and set the power setting in under 10 seconds. | |
| Two or more keys were touched at the same time. | Touch one key at a time. | |
| the "Pause" function is active. See the chapter "Using the hob" | ||
| The control panel is wet or has grease spots. Clean | the control panel. | |
| The hob switches itself off. One or more keys on the control panel have been covered. | Remove objects from the control panel keys. | |
| The residual heat indicator light does not light up. | The zone is not hot because it has only been in operation for a very short time. | If the zone has been running long enough to be hot, contact the Authorised Service Centre. |
| The "Automatic Heating" function does not work. | The zone is hot. Allow the zone to cool down. | |
| The highest power was set. The highest power has | the same power as the function. | |
| The power setting switches between two settings. | The "Power Management" function is active. See the chapter "Using the hob" | |
| The control panel keys are overheated. | The cooking utensils are either too large or have been placed too close to the controls. | If possible, place large pots/pans on the rear zones. |
| appears on the display. | The "Safety shut-down" function is active. Switch the appliance off and then back on again. | |
| appears on the display. | The "Child lock" function is active. Refer to the chapter "Using the hob" | |
| appears on the display. | Water or cooking utensils on the control panel. | Remove the objects from the control panel. |
| appears on the display. | There are no cooking utensils on the zone. | Place a cooking utensil on the zone. |
| Cooking utensils are not suitable. | Use suitable cooking utensils.Refer to the chapter "Induction cooking". | |
| The diameter of the bottom of the cooking utensil is too small for the zone. | Use cooking utensils of the correct size. Refer to the chapter "Induction cooking". | |
| The cooking utensils do not cover the square/cross/circle. | Make sure that the cross/square/circle is completely covered. | |
| appears on the display. | Induction plates are overheated. | Allow the appliance to cool down. |
| appears on the display. | Unsuitable cooking utensil | Use a suitable cooking utensil. |
| and a number appear in the display. | An error has occurred in the appliance. | Disconnect the appliance from the power supply for some time. Disconnect the fuse from the household electrical system. Reconnect it. If the error code appears again, please contact the Authorised Service Centre. |
| appears on the display. | The appliance is overheated.The cooling fan may be blocked. | Allow the appliance to cool down. Check whether objects are blocking the cooling fan. If the symbol still appears, contact a service centre. |
| appears on the display. | Incorrect data configuration A new configuration | is required. Contact an authorised service centre. |
| appears on the display. | Absent or defective communication between the controls and induction coils. | Ensure that the connection cable is correctly plugged in and in good working order. |
| appears on the display. | The control panel is incorrectly connected. | Connect to the correct supply voltage. |
| appears on the display. | An internal component of the appliance must be replaced. | Contact an authorised service centre. |
If you cannot find a solution to the problem, contact your dealer or the Authorised Service Centre. Provide the data shown on the data plate.
Cher Client,
Power boost (Chauffe rapide) 9
text_image
OCTA 9 Power Level: 2100W Booster (P): 3000W OCTA 9 Power Level: 2100W Booster (P): 3000WMax power: 3.7 kW

text_image
OCTA bridged 9 Power Level: 3000W Booster: 3700WFig. 1A

text_image
520 300 49 488 264 32 min. 50 R 3 268 490text_image
Technical diagram showing hands holding a bent pipe with a 1 mm dimension annotation and an inset detail view.Fig. 3

text_image
100 MIN. fronte - front - parte frontal face - voorkant - frontseite - frente induzione - induction - induction - Induktion - inducción - inductie - indução 600 MIN. 50 MIN. induzione - induction - induction - Induktion - inducción - inductie - indução aria - air - air - Luft - aire - lucht - ar 100 cm² MIN. (20 x 500) 20 MIN. ZONA FORNO O ARMADIETTO OVEN ZONE OR CUPBOARD ZONE FOUR OU PLACARD OFENBEREICH ODER SCHRANK ZONA HORNO O ARMARIO OVENRUIMTE OF KASTJE ZONA DO FORNO OU ARMÁRIO lato - side - côté - lado - zijkant - seite aria - air - air - Luft - aire - lucht - ar 100 cm² MIN. 50 MIN.Fig. 4
text_image
MIN. 30Fig. 5
text_image
Induction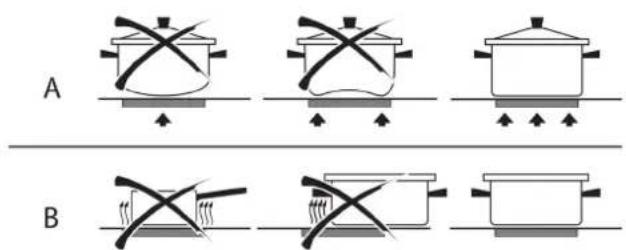
text_image
A BFig. 6A

text_image
≤ Ø 90 ≥ Ø 110Fig. 6B

text_image
X ≤ Ø 190 ✓ ≥ Ø 230Fig. 7
text_image
P O L M N 1 G H I P O L M N 1 G H I D F E Q 000 -0+ i i0 ii B A CFig. 8
text_image
Yellow/Green Blue Brown 1Ph+N220-240 V \~ 50/60 Hz
H05V2V2-F 3x1,5 mm ^4

text_image
Technical diagram showing two assembly steps with labeled components and tool tips, likely for electronics or circuit design.Fig. 9
natural_image
Illustration of a hand using a power tool to clean or store items on a dark surface (no text or symbols)
ATTENTION
text_image
O PHR - 0 + 1 0 11text_image
9 PHR -0 + 1 0 11text_image
Creative Commons license symbols including a trash bin, a person recycling with arrows, an open book, and a recycling bin icon.text_image
OCTA 9 Power Level: 2100W Booster (P): 3000W OCTA 9 Power Level: 2100W Booster (P): 3000WMax power: 3.7 kW

text_image
OCTA bridged 9 Power Level: 3000W Booster: 3700WAbb. 1A
text_image
520 300 49 488 264 32 min. 50 R 3 268 490text_image
Technical diagram showing hands holding a bent pipe with a 1 mm dimension annotation and an inset detail view.Abb. 3
text_image
100 MIN. fronte - front - parte frontal face - voorkant - frontseite - frente 600 MIN. induzione - induction - induction - Induktion - inducción - inductie - induzione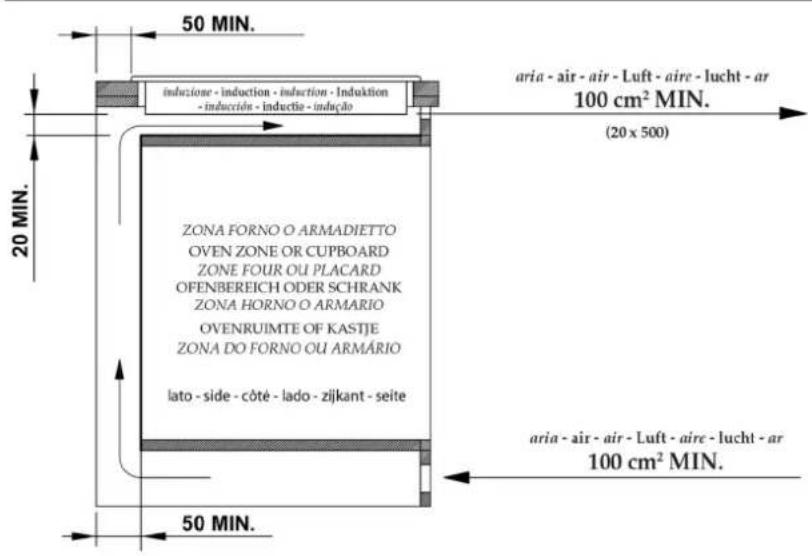
text_image
50 MIN. induzone - induction - induction - Induktion - inducción - inducción - indução 20 MIN. aria - air - air - Luft - aire - lucht - ar 100 cm² MIN. (20 x 500) ZONA FORNO O ARMADIETTO OVEN ZONE OR CUPBOARD ZONE FOUR OU PLACARD OFENBEREICH ODER SCHRANK ZONA HORNO O ARMARIO OVENRUIMTE OF KASTJE ZONA DO FORNO OU ARMÁRIO lato - side - côté - lado - zijkant - seite 50 MIN. aria - air - air - Luft - aire - lucht - ar 100 cm² MIN.Abb. 4
text_image
MIN. 30Abb. 5
text_image
InductionA
text_image
Diagram showing six cooking steps with cooking pots and crossed ingredients, likely illustrating a cooking or heating process.B
Abb. 6A
text_image
≤ Ø 90 ≥ Ø 110Abb. 6B

text_image
≤ Ø 190 ≥ Ø 230Abb. 7

text_image
P O L M N 0 θ n G H I P O L M N 0 θ U D F E Q 000 - θ + i θ i i G H I B A CAbb. 8
text_image
Yellow/Green 5 N Blue 4 3 2 1 L1 Brown 1Ph+N220-240 V \~ 50/60 Hz
H05V2V2-F 3x1,5 mm ^4

text_image
1.1 1.2 1.3 N1 N2 1 2 3 4 5 6 1.1 1.2 1.3 N1 N2 1 2 3 4 5 6 1.1 1.2 1.3 N1 N2 1 2 3 4 5 6Abb. 9
natural_image
Illustration of a hand using a power tool to clean or brush on a flat surface (no text or symbols)
WARNUNG
text_image
PHR -0+ 1 0 11natural_image
Pure electrical circuit lines without any symbolstext_image
OCTA 9 Power Level: 2100W Booster (P): 3000W OCTA 9 Power Level: 2100W Booster (P): 3000WMax power: 3.7 kW

text_image
OCTA bridged 9 Power Level: 3000W Booster: 3700WFig. 1A

text_image
520 300 49 488 264 32 min. 50 R 3 268 490text_image
Technical diagram showing hands holding a bent pipe with a 1 mm dimension annotation and an inset detail view.Fig. 3
text_image
100 MIN. fronte - front - parte frontal face - voorkant - frontseite - frente induzione - induction - induction - Induktion - inducción - inductie - indução 600 MIN. 50 MIN. induzione - induction - induction - Induktion - inducción - inductie - indução aria - air - air - Luft - aire - lucht - ar 100 cm² MIN. (20 x 500) 20 MIN. ZONA FORNO O ARMADIETTO OVEN ZONE OR CUPBOARD ZONE FOUR OU PLACARD OFENBEREICH ODER SCHRANK ZONA HORNO O ARMARIO OVENRUIMTE OF KASTJE ZONA DO FORNO OU ARMÁRIO lato - side - côté - lado - zijkant - seite aria - air - air - Luft - aire - lucht - ar 100 cm² MIN. 50 MIN.Fig. 4

text_image
MIN. 30Fig. 5

text_image
Induction
text_image
A BFig. 6A

text_image
≤Ø 90 ≥Ø 110Fig. 6B
text_image
X ≤ Ø 190 ✓ ≥ Ø 230Fig. 7

text_image
P O L M N 0 θ n G H I P O L M N 0 θ U D F E Q 000 - θ + i θ i i G H I B A CFig. 8

text_image
Yellow/Green 5 N Blue 4 3 2 1 L1 Brown 1Ph+N220-240 V \~ 50/60 Hz
H05V2V2-F 3x1,5 mm ^4
text_image
1 L2 L3 N2 2 3 4 5 1 L2 L3 N2 2 3 4 5 6 1 L2 L3 N2 2 3 4 5 6Fig. 9
natural_image
Illustration of a hand using a power tool to clean or brush on a dark surface (no text or symbols)