
DPC10RC-QS - Compressor DEWALT - Free user manual and instructions
Find the device manual for free DPC10RC-QS DEWALT in PDF.

User questions about DPC10RC-QS DEWALT
0 question about this device. Answer the ones you know or ask your own.
Ask a new question about this device
Download the instructions for your Compressor in PDF format for free! Find your manual DPC10RC-QS - DEWALT and take your electronic device back in hand. On this page are published all the documents necessary for the use of your device. DPC10RC-QS by DEWALT.
USER MANUAL DPC10RC-QS DEWALT
English SAFETY & OPERATING INSTRUCTIONS MANUAL
(original instructions) 5
| Français MANUEL D'INSTRUCTIONS DE SÉCURITÉ ET D'UTILISATION(traduction de la notice d'instructions originale) | 15 |
| Deutsch SICHERHEITS- UND BEDIENUNGSANLEITUNG(übersetzt von den Originalanweisungen) | 26 |
| Nederlands VEILIGHEIDSHANDLEIDING EN GEBRUIKSAANWIJZING(vertaald vanuit de originele instructies) | 38 |
| Dansk SIKKERHEDS- & BRUGSANVISNING(oversat fra original brugsvejledning) | 49 |
| Suomi TURVALLISUUS- JA KÄYTTÖOHJEET(käännetty alkuperäisestä käyttöohjeesta) | 60 |
| Ελληνικά ΕΓΧΕΙΡΙΔΙΟ ΑΣΦΑΛΕΙΑΣ ΚΑΙ ΟΔΗΓΙΩΝ ΛΕΙΤΟΥΡΓΙΑΣ(μετάφραση από τις πρωτότυπες οδηγίες) | 71 |
| Italiano MANUALE DI SICUREZZA E ISTRUZIONI D'USO(tradotto dalle istruzioni originali) | 83 |
| Norsk BRUKSANVISNING FOR SIKKERHET OG DRIFT(oversatt fra de originale instruksjonene) 94 | |
| Português MANUAL DE INSTRUÇÕES DE FUNCIONAMENTO E DE SEGURANÇA(traduzido das instruções originais) | 105 |
| Español MANUAL DE INSTRUCCIONES Y SEGURIDAD(traducido de las instrucciones originales) | 117 |
| Svenska MANUAL FÖR SÄKERHETS- OCH ANVÄNDARINSTRUKTIONER(översatt från de ursprungliga instruktionerna) 128 | |
| Polski INSTRUKCJA OBSŁUGI I ZASADY BEZPIECZEŃSTWA(tłumaczenie z wersji oryginalnej) 139 | |
| Čeština NÁVOD PRO OBSLUHU A BEZPEČNOST(překlad originálu) 150 | |
| Slovenský BEZPEČNOSTNÝ NÁVOD S POKYNMI(preklad originálu) 161 | |
| Magyar BIZTONSÁGI ÉS ÜZEMELTETÉSI ÚTMUTATÓ(eredeti szöveg fordítása) 173 | |
| Român MANUAL DE INSTRUCTIUNI PRIVIND UTILIZAREA ŞI SIGURANTA(traducerea versiunii originale) 183 |

Oil Free
Sans huile
Öllos
Olie Vrij
Oliefri
Μη λιπαινόμενος
Senza olio
Sin aceite
Oljefri
Isento de Óleo
Voitelematon
Oljefri
Bezolejowy
Before positioning, operating or adjusting the compressor, read the instruction book carefully. MARKINGS ON TOOL
The following pictograms are shown on the tool:

RISK OF ELECTRIC SHOCK:
CAUTION: before doing any work on the compressor, it must be disconnected from the power supply.

RISK OF HIGH TEMPERATURES:
CAUTION: the compressor contains some parts which might reach high TEMPERATURES.

RISK OF ACCIDENTAL START-UP:
Attention: the compressor could start automatically in case of a black-out and subsequent reset. WEAR EAR PROTECTION

IMPORTANT INFORMATION
Read and understand all of the operating instructions, safety precautions and warnings in the Instruction Manual before operating or maintaining this compressor. Most accidents that result from compressor operation and maintenance are caused by the failure to observe basic safety rules or precautions. An accident can often be avoided by recognizing a potentially hazardous situation before it occurs, and by observing appropriate safety procedures. Basic safety precautions are outlined in the “SAFETY” section of this Instruction Manual and in the sections which contain the operation and maintenance instructions. Hazards that must be avoided to prevent bodily injury or machine damage are identified by WARNINGS on the compressor and in this Instruction Manual.
Use the DeWALT compressor only for the purpose for which it was designed, such as: pneumatic nailing tools, paint spraying, tyre inflating etc.. Always ensure that the tool you are connecting has a suitable air pressure value.
MEANINGS OF SIGNAL WORDS
⚠ WARNING: indicates a potentially hazardous situations which, if ignored, could result in serious personal injury.
⚠ CAUTION: indicates a hazardous situations which, if ignored, could result moderate personal injury, or could cause machine damage.
NOTE: emphasizes essential information
Safety instructions
IMPORTANT SAFETY INSTRUCTIONS FOR USE OF THE COMPRESSOR.
⚠ WARNING: DEATH OR SERIOUS BODILY INJURY COULD RESULT FROM IMPROPER OR UNSAFE USE OF COMPRESSOR. TO AVOID THESE RISKS, FOLLOW THESE BASIC SAFETY INSTRUCTIONS.
READ ALL INSTRUCTIONS
-
NEVER TOUCH MOVING PARTS Never place your hands, fingers or other body parts near the compressor's moving parts.
-
NEVER OPERATE WITHOUT ALL GUARDS IN PLACE Never operate this compressor without all guards or safety features in place and in proper working order. If maintenance or servicing requires the removal of a guard or safety features, be sure to replace the guards or safety feature before resuming operation of the compressor.
-
ALWAYS WEAR EYE PROTECTION Always wear safety goggles or equivalent eye protection. Compressed air must never be aimed at anyone or any part of the body.
4. PROTECT YOURSELF AGAINST ELECTRIC SHOCK
Prevent body contact with grounded surfaces such as pipes, radiators, ranges and refrigeration enclosures. Never operate the compressor in damp or wet locations. Never leave the appliance exposed to adverse weather conditions.
-
DISCONNECT THE COMPRESSOR Always disconnect the compressor from the power source and remove the compressed air from the air tank before servicing, inspecting, maintaining, cleaning, replacing or checking any parts.
-
AVOID UNINTENTIONAL STARTING Do not carry the compressor while it is connected to its power source or when the air tank is filled with compressed air. Be sure the knob of the pressure switch in the "OFF" position before connecting the compressor to its power source.
-
STORE COMPRESSOR PROPERLY When not in use, the compressor should be stored in dry place. Keep out of reach of children. Lock-out the storage area.
-
KEEP WORK AREA CLEAN Cluttered areas invite injuries. Clear all work areas of unnecessary tools, debris, furniture etc...
-
KEEP CHILDREN AWAY Do not let visitors contact compressor extension cord. All visitors should be kept safely away from work area.
-
DRESS PROPERLY Do not wear loose clothing or jewellery. They can be caught in moving parts. Wear protective hair covering to contain long hair.
-
DON'T ABUSE CORD Never yank it to disconnect from receptacle. Keep cord from heat, oil and sharp edges.
-
MAINTAIN COMPRESSOR WITH CARE Follow instructions for lubricating. Inspect cords periodically and if damaged, have repaired by authorized service facility. Inspect extension cords periodically and replace if damaged.
-
OUTDOOR USE EXTENSION CORDS When compressor in used outdoors, use only extension cords intended for use outdoors and so marked.
-
STAY ALERT Watch what you are doing. Use common sense. Do not operate compressor when you are tired. compressor should never be used by you if you are under
the influence of alcohol, drugs or medication that makes you drowsy.
15. CHECK FOR DAMAGED PARTS AND AIR LEAKS
Before further use of the compressor, carefully checked the guard and other parts for damage to make sure that it will operate properly and perform its intended function. Check for alignment of moving parts, binding of moving parts, breakage of parts, mounting, air leak, and any other conditions that may affect its operation. A guard or other part that is damaged should be properly repaired or replaced by an authorized service center unless otherwise indicated elsewhere in this Instruction Manual. Have defective pressure switches replaced by authorized service center. Do not use compressor if switch does not turn it on and off.
16. NEVER USE COMPRESSOR FOR APPLICATIONS
OTHER THAN THOSE SPECIFIED Never use compressor for applications other than those specified in the Instruction Manual. Never use compressed air for breathing or respiration. Never stand on the compressor.
- HANDLE COMPRESSOR CORRECTLY Operate the compressor according to the instructions provided herein. Never allow the compressor to be operated by children, individuals unfamiliar with its operation or unauthorized personnel.
18. KEEP ALL SCREWS, BOLTS AND COVERS TIGHTLY IN
PLACE Keep all screws, bolts, and plates tightly mounted. Check their conditions periodically.
- KEEP MOTOR AIR VENT CLEAN The motor air vent must be kept clean so that air can freely flow at all times. Check for dust build-up frequently.
20. OPERATE COMPRESSOR AT THE RATED VOLTAGE
Operate the compressor at voltages specified on their nameplates. If using the compressor at a higher voltage than the rated voltage, it will result in abnormally fast motor revolution and may damage the unit and burn out the motor.
-
NEVER USE A COMPRESSOR WHICH IS DEFECTIVE OR OPERATING ABNORMALLY If the compressor appears to be operating unusually, making strange noises, or otherwise appears defective, stop using it immediately and arrange for repairs by an authorized service center.
-
DO NOT WIPE PLASTIC PARTS WITH SOLVENT Solvents such as gasoline, thinner, benzine, carbon tetrachloride, and alcohol may damage and crack plastic parts. Do not wipe them with such solvents. Wipe plastic parts with a soft cloth lightly dampened with soapy water and dry thoroughly.
23. USE ONLY GENUINE REPLACEMENT PARTS
Replacement parts not original may void your warranty and can lead to malfunction and resulting injuries. Genuine parts are available from your dealer.
- DO NOT MODIFY THE COMPRESSOR Do not modify the compressor. Always contact the authorized service center any repairs. Unauthorized modification may not only impair
the compressor performance but may also result in accident or injury to repair personnel who do not have the required knowledge and technical expertise to perform the repair operations correctly.
25. TURN OFF THE PRESSURE SWITCH WHEN THE
COMPRESSOR IS NOT USED When the compressor is not used, turn the knob of the pressure switch OFF, disconnect it from the power source and open the drain cock to discharge the compressed air from the air tank.
-
NEVER TOUCH HOT SURFACE To reduce the risk of burns, do not touch tubes, heads, cylinder and motors.
-
DO NOT DIRECT AIR STREAM AT BODY Risk of injury, do not direct air stream at persons or animals.
-
DRAIN TANK Drain tank daily or after 4 hours of use. Open drain fitting and tilt compressor to empty accumulated water.
-
DO NOT STOP COMPRESSOR BY PULLING OUT THE PLUG Use the "AUTO/OFF" knob of pressure switch.
30. USE ONLY RECOMMENDED AIR HANDLING PARTS ACCEPTABLE FOR PRESSURE NOT LESS THAN 8.6 BAR
(125 PSI) Risk of bursting. Use only recommended air handling parts acceptable for pressures not less than 8.6 bar (125 psi).
31. WEAR PROPER HEARING AND HEAD PROTECTION
Suitable protective clothing must be worn when operating the compressor and connected tool or accessory. Consult the tool / accessory manual and adhere to any safety requirements.
32. MAKE ALLOWANCE FOR ENVIRONMENTAL CONDITIONS
Never leave the compressor in the rain. Never use the compressor in damp or wet conditions. Provide good lighting. Never use the compressor near combustible liquids or gases.
REPLACEMENT PARTS
When servicing use only identical replacement parts. Repairs should be conducted only by authorized service center.
EXTENSION CORD
Use only three-extension cords that have three-prong grounding type plugs and three-pole receptacles that accept the compressor's plug. Replace or repair damaged cord. Make sure your extension cord is in good condition. When using an extension cord, be sure to use one heavy enough to carry the current your product will draw. An undersized cord will cause a drop in line voltage resulting in loss of power and overheating. Table shows the correct size to use depending on cord length and name plate ampere rating. If in doubt, use the next heavier gage. The smaller the gage number, the heavier the cord.
When operating a power tool outdoors, use an extension cord suitable for outdoor use. Use of a cord suitable for outdoor use reduces the risk of electric shock.
SECTION VALID FOR A MAX LENGTH OF 20m SINGLE-PHASE
| Power / HP | Power / kW | 220/230V mm ^2 | 110/120V mm ^2 |
| 0.75-1 | 0.65-0.7 | 1.5 | 2.5 |
| 1.5 | 1.1 | 2.5 | 4 |
| 2 | 1.5 | 2.5 | |
| 2.5-3 | 1.8-2.2 | 4 | - |
⚠ WARNING Avoid electrical shock hazard. Never use this compressor with a damaged or frayed electrical cord or extension cord. Inspect all electrical cords regularly. Never use in near water or in any environment where electric shock is possible.
SAFETY VALVE
This compressor is equipped with a safety valve that is set to avoid over-pressurization of the air tanks. This valve is factory pre-set and will not function unless tank pressure reaches this pressure.
⚠ WARNING: DO NOT ATTEMPT TO ADJUST OR ELIMINATE THIS SAFETY DEVICE. ANY ADJUSTMENTS TO THIS VALVE COULD CAUSE SERIOUS INJURY. If this device requires service or maintenance, see an Authorized DEWALT Service Center.
Attachments and Accessories:
For any attachment or accessory you will be using with this compressor, the maximum allowable recommended pressure should be clearly marked on the product or should be clearly noted within the operations manual. Exceeding the pressure rating of these attachments (including, but not limited to:air tools, air operated accessories, spray guns, air hose, air hose connections, tires and other inflatables) could cause them to fly apart or explode and could result in serious injury.
- Never exceed the maximum allowable pressure recommended by the manufacturer of any attachment or accessory you use with this compressor.
DUTY CYCLE:
To ensure long life of your DEWALT air compressor, do not operate on more than the duty cycle indicated on the technical data plate. If, for example, this air compressor pumps air more than 25% of one hour, then the compressor's capability is less than the air delivery required by the application. Always match the air volume requirements of the attachment or accessory with the air volume delivery of the compressor.
To avoid overheating of the electric motor, this compressor is designed for intermittent operation as indicated on the technical dataplate (for example, S3-25 means 2.5 minutes ON, 7.5 minutes OFF).
SAVE THESE INSTRUCTIONS AND MAKE THEM AVAILABLE TO OTHER USERS OF THIS TOOL!
NOTE: The information contained in this Instruction Manual is designed to assist you in the safe operation and maintenance of the compressor. Some illustrations in this Instruction Manual may show details or attachments that differ from those on your own compressor.
INSTALLATION
Remove the compressor from its packing, makes sure it is in perfect condition, checking if it was damaged during transport, and carry out the following operations:
DPC16PS ONLY
⚠ Caution: Risk of personal injury. Avoid placing hands between handle and top panel when assembling to prevent pinching.
- Place handle (5) into bushings on top panel (7).
- Depress snap buttons and slide handle through first bushings until it stops at second bushings.
- Reach under top panel and depress snap buttons again and slide through second bushings.
- Pull handle all the way up until it stops. Turn knobs (15) to lock handle in place. IMPORTANT: Always pull handle up and lock in place before using as a dolly.
- If not using the dolly feature, loosen knobs and push handle down until it stops.
LUBRICATION AND OIL - DPC16PS ONLY
⚠️ CAUTION: The compressor was shipped with oil in the crankcase. Please check carefully if the oil is at the right level. Do not attempt to operate this air compressor without first checking the oil level in the crankcase. Serious damage can result from even limited operation unless filled with oil and broken in correctly. Closely follow Initial Set-up under Operation having completed all required steps.
⚠ Caution: Multi-viscosity motor oils, like 10W30, should not be used in an air compressor. They leave carbon deposits on critical components, thus reducing performance and compressor life. Use DeWALT synthetic or SAE 40, non-detergent air compressor oil.
-
Place unit on a level surface.
-
Remove dipstick (13) and check oil level. Gradually add DeWALT synthetic or SAE 40, non-detergent air compressor oil if required. NOTE: See Specifications for pump oil capacity.
⚠ Caution: Risk of unsafe operation. Overfilling with oil will cause premature compressor failure. Do not overfill.
- Reposition dipstick.
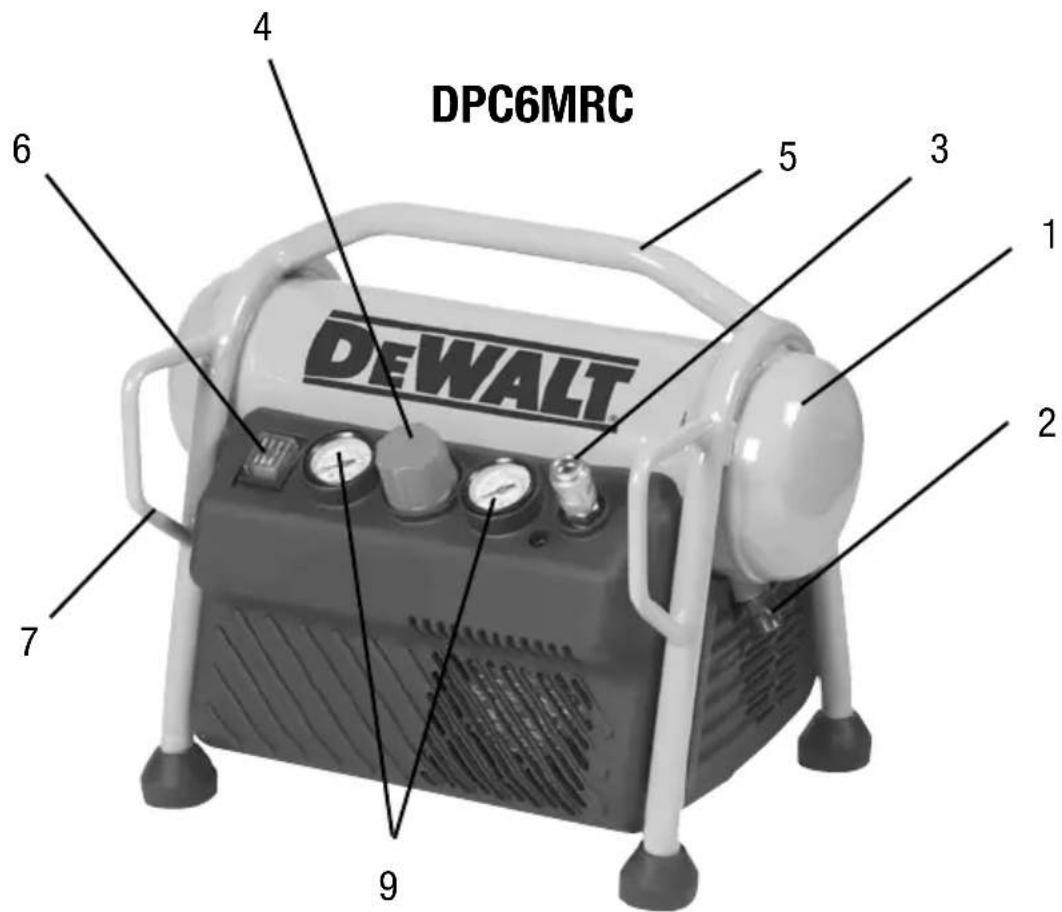
NOTE: Some units (DPC6MRC, DPC10RC) are equipped with an oil-free pump. There is no oil to replace or check.
ELECTRICAL CONNECTION
Do not abuse the cord. Never use the cord for carrying, pulling or unplugging the power tool. Keep cord away from heat, oil, sharp edges or moving parts.
Damaged or entangled cords increase the risk of electric shock.
Single-phase compressors are supplied with an electrical cable and a two-pole & earth plug. The compressor must be connected to a grounded power socket.
IMPORTANT: Never use the ground socket instead of the neutral wire. The ground connection must be made to meet safety standards (EN 60204). The plug of the power cable must not be used as a switch, but must be fitted in a power socket controlled by a suitable differential switch (thermalbreaker).
⚠ DANGER: RISK OF ELECTRICAL SHOCK. IMPROPER GROUNDING CAN RESULT IN ELECTRICAL SHOCK.
Do not modify the plug provided. If it does not fit the available outlet, a correct outlet should be installed by a qualified electrician.
Repairs to the cord set or plug MUST be made by a qualified electrician.
PREPARATION FOR USE
PRE-START CHECKLIST
- Ensure the On/Off switch (6) is in the OFF position.
- Plug the power cord into the correct branch circuit receptacle. See Electrical Connection (above).
- Ensure air tank is drained, see Draining Air Tank under Maintenance.
- Ensure the drain valve (2) is closed.
- Ensure safety valve (14) is functioning properly, see Checking Safety Valve under Maintenance.
- Check pump oil level, see Compressor Pump Oil under Maintenance. (DPC16PS Only)
⚠️ CAUTION: Do not operate without oil or with inadequate oil. DeWALT is not responsible for compressor failure caused by inadequate oil.
7. Turn regulator knob (4) counterclockwise until fully closed. Ensure regulated pressure gauge reads 0 bar (0 psi).
8. Attach hose and accessories.
⚠ Warning: Risk of unsafe operation. Firmly grasp hose in hand when installing or disconnecting to prevent hose whip.
9. Ensure all covers and labels are in place, legible (for labels) and securely mounted. Do not use compressor until all items have been verified.
⚠ Warning: Risk of bursting. Too much air pressure causes a hazardous risk of bursting. Check the manufacturer's maximum pressure rating for air tools and accessories. The regulator outlet pressure must never exceed the maximum pressure rating.
INITIAL SET-UP
⚠ Warning: Do not operate this unit until you read and understand this instruction manual for safety, operation and maintenance instructions.
BREAK-IN PROCEDURE
⚠️ CAUTION: Risk of property damage. Serious damage may result if the following break-in instructions are not closely followed.
This procedure is required before the air compressor is put into service for the first time and when the check valve or a compressor pump/motor has been replaced.
- Ensure the On/Off switch (6) is in the OFF position.
NOTE: If hose is not connected to Quick Connect body, pull coupler back until it clicks to prevent air from escaping through the quick connect. - Plug the power cord into the correct branch circuit receptacle. See Voltage and Circuit Protection under Installation.
- Open the drain valve (counter-clockwise) fully to permit air to escape and prevent air pressure build up in the air tank during the break-in period.
- Move the On/Off switch to the ON position. The compressor will start.
- Run the compressor for 20 minutes.
- After 20 minutes, close the drain valve by turning clockwise. The tank will fill to cut-out pressure and the motor will stop.
- Compressed air will be available until it is used or bled off.
STARTING
Check that the mains power matches that indicated on the electrical data-plate - the permissible tolerance range is +/-5%. Turn or press into position "0". Fit the plug in the power socket and start the compressor, turning the pressure switch knob into position "1".
The compressor is fully automatic, and is controlled by the pressure switch which stops it when tank pressure reaches maximum value and restarts it when it falls to minimum value. The pressure difference between maximum and minimum values is usually about 2 bar (29 psi). E.g.: the compressor stops when it reaches 8 bar (116 psi) - maximum operating pressure) and restarts automatically when the pressure inside the tank drops to 6 bar (87 psi). After connecting the compressor to the power line, load it to maximum pressure and check exactly how the machine is operating.
NOTE: The head/cylinder/delivery tube unit can reach high temperatures. Take care when working near these parts, and do not touch them to avoid possible burns.
IMPORTANT
The electro-compressors must be connected to a power socket protected by a suitable differential switch (thermal-breaker). The motor is equipped with an automatic
thermal breaker located inside the winding - this stops the compressor when motor temperature reaches excessively high values (180°C). If the breaker is tripped, the compressors restart automatically after 10 to 15 minutes.
You do not have to use the maximum operating pressure at all times. On the contrary, the pneumatic tool being used often requires less pressure. On compressors supplied with a pressure reducer, operating pressure must be correctly adjusted.
Adjust pressure to the required value by turning the knob (4) clockwise to increase pressure and anti-clockwise to reduce it. When you have obtained optimum pressure, lock the knob by pressing it downward. For pressure reducers equipped without a pressure gauge, the set pressure can be seen on the graduated scale located on the reducer body.
On pressure reducers equipped with a pressure gauge, pressure can be seen on the gauge itself.
WARNING: Some pressure regulators do not have "push to lock", therefore simply turn the knob to adjust the pressure.
STOPPING THE COMPRESSOR
- Turn or press the switch/button into position "0" (according to the type of pressure switch fitted on the compressor). DO NOT turn off the unit by switching off at the socket or pulling out the plug.
- Turn regulator knob (4) counterclockwise until fully closed. Ensure regulated pressure gauge reads 0 bar (0 psi).
- Remove hose and accessory.
- Drain the air tank, see Draining Air Tank under Maintenance. Ensure air tank pressure gauge reads 0 bar (0 psi).
Maintenance
⚠ WARNING: To reduce the risk of injury, turn unit off and disconnect machine from power source before installing and removing accessories, before adjusting or changing setups or when making repairs.
An accidental start-up can cause injury.
The following procedures must be followed when maintenance or service is performed on the air compressor.
NOTE: Allow air compressor to cool down before starting service.
NOTE: All compressed air systems contain maintenance parts (e.g., oil, filters, separators) that are periodically replaced. These used parts may contain substances that are regulated and must be disposed of in accordance with local, state, and federal laws and regulations.
NOTE: Take note of the positions and locations of parts during disassembly to make reassembly easier.
NOTE: Any service operations not included in this section should be performed by a DeWALT factory service center or a DeWALT authorized service center.
DRAINING AIR TANK
The condensation in the tank must be drained daily by opening the drain tap (2) under the tank. Take care if there is compressed air inside the cylinder, as water could flow out with considerable force.
- Verify that the compressor is turned "Off".
- Holding the handle, tilt the compressor toward the drain valve so it is positioned at the bottom of the tank.
- Turn the drain valve to open.
- Keep the compressor tilted until all moisture has been removed.
| MAINTENANCE CHART | ||||
| Procedure Daily Weekly Monthly 1 year or 200 Hours | ||||
| Check safety valve | X | |||
| Inspect air filter+ | X | |||
| Drain air tank | X | |||
| Check pump oil level | X | |||
| Change pump oil (DPC16PS Only)**+ | X | |||
| Oil leak inspection (DPC16PS Only) | X | |||
| Check for unusual noise/vibration | X | |||
| Check for air leaks* | X | |||
| Clean compressor exterior | X | |||
| * To check for air leaks apply a solution of soapy water around joints. While compressor is pumping to pressure and after pressure cuts out, look for air bubbles to form. | ||||
| ** The pump oil must be changed after the first 20 hours of operation. Thereafter, when usingDEWALT synthetic or SAE 40, non-detergent air compressor oil, change oil every 200 hours of operation or once a year, whichever comes first. | ||||
| + Perform more frequent in dusty or humid conditions | ||||
Condensation of compressors that are oil lubricated must not be drained into the sewer or dispersed in the environment as it contains oil.
CHECKING SAFETY VALVE (14)
⚠ WARNING: Hot surfaces. Risk of burn. Aftercooler, pump head, and surrounding parts are very hot, do not touch. Allow compressor to cool prior to servicing.
⚠ WARNING: Risk of bursting. If the safety valve does not work properly, over-pressurization may occur, causing air tank rupture or an explosion.
Before starting compressor, pull the ring on the safety valve to make sure that the safety valve operates freely. If the valve is stuck or does not operate smoothly, it must be replaced with the same type of valve.
CHECKING AIR FILTER ELEMENT (10)
⚠ WARNING: Hot surfaces. Risk of burn. Aftercooler, pump head, and surrounding parts are very hot, do not touch. Allow compressor to cool prior to servicing.
-
Ensure the On/Off switch (6) is in the OFF position.
-
Allow unit to cool.
-
Remove air filter (10) from unit.
-
Carefully pry filter top from base.
-
Remove element from filter base.
-
If element needs cleaning, blow out with air. Replace if needed. Purchase replacement parts from your local dealer or authorized service center. Always use identical replacement parts.
-
Place element back in filter base.
-
Snap filter top to filter base.
-
Reassemble air filter to unit. Ensure exhaust outlet points down.
⚠️ CAUTION: Risk of unsafe operation. Do not operate without air inlet filter.
COMPRESSOR PUMP OIL (DPC16PS ONLY) CHECKING OIL
⚠ WARNING: Hot surfaces. Risk of burn. Aftercooler, pump head, and surrounding parts are very hot, do not touch. Allow compressor to cool prior to servicing.
- Ensure On/Off switch is in the OFF position.
- Place unit on a flat level surface.
- Remove dipstick (13) and wipe clean.
- Reinsert dipstick fully into oil fill port for a few seconds to allow oil to collect on the dipstick.
- Remove oil dipstick to read oil level. Oil should not exceed top raised line on dipstick. If oil is below lower mark, add same type of oil in crankcase and follow Steps 4 - 6.
NOTE: When filling the crankcase, the oil flows very slowly into the pump. If the oil is added too quickly, it will overflow and appear to be full.
⚠️ CAUTION: Risk of unsafe operation. Overfilling with oil will cause premature compressor failure. Do not overfill.
6. Replace dipstick.
CHANGING OIL
NOTE: Pump oil contains substances that are regulated and must be disposed of in accordance with local, state and federal laws and regulations.
⚠ WARNING: Hot surfaces. Risk of burn. Aftercooler, pump head, and surrounding parts are very hot, do not touch. Allow compressor to cool prior to servicing.
- Ensure On/Off switch is in the OFF position.
- Allow the unit to cool.
- Remove air compressor plug from outlet.
- Drain air tank.
- Locate a suitable container under pump drain plug (17).
- Remove the dipstick (13) from crank case.
- Remove the oil drain plug (17).
- Allow ample time for all oil to drain out. (Tilting the compressor towards the drain plug will assist in draining.)
- Install the oil drain plug.
- Fill pump using DEWALT synthetic or SAE 40, non-detergent air compressor oil.
11.Replacedipstick.
WHAT TO DO IF SMALL MALFUNCTIONS OCCUR
Loss of air in valve under pressure switch
This trouble depends on poor tightness of the check valve. Take the following action:
- Discharge all pressure from the tank
- Unscrew the hexagon-head of the valve
- Carefully clean both the rubber disk and its seat.
- Refit all parts accurately.
Air losses
These can be caused by poor tightness of a union - check all unions, wetting them with soapy water.
Compressor not starting
If the compressor has trouble starting, check the following :
- Does mains power match that of the data-plate?
- Are power cable extensions of adequate diameter or length?
- Is the work environment too cold? (under 0°C)
- Is there oil in the housing to ensure lubrication?
- Is power supplied to the electrical line? (sockets well connected, thermal-breaker, fuses in good condition
Compressor not stopping
- If the compressor does not stop when maximum pressure is reached, the tank safety valve comes into operation. A compressor with a faulty safety valve must NEVER be used - contact your nearest service centre immediately.
IMPORTANT
- Do not on any account unscrew any connection while the tank is pressurised
- Always check if the tank is pressure free.
- Do not drill holes, weld or purposely deform the compressed air tank.
- Do not do any jobs on the compressor unless you have disconnected the power plug.
- Temperature in operating ambient: 0^ C + 35^ C.
- Do not aim jets of water or inflammable liquids on the compressor.
- Do not place flammable objects near the compressor.
- During down-times, turn the pressure switch to position "0" (OFF).
- Never aim the air jet at people or animals
- Do not transport the compressor while the tank is pressurised.
- Be careful with regard to some parts of the compressor such as the head and delivery tubes, as they can reach high temperatures. Do not touch these parts to avoid burns.
- Transport the compressor, lifting or pulling it with the appropriate grips or handles
- Keep children and animals well away from the machine operating area.
- If using the compressor for painting: a) Do not work in closed environments or near to naked flames b) Make sure there is adequate exchange of air at the place of work c) Protect your nose and mouth with an appropriate mask. Consult the tool / accessory manual and adhere to any safety requirements.
- If the electrical cable or plug are damaged, do not use the compressor and contact an authorised service centre to replace the faulty element with an original spare part.
- If the compressor is located on a shelf or on a top above floor height, it must be secured to prevent it falling while in operation.
- Do not put objects or your hands inside the protective grilles to avoid injury to yourself or damaging the compressor.
- Do not use the compressor as a blunt object toward things or animals, to avoid serious damage.
- When you have finished using the compressor, always remove the plug from the power socket.
ELECTRO-COMPRESSOR MODELS
For the European market, the compressor tanks are manufactured to meet Directive 2009/105/EC For the European market, the compressors are manufactured to meet Directive 2006/42/EC.
For the European market, the compressors are manufactured to meet Directive 2000/14/EC.
Acoustic pressure measured free-field at a distance of 4m at maximum operating pressure.
- For efficient operation of the machine at full continuing load and at maximum operating pressure, make sure the temperature of the work environment indoors does not exceed +25°C.
THESE COMPRESSORS HAVE BEEN DESIGNED FOR INTERMITTENT USE. THEY SHOULD ONLY BE USED FOR APPLICATIONS WHERE USAGE WILL NOT EXCEED 25% OF DUTY OVER THE COURSE OF ONE HOUR.
STORING THE PACKED AND UNPACKED COMPRESSOR
For the whole time that the compressor is not used before unpacking it, store it in a dry place at a temperature between +5°C and +45°C and sheltered away from weather. For the whole time that the compressor is not used after unpacking it, disconnect from the mains supply, drain the air tank place sheets over it to protect it from dust, which may settle on the components. The oil is to be replaced and the operational efficiency of the compressor is to be checked if it is not used for long periods.
PNEUMATIC CONNECTIONS
Make sure you always use pneumatic tubes for compressed air with maximum pressure characteristics that are adequate for the compressor. Do not attempt to repair tubes if faulty.
WE RESERVE THE RIGHT TO MAKE ANY MODIFICATIONS WITHOUT PRIOR NOTICE WHENEVER NECESSARY.
TROUBLESHOOTING GUIDE
This section provides a list of the more frequently encountered malfunctions, their causes and corrective actions. The operator or maintenance personnel can perform some corrective actions, and others may require the assistance of a qualified DEWALT technician or your dealer.
Problem
Code
Excessive air tank pressure-safety valve pops off 1,2
Air leaks
3
Air leaks in air tank or at air tank welds 4
Air leaks between head and valve plate 5
Air leaks from safety valve 6
Knocking Noise
6,16,17
Pressure reading on the regulated pressure gauge drops when an accessory is used 7
Compressor is not supplying enough air to operate accessories 8,9,10,11,12,15
Regulator knob has continuous air leak 13
Regulator will not shut off air outlet 13
Moisture in pump crankcase
Motor will not run
14,18
11,19,20
23,24,25,26
| CODE | POSSIBLE CAUSE POSSIBLE SOLUTION | |
| 1 | Pressure switch does not shut off motor when compressor reaches cut-out pressure | Set the On/Off switch to OFF, if the unit does not shut off contact a DeWALT factory service center or a DeWALT authorized service center. |
| 2 | Pressure switch cut-out too high | Contact a DeWALT factory service center or a DeWALT authorized service center. |
| 3 | Tube fittings are not tight enough | Tighten fittings where air can be heard escaping. Check fittings with soapy water solution. Do Not Overtighten. |
| 4 | Defective air tank | Air tank must be replaced. Do not repair the leak.⚠ WARNING: Risk of bursting. Do not drill into, weld or otherwise modify air tank or it will weaken. The air tank can rupture or explode. |
| 5 | Leaking seals | Contact a DeWALT factory service center or a DeWALT authorized service center. |
| 6 | Defective safety valve | Operate safety valve manually by pulling on ring. If valve still leaks, it must be replaced. |
| 7 | Regulator is not adjusted correctly for accessory being used | It is normal for some pressure drop to occur when an accessory is used, adjust the regulator as instructed in Regulator under Features if pressure drop is excessive.NOTE: Adjust the regulated pressure under flow conditions while accessory is being used. |
| 8 | Prolonged excessive use of air | Decrease amount of air usage. |
| 9 | Compressor is not large enough for accessory | Check the accessory air requirement. If it is higher than the CFM or pressure supplied by your air compressor, a larger compressor is needed to operate accessory. |
| 10 | Hole in air hose Replace air hose. | |
| 11 | Check valve restricted Remove, clean or replace. | |
| 12 | Air leaks Tighten fittings. | |
| 13 | Regulator is damaged Replace. | |
| 14 | Unit operating in damp or humid conditions | Move unit to a dry well ventilated area |
| 15 | Restricted air intake filter Clean or replace air intake filter | |
| 16 | Engine or pump oil is low | Add same type of oil in crankcase to pump. See Compressor Pump Oil under Maintenance. |
| 17 | Carbon build-up in pump. | Contact a DeWALT factory service center or a DeWALT authorized service center. |
| 18 | Detergent type oil being used in pump | Drain oil and refill pump using DeWALT synthetic or SAE 40, non-detergent air compressor oil. |
| 19 | Motor overload protection switch has tripped | See Motor Overload under Features. |
| 20 | Extension cord is wrong length or gauge | Check for proper gauge wire and cord length. See Extension Cords under Installation. |
| 21 | Loose electrical connections | Contact a DeWALT factory service center or a DeWALT authorized service center. |
| 22 | Possible defective motor or starting capacitor | Contact a DeWALT factory service center or a DeWALT authorized service center. |
| 23 | Paint spray on internal motor parts | Contact a DeWALT factory service center or a DeWALT authorized service center. Do not operate the compressor in the paint spray area. See flammable vapor warning. |
| 24 | Fuse blown, circuit breaker tripped | Check fuse box for blown fuse and replace as necessary. Reset circuit breaker. Do not use a fuse or circuit breaker with higher rating than that specified for your particular branch circuit.Check for proper fuse. Use only a time delay fuse.Check for low voltage conditions and/or proper extension cord.Disconnect the other electrical appliances from circuit or operate the compressor on its own branch circuit. |
| 25 | Tank pressure exceeds pressure switch cut-in pressure | Motor will start automatically when tank pressure drops below cut-in pressure of pressure switch. |
| 26 | Pressure release valve on pressure switch has not unloaded head pressure | Set the On/Off switch to OFF. If the valve does not open, replace switch. Contact a DeWALT factory service center or a DeWALT authorized service center. |
CLEANING
⚠ WARNING: Blow dirt and dust out of the main housing with dry air as often as dirt is seen collecting in and around the air vents. Wear eye protection when performing this procedure.
⚠ WARNING: Never use solvents or other harsh chemicals for cleaning the non-metallic parts of the tool. These chemicals may weaken the materials used in these parts. Use a cloth dampened only with water and mild soap. Never let any liquid get inside the tool; never immerse
OPTIONAL ACCESSORIES
⚠ WARNING: Since accessories, other than those offered by DEWALT, have not been tested with this product, use of such accessories with this tool could be hazardous. To reduce the risk of injury, only DEWALT recommended accessories should be used with this product.
PROTECTING THE ENVIRONMENT

Separate collection. This product must not be disposed of with normal household waste.
Should you find one day that your DEWALT product needs replacement, or if it is of no further use to you, do not dispose of it with household waste. Make this product available for separate collection.

Separate collection of used products and packaging allows materials to be recycled and used again. Re-use of recycled materials helps prevent environmental pollution and reduces the demand for raw materials.
Local regulations may provide for separate collection of electrical products from the household, at municipal waste sites or by the retailer when you purchase a new product. DeWALT provides a facility for the collection and recycling of DeWALT products once they have reached the end of their working life. To take advantage of this service please return your product to any authorised repair agent who will collect them on our behalf.
You can check the location of your nearest authorised repair agent by contacting your local DeWALT office at the address indicated in this manual. Alternatively, a list of authorised DeWALT repair agents and full details of our after-sales service and contacts are available on the Internet at: www.2helpU.com.
| Model | DPC6MRC-GB DPC6MRC-QS | DPC10RC-GB DPC10RC-QS | DPC10RC-LX | DPC16PS-GB DPC16PS-QS | DPC16PS-LX |
| Tank Size (l) 6 10 10 16 16 | |||||
| Volts (ac V) 230 230 110 230 110 | |||||
| Power peak Horse power / kW 1,5 / 1,1 2,0 / 1,5 2,0 / 1,5 2,5 / 1,8 2,5 / 1,8 | |||||
| Power running Horse power / kW 1,5 / 1,1 1,85 / 1,4 1,85 / 1,4 2,3 / 1,7 2,3 / 1,7 | |||||
| Current (A) | 5 | 6 | 13.5 | 8 | 14 |
| Pump Type | Oil-Free | Oil-Free | Oil-Free | Oil Lubricated | Oil Lubricated |
| Noise / measurement uncertainty, L_WA / K_WA | 97 / 1,5 | 97 / 1,5 | 97 / 1,5 | 91 / 1,5 | 91 / 1,5 |
| Noise / measurement uncertainty, L_PA / K_PA | 77 77 77 71 71 | ||||
| Maximum Working Presure (bar / psi) | 8 / 116 | 10 / 145 | 10 / 145 | 10 / 145 | 10 / 145 |
| Air Displacement (l/min / cfm) | 170 / 6,0 | 216 / 7,6 | 216 / 7,6 | 240 /8,4 | 208 / 7,3 |
| Air Delivery (l/min / cfm) @ 7 bar) | 75 | 82 | 82 | 150 | 115 |
| Compressor speed in 1/min ( rpm) | 3400 | 3400 | 3400 | 2850 | 2850 |
| Weight (kg) | 10.5 | 18 18 36 36 | |||
| Protection type | IP20 | IP20 | IP20 | IP20 | IP20 |

Do not modify the plug provided. If it does not fit the available outlet, a correct outlet should be installed by a qualified electrician.
Repairs to the cord set or plug MUST be made by a qualified electrician.
MODE D'EMPLOI
LISTE DE VERIFICATION DE PRE-DEMARRAGE
Loss of air in valve under pressure switch
OPSCHRIFTEN OP GEREEDSCHAP
OPTIONELE HULPSTUKKEN
DRÆNING AF LUFTBEHOLDER
ILMANPAINESÄILIÖN TYHJENNYS
VALINNAISET LISÄLAITTEET
MERKING PÅ PRODUKTET
12. VEDLIKEHOLD KOMPRESSOREN OMSORGSFULLT
Følg veiledningen angående smøring. Kontroller ledningene regelmessig og hvis de er skadet, må de repareres av et autorisert servicesenter. Kontroller skjøteledninger regelmessig og skift dem ut dersom de er skadet.
13. SKJ∅TELEDNINGER FOR UTEND∅RS BRUK Når
JUSTERING AV ARBEIDSTRYKKET
This section provides a list of the more frequently encountered malfunctions, their causes and corrective actions. The operator or maintenance personnel can perform some corrective actions, and others may require the assistance of a qualified DEWALT technician or your dealer.
El motor no funciona 11, 19, 20, 21, 22,
23,
24,
25,
21
RISK FÖR OFRIVILLIG START
OBS: understryker viktig information.
Säkerhetsinstruktioner
VIKTIGA INSTRUKTIONER FÖR ETT SÄKERT BRUK AV KOMPRESSORN.
⚠ EN FELAKTIG ANVÄNDNING OCH ETT DÅLIGT UNDERHÅLL AV DENNA KOMPRESSOR KAN FÖRORSAKA FYSISKA KROPPSSKADOR PÅ ANVÄNDAREN FÖR ATT UNDVIKA DESSA RISKER, BER VI DIG ATT LÄSA FÖLJANDE INSTRUKTIONER NOGA
LÄS ALLA INSTRUKTIONER
CHECKLISTA INNAN START
This section provides a list of the more frequently encountered malfunctions, their causes and corrective actions. The operator or maintenance personnel can perform some corrective actions, and others may require the assistance of a qualified DEWALT technician or your dealer.
Motor nebeží 11, 19, 20, 21, 22,
23, 24, 25,
13
21
CONEXIUNEA ELECTRICĂ
GB: EC DECLARATION OF CONFORMITY
This product* meets the applicable requirements of the following standards: EN 1012-1, EN 60204-1, EN 55014-1, EN 55014-2, EN 61000-3-2, EN 61000-3-3: EN ISO 2151. We hereby declare that the product meets the applicable requirements of the following Directives: 2006/42/EC - 2011/65EU - 2004/108/EC - 2000/14/CE (Annex VI - proc. 1). 2000/14/EC annex VI - proc. 1 conformity assessment made by Eurofins TECH S.r.l. (1). Guaranteed sound power level LwA: 97dB (DPC6, DPC10), 91dB (DPC16). The technical documentation is available from the manufacturer at the address below(2).
