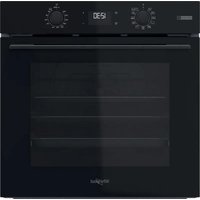
OMSK58CU1B - Oven WHIRLPOOL - Free user manual and instructions
Find the device manual for free OMSK58CU1B WHIRLPOOL in PDF.


User questions about OMSK58CU1B WHIRLPOOL
0 question about this device. Answer the ones you know or ask your own.
Ask a new question about this device
Download the instructions for your Oven in PDF format for free! Find your manual OMSK58CU1B - WHIRLPOOL and take your electronic device back in hand. On this page are published all the documents necessary for the use of your device. OMSK58CU1B by WHIRLPOOL.
USER MANUAL OMSK58CU1B WHIRLPOOL
THANK YOU FOR BUYING A WHIRLPOOL PRODUCT In order to receive a more complete assistance, please register your product on www.whirlpool.eu/register

Before using the appliance carefully read the Safety Instruction.
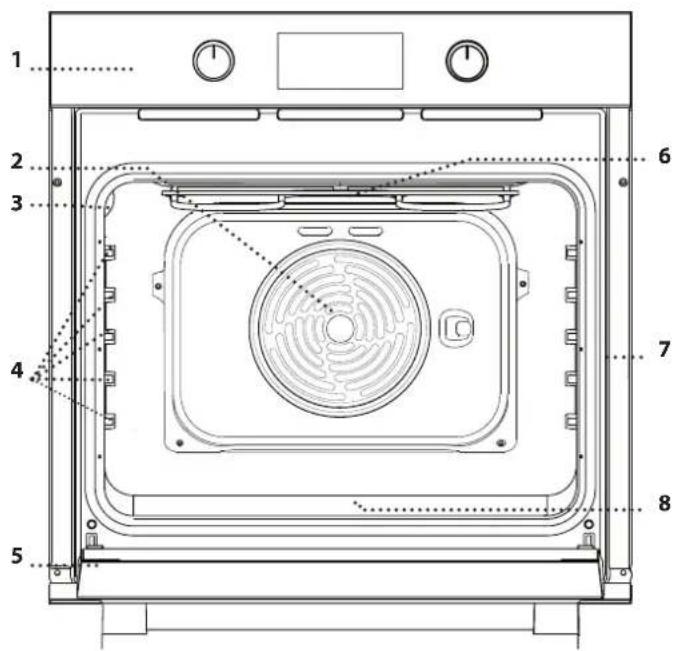
PRODUCT DESCRIPTION
text_image
1 2 3 4 5 6 7 8-
Control panel
-
Fan and circular heating element (not visible)
-
Lamp
-
Shelf guides
(the level is indicated on the wall of the cooking compartment)
-
Door
-
Top heating element/grill
-
Identification plate (do not remove)
-
STEAM embossing for drinking water
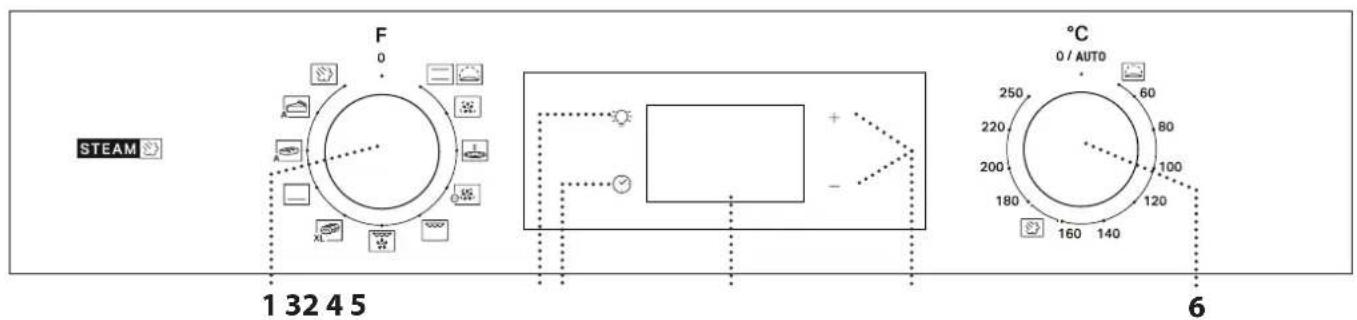
CONTROL PANEL DESCRIPTION
text_image
STEAM F 0 1 32 4 5 + - °C 0 / AUTO 60 80 100 120 140 160 180 200 220 250 255 255 255 255 255 255 255 255 255 255 255 255 255 255 255 255 255 255 255 255 255 255 255 255 255 251. SELECTION KNOB
For switching the oven on by selecting a function. Turn to the Q position to switch the oven off.
2. LIGHT
With the oven switched on, press ⚙ to turn the oven compartment lamp on or off.
3. SETTING THE TIME
For accessing the cooking time settings, delayed start and timer. For displaying the time when the oven is off.
4. DISPLAY
5. ADJUSTMENT BUTTONS
For changing the cooking time settings.
6. THERMOSTAT KNOB
Turn to select the temperature you require when activating manual functions.
Please note: Type of knob may vary from model type. If the knobs are push-activated, push down on the center of the knob to release it from seating.
ACCESSORIES
natural_image
Simple line drawing of a rectangular grid with horizontal lines, no text or symbols present.Use to cook food or as a support for pans, cake tins and other ovenproof items of cookware.
natural_image
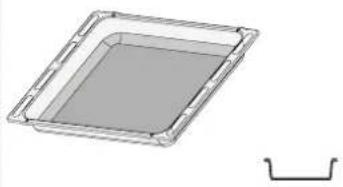
3D rendering of a rectangular tray with a gray inner area and a separate U-shaped bracket on the right (no text or symbols)Use as an oven tray for cooking meat, fish, vegetables, focaccia, etc. or position underneath the wire shelf to collect cooking juices.
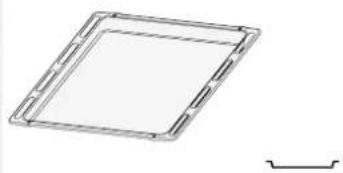
natural_image
Pure geometric diagram of a square frame with a small curved line on the right side (no text or symbols)Use for cooking all bread and pastry products, but also for roasts, fish en papillotte, etc.
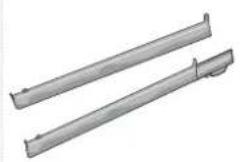
To facilitate inserting or removing accessories.
* Available only on certain models
The number and the type of accessories may vary depending on which model is purchased.
Other accessories can be purchased separately from the After-sales Service.
INSERTING THE WIRE SHELF AND OTHER ACCESSORIES
Insert the wire shelf onto the level you require by holding it tilted slightly upwards and resting the raised rear side (pointing upwards) down first.
SLIDING RUNNERS AND SHELF GUIDES
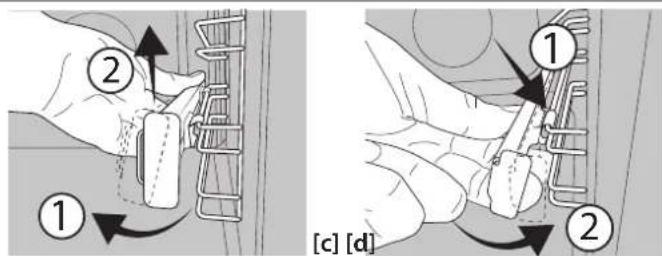
Before using the oven remove the protective tape [a] and then remove the protective foil [b] from the sliding runners.
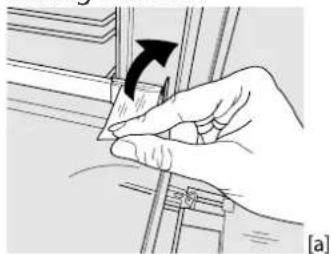
natural_image
Hand holding a tool with an arrow indicating direction (no text or symbols present)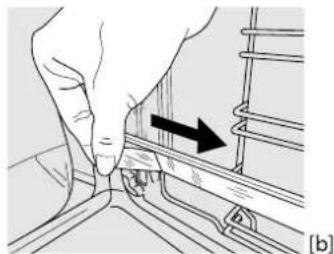
natural_image
Illustration of a hand pressing down on a mechanical component with an arrow indicating direction (no text or symbols present)REMOVING THE SLIDING RUNNERS [c]
Pull the lower part of the sliding runner to uncouple the lower hooks (1) and pull the the sliding runners upwards, removing them from the upper hooks (2).
REFITTING THE SLIDING RUNNERS [d]
Hook the upper hooks on the shelf guides (1) then press the lower part of the sliding runners against the shelf guides, until the lower hooks are clicking (2).
FIRST TIME USE
1. SETTING THE TIME
You will need to set the time when you switch on the appliance for the first time: Press ⚙ until the ⚙ icon and the two digits for the hour start flashing on the display.
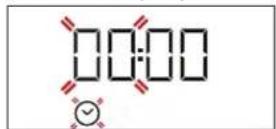
Use + or - to set the hour and press ⏻ to confirm. The two digits for the minutes will start flashing. Use + or - to set the minutes and press ⏻ to confirm.
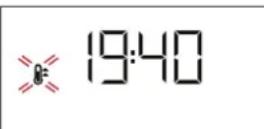
Please note: When the Ⓧ icon is flashing, for example following lengthy power outages, you will need to reset the time.
Then slide it horizontally along the runners as far as possible.
Other accessories, like the baking tray, are to be inserted horizontally, letting them slide on the runners.
text_image
Diagram showing two-step car seatbelting process with labeled parts and directional arrowsREMOVING AND REFITTING THE SHELF GUIDES
-
To remove the shelf guides, firmly grip the external part of the guide, and pull it towards you to extract the support and the two internal pins from the lodging.
-
To reposition the shelf guides, position them near the cavity and initially insert the two pins into their lodgings. Next, position the external part near its lodging, insert the support, and firmly press towards the wall of the cavity to make sure the shelf guide is properly secured.
2. HEAT THE OVEN
A new oven may release odours that have been left behind during manufacturing: this is completely normal. Before starting to cook food, we therefore recommend heating the oven with it empty in order to remove any possible odours. Remove any protective cardboard or transparent film from the oven and remove any accessories from inside it.
Heat the oven to 250 °C for about one hour. The oven must be empty during this time.
Please note: It is advisable to air the room after using the appliance for the first time.
FUNCTIONS

CONVENTIONAL
For cooking any kind of dish on one shelf only.

RISING
For helping sweet or savoury dough to rise ively. Turn the thermostat knob to the icon to te this function.

FORCED AIR
For cooking different foods that require the
same cooking temperature on several shelves (maximum three) at the same time. This function can be used to cook different foods without odours being transferred from one food to another.

PIZZA
For baking different types and sizes of pizza and bread. It is a good idea to swap the position of the baking trays halfway through cooking.

ECO FORCED AIR
For cooking roasts and stuffed roasting joints single shelf. Food is prevented from drying out sively by gentle, intermittent air circulation.
When this ECO function is in use, the light will remain switched off during cooking but can be switched on again by pressing ⚙️.

GRILL
For grilling steaks, kebabs and sausages,
cooking vegetables au gratin or toasting bread. When grilling meat, we recommend using a dripping pan to collect the cooking juices: position the pan on any of the levels below the wire shelf and add 200 ml of drinking water.

TURBO GRILL
For roasting large joints of meat (legs, roast
beef, chicken). We recommend using a dripping pan to collect the cooking juices: position the pan on any of the levels below the wire shelf and add 200 ml of drinking water.
DAILY USE
1. SELECT A FUNCTION
To select a function, turn the selection knob to the symbol for the function you require: the display will light up and an audible signal will sound.

2. ACTIVATE A FUNCTION
MANUAL
To start the function you have selected, turn the thermostat knob to set the temperature you require.
Please note: During cooking you can change the function by turning the selection knob or adjust the temperature by turning the thermostat knob. The function will not start if the thermostat knob will be on operation. You can set the cooking time, cooking end time (only if you set a cooking time) and a timer.

MAXI COOKING
XL For cooking large joints of meat (above 2.5kg). We recommend turning the meat over during cooking to ensure that both sides brown evenly. We also recommend basting the joint every so often to prevent it from drying out excessively.

BOTTOM HEATING
Useful for browning the bottom of dishes.
Function also recommended for slow cooking, to finish cooking dishes with a very liquid consistency or concentrate sauces and gravies.

BREAD AUTO
A This function automatically selects the ideal temperature and baking time for bread. For best results, carefully follow the recipe. Activate the function when the oven is cold. Thermostat knob needs to remain in O/AUTO position as the temperature is set automatically by the function.

PASTRY AUTO
A This function automatically selects the ideal temperature and baking time for cakes. Activate the function when the oven is cold. Thermostat knob needs to remain in 0/AUTO position as the temperature is set automatically by the function.

STEAM+
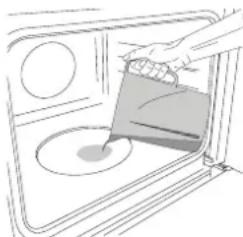
The Steam+ function allows to obtain excellent performances thanks to the presence of steam in the cooking cycle. This function automatically manages the ideal temperature for cooking a wide range of recipes; the cooking times of the main dishes are shown in the relative cooking table. Always activate the steam function when the oven is cold, and after pouring 200 ml of drinking water into the bottom of the cavity. To activate Steam+ function, the thermostat knob needs to be turned in to position of icon.
RISING
To start the "Rising" function, turn the thermostat knob to Rising position (40 deg) and put function knob in Conventional position; if the oven is set to a different temperature, the function will not start. Please note: You can set the cooking time, cooking end time (only if you set a cooking time) and a timer.


natural_image
Line drawing of a kitchen interior with a hand pouring liquid into a bowl (no text or symbols)To start the Steam function, pour 200 ml of drinking water in the oven bottom. Select the function turning clockwise the selection knob on the relevant icon, and the thermostat knob in any position between 160 and 180°C (as suggested by the icon). The function will start and the display will show the current time of the day. No preheating is needed. To end the cooking, turn the selection knob on 0 position. During Steam cooking do not open the door and never top up the water.
Please note: To set a specific duration, according to the related cooking table, follow the instruction in the "Programming Cooking" paragraph.
3. PREHEATING AND RESIDUAL HEAT
Once the function starts, an audible signal and a flashing icon ⚪ on the display indicate that the preheating phase is active.
When the set temperature has been reached, the icon becomes fixed and a new audible signal will sound to indicate that the food can be placed inside and cooking can proceed.
Please note: Placing food in the oven before the preheating phase has finished may have an adverse effect on the final result of cooking.
After cooking and with the function deactivated, the icon ≈ may continue to remain visible on the display even after the cooling fan has switched off to indicate that there is residual heat in the compartment.
Please note: The time after which the icon switches off varies because it depends on a series of factors such as ambient temperature and function used. In any case, the product should be considered to be off when the pointer on the selection knob is at "0".
4. PROGRAMMING COOKING
You will need to select a function before you can start programming cooking.
DURATION
Keep pressing until the icon and "00:00" start flashing on the display.
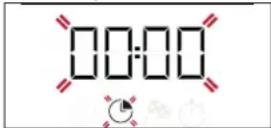
Use or to-set the cooking time you require, then press to confirm.
Activate the function by turning the thermostat knob to the temperature you require: an audible signal will sound and the display will indicate that cooking is complete.
Please note: To cancel the cooking time you have set, keep pressing ⏻ until the ⏱on starts flashing on the display, then use – to reset the cooking time to "00:00". This cooking time includes a preheating phase.
PROGRAMMING THE END COOKING TIME/DELAYED START
After a cooking duration has been set, starting the function can be delayed by programming its end time: press ☑ until the 📄con and the current time start flashing on the display.
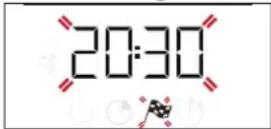
Use or to-set the time you want cooking to end and press ☑ to confirm.
Activate the function by turning the thermostat knob to the temperature you require: the function will remain paused until it starts automatically after the period of time that has been calculated in order for cooking to finish at the time you have set.
Please note: To cancel the setting, switch the oven off by turning the selection knob to the 0 position.
END OF COOKING
An audible signal will sound and the display will indicate that the function has finished.
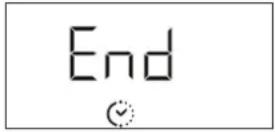
Turn the selection knob to select a different function or to 0 to switch the oven off.
Please note: If the timer is active, the display will show "END" alternately with the remaining time.
5. SETTING THE TIMER
This option does not interrupt or program cooking but allows you to use the display as a timer, either during while a function is active or when the oven is off. Keep pressing ⏻ until the icon and "00:00" start flashing on the display.
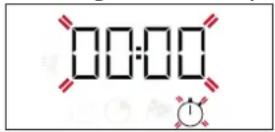
Use or to-set the time you require and press to confirm.

An audible signal will sound once the timer has finished counting down the selected time.
Notes: To cancel the timer, keep pressing until the icon starts flashing, then use - to reset the time to "00:00".
COOKING TABLE
| RECIPE | FUNCTION | PREHEAT | TEMPERATURE (°C) | DURATION (Min) | LEVEL AND ACCESSORIES |
| Leavened cakes | Yes 170 | 30 - 50 | 2 | ||
| Yes 160 | 30 - 50 | 2 | |||
| Yes 160 | 40 - 60 | 4 | |||
| Filled cake(cheese cake, strudel, fruit pie) | Yes 160 | - 200 35 - 90 | 2 | ||
| Yes 160 | - 200 40 - 90 | 4 2 | |||
| Biscuits / tartlets | Yes 160 | 25 - 35 | 3 | ||
| Yes 160 | 25 - 35 | 3 | |||
| Yes 150 | 35 - 45 | 4 2 | |||
| Choux buns | Yes 180 | - 210 30 - 40 | 3 | ||
| Yes 180 | - 200 35 - 45 | 4 2 | |||
| Yes 180 | - 200 35 - 45 | 5 3 1 | |||
| Meringues | Yes | 90 | 150 - 200 | 3 | |
| Yes | 90 | 140 - 200 | 4 2 | ||
| Yes | 90 | 140 - 200 | 5 3 1 | ||
| Pizza / Focaccia | Yes 190 | - 250 15 - 50 | 1/2 | ||
| Yes 190 | - 250 20 - 50 | 4 2 | |||
| Frozen pizza | Yes 250 | 10 - 20 | 3 | ||
| Yes | 230-250 | 10 - 25 | 4 2 | ||
| Salty cakes(vegetable pie,quiche) | Yes 180 | - 200 40 - 55 | 3 | ||
| Yes 180 | - 200 45 - 60 | 4 2 | |||
| Yes 180 | - 200 45 - 60 | 5 3 1 | |||
| Vols-au-vents / puff pastry crackers | Yes 190 | - 200 20 - 30 | 3 | ||
| Yes | 180 - 190 20 - 40 | 4 2 | |||
| Yes | 180 - 190 20 - 40 | 5 3 1 | |||
| Lasagne / baked pasta /canneloni / flans | Yes 190 | - 200 45 - 65 | 2 | ||
| Lamb / veal / beef / 1 kg | Yes | 190 - 200 | 80 - 110 | 3 | |
| Roast with crackling 2 kg | Yes | 180 - 190 | 110 - 150 | 3 | |
| Chicken / rabbit / duck 1 kg | Yes 200 | - 230 | 50 - 100 | 2 | |
| Turkey / goose 3 kg | - | 190 - 200 | 100 - 160 | 2 | |
| Baked fish / en papillote(fillets, whole) | Yes | 170 - 190 | 30 - 45 | 2 | |
| Stuffed vegetables(tomatoes, courgettes, aubergines) | Yes 180 | - 200 50 - 70 | 3 | ||
| Toasted bread | 5' | 250 | 2 - 6 | 5 | |
| Fish fillets / slices | - | 230 - 250 | 15 - 30 * | 4 3 |
* Turn food halfway through cooking
| ACCESSORIES | Wire shelf | Baking dish on the wire shelf | Baking tray/Drip tray or baking dish on the wire shelf | Drip tray / Baking tray | Drip tray / Baking tray with 200 ml of water |
| FUNCTIONS | Conventional | Forced air | Pizza | Maxi cooking | Grill Turbo grill Eco forced ir |
| RECIPE | FUNCTION | PREHEAT | TEMPERATURE (°C) | DURATION (Min) | LEVEL AND ACCESSORIES |
| Sausages / kebabs / spare ribs / hamburgers | - 250 15 - 30 * | 5 4 | |||
| Roast chicken 1-1,3 kg | Yes 200 - 220 55 - 70 ** | 2 1 | |||
| Roast beef rare 1 kg | Yes 200 - 210 35 - 50 ** | 3 | |||
| Leg of lamb / knuckle | Yes 200 - 210 60 - 90 ** | 3 | |||
| Roast potatoes | Yes 200 - 210 35 - 55 | 2 | |||
| Vegetable gratin | - | 200 - 210 25 - 55 | - | 3 | |
| Meat and potatoes | Yes 190 - 200 | 45 - 100 *** | 4 1 | ||
| Fish and vegetables | Yes | 180 | 30 - 50 *** | 4 2 | |
| Lasagne and meat | Yes | 200 | 50 - 100 *** | 4 1 | |
| Complete meal:fruit tart (level 5) / lasagne (level 3) / meat (level 1) | Yes 180 - 190 | 40 - 120 *** | 5 3 1 | ||
| Roast meat / stuffed roasting joints | - | 170 - 180 | 100 - 150 | 3 | |
** Turn food two thirds of the way through cooking (if necessary).

COOKING TABLE STEAM+
*** Estimated length of time: dishes can be removed from the oven at different times depending on personal preference.
| FOOD | RECIPE | QUANTITY | TIME (min) | ACCESSORIES | LEVEL | WATER |
 BREAD BREAD | Small breads | 80-100 g | 30 - 45 | 2 | 200 ml | |
| Sandwich loaf in tin | 300-500 g 40 - 60 | |||||
| Bread | 500g-2 kg 50 - 100 | |||||
| Baguettes | 200-300 g | 30 - 45 | ||||
 MEAT MEAT | Roast | 1 kg | 60 - 110 | |||
| Ribs | 500g-1,5 kg | 50 - 75 | ||||
| Chicken | 1-1,5 kg | 55 - 80 | ||||
| Chicken/Turkey | 3 kg | 100 - 140 | ||||
 FISH FISH | Fillet Steak | 0.5-2 cm | 15 - 25 | |||
| Fillet Steak | 2-4 cm 20 - 35 | |||||
| Whole Fish | 300- 600 g | 20 - 30 | ||||
| Whole Fish | 600 -1200 g | 25 - 45 | ||||
 VEGETABLES VEGETABLES | Steamed Potatoes | 0.5-1.5 kg | 45 - 60 | |||
| Stuffed Peppers | 1-2 kg | 35 - 55 | ||||
| Steamed Broccoli | 0.3-1 kg | 30 - 50 | ||||
| Steamed Zucchini | 0.5-1.5 kg | 30 - 50 | ||||
 PASTRIES PASTRIES | Cookies | a tray | 25 - 35 | |||
| Muffin | 30-60 g | 25 - 45 | ||||
| Sponge Cake | 500-700 g 30 - 50 | |||||
| Tart | a tin | 35 - 55 | ||||
Start the STEAM+ function only when the oven is cold. Opening the door and topping up the water during cooking may have an adverse effect on the final cooking result.
| ACCESSORIES | Wire shelf | Baking dish on the wire shelf | Baking tray/Drip tray or baking dish on the wire shelf | Drip tray / Baking tray | Drip tray / Baking tray with 200 ml of water |
| FUNCTIONS | Conventional | Forced air | Pizza | Maxi cooking | Grill Turbo grill Eco forced ir |
CLEANING AND MAINTENANCE
Make sure that the oven has cooled down before carrying out any maintenance or cleaning.
Do not use steam cleaners.
Do not use wire wool, abrasive scourers or abrasive/corrosive cleaning agents, as these could damage the surfaces of the appliance.
Wear protective gloves.
The oven must be disconnected from the mains before carrying out any kind of maintenance work.
EXTERIOR SURFACES
Clean the surfaces with a damp microfibre cloth. If they are very dirty, add a few drops of pH-neutral detergent. Finish off with a dry cloth.
Do not use corrosive or abrasive detergents. If any of these products inadvertently comes into contact with the surfaces of the appliance, clean immediately with a damp microfibre cloth.
INTERIOR SURFACES
• After every use, leave the oven to cool and then clean it, preferably while it is still warm, to remove any deposits or stains caused by food residues. To dry any condensation that has formed as a result of cooking foods with a high water content, leave the oven to cool completely and then wipe it with a cloth or sponge.
- To remove the remaining limescale from the bottom of the cavity after STEAM cooking, we recommend to clean the cavity with the products provided by After Sales Service (please follow instructions attached to the product).
Cleaning is recommended at least every 5 to 10 STEAM cooking cycles.
• The door can be easily removed and refitted to facilitate cleaning of the glass
- Clean the glass in the door with a suitable liquid detergent.
ACCESSORIES
Soak the accessories in a washing-up liquid solution after use, handling them with oven gloves if they are still hot. Food residues can be removed using a washing-up brush or a sponge.
CLEANING THE CATALYTIC PANELS (ONLY IN SOME MODELS)
This oven could be equipped with special catalytic liners that facilitate cleaning of the cooking compartment thanks to their special self-cleaning coating, which is highly porous and able to absorb grease and grime. These panels are fitted to the shelf guides: When repositioning and then refitting the shelf guides, make sure that the hooks at the top are slotted into the appropriate holes in the panels.
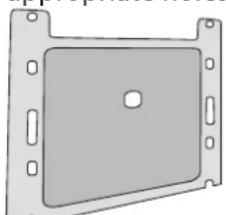
natural_image
Simple line drawing of a rectangular metal plate with mounting holes and a central hole (no text or symbols)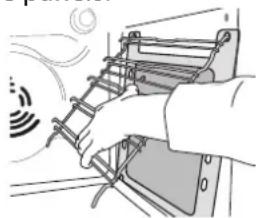
natural_image
Illustration of a hand operating a ladder with motion lines indicating airflow (no text or symbols)To make best use of the catalytic panels' self-cleaning properties, we recommend heating the oven to 200 °C for around one hour using the "Convection Bake" function. The oven must be empty during this time. Then leave the oven to cool down before removing any remaining food residues using a non-abrasive sponge.
Please note: Using corrosive or abrasive cleaning agents, stiff brushes, pan scourers or oven sprays could damage the catalytic surface and compromise its self-cleaning properties. Please contact our After-sales Service if you require replacement panels.
REMOVING AND REFITTING THE DOOR
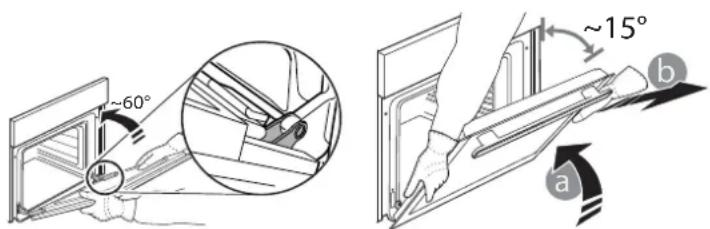
- To remove the door, open it fully and lower the catches until they are in the unlock position.
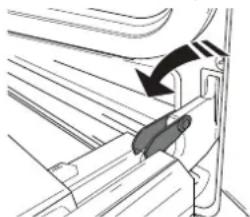
natural_image
Diagram of a mechanical assembly with a black arrow indicating direction (no text or symbols present)- Close the door as much as you can. Take a firm hold of the door with both hands – do not hold it by the handle. Simply remove the door by continuing to close it while pulling it upwards (a) at the same time until it is released from its seating (b).
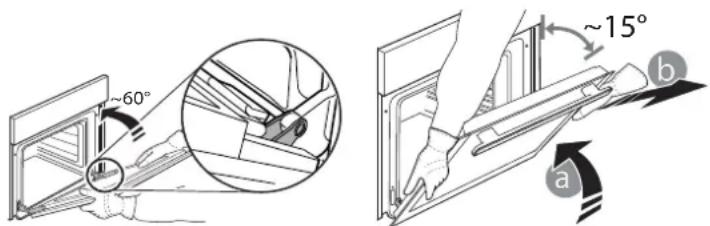
text_image
~60° ~15° a bPut the door to one side, resting it on a soft surface.
- Refit the door by moving it towards the oven, aligning the hooks of the hinges with their seating and securing the upper part onto its seating.
- Lower the door and then open it fully. Lower the catches into their original position: make sure that you lower them down completely.
- Try closing the door and check to make sure that it lines up with the control panel. If it does not, repeat the steps above.
REPLACING THE LAMP
- Disconnect the oven from the power supply.
- Unscrew the cover from the light, replace the bulb and screw the cover back on the light.
- Reconnect the oven to the power supply.
Please note: Use 25 W/230 V type G9, T300 °C halogen lamps. The bulb used in the product is specifically designed for domestic appliances and is not suitable for general room lighting within the home (EC Regulation 244/2009). Light bulbs are available from our After-sales Service. - Do not handle bulbs with your bare hands as your fingerprints could damage them. Do not use the oven until the light cover has been refitted.
CLEANING OF THE DOOR GLASSES
- After removing the door and resting it on a soft surface with the handle downwards, simultaneously press the two retaining clips and remove the upper edge of the door by pulling it towards you.
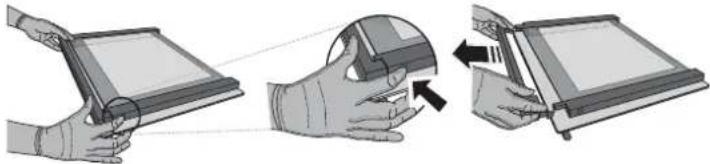
natural_image
Illustration of three-step robotic manipulation process: hand holding tablet, eye interacting with device, and tool cutting (no text or symbols)- Lift and firmly hold the inner glass with both hands, remove it and place it on a soft surface before cleaning it.
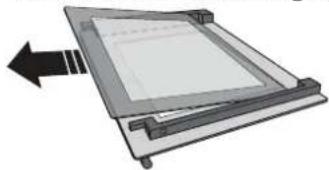
natural_image
Diagram of a mechanical component with a directional arrow indicating movement (no text or symbols)- Refit the intermediate pane (marked with "R") before refitting the inside pane: To position the panes of glass correctly, make sure that the "R" mark can be seen in the left-hand corner. First insert the long side of the glass marked "R" into the support seats, then lower it into position. Repeat this procedure for both panes of glass.
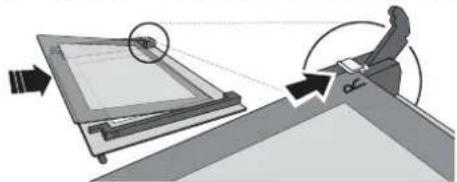
natural_image
Diagram showing a mechanical assembly with an arrow indicating motion, no text or symbols present- Refit the upper edge: A click will indicate correct positioning. Make sure the seal is secure before refitting the door.
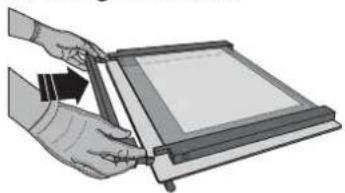
natural_image
Illustration of hands holding a tablet device with a scroll wheel (no text or symbols visible)TROUBLESHOOTING
| Problem Possible cause Solution | ||
| The oven is not working. | Power cut.Disconnection from the mains. | Check for the presence of mains electrical power and whether the oven is connected to the electricity supply. Turn off the oven and restart it to see if the fault persists. |
| The display shows the letter “F” followed by a number or letter. | Oven failure. | Contact you nearest Client After-sales Service Centre and state the number following the letter “F”. |
| The display is showing the message “Hot” and the selected function will not start. | Temperature too high. | Allow the oven to cool down before activating the function. Select a different function. |
| The display shows unclear text and appears to be broken. | Another language set. | Contact your nearest Client After-sales Service Center. |
Policies, standard documentation and additional product information can be found by:
- Visiting our website docs.whirlpool.eu
• Using QR Code
• Alternatively, contact our After-sales Service (See phone number in the warranty booklet). When contacting our After-sales Service, please state the codes provided on your product's identification plate.


DĚKUJEME VÁM, ŽE JSTE SI ZAKOUPILI VÝROBEK ZNAČKY WHIRLPOOL
natural_image
Simple line drawing of a rectangular metal grate or filter with no text or symbolsnatural_image
3D rendering of a square tray with a gray inner area and a separate curved bracket on the right (no text or symbols)natural_image
Pure geometric diagram of a square frame with a small curved line on the right side (no text or symbols)natural_image
Hand holding a metal bracket with an arrow indicating rotation (no text or symbols)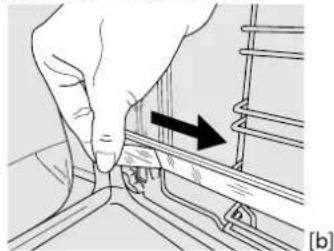
natural_image
Hand pressing a component on a rail track, showing a black arrow indicating direction (no text or symbols present)VYJMUTÍ VÝSUVNÝCH LIŠT [c]
text_image
Diagram illustrating two steps of a car door handle replacement, labeled with numbered instructions and reference to [c] [d].DEMONTÁŽ A INSTALACE VODICÍCH DRÁŽEK
natural_image
Line drawing of a kitchen interior with a hand pouring liquid into a bowl (no text or symbols)3. PŘEDEHŘEV A ZBYTKOVÉ TEPLO
natural_image
Simple line drawing of a rectangular plate with mounting holes and a central hole (no text or symbols)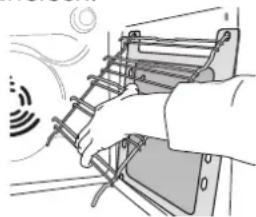
natural_image
Illustration of a hand operating a ladder with motion lines indicating speed (no text or symbols)natural_image
Diagram of a mechanical component with an arrow indicating direction (no text or symbols present)natural_image
Illustration of three-step hand manipulation process: holding a tablet, adjusting the screen, and adjusting the cover (no text or symbols)natural_image
Diagram of a mechanical component with an arrow indicating direction (no text or symbols)natural_image
Diagram showing a person interacting with a device on a floor, with arrows indicating motion (no text or symbols present)natural_image
Illustration of hands using a tablet to interact with a screen (no text or symbols visible)ODSTRAŇOVÁNÍ ZÁVAD
natural_image
Simple line drawing of a rectangular plate with horizontal slats (no text or symbols)natural_image
3D diagram of a square frame with a gray inner square and a small curved bracket on the right side (no text or symbols)natural_image
Simple line drawing of a square frame with a small protrusion on the right side (no text or symbols)PROWADNICE WYSUWANE I DRABINKI METALOWE
natural_image
Illustration of a hand holding a small object with an arrow indicating rotation (no text or symbols present)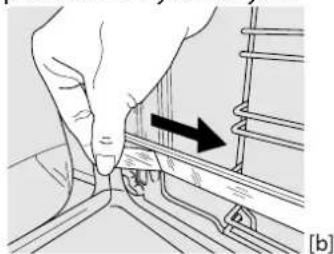
natural_image
Hand pressing a component on a rail track, showing a black arrow indicating direction (no text or symbols present)DEMONTAŻ PROWADNIC WYSUWANYCH [c]
text_image
Diagram illustrating two mechanical assembly steps labeled ① and ②, showing hand positioning and component alignment.WYJMOWANIE I PONOWNY MONTAŻ DRABINEK
natural_image
Line drawing of a kitchen interior with a hand pouring liquid into a bowl (no text or symbols)natural_image
Simple line drawing of a rectangular metal plate with mounting holes and a central hole (no text or symbols)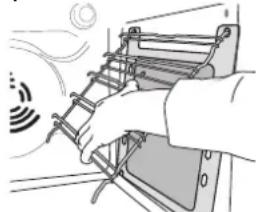
natural_image
Illustration of a hand using a ladder to lift a tray, emitting exhaust smoke (no text or symbols)natural_image
Technical line drawing of a mechanical assembly with a black arrow indicating direction (no text or symbols)natural_image
Illustration of three-step robotic manipulation process: hand holding tablet, head with magnifying glass, and screen with tool (no text or symbols)natural_image
Diagram of a mechanical component with a directional arrow indicating movement (no text or symbols)natural_image
Diagram showing a mechanical setup with a slide and a hand, no text or symbols presentnatural_image
Illustration of hands using a tablet to interact with a screen (no text or symbols visible)ROZWIĄZYWANIE PROBLEMÓW
natural_image
Simple line drawing of a rectangular plate with horizontal slats (no text or symbols)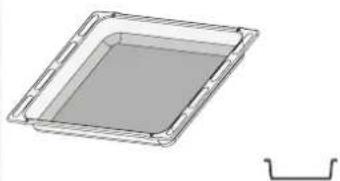
natural_image
3D rendering of a rectangular tray with a gray inner area and a separate curved bracket on the right (no text or symbols)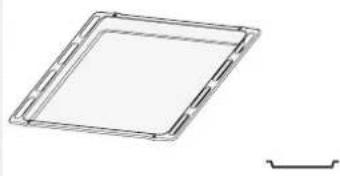
natural_image
Simple line drawing of a square frame with a small protrusion on the right side (no text or symbols)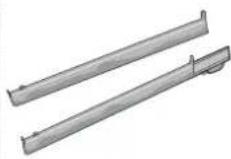
natural_image
Illustration of a hand holding a metal bracket with an arrow indicating direction (no text or symbols)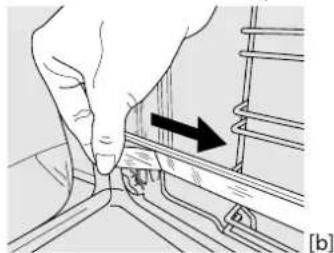
natural_image
Hand pressing a component on a rail track, showing a black arrow indicating direction (no text or symbols present)ЗНЯТТЯ ТЕЛЕСКОПІЧНИХ НАПРЯМНИХ [с]
text_image
Diagram showing a hand inserting a component into a device, labeled with steps 1 and 2.![WHIRLPOOL OMSK58CU1B - ЗНЯТТЯ ТЕЛЕСКОПІЧНИХ НАПРЯМНИХ [с] - 1](/content/2026/04/696796/images/f940913306592d98181b13707c1e8d2afd0a8d52bb253297045e03d428a8cda6.jpg)
text_image
[c] [d] ① ②natural_image
Line drawing of a kitchen interior with a hand pouring liquid into a bowl (no text or symbols)natural_image
Simple line drawing of a rectangular metal plate with mounting holes and a central hole (no text or symbols)![WHIRLPOOL OMSK58CU1B - ЗНЯТТЯ ТЕЛЕСКОПІЧНИХ НАПРЯМНИХ [с] - 2](/content/2026/04/696796/images/386f7c07d16846b512791bae30c3b17364a12c0121eee676daa66b4e86532d0f.jpg)
natural_image
Illustration of a hand operating a ladder with signal waves, no text or symbols presentnatural_image
Diagram of a car seatbelt mechanism with a black arrow indicating direction (no text or symbols present)natural_image
Illustration of three hands holding a tablet device, showing the process with arrows indicating rotation (no text or symbols present)natural_image
Diagram of a mechanical component with an arrow indicating direction (no text or symbols)natural_image
Diagram showing a person seated on a floor next to a framed picture frame, with an arrow indicating motion direction (no text or symbols present)natural_image
Illustration of hands holding a tablet device with a small screen (no text or symbols visible)natural_image
Two technical diagrams showing hand positioning of a mechanical component, labeled (a) and (b), with no visible text or symbols.LIUGSIINIDE EEMALDAMINE [c]
text_image
① ② ① ① ② [c] [d]RIIULISIINIDE EEMALDAMINE JA ÜMBERPAIGUTAMINE
natural_image
Line drawing of a hand pouring liquid into a microwave oven (no text or symbols)natural_image
Simple line drawing of a rectangular metal plate with mounting flanges (no text or symbols)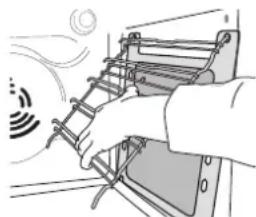
natural_image
Illustration of a hand operating a ladder with motion lines indicating speed (no text or symbols)natural_image
Diagram of a mechanical component with an arrow indicating direction (no text or symbols present)natural_image
Illustration of three-step robotic manipulation process: hand holding tablet, tool interacting with device, and close-up of tool tip (no text or symbols)natural_image
Diagram of a mechanical component with an arrow indicating direction (no text or symbols)natural_image
Diagram showing a mechanical assembly with an arrow indicating motion, no text or symbols presentnatural_image
Illustration of hands using a tablet to interact with a screen (no text or symbols visible)RIKKEOTSING
natural_image
Simple line drawing of a rectangular plate with horizontal slats and a small protrusion on top (no text or symbols)natural_image
3D rendering of a square tray with a shaded interior and a separate curved bracket on the right (no text or symbols)natural_image
Simple line drawing of a square frame with a small protrusion on the right side (no text or symbols)natural_image
Illustration of a hand holding a small object with an arrow indicating upward motion (no text or symbols present)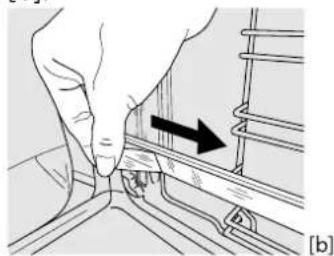
natural_image
Illustration of a hand pressing down on a mechanical component with an arrow indicating direction (no text or symbols present)SLANKIOJANČIŲ GROTELIŲ IŠĖMIMAS [c]
text_image
Diagram illustrating two mechanical assembly steps labeled ① and ②, with arrows indicating rotation or movement.SKERSINIŲ GROTELIŲ IŠĖMIMAS IR ĮSTATYMAS
natural_image
Line drawing of a kitchen interior with a hand pouring liquid into a bowl (no text or symbols)natural_image
Simple line drawing of a rectangular metal plate with mounting holes (no text or symbols)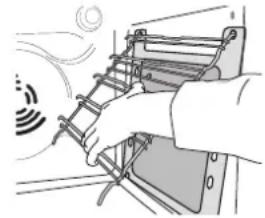
natural_image
Illustration of a hand using a ladder to lift a device with smoke and motion lines (no text or symbols)natural_image
Diagram of a vehicle's seatbelt mechanism with a black arrow indicating direction (no text or symbols)- Uždarykite dureles.
natural_image
Illustration of three-step hand-drawn steps showing a device being processed, with no visible text or symbols.natural_image
Diagram of a mechanical component with an arrow indicating direction (no text or symbols)natural_image
Diagram showing a person using a device to interact with a mechanical component, no text or symbols presentnatural_image
Illustration of hands using a digital tablet to interact with a screen (no text or symbols visible)TRIKČIŲ ŠALINIMAS
natural_image
Simple line drawing of a rectangular plate with horizontal slats (no text or symbols)natural_image
3D rendering of a rectangular tray with a gray inner area and a separate U-shaped bracket (no text or symbols)natural_image
Pure geometric diagram of a square frame with a small curved line on the right side (no text or symbols)natural_image
Hand holding a tool with an arrow indicating direction (no text or symbols present)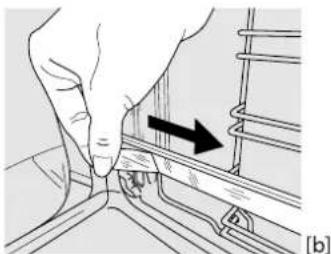
natural_image
Illustration of a hand pressing down on a mechanical component with an arrow indicating direction (no text or symbols present)SLÍDOŠO SLIEČU IZNEMŠANA [c]
text_image
Diagram illustrating two steps of a car door handle replacement, labeled with numbered instructions and reference to [c] [d].PLAUKTU VADOTNU IZNEMŠANA UN ATKÄRTOTA IEVIETOŠANA
natural_image
Line drawing of a kitchen interior with a hand pouring liquid into a microwave oven (no text or symbols)natural_image
Technical drawing of a rectangular mechanical part with mounting holes and a central hole (no text or symbols)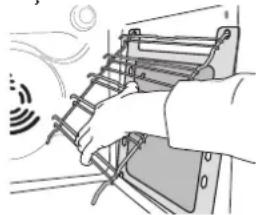
natural_image
Illustration of a hand using a ladder to lift a box with smoke and heat symbols (no text or labels)natural_image
Diagram of a vehicle's seatbelt mechanism with an arrow indicating direction (no text or symbols)natural_image
Three-step illustration showing hands using a device to interact with a device, no text or symbols presentnatural_image
Diagram of a mechanical component with an arrow indicating direction (no text or symbols)natural_image
Diagram showing a person seated on a floor next to a large screen with an arrow indicating motion (no text or symbols present)natural_image
Illustration of hands using a digital tablet to interact with a screen (no text or symbols visible)PROBLÉMU RISINĀŠANA
natural_image
Technical diagram showing two views of a grid-like structure with a highlighted section, labeled 'ODKVAPKAVANIE*' (no text or symbols on the diagram itself)natural_image
Technical illustration of a square frame and two metal support beams (no text or symbols)natural_image
Illustration of a hand holding a small object with an arrow indicating rotation (no text or symbols present)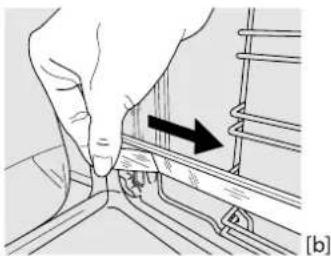
natural_image
Illustration of a hand pressing down on a mechanical component with an arrow indicating direction (no text or symbols present)VYBRATIE POSUVNÝCH BEŽCOV [c]
text_image
Diagram showing two-step car door handle assembly with labeled parts and directional arrowsVYBERANIE A VSÁDZANIE VODIACICH LÍŠT
- Ak chcete vodiace lišty vybrať, pevne uchopte vonkajšiu časť lišty, potiahnite ju k sebe, aby ste vytiahli podperu a dva vnútorné kolíky z otvorov.
- Ak ich chcete zasa nasadit, priložte ich k priestoru rúry a najprv zasuňte oba kolíky do otvorov. Potom umiestnite vonkajšiu časť k otvoru, zasuňte podperu a pevne zatlačte k stene priestoru rúry tak, aby bola vodiaca lišta pevne osadená.
2. ZOHREJTE RÚRU
natural_image
Line drawing of a kitchen interior with a hand pouring liquid into a bowl (no text or symbols)natural_image
Simple line drawing of a rectangular metal plate with mounting holes (no text or symbols)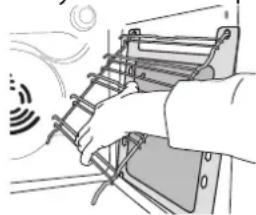
natural_image
Illustration of a hand using a ladder to lift a box with smoke and sun in the background (no text or symbols)natural_image
Diagram of a vehicle's seatbelt mechanism with an arrow indicating direction (no text or symbols present)- Zatvorte dvierka, pokial'to ide.
Pevne dvierka chytte oboma rukami – nedržte ich za rukovät.
Dvierka jednoducho vyberiete tak, že ich budete d'alej zatvárat a pritom t'ahat nahor (a), až kým sa neuvolnia zo sedla (b).
text_image
~60° ~15° a bnatural_image
Three-step illustration showing hands holding a tablet, interacting with a device, and adjusting the screen (no text or symbols present)natural_image
Diagram of a mechanical device with a paper sheet and directional arrow (no text or symbols)natural_image
Diagram showing a person using a device to interact with a laptop, with no visible text or symbols.natural_image
Illustration of hands operating a tablet device with a scroll wheel (no text or symbols visible)RIEŠENIE PROBLÉMOV
MERCI D'AVOIR CHOISI UN PRODUIT WHIRLPOOL
natural_image
Simple line drawing of a rectangular plate with horizontal slats (no text or symbols)natural_image
3D rendering of a rectangular tray with a gray interior and a separate U-shaped bracket (no text or symbols)natural_image
Simple line drawing of a square frame with a small curved line on the right side (no text or symbols)natural_image
Illustration of a hand holding a tool with an arrow indicating rotation (no text or symbols present)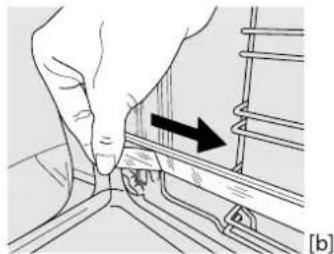
natural_image
Hand pressing a component on a rail track, showing a black arrow indicating direction (no text or symbols present)ENLÈVEMENT DES PATINS COULISSANTS [c]
text_image
Diagram illustrating two-step car door handle assembly with labeled parts and directional arrowsENLEVER ET REPLACER LES SUPPORTS DE GRILLE
natural_image
Line drawing of a hand pouring liquid into a microwave oven (no text or symbols)natural_image
Simple line drawing of a rectangular metal plate with mounting holes and a central hole (no text or symbols)