
WP-DC37 - Camera CANON - Free user manual and instructions
Find the device manual for free WP-DC37 CANON in PDF.
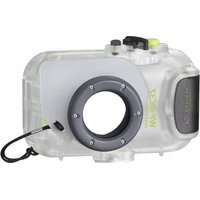


| Product type | Waterproof camera housing |
| Brand | Canon |
| Model | WP-DC37 |
| Body material | Polycarbonate |
| Dimensions (L × W × H) | 126,3 × 77,9 × 60,8 mm |
| Weight (with diffuser plate) | Approx. 220 g |
| Volume | Approx. 330 cm³ |
| Maximum operating depth | 40 m (130 feet) |
| Waterproof rating | IPX8 (conforms to IEC/JIS) |
| Seal type | O-ring (crimp seal) |
| Operating temperature | 0 to 40 °C |
| Package contents | Waterproof housing, wrist strap, diffuser plate, silicone grease, user guide |
| Mounting | Wrist strap, tripod socket |
| External controls | Shutter button, zoom lever, ON/OFF button, mode dial, lock button, indentation, playback, macro, flash buttons |
| Available shooting modes | Auto, Underwater, Beach, Snow |
| Usage limitations | No exposure compensation, no self-timer, no video playback, no image deletion |
| Maintenance | Rinse with fresh water, wipe dry, grease the seal |
| Seal replacement | Recommended once a year (contact Canon customer service) |
| Safety precautions | Do not use as a flotation device, avoid high temperatures, do not disassemble, do not damage the seal |
| Country of manufacture | Not specified |
Frequently Asked Questions - WP-DC37 CANON
User questions about WP-DC37 CANON
0 question about this device. Answer the ones you know or ask your own.
Ask a new question about this device
Download the instructions for your Camera in PDF format for free! Find your manual WP-DC37 - CANON and take your electronic device back in hand. On this page are published all the documents necessary for the use of your device. WP-DC37 by CANON.
USER MANUAL WP-DC37 CANON
User Manual
RUSSIAN
Digital Camera Waterproof Case Instruction Manual
Chinese
Japanese
Read this first
Store this guide safely so that you can use it in the future.
Checking the Package Contents
Make sure you read this guide before using the Waterproof Case.
Store this guide safely so that you can use it in the future.
Checking the Package Contents
Check if the following items are included in your Waterproof Case package. If anything is missing, contact the retailer from which you purchased the Waterproof Case.
Waterproof Case, Wrist Strap, Diffusion Plate, Silicon Grease for the Waterproof Seal, User Guide (this guide)
Read This First
Before you use the Waterproof Case, make sure it is functioning correctly and does not leak. To check for leaks, close the camera case before putting the camera in, and hold it under water at an approximate depth of 15 cm (5.9 in.) for about three minutes. If it leaks, contact a Canon Customer Support Help Desk.
Disclaimer
Reprinting, transmitting, or storing in a retrieval system any part of this guide without the permission of Canon is prohibited.
Canon reserves the right to change the contents of this guide at any time without prior notice.
Illustrations and screenshots in this guide may differ slightly from the actual equipment.
Canon Inc., its subsidiaries and affiliates, and distributors of the Waterproof Case are not liable for any damages due to misuse of the case.
- Also carefully read the Camera User Guide supplied with your camera.
- Things you should be careful about.
- Hints for getting more out of your Waterproof Case.
The various types of memory cards that can be used in the camera are collectively referred to as memory cards in this guide.
Safety Precautions
Before using the Waterproof Case, ensure that you read the safety precautions below. Always ensure that the Waterproof Case is operated correctly.
The safety precautions noted on the following pages are intended to prevent injuries to yourself and other persons, or damage to the equipment.

Warning
Denotes the possibility of serious injury or death.

Caution Denotes the possibility of injury.
Caution
Denotes the possibility of damage to the Waterproof Case and camera.

Warning
Be sure to remove the camera after using the Waterproof Case.
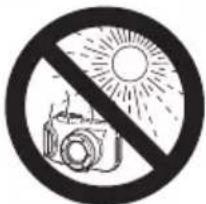
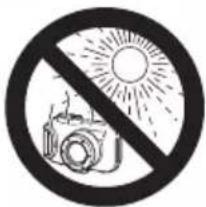
Leaving the camera in the Waterproof Case and placing it in direct sunlight or other places subject to high temperatures may result in fire, or cause the case to burst.
Do not use the Waterproof Case as a personal flotation device (such as a life preserver).

Caution
Immediately turn off the camera if the Waterproof Case leaks.
Leaks could result in fire or electrical shock. Thoroughly wipe the Waterproof Case interior and the camera dry and contact a Canon Customer Support Help Desk.
Caution
Be careful of condensation.
Moving the Waterproof Case rapidly between hot and cold temperatures may cause condensation (water droplets) to form on its internal surfaces. If this occurs, stop using the camera as the condensation may cause a malfunction. Remove the camera, and wipe off the condensation from the case and camera with a soft, dry cloth so that it is completely dry.
Do not insert the camera with the strap attached. Do not press the buttons or lever with unnecessary force when using the case underwater.
Do not spray the waterproof seal with tap-water. Do not damage the waterproof seal, or allow dirt to accumulate between the waterproof seal and the case.
Do not disassemble or modify the Waterproof Case. The above actions could cause leaks.
Avoid using or storing the Waterproof Case in the following places.
Depths exceeding 40 meters (130 ft.).
Places subject to temperatures above 40°C (104°F).
Avoid placing or storing the Waterproof Case in the following places.
Places subject to strong sunlight.
Humid or dusty areas.
Near substances such as
naphthalene or insecticides.
Do not drop or throw the Waterproof Case.
The above actions may warp the case and cause malfunctions.
Use only the supplied silicon grease.
Use of other waterproofing products may impair the strength of the Waterproof Case.
Waterproof Seal
Debris stuck to the waterproof seal may cause water leakage. Catching a single strand of hair, or a tiny grain of sand in the seal can cause leaks.
If you notice that the waterproof seal is damaged or cracked, stop using the case immediately and contact a Canon Customer Support Help Desk.
When storing your Waterproof Case, keep it open to prevent the waterproof seal from deforming and to maintain its waterproof capabilities.
Protect the waterproof seal from dust and scratches during storage.
To ensure that the case remains watertight, you should replace the seal once a year.
Contact a Canon Customer Support Help Desk for replacement seals.

Components Guide
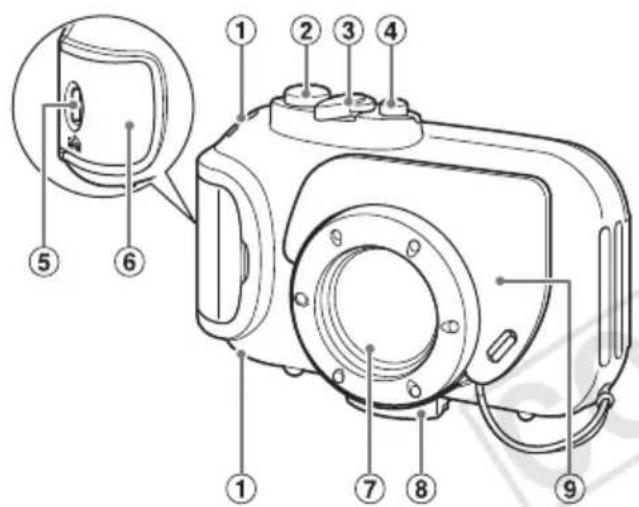
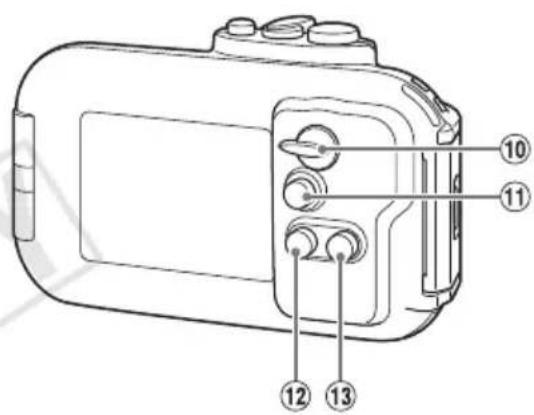
① Strap Mounts ② Shutter Button ③ Zoom Lever ④ Power Button ⑤ Lock Release Switch ⑥ Catch ⑦ Lens Window ⑧ Tripod Socket ⑨ Diffusion Plate
⑩ Mode Switch ⑪ (Playback) Button ⑫ (Macro)/ (Infinity)/ ⑬ Button ⑭ (Flash)/▶ Button
Preparations
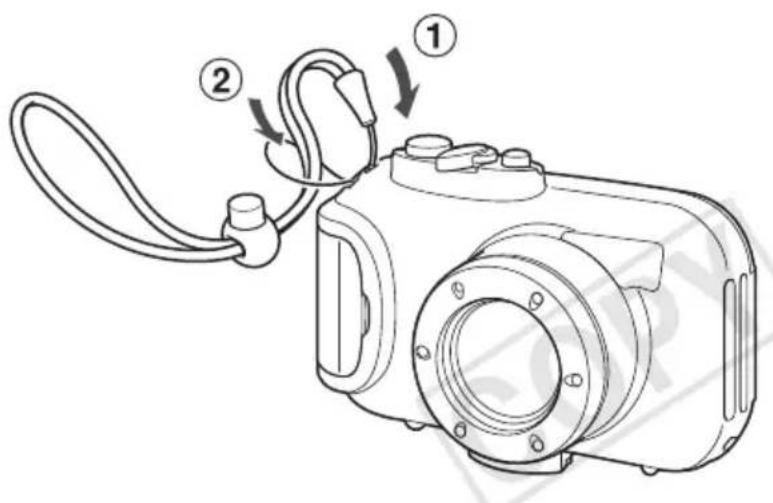
1. Attach the strap.
Do not attach the strap included with the camera.
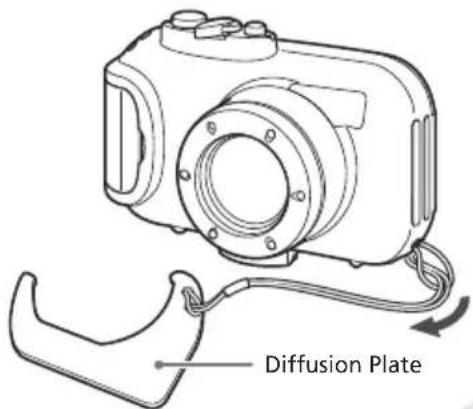
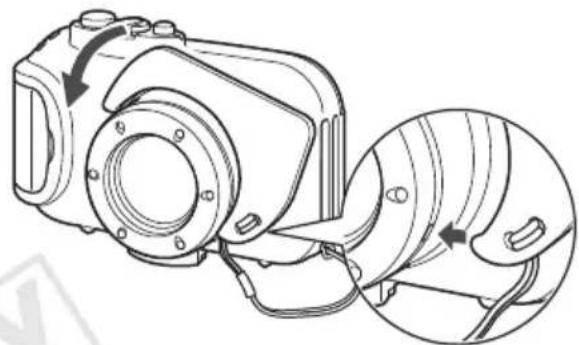
2. Attach the diffusion plate.
Do not scratch the surface of the diffusion plate, as this may prevent light from the flash from being properly diffused.
The effectiveness of the diffusion plate may be impaired if the subject is too close to the camera.
Removing the Diffusion Plate
Lift and remove the diffusion plate.
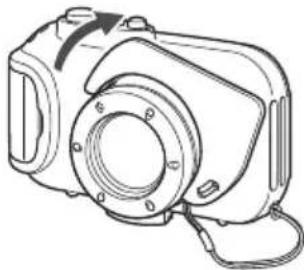
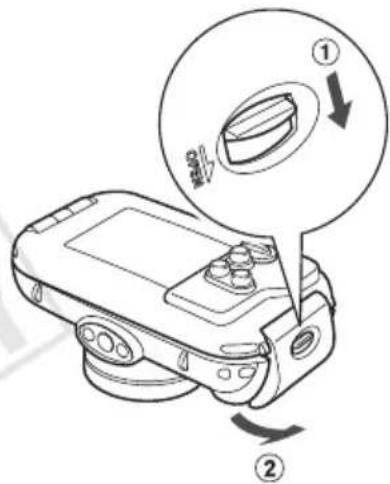
3 Release the catch to open the case. When using commercially available
When using commercially available anticondensation products, the anticondensation solution should only be applied to the inside surface of the lens window using a soft, dry cloth. If anticondensation solution comes in contact with any surface other than the inside of the lens window, wipe it off immediately with a soft, dry cloth, as it could lead to deterioration of the Waterproof Case.
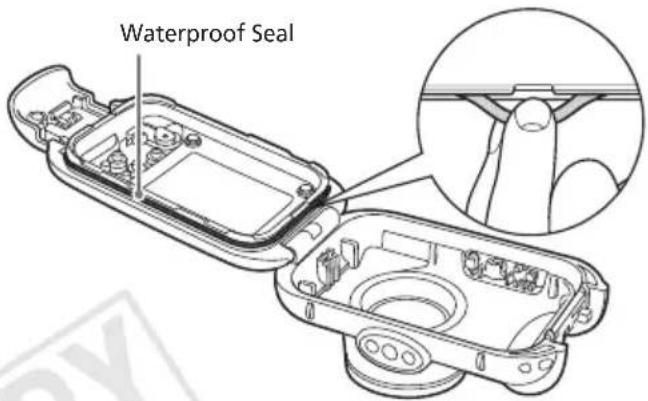
4 Apply silicon grease to the waterproof seal.
- Remove the waterproof seal as shown. Do not dig your fingernails into it or pull on it forcibly.
- Using a cotton swab, wipe off any debris in the mounting groove.
- Apply a small amount (droplet) of grease to your fingertip, and evenly coat the entire surface of the waterproof seal.
- Place the waterproof seal back in the seal mounting groove. Take care not to twist it.
Preparing the Camera

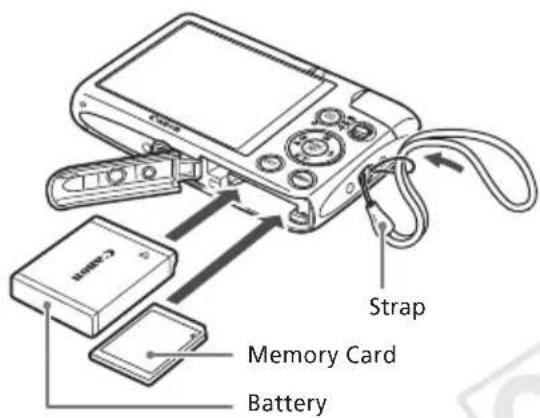
5 Remove the strap, and make sure the battery and memory card are in the camera.
Refer to the Camera User Guide for information on the correct battery, and how to insert the battery and memory card. Use a battery that is adequately charged. Check the estimated capacity of your memory card and ensure there is enough space to record images.
Inserting the Camera Into the Case
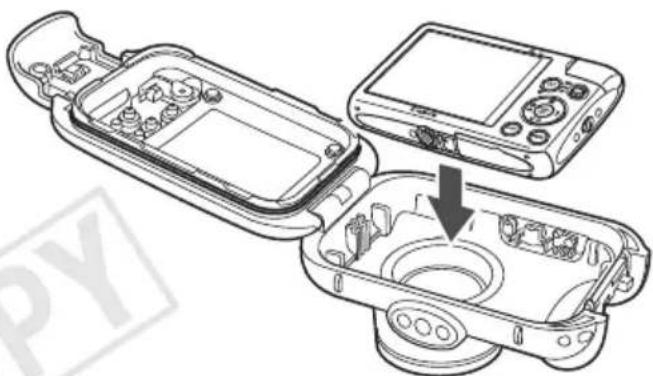
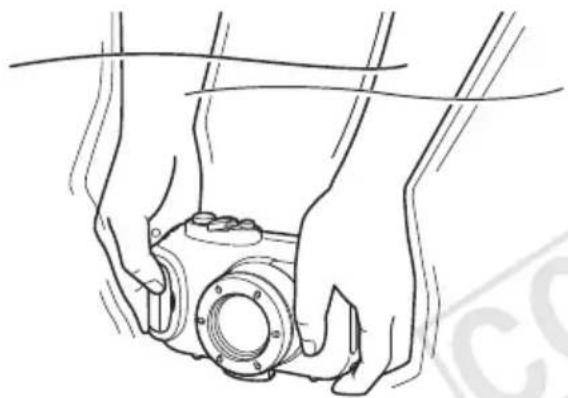
6 Insert the camera into the Waterproof Case.
Choose a place well away from salty sea air. Keep the lens window clean by wiping it gently with a dry cloth.
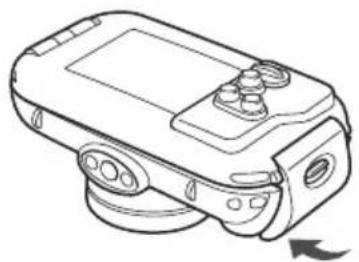
7 Close the case. Make sure that
Make sure that the waterproof seal is free of debris.
Make sure that the catch is securely locked.
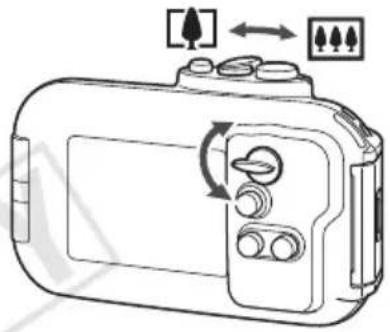
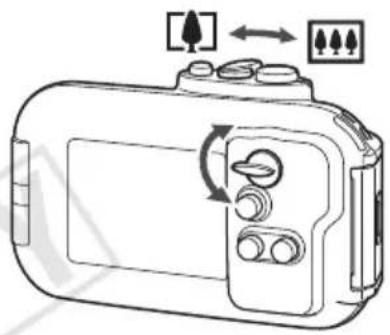
8 Turn the mode switch in the direction of the arrow to engage the mode switch of the camera.

Using the Camera
Refer to the Camera User Guide for details on how to use the camera.
When the camera is inserted into the case, the available shooting modes are limited to the following:


: (Underwater)/ (Beach)/ (Snow) Standard
When the camera is inserted into the case, the Playback mode is limited to the following function:
Switching images by pressing the buttons. Using the zoom lever to switch between Index Display and Single Image Playback.

When the camera is inserted into the case, mainly the following restrictions apply:
Recorded images cannot be erased. Ensure that there is enough space on your memory card to record images beforehand.
The following functions are not available:
Exposure Compensation
Self-Timer
Movie Playback
Functions that use the SET, DISP., and MENU buttons are not available.
Choosing a Shooting Mode
When you set the mode switch to 0, the shooting mode you can use depends on how you turn on the camera.


(Underwater) Press the power button only.

(Beach) Press and hold down the button, then press the power button.

(Snow) Press and hold down the button, then press the power button.

Once turned on, you cannot switch to another shooting mode. To switch to another mode, first turn off the camera and then turn the camera on again using the method described above for your desired shooting mode.

To change focus range or flash settings, press the buttons to choose an option, then press the shutter button halfway.

Removing the Camera
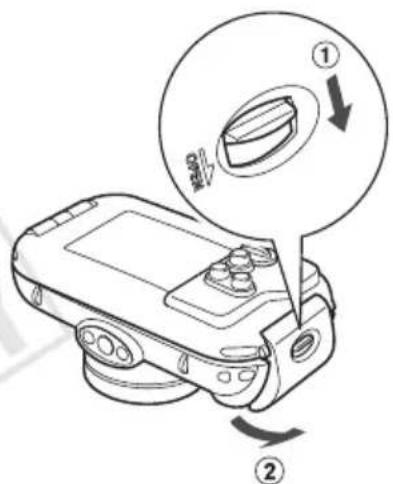
1 Thoroughly dry the case, wiping off all the water.
Remove any dirt, sand, hair or other debris from the case and wash it with clean, running water to remove any salt deposits.
2 Open the case and remove the camera.
Care and Maintenance
Make sure to do the following after using the Waterproof Case.
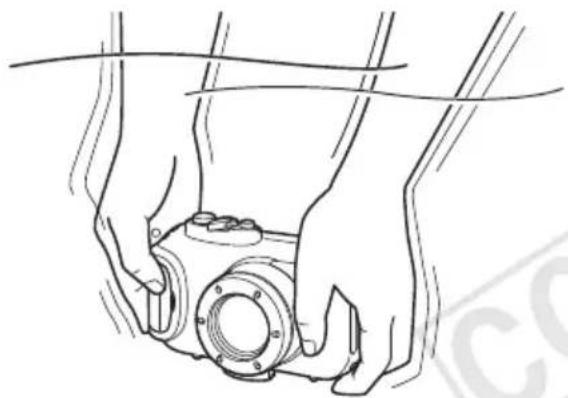
1 Close the case.
Do not wash the interior of the Waterproof Case with water. Wipe it with a soft, dry cloth.
2 Thoroughly wash the case with clean water, then wipe it completely dry with a soft, dry cloth.
After using the case in the ocean, soak it in clean water for several hours to remove any salt deposits.
Specifications
Waterproof Capability: Meets IEC/JIS protection rating "IPX8" equivalent For use within a depth of 40m (130 ft.)
Waterproofing: Seal (crimp-type O-ring)
Body Materials: Polycarbonate
Camera Operating Temperatures:
0 to 40°C (32 to 104°F)
Dimensions: 126.3 × 77.9 × 60.8 mm
(4.97 × 3.06 × 2.39 in.)
(excluding protrusions)
Volume: Approx. 330 cm³ (11.2 fl. oz. (US))
Weight: Approx. 220 g (7.8 oz.)
(Waterproof Case only*)
*Including diffusion plate
All data noted here are based on Canon's testing standards. Product specifications and appearance are subject to change without prior notice.
Deutsch
Volume: Approx. 330 cm
Weight: Approx. 220 g
(waterproof case only*)
Indicates the possibility of damage to the waterproof case and camera.

Caution
After using the waterproof case, be sure to remove the camera from it.
If you leave the camera in the waterproof case in direct sunlight or in other places with high temperature, this may lead to fire or explosion of the case.
Do not use the waterproof case as a personal flotation device (for example, instead of a life jacket).

Warning
If the waterproof case starts to leak, immediately turn off the camera.
Leaks may lead to fire or electric shock. Thoroughly dry the camera and the interior surfaces of the waterproof case, then contact the Canon customer support center.
Warning
Do not expose the waterproof adhesive to open flame and do not modify its design.
This may lead to leaks.
Do not use or store the waterproof adhesive in the following places:
At depths exceeding 40 m; in places where the temperature exceeds 40°C
Do not leave or store the waterproof adhesive in the following places:
In direct sunlight; in damp, dusty places; near chemicals such as naphtha and acetone.
Do not allow the waterproof adhesive to get wet or drop it.
The above actions may lead to deformation of the adhesive and leaks in the sealant.
Use only the supplied spatula.
The use of other tools or materials may damage the waterproof adhesive.
Waterproof adhesive
When applying the waterproof adhesive, leaks may occur. This is possible if a single hair or a grain of coarse sand gets on the adhesive.
If you notice that the waterproof adhesive is damaged or cracked, immediately stop using the adhesive and contact Canon customer support.
When storing the waterproof adhesive, keep its cap closed to prevent deformation of the waterproof adhesive and maintain its ability to not let water through.
When storing, be careful that dust does not get on the waterproof adhesive and protect the adhesive from direct sunlight.
The O-ring must be replaced once a year.
For spare O-rings, contact the Canon parts service department.
① Lens attachment ring ② Shutter release button ③ Zoom lever. ④ ON/OFF button ⑤ Focus ring ⑥ Lock ⑦ Lens window ⑧ Main unit ⑨ Diffuser plate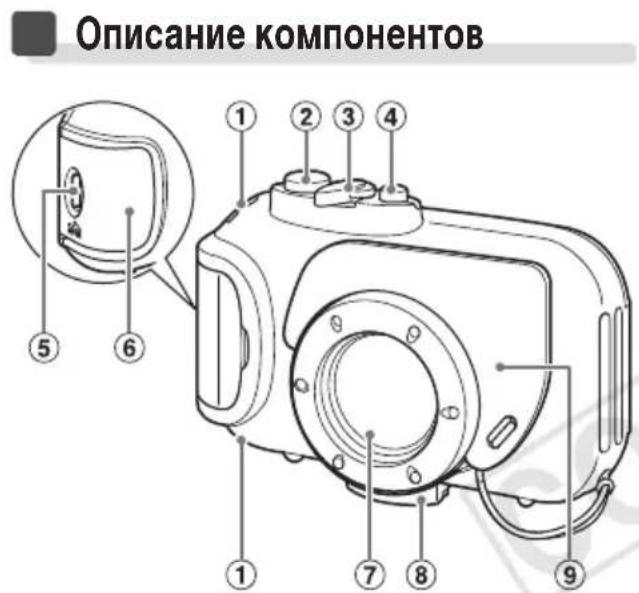
10 Mode switch 11 Flash button (reception) 12 Button (macro)/(infinity) 13 Button (flash)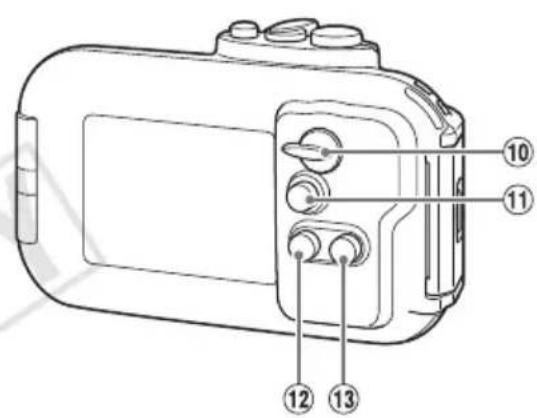

Strap
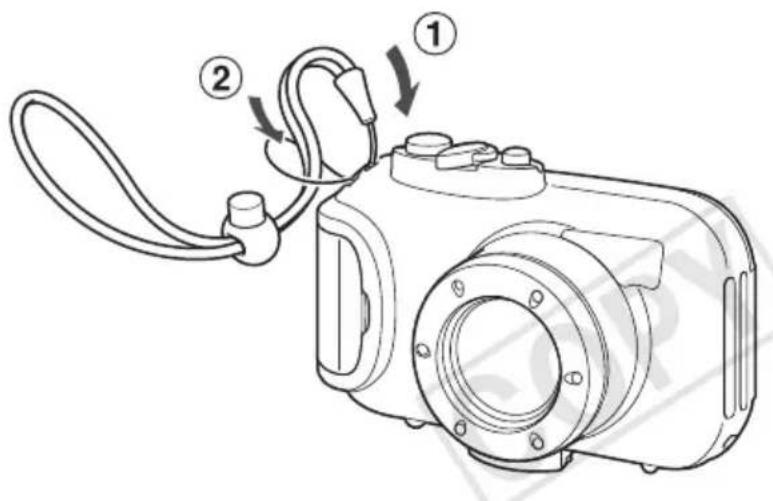

Attach the strap.

Do not attach the strap that comes with the camera.
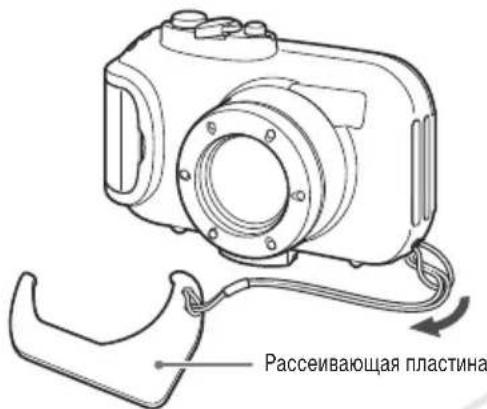
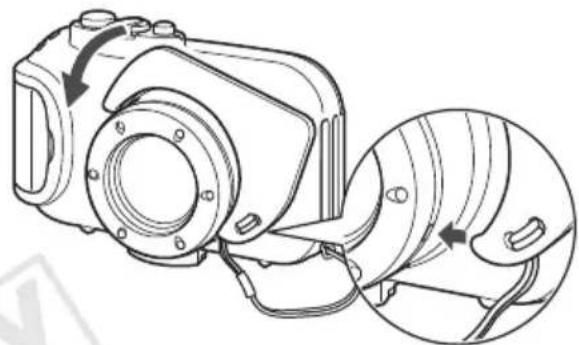
2 Attach the diffuser plate.
Protect the surface of the diffuser plate from scratches, as they may cause incorrect light diffusion of the flash.
If the subject is too close to the camera, the effectiveness of the diffuser plate may decrease.
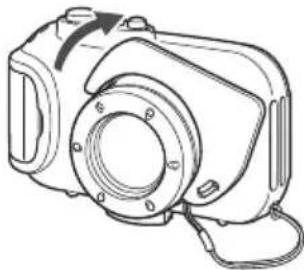
Removing the diffuser plate
Lift the diffuser plate and remove it.
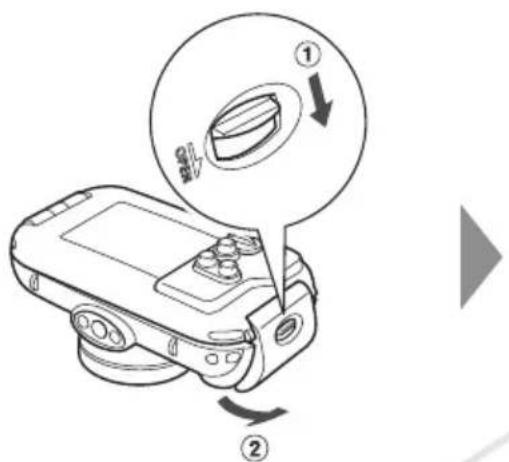
While lifting the diffuser plate, release the lock.
Using commercially available anti-condensation agent, apply the anti-condensation solution only to the inner surface of the lens window with a soft dry cloth. If the anti-condensation solution is applied to any other surface besides the inner side of the lens window, wipe it off immediately with a soft dry cloth, as it may damage the water-repellent coating.
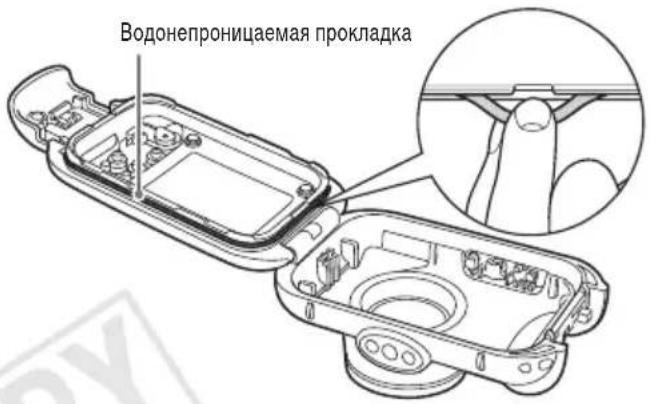
Apply silicone grease to the water-repellent O-ring.
- Remove the waterproof gasket as shown in the figure. Do not pull it by the edges or stretch it.
- Wipe all dirt out of the mounting groove.
- Apply a small amount (a drop) of lubricant to the gasket lip and evenly coat the entire surface of the waterproof gasket.
- Install the waterproof gasket back into the mounting groove. Make sure the gasket does not twist.
Camera preparation
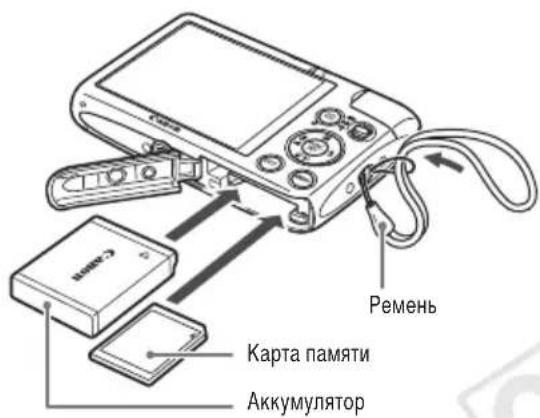
5 Remove the belt and make sure that the memory card and battery are installed in the camera.
Depending on the battery used, and also regarding the installation of the battery and memory card, see the camera user manual. Use a sufficiently charged battery. Check the free capacity of the memory card and make sure there is enough space for recording images.
Installing the camera in the housing
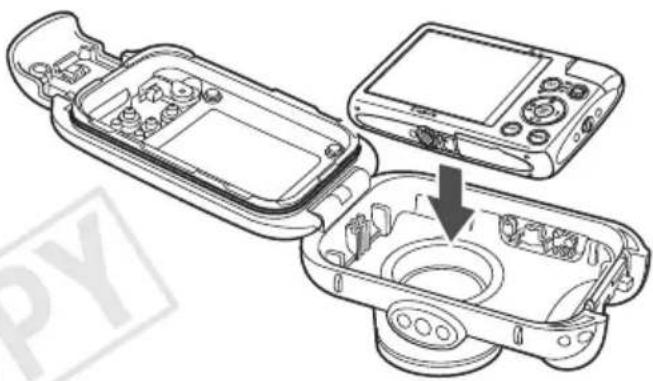
6 Install the camera in the waterproof housing.
Choose a place with low humidity, where salty sea air does not reach. Ensure the cleanliness of the lens window, carefully wiping it with a dry cloth.
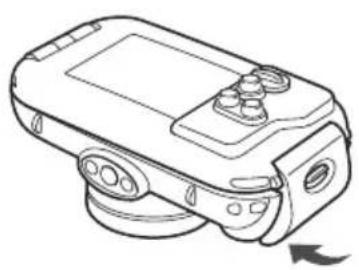
Close the housing.
Make sure there is no dirt on the waterproof gasket.
Make sure the latch is securely closed.
8 Turn the mode dial in the direction of the arrow to connect it to the mode dial on the camera.
Using the camera
Before working with the camera, read the camera user manual.
When the camera is in the case, only the following modes are available:
AUTO

(Snow) Press the button
Without releasing
it, press the ON/OFF button.

After turning on the camera, switching to another shooting mode is impossible. To switch to another mode, first turn off the camera, then turn it on again using the method described above for the desired shooting mode.

To set the focus range or flash parameters, select the desired option with the buttons, then press the shutter button again.

Removing the camera
Carefully dry the case, wiping off all water from it.
Remove all dirt, sand, hair, or other debris from the case, then rinse it with clean running water to remove any remaining soap.
2 Open the case and remove the camera.
Maintenance
After using the waterproof case, be sure to perform the following operations.
Close the case.
Wipe the inner surfaces of the waterproof bag with a soft, dry cloth.
Carefully wipe off any dirt, then dry it thoroughly with a dry cloth.
After using the bag in the ocean, rinse it with clean water for several hours to remove all salt residue.
Technical specifications
Waterproof rating: meets requirements equivalent to IPX8. Standard IEC/JIS for immersion up to 40 m
Waterproofing: PVC (standard coated PVC)
Material of the body: Polycarbonate
- JAPANESE
- CHECKING THE PACKAGE CONTENTS
- READ THIS FIRST
- DISCLAIMER
- SAFETY PRECAUTIONS
- WARNING
- BE SURE TO REMOVE THE CAMERA AFTER USING THE WATERPROOF CASE
- CAUTION
- IMMEDIATELY TURN OFF THE CAMERA IF THE WATERPROOF CASE LEAKS
- BE CAREFUL OF CONDENSATION
- WATERPROOF SEAL
- COMPONENTS GUIDE
- PREPARATIONS
- ATTACH THE STRAP
- DO NOT ATTACH THE STRAP INCLUDED WITH THE CAMERA
- ATTACH THE DIFFUSION PLATE
- REMOVING THE DIFFUSION PLATE
- RELEASE THE CATCH TO OPEN THE CASE. WHEN USING COMMERCIALLY AVAILABLE
- APPLY SILICON GREASE TO THE WATERPROOF SEAL
- PREPARING THE CAMERA
- REMOVE THE STRAP, AND MAKE SURE THE BATTERY AND MEMORY CARD ARE IN THE CAMERA
- INSERTING THE CAMERA INTO THE CASE
- INSERT THE CAMERA INTO THE WATERPROOF CASE
- CLOSE THE CASE. MAKE SURE THAT
- USING THE CAMERA
- CHOOSING A SHOOTING MODE
- REMOVING THE CAMERA
- CARE AND MAINTENANCE
- CLOSE THE CASE
- THOROUGHLY WASH THE CASE WITH CLEAN WATER, THEN WIPE IT COMPLETELY DRY WITH A SOFT, DRY CLOTH
- SPECIFICATIONS
- DEUTSCH
- WEIGHT: APPROX. 220 G
- WATERPROOF ADHESIVE
- STRAP
- ATTACH THE DIFFUSER PLATE
- REMOVING THE DIFFUSER PLATE
- WHILE LIFTING THE DIFFUSER PLATE, RELEASE THE LOCK
- APPLY SILICONE GREASE TO THE WATER-REPELLENT O-RING
- CAMERA PREPARATION
- REMOVE THE BELT AND MAKE SURE THAT THE MEMORY CARD AND BATTERY ARE INSTALLED IN THE CAMERA
- INSTALLING THE CAMERA IN THE HOUSING
- INSTALL THE CAMERA IN THE WATERPROOF HOUSING
- CLOSE THE HOUSING
- MAINTENANCE
- CAREFULLY WIPE OFF ANY DIRT, THEN DRY IT THOROUGHLY WITH A DRY CLOTH
- TECHNICAL SPECIFICATIONS
Brand : CANON
Model : WP-DC37
Category : Camera