DO1033S - Vacuum Cleaner DOMO - Free user manual and instructions
Find the device manual for free DO1033S DOMO in PDF.


User questions about DO1033S DOMO
0 question about this device. Answer the ones you know or ask your own.
Ask a new question about this device
Download the instructions for your Vacuum Cleaner in PDF format for free! Find your manual DO1033S - DOMO and take your electronic device back in hand. On this page are published all the documents necessary for the use of your device. DO1033S by DOMO.
USER MANUAL DO1033S DOMO
natural_image
Black vacuum cleaner with coiled hose and handle, isolated on white background (no text or symbols visible)DO1033S
| Handleiding Stofzuiger | |
| Mode d'emploi Aspirateur | |
| Gebrauchsanleitung Staubsauger | |
| Instruction booklet Vacuum cleaner | |
| Manual de instrucciones Aspiradora | |
| Istruzioni per l'uso Aspirapolvere |

natural_image
Two black-and-white icons: a warning triangle with an exclamation mark and an open book (no text or symbols)text_image
Labeled diagram of a vacuum cleaner with numbered parts for identification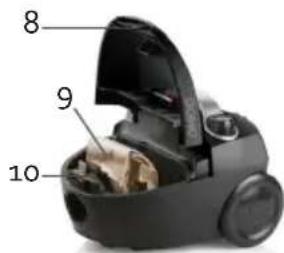
text_image
8 9 10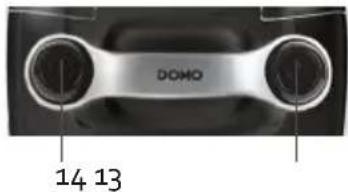
text_image
DOMO 14 13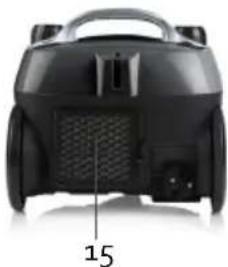
natural_image
Back view of a black vacuum cleaner with visible internal components and a numbered label '15' (no text or symbols on the device itself)natural_image
Close-up of a black handheld vacuum cleaner with attached screw and control buttons (no visible text or symbols)BUIS
natural_image
Close-up of a black DOWO vacuum cleaner head with labeled parts A and B (no text or symbols on the device itself)REINIGING EN ONDERHOUD
VERWISSELEN STOFZAK
natural_image
Close-up of a black handheld device with a threaded tip and labeled component '1' (no readable text or symbols beyond labels)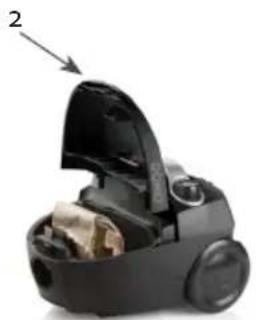
natural_image
Black vacuum cleaner with open lid and internal compartments (no text or symbols visible)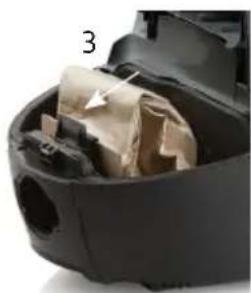
natural_image
Close-up of a black plastic appliance with internal components and a numbered label '3' (no visible text or symbols on the appliance itself)FILTERS
natural_image
Front view of a black robotic device with visible mesh grille and control buttons (no text or symbols)Motorfilter
natural_image
Three views of a black vacuum cleaner device showing internal components and assembly (no text or symbols visible)OPGELET
text_image
Prohibition sign with crossed-out trash bin and no text, indicating no waste or disposal restrictionnatural_image
Recycling symbol icon with three chasing arrows forming a triangle (no text or labels)natural_image
Front view of a black vacuum cleaner with visible vent and grille (no text or symbols)AVANT LA PREMIÈRE UTILISATION
natural_image
Close-up of a black handheld vacuum cleaner with attached sensor and connector (no visible text or symbols)ACCESSOIRES
natural_image
Three-panel image showing a black vacuum cleaner with internal components, labeled 1, 2, and 3 (no text or symbols on the device itself)LES FILTRES
natural_image
Front view of a black vacuum cleaner with visible vent and door (no text or symbols)FILTRE DU MOTEUR
natural_image
Three views of a black DODAD vacuum cleaner showing internal components and mounting features (no text or symbols visible)ATTENTION
text_image
Prohibition sign with crossed-out trash bin and no text, indicating no waste or disposal.natural_image
Recycling symbol icon with three chasing arrows forming a triangle (no text or labels)natural_image
Front view of a black robotic vacuum cleaner with visible internal components and a numbered label '15' (no text or symbols on the device itself)natural_image
Close-up of a black handheld vacuum cleaner with attached cable and ventilation slots (no visible text or symbols)ROHR
natural_image
Front view of a black robotic vacuum cleaner with visible vent and handle (no text or symbols)Motorfilter
natural_image
Three views of a black DDoMO vacuum cleaner showing internal components and assembly (no text or symbols visible)ACHTUNG
text_image
Prohibition sign with a trash bin crossed out and a black rectangle below, indicating no waste or pollution.natural_image
Recycling symbol icon with three chasing arrows forming a triangle (no text or labels)All of our products are always submitted to a strict quality control before they are sold to you.
Should you nevertheless experience problems with your device, we sincerely regret this. In that case, we kindly request you to contact our customer service.
Our staff will gladly assist you.

+32 14 21 71 91

info@linea2000.be
Monday – Thursday: 8.30 – 12.00 and 13.00 – 17.00
Friday: 8.30 - 12.00 and 13.00 - 16.30
This appliance has a two year warranty period. During this period the manufacturer is responsible for any failures that are the direct result of construction failure. When these failures occur the appliance will be repaired or replaced if necessary. The warranty will not be valid when the damage to the appliance is caused by wrong use, not following the instructions or repairs executed by a third party. The guarantee is issued with the original till receipt. All parts, which are subject to wear, are excluded from the warranty. If your device breaks down within the 2-year warranty period, you can return the device together with your receipt to the shop where you purchased it.
The guarantee on accessories and components that are liable to wear-and-tear is only 6 months.
The guarantee and responsibility of the supplier and manufacturer lapse automatically in the following cases:
- If the instructions in this manual have not been followed.
· In case of incorrect connection, e.g., electrical voltage that is too high.
· In case of incorrect, rough or abnormal use.
· In case of insufficient or incorrect maintenance.
· In case of repairs or alterations to the device by the consumer or non-authorised third parties. - If the customer used parts or accessories that are not recommended or provided by the supplier / manufacturer.
SAFETY INSTRUCTIONS
When using electrical appliances, basic safety precautions should always be taken, including the following:
- Read all instructions carefully. Keep this manual for future reference.
- Make sure all packaging materials and promotional stickers have been removed before using the appliance for the first time. Make sure children cannot play with the packaging materials.
· This appliance is intended to be used in household and similar applications such as:
- staff kitchen areas in shops, offices and other working environments;
· farm houses; - by clients in hotels, motels and other residential type environments;
- bed and breakfast type environments.
· Children should be supervised to ensure that they do not play with the appliance.
- This appliance can be used by children aged from 16 years and above and persons with reduced physical, sensory or mental capabilities or lack of experience and knowledge if they have been given supervision or instruction concerning use of the appliance in a safe way and understand the hazards
involved. Children shall not play with the appliance. Cleaning and user maintenance shall not be made by children unless they are older than 16 and supervised.
- Keep the appliance and its cord out of reach of children younger than 16 years.
- Before use, check if the voltage stated on the appliance corresponds with the voltage of the power net at your home.
· Always connect the appliance to an earthed socket. - Do not let the cord hang on a hot surface or on the edge of a table or counter top.
- Never use the appliance when the cord or plug is damaged, after malfunction or when the appliance itself is damaged. In that case, take the appliance to the nearest qualified service center for check-up and repair.
- Close supervision is necessary when the appliance is used near or by children.
- The use of accessories that are not recommended or sold by the manufacturer can cause fire, electrical shock or injuries.
- Unplug the appliance when it is not in use, before assembling or disassembling any parts and before cleaning the appliance. Put all buttons and knobs into the 'off' position and unplug the appliance by grasping the plug. Never unplug by pulling the cord.
· Do not leave a working appliance unattended. - Never place this appliance near a gas stove or electrical stove or in a place where it may come into contact with a warm appliance.
- Do not use the appliance outdoors.
- Only use the appliance for its intended use.
· Always use the appliance on a steady, dry and level surface. - Only use the appliance for domestic use. The manufacturer can not be held responsible for accidents that result from improper use of the appliance or not following the instructions described in this manual.
· All repairs should be carried out by the manufacturer or its aftersales service.
· Never immerse the appliance, the cord or the plug in water or any other liquid. - Make sure that children do not touch the cord or appliance.
- Keep the cord away from sharp edges and hot parts or other heat sources.
· To prevent the risk of electrocution, do not use the vacuum cleaner outdoors or on wet surfaces. - Only use the vacuum cleaner as described in this instruction booklet.
- Do not pull the cord. Do not use the cord as a handle. Do not jam the cord between a door or do not pull it around corners or sharp edges. Do not run the vacuum cleaner over the cord. Keep the cord away from hot surfaces.
- Do not touch the plug or the vacuum cleaner when you have wet hands.
- Do not put any objects in the openings of the vacuum cleaner. Do not use the appliance when an opening is blocked.
- Keep hair, loose clothing, fingers and other body parts away from openings of the vacuum cleaner and from moving parts.
- Be extra careful when cleaning stairs.
- Never use the vacuum cleaner to pick up any combustible or inflammable liquids like gasoline, or do not use the appliance in places where such substances might be present.
- Remove large and sharp objects from the floor before vacuuming it to prevent possible damage.
- Hold the plug while rewinding the cord onto the cord reel. Do not let the plug whip back and forth during rewinding.
· Unplug the appliance before connecting the hose.
· Do not pick up any burning or smoking objects, like cigarettes, matches or hot ashes.
SAVE THESE INSTRUCTIONS
PARTS
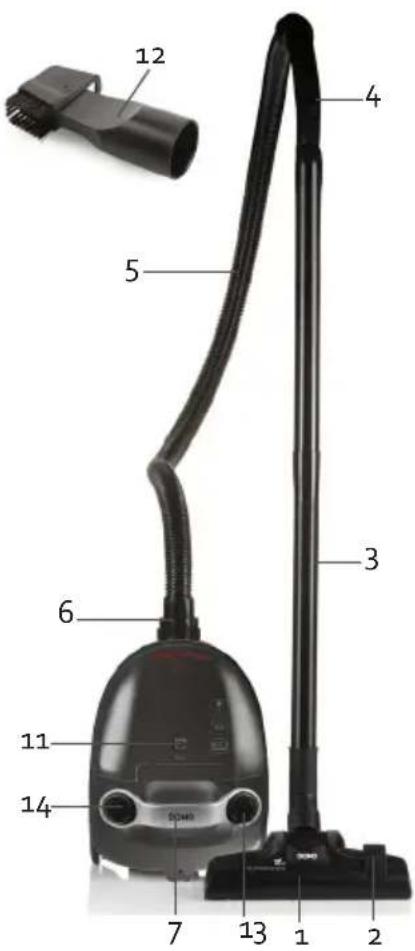
- Floor nozzle
- Button to pull out or retract brushes
- Tube
- Additional suction power control
- Hose
- Connection for hose
- Handle
- Handle lid dust bag compartment
- Dust bag: 1,5 l
- Dust bag frame
- Full dust bag indicator
- Crevice nozzle with dusting brush
- Button for automatic cord rewinding
- On/off button
- EPA 10 filter behind grid
text_image
12 4 5 3 6 11 14 7 13 1 2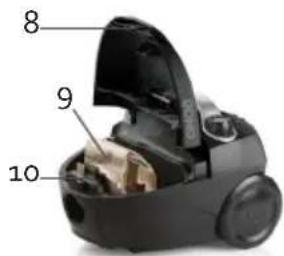
text_image
8 9 10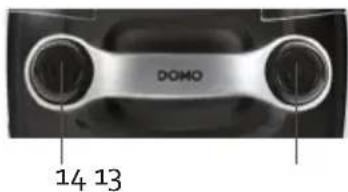
text_image
DOMO 14 13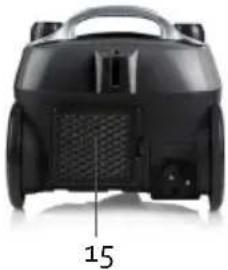
natural_image
Back view of a black handheld vacuum cleaner with visible internal components and a numbered label '15' (no text or symbols on the device itself)BEFORE THE FIRST USE
Always unplug the vacuum cleaner before (dis)assembling any parts.
HOSE
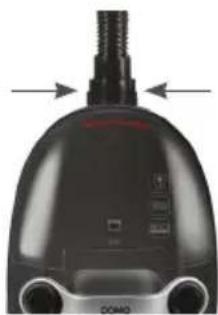
- Assembly: Insert the connector at the end of the hose into the connection opening of the vacuum cleaner so that the hose is fixed into place.
- Disassembly: Unplug the vacuum cleaner. Push in the sides of the connector at the end of the hose and pull the hose out of the vacuum cleaner.
natural_image
Close-up of a black handheld device with a threaded tip and two circular ports, no visible text or symbols.TUBE
- Put the handle of the hose into the tube.
- Attach the floor nozzle to the tube by firmly sliding the tube into the nozzle.
ACCESSORIES
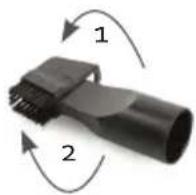
- Crevice nozzle: for hard to reach areas like radiators, crevices, corners, in between pillows,...
- Dust brush: for furniture, shelves,...
USE
-
Unwind the cord to a substantial length and plug in the vacuum cleaner. The yellow label on the cord indicates the maximum length of the cord, that should not be exceeded.
-
To turn the vacuum cleaner on and off, press the foot pedal with the Ⓐ symbol.
-
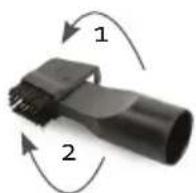
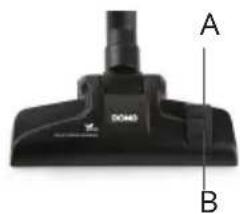
When you want to clean hard floors, make sure that the brushes in the floor nozzle are down
-
When you want to clean carpet, make sure that the brushes in the floor nozzle are retracted (B).
-
Slide the valve on the hose into the closed or open position to increase or reduce the suction power.
-
When you have finished vacuuming, unplug the vacuum cleaner and automatically rewind the cord by pressing the foot pedal with the symbol. Make sure that the plug does not whip back and forth while rewinding the cord, by guiding the cord with your hand. This to prevent possible damage.
natural_image
Close-up of a black D0463 vacuum cleaner with labeled parts A and B (no text or symbols on the device itself)CLEANING AND MAINTENANCE
CHANGING THE DUST BAG
The vacuum cleaner cannot be used without the dust bag. When the dust bag is full or damaged you need to replace it immediately. The dust bag full indicator turns red when you need to replace it.
-
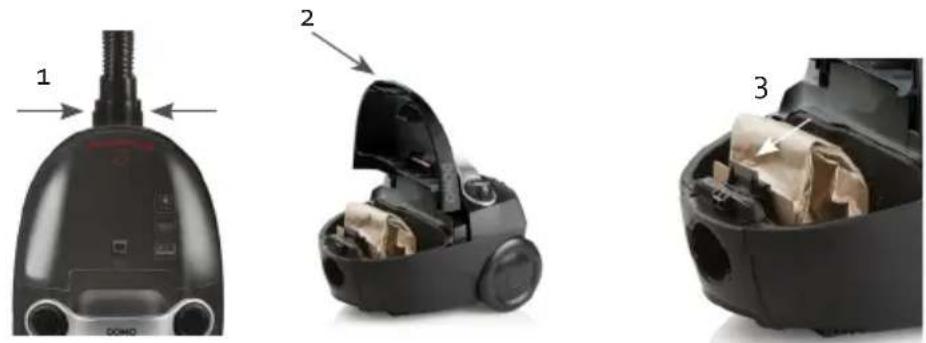
Remove the flexible hose.
-
Open the top of the dust bag reservoir via the cover.
-
Pull the dust bag holder towards you to remove the dust bag and place a new one in the correct position. Make sure that the dust bag is fixed into place under the dust bag holder.
natural_image
Three views of a black vacuum cleaner with internal components, shown from top, front, and side (no text or symbols visible)THE FILTERS
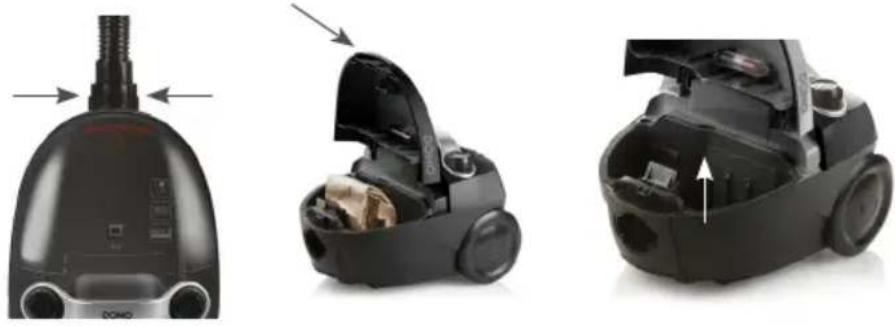
The appliance has 2 filters. In a normal cleaning session, it is sufficient to tap out the filters. It is recommended that you thoroughly clean the filters under tepid running water 3 to 4 times per year. Make sure that it is completely dry before putting it back in the appliance. You can also replace them if necessary. Avoid direct sunlight or intense overheating. Never put the filters in the washing appliance to prevent deformation. Do not use abrasive or cleaning products and wash from the bottom of the filter.
EPA filter
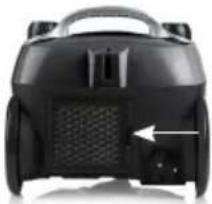
Remove the EPA filter through the provided valve. Clean it thoroughly under tepid running water. Allow it to air-dry properly. It is recommended that this filter be replaced once a year. Place all the parts back in the vacuum cleaner before using the appliance again.
natural_image
Back view of a black robotic device with visible internal components and a white arrow pointing to a small component (no text or symbols)Motor filter
The motor filter is located in the dust bag compartment. Remove the flexible hose. Open the lid of the dust bag reservoir. Take out the filter. Clean it thoroughly under tepid running water. Allow it to air-dry properly. Replace it in the vacuum.
natural_image
Three views of a black vacuum cleaner device showing internal components and assembly (no text or symbols visible)PLEASE NOTE:
· Make sure that all components are correctly assembled before using the vacuum cleaner again.
- Always use the vacuum cleaner with the filters intact. If you do not do this, you may lose suction force or damage the motor.
- Unplug the plug before cleaning the filters.
· Do not put the filter into the dishwasher.
· Do not use a hairdryer to dry the filters.
ENVIRONMENTAL GUIDELINES

text_image
Prohibition sign depicting a trash bin crossed with a diagonal line, indicating no waste or discharge.This symbol on the product or on its packaging indicates that this product may not be treated as household waste. Instead it must be brought to the applicable collection point for recycling of electrical and electronic equipment. By ensuring this product is disposed of correctly, you will help prevent potential negative consequences for the environment and human health, which could otherwise be caused by inappropriate waste handling of this product. For more detailed information about recycling of this product, please contact your local city office, your household waste disposal service or the shop where you purchased the product.

natural_image
Recycling symbol icon with three chasing arrows forming a triangle (no text or labels)The packaging is recyclable. Please treat the packaging ecologically.
GARANTIA
natural_image
Front view of a black robotic vacuum cleaner with visible internal components and a numbered label '15' (no text or symbols on the device itself)natural_image
Close-up of a black handheld vacuum cleaner with attached screw and control buttons (no visible text or symbols)TUBO
natural_image
Close-up of a black SOMO vacuum cleaner head with labeled parts A and B (no text or symbols on the device itself)LIMPIEZAY MANTENIMIENTO
CAMBIAR LA BOLSA DE POLVO
natural_image
Three views of a black DCMO vacuum cleaner with internal components, shown from top, front, and side (no text or symbols visible)FILTROS
natural_image
Front view of a black vacuum cleaner with visible vent and door (no text or symbols)Filtro del motor
natural_image
Three views of a black DOWA vacuum cleaner showing internal components and assembly (no text or symbols visible)ATENCIÓN
text_image
Prohibition sign with a trash bin crossed out and a black rectangle below, indicating no waste or discharge.natural_image
Recycling symbol icon with three chasing arrows forming a triangle (no text or labels)natural_image
Back view of a black robotic vacuum cleaner with visible mesh chamber and labeled part '15' (no text or symbols on device body)PRIMA DELL'USO
natural_image
Close-up of a black handheld vacuum cleaner with nozzle and control buttons (no visible text or symbols)