KM34S3B - Microwave Oven SHARP - Free user manual and instructions
Find the device manual for free KM34S3B SHARP in PDF.

User questions about KM34S3B SHARP
0 question about this device. Answer the ones you know or ask your own.
Ask a new question about this device
Download the instructions for your Microwave Oven in PDF format for free! Find your manual KM34S3B - SHARP and take your electronic device back in hand. On this page are published all the documents necessary for the use of your device. KM34S3B by SHARP.
USER MANUAL KM34S3B SHARP
This operation manual contains important information which you should read carefully before using your microwave oven. Important: There may be a serious risk to health if this operation manual is not followed or if the oven is modified so that it operates with the door open.
F
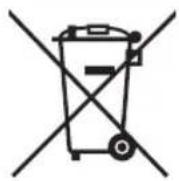
Attention: Your product is marked with this symbol. It means that used electrical and electronic products should not be mixed with general household waste. There is a separate collection system for these products.
A. Information on Disposal for Users (private households)
1. In the European Union
Attention: If you want to dispose of this equipment, please do not use the ordinary dust bin!
Used electrical and electronic equipment must be treated separately and in accordance with legislation that requires proper treatment, recovery and recycling of used electrical and electronic equipment.
Following the implementation by members states private households within the EU states may return their used electrical and electronic equipment to designated collection facilities free of charge*.
In some countries* your local retailer may also take back your old product free of charge if you purchase a similar new one.
*) Please contact your local authority for further details.
If your used electrical or electronic equipment has batteries or accumulators, please dispose of these separately beforehand according to local requirements.
By disposing of this product correctly you will help ensure that the waste undergoes the necessary treatment, recovery and recycling and thus prevent potential negative effects on the environment and human health which could otherwise arise due to inappropriate waste handling.
2. In other Countries outside the EU
If you wish to discard this product, please contact your local authorities and ask for the correct method of disposal.
For Switzerland: Used electrical or electronic equipment can be returned free of charge to the dealer, even if you don't purchase a new product. Further collection facilities are listed on the homepage of www.swico.ch or www.sens.ch.
B. Information on Disposal for Business Users
1. In the European Union
If the product is used for business purposes and you want to discard it: Please contact your dealer who will inform you about the take-back of the product. You might be charged for the costs arising from take-back and recycling. Small products (and small amounts) might be taken back by your local collection facilities. For Spain: Please contact the established collection system or your local authority for take-back of your used products.
2. In other Countries outside the EU
If you wish to discard of this product, please contact your local authorities and ask for the correct method of disposal.
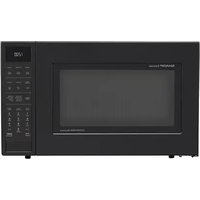
HOW YOUR OVEN WORKS

Microwaves are energy waves, similar to those used for TV and radio signals.
Electrical energy is converted into microwave energy, which is directed into the middle bottom of the cavity via a waveguide. Then the microwave stirrer distribute the microwave energy to every corner of the cavity evenly.
Microwaves cannot pass through metal, because of this the oven cavity is made of metal and there is a fine metal mesh on the door.
During cooking the microwaves bounce off the sides of the oven cavity at random.
flowchart
graph TD
    A["Central Device"] --> B["Control Panel"]
    A --> C["Path 1"]
    A --> D["Path 2"]
    A --> E["Path 3"]
    A --> F["Path 4"]
    A --> G["Path 5"]
    A --> H["Path 6"]
    A --> I["Path 7"]
    A --> J["Path 8"]
    A --> K["Path 9"]
    A --> L["Path 10"]
    A --> M["Path 11"]
    A --> N["Path 12"]
    A --> O["Path 13"]
    A --> P["Path 14"]
    A --> Q["Path 15"]
    A --> R["Path 16"]
    A --> S["Path 17"]
    A --> T["Path 18"]
    A --> U["Path 19"]
    A --> V["Path 20"]
    A --> W["Path 21"]
    A --> X["Path 22"]
    A --> Y["Path 23"]
    A --> Z["Path 24"]
    A --> AA["Path 25"]
    A --> AB["Path 26"]
    A --> AC["Path 27"]
    A --> AD["Path 28"]
    A --> AE["Path 29"]
    A --> AF["Path 30"]
    A --> AG["Path 31"]
    A --> AH["Path 32"]
    A --> AI["Path 33"]
    A --> AJ["Path 34"]
    A --> AK["Path 35"]
    A --> AL["Path 36"]
    A --> AM["Path 37"]
    A --> AN["Path 38"]
    A --> AO["Path 39"]
    A --> AP["Path 40"]
    A --> AQ["Path 41"]
    A --> AR["Path 42"]
    A --> AS["Path 43"]
    A --> AT["Path 44"]
    A --> AU["Path 45"]
    A --> AV["Path 46"]
    A --> AW["Path 47"]
    A --> AX["Path 48"]
    A --> AY["Path 49"]
    A --> AZ["Path 50"]
Microwaves will pass through certain materials, such as glass and plastic, to heat the food. (See, Suitable Ovenware' on page GB-33).
Water, sugar and fat in food absorb microwaves which cause them to vibrate. This creates heat by friction, in the same way your hands get warm when you rub them together.
The outer areas of the food are heated by the microwave energy, then the heat moves to the centre by conduction, as it does in conventional cooking. It is important to turn, rearrange or stir food to ensure even heating.
Once cooking is complete, the oven automatically stops producing microwaves.
Standing time is necessary after cooking, as it enables the heat to disperse equally throughout the food.
Z
GB-2

CONTENTS
IMPORTANT SAFETY INSTRUCTIONS. 4-14
SETTING UP YOUR OVEN 15
IMPORTANT INFORMATION ABOUT INSTALLING 12
INSTALLATION DIMENSIONS 16
INSTALLATION PROCEDURE....16
BEFORE FIRST USE 17
CARE AND CLEANING 35
SPECIFICATIONS 36
PRECAUTIONS TO AVOID POSSIBLE EXPOSURE TO EXCESSIVE MICROWAVE ENERGY
(a) Do not attempt to operate this oven with the door open since this can result in harmful exposure to microwave energy. It is important not to break or tamper with the safety interlocks.
(b) Do not place any object between the oven front face and the door or allow soil or cleaner residue to accumulate on sealing surfaces.
(c) WARNING: If the door or door seals are damaged, the oven must not be operated until it has been repaired by a competent person.

ADDENDUM
If the apparatus is not maintained in a good state of cleanliness, its surface could be degraded and affect the lifespan of the apparatus and lead to a dangerous situation.
IMPORTANT SAFETY INSTRUCTIONS

IMPORTANT SAFETY INSTRUCTIONS: READ CAREFULLY AND KEEP FOR FUTURE REFERENCE
To avoid the danger of fire.
The microwave oven should not be left unattended during operation. Power levels that are too high, or cooking times that are too long, may overheat foods resulting in a fire.
The electrical outlet must be readily accessible so that the unit can be unplugged easily in an emergency.
The AC power supply must be 230V, 50Hz with a 15A distribution line fuse, or a 15A distribution circuit breaker.
A separate circuit serving only this appliance should be provided.
Do not place the oven in areas where heat is generated.
For example, close to a conventional oven.
Do not install the oven in an area of high humidity or where moisture may collect.
Do not store or use the oven outdoors.
Z
IMPORTANT SAFETY INSTRUCTIONS
If smoke is emitted, switch off or unplug the oven and keep the door closed in order to stifle any flames.
Use only microwave-safe containers and utensils. See page GB-33. Utensils should be checked to ensure that they are suitable for use in microwave ovens.
When heating food in plastic or paper containers, monitor the oven due to the possibility of ignition.
Clean the waveguide cover, the oven cavity and tray after use. These must be dry and free from grease. Built-up grease may overheat and begin to smoke or catch fire.
Do not place flammable materials near the oven or ventilation openings.
Do not block the ventilation openings.
Remove all metallic seals, wire twists, etc., from food and food packages. Arcing on metallic surfaces may cause a fire.
Do not use the microwave oven to heat oil for deep frying. The temperature cannot be controlled and the oil may catch fire.
To make popcorn, use only special microwave popcorn makers.
IMPORTANT SAFETY INSTRUCTIONS

Do not store food or any other items inside the oven. Check the settings after you start the oven to ensure the oven is operating as desired.
To avoid overheating and fire, special care must be taken when cooking or reheating foods with a high sugar or fat content, for example, sausage rolls, pies or Christmas pudding.
See the corresponding hints in the operation manual.
To avoid the possibility of injury
WARNING:
Do not operate the oven if it is damaged or malfunctioning. Check the following before use:
a) The door; make sure the door closes properly and ensure it is not misaligned or warped.
b) The hinges and safety door latches; check to make sure they are not broken or loose.
c) The door seals and sealing surfaces; ensure that they have not been damaged.
d) Inside the oven cavity or on the door; make sure there are no dents.
e) The power supply cord and plug; ensure that they are not damaged.
If the door or door seals are damaged, the oven must not be operated until it has been repaired by a competent person.
Z
IMPORTANT SAFETY INSTRUCTIONS
Never adjust, repair or modify the oven yourself. It is hazardous for anyone other than a competent person to carry out any service or repair operation which involves the removal of a cover which gives protection against exposure to microwave energy.
Do not operate the oven with the door open or alter the door safety latches in any way. Do not operate the oven if there is an object between the door seals and sealing surfaces.
Do not allow grease or dirt to build up on the door seals and adjacent parts. Clean the oven at regular intervals and remove any food deposits. Follow the instructions for „Care and Cleaning” on page GB-35. Failure to maintain the oven in a clean condition could lead to a deterioration of the surface that could adversely affect the life of the appliance and possibly result in a hazardous situation.
Individuals with PACEMAKERS should check with their doctor or the manufacturer of the pacemaker for precautions regarding microwave ovens.
To avoid the possibility of electric shock
Under no circumstances should you remove the outer cabinet.
IMPORTANT SAFETY INSTRUCTIONS

Never spill or insert any objects into the door lock openings or ventilation openings. In the event of a spill, turn off and unplug the oven immediately, and call an authorised service agent.
Do not immerse the power supply cord or plug in water or any other liquid.
Do not let the power supply cord hang over the edge of a table or work surface.
Keep the power supply cord away from heated surfaces, including the rear of the oven. Keep the appliance and its cord out of reach of children less than 8 years.
Do not attempt to replace the oven lamp yourself or allow anyone who is not an electrician authorised to do so. If the oven lamp fails, please consult your dealer or an authorised service agent. If the power supply cord of this appliance is damaged, it must be replaced with a special cord. The exchange must be made by an authorised service agent.
To avoid the possibility of explosion and sudden boiling:
WARNING: Liquids and other foods must not be heated in sealed containers since they are liable to explode.
Microwave heating of beverages can result in delayed eruptive boiling, therefore care must be taken when handling the container.
Z
IMPORTANT SAFETY INSTRUCTIONS
Never use sealed containers. Remove seals and lids before use. Sealed containers can explode due to a build up of pressure even after the oven has been turned off.
Take care when microwaving liquids. Use a wide mouthed container to allow bubbles to escape.
Never heat liquids in narrow necked containers such as baby bottles, as this may result in the contents erupting from the container when heated and cause burns.
To prevent sudden eruption of boiling liquid and possible scalding:
- Do not use excessive amount of time.
- Stir liquid prior to heating/reheating.
- It is advisable to insert a glass rod or similar utensil (not metal) into the liquid whilst reheating.
- Let liquid stand for at least 20 seconds in the oven at the end of cooking time to prevent delayed eruptive boiling.
Do not cook eggs in their shells, and whole hard boiled eggs should not be heated in microwave ovens since they may explode even after microwave cooking has ended. To cook or reheat eggs which have not been scrambled or mixed, pierce the yolks and the whites, or the eggs may explode. Shell and slice hard boiled eggs before reheating them in the microwave oven.
IMPORTANT SAFETY INSTRUCTIONS

Pierce the skin of such foods as potatoes, sausages and fruit before cooking, or they may explode.
To avoid the possibility of burns
WARNING: The contents of feeding bottles and baby food jars must be stirred or shaken and the temperature checked before consumption, in order to avoid burns.
Use pot holders or oven gloves when removing food from the oven to prevent burns.
Always open containers, popcorn makers, oven cooking bags, etc., away from the face and hands to avoid steam burns and eruption of boiling. To avoid burns, always test food temperature and stir before serving and pay special attention to the temperature of food and drink given to babies, children or the elderly. Accessible parts may become hot during use. Young children should be kept away. Temperature of the container is not a true indication of the temperature of the food or drink; always check the food temperature.
Always stand back from the oven door when opening it to avoid burns from escaping steam and heat. Slice stuffed baked foods after heating to release steam and avoid burns.
Keep children away from the door to prevent them burning themselves.
Z
GB-10

IMPORTANT SAFETY INSTRUCTIONS
To avoid misuse by children
WARNING: Only allow children aged from 8 years and above to use the oven without supervision when adequate instructions have been given so that the child is able to use the oven in a safe way and understands the hazards of improper use. This appliance is not intended for use by persons (including children) with reduced physical, sensory or mental capabilities, or lack of experience and knowledge, unless they have been given supervision or instruction concerning use of the appliance by a person responsible for their safety. Children should be supervised to ensure that they do not play with the appliance.
Do not lean or swing on the oven door.
Do not play with the oven or use it as a toy. Children should be taught all important safety instructions: use of pot holders, careful removal of food coverings; paying special attention to packaging (e.g. self-heating materials) designed to make food crisp, as they may be extra hot.
Other warnings
Never modify the oven in any way. Do not move the oven while it is in operation. This appliance is intended to be used for domestic usage only. This oven is for home food preparation only and may only be used for cooking food. It is not suitable for commercial or laboratory use.
IMPORTANT SAFETY INSTRUCTIONS

To promote trouble-free use of your oven and avoid damage.
Never operate the oven when it is empty. When using a browning dish or self-heating material, always place a heat-resistant insulator such as a porcelain plate under it to prevent damage to glass and ceramic dishes due to heat stress. The preheating time specified in the dishes instructions must not be exceeded.
Do not use metal utensils, which reflect microwaves and may cause electrical arcing. Do not put cans in the oven. Use only the trays designed for this oven. Do not operate the oven without the tray. To prevent the tray from breaking:
(a) Before cleaning the glass tray with water, leave the tray to cool.
(b) Do not put hot foods or hot utensils on a cold tray.
(c) Do not put cold foods or cold utensils on a hot tray.
NOTE:
If you are unsure how to connect your oven, please consult an authorised, qualified electrician. Neither the manufacturer nor the dealer can accept any liability for damage to the oven or personal injury resulting from failure to observe the correct electrical connection procedure. Water vapour or drops may occasionally form on the oven walls or around the door seals and sealing surfaces. This is a normal occurrence and is not an indication of
Z

IMPORTANT SAFETY INSTRUCTIONS
microwave leakage or a malfunction.
DANGER! Electric Shock Hazard
Touching some of the internal components can cause serious personal injury or death. Do not disassemble this appliance.
WARNING
Improper use of the grounding can result in electric shock. Do not plug into an outlet until appliance is properly installed and grounded. This appliance must be grounded. In the event of an electrical short circuit, grounding reduces the risk of electric shock by providing an escape wire for the electric current. This appliance is equipped with a cord having a grounding wire with a grounding plug. The plug must be plugged into an outlet that is properly installed and grounded. Consult a qualified electrician or serviceman if the grounding instructions are not completely understood or if doubt exists as to whether the appliance is properly grounded. If it is necessary to use an extension cord, use only a 3-wire extension cord.
IMPORTANT SAFETY INSTRUCTIONS

- A short power-supply cord is provided to reduce the risks resulting from becoming entangled in or tripping over a longer cord.
- If a long cord set or extension cord is used:
1) The marked electrical rating of the cord set or extension cord should be at least as great as the electrical rating of the appliance.
2 The extension cord must be a grounding type 3-wire cord.
3) The long cord should be arranged so that it will not drape over the counter top or tabletop where it can be pulled on by children or tripped over unintentionally.
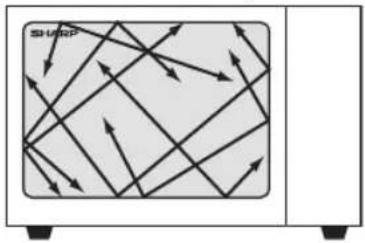
SETTING UP YOUR OVEN
Names of Oven Parts and Accessories
text_image
1 2 3 4 5 6- Control panel
- Grill element
- Light
- Cavity
- Door glass
- Hinge
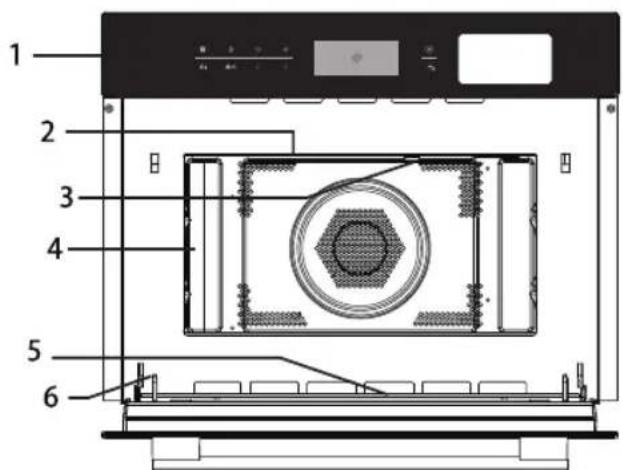
natural_image
Technical line drawings of two rectangular metal grates, one with ribbed top and the other with a small inset showing internal structure (no text or symbols)- Grill Rack
- Glass Ram
Important information
• This appliance is NOT intended for commercial use.
- Please observe the installation instructions provided and note that this appliance should only be installed by a qualified technician.
• The appliance is fitted with a plug and must only be connected to a properly installed earthed socket.
- In case a new socket is needed, installation and cable connection must only be done by a qualified electrician. If the plug is no longer accessible following installation, a pole disconnecting device must be present on the installation site with a contact gap of at least 3 mm.
- Adapters, multiway strips and extension cords must not be used. Overloading can result in fire.
- If the appliance is not fitted with a supply cord and a plug, the connection equipment must have a contact separation in all poles that provide full disconnection, and the appliance must be incorporated in the fixed wiring in accordance with the wiring rules.
The accessible surface may be hot during operation.
• This appliance is only intended to be fully fitted in a kitchen.
• This appliance is not designed to be used as a tabletop appliance or inside a cupboard.
• The fitted cabinet must not have a back wall behind the appliance.
- A gap of at least 45 mm must be maintained between the wall and the base or back panel of the unit above.
- The fitted cabinet must have a ventilation opening of 250~cm^2 on the front. To achieve this, cut back the base panel or fit a ventilation grille.
- Ventilation slots and intakes must not be covered.
- The safe operation of this appliance can only be guaranteed if it has been installed in accordance with these installation instructions.
- The fitter is liable for any damage resulting from incorrect installation.
- The units into which the appliance is fitted must be heat-resistant up to 90 °C.
INSTALLATION DIMENSIONS

Ventilation openings
behing, min. 250 cm²

text_image
min 550 600 560+8 min 45 450+2 min 45 Back panel open Ventilation area in the base, min. 250 cm² Ventilation grid Cupboard feet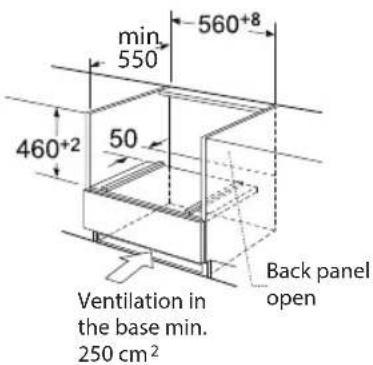
text_image
min 550 560+8 460+2 50 Back panel open Ventilation in the base min. 250 cm²Note: There should be gap above the oven.
INSTALLATION PROCEDURE

- Do not hold or carry the appliance by the door handle. The door handle cannot hold the weight of the appliance and may break off.
- Carefully push the oven into the box, making sure that it is in the centre.
- Open the door and fasten the oven with the screws that were supplied.
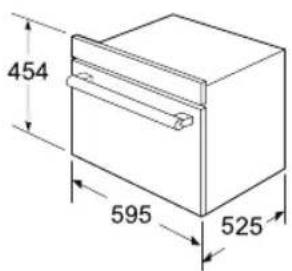
text_image
454 595 525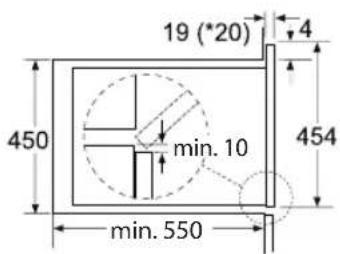
text_image
19 (*20) 4 450 min. 10 min. 550 454* 20mm for metal fascias

natural_image
Diagram of an oven with a lid and tray, showing internal components (no text or symbols)• Fully insert the appliance and centre it.
- Do not kink the connecting cable. Screw the appliance into place.
- The gap between the worktop and the appliance must not be closed by additional battens.
Important notes on electrical connection
The appliance is fitted with a plug and must only be connected to a properly installed earthed socket.
Only a qualified electrician who takes the appropriate regulations into account may install the socket or replace the connecting cable. If the plug is no longer accessible following installation, an all-pole isolating switch must be present on the installation side with a contact gap of at least 3 mm. Contact protection must be ensured by the installation.
Fuse protection: see instructions for use-technical data.
DRE FIRST USE
Initial cleaning and heating
Removing the microwave oven all of the protection foil on the front.
For more information see the "CLEANING". Before the first use of the appliance,
■ Remove all accessories and wash out of the microwave.
■ Electric heating empty containers. New appliances typically smell when first used. Before using the electrical appliance to cook food faster to heat it helps to banish odors.
- Before heating, it is best to wipe the microwave oven interior with a damp cloth. In this way, storage and untwisting appliances accumulated in the packaging process in furnace dust or residual packing material can be removed.
- Touch" ▶" keys. Appliance turn on, the main menu appears in the display.
- Touch" to choose the convection function.
Recommended temperature will be highlighted, along with microwave started directly.
- Raise the temperature to maximum temperature. This can be achieved by using adjustment keys to achieve.
- Touch" ▶ " symbol next to the sensor keys. Heat the empty oven for at least an hour. When you do this, make sure that the room well ventilated. Close the door to the other room to avoid odor pervaded the House.
- Let the appliance cool down to room temperature. Then solution of neutral detergent mixed with hot water to clean inside the microwave oven, then wipe dry with a clean soft cloth.
Keep the door open until completely dry in the oven.
RATION INSTRUCTION
Control Panel

text_image
User interface toolbar with navigation buttons and a blank preview areaThis microwave oven uses modern electronic control to adjust cooking parameters to meet your needs better for cooking.
1. Clock setting up
When the microwave oven is electrified, "00:00" will blink, buzzer will ring once.
1) Press " < " or " >" to set the right time(between 00:00 and 23:59.)
2) After you have set the right time, press "L". The clock has been set.
Note: 1) If you want to change the time, you have to press and hold the "L" button for 3 seconds. The actual time disappears and then the time will blink in the display. Press "<" or "> " to set the new time and press the " " button to confirm the setting.
2) When you set the clock, long press " < " or " >" when adjusting 10MIN, short press time (each time you adjust 1MIN).
NOTE: When press "≡", you could choose Microwave, Grill, Convection, Grill + Fan, MW + Convection, MW+Grill function, Microwave + Grill + Fan.
2. Microwave Cooking
1) Press the "?" button to activate the microwave function. "01:00" displays and the microwave icon appears.
2) Press "⋮" or "< " or " } to select cooking mode.
3) Press "↔", then press "<" or "">" to adjust the microwave power (900W, 700W, 450W, 300W, 100W). The default power is 900W.
4) Press "▶" then press "< " or " >" to set the cooking time. The max. cooking time depends on the power that has been set. When the power is 900W, the MAX. time is 30 minutes and other powers are 90 minutes.
5) Press "▶" button to start cooking.
Microwave Power Chart
| Microwave Power 1 | 100% 80% 80% 80% 20% | |||
| Display 900W | 700W 450W 300W 100W |
You can see from the table below from which power levels you can choose and for which foods the power levels are suitable.
| Power level Food | |
| 900 W - Boiling water, reheating- Cooking chicken, fish, vegetables | |
| 700 W -Reheating | - Cooking mushrooms, shell fish- Cooking dishes containing eggs and cheese |
| 450 W - Cooking rice, soup | |
| 300 W -Defrosting | - Melting chocolate and butter |
| 100 W - Defrosting sensitive/delicate foods- Defrosting irregularly-shaped foods- Softening ice cream- Allowing dough to rise - Defrosting sensitive/delicate foods- Defrosting irregularly-shaped foods- Softening ice cream- Allowing dough to rise | |
Z
RATION INSTRUCTION
3. Grill Cooking
1) Press the "?" button to activate the microwave function. "01:00" displays and the microwave icon appears.
2) Press "≈" or "< " or " >" to select cooking mode.
3) Press "↔" to choose the grill level.
4) Press "< " or " } to select the level 3 (the MAX.), level 2 or level 1 (the MIN.).
5) Press "L" button to start cooking.
Press "or" to select the level 3 (the MAX.), level 2 or level 1 (the MIN.).
6) Press "▶" button to start cooking.
4. Grill Cooking
1) Press the "?" button to activate the microwave function. "01:00" displays and the microwave icon appears.
2) Press "≈" or "< " or " >" to select convection mode.
The default temperature is 180 degrees.
3) Press "↔" to enter to the temperature mode.
4) Press "or" to select temperature. The temperature is from 50 to 230 degrees. (50, 100, 105, 110, 115, 120, 125, 130, 135, 140, 145, 150, 155, 160, 165, 170, 175, 180, 185, 190, 195, 200, 205, 210, 215, 220, 225, 230)
5) Press "L" to select the time setting mode. The default time is 10 minutes. Press "<" or "> " to select the cooking time. The MAX. time is 5 hours.
6) Press "▶" button to start cooking.
5. Grill Fan Cooking
1) Press the "?" button to activate the microwave function. "01:00" displays and the microwave icon appears.
2) Press "≈" or "< " or " >" to select grill fan mode. The default temperature is 180 degrees.
3) Press "↔" to enter to the temperature selection.
4) Press "or" to enter to the temperature selection. from 35 to 180 degrees. (35, 100, 105, 110, 115, 120, 125, 130, 135, 140, 145, 150, 155, 160, 165, 170, 175, 180)
5) Press "L" to select the time setting mode. The default time is 10 minutes.
Press "<" or "> " to select the cooking time. The MAX. time is 5 hours.
6) Press "▶" button to start cooking.
6. Microwave + Grill Cooking
1) Press the "?" button to activate the microwave function. "01:00" displays and the microwave icon appears.
2) Press "≈" or "< " or " } to select the " MW+GRILL" combination mode.
3) Press "↔" to enter to the grill level selection.
4) Press "or" to select the level 3 (the MAX.), level 2 or level 1 (the MIN.).
5) Press "↔" to enter to the microwave power level selection.
6) Press "or" to select the microwave power(700W, 450W, 300W, 100W). The default power is 300W.
7) Press "L" to select the time setting mode. The default time is 10 minutes.
8) Press "or" to select the cooking time. The MAX. time is 90 minutes.
9) Press "▶" button to start cooking.
7. Combination Cooking
1) Press the "?" button to activate the microwave function. "01:00" displays and the microwave icon appears.
2) Press "≈" or "< " or ") " to select the "MW+ CONV". combination mode.
3) Press " " to enter to the temperature selection.
The default temperature is 180 degrees.
4) Press "or" to select the temperature between 50 to 230 degrees. (50, 100, 105, 110, 115, 120, 125, 130, 135, 140, 145, 150, 155, 160, 165, 170, 175, 180, 185, 190, 195, 200, 205, 210, 215, 220, 225, 230)
5) Press "↔" to enter to the microwave power level selection.
6) Press "or" to select the microwave power (700W, 450W, 300W, 100W). The default power is 300W.
7) Press "L" to select the time setting mode. The default time is 10 minutes.
8) Press "or" to select the cooking time. The MAX. time is 90 minutes.
9) Press "▶" button to start cooking.

RATION INSTRUCTION
8. Microwave + Grill Fan Cooking
1) Press the "?" button to activate the microwave function. "01:00" displays and the microwave icon appears.
2) Press "≈" or "< " or " >" to select the "MW+GRILL+FAN" combination mode.
3) Press "↔" to enter to the temperature selection. The default temperature is 180 degrees.
4) Press "< " or " } to select the temperature. The temperature is from 100 to 180 degrees. (100, 105, 110, 115, 120, 125, 130, 135, 140, 145, 150, 155, 160, 165, 170, 175, 180)
5) Press " " to enter to the microwave power level selection.
6) Press "or" to select the microwave power (700W, 450W, 300W, 100W). The default power is 300W.
7) Press "L" to select the time setting mode. The default time is 10 minutes.
8) Press "or" to select the cooking time. The MAX. time is 90 minutes.
9) Press "▶" button to start cooking.
9. Auto Cooking Programs
1) In standby mode, press "③/A" button once, the display "*lights, go into defrost menu mode; press the key more than once, you can switch between the different cooking types such as d01, P01, S01, at this point you can press the "<" or "> " to choose defrost, non steam menu steam menu switches between three types of cooking. When the display "A" lights, enter menu mode automatically, the default symbol weight, cooking time and cooking weight light; the display shows P01 or S01.
2) Press the "↔" and flashing display shows P01 or S01, at this point, you can press "<" or ">", select the menu type (P01-P40 or S01-S40).
Note:
1) For non-steam menu (P01-P20), press "↔" to confirm menu selection and enter the weight of menu selection state automatically, at this point, you can press "<" or ">", choose the automatic menu weight cooking time display.
2) For the steam menu, at this time, if you need to adjust the default cooking time, you can press "L", and makes the default cooking time of flashing, at this point, press "<" or "> "to adjust the Cook time menu.
3) Press "▶" button to start cooking.
1) After steam auto menu, the water pump will withdraw the water back to water tank, there will be some noise sound.
2) After steam auto menu, you need to clean the water on cavity and door panel.
3) If the menu need preheating, don't put the food in the oven during preheating. Only when the temperature is reached, can you put in the food to start cooking.
10. Defrost
1) In standby mode, press "@/A" button once, select defrost mode, the display "* lights, into auto defrost mode; display displays d01, initial weight, cooking time and cooking signs light up;
2) Press the "↔" to confirm the selected defrost mode and enter the defrost weight selection state, press "<" or ">", to select automatic defrost weight cooking time display;
3) Press "▶" button to start cooking.
11. Preheating the oven
The preheating function can be activated after you have set the functions: Convection, Grill fan, MW-convection, MW-Grill fan.
1) Press ""/A" button. When the preheat icon appears in the display.
2) Press "↔" button to start preheating. When the right temperature is reached, you will hear three beeps. You can stop the preheating by opening the oven door or by pressing the "☐" button.
Note: The preheating function only works if you have already chosen one of the modes above. During preheating, the microwave function is switched off. During preheating, don't put the food in the oven. Only when the temperature is reached, can you put in the food to start cooking.
12. Steam Cooking
1) In standby mode, press "###" button, enter the steam mode, time lights up by default 10:00. The icon is displayed, signs light up, there is no Parallax display "10:00", "Min" and "°C" symbol lit, tank icon on the right show the current water level (Water, lack of water). The default temperature 100 lights up.
2) Press the "↔" key to switch to the temperature selected, the temperature flashes, at this point, press "or" to select a temperature (50, 60, 70, 80, 90, 100).
3) Press "L" to select the time setting mode. The default time is 10 minutes.
4) Press the "or" to select the cooking time. The MAX. time is 90 minutes.
5) Press "▶" button to start cooking.
RATION INSTRUCTION
13. Convection + Steam Cooking
1) In standby mode, press "{{{}}" enter the steam mode, time lights up by default 10:00.
Press "{{{}}" or "<" or ">" to select the Conv. +Steam mode. The icon is displayed, the default temperature is 180 degrees.
2) Press "↔" to enter to the temperature selection.
3) Press " < " or " >" to select temperature. (180, 190, 200, 210, 220 degree)
4) Press "↔" button, adjust the steam(10,20,30), and steam the display flashes, then press "<" or ">" to set steam (default 30 percent), if the steam is not in Flash, you can press the "↔" key to make it Flash and then press "<" and ">" to set the steam.
5) Press " (L)" to select the time setting mode. The default time is 10 minutes.
6) Press "or" to select the cooking time. The MAX. time is 90 minutes.
7) Press "▶" button to start cooking.
14. Microwave+Steam Cooking
1) In standby mode, press "###" button, enter the steam mode, time lights up by default 10:00. Press "###" or "<" or "> " to select MW+Steam mode. The icon is displayed, then displays 300W.
2) Press "↔" to enter to the microwave power level selection.
3) Press "or" to select the microwave power (900W, 700W, 450W, 300W, 100W). The default power is 300W.
4) Press "↔" button, adjust the steam, and steam the display flashes, then press "<" or "> " to set steam (default 30 percent), if the steam is not in Flash, you can press the "↔" key to make it flash, and then press "<" or "> " to set the steam.
5) Press " (L)" to select the time setting mode. The default time is 10 minutes.
6) Press "or" to select the cooking time. The MAX. time depends on the power that has been set. When the power is 900W, the MAX. time is 30 minutes and other powers are 90 minutes.
7) Press "▶" button to start cooking.
The ratio of the steam under different microwave power:
| Microwave Power Steam Ratio | |
| 100W 10%, 20%, 30% | |
| 300W 10%, 20%, 30%, | 40%, 50%, 60% |
| 450W 10%, 20%, 30%, | 40%, 50%, 60%, 70% |
| 700W 10%, 20%, 30%, | 40%, 50%, 60%, 70% |
| 900W 10%, 20%, 30%, | 40%, 50%, 60%, 70%, 80%, 90%, 100% |
15. Child Safety Lock
Lock: In standby mode, press "☐" for 3 seconds, there will be a long "beep" denoting entering into the children-lock state and "☐" indicator will light. Unlock: In locked mode, press "☐" for 3 seconds, there will be a long "beep" denoting that the lock is released, and "☐" indicator will disappear.
16. Display Specification
(1) When setting, if no other operation, it will confirm automatically after 10 seconds. Except clock setting for the first time.
(2) During setting program, after adjusted for 3 seconds, it will confirm automatically. Except auto menu, it will confirm after adjusted for 10 seconds.
(3) When the oven is in setting state or pause state, including auto menu and defrost program, if no operation in 5 minutes, it will enter into the off state.
(4) The oven lamp will light all the time if the door is open.
(5) The oven lamp will light all the time if the oven is paused.
(6)" ▶" button must be pressed to continue cooking if the oven door is open during cooking process.
(7)The" : " button can be press in any state to open the water tank.
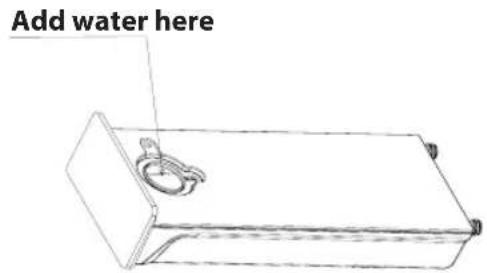
text_image
Add water hereSteam note:
1. Before steam cooking:
Before starting the steam cooking mode, if the tank is short of water, press ▶ button, abnormal buzzer will ring and the screen icon will show water scarcity status of water level to remind you to add water.
Note: Before starting the steam cooking mode, please clean the water tank.
2. During steam cooking:
During steam cooking mode, if the tank is short of water, abnormal buzzer will ring and the screen icon will show water scarcity status of water level to remind you to add water. After adding water, it can work normally.
RATION INSTRUCTION
3. After steam cooking:
1-After steam function is finished, the water in boiler will be withdraw to water tank. This process lasts for about 1 minute.
2-During the process to withdraw the water back to water tank, if the water tank is full, the system will be beeping 10 times to remind you clean up the tank. After the water tank is empty, the system will continue to withdraw water.
Note: After steam cooking, please remove the water from water tank.
Defect codes
Below defect codes may occur during steam functions :
E-06: 1-Water tank is not close well.
E-05: water system abnormal, need to contact for Engineer to check, below is the possibilities.
1-The water sensor is abnormal.
2-The water pipe is abnormal.
3-The water pump is abnormal.
4-The water tank is abnormal.
17. Auto Scale Removal Function
For best cleaning results, we recommend that you use detergent sodium citrate, which were randomly for descaling steam microwave oven. Follow the manufacturer's instructions on the packaging. It is suggested that descaling function should be used after the steam function has been run for 20 hours.
1) Power up the system, remove the water tank, inject 1000ml of fresh water into the water tank, adding a pack of descaling agent.
2) Push the water tank into the appropriate location of the appliance.
3) In standby mode, press "m/A" button once, the display " * lights, screen displays default mode d01, default weight 0.10, corresponding cooking time and " Kg " "Min" light up.
4)Press" ☑/A " repeatedly, when " CLE " indicator lighten t means to enter Scale R removal function. "Min" and default time " 20:00 " lighten, tank icon show the current water level (Water, lack of water, full of water), other icons disappear.
5) Press "▶" to start the program.
6) Stay whole 1 minute after the program has finished, take out the water tank and pour the water in the tank. Thoroughly clean the water tank.
7) Replace the fresh water, repeat steps 3 to 6. Note: the descaling process shall not be shut down. If the descaling process shut down before the end, the entire program must be started from step 3.
| Crab | S10 | 2 | Steam100°C +300W |
| 3 | |||
| 4 | |||
| 5 | |||
| 6 | |||
| Chicken leg | S11 | 200 | Steam100°C +300W |
| 300 | |||
| 400 | |||
| 500 | |||
| 600 | |||
| Chicken breast | S12 | 200 | Steam100°C +300W |
| 300 | |||
| 400 | |||
| 500 | |||
| 600 | |||
| 700 | |||
| 800 | |||
| Meatball | S13 | 200 | Steam100°C +300W |
| 300 | |||
| 400 | |||
| 500 | |||
| 600 | |||
| Turkey escalope | S14 | 400 | Steam100°C +300W |
| 500 | |||
| 600 | |||
| 700 | |||
| 800 | |||
| Pork filet, whole | S15 | 200 | Steam100°C +300W |
| 300 | |||
| 400 | |||
| 500 | |||
| 600 | |||
| Sausages | S16 | 200 | Steam100°C +100W |
| 300 | |||
| 400 | |||
| 500 | |||
| 600 | |||
| Runny eggs | S17 | 1 | Steam100°C |
| 3 | |||
| Eggs, hard | S18 | 1 | Steam100°C |
| 3 | |||
| Eggs, soft | S19 | 1 | Steam100°C |
| 3 | |||
| Brown rice + water | S20 | 200g+400mL | Steam100°C + 450W/Steam100°C + 300W |
| 400g+800mL | |||
| Rice + water | S21 | 200g+300mL | Steam100°C + 450W/Steam100°C + 300W |
| 400g+600mL |
| Eggplant/Aubergine | S22 | 200 | Steam100°C +300W |
| 300 | |||
| 400 | |||
| 500 | |||
| 600 | |||
| Beans | S23 | 200 | Steam100°C +300W |
| 300 | |||
| 400 | |||
| 500 | |||
| 600 | |||
| Broccoli | S24 | 200 | Steam100°C |
| 300 | |||
| 400 | |||
| 500 | |||
| 600 | |||
| Cauliflower | S25 | 200 | Steam100°C +300W |
| 300 | |||
| 400 | |||
| 500 | |||
| 600 | |||
| Peas | S26 | 200 | Steam100°C +300W |
| 300 | |||
| 400 | |||
| 500 | |||
| 600 | |||
| Potatoes with skin (whole, small) | S27 | 1 | Steam100°C +300W |
| 2 | |||
| 3 | |||
| 4 | |||
| Potatoes with skin (whole, big) | S28 | 1 | Steam100°C +300W |
| 2 | |||
| 3 | |||
| 4 | |||
| Potatoes without skin (pieces) | S29 | 200 | Steam100°C +300W |
| 300 | |||
| 400 | |||
| 500 | |||
| 600 | |||
| Carrots | S30 | 200 | Steam100°C +300W |
| 300 | |||
| 400 | |||
| 500 | |||
| 600 | |||
| Corn cobs | S31 | 2 | Steam100°C +300W |
| 3 | |||
| 4 | |||
| 5 | |||
| 6 |
Z
GB-28

RATION INSTRUCTION
| Bell peppers | S32 | 200 | Steam100°C |
| 300 | |||
| 400 | |||
| 500 | |||
| 600 | |||
| Hot peppers | S33 | 200 | Steam100°C |
| 300 | |||
| 400 | |||
| 500 | |||
| 600 | |||
| Mushrooms | S34 | 200 | Steam100°C +300W |
| 300 | |||
| 400 | |||
| 500 | |||
| 600 | |||
| Leeks | S35 | 200 | Steam100°C +300W |
| 300 | |||
| 400 | |||
| 500 | |||
| 600 | |||
| Brussels sprouts | S36 | 200 | Steam100°C |
| 300 | |||
| 400 | |||
| 500 | |||
| 600 | |||
| Celery | S37 | 200 | Steam100°C +300W |
| 300 | |||
| 400 | |||
| 500 | |||
| 600 | |||
| 700 | |||
| 800 | |||
| Asparagus | S38 | 200 | Steam100°C +100W |
| 300 | |||
| 400 | |||
| 500 | |||
| 600 | |||
| Spinach | S39 | 200 | Steam100°C +300W |
| 300 | |||
| 400 | |||
| 500 | |||
| 600 | |||
| Courgette | S40 | 200 | Steam100°C +300W |
| 300 | |||
| 400 | |||
| 500 | |||
| 600 |
| Normal Conditions | |
| Microwave oven interfering TV reception | Radio and TV reception may be interfered when microwave oven operating. It is similar to the interference of small electrical appliances, like mixer, vacuum cleaner, and electric fan. It is normal. |
| Dim oven light | In low power microwave cooking, oven light may become dim. It is normal. |
| Steam accumulating on door, hot air out of vents | In cooking, steam may come out of food. Most will get out from vents. But some may accumulate on cool place like oven door. It is normal. |
| Oven started accidentally with no food in. | It is forbidden to run the unit without any food inside. It is very dangerous. |
| Trouble Possible | Cause Remedy | |
| Oven can not be started. | (1) Power cord not plugged in tightly. | Unplug. Then plug again after 10 seconds. |
| (2) Fuse blowing or circuit breaker works. | Replace fuse or reset circuit breaker (repaired by professional personnel of our company) | |
| (3) Trouble with outlet. | Test outlet with other electrical appliances. | |
| Oven does not heat. (4) | Door not closed well. Close door | well. |
SUITABLE OVENWARE
See the instructions in the table on the next page. There may be certain non-metallic utensils that are not safe to use for microwaving. If in doubt, you can test the utensil in question following the procedure below.
Utensil Test:
- Fill a microwave-safe container with 1 cup of cold water (250ml) along with the utensil in question.
- Cook on maximum power for 1 minute.
- Carefully feel the utensil. If the empty utensil is warm, do not use it for microwave cooking.
- Do not exceed 1 minute cooking time.
SUITABLE OVENWARE
To cook/defrost food using a microwaves feature, the microwave energy must be able to pass through the container to penetrate the food. Therefore it is important to choose suitable cookware.
Round/oval dishes are preferable to square/oblong ones, as the food in the corners tends to overcook. A variety of cookware can be used as listed below.
| Cookware Microwave | Safe | Grill Convection Mix | Cook Comments | |||
| Aluminium foilFoil containers | ✓ / ✗ | ✓ | ✓ | ✓ / ✗ | Small pieces of aluminium foil can be used to shield food from overheating. Keep foil at least 2cm from the oven walls, as arcing may occur. Foil containers are not recommended unless specified by the manufacturer, e.g. Microfoil®, follow instructions carefully. | |
| Browning dishes | ✓ ✗ | ✗ ✗ | ✗ ✗ | Always follow the manufacturers instructions. Do not exceed heating times given. Be very careful as these dishes become very hot. | ||
| China and ceramics | ✓ / ✗ | ✗ ✓ | ✓ | Mix with Conv. only | Porcelain, pottery, glazed earthenware and bone china are usually suitable, except for those with metallic decoration. | |
| Glassware e.g.Pyrex® | ✓ ✓ | ✓ ✓ | ✓ ✓ | Care should be taken if using fine glassware as it can break or crack if heated suddenly. | ||
| Metal | ✗ ✓ | ✓ ✓ | ✗ ✗ | It is not recommended to use metal cookware as it will arc, which can lead to fire. | ||
| Plastic/Poly-styrene e.g fast food containers | ✓ ✗ | ✓ ✓ | ✓ / ✗ | Care must be taken as some containers warp, melt or discolour at high temperatures. | ||
| Cling film | ✓ ✗ | ✗ ✗ | ✗ ✗ | It should not touch the food and must be pierced to let the steam escape. | ||
| Freezer/Roasting bags | ✓ | ✗ | ✓ / ✗ | ✗ | Must be pierced to let steam escape. Ensure bags are suitable for microwave use. Do not use plastic or metal ties, as they may melt or catch fire due to the metal 'arcing'. | |
| Paper - plates,cups and kitchen paper | ✓ ✗ | ✗ ✗ | ✗ ✗ | Only use for warming or to absorb moisture. Care must be taken as overheating may cause fire. | ||
| Straw and wood-en containers | ✓ ✗ | ✗ ✗ | ✗ ✗ | Always supervise the oven when using these materials as overheating may cause fire. | ||
| Recycled paperand newspaper | ✗ ✗ | ✗ ✗ | ✗ ✗ | May contain extracts of metal which will cause 'arcing' and may lead to fire. | ||
| Rack | ✓ ✓ | ✓ ✓ | ✓ ✓ | The metal racks supplied have been specially designed for all cooking modes and will not damage the oven. | ||

WARNING: When heating food in plastic or paper containers, monitor the oven due to the possibility of ignition.
CARE AND CLEANING
CAUTION: DO NOT USE COMMERCIAL OVEN CLEANERS, STEAM CLEANERS, ABRASIVE, HARSH CLEANERS, ANY THAT CONTAIN SODIUM HYDROXIDE OR SCOURING PADS ON ANY PART OF YOUR MICROWAVE OVEN. CLEAN THE OVEN AT REGULAR INTERVALS AND REMOVE ANY FOOD DEPOSITS - Keep the oven clean, or the oven could lead to a deterioration of the surface. This could adversely affect the life of the appliance and possibly result in a hazardous situation.
Oven exterior
The outside of your oven can be cleaned easily with mild soap and water. Make sure the soap is wiped off with a moist cloth, and dry the exterior with a soft towel.
Control panel
Open the door before cleaning to de-activate the control panel.
Care should be taken in cleaning the control panel. Use a cloth damp with water only, gently wipe the panel until it becomes clean. Avoid using excessive amounts of water. Do not use any sort of chemical or abrasive cleaner.
Oven Interior
-
For cleaning, wipe any splatters or spills with a soft damp cloth or sponge after each use while the oven is still warm. For heavier spills, use a mild soap and wipe several times with a damp cloth until all residues are removed. Do not remove the waveguide cover.
-
Make sure that mild soap or water does not penetrate the small vents in the walls which may cause damage to the oven.
- Do not use spray cleaners on the oven interior.
Keep the waveguide cover clean at all time. The waveguide cover is constructed from a fragile material and should be cleaned with care (follow the cleaning instructions above).
NOTE: Excessive soaking may cause disintegration of the waveguide cover. The waveguide cover is a consumable part and without regular cleaning, will need to be replaced.
Glass tray
Remove the glass tray from the oven. Wash the glass tray in mild soapy water. Dry with a soft cloth. The glass tray is dishwasher safe.
Door
To remove all traces of dirt, regularly clean both sides of the door, the door seals and adjacent parts with a soft, damp cloth. Do not use harsh abrasive cleaners or sharp metal scrapers to clean the glass oven door since they can scratch the surface, which may result in shattering of the glass.
NOTE: A steam cleaner should not be used.
Cleaning tip - For easier cleaning of your oven:
Place half a lemon in a bowl, add 300ml (1/2 pint) water and heat on 100% for 10 -12 minutes.
Wipe the oven clean using a soft, dry cloth.
SPECIFICATIONS

| Model name: KM-345S3B | |
| AC Line Voltage : 230V~, 50Hz single phaseDistribution line fuse/circuit breaker : 15AAC Power required: Maximum : 3300WOutput power: Microwave : 900WTop Grill (Infrared) : 1200WConvection : 1700WSteam : 1500WOff Mode (Energy Save Mode) : less than 1.0WMicrowave Frequency : 2450MHz*Outside Dimensions (W) x (H) x (D)** mm : 594 x 454,5 x 550Cavity Dimensions (W) x (H) x (D)*** mm : 407 x 234 x 385Oven Capacity : 34 litres***Net weight : approx. 32kgOven lamp : 25W/230V~ |
* This product fulfils the requirement of the European standard EN55011.
In conformity with this standard, this product is classified as group 2 class B equipment.
Group 2 means that the equipment intentionally generates radio-frequency energy in the form of electromagnetic radiation for the heat treatment of food.
Class B equipment means that the equipment is suitable to be used in domestic establishments.
** The depth does not include the door opening handle.
*** Internal capacity is calculated by measuring maximum width, depth and height. Actual capacity for holding food is less.
AS PART OF A POLICY OF CONTINUOUS IMPROVEMENT, WE RESERVE THE RIGHT TO ALTER DESIGN AND SPECIFICATIONS WITHOUT NOTICE.
Z
GB-36

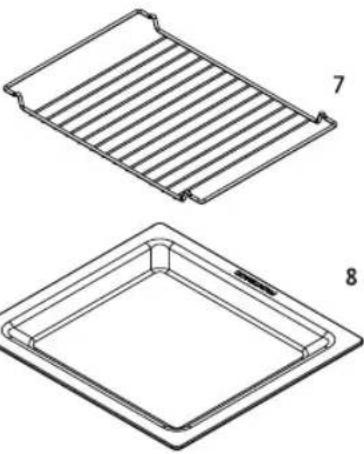
natural_image
Technical line drawings of two rectangular metal components with internal channels, labeled 7 and 8 (no text or symbols on the diagrams themselves)- Boilte Raprille
- BlatsaPaen verre
Information importante
natural_image
Line drawing of an open oven with a dish inside, showing internal components and a handle (no text or symbols)text_image
User interface toolbar with navigation buttons and a play button, featuring icons for video, audio, and image control.| Puissance micro-ondes | 100% 80% | 80% 80% 20% | |||
| Affichage 900 W | W 700 W 450 W | 300 W 100 W |
| Puissance micro-ondes | Ratio de vapeur |
| 100 W 10%, 20%, 30% | |
| 300 W 10%, 20%, 30%, | 40%, 50%, 60% |
| 450 W 10%, 20%, 30%, | 40%, 50%, 60%, 70% |
INSTRUCTION D'OPÉRATION
| 700 W 10%, 20%, 30% | 40%, 50%, 60%, 70% |
| 900 W 10%, 20%, 30% | 40%, 50%, 60%, 70%, 80%, 90%, 100% |
PLATS ADAPTÉS AU FOUR
PLATS ADAPTÉS AU FOUR

PROBLEEMOPLOSSING....33
GESCHIKT OVENGEREI 33-34
ONDERHOUD EN REINIGING 35
SPECIFICATIONS 36
VOORZORGSMAATREGELEN OM MOGELIJKE BLOOTSTELLING AAN OVERMATIGE MICROGOLF ENERGIE TE VERMIJDEN
natural_image
Technical line drawings of two rectangular metal grates, one with ribbed top and the other with a recessed inner frame (no text or symbols)- Grill Baster
- Graspian
natural_image
Diagram of an oven with a lid and tray, showing internal components (no text or symbols)text_image
User interface toolbar with navigation buttons and a play button, featuring icons for '进', '加', 'A', and '<' buttons.| Magnetronvermogen | Stoomverhoudign |
| 100 W 10%, 20%, 30% | |
| 300 W 10%, 20%, 30%, | 40%, 50%, 60% |
| 450 W 10%, 20%, 30%, | 40%, 50%, 60%, 70% |
| 700 W 10%, 20%, 30%, | 40%, 50%, 60%, 70% |
| 900 W 10%, 20%, 30%, | 40%, 50%, 60%, 70%, 80%, 90%, 100% |
15. Kinderbeveiliging
natural_image
Line drawing of a rectangular box with a lid and handle, no text or symbols presentnatural_image
Color palette bar with grayscale shades and a central crosshair symbol (no text or labels)
natural_image
Two isolated black crosshair symbols on a white background, no text or labels present.
text_image
KM-345S3B_OM.indb 37 2017-08-30 11:28:41SERVICE
 |  | |
| België/Belgique helpdesk.BE@sharphomeappliances.com 015480361 | ||
| Česko helpdesk.CZ@sharphomeappliances.com 00420225376466 | ||
| Danmark helpdesk.DK@sharphomeappliances.com 0080074277737 | ||
| Deutschland helpdesk.DE@sharphomeappliances.com 08970809954 | ||
| Eesti helpdesk.EE@sharphomeappliances.com 00372654 6543 | ||
| España helpdesk.ES@sharphomeappliances.com 902050407 / 914872814 | ||
| Ελλάδα helpdesk.GR@sharphomeappliances.com 00302104833477 | ||
| France helpdesk.FR@sharphomeappliances.com 08 09 10 15 15 | ||
| Hrvatska helpdesk.HR@sharphomeappliances.com 0038513735684 | ||
| Ireland | helpdesk.IE@sharphomeappliances.com | *03330143055 / 03335777230 |
| Ísland | helpdesk.IS@sharphomeappliances.com | 0080074277737 |
| Latvija helpdesk.LV@sharphomeappliances.com 003717173066 | ||
| Liechtenstein | helpdesk.CH@sharphomeappliances.com 0800834644 | |
| Lietuva helpdesk.LT@sharphomeappliances.com 00370870044724 | ||
| Luxemburg/Luxembourg | helpdesk.LU@sharphomeappliances.com 003215480361 | |
| Magyarország | helpdesk.HU@sharphomeappliances.com | 003619993934 |
| Nederland | helpdesk.NL@sharphomeappliances.com 0207237777 | |
| Norge | helpdesk.NO@sharphomeappliances.com | 0080074277737 |
| Österreich | helpdesk.AT@sharphomeappliances.com 0820555888 | |
| Polska helpdesk.PL@sharphomeappliances.com 0048222727444 | ||
| Portugal | helpdesk.PT@sharphomeappliances.com | 225025742 |
| România | helpdesk.RO@sharphomeappliances.com | 0040212300982 |
| Schweiz/Suisse | helpdesk.CH@sharphomeappliances.com | 0800834644 |
| Slovenija helpdesk.Sl@sharphomeappliances.com 0038617291303 | ||
| Slovensko | helpdesk.SK@sharphomeappliances.com | 00421250112041 |
| Suomi helpdesk.Fl@sharphomeappliances.com 0080074277737 | ||
| Sverige | helpdesk.SE@sharphomeappliances.com | 0080074277737 |
| United Kingdom | helpdesk.GB@sharphomeappliances.com | 0333 5777230 |
| United Kingdom | helpdesk.GB@sharphomeappliances.com | *0333 0143055 |
| България | helpdesk.BG@sharphomeappliances.com | 0035970011770 |
| Україна | helpdesk.UA@sharphomeappliances.com | 00380443924536 |
*Microwave oven, Vacuum cleaners and SDA service only
Follow us:


Vestel UK
London, United Kingdom
www.sharphomeappliances.com/support

Printed in China