Medicus System - Blood pressure monitor BOSO - Free user manual and instructions
Find the device manual for free Medicus System BOSO in PDF.

User questions about Medicus System BOSO
0 question about this device. Answer the ones you know or ask your own.
Ask a new question about this device
Download the instructions for your Blood pressure monitor in PDF format for free! Find your manual Medicus System - BOSO and take your electronic device back in hand. On this page are published all the documents necessary for the use of your device. Medicus System by BOSO.
USER MANUAL Medicus System BOSO
Zutreffende Norm: DIN EN ISO 80601-2-30 „Medical electrical equipment - Part 2-30: Particular requirements for the basic safety and essential performance of automated type non-invasive sphygmomanometers".
Contents of package 53
Symbols on the blood pressure monitor and in the.app. 54
Symbols on the power supply unit 57
Quick guide 58
Introduction 59
Purpose 60
Blood pressure values 61
Systolic and diastolic blood pressure value 61
WHO blood pressure cut-off values 61
Starting up 63
Inserting batteries 63
Battery status 64
General instructions for self-measurement 65
General Notices for Bluetooth Connection 67
Preparing to measure your blood pressure 69
Note on cuff sizes 69
Table of contents
Attaching the cuff 70
Measuring your blood pressure 73
Interrupting a measurement 74
Measurement display 75
Set up app and create connection 77
Measuring and transferring blood pressure 81
Evaluating and sending measurements 83
85
Mains operation 86
Error messages 87
Cleaning and Disinfection 90
Warranty Conditions 91
Customer service / Disposal 92
Technical data 93
Calibration checks - Testing instructions
(for trained specialist staff only) 96

Product features

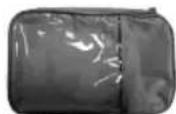
Contents of package
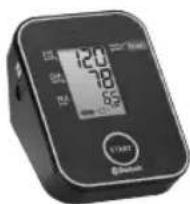
1 boso medicus system blood pressure monitor
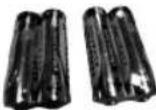
4 LR 6 (AA) batteries
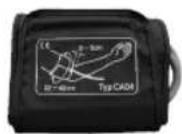
1 CA 04 universal cuff
1 User instructions
1 Bag
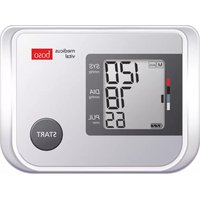
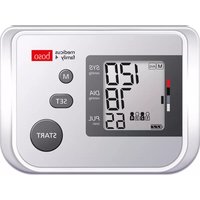
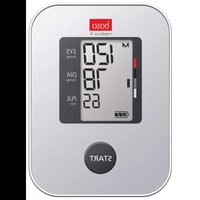
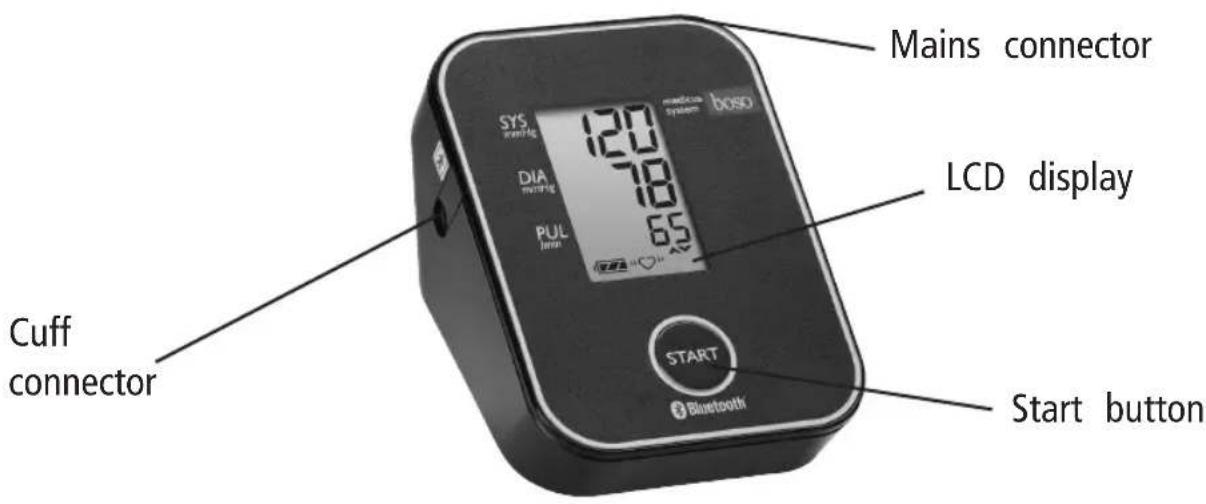
Symbols on the blood pressure monitor
| Symbol Function/meaning | |
| START | START/STOP button |
| EN | Direct current |
| SN | Serial number |
| Year of manufacture | |
| Type BF: The device, cuff and tubing have been designed to protect the patient against electric shock. | |
| AV | Bluetooth communication active. |
| MReading in progress. Flashes as soon as a heartbeat was detected | |
Symbols on the blood pressure monitor
Symbol Function/meaning
| (♥) | Cardiac rhythm disorder or movement during reading. |
| Battery fully charged. | |
| Battery partly discharged. | |
| Replace battery as soon as possible. | |
| Flashing! No further reading possible. Replace battery. | |
| Protect against liquids |

Symbols on the blood pressure monitor and in the app

Symbol Function/meaning
| SYS | Systolic blood pressure in mmHg |
| DIA | Diastolic blood pressure in mmHg |
| PUL | Pulse per minute |
| Arr | Reading with cardiac rhythm disorder or movement |
| €0124 | Device complies with the European Medical Devices Directive. |
| Device must not be discarded with household waste. | |
| Manufacturer | |
| Read instructions for use | |
| -€- | Polarity of power supply port |
Symbols on the power supply unit
Symbol Function/meaning
| Only for use in enclosed spaces. | |
| Protection class II device | |
| Thermal fuse | |
| Fuse | |
| CE | Device complies with the European Medical Devices Directive |
| Polarity of the mains adapter plug |

Quick guide
Insert batteries, ensure correct position This quick guide does not replace the ing (P. 63) detailed information on the use and safety of the blood pressure monitor feaConnect cuff to monitor (P. 69) tured in the user instructions.

Attach cuff (P. 70)
Start (and stop) a measurement by pressing the start button (P. 73)

Please be sure therefore to read the user instructions!
Measured systolic, diastolic and pulse values are displayed after the measurement is completed (P. 75)
Introduction
Dear Customer, before using the instrument for the first We are delighted that you have decidedtime, as correct blood pressure readings to purchase a boso blood pressure moncan only be obtained if the instrument is itor. The boso brand is synonymous withoperated correctly. optimal quality and precision and is also these user instructions, 一 means an number 1 among professionals: 96 % of action by the user.
all German general practitioners, physicians and internists work in practice withTo get help concerning usage or maintainblood pressure instruments from boso ance please contact your dealer or the(API survey conducted by GfK 01/2016). manufacturer (contact details can beThe experience gained from decades of found on the back cover of this manual).use by profession-als has also been incorporated into all the patient monitors forAn unexpected operating condition or anhome measurement. incidence which has worsened the healthThis instrument has also passed our striccondition or could have worsened thequality control procedures and is your rhealth condition should be reported to theable partner for monitoring your blood manufacturer immediately.pressure values.
Please read these user instructions
If the instrument is to be sold, ensure that these user instructions are enclosed.
Introduction
The boso-medicus system blood pressure The Bluetooth radio transmission of the monitor is suitable for patients with an device conforms to the Radio Equipment upper arm circumference of between 22 Directive (RED) 2014/53/EU. and 48~cm .

The use of accessories not referred to iPurpose these instructions for use can undermine safety. Non-invasiv
Non-invasive recording of systolic and diastolic blood pressure and pulse rate in
Wireless communication devices, such as adults. Not suitable for use on newborn home networking devices, mobile phones and infants. The device is suitable cordless phones and their base stations, for self-measurement at home. The walkie-talkies can affect this blood pres-patient is regarded as the operator. sure monitor. Therefore, a minimum distance of 12 inch should be kept fromThe instrument can be used with any arm such devices. circumference as shown on the corresponding cuff.
To determine the blood pressure, two vDiastolic (lower) blood pressure: ues need to be measured: Thisispresent whentheheart muscleexpands and fills with blood again.
Systolic (upper) blood pressure:
This is produced when the heart musculos pressure measurement values are contracts and blood is forced into theexpressed in mmHg (mm of mercury). blood vessels.
EN
| The World Health Organization (WHO) has defined the following cut-off values for assessing blood pressure: | ||
| systolic diastolic | ||
| High blood pressure (hypertension) over 140 mmHg over 90 mmHg Borderline normal blood pressure 130 to 139 mmHg 85 to 89 mmHg Normal blood pressure 120 to 129 mmHg 80 to 84 mmHg Optimum blood pressure up to 119 mmHg up to 79 mmHg | ||
Blood pressure values

Whether medical treatment is necessary than at the doctor's. The German depends not only on the blood pressure Hypertension League has therefore defi-but also on the patient's risk profile. Ned lower cut-off values for home measu-Please contact your GP if one of the valements: ues (systole, diastole) consistently exceeds the cut-off point for high blood pressure.
Home measurement: 135/85 mmHg
Self-measurement of blood pressure after Measurement in the produces somewhat lower values at home doctor's surgery: 140/90 mmHg
Starting up
The device must be installed and put in a Never mix old and new batteries or operation in accordance with the instrucdifferent makes. tions in this manual.
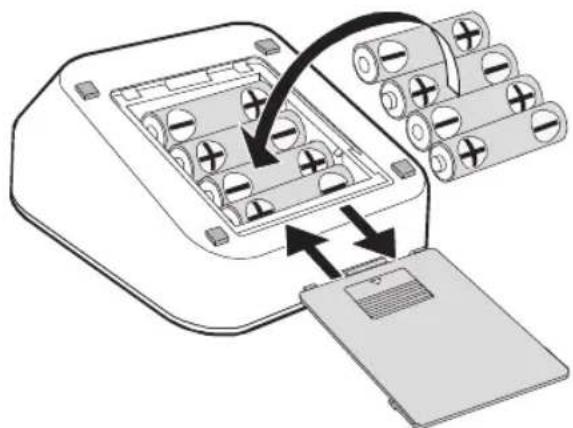
Illustration 1
If the batteries are not inserted correctly, the monitor will not work and this may cause the batteries to heat up and leak, damaging the monitor.
EN
Inserting the batteries
The battery compartment is located on the underside of the monitor.Insert batteries in the battery compartment as shown in illustration 1.
Remove the batteries if the monitor is not to be used for any length of time.
Use only high quality leak-proof batteries of the correct specifications (see "Technical data" P. 93).
Batteries that are short-circuited can become hot and cause burning.
Starting up
The monitor has a battery status display! Care for the environment (see P. 55)

Battery fully charged.

Battery partially charged.

Replace battery soon.

Flashing! No further measurements possible. Replace battery.
Do not dispose of used batteries and charger units in domestic waste.
You can take these to collection sites for used batteries or special waste.
Contact your local authority for information.
General instructions for self-measurement
-
Fluctuations in blood pressure are quite normal. Even when measurements are repeated, there can be marked differences. Single or irregular measurements do not provide reliable information about the actual blood pressure. A reliable evaluation is only possible if reg-5. Ural measurements are taken under comparable conditions and themeasurement values entered in the blood presure record card.
-
Self-testing does not mean self-treatment. Do not on any account change the dose of medicine prescribed by your doctor of your own accord.
Incorrect measurements can also occur in patients with a weak pulse (possibly in patients wearing a pacemaker, for example). The blood pressure monitor itself has no effect on the pacemaker.
The device has not been validated use on pregnant women.

Always take the measurement in a calm and relaxed state.
You are recommended to check your blood pressure twice a day- inthemorning on getting up and in the evening once you have relaxed after work.
-
Always measure your blood pressure
-
Irregular heartbeats can affect the accu-from the arm with the higher blood racy of the monitor or result in incorpresure values (where not required measurements (see page 88). otherwise (see page 71)).
General instructions for self-measurement
To do this, measure the blood pressure first in both arms and thereafter always from the arm with the higher blood pressure.

General Notices for Bluetooth Connection
- The blood pressure monitor may not device is unobstructed. The communication be used in locations where wireless distance can be shortened by the communication is prohibited, such as in construction of the building or other ob-aircraft or hospitals. This blood pressure stacles. Communication through reinmonitor can have unfavorable effects forced concrete walls in particular may on electronic devices or electrical medi-not be possible under certain circum- cal devices. EN
- The maximum communication distance- During pairing, Bluetooth must be deac between the blood pressure monitor -tivated on all other devices within and the receiver equals approx. 10 me-range.
ters.This distance can be reduced by the
environment; therefore, verify whether - If the improbable case should occur that the distance is short enough for trans- this blood pressure monitor disrupts o-. mission of data after the measurement. her wireless communication devices, use the blood pressure monitor at a dif.
Ensure that the space between the different location.

General Notices for Bluetooth Connection

- Do not use the Bluetooth connection in the vicinity of an IEEE802.11g/b/n-WLAN device or other wireless communications systems (particularly in the range of 2.4 GHz) or near devices which emit electromagnetic waves (such as microwave appliances). This can cause the connection to be frequently interrupted, communication speed to be significantly reduced and errors to occur.
Preparing to measure your blood pressure
Note on cuff sizes:
The monitor may only be used with the following cuff types. These should be chosen according to the upper arm circumference printed on them.
| Type | Arm Order number circumference | |||
| CA01 | 22 | - | 32 | cm 143-4-764 |
| CA02 | 32 | - | 48 | cm 143-4-757 |
| CA04 | 22 | - | 42 | cm 143-4-765* |
- Standard cuff supplied as standard.
Attach the cuff to the monitor by pressing the plug (click) into the socket on the left side of the unit. (See illustration 2).
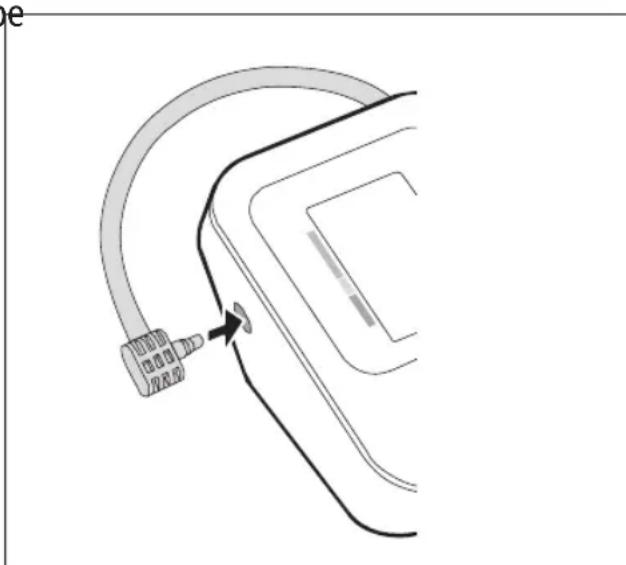
Illustration 2
Preparing to measure your blood pressure
Observe the following instructions Attaching the cuff
when measuring your blood pressure:The measurement should be taken from

Avoid smoking or drinking coffeethe bare upper arm.
for one hour before measuring your blood pressure.
In the case of tightly fitting outer
clothing, ensure that the blood supply to


Sit comfortably for the blood prethe arm is not cut off when the sleeve is sure measurement. Support your rolled up (if necessary remove the article of back and arms. Do not cross youclothing before taking the measurement).
legs. Place your feet flat on the
floor.
Relax for 5 minutes before taking a measurement.
Do not move during the measurement.
Open out the cuff into the shape of a ring and slide it over the upper arm until the bottom edge of the cuff is about 2 - 3cm above the elbow. The cuff must be positioned so that the marking is over the artery (see illustration 3).
Preparing to measure your blood pressure
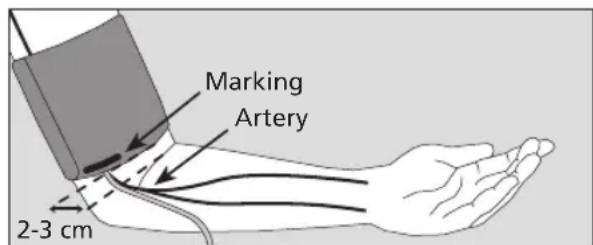
Illustration 3
During the measurement, medical apparatus that are being used on the same arm at the same time, may malfunction.
The cuff must not be too tight. There should be enough space to fit roughly two fingers between arm and cuff.
Do not attach the cuff over wounds this can cause further injuries.
Ensure that the cuff is not attached an arm where arteries or veins are und going or have undergone medical treatment (e.g. shunt).
For women who have had a breast amputated, do not attach the cuff to the arm on the amputated side of the body.
The metal ring should never lie over the artery (see illustration 3) as this may produce a false reading.
Grasp the end of the cuff that feeds though the metal ring and wrap it around the outside of your arm. Attach the Velcro fastener by applying gentle pressure.
Preparing to measure your blood pressure
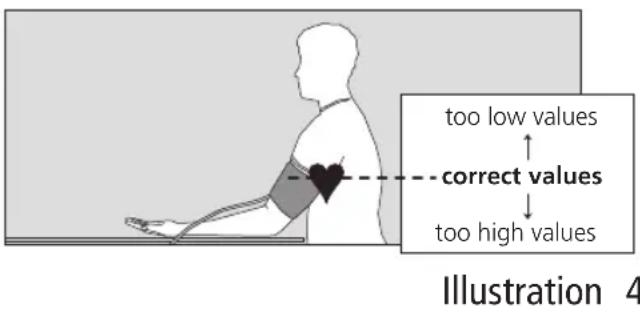
Place your arm with the cuff attached! The blood pressure measurement on the table, holding it relaxed and should not prevent the flow of blood for an slightly bent so that the cuff is levelunnecessary length of time (> 2 minutes). With your heart. If the monitor fails to function correctly, remove the cuff from the arm.

Excessive frequent measurements can cause injury by restricting blood flow.
The device may not be used by unsupervised children.
Do not use the device near infants. This can lead to accidents or damage.
Do not start the device without putting on the cuff.

Do not talk during the measurement.
Check that the air tube is not kinked during the measurement. This could cause congestion of the blood flow and subsequent injury.
There are small parts that may cause a choking hazard if swallowed by mistake by infants.
If the ambient temperature changes Now hold the arm absolutely still and significantly, leave the device about an do not talk. hour to adapt to the new ambient tempera- rature before using it. All the items on the LCD display appear
The performance of the device can be affected by excessive temperature, humidity or altitude.
Measuring your blood pressure
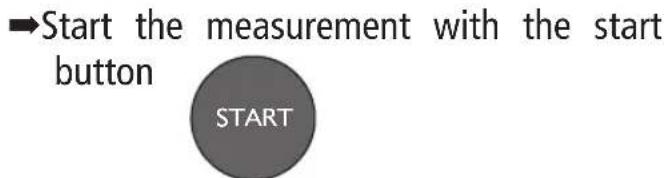
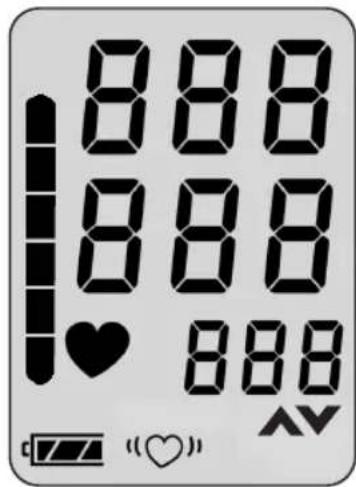
Illustration 5

Measuring your blood pressure
The pump starts to inflate the cuff.
During the measurement phase the descending cuff pressure and the flashing
The monitor has an intelligent automatic symbol are displayed (see illustrate-inflation system for gentle inflation to this 6).
correct cuff pressure.

The rising cuff pressure is displayed as a digital numerical value and in the form of a bar on the left-hand edge of the display.
When the required pressure is reached, the pump switches off and the air is released slowly from the cuff.

Interrupting a measurement:
A measurement can be interrupted at any stage by pressing the start button; the cuff deflates automatically.
Illustration 6
Measurement display
After the end of the measurement, the built valve opens automatically and the cuff deflates rapidly.
The measured blood pressure values (systole, diastole, pulse) are displayed illustration 7).
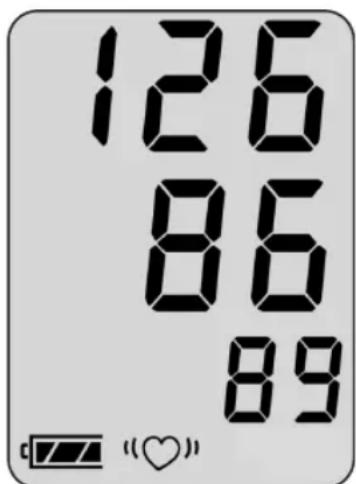
Systole mmHg
Diastole mmHg
Pulse/min.
In-the symbol appears after the measurement, it is recommended that the measurement is repeated, holding the arm completely still. If the symbol appears again even with the arm held still, this may be an indication of an irregular heartbeat. Please discuss this with your doctor at your next visit.
Blood pressure is a dynamic parameter and can be affected by the patient's position, e.g. sitting, standing, lying, moving, before or during the measurement, physical condition (stress, disease, etc.).
If the measurement result is obviously wrong, repeat the measurement.
Illustration 7
Measurement display
The unit switches itself off automatically after about 1 min. To repeat a measurement, press the start button again briefly.


Allow at least two minutes between measurements.
If no further measurement is required, remove the cuff from the arm.
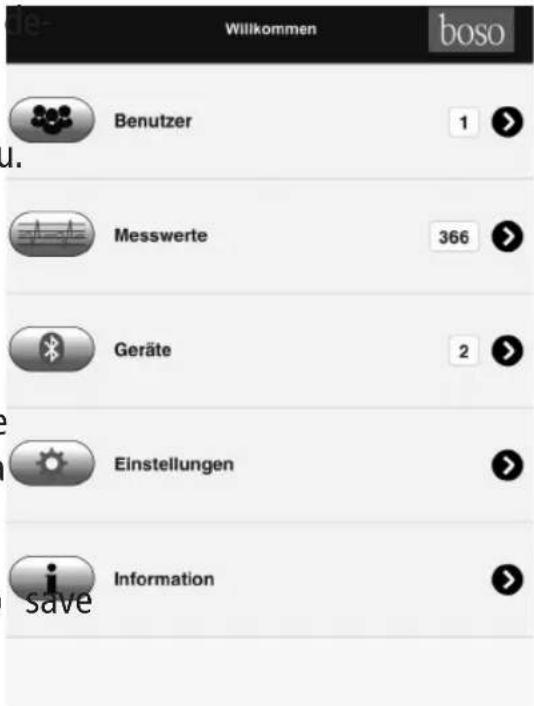
Set up app and create connection

Requires interaction with boso-App

Requires interaction with boso medicus system
- Download the boso app from the Google/Apple Store.


To enable data exchange between the blood pressure monitor and your mobile device, follow these steps:
- Ensure that Bluetooth is activated on your mobile device. (Bluetooth 4.0 is required)
When installing the app, the operating system (Android/iOS) will ask for permission to access the current location. You must answer "YES" in order to avoid BT connection errors.
Note: The information "current location" is not required by the boso app but by the operating system for the Bluetooth connection.
Set up app and create connection

- Open the boso app on your mobile device.
-
Set up a new user:
-
Select "User" from the main menu.
- Select " ^+ New" from the bottom menu bar.
- Enter your personal data. Compulsory fields are indicated by **.
-
Click on the "Save" button in the bottom menu bar to save the data you have entered.
-
Tick the user for whom you wish to save the measurement values.
Set up app and create connection

- Use the "Back" button in the top menu bar to return to the main menu.
- Open "Devices" in the main menu.

- Press the START key on the blood pressure monitor and hold it down until "Pr" appears on the display. The communication indicator is shown on the displ for approximately one minute.


- In the "Devices" menu, select "Add new device" in the bottom menu bar.
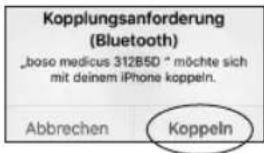
If you are using iOS, you must also press "Pair" to confirm the pairing request.
- Date and time are automatically synchronised by the mobile device.
- After pairing successfully, "End" appears in the display on the monitor and the monitor is displayed in the device list in the app.
Setup is now complete. Now leave the menu via the "Back" button in the top menu bar.
Set up app and create connection

The blood pressure monitor must be reconnected to the mobile device after changing the batteries, as the time information is deleted when the batteries are changed.
If this is not done, the current system time of the mobile device is stored as the time stamp for the readings during data transfer.
Please proceed as follows:
- Delete the blood pressure monitor from the devices list in the app
- Delete the blood pressure monitor from the Bluetooth settings of the mobile device
- Pair again as described.
Measuring and transferring blood pressure
Now put on the cuff and carry out a blood pressure measurement as described in the user instructions.
As long as Bluetooth is active and the app is running, the measured values are automatically transferred after the blood pressure measurement has been completed.

After successful transfer, the measurement value is deleted from the measurement value memory of the blood pressure monitor.
Repeat the pairing process if the measurement data have not been transferred. If the app or Bluetooth are inactive, up to 30 measurement
values are automatically saved in the blood pressure monitor (If the measurement value memory of 30 measurements is full, the oldest measurement is deleted and the current measurement is saved.
Faulty measurements are not saved) and sent after the next measurement once the app has been activated.
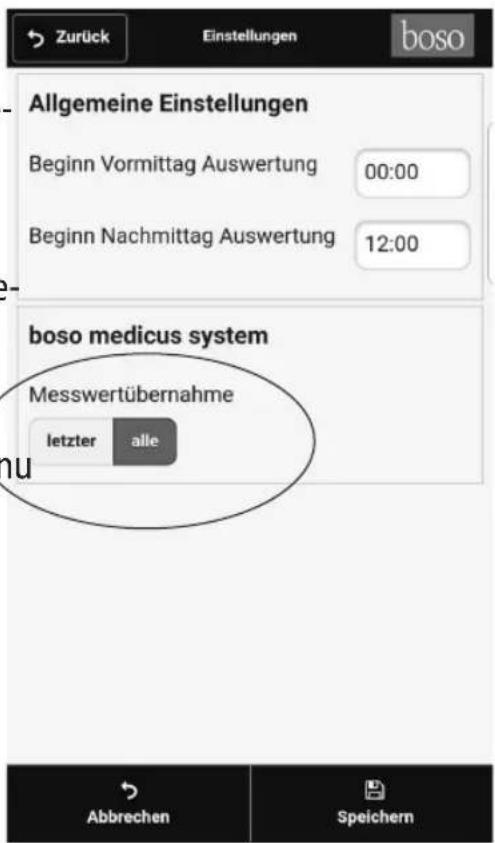
In order to enable all saved measurement values in the medicus system measurement value memory to be transferred to the app, measurement value transfer of all measurement values must be activated in the "Settings" menu (default setting). If "last" is selected here,
Measuring and transferring blood pressure

only the last measured measurement value is transferred and all saved measurement values are deleted.
Times for the morning and afternoon evaluations can also be altered in this menu.
Save your settings by using the "Save" button in the bottom menu bar.
Evaluating and sending measurements

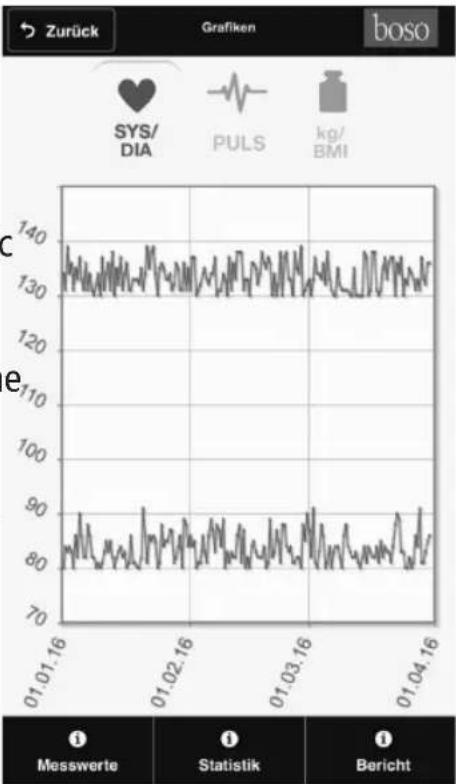
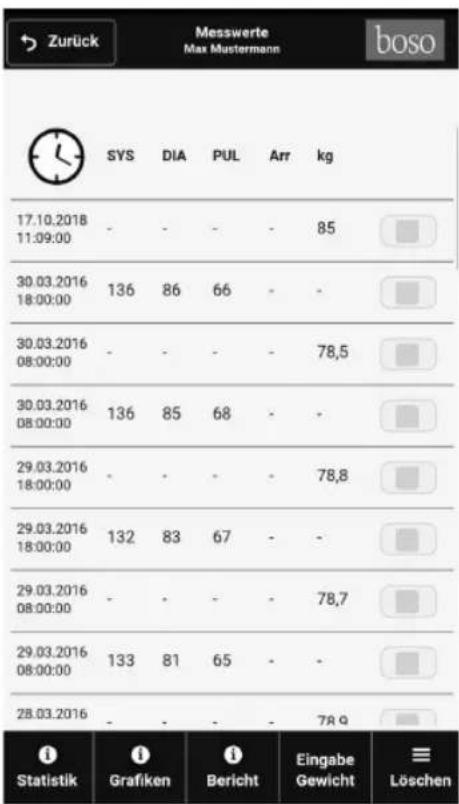
All measurement values that have been sent so far are displayed in the "Measurement values" menu.
Use the "Graphs" button in the bottom menu bar to see a graphic representation of the measurement values.
The buttons in the top area of the screen allow you to select the graphs available: "SYS/DIA" and "PULSE". Click on a graph to enlarge or shrink it.
"kg/BMI" is intended for scales.

Evaluating and sending measurements

Use the "Statistics" button in the bottom menu bar to see a statistical summary of measurement values. The time range for the summary (date from/to) can be selected.
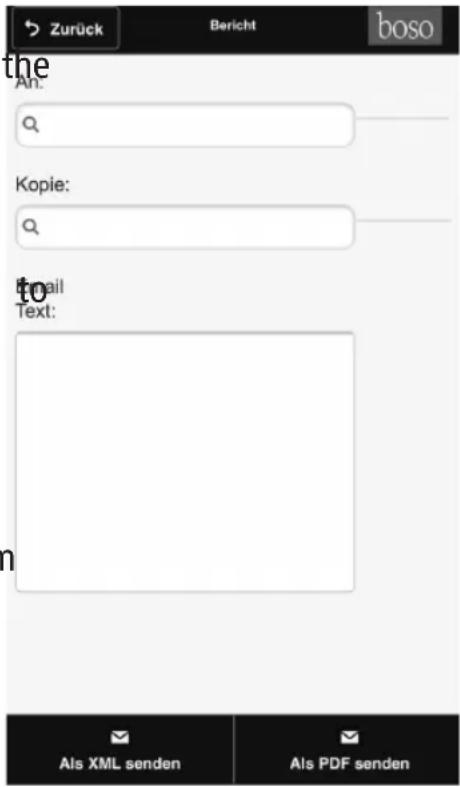
The "Report" button in the bottom menu bar takes you to the menu which you use send measurement values. Thesummary can be sent by email in PDF or XML format. The XML file can be imported into the PC program "bosoprofilemanagerXDHome." This program offers additional evaluation options and is available free of charge from the Internet (http://www.boso.de/download/ profilmanagerXDHome/).
Deleting measurement values

Individually selected measurement values or measurement data older than 1/3/6/12 months can be deleted via the "Delete" button in the bottom menu bar.
Note that data cannot be restored. Please archive your data in good time by creating an XML or PDF file using the "Report" button.

Mains operation

The mains connection socket is located Do not touch the batteries, the power the rear of the monitor. supply unit socket and the patient at the
Where required, use only the boso powame time.
supply unit (order number 410-7-150).
This power supply unit produces a rectified Remove the power supply unit plug output of the correct polarity. Other conform the blood pressure monitor when it is merely available power supply units cannot in use.
cause damage to the electronic components, which will invalidate the warranty.
There is also a risk of fire with these other power supply units.
Error messages
If any problems occur during the measurement, the display will show an error message instead of a blood pressure reading.
Meaning of error messages:
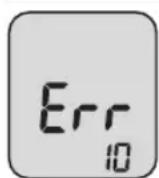
| Cause of Err message: Troubleshooting | ||
| Err | Excessive variation in cuff pressure during measurement | ure Hold arm still. |
| No valid pulse readings Check | position of cuff (see page 70) and repeat measurement. | |
| Systole – diastole difference Check | heck position of cuff (see page 70) too small: and repeat measurement. | |
| Systole – diastole≤10 mmHg | ||
| ErrCUF | Incorrectly inflated Cuff possibly | too loose, attach cuff more firmly (see page 70) |

Error messages

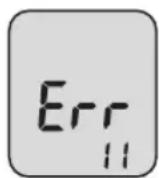
| Cause of Err message: Troubleshooting: | |
| The pulse value couldCheck position of cuff not be determined and repeat measurement. correctly. | |
| Internal Error Remove the batteries and briefly press START but- ton. Put the batteries back into the monitor. If the error persists, return the instrument for repairs to the manufacturer. | |
| “○” Display: Troubleshooting: | |
| Repeat measurement recommended, holding the arm absolutely still. If the symbol appears again, even with the arm held still, this may be an indication of gular heartbeat. Please discuss this with your doctor at your next visit. |
Cause of Err message: Troubleshooting:
Bluetooth connection error
Remove the batteries and briefly press START button. Put the batteries back into the monitor. Carry out the pairing again. If the error persists, return the instrument for repairs to the manufacturer.
When installing the app, the system will ask for permission to access the current location. You must answer "YES" in order to avoid BT connection errors.
Cleaning and Disinfection

Cleaning Monitor:
Use a soft, dry cloth to clean your mo
Cleaning Cuff:
Small stains on the cuff can be remove carefully with a proprietary washing-up liquid.
Disinfection Cuff:
Fior/disinfectant wipes (at least 5 minutes exposure time) of the device and the cuff, we recommend the disinfectant antifect liquid (Schulke & Mayr).To disinfect the cuff, we recommend spray disinfection. In particular, if the device is used on multiple users is to pay attention to regular cleaning and disinfections of the cuff.
Warranty Conditions
We give 3 years warranty from the date of the case of justified warranty claims the purchase. The purchase date has to be device has to be sent along with the origin given by the invoice. Within the warranty p e1 invoice to:
Period defects are eliminated free of charge. GOSCH + SOHN GMBH U. CO. KG, After repairs the warranty period is not Behnhofstr. 64, D-72417 Jungingen.
tended on the whole unit, but only to the
replaced components.
boso accepts no responsibility for losses EN such as operational disruptions or data los
Excluded from the warranty are parts sues, which can occur due to the use of this ject to normal wear and tear (e.g. cuff)blood pressure monitor.
transport damages and any damage cau
used by improper handling (e.g.non-compliance guarantee is made that this blood presence with the instructions for use). Damare monitor can establish a connection ges due to disassembly by unauthorized with all Bluetooth-compatible devices.
persons are also excluded from warranty.
No claims for damages against us are substantiated by the warranty.
Customer service
Disposal

Customer service:
Warranty and repair work must be undertaken by trained and authorised personnel
Do not modify this equipment without aA horization of the manufacturer. b
Send the monitor, carefully packaged and electronic items. with sufficient postage, to your authorised dealer or directly to: Please note tha
Do not dispose of monitors and batteries in the domestic waste.
t- the end of its lifespan, the monitor must be taken to a collection site for obsolete
ectronic items.
Please note that batteries and rechargeable batteries must be disposed of separately (local authority collection site).
Expected operational lifetime of the equipment: 5 years (using the unit 6 times a day)
Expected operational lifetime of the cuff: 2 years (using the unit 6 times a day).
Technical data
Measurement principle: oscillometric
Measurement range: Systolic: 60 to 279mmHg
Diastolic: 40 to 200 mmHg
Pulse: 40 to 180 per minute
Cuff pressure: 0 to 299 mmHg
Memory store: 30 measurements
Display: LCD
Operating conditions: environmental temperature +10^ to +40^
Relative humidity 15 to 85%
Air pressure 800 hPa to 1060 hPa
Transport/ environmental temperature -20^ to +60^
Storage conditions: Relative humidity 10 to 95%
Air pressure 700 hPa to 1060 hPa
Power supply: DC 6 V (4 x 1.5 V Mignon IEC LR 6 alkaline manganese
batteries)
Alternative special option: DC 6V power supply
unit, Order No.410-7-150

Technical data
Typical battery life: 500 measurement cycles (depending on inflation pressure and frequency of use).
Battery check: symbol display in LCD window
Weight: 250 g without batteries

Dimensions (WxHxD): 96 mm x 68 mm x 130 mm
Classification: Medical device with internal energy source (in battery operation) / class II (in power supply unit operation), continuous operation mode
Applied part: Type BF ( )

Protection against solid IP20
objects: IP classification is the degree of protection provided by enclosures in accordance with IEC 60529. This device is protected against solid foreign objects of 12mm diameter and greater such as fingers. This device is not protected against water.
Technical data
Clinical test: Accuracy complies with the requirements
of ISO 81060 Part 2
Bluetooth: Bluetooth Version 4.0
Maximum deviation of cuff ± 3mmHg or 2% of the reading
pressure measurement: (whichever is greater)
Maximum deviation of ± 5%
pulse rate display:
Applicable standards: DIN EN ISO 80601-2-30 „Medical electrical
equipment - Part 2-30: Particular requirements for the basic safety and essential performance of automated type non-invasive sphygmomanometers".
Wireless Communication: VZ (MURATA Manufacturing Co. Ltd.)
Bluetooth Ver.4.OLE BLP
Frequency band: 2402-2480 MHz
Maximum RF output power: 1.6dBM
Modulation: GFSK

Calibration checks - Testing instructions
(for trained specialist staff only)

Calibration checks - every 2 years at the latest - must be performed by the following institutions or persons:
Manufacturer
Trade measurements authorities
- Persons who fulfil the requirements of the legislation governing the operation of medical devices.
A) Function testing
Function testing of the monitor can only be carried out on a person or a suitable simulator.
Note:
When the pressure in measurement mode increases above 299mmHg , the quick release valve is triggered and the pressure circuit opens. When the pressure in test mode increases above 320 mmHg, the measured value display flashes.
b) For the calibration checks a special test plug must be used. The test plug is available for a fee from the manufacturer.
B) Testing of pressure circuit integrity and deviation of pressure display
Calibration checks - Testing instructions
(for trained specialist staff only)
Testing
5.) Switch off monitor by pressing the START button again.
1.) Remove batteries.
The device must not undergo service
2.) Hold start button pressed down and/or maintenance while it is in use. insert batteries.
3.) Release start button. The monitor is now ready for testing; the current pressure is displayed in the SYS and DIA fields.
4.) Perform test for deviation of pressure display and pressure circuit integrity (observe setting time for cuff - at least 30 seconds) in the usual manner.

Table des matieres

Normes appliquées : DIN EN ISO 80601-2-30 „Medical electrical equipment - Part 2-30: Particular requirements for the basic safety and essential performance of automated type non-invasive sphygmomanometers".
Communication sans fil : VZ (MURATA Manufacturing Co. Ltd.)
Bluetooth Ver.4.OLE BLP
Bande de fréquence : 2402-2480 MHz
Puisance de sortie RF maximale : 1.6dBM
Modulation: GFSK

Norme di riferimento: DIN EN ISO 80601-2-30 „Medical electrical equipment - Part 2-30: Particular requirements for the basic safety and essential performance of automated type non-invasive sphygmomanometers".
Normas aplicables: DIN EN ISO 80601-2-30 „Medical electrical equipment - Part 2-30: Particular requirements for the basic safety and essential performance of automated type non-invasive sphygmomanometers".