
GTH63TBK - Cooker Glem Gas - Free user manual and instructions
Find the device manual for free GTH63TBK Glem Gas in PDF.

| Product type | Ceramic hob cooker |
| Brand | Glem Gas |
| Model | GTH63TBK |
| Number of cooking zones | 4 zones (including one triple and one double zone) |
| Control type | Touch controls (Touch Control) |
| Power supply | 220-240 V ~ 50/60 Hz (according to standard, check rating plate) |
| Maximum power | Up to 6400 W (can be limited to 2800 or 3300 W) |
| Cut-out dimensions (W x D) | Approximately 56 x 49 cm (check manual for exact dimensions) |
| Worktop thickness | Standard (fixing with brackets) |
| Main functions | Programmable timer (1-99 min), Heat Up function, automatic shut-off, child lock, residual heat indicator (H) |
| Expandable zones | Double zone on E1-E3, triple zone on E3 (depending on model) |
| Safety | Child lock (key B), safety shut-off in case of overflow, overheat protection (display Fc), power limitation |
| Maintenance and cleaning | Clean with special scraper, mild detergents (SIDOL, STAHLFIX). Do not use steam cleaners or abrasive sponges |
| Electrical connection | Cable H05V2V2-F, cross-section ≥ 2.5 mm² (≥ 4 mm² for power > 6400 W). Requires omnipolar switch with contact opening ≥ 3 mm |
| Energy efficiency class | Not specified (estimate class A according to standard) |
| Manual available in | French, English, German, Italian, Spanish, Dutch, Norwegian, Portuguese, Swedish, Danish, Finnish |
Frequently Asked Questions - GTH63TBK Glem Gas
User questions about GTH63TBK Glem Gas
0 question about this device. Answer the ones you know or ask your own.
Ask a new question about this device
Download the instructions for your Cooker in PDF format for free! Find your manual GTH63TBK - Glem Gas and take your electronic device back in hand. On this page are published all the documents necessary for the use of your device. GTH63TBK by Glem Gas.
USER MANUAL GTH63TBK Glem Gas
operating and maintenance
natural_image
Simple line drawing of a cooking pot with crossed lines indicating resistance (no text or symbols)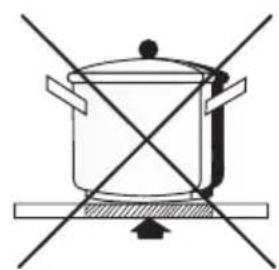
natural_image
Simple line drawing of a cooking pot with crossed lines indicating resistance or crossed panes (no text or symbols)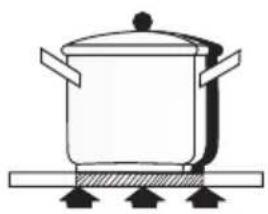
natural_image
Simple line drawing of a cooking pot on a heating element (no text or symbols)Fig.2
natural_image
Illustration of a hand using a power tool to brush a curved object (no text or symbols present)Fig.3
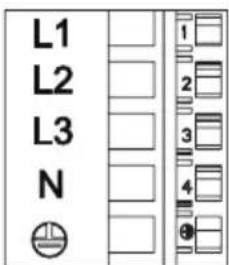
220-240V 1N \~ H05V2V2-F 3G 220-240V 2\~ H05V2V2-F 3G

380-415V 2N\~ H05V2V2-F 4G 220-240V 3\~ H05V2V2-F 4G
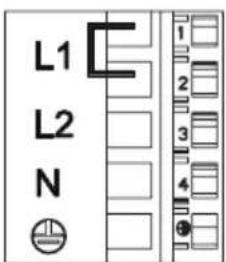
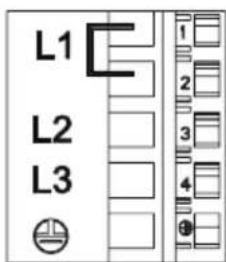
380-415V 3N\~ H05V2V2-F 5G
flowchart
graph TD
    A["A"] --> B["I"]
    B --> C["O"]
    C --> D["03"]
    D --> E["N"]
    E --> F["9."]
    F --> G["E1"]
    G --> H["H"]
    H --> I["E2"]
    I --> J["F"]
    J --> K["E3"]
    K --> L["T"]
    L --> M["G"]
    M --> N["F3"]
    N --> O["B1"]
    O --> P["D"]
    P --> Q["B"]
Fig.4
flowchart
graph TD
    A["O"] --> B["03"]
    C["N"] --> D["03"]
    D --> E["T"]
    E --> F["G"]
    F --> G["F3"]
    H["E2"] --> I["E1"]
    I --> J["F"]
    K["E3"] --> L["E4"]
    M["E"] --> N["H"]
    N --> O["H1"]
    P["F1"] --> Q["H1"]
    Q --> R["H"]
    S["I"] --> T["C"]
    T --> U["D"]
    V["B1"] --> W["B"]
    X["B4"] --> Y["B"]
GENERALITÀ
O.S.D. (Overflow Safety Device) (Fig.4):
O.S.D. (Overflow Safety Device) (Abb.4):
O.S.D.(Overflow Safety Device) (Fig.4):
O.S.D. (Overflow Safety Device) (Fig.4):
HEAT UP (Chauffage Rapide):
Carefully read the contents of this leaflet since it provides important instructions regarding safety of installation, use and maintenance.
Keep the leaflet for possible future consultation. All the operations relating to installation/replacement (electrical connections) must be carried out by specialised personnel in conformity with the regulations in force.
SAFETY WARNINGS
It is recommended to use flat-bottom pans with a diameter equal to or slightly larger than that of the heated area. Do not use pans with a rough base to prevent scratching the heat surface of the cooktop (Fig.2).
This appliance is not suitable for use by children or persons requiring supervision. Do not let children play with the appliance.
Important:
- Avoid spilling liquid, therefore to boil or heat liquids, reduce the heat.
- Do not leave the heating elements on with empty pots and pans or without receptacles.
- When you have finished cooking, switch off the relevant heating element with the control indicated below.
Attention:
- Steam cleaners must not be used.
- If the surface is cracked, switch off the appliance to prevent electric shock.
- This appliance is not intended for use by young children or infirm persons without supervision.
- Young children should be supervised to ensure they do not play with the appliance.
This appliance conforms to the European Directive EC/2002/96, Waste Electrical and Electronic Equipment (WEEE). By making sure that this appliance is disposed of in a suitable manner, the user is helping to prevent potential damage to the environment or to public health.
The symbol on the product or on the accompanying paperwork indicates that the appliance should not be treated as domestic waste, but should be delivered to a suitable electric and electronic appliance recycling collection point.
Follow local guidelines when disposing of waste. For more information on the treatment, re-use and recycling of this product, please contact your local authority, domestic waste collection service or the shop where the appliance was purchased.
INSTALLATION INSTRUCTIONS
These instructions address specialised installers and serve as a guide for installation, adjustment and maintenance in conformity with the laws and regulations in force. If a built-in oven or any other appliance that generates heat must be fitted directly under the glass-ceramic cooktop, THIS APPLIANCE (oven) AND THE GLASS-CERAMIC COOKTOP MUST BE SUIT-ABLY INSULATED in such a way that the heat generated by the oven, measured on the bottom right of the cooktop, does not
exceed 60°C. Failure to respect this precaution may determine improper functioning of the TOUCHCONTROL system.
Positioning (Fig.1):
The domestic appliance is designed to be built into a worktop as illustrated in the specific figure. Apply sealant around the entire perimeter (cut-out dimensions Fig.1B). Fix the domestic appliance on the worktop by means of the 4 brackets provided, taking the thickness of the worktop into account (Fig.1A). If the lower part of the appliance, after installation, is accessible via the lower part of the cabinet then it is necessary to mount a separator panel respecting the distances indicated (Fig.1C). If the appliance is installed with an oven underneath then the separator is not necessary.
Electrical connections:
Before making the electrical connections, check that:
- the ground cable is 2cm longer than the other cables;
- the system ratings meet the ratings indicated on the identification plate fixed on the lower part of the worktop;
- the system is fitted with efficient earthing compliant to the laws and regulations in force.
Earthing is obligatory by law.
If the appliance is not fitted with a cable, use type:
"H05V2V2-F" for a power level of up to 6400 Watts. The cross-section of the cable should be at least 2.5mm^2 , or 4mm^2 for greater power levels.
The cable should never reach a temperature which is 50^ C above the temperature of the room in which it is installed.
The appliance is designed for permanent connection to the electricity supply and should therefore be fitted with an omnipolar switch which has a minimum opening of 3mm between contacts. The switch should be suitable for the charge indicated on the appliance data plate and must conform to all current legislation (the yellow/green earth wire must not be interrupted by the switch).
The omnipolar switch must be easy to reach once the installation process has been completed.
USE AND MAINTENANCE
ATTENTION!
- The equipment has a 2800 - 3300 W power limiting system. Please refer to the "Power Limiting" section to use this function.
- Before using the cooktop, turn on all heating plates for at least 15 minutes in 3-4 power level. This is a first-ignition process, and must be repeated if cooktop is no used for some weeks.
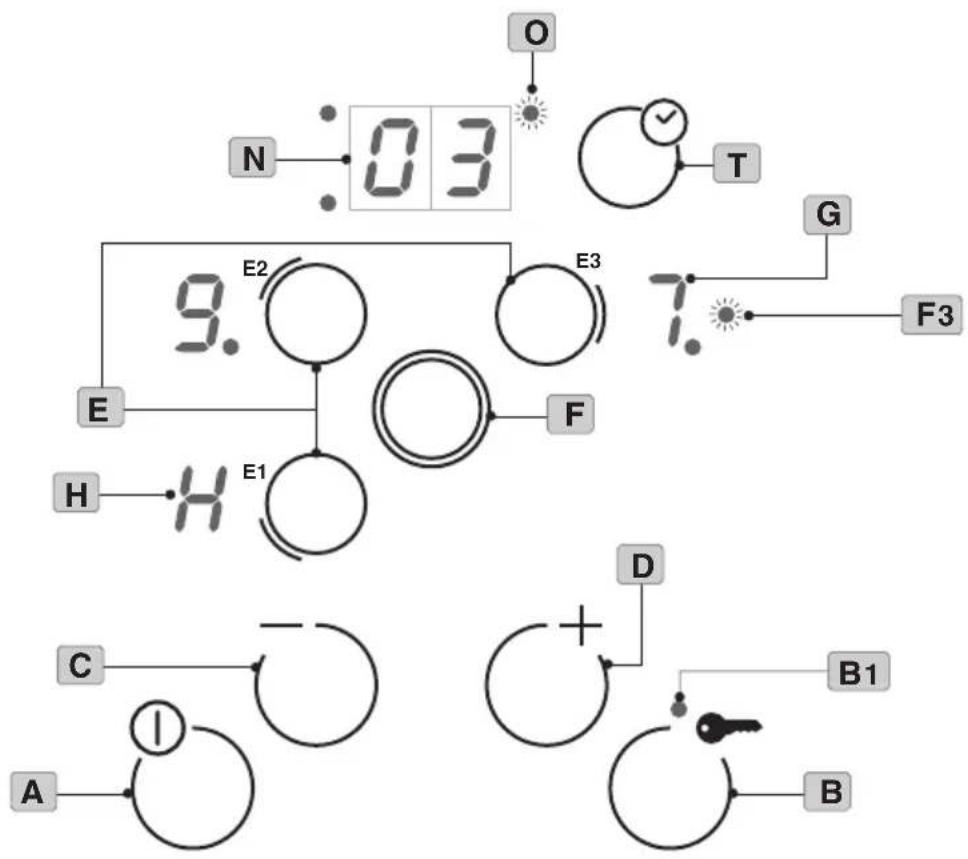
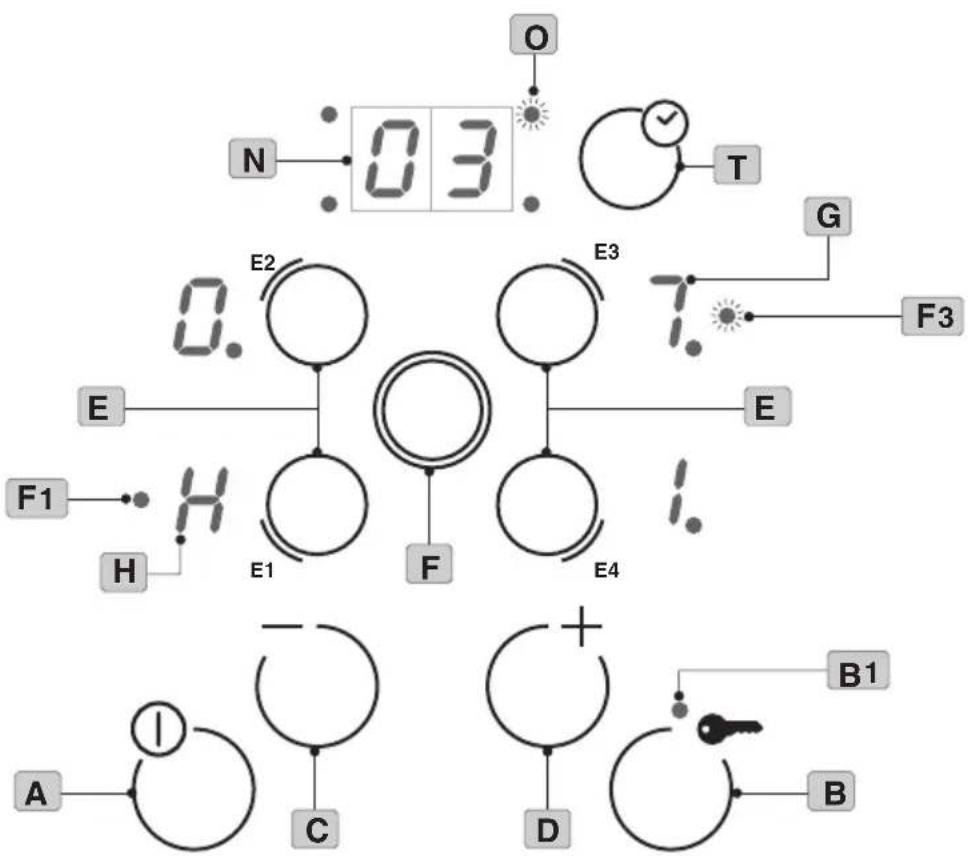
Use (Fig.4):
A = ON/OFF button
B = Key button
B1 = key button ON/OFF indicator
C = "-"button
D = "+"button
E = Heating plate selection button
E1-E3 = Prearrangement for double or triple heating plates
F = Double or triple heating plate selection button
F1-F3 = Double or triple active heating plate indicator
G = heating plate display
H = Residual heat indicator "H"
T = Timer button
N = Timer Display
O = Heating plate with active timer function indicator.
Cooktop Ignition:
- Verify that "B1" led is off before turning the equipment on; otherwise, turn it off by pressing the "B" key button for approximately 2 seconds.
- Next, select the "A" button.
- All "G" displays will show a '0' for about 10 seconds. If no action is taken during this period, the cooktop will go off.
Heating Plate Ignition:
- A heating plate can be turned on by selecting one of the "E" buttons. A blinking zero will appear on the display.
- Use "+" or "-" buttons to regulate the power level. If the "+" button is selected, the display will show power level 1. If the
"- " button is selected, the display will show power level 9. - After this, power level can be regulated by pressing the "+" or "-" buttons.
Turning off the heating Plate:
- Select the appropriate heating plate by pressing the "E" button. The display will start blinking.
- Use the "-" button to set power level to zero. OR
- Select the heating plate by pressing the "E" button and the display will start blinking.
- Press the "+" and "-" buttons simultaneously.
You can turn off all the heating zones simultaneously by pressing the ON/OFF button.
Double Plate Function:
- The double plate function is only activated, depending on the model, on the "E1-E3" heating plates.
- Select and adjust the power level as described in "Heating Plates Ignition" section.
- Select the "F" button.
- After activating the double plate, a "F1-F3" fixed led will appear near the display of the previously selected plate.
To deactivate this function, follow the instructions below: - Select the plate using the "E1-E3" button.
- Press the "F" button to deactivate this function. The "F1-F3" led will go off at the same time.
Triple Plate Function:
- The triple plate function is only activated, depending on the model, in the "E3" heating plates.
- Select and adjust the power level as described in the "Heating Plates Ignition" section.
- Select the "F" button.
- After activating the triple plate, an "F3" blinking led will appear near its corresponding display.
- Select the "F" button again to activate the triple plate.
- At this point the "F3" led will be fixed.
To deactivate this function, follow the instructions below:
- Select the plate using the "E3" button.
- Press the "F" button to deactivate this function, and the led near the display starts blinking.
- Next the double heating zone will operate again.
Residual Heat Function:
- When the "E" heating plate is in position 'OFF', and the glass surface temperature is above 50 °C, a light indicator appears on the "G" display of the heating plate:
1) If other plates are still operating, the display shows an alternating "0" and "H";
2) When the equipment is in the 'OFF' position, the display shows a fixed "H".
Key Function (Fig.4B):
To prevent children or people- requiring supervision- from using the cooktop, all functions can be blocked with the "B" button.
To activate or deactivate, press the "B" button for approximately 2 seconds. The function is activated when the "B1" indicator is turned on.
If the appliance is on and the key function is activated, the ON/OFF button works in the same way.
O.S.D.(Overflow Safety Device) (Fig.4):
The cooktop has a safety system that turns all the plates OFF and activates the safety lock if any liquid or objects are found on the control area.
The cooktop goes off automatically.
HEAT UP:
The Heat Up function allows the heating plate to be at maximum temperature for a certain period of time; then, the temperature drops to a lower selected value.
HEAT UP activation:
- Select the heating zone using the "E" button.
- Set power level to 9.
- Select the "+" button again.
-
A "-" decimal point will appear on the display, near the power level, for about 5 seconds. During this period select the desired power level -between 1 and 8- to be reached within a short period of time.
-
If you select power level 9 the function will be cancelled.
- When the heat up function is activated, it is possible to raise the temperature level selected before.
- When the function is over, an acoustic BEEP signal is heard. After the acoustic signal, the appliance will continue working with the power level set beforehand.
HEAT UP deactivation:
- Select the heating zone using the "E" button.
- Set power level to 9.
- When the "•" decimal point on the display disappears, the function is deactivated.
TIMER (Fig.4T):
This function sets the auto turn-off time (from 1 to 99 minutes) for the selected heating plates.
Note: The Timer can be simultaneously activated in all the heating plates.
- Select the "E" heating plate.
- Set the power level, from 1 to 9, by pressing the "+" and "-" buttons.
- Select the "F" timer button.
- The "O" plates indication led will start blinking.
- Set the desired time using the "+" and "-" buttons.
- After some seconds, the time set will be fixed on the "N" display and the remaining time will be shown.
- When the time set before is over, the "N" timer display and the "O" plates indicator will start blinking followed by an acoustic signal. This indicates that the time set is over and that the heating zone is off.
- If the timer is activated simultaneously in more plates, the minimum residual time will appear on the display with the corresponding heating zone blinking led.
- To deactivate the acoustic signal, press the "T" timer button; otherwise, it will be automatically off after about 1 minute.
- To deactivate the blinking light indicator, press the "T" timer button.
To deactivate the timer function before the set time, follow the instructions below:
- Select the "E" heating zone.
- Press the "T" timer button.
- Set the time in "0" with the "-" button.
- When the "G" display and the "O" plate indicator stop blinking, the function is deactivated.
Note: To display the residual cooking time, just press the cooking zone "E" of interest selection button.
Power Limiting:
The cooktop has a 2800 -3300 W POWER LIMITING SYSTEM.
The product can be set up with the following instructions:
- Disconnect and reconnect the appliance to the domestic power supply.
- Select the "B" button within 30 seconds after the reconnection to the domestic power supply.
- Press the "E1", "+" and "-" buttons simultaneously.
- 99 values are shown on the display.
- Use the "+" or "-" buttons to set the desired power (28 for 2800 W, 33 for 3300 W, or 99 for no limitation).
- Having the desired power already set, press the "E1", "+" and "-" buttons simultaneously.
- The cooktop is adjusted to the desired power.
- To change the power again, repeat the whole procedure.
ATTENTION!
To avoid damaging electronic circuits, the board has an overheating safety system. When used at higher power levels for a long time, the cooktop can go off temporarily. The letters "Fs" are shown on the display until an ideal temperature is reached.
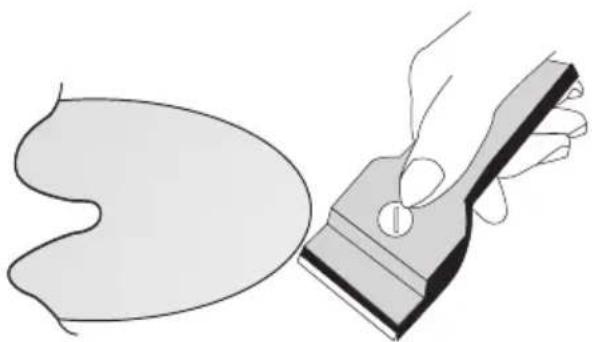
Maintenance (Fig.3):
Remove any residues of food and drops of grease from the cooking surface using the special scraper supplied on request.
Clean the heated area as thoroughly as possible using SIDOL, STAHLFIX or similar products and a cloth/paper, then rinse with water and dry with a clean cloth.
Using the special scraper (optional) immediately remove any fragments of aluminium and plastic material that have unintentionally melted on the heated cooking area or residues of sugar or food with a high sugar content. In this way, any damage to the cooktop surface is prevented.
Under no circumstances use abrasive sponges or irritating chemical detergents such as oven sprays or stain removers.
THE MANUFACTURER DECLINES ALL RESPONSIBILITY FOR EVENTUAL DAMAGES CAUSED BY BREACHING THE ABOVE WARNINGS.
ALGEMENE INFORMATIE
WAARSCHUWINGEN MET BETREKKING TOT DE VEILIGHEID
G = Display kookzone
H = Symbool resterende warmte "H"
T = Timertoets
N = Display Timer
O.S.D. (Overflow Safety Device) (Afb.4):
Deactivering HEAT UP:
O.S.D. (Overflow Safety Device) (Fig.4):
H = Symbol for restvarme "H"
T = Taste Timer
N = Display Timer
O.S.D. (Overflow Safety Device) (Fig.4):
O.S.D. (Overflow Safety Device) (Kuva 4):
B1 = Indikator for ON/OFF tastelås
C = Tast for "-"
D = Tast for "+"
G = Display for kokesone
H = Symbol for resterende varme "H"
T = Tast for Timer
N = Display for Timer
O=Indikator for kokesoner som har aktivert timerfunksjon.
O.S.D. (Overflow Safety Device) (Fig.4):
HEAT UP (Hurtigoppvarming):
O.S.D. (Overflow Safety Device) (Fig.4):

- GENERALITÀ
- O.S.D. (Overflow Safety Device) (Fig.4):
- O.S.D. (Overflow Safety Device) (Abb.4):
- O.S.D.(Overflow Safety Device) (Fig.4):
- HEAT UP (Chauffage Rapide):
- SAFETY WARNINGS
- Important:
- Attention:
- INSTALLATION INSTRUCTIONS
- Positioning (Fig.1):
- Electrical connections:
- USE AND MAINTENANCE
- ATTENTION!
- Use (Fig.4):
- Cooktop Ignition:
- Heating Plate Ignition:
- Turning off the heating Plate:
- Double Plate Function:
- Triple Plate Function:
- Residual Heat Function:
- Key Function (Fig.4B):
- HEAT UP:
- TIMER (Fig.4T):
- Power Limiting:
- Maintenance (Fig.3):
- ALGEMENE INFORMATIE
- WAARSCHUWINGEN MET BETREKKING TOT DE VEILIGHEID
- O.S.D. (Overflow Safety Device) (Afb.4):
- O.S.D. (Overflow Safety Device) (Kuva 4):
- HEAT UP (Hurtigoppvarming):
Brand : Glem Gas
Model : GTH63TBK
Category : Cooker