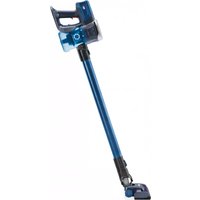
1643FL - Vacuum Cleaner Flama - Free user manual and instructions
Find the device manual for free 1643FL Flama in PDF.


| Product type | Cordless vacuum cleaner |
| Brand | Flama |
| Model | 1643FL |
| Net weight | 2.4 kg |
| Battery | 22.2 V / 2200 mAh |
| Charging time | 4.5 hours |
| Battery life | 15 min (full power) / 35 min (combined use) |
| Power | 140 W |
| Suction | 9 kPa |
| Airflow rate | 20 m³/s |
| Filter | Washable HEPA filter + metal filter |
| Dust bin capacity | Not explicitly specified, transparent dust bin |
| Included accessories | Motorized multi-surface brush, furniture and carpet brush, crevice tool, extension tube, wall mounting bracket |
| Noise level | Not specified |
| Maintenance | Empty the dust bin after use; wash the HEPA filter and protector with water; clean the rotating brush |
| Safety | Do not vacuum liquids, do not use without filter, use only the supplied charger, do not expose to moisture |
| Warranty | 36 months from purchase date (according to terms) |
| Consumables | HEPA filter (replace every 50 hours of use) |
| Usage | Dry surfaces only, no liquids |
Frequently Asked Questions - 1643FL Flama
User questions about 1643FL Flama
0 question about this device. Answer the ones you know or ask your own.
Ask a new question about this device
Download the instructions for your Vacuum Cleaner in PDF format for free! Find your manual 1643FL - Flama and take your electronic device back in hand. On this page are published all the documents necessary for the use of your device. 1643FL by Flama.
USER MANUAL 1643FL Flama
natural_image
Black adjustable vacuum cleaner with a long black handle and control panel (no visible text or symbols)1643FL
PT ASPIRADOR VERTICAL SEM FIOS 1 ES ASPIRADORA ESCOBA SIN CABLE 9 EN CORDLESS STICK VACUUM CLEANER 17 FR ASPIRATEUR BALAI SANS FIL 25
ASPIRADOR VERTICAL SEM FIOS
INSTRUÇÕES DE SEGURANÇA
natural_image
Symbol of a trash bin crossed with a diagonal line and a horizontal bar below (no text or numbers present)natural_image
Symbol of a trash bin with crossed lines indicating no waste or discharge (no text or labels)Please read these instructions carefully before using the appliance for the first time and keep them for future reference.
FLAMA shall not be liable for any use that is not in accordance with the instructions.
This appliance may be used by persons unfamiliar with its use, by disabled persons, or by children aged 8 and over, provided that they are supervised or have received training concerning the safe use of the appliance and understand the dangers it entails.
Children must not carry out cleaning or maintenance operations, unless they are supervised by an adult.
This appliance is not a toy. Children should be supervised to ensure they do not play with the appliance.
Only connect the charger to a low-voltage power socket that corresponds to the appliance's specifications.
Before connecting the charger to the mains, check that the voltage indicated on the specifications label matches the mains voltage.
The appliance's plug must match the electrical socket. Never tamper with the plug. Do not use plug adapters.
Do not force the power cord. Never use the power cord to lift, transport or disconnect the battery charger.
Check the condition of the power cord. Damaged or entangled cords increase the risk of electrical shock.
Do not touch the plug with wet hands.
Do not use the appliance if the power cord or the plug are damaged.
If any of the casings of the appliance break, immediately disconnect the appliance from the power supply to avoid the possibility of getting an electric shock.
Do not use the appliance if it has fallen and if there are visible signs of damage or leakage.
Avoid any contact with the liquid that may spill out of the battery. In case of accidental contact with the eyes, rinse them and consult a physician immediately. Liquid spilled from the battery may cause irritation or burns.
Unplug the battery charger from the mains when it is not in use and before starting any cleaning operation.
The appliance must be disconnected from the charger before removing the battery.
The battery must be removed from the appliance before it is disposed of.
The battery must be disposed of safely.
Do not use or store the appliance outdoors.
Do not expose the appliance to rain or wet conditions. Any water inside the appliance will increase the risk of electric shock.
USE AND CARE:
Do not use the appliance if its filter(s) are not correctly placed.
Do not use the appliance if the accessories are not correctly fitted.
Do not use the appliance to collect water or any other liquid.
Do not use the appliance if the on/off device is not working.
Respect the indication of the MAX level of the waste container.
Do not use over areas containing metallic objects, such as staples and/or screws.
Never vacuum incandescent or sharp objects (butts, ashes, nails, etc.).
Never open the battery(ies) under any circumstances.
When the battery(ies) are not in use, keep them away from other metallic objects, such as paper clips, coins, keys, etc., which can connect one pole to the other.
Avoid short-circuiting the battery terminals, as there is a risk of explosion or fire.
Do not store the appliance in places where the ambient temperature may exceed 40^ C.
Only use the appliance for dry tasks.
Never leave the appliance unattended if it is switched on. Furthermore, you will save energy and prolong the useful life of the appliance.
Do not use the appliance on any part of the body of a person or animal.
Only recharge the battery(ies) with the charger provided by the manufacturer. A charger that is suitable for a certain type of battery may pose a risk of explosion or fire if used with other battery(ies).
Only use the device with the battery(ies) with which it was specifically designed. Using other battery(ies) may pose a risk of explosion or fire.
To recharge the battery, use only the charger provided with the appliance.
Warning - The appliance has a rotary brush; some objects may get trapped in the rotary brush.
This product complies with the Low-Voltage and Electromagnetic Compatibility Directives, as well as with the Directives on restrictions on the use of certain hazardous substances in electrical and electronic appliances and on ecodesign requirements applicable to energy-related products.
This instruction manual is also available in PDF format at www.flama.pt.
IMPORTANT:
Press and hold the accessory release button while fitting or removing the tube or accessories. Do not force any of the components, as this could damage the appliance.
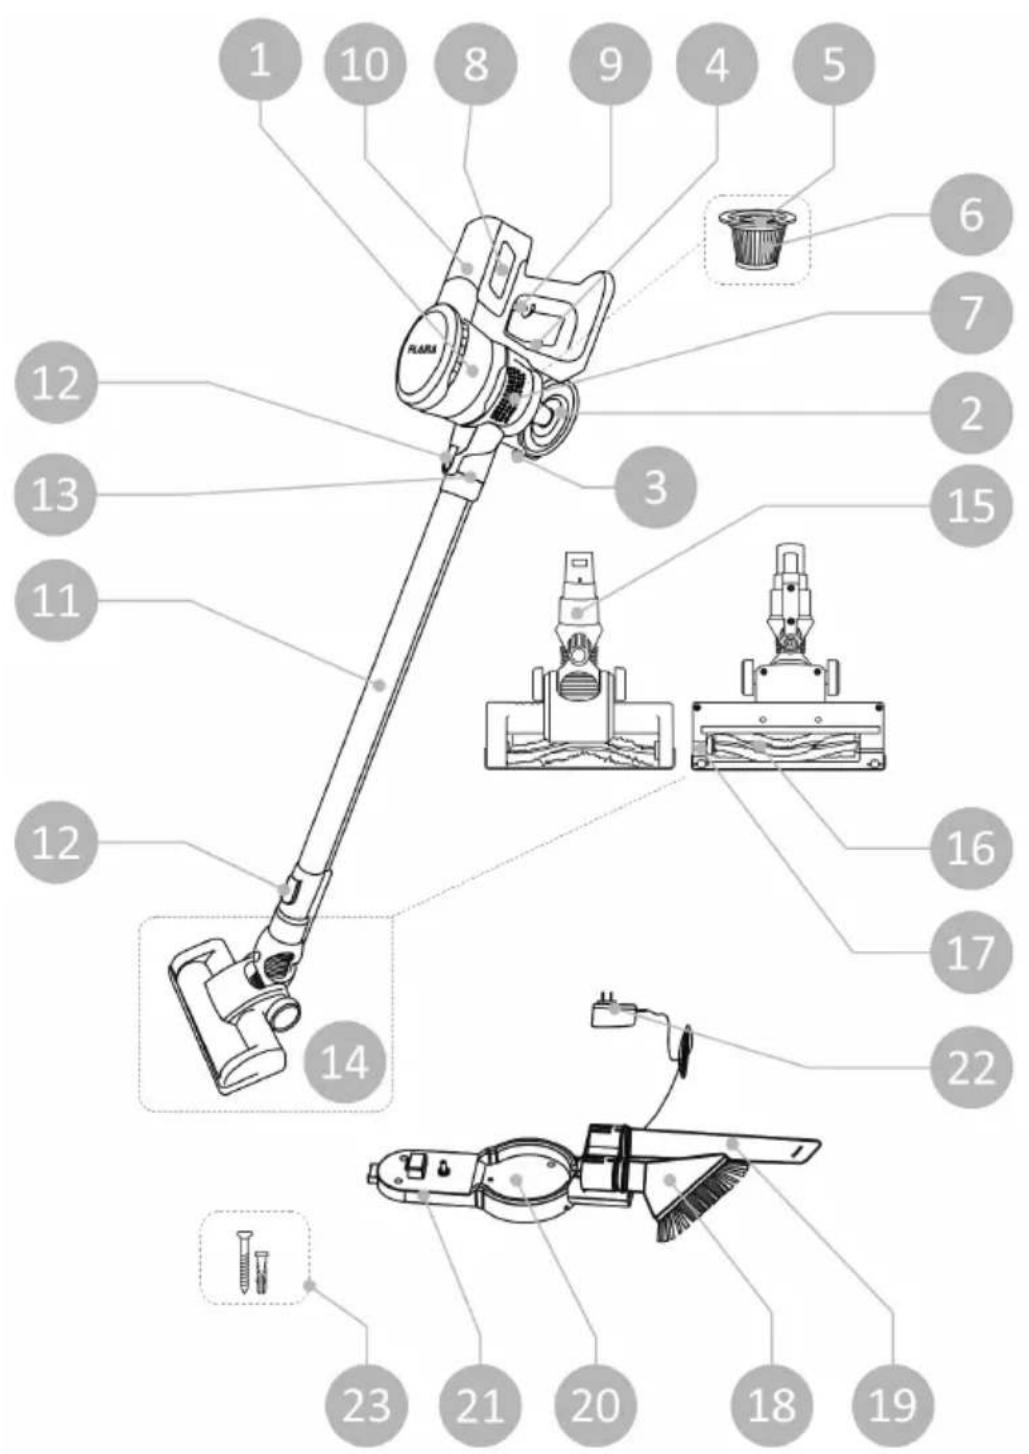
DESCRIPTION
- Vacuum cleaner body
- Dust bin
- Bin lid button
- Bin release button
- HEPA filter
- HEPA filter enclosure
- Metallic filter
- Battery
- ON/OFF button
- Use/battery indicator
- Wand
- Accessory release button
- Wand/accessory connection
- Multi-surface motorized cleaner head
- Socket
- Rotating brush
- Rotating brush release button
- Upholstery brush
- Crevice tool
- Wall dock
- Wall dock rear cover
- Charger
- Screws and dowels for the wall dock
INSTALLATION/ASSEMBLY
Remove all labels, stickers and tags except the product nameplate.
Wall dock
The appliance has a wall dock, which should be affixed to the wall.
Attach the wall dock as you see fit, using dowels, screws, glue, etc.
Make sure that the dock can support at least double the weight of the appliance.
Dock the appliance in the wall dock.
The appliance can be charged without using the wall dock. To do so, unscrew the rear cover of the wall dock and remove the cable from the charger, which can be directly connected to the vacuum cleaner.
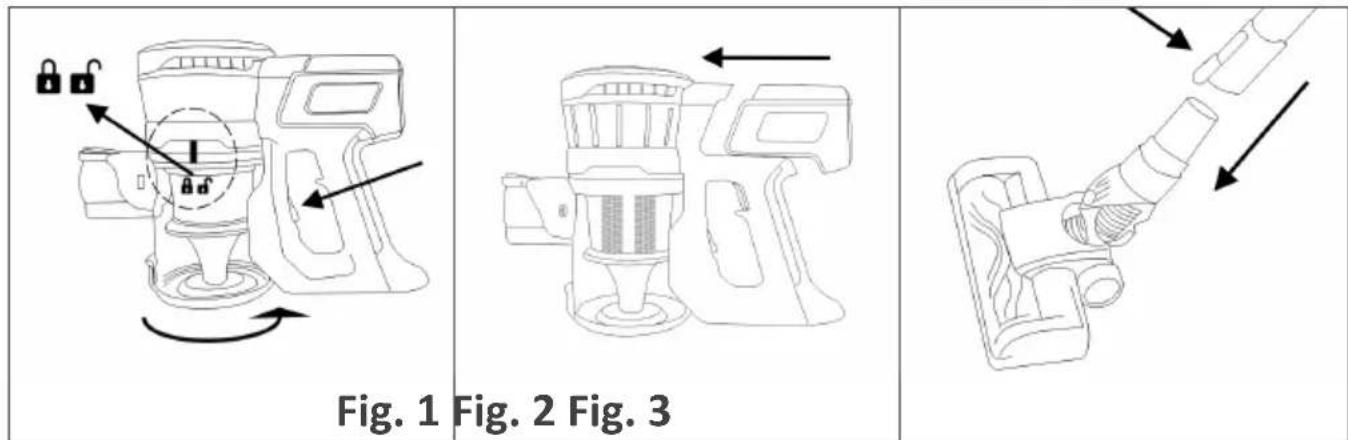
Assembling the dust bin (Fig. 1)
Align the UNLOCK symbol on the dust bin with the mark on the vacuum cleaner body.
Set the bin into the body.
Pressing and holding the bin release button, turn the dust bin counterclockwise until you hear a CLICK.
Assembling the battery (Fig. 2)
Insert the battery and make sure it is securely attached.
Warning: New batteries are not fully charged and should be charged completely before using the appliance for the first time.
Charge the battery at room temperatures between 4 and 40°C (39-104°F).
Connect the charger to a wall socket.
The time needed for a full charge is around 3 to 4 hours. Never overload the batteries (only the first charge is recommended to be done over 5 consecutive hours).
Plug the charger connector into the socket on the back of the appliance.
While the battery is charging, the pilot light will turn on to indicate that the charger is charging the battery.
Remove the battery from the charger after the specified amount of time.
Once charging is complete, unplug the charger from the wall outlet.
Note: Do not use the appliance while it is plugged in.
Note: For a long useful battery life, it is recommended that you only charge the battery once it is fully depleted.
Use indicator
The use indicator indicates the battery status:
Flashing red - the battery needs to be charged.
Steady red - the battery is low.
Steady green - charge complete.
Assembling the multi-surface motorized cleaner head and accessories (Fig. 3)
Fit the wand, multi-surface motorized cleaner head or the accessories into the wand/accessory connection or into the end of the wand.
WARNING
Press and hold the accessory release button while fitting or removing the tube or accessories. Do not force any of the components, as this could damage the appliance.
OPERATION
Use/battery indicator
The use indicator indicates the battery status:
Flashing red - the battery needs to be charged.
Steady red - the battery is low.
Steady green - charge complete.
Before first use
Before using the product for the first time, it is important to let the battery charge completely.
Prepare the appliance according to the desired vacuum function.
Use
Press the ON/OFF button to start the appliance (the use/battery indicator will light up) and vacuum at moderate strength.
Press the button again to vacuum at maximum strength.
Pressing the button again will turn off the appliance.
After use
To remove the wand and the accessories from the vacuum cleaner, press the accessory release button and pull.
Remove the battery from the appliance if it will not be used for a long period of time.
Clean the appliance.
CLEANING AND MAINTENANCE
Unplug the charger from the wall outlet and let it cool down before beginning any cleaning operation.
Clean the appliance with a damp cloth and a few drops of detergent, drying it immediately afterward.
Do not use solvents, products with acidic or basic pH, such as bleach, or abrasive products to clean the appliance.
Never submerge the appliance in water or any other liquid, and do not place it under running water.
NOTE - as can occur with any painted parts, with use and after a certain period of time the paint will begin to wear away. This is normal and does not affect the appliance's performance. Some hand creams and disinfectants can accelerate this process.
Emptying the dust bin
Empty the dust bin when it is full or when there is a noticeable reduction in the appliance's suction strength.
Remove the accessories from the bin's air intake.
Open the lid of the bin by pressing the bin lid button and empty the contents into an appropriate waste container.
Cleaning/substituting the filter
It is recommended to periodically check the state of the dust bin HEPA filter (a highly-efficient air filter that effectively captures spores, ashes, mites, pollen, etc.) and to substitute it after every 50 hours of use.
Remove the dust bin by pressing the bin release button.
Turn the dust bin clockwise.
Remove the metallic filter, the HEPA filter and the HEPA filter enclosure.
To remove the HEPA filter, gently turn it to the right to remove it from the metallic filter.
Remove the HEPA filter enclosure.
Wash the enclosure and the HEPA filter with water.
Allow the HEPA filter and the filter enclosure to dry completely before reassembling.
Proceed in reverse order to mount the HEPA filter to the metallic filter. Make sure you have already assembled the HEPA filter enclosure.
Place the metallic filter inside the bin and mount the dust bin as described in the "Assembling the dust bin" section.
Cleaning the brushes
At the bottom of the multi-surface motorized cleaner head, slide the rotating brush release button outwards to remove the rotating brush. Remove the rotating brush and clean it.
To re-assemble it, follow the directions above in reverse order.
Clean the multi-surface motorized cleaner head with a damp cloth and a few drops of detergent, drying it immediately afterward.
CONSUMABLES
All consumables (filters, etc.) for your appliance model may be acquired from authorized distributors and establishments.
Always use manufacturer consumables designed specifically for your appliance model.
TROUBLESHOOTING
| Does not vacuum well / loss of suction | Empty the dust binMake sure the bin is correctly fittedMake sure the filter is correctly fittedClean the filter |
| Stopped working | Charge the batteryClean debris from the motorized cleaner head brush |
| Battery does not charge | Check the connection to the wall socketCheck the connections |
TECHNICAL DATA
| Battery 22.2V/2200mA | |
| Charge time 4,5hours | |
| Battery charger - output 26V/500mA | |
| Net weight 2.4Kg | |
| Run time | 15 minutes at full strength35 minutes at mixed use |
| Output 140W | |
| Suction 9 kPa | |
| Air flow 20m3/s |
ANOMALIES AND REPAIR
In case of malfunction, please take the appliance to an authorized Technical Assistance Service. Do not attempt to disassemble or repair the appliance, as this may be dangerous.
PROTECTING THE ENVIRONMENT
natural_image
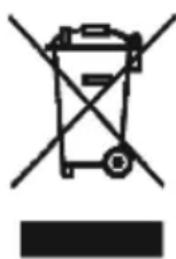
Symbol of a trash bin with crossed lines indicating no waste or discharge, and a solid black rectangle below (no text or labels)This symbol indicates the separate collection of electrical and electronic equipment.
The main objective of the separate collection of this waste is to reduce the quantity to be disposed of, promote re-
use, recycling and other forms of recovery in order to reduce its negative effects on the environment.
When it is no longer in use, this appliance must not be disposed of together with other unsorted municipal waste.
The user is responsible for delivering it free of charge to the selective collection facilities available for that purpose.
Pieces of equipment that are no longer in use can also be taken back at points of sale, by purchasing new pieces of equipment that are equivalent and have the same functions.
For more detailed information on collection points, please contact your City Council or a point of sale for this equipment.
ASPIRATEUR BALAI SANS FIL
CONSIGNES DE SÉCURITÉ
DYSFONCTIONNEMENTS ET RÉPARATIONS
natural_image
Symbol of a trash bin with crossed lines indicating no waste, and a solid black rectangle below (no text or labels)- Keep the proof of purchase (receipt) for this product carefully. When a repair is made under these conditions, the technician will require proof of purchase. This assistance can only be provided once you have proven, with the proof of purchase, that your appliance is within the warranty period.
- The warranty period for this appliance is defined by the respective EU Directive in force on the date of purchase/delivery.
- Within the guarantee period, we will repair or replace, free of charge, any parts which, during the normal use of the appliance, have deteriorated as a result of a proven material or manufacturing defect.
- This warranty does not cover consumable items, light bulbs, easily breakable parts made of glass or plastic, or any other defects that do not impair its proper functioning.
- We accept no liability for damage caused by incorrect or careless use of the appliance, by its connection to an electrical current other than that indicated on the appliance's rating plate, by faulty electrical installation, or by atmospheric, chemical or electrochemical causes. Other claims or demands for compensation relating to objects which are not an integral part of the appliance will be denied.
- The provision of assistance under warranty does not extend the warranty period. Only within this period will assistance be provided under warranty. The right to assistance is only granted to the first purchaser of the device and cannot be transferred to a third party.
- The warranty expires when unauthorized persons have attempted to repair, modify or replace parts of the appliance.
- All expenses and risks of transportation to our factory or vice versa will always be borne by the buyer.
WARRANTY CONDITIONS
To benefit from the Technical Assistance service during the 36-month warranty period after the date of purchase, you will need to:
Present the Invoice/Proof of Purchase, stating the model and the manufacturing number of the product (whenever possible).
Note: Failure to present the aforementioned documents will be grounds for not providing services under warranty.
CONDITIONS DE GARANTIE
CONDITIONS DE GARANTIE
- ASPIRADOR VERTICAL SEM FIOS
- INSTRUÇÕES DE SEGURANÇA
- USE AND CARE:
- IMPORTANT:
- DESCRIPTION
- INSTALLATION/ASSEMBLY
- Assembling the dust bin (Fig. 1)
- Assembling the battery (Fig. 2)
- Assembling the multi-surface motorized cleaner head and accessories (Fig. 3)
- WARNING
- OPERATION
- Before first use
- Use
- After use
- CLEANING AND MAINTENANCE
- Emptying the dust bin
- Cleaning/substituting the filter
- Cleaning the brushes
- CONSUMABLES
- ANOMALIES AND REPAIR
- PROTECTING THE ENVIRONMENT
- ASPIRATEUR BALAI SANS FIL
- CONSIGNES DE SÉCURITÉ
- DYSFONCTIONNEMENTS ET RÉPARATIONS
- WARRANTY CONDITIONS
- CONDITIONS DE GARANTIE
Brand : Flama
Model : 1643FL
Category : Vacuum Cleaner