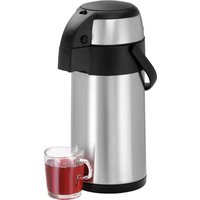
150992 - Water dispenser BARTSCHER - Free user manual and instructions
Find the device manual for free 150992 BARTSCHER in PDF.


| Product Type | Samovar / Hot Water Dispenser |
| Brand | Bartscher |
| Model | 150992 (code 191001) |
| Material | Stainless steel |
| Water tank capacity | 3 liters |
| Teapot capacity | 1.2 liters |
| Dimensions (with teapot) | Diameter 200 mm, Height 490 mm |
| Weight | 1.7 kg |
| Electrical supply | 230 V ~ 50 Hz, 1.5 kW |
| Temperature setting | Continuous (positions WARM, HOT, BOIL, OFF) |
| Main functions | Heat water, continuous or intermittent boiling, keep warm |
| Included accessories | Teapot 1.2 L, tea strainer, lid, drain tap |
| Safety | Overheat and dry operation protection, automatic shut-off |
| Cleaning and descaling | Regular cleaning, descaling recommended every 1 to 2 weeks; lid, teapot, and tea strainer dishwasher-safe |
| Spare parts and repairability | Use only original parts; repairs by qualified professional |
| Intended use | Domestic and similar use: preparing tea, infusions, hot water for instant beverages |
| General information | Instruction manual included; store in a dry place, protected from frost and direct sunlight |
Frequently Asked Questions - 150992 BARTSCHER
User questions about 150992 BARTSCHER
0 question about this device. Answer the ones you know or ask your own.
Ask a new question about this device
Download the instructions for your Water dispenser in PDF format for free! Find your manual 150992 - BARTSCHER and take your electronic device back in hand. On this page are published all the documents necessary for the use of your device. 150992 by BARTSCHER.
USER MANUAL 150992 BARTSCHER
natural_image
Exterior view of a modern Bartscher coffee maker with dual-tiered teapot and control panel (no text or symbols visible)191001
Bedienungsanleitung
Samowar 3L
Seite 1 bis 20
D/A/CH
Instruction manual
Samovar 3L
from page 21 to 40
GB/UK
Mode d'emploi
Samovar 3L
natural_image
Illustration of two hands operating a valve, showing the process with no text or symbols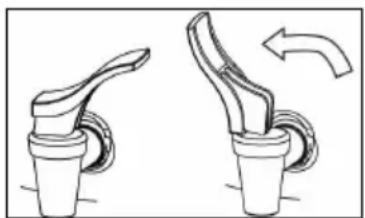
natural_image
Diagram showing two mechanical components with curved arrows indicating motion (no text or symbols)Gerät ausschalten
of the original instruction manual
1. Safety 22
1.1 Safety instructions....22
1.2 Key to symbols 24
1.3 Sources of danger 24
1.4 Intended use 26
2. General information 27
2.1 Liability and Warrantees.... 27
2.2 Copyright protection 27
2.3 Declaration of conformity 27
3. Transport, packaging and storage.... 28
3.1 Delivery check.... 28
3.2 Packaging 28
3.3 Storage....28
4. Technical data 29
4.1 Overview of parts 29
4.2 Technical specification 30
5. Installation 30
5.1 Positioning....30
5.2 Electric connection 31
6. Start-up and operation.... 31
6.1 Before operation.... 31
6.2 Start-up 32
6.3 Operation 33
7. Cleaning and descaling 37
8. Possible Malfunctions ...... 39
9. Waste disposal 40
Bartscher GmbH
Read these instructions before using and keep them available at all times!
This instruction manual contains information about the installation, operation and maintenance of the device and should be consulted as an important source of information and reference guide. Awareness of the safety instructions and instructions for use in this manual will ensure the safe and correct use of the device.
In addition to the information given here, you should comply with any local Health and safety Controls and generally applicable safety regulations.
The instruction manual forms part of the product and should be kept near the device and easily accessible for anyone carrying out the installation, servicing, maintenance or cleaning.
1. Safety
This device is designed in accordance with the presently applicable technological standards. However, the device can pose a danger if handled improperly and inappropriately.
All people using the device should follow the instructions and tips contained in these instructions.
1.1 Safety instructions
- Do not use the device in case of incorrect operation, damages, or dropping on the floor.
- Electric shock hazard! Never immerse the device or plug in water or other liquids.
- Burn hazard! Overfilling of water tank may cause water splashing and burns! Do not exceed the maximum filling level!
-
The device must not be operated by children below 8 years old, as well as persons physically, sensorially, or mentally impaired, or having low experience and/or knowledge, unless they are supervised or instructed in range of safe operation and resulting hazards.
• Children must not play with the device. -
Cleaning and operational maintenance must not be performed by children, unless they are above 8 years old and supervised.
- Children below 8 years old must not be present in the vicinity of the device and the supply cable.
• Never leave the device unattended during its operation. - Never clean the device base in running water as it can get inside the unit and cause electrocution.
- The maintenance and repair works must be performed only by the qualified professionals with use of original spare parts and equipment.
- Do not use the accessories and spare parts not recommended by the producer. They may be dangerous for the user and other people or may damage the device and cause loss of warranty rights. Never attempt to repair the device by yourself!
- To prevent hazards and to ensure optimum efficiency, no modifications or alterations to the device that are not explicitly approved by the manufacturer may be undertaken.
• This device may only be operated in technically proper and safe condition. - Periodically inspect the electric supply cable for damages. Do not operate the device with the damaged supply cable. When the cable is damaged it should be replaced by the service company or qualified electrician in order to avoid the hazards.
- Do not control the device with use of external timer or remote controller.
• Only use the device indoors.
1.2 Key to symbols
In this manual, symbols are used to highlight important safety instructions and any advice relating to the device. The instructions should be followed very carefully to avoid any risk of accident, personal injury or material damage.

DANGER!
This symbol highlights hazards which could lead to injury.
To avoid them please follow the instructions very carefully and proceed with particular attention in these cases.

WARNING!
This symbol highlights dangerous situations which could lead to injury or death.
To avoid them please follow the instructions very carefully and proceed with particular attention in these cases.

CAUTION!
This symbol highlights dangerous situations which could lead to light injuries, or damage, malfunction, and/or destruction of the device.
To avoid them please follow the instructions very carefully and proceed with particular attention in these cases.
NOTE!
This symbol highlights recommendations and information aimed for effective and trouble-free device operation.
1.3 Sources of danger

DANGER!
Electric shock hazard!
Do not operate the device with the damaged supply cable or plug.
In any case do not open the device housing. In case of electrical or mechanical modifications the electric shock hazard will occur.
➢ Never immerse the device or plug in water or other liquids.
Remove the plug from its socket:
- when the device is not used,
- in case of anomalies during operation,
- before cleaning.

DANGER!
Suffocation hazard!
➢ Prevent access of children to the package materials like plastic bags and foamed polystyrene elements.

WARNING!
Do not use the device for heating other liquids than water.

WARNING!
Hazard connected with steam and hot water!
➢ Never fill the device above the maximum mark.
Do not open the water tank lid during boiling, the splashing hot water and released steam may cause burns.

WARNING!
Microbial hazard!
The water tank should be periodically completely emptied, cleaned, and disinfected in order to eliminate the possibility of harmful microbial growth.

CAUTION!
Do not use any sharp objects or abrasive agents for cleaning the surfaces.
➢ Never carry or lift the device by the supply cable.
The supply cable must be disconnected from the socket only by pulling the plug.
Do not use the device when the tank is empty.
1.4 Intended use
Safe operation is only guaranteed when using the device for its intended purpose. Any technical interventions, as well as assembly and maintenance are to be made by a qualified customer service only.
The device is intended for home use or in similar places such as:
- in kitchens for store or office employees or in other service locations;
- in suburban properties;
- by guests of hotels, motels and other places of accommodation;
- in Bed & Breakfasts.
The Samovar is ideally suited for preparing tea and other 'instant' hot drinks. The Samovar must not be used for:
- heating milk and other liquids which foam;
- reheating soups, sauces and other thick liquid dishes;
- Boiling up liquids containing sugar, sweeteners, acids, leaches or alcohols;
- Filling in and heating of inflammable, noxious, easily volatilizing or similar liquids or substances or materials.

CAUTION!
Any use going beyond the intended purpose and/or any different use of the device is forbidden and is not considered as conventional.
Any claims against the manufacturer or his authorized representative as a consequence of experiencing damages resulting from unconventional use are impossible.
The operator is liable for all damages resulting from inappropriate use.
2. General information 2.1 Liability and Warrantees
All the information and instructions in this manual take into account standard safety regulations, current levels of technical engineering as well as the expertise and experience we have developed over the years.
The instruction manual was translated with all due care and attention. However, we do not accept liability for any translation errors. The German version of this instruction manual is definitive.
If the delivery consists of a special model, the actual scope of delivery may differ from the descriptions and illustrations in this manual. This is also the case for special orders or when the device has been modified in line with new technology.

CAUTION!
Read this manual carefully and thoroughly before any operation of the device, and especially before turning it on!
Manufacturer is not liable for any damages or faults caused by:
- violation of advice concerning operation and cleaning;
- use other than designed;
- alterations made by user;
- use of inadequate spare parts.
We reserve the right to make technical changes for purposes of developing and improving the useful properties.
2.2 Copyright protection
The instruction manual including any texts, drawings, images or other illustrations is copyright. No part of this publication may be reproduced, transmitted or used in any form or by any means without permission in writing from the manufacturer. Any person who commits any unauthorized act in relation to this publication shall be liable to claims for damages. All rights reserved.
NOTE!
The contents, texts, drawings, pictures and any other illustrations are copyright and subject to other protection rights. Any person unlawfully using this publication is liable to criminal prosecution.
2.3 Declaration of conformity

The device complies with the current standards and directives of the EU. We certify this in the EC declaration of conformity. If required we will be glad to send you the according declaration of conformity.
3. Transport, packaging and storage
3.1 Delivery check
Please check the delivery upon completeness and transport damage immediately after receipt. In case of visible damage do not accept or accept the delivery with reservation only.
Note the extent of damage on the carrier's bill of delivery. Trigger off the complaint. Hidden damages should be reclaimed immediately after notice, as claims for damages can only be asserted within the effective period for complaints.
3.2 Packaging
Please do not throw away the covering carton of your device as it might be useful for storage purposes, when moving or, in case of damages, when the device must be sent back to a repair center. The outer and inner packing material should be removed completely from the device before installation.
NOTE!
If you liked to dispose the packing, consider the regulations applicable in your country. Supply re-usable packing materials to the recycling.
Please inspect the device upon completeness. In case any part is missing please contact our customer service center immediately.
3.3 Storage
Keep the package closed until installation and under consideration of the outside indicated positioning- and storage markings.
Packages should be stored under consideration of the following:
- Do not store outdoors.
- Keep it dry and dust-free.
- Do not expose it to aggressive media.
- Do not expose it to direct sunlight.
- Avoid mechanical shocks and vibration.
- In case of longer storage (> 3 months) make sure you check the state of the packaging and the parts regularly. If required refresh or renew.
4. Technical data 4.1 Overview of parts
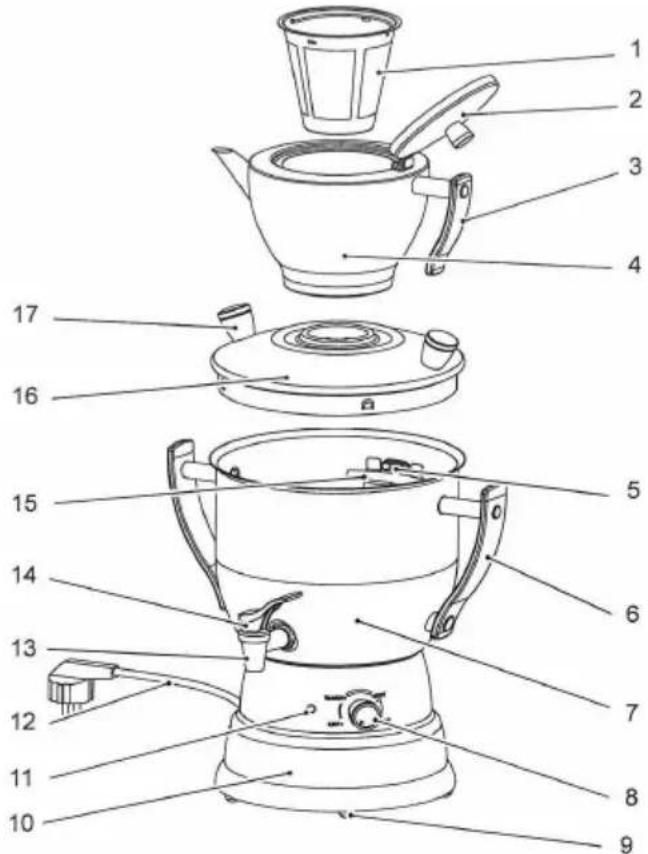
- Tea strainer
- Lid of teapot
- Handle of teapot
- Teapot, capacity: 1.2 litres
- Steam outlet
- Handle of water tank
- Water tank, capacity: 3.0 litres
- Rotating temperature controller
- Slip-resistant silicon legs
- Base with integrated powerline and cable storage
- Control light
- Power cable with plug
- Drain tap
- Drain tap lever
- Max. filling level marking water tank
- Lid of water tank
- Handle of lid of water tank
4.2 Technical specification
| Name | Samovar 3L |
| Code-No.: | 191001 |
| Material: high-grade stainless steel | |
| Temperature control: stepless | |
| Capacity: 3 litres | |
| Power supply: 1.5 kW / 230 V 50 Hz | |
| Dimensions: ∅ 200 mm, H 490 mm (with teapot) | |
| Weight: 1.7 kg | |
| Equipment: teapot (1.2 litres), tea strainer |
We reserve the right to make technical changes!
5. Installation
5.1 Positioning
- Before the operation unpack the device and remove all package material and protective foil from the device and equipment.

CAUTION!
➢ Never remove the rating plate and any warning signs from the device.
- Place the device on top of an even, stable, dry, and water-resistant surface which supports the weight of the device and is not heat sensitive.
- Never place the device in humid or wet environment.
- Do not place the device in the vicinity of open fire, electric ovens, heating furnaces, or other heat sources.
- Never place the device on the table edge to avoid tilting or drop.
- Position the device in such way that the plug is easily accessible for quick disconnecting when required.
5.2 Electric connection

DANGER! Electric shock hazard!
The device can cause injuries due to improper installation!
Before installation and connecting the local power grid specification should be compared with that of the device (see rating plate).
Connect the device only in case of compliance!
Connect the device only to properly installed single socket with protective terminal.
Do not disconnect the supply cable by pulling it, always pull the plug.
- The supply cable must not touch the heat sources or sharp edges. The supply cable should not hang from the table or other surface. Pay attention to avoid stepping on or tripping by the cable.
- The supply cable must not be bent, crushed, tangled, it must be always completely unwound.
- Do not place the device or other objects on the supply cable.
- Do not place the supply cable on the carpets or other thermally insulating materials. Do not cover it. Keep away the cable from operating range and do not immerse it in water or other liquids.
- The electrical circuit in the socket must be secured to at least 16A. Only connect the device directly to the wall socket; do not use any extension cords or power strips.
6. Start-up and operation
6.1 Before operation
- Before operation become familiar with the device and equipment by reading this manual.
- Before the device operation clean it thoroughly according to the instructions in section 7 "Cleaning and descaling".
- Fill the water reservoir to its maximum capacity (as indicated) and boil. Pour the water out. Repeat it 2—3 times.
• Before start-up make sure that the device is in perfect condition.
6.2 Start-up
Activation / deactivation of the device
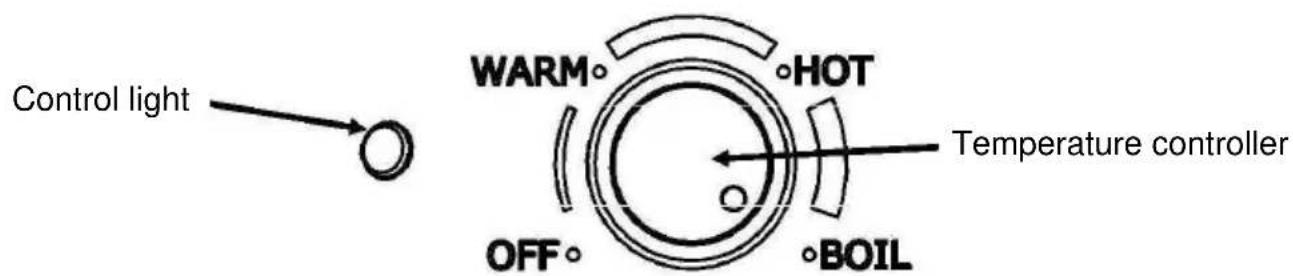
- The device is turned on/off by rotating the temperature controller. In position the device is turned off.
- To set the device in the normal operation mode position the temperature controller to •HOT In WARM water will be boiled as quickly as possible.
- For the interval boiling rotate the temperature controller backwards until the control light goes off. The device will maintain the water temperature of 95^ C – 100^ C.
Temperature controller settings
| Stufe | Function | |
| OFF° | The device is turned off | |
| WARM° | Warm water: | Approx. 3/4 rotation backwards,water temperature approx. 60 °C – 70 °C |
| °HOT | Hot water: | Approx. 1/2 rotation backwards,water temperature approx. 85 °C – 95°C |
| °BOIL | Boiling water: | Temperature controller turned completely; water temperature approx. 100 °C |
| °BOIL | Interval boiling: | Approx. 1/4 to 1/2 rotation backwards after water boiling; water temperature approx. 95 °C – 100°C |
6.3 Operation
Water heating

CAUTION!
Make sure that the temperature controller is rotated to position OFF° counterclockwise until the end.
• Pour required amount of fresh water to the device (only up to the maximum mark).

WARNING! Burn hazard!
Overfilling of water tank may cause water splashing and burns! Do not exceed the maximum filling level!
NOTE!
In order to reduce the heating phase time fill the tank with warm water. In case of cold water the heating time is longer.
- Place the lid on the tank and put the teapot on it.
- Connect the device to appropriate single grounded socket.
- Rotate the temperature controller clockwise. The thermostat allows for stepless adjustment of water temperature. The following settings may be used: Boiling / interval boiling (BOIL) / HOT / WARM. Follow the table on page 32.
- The control light is on during the heating phase.
Water boiling
- In order to boil water set the temperature to the maximum. Rotate the temperature controller clockwise to position •BOIL
- The control light will come on. It indicates that the device is heating. After several minutes the water will boil. It is indicated by released steam.
- When the temperature controller remains in that position the water will continuously boil and will evaporate eventually.

WARNING! Burn hazard!
The released hot steam may cause burns of hands, arms, and face! Do not remove the lid during boiling.
Interval boiling
- In order to avoid continuous boiling rotate the temperature controller backward until the control light goes off. The device will be set to interval boiling mode.
- When the water temperature in the tank drops the control light will come on and the device will heat the water. The thermostat adjusts the energy consumption to the needs and saves it.
Adding water

CAUTION! Burn hazard!
During filling of hot tank the released hot steam may cause burns of hands, arms, and face! Do not remove the lid during boiling
- Rotate the temperature controller counterclockwise to position .OFF°
- Before refilling with water leave the device for a few minutes for coling down.
NOTE!
- The thermostat will turn the device off when there is no (or too little) water in the tank. When the protection against dry operation is activated, disconnect the device from the socket and wait for cooling down before refilling.
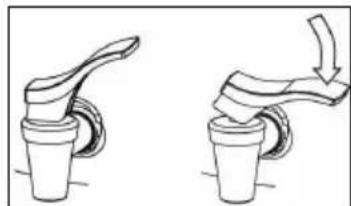
Operation of drain tap
Pulse mode
Press the drain tap lever down. The tap will open. To close the tap release the lever.
Continuous mode
Pull the tap lever completely backwards. It will be locked in such position. The tap will open. To close the tap pull the lever forwards.
natural_image
Illustration of a hand turning a valve into a tap (no text or symbols)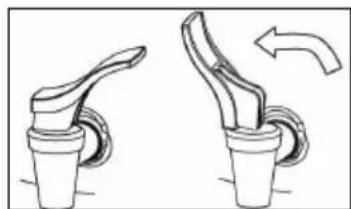
natural_image
Diagram showing two mechanical components with a curved arrow indicating rotation (no text or symbols)Turning the device off
- The device is turned off by rotating the temperature controller counterclockwise to position OFF the control light will go off. Disconnect the device from the socket (pull the plug!).
Preparation of tea
There are teas and teas. In the strict sense, the term tea describes a beverage made by steeping the leaves of Camellia sinensis in boiling water. There is black and green tea. Hot water can however also be poured over leaves of other plants or pieces of fruit.
Therefore preparation of tea is not always the same. In order to preserve the flavour and beneficial ingredients, infusions and teas are prepared with hot or boiling water and left to steep for shorter or longer periods. Green tea is for example best prepared with water at a temperature of 85^ C. In any case, always follow the instructions on the packaging.
Black tea
- Place the supplied tea strainer inside the tea pot.
- Fill the tea strainer with loose leaf tea (approx. one teaspoon per cup) or place a tea bag directly into the tea pot (approx. 1 tea bag per 1-2 cups).
- Place the lid on the tank and put the teapot on it. This pre-heats the teapot at the same time.

CAUTION! Burn hazard!
Place the teapot on to the lid in such way that the escaping steam does heat up the handle.
- Boil the water.
- Remove the teapot from the tank.

CAUTION! Burn hazard!
Hot steam will escape! A small amount of condensed water may also drip from the base of the teapot. Use the cloth for holding hot pots!
- Now pour boiling water over the tea from the tap.
• Fill max. 1 I into the teapot.
- Replace the teapot with the tea concentrate on the water tank. The steam rising in the water tank keeps the tea in the teapot at precisely the right temperature required for brewing.
NOTE!
You might choose the tea concentration by taste. Always take notice of the steeping time indicated on the tea packing, as it differs between the tea sorts.
• After the desired brewing time has elapsed, remove the tea strainer (tea bag) from the teapot.
- Next pour the required amount of tea concentrate from the teapot into your glass (to taste) and then top your glass up with water from the water tank. This will allow you to vary the strength and taste of your tea.
- The teapot can be left on the water tank when the appliance is operating so you can have more tea at any time. Position the knob somewhat above the °HOT position (but not to the detent), so that the water remains hot but does not boil continuously. The control light will illuminate and extinguish in cycle. However, the maximum heating setting should only be used for initial boiling of the water.
Green tea
- Green tea can also be prepared with the Samovar. Green tea should generally not be brewed with boiling water as this gives it a slightly bitter taste. Depending on the kind of tea the ideal water temperature is 50 °C - 70 °C . Most green teas develop their optimum taste at around 70 °C . The higher the quality of the green tea, the lower the optimum water temperature. Teas of the highest quality are brewed with water at 50 °C - 60 °C .
- Normal green teas must infuse for 1 to 3 minutes, while high-grade green teas only need around 1 to 1 1/2 minutes.
- Green tea is always dosed less than black tea. Around 1 g per 100 ml or 1 level teaspoon to 200 ml of water. You can determine the strength of the concentrate yourself.
- Boil the water in the tank. Then pour some hot water into the cups (the teapot has been pre-warmed on the container during the boiling process). Then turn the adjusting knob back to the position (spending on the type of tea) and allow the water to cool down a little (approx. 5 – 6 minutes). Now pour hot water from the tank onto the tea. Place the teapot on top of the tank as described before so that the tea remains hot and then proceed as for black tea.
Herbal infusion

CAUTION!
Always prepare infusions of herbs, fruit, Rooibos and spice with boiling water and let them steep for minimum 5 to 10 minutes. This is to ensure that the beverage is completely safe for consumption!
- For herbal infusions, whether prepared with loose leaves or bags, always use boiling water and adhere to the recommended steeping time. In extremely rare cases, herbal mixtures might contain Salmonella, which is however effectively destroyed by boiling water. Incorrect preparation of the infusion can pose a health risk, especially in connection with infusions for children.
- Never prepare herbal infusions using water that is not boiling hot, for example to make a beverage that is at drinking temperature the moment it is prepared. Germs that might be contained in the ingredients might not be destroyed, which could be particularly harmful to babies, small children and the sick. Never let the prepared infusion stand for several hours before consuming it.
While the boiling water destroys all germs contained in the herbal mixture, spores might survive. They may germinate in the warm water.
7. Cleaning and descaling
Cleaning
- Clean the device regularly.
○ Empty the device after each use. - Thoroughly rinse the device tank with clean water.

CAUTION!
The water tank should be periodically completely emptied, and cleaned (disinfected) in order to eliminate the possibility of harmful microbial growth.
- Clean the samovar's surface with a soft, wet cloth and dry thoroughly.

DANGER! Electric shock hazard!
Never clean the device base in running water as it can get inside the unit and cause electrocution.
○ Wash the teapot, stainer, and lid in lukewarm water with a gentle washing agent. Rinse with clean water.
The lid, teapot, and tea strainer are dishwasher-safe!
○ Always use the soft cloth only, never use any abrasive washcloth which may scratch the device.
- After cleaning dry and polish the surfaces with dry cloth.
Descaling

CAUTION!
Complaints will not be accepted if the samovar is not descaled regularly as described in the instruction manual. Such complaints are no cases of warranty!
- Bad water conditions might lead to scaling. This results in longer heating time and might damage the device.
○ Depending on the frequency of usage and water quality, descale the water tank every 1 – 2 weeks. - Fill the water tank with fresh water, add vinegar or a common descaling agent and boil the solution.
- Let some of the solution flow trough the tap in order to remove scale here as well.
- Repeat the boiling of the solution 1 – 2 times.
- Let the device cool off for a few minutes.
○ After descaling pour out the descaling solution. Rinse the reservoir thoroughly with clean water and pour some water out through the tap. - In case of scale deposits in the teapot clean it with the solution of vinegar or a common descaling agent.
Use pre-filtered water in order to avoid scaling!
Storage
○ In case of longer inactivity period clean the device according to the description above and store in dry and clean place, protected from frost, sunlight, and out of reach of children. Do not place any heavy objects on the device.
8. Possible Malfunctions

CAUTION!
In the event of malfunctions during use immediately remove the plug from the socket.
In case of anomalies use the table below before calling the service company or informing the vendor.
| FAILURE CAUSE SOLUTION | ||
| The device is not working | · The plug is not connected to the socket.· The house electric system protection has been activated due to operation of many high-power devices.· The temperature controller is in position OFF° | · Connect the plug to the electric socket.· Disconnect the device from the power supply. Then reset the fuse.· Set the temperature controller in desired position. |
| The device is turned on but the control light is off. | · Damaged control light.· Incorrect setting of temperature controller. | · Contact the vendor.· Set the temperature controller in appropriate position. |
| The device turns off. | · The protection against dry operation has been activated due to lack or insufficient amount of water in the tank. | · Wait for the device to cool down and pour the water. |
When the anomalies cannot be removed:
- set the temperature controller in position OFF° and disconnect the device from the power supply (pull the plug!),
- do not open the housing,
- contact the service company or the vendor.
9. Waste disposal
Discarding old devices
At the end of its service life the discarded device has to be disposed in accordance with the national regulations. It is advisable to contact a company which is specialized in waste disposal, or just contact the local disposal service in your community.

DANGER! Electric shock hazard!
To exclude any abuse and the dangers involved make the waste device unfit for use before disposal. For that purpose disconnect the device from the power supply and remove the supply cable from the device.

CAUTION!
For the disposal of the device please consider and act according to the national and local rules and regulations.
Bartscher GmbH
4.2 Indications techniques
natural_image
Illustration of two mechanical components with a handle and base, showing a step-down view (no text or symbols)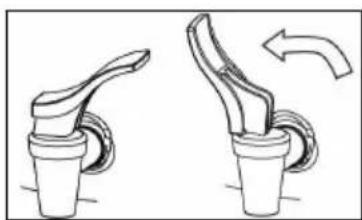
natural_image
Two diagrams showing a mechanical component with a curved arrow indicating rotation (no text or symbols)Arrêter l'appareil
natural_image
Illustration of a faucet being lifted by a valve, showing two different states (no text or symbols present)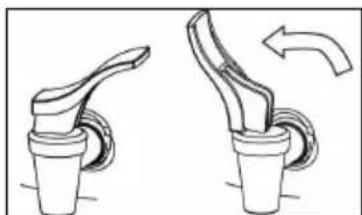
natural_image
Diagram showing two mechanical components with a curved arrow indicating rotation (no text or symbols)Выключение прибора
- Bedienungsanleitung
- Samowar 3L
- Instruction manual
- Samovar 3L
- Mode d'emploi
- Gerät ausschalten
- of the original instruction manual
- Safety 22
- General information 27
- Transport, packaging and storage.... 28
- Technical data 29
- Installation 30
- Start-up and operation.... 31
- Cleaning and descaling 37
- Possible Malfunctions ...... 39
- Waste disposal 40
- Read these instructions before using and keep them available at all times!
- Safety
- Safety instructions
- Key to symbols
- DANGER!
- WARNING!
- CAUTION!
- NOTE!
- Sources of danger
- Electric shock hazard!
- Suffocation hazard!
- Hazard connected with steam and hot water!
- Microbial hazard!
- Intended use
- General information 2.1 Liability and Warrantees
- Copyright protection
- Declaration of conformity
- Transport, packaging and storage
- Delivery check
- Packaging
- Storage
- Technical data 4.1 Overview of parts
- Technical specification
- Installation
- Positioning
- Electric connection
- DANGER! Electric shock hazard!
- Start-up and operation
- Before operation
- Start-up
- Activation / deactivation of the device
- Temperature controller settings
- Operation
- Water heating
- WARNING! Burn hazard!
- Water boiling
- Interval boiling
- Adding water
- CAUTION! Burn hazard!
- Operation of drain tap
- Pulse mode
- Continuous mode
- Turning the device off
- Preparation of tea
- Black tea
- Green tea
- Herbal infusion
- Cleaning and descaling
- Cleaning
- Descaling
- Storage
- Possible Malfunctions
- When the anomalies cannot be removed:
- Waste disposal
- Discarding old devices
- Indications techniques
- Arrêter l'appareil
- Выключение прибора
Brand : BARTSCHER
Model : 150992
Category : Water dispenser