Platinum OctoPre LE Optional CODEC - Audio Interface FOCUSRITE - Free user manual and instructions
Find the device manual for free Platinum OctoPre LE Optional CODEC FOCUSRITE in PDF.


User questions about Platinum OctoPre LE Optional CODEC FOCUSRITE
0 question about this device. Answer the ones you know or ask your own.
Ask a new question about this device
Download the instructions for your Audio Interface in PDF format for free! Find your manual Platinum OctoPre LE Optional CODEC - FOCUSRITE and take your electronic device back in hand. On this page are published all the documents necessary for the use of your device. Platinum OctoPre LE Optional CODEC by FOCUSRITE.
USER MANUAL Platinum OctoPre LE Optional CODEC FOCUSRITE
IMPORTANT SAFETY INSTRUCTIONS....1
INTRODUCTION....2
REAR PANEL CONNECTIONS....2
GETTING STARTED - A QUICK GUIDE 3
FACILITIES AND CONTROLS....3
DIGITAL CONVERTER OPTIONS....4
OPTIONAL DIGITAL CONVERTER FRONT PANEL CONTROLS.... 5
OPTIONAL DIGITAL CONVERTER REAR PANEL CONNECTIONS AND
SWITCHES....5
FREQUENTLY ASKED QUESTIONS....6
TROUBLESHOOTING....6
CONTACTING US....6
IMPORTANT SAFETY INSTRUCTIONS
Please read all of these instructions and save them for future reference. Follow all warnings and instructions marked on the unit.
- Do not obstruct air vents in the rear panel. Do not insert objects through any apertures.
- Do not use a damaged or frayed power cord.
- Unplug the unit before cleaning. Clean with a damp cloth only. Do not spill liquid on the unit.
- Ensure adequate airflow around the unit to prevent overheating. We recommend leaving a blank 1U panel above the unit to aid ventilation.
- Unplug the unit and refer servicing to qualified service personnel under the following conditions: If the power cord or plug is damaged; if liquid has entered the unit; if the unit has been dropped or the case damaged; if the unit does not operate normally or exhibits a distinct change in performance. Adjust only those controls that are covered by the operating instructions.
- Do not defeat the safety purpose of the polarised or grounding-type plug. A polarised plug has two blades with one wider than the other. A grounding type plug has two blades and a third grounding prong. The wider blade or the third prong is provided for your safety. When the plug provided does not fit into your outlet, consult an electrician for replacement of the obsolete outlet.
WARNING: THIS UNIT MUST BE EARTHED BY THE POWER CORD. UNDER NO CIRCUMSTANCES SHOULD THE MAINS EARTH BE DISCONNECTED FROM THE MAINS LEAD.
This unit is supplied with an external power supply dependant on the region in which the OctoPre LE is purchased. To avoid the risk of fire, replace the mains fuse only with the correct value fuse, as marked on the plug. The external power supply unit contains no user serviceable parts. Refer all servicing to a qualified service engineer, through the appropriate Focusrite dealer.
RACK VENTILATION: PLEASE ENSURE THE OCTOPRE LE IS PLACED TOWARDS THE BOTTOM OF YOUR EQUIPMENT RACK, WITH SUFFICIENT SPACE ABOVE AND BELOW FOR VENTILATION.
INTRODUCTION

text_image
Focusrite 1 2 3 4 5 6 7 8 9 10 11 12 13 14 15 16 17 18 19 20 21 22 23 24 25 26 27 28 29 30 31 32 33 34 35 36 37 38 39 40 41 42 43 44 45 46 47 48 49 50 51 52 53 54 55 56 57 58 59 60 61 62 63 64 65 66 67 68 69 70 71 72 73 74 75 76 77 78 79 80 81 82 83 84 85 86 87 88 89 90 91 92 93 94 95 96 97 98 99 100The OctoPre LE features eight channels of classic Focusrite preamplification based on the popular Green Range. As well as eight analogue outputs, there is the option of a digital converter card (CODEC), which both accepts and transmits digital audio in either 44.1 or 48kHz 24-bit ADAT ^™ optical 'lightpipe' format. The optional CODEC means that the OctoPre LE can also be used as a monitoring control between the DAW and speaker system, for up to 7.1 surround monitoring.
The mic pres featured in the OctoPre LE have a circuit design based around the classic Focusrite Green range and feature an extremely transparent sonic character with very low distortion. They utilise the same full bandwidth philosophy of all Focusrite products, ensuring detail and clarity without obvious colouration.
Eight balanced (although unbalanced can be used) 1/4" jack inputs are located on the front panel for quick and easy access, the first two channels of which can be used for 101-free plug-in of guitars and basses. Channels 1 and 2 also allow a microphone signal (input using the rear panel XLR connections) the option of a lower impedance input, should the microphone in use have a low output impedance (around 50Ω for example).
With classic Focusrite analogue circuit design and comprehensive A/D and D/A interface options, OctoPre LE is the perfect partner for a digital audio workstation, making high quality, multi-channel recording easy. Equally, it could be utilised as part of a compact multi-channel location recording solution (with a laptop or ADAT ^™ , for example), or as an additional set of professional-quality mic pres for any analogue or digital console or hard disk recorder.
REAR PANEL CONNECTIONS

text_image
N382 CE DAC TO UNE OUT WORD CLOCK OUT WORD CLOCK IN P-OUT ADAT IN m COVEE IN 21 WATTEN PAN USE ONLY POWER UNIT SUPPLIEDThe OctoPre LE features eight microphone inputs on XLR connectors and eight balanced line outputs on 1/4" (TRS) jack connectors.
GETTING STARTED - A QUICK GUIDE
-
Ensure that nothing other than the mains supply is connected to your OctoPre LE, then switch it on via the POWER switch on the right hand side of the unit. If your unit is permanently connected to a patchbay, ensure audio is not being fed to any connected speakers to avoid any turn-on speaker pops.
-
Connect the analogue line outputs of the OctoPre LE to your recorder or audio interface. If using the digital converter option, connect the OctoPre LE's ADAT ^™ output to the ADAT ^™ input of your recorder or audio interface. See page 4 for more information on the OctoPre LE digital options.
-
Ensure that each channel's LEVEL is set fully anti-clockwise.
-
Connect your input sources to the eight channel inputs as required. Microphones should be plugged into the XLR MIC INPUTS on the rear panel. If you wish to connect line-level sources, connect these to the LINE INPUTS on the front panel; this will automatically switch off the corresponding microphone inputs. You may connect an electric guitar or bass to the Line inputs on channels 1 and 2.
-
If using the INSTRUMENT INPUT on channel 1 or 2, ensure that the corresponding INST switch is engaged. If using a MICROPHONE (XLR) INPUT on the rear panel, ensure that nothing is connected to the corresponding LINE INPUT on the front panel.
-
If using one or a number of condenser microphones that require phantom power, activate the 48V 'All On' switch on the front panel. This will provide phantom power to ALL microphones connected to the rear panel MIC INPUTS. If you are unsure as to whether your microphone requires phantom power, refer to its user guide, as phantom power will damage some microphones, most notably ribbon microphones or radio mic receivers. NB Dynamic microphones will be unaffected by phantom power.
-
Increase the LEVEL control for each channel you wish to use, ensuring that the red O/L LED does not illuminate. To visually monitor the incoming signal on a particular channel, press the source switch beside the dBFS meter until the desired channel's O/L LED is lit (See METERING section below). It is advisable to set the incoming signal to be an average of between -10 and -6dBFS.
-
If using microphones, ensure that the microphone placement is at its best. Before you start recordings, alter the microphone placement until you get as close as possible to the sound you want. Note that moving the microphone may have an effect on the level of the signal entering the OctoPre LE, requiring an alteration to the LEVEL setting.
FACILITIES AND CONTROLS
POWER
This switch turns the unit on. We recommend that the unit be powered up before connecting to any equipment that it is feeding, to avoid clicks or thumps, which may harm output devices. It is also a good idea to allow the unit to stabilise for a couple of minutes before use to ensure that the internal circuitry is properly acclimatized.
text_image
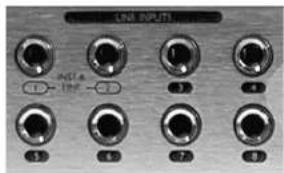
LINE INPUTS LINE 1 - 100 - 20 1 8 5 9 7 8LINE INPUTS
Line (and instrument for channels 1 and 2) inputs are provided on the front panel for all eight channels via balanced 1/4" jack sockets. An unbalanced signal will be accepted for all channels and expected for channels 1 and 2 when in instrument mode. Connecting a jack plug into a front panel line input automatically cuts the corresponding mic XLR input on the rear panel and selects an appropriate gain calibration for the level dial on that channel.
text_image
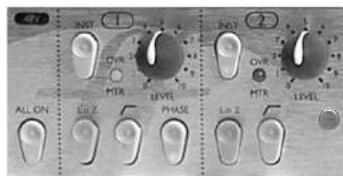
OUT OUT ON OFF MTR LEVEL ALL ON OUT PHASE Ltr 1 LEVELINST (Switch) [CHANNELS 1 & 2 ONLY]
When engaged (in), the corresponding 1/4" jack front panel (line) input will accept an unbalanced instrument signal and the gain dial for that channel will be calibrated to an appropriate level.
ENGLISH
Lo Z (Switch) [CHANNELS 1 & 2 ONLY]
This switch changes the input impedance to the lower value of 150 (when engaged). This should be utilised if the output impedance of the microphone is low, around 50 for example, or if a ribbon microphone is in use. Alternatively, this switch can be activated with a higher impedance microphone to experiment with different sounds.
∅ (Phase Reverse Switch) [CHANNEL 1 ONLY]
This allows the phase of the input signal to be reversed (switch engaged), to correct phase problems that may occur when using multiple microphones. This switch should be disengaged (in the out position) when no phasing problems have been detected.
LEVEL (Knob)
This sets the signal level for the channel. Connect an input signal to the unit, ensuring that the LEVEL control is set fully anti-clockwise, and increase the LEVEL control until a signal is displayed on the front panel meter (if the channel is selected - see METERING section) or at the destination (recording medium). The red O/L (Overload) LED should not light, if it does you should reduce the LEVEL as this signifies that the input has reached 0dBFS.
With a MIC INPUT connected to a rear panel XLR connector (ensure nothing is connected to that channel's front panel Line input), the LEVEL control provides +14dB (fully anti-clockwise) to +60dB (fully clockwise) of gain.
With a LINE INPUT connected to a front panel balanced (unbalanced will be accepted) 1/4" jack connector, the gain is adjustable from -10dB (fully anti-clockwise) to +38dB (fully clockwise).
With the INST switch activated (channels 1 & 2 only) and an instrument connected to that channel's front panel Line input, the LEVEL control provides +14dB to +60dB of gain.
[Switch]
This is a high-pass filter, which removes unwanted low frequencies such as stage rumble via microphone stands or 'proximity effect' (where low frequencies are over-emphasised when using certain types of microphone at close range). Engaging the switch inserts a 12dB/octave, 2-pole HP filter at 120Hz in the signal path.
48V ALL ON (Switch)
This switch activates phantom power circuits for all XLR inputs on the rear panel, so that 48V is supplied to every connected microphone. If you are using condenser microphones then this switch will need to be engaged. If you are unsure whether your microphone requires phantom power, refer to its user guide, as phantom power will damage some microphones, most notably ribbon microphones. NB Dynamic microphones will be unaffected by phantom power.
METERING
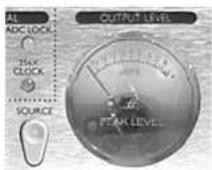
The meter on the front panel displays the level of the selected incoming signal in dBFS, where 0dBFS (digital clipping point) relates to +22dBu. Any signal over 0dBFS will cause the O/L LED on that channel to illuminate to indicate that the level is too high. For most input signals, an average level of between -10 and -6dBFS is recommended. To use the meter to view a particular channel's level, simply use the SOURCE switch as described below.
SOURCE (non-latching switch)
This switch selects the source signal that the meter on the front panel displays. Pressing the switch repeatedly will cycle through the eight channels in sequence. The currently displayed channel's O/L LED will illuminate to indicate the selection.
DIGITAL CONVERTER OPTIONS
In addition to the analogue outputs, the OctoPre LE can be fitted with a digital converter I/O (CODEC) option. This allows quality digital conversion of the recorded signals within the unit before transmitting directly to the DAW (interface or soundcard) or other recording medium. Additionally, a digital to analogue converter is included, whereby a digital output of a DAW (interface or soundcard) can be connected directly to the unit for monitoring purposes; all eight channels can be converted and fed to the Line 1/4" jack outputs on the rear panel, or just 1-4/5-8 as required (see corresponding switch details below).
The optional digital converter card features two ADAT ^™ -type optical 'lightpipe' connectors, an input and output. Digital audio can be transmitted or received at either 44.1 or 48kHz sample rates (selected on the front panel) and 24-bit resolution.
ENGLISH
ADAT™ lightpipe cables are available from your local dealer, or in the UK from Studiospares (tel +44 (0)20 7482 1692): stock number 585-510. See optional Digital Card manual for more details.
OPTIONAL DIGITAL CONVERTER FRONT PANEL CONTROLS
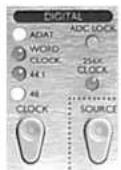
CLOCK (non-latching switch)
This switch is used to select the digital clock source. Pressing the switch steps through the five available sources: Internal crystal (running at 44.1kHz or 48kHz), an external Word clock source (input on rear panel), an external 256x clock source (input on rear panel) or the clock embedded within the incoming ADAT ^™ signal (input on rear panel). The green LEDs indicate the currently selected clock source.
ADC LOCK (LED)
This LED indicates that the internal A/D chips are correctly synchronised to the external clock signal entering the rear panel Word clock BNC connector (if Word clock or 256x are selected) or ADAT ^™ input (if ADAT ^™ is selected). If there is a problem with synchronisation then the ADC LOCK LED will fail to light and the corresponding CLOCK LED will flash. When a Lock is achieved, the ADC LOCK LED, the selected CLOCK SOURCE and, if an external source is selected, the sample rate LED will all illuminate.
OPTIONAL DIGITAL CONVERTER REAR PANEL CONNECTIONS AND SWITCHES

text_image
DAC TO LINE OUT S-8 I-4 WORD CLOCK OUT WORD CLOCK IN P-OUT ADAT IN DIGITAL I/OADAT™ IN (Optical 'lightpipe' connector)
This connector allows an ADAT ^™ -type multi-channel digital signal to be fed to the digital to analogue converter and then on to the Line outputs on the rear panel, if selected by the relevant switches (see below), for up to 7.1 surround monitoring.
ADAT OUT (Optical 'lightpipe' connector)
This connector transmits the recorded signals in ADAT ^™ -type multi-channel digital format for sending directly to the DAW or other recording medium. This output can be used to send all eight of the OctoPre LE's analogue input channels for recording, whilst simultaneously using the ADAT ^™ in with the Line outputs for monitoring.
WORD CLOCK IN (BNC connector)
This connector provides an input for either an external Word clock or 256x clock source, from which the OctoPre LE's optional A/D chip can be set to synchronise (see CLOCK section in OPTIONAL DIGITAL CONVERTER FRONT PANEL CONTROLS). For further advice on synchronisation in digital setups, refer to the support section at www.focusrite.com.
WORD CLOCK OUT (BNC connector)
This connector provides a word clock signal from the optional converter card, so that the OctoPre LE can be the master clock from which another ('slave') device or devices can be synchronised. If the OctoPre LE is synchronised to an external source and the ADC Lock is illuminated, the Word clock output will transmit a clock at the sample rate indicated on the front panel (44.1kHz, 48kHz or 256x if that mode is selected), from which further devices can be saved. For further advice on synchronisation in digital setups, refer to the support section at www.focuswrite.com.
DAC TO LINE OUT (Switches)
Since the OctoPre LE can act as a monitoring control for outputs sent digitally from the DAW or other recording medium, the ADAT ^™ digital input can be routed to the balanced 1/4" jack Line outputs on the rear panel. There are two switches to allow this; 1-4 sends channels 1-4 of the incoming ADAT ^™ signal to the first four Line outputs; 5-8 sends channels 5-8 of the incoming ADAT ^™ signal to the last four Line outputs. With both switches engaged, all eight channels of the incoming ADAT ^™ signal will be sent to the Line outputs, for 7.1 surround monitoring or analogue subgroup mixing for example. In this case, the digital ADAT ^™ output can still be used to record all eight of the OctoPre LE's input channels. With only 1 switch engaged (if only monitoring up to four channels from the ADAT ^™ input), the four remaining Line outputs can be utilised for additional purposes if required.
ENGLISH
FREQUENTLY ASKED QUESTIONS
Q: Should I use balanced connectors with my OctoPre?
A: Preferably yes; the Line level analogue inputs and outputs are balanced, operating at +4dBu. If you wish to connect unbalanced equipment to the OctoPre LE's Line inputs however, this can be done, but the signal level will be 6dB lower. Channels 1 and 2 will expect to receive an unbalanced signal if the INST switch on those channels is selected.
Q: Does the OctoPre LE have the same kind of spectacular bandwidth that has given the Red and ISA range units their reputation for 'open-ended' sound?
A: Yes. The audio bandwidth of the OctoPre LE is 10Hz to 122kHz!
Q: Can I take my OctoPre LE with me when I travel internationally?
A: It depends. There are three versions of the OctoPre LE mains transformer. One is suitable for use in North America and Japan, with mains voltages in the 100-120V range. The other two versions are designed for use in the UK and Europe (the only difference being the mains plug), with mains voltages in the 200-240V range. If you buy an OctoPre LE in a particular territory, it will be configured for ONLY that territory's mains voltage range. For example, if you're travelling from the USA to the UK, you CANNOT use your US model OctoPre LE with the suppiled mains transformer. But if the mains voltage in the country you're visiting is in the same range, you can use the OctoPre LE with no problems - so taking an OctoPre LE from the USA to Japan, or from Germany to France, for example, external supply for different territories is available from your local Focusrite distributor.
Q: Can I retrofit a digital board to an analogue OctoPre LE at a later date?
A: Yes, and you can do it yourself - it can easily be retro-fitted by the customer without any soldering etc, just a few screws to undo and three clip-connectors to join to the main PCB.
TROUBLESHOOTING
No LEDs illuminate
• Is the POWER switched on?
• Is the correct Power Supply Unit being used?
- Has the fuse in the mains plug blown?
No output when using the MIC INPUT
• Is the power switched on?
• Is the LEVEL set correctly? (See 'Facilities and Controls' section for details.)
• Is something connected to the corresponding LINE input on the front panel?
- For microphones that require phantom power, is the +48V switch switched in? (If you are unsure whether your microphone requires phantom power, check the user guide for your microphone.)
- Are the DAC TO LINE OUT switches disengaged?
No output when using the LINE INPUT
• Is the power switched on?
• Is the LEVEL set correctly? (See 'Facilities and Controls' section for details.)
• Is the INST switch on the front panel switched out? (Channels 1 & 2 only.)
- Are the DAC TO LINE OUT switches disengaged?
No output when using the INSTRUMENT INPUT (Channels 1 & 2 only)
• Is the power switched on?
• Is the LEVEL set correctly? (See 'Facilities and Controls' section for details.)
- Is the INST switch on the front panel switched in?
- Are the DAC TO LINE OUT switches disengaged?
No output from the optional digital converter card
• Is the receiving device set to receive the correct sample rate (44.1 or 48kHz)?
• Is the receiving device set to receive digital audio at 24-bit?
- Is the receiving device locking to an internal or additional external clock source, rather than the ADAT ^TM signal sent from the OctoPre LE?
- If the October LE is slaved to an external source, is this set up correctly? (See OPTIONAL DIGITAL CONVERTER front panel and rear panel information above.)
No output whilst monitoring the ADAT™ INPUT on the rear panel
- Are the DAC TO LINE OUT switches engaged?
- Is the incoming audio at the correct sample rate (44.1/48kHz) and bit depth (24-bit)?
CONTACTING US
If you have any further questions about your OctoPre LE, or are continuing to have difficulty, you can visit the support section at www.focusrite.com or email us for help at tech@focusrite.com. Alternatively, telephone us on +44 (0)1494 462246, or contact your local distributor (see listing at the back of this manual).
^1 ADAT ^18 is a registered trademark of Alesis Corporation Inc.
INHALT
INHALT 7
text_image
OUT OUT MTR LEVEL ALL ON LO 2 PHASE LO 2 OUT OUT MTR LEVELINST (Schalter) [nur Kanal 1 & 2]
DIGITAL-WANDLER OPTIONEN
text_image
DAC TO LINE OUT WORD CLOCK OUT WORD CLOCK IN P-OUT ADAT IN S-8 I-4 DIGITAL I/OQUESTIONS FREQUEMMENT POSEES....18
DYSFONCTIONNEMENT 18
CONTACTEZ-NOUS 18
INSTRUCTIONS RELATIVES A LA SECURITE
text_image
OUT OUT OUT OUT ALL ON LO 2 LEVEL PHASE LO 2 LEVELFRANÇAIS
text_image
DAC TO LINE OUT WORD CLOCK OUT WORD CLOCK IN OUT ADAT IN DIGITAL I/OFRANÇAIS
QUESTIONS FREQUEMMENT POSEES
text_image
DAC TO LINE OUT 5.8 1.4 WORD CLOCK OUT WORD CLOCK IN P-OUT ADAT IN DIGITALtext_image
DAC TO LINE OUT WORD CLOCK OUT WORD CLOCK IN OUT ADAT IN DIGITAL I/OADAT™ IN (Conector óptico)
WORD CLOCK IN (Conector BNC)
WORD CLOCK OUT (Conector BNC)
Gain = +13dB to +60dB
Input Impedance = 2.5kΩ/150Ω on Lo Z (Ch1 & 2)
EIN = 124dB @ 60dB Gain with 150Ω Termination & 22Hz/22kHz Filter
THD + N@Min~Gain(+13dB) = 0.0006% with~0dBu~input\& 22Hz / 22kHz~Filter
THD+N @ Max Gain (+60dB) = 0.003% with -36dBu input & 22Hz/22kHz Filter
THD+N @ Max Input (+9dBu) = 0.0008% with 22Hz/22kHz Filter
Frequency Response:
Min Gain (+13dB) with -13dBu input = -0.4dB @ 10Hz & -3dB @ 122kHz
Max Gain (+60dB) with -60dBu input = -2.3dB @ 10Hz & -3dB @ 67kHz
CMRR @ Max Gain (+60dB) = 80dB
Line Input Response
Gain = -10dB to +36dB
Input Impedance = 24kΩ
Noise @ Unity Gain (0dB) = -88dBu with 22Hz/22kHz Filter
S/N Ratio relative to max headroom (+36dBu) = 124dB
S/N Ratio relative to 0dBfs (+22dBu) = 110dB
THD+N @ Unity Gain (0dB) = 0.001% with 0dBFS (+22dBu) input and
22Hz/22kHz Filter
Frequency Response @ Unity Gain (0dB) = -0.5dB @ 10Hz & -3dB @ 110kHz
Instrument Input Response
Gain = +13dB to +60dB
Input Impedance = 1MΩ
Noise @ Min Gain (+13dB) = -87dBu with 22Hz/22kHz Filter
Noise @ Max Gain (+60dB) = -42dBu with 22Hz/22kHz Filter
THD+N @ Min Gain (+13dB) = 0.001% with 0dBu input & 22Hz/22kHz Filter
Frequency Response @ Min Gain (+13dB) with -13dBu input = -0.4dB @ 10Hz &
-3dB @ 122kHz
Input Meter
Peak Level Moving Coil Meter
-24dBfs to +2dBfs (-2dBu to +24dBu), +22dBu = 0dBfs
Overload LED's triggered @ 0dBfs (+22dBu)
High Pass Filter
Roll Off = 12dB/Octave 2 pole filter
Cut Off Frequency: -3dB @ 120Hz, -6dB @ 85Hz, -12dB @ 56Hz
Frequency Range:
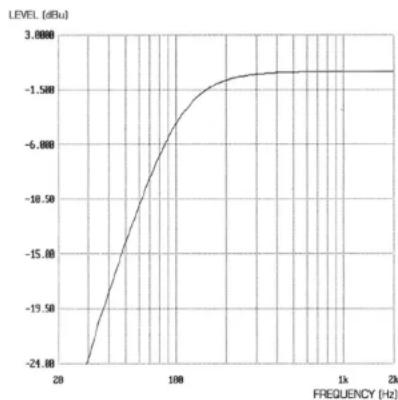
line
| FREQUENCY (Hz) | LEVEL (dBu) | | -------------- | ----------- | | 20 | -24.00 | | 100 | -6.00 | | 1k | -1.50 | | 2k | -1.50 |OPTIONAL DIGITAL CONVERTER
DAC Performance
Playback Sample Frequency = 44.1kHz & 48kHz
Maximum Bit Depth = 24-bit
Maximum analogue output level = +22dBu
Dynamic Range = 107dB 'A' weighted
ADC Performance
Sample Frequency = 44.1kHz & 48kHz
Bit Depth = 24-bit
Maximum analogue input level = +22dBu (0dBfs)
Dynamic Range = 109.5dB 'A' weighted
Connections
Digital in/out: ADAT ^™ -type optical 'lightpipe'
Wordclock in/out: BNC
FOCUSRITE DISTRIBUTORS
Australia
Electric Factory Pty Ltd.
Phone: -61 3 9480 5988
Fax: -61 3 9484 6708
Email: elfo@ozmail.com.au
Austria
Klangzabe GesmbH
Phone: +43 1545 1717 52
Fax: -43 1545 1717 9
Email: klangplan@klangfarbe.com
Belgium
Audio XL NV
Phone: +32 11 232355
Fax: -32 11 232172
Email: info@audioxl.be
Brazil
Pride Music
Phone: +55 11 6975-2711
Fax: -55 11 6975-2772
Email: info@pridemusic.com.br
Bulgaria
Bukcomp Ltd
Phone: -35 932 652758
Email: info@bulcomp.com
Canada
Erikson Audio (Jam Industries)
Phone: 001 514 457 2555
Fax: 001 514 457 0055
Email: info@cnissonataibo.com
Croatia, Slovenia, Bosnia,
Macedonia and Serbia
Music Export
Phone: +19 89 746 123 90
Fax: -49 89 746 123 90
Email: Music.Exports@5-online.de
Cyprus
Technesound
Phone: +357 22499971
Fax: -357 22499986
Email: info@tochaosound.com.cy
Czech Republic
Mediaport
Phone: 1420 2 7173 5610
Fax: -120 2 7273 1897
Email: info@mediapors.cz
Czech Republic
Audiopolis
Phone: +420 2 +148 3501
Fax: -420 2 4148 35
Email: sales@audiopolis.cz
Denmark
New Music
Phone: +45 87 32 87 00
Fax: +45 87 32 87 01
Audiopole (Tam Tam Audio)
Phone: +33 1 45 14478
Fax: +33 1 +5 1+4790
Email: commercial@audiopole.fi
Germany
Digital Media Technology
Phone: +852 2721 0343
Fax: +852 2366 6883
Email: dmftak@dmpro.com
Hungary
Hat Space (Absolute! Ltd)
Phone: +361 322 2519
Fax: +361 341 0272
A.F. Marceler (Bucharest)
Phone: +40 1 337 1254
Fax: +40 1 337 1254
Email: marceler@arexin.70
Russia, Baltics, CIS
A&T Trade
Phone: +7 095 796 9262
Tax: +7 095 796 9266
Email: pro_brand@atrate.ru
Singapore/Malaysia
Team 108
Phone: +65 718 9333
Fax: +65 747 7273
Email: 108@team108.com.sg
Slovakia
Centron
Phone: +421 264 780767
Fax: -421 264 780042
Email: centron@centron.sk
South Africa
Elicom Pty Ltd
Phone: +27 11.787 0355
Fax: +27 11 787 9627
Email: elcron@julrica.com
South
Best Logic Sound Co.
Phone: +82 2 515 7385
Fax: +82 2 516 7395
Digital Media Technology (Taiwan) Ltd
Phone: 1886 2 25164318
Fax: +886 2 25159881
Email: dmatp@dmapro.com
Thailand
KEC
Phone: +66 2 222 8613/1
Tax: +65 2 225 3173
Email: keci@kec.co.th
Turkey
STD SFS Teknigi Danismanlik
Phone: +90 212 2889825
Fax: +90 212 2889831
Email: info@std.com.tr
United Arab Emirates
NMK Electronics Eat
Phone: +971 4626683
Tax: +971 626682
Email: nmk@entirates.net ae
United Kingdom & Ireland
Focusrite Audio Engineering Ltd
Phone: 144 (0) 1494 462245
Fax: +44 (0) 1+94 459020
Email: sales@locusrite.com
USA
American Music and Sound
Phone: 866-FOCUSRITE/800-131-2609
Fax: 500 431 3129
Email: focusrite@americamusicandsound.com
Venezuela
Avcom C.A
Phone: +582 234 0032
Tax: +582 235 1416
Email: jmcndez@avcom.com.ve
Vietnam
Vistar
Phone: 184 4 824 3058
Fax: 484 4 825 0099
Email: vistar@netnam.org.vn
Other territories not listed:
Please contact Focusrate United Kingdom
