
EAT978 - Toaster ELECTROLUX - Free user manual and instructions
Find the device manual for free EAT978 ELECTROLUX in PDF.

User questions about EAT978 ELECTROLUX
0 question about this device. Answer the ones you know or ask your own.
Ask a new question about this device
Download the instructions for your Toaster in PDF format for free! Find your manual EAT978 - ELECTROLUX and take your electronic device back in hand. On this page are published all the documents necessary for the use of your device. EAT978 by ELECTROLUX.
USER MANUAL EAT978 ELECTROLUX
natural_image
Exterior view of a black Electrolux 6-water toaster with metallic grille and control buttons (no text or symbols on device body)EN INSTRUCTION BOOK
FR MODE D'EMPLOI
Downloaded from www.vandenborre.be
Catalogue
Language of Introduction Page
English 1 - 7
French 8 - 15
Dutch 16 - 23
Spanish 24 - 31
Portuguese 32 - 39
EN
PLEASE READ THE FOLLOWING INSTRUCTIONS CAREFULLY BEFORE USING THE APPLIANCE AND KEEP FOR FUTURE REFERENCE.
WARNINGS
- This appliance is intended to be used in household and similar applications such as:
- staff kitchen areas in shops, offices and other working environments;
- farm houses;
- by clients in hotels, motels and other residential type environments;
- bed and breakfast type environments.
- If the supply cord is damaged, it must be replaced by the manufacturer, its service agent or similarly qualified persons in order to avoid a hazard.
- This appliance can be used by children aged from 8 years and above and persons with reduced physical, sensory or mental capabilities or lack of experience and knowledge if they have been given supervision or instruction concerning use of the appliance in a safe way and understand the hazards involved. Children shall not play with the appliance. Cleaning and user maintenance shall not be made by children unless they are older than 8 and supervised.
- Keep the appliance and its cord out of reach of children less than 8 years.
- The appliance is not intended to be operated by means of an external timer or separate remote-control system.
- The outer surface may get hot when the appliance is operating.
- The bread may burn, therefore do not use the toaster near or below
combustible material such as curtains.
- The temperature of accessible surfaces may be high when the appliance is operating.
- Never insert slices of bread that are too thick into the toaster for they could jam the popup mechanism and cause a fire.
- Be sure to clean the crumb tray often for an accumulation of crumbs could eventually cause a fire hazard.
- Do not place the appliance in or near hot gas or electric burner, or permit to touch a heated oven or mini oven.
- Regarding the instructions for cleaning surfaces in contact with food and the detail information on how to remove breadcrumbs, refer to "Cleaning and maintenance" on page 6 of the manual.
- The surfaces are liable to get hot during use.
IMPORTANT SAFETY INSTRUCTIONS
- Do not use outdoors.
- Stand the appliance on a stable flat surface before use.
- Check that the voltage marked on the appliance rating plate matches your local mains supply.
- Do not touch hot surfaces. Use knobs at all times.
- To protect against electrical shock, do not immerse the appliance or its lead in water or any other liquid.
- Disconnect the appliance from the mains socket when filling or emptying the toaster, before cleaning and when it is not in use.
- When using this appliance, provide adequate air space above and on all sides for circulation.
- Do not let the power cord hang over the edge of the work surface or allow it to touch hot surfaces or sources of heat or flame.
- The appliance is for household use only. Do not use the appliance for other than its intended use.
- Do not use accessories not recommended by the manufacturer to avoid danger
EN
of fire, electric shock or personal injury.
- Oversize food, metal foil packages or utensils must not be inserted in the appliance, as this may cause fire or electrical shock.
- Do not operate the appliance under or near curtains or other flammable materials or under wall cabinets, as the bread may burn which constitutes a fine hazard.
- Do not use the toaster without the crumb tray in place.
• To avoid possibility of fire, do not leave the toaster unattended during use. - Immediately press the stop button and unplug the appliance if fire or smoke is observed. Do not use or attempt to repair the appliance yourself, seek expert advice.
- If a slice of bread gets stuck inside the appliance, unplug the appliance and allow it to cool down before removing the bread.
- Do not use metallic objects such as knives to dislodge food as these could make the metallic objects hot or cause an electric shock.
- Do not place the appliance on a hot surface.
- Do not attempt to dislodge food when the appliance is in operation.
- Do not place foil wrapped articles in the toaster.
- Be sure to remove the bread carefully after toasting so as to avoid injuries.
- Do not use abrasive, caustic or oven cleaners when cleaning this appliance.
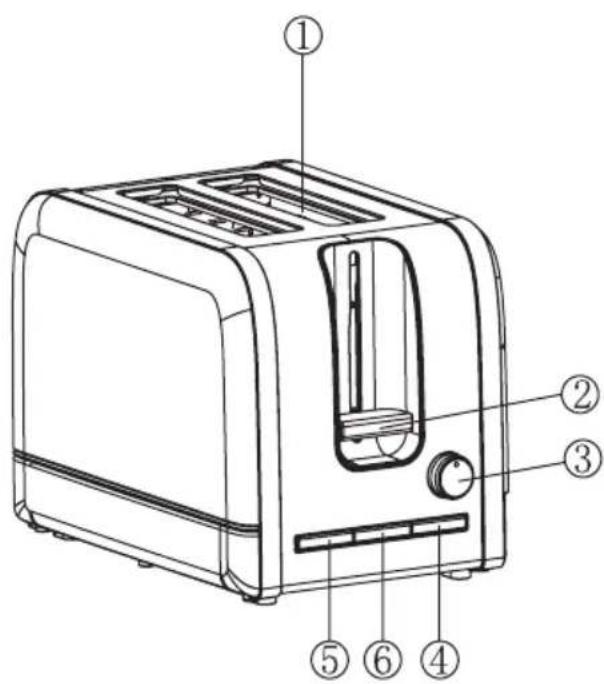
PARTS
text_image
Labeled diagram of a toaster with numbered parts for identification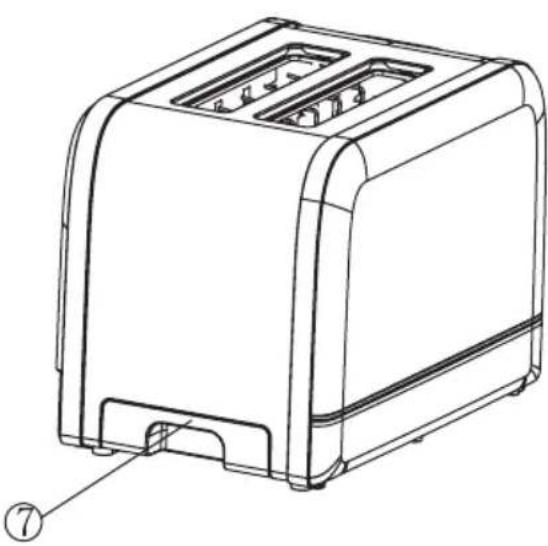
natural_image
Line drawing of a toaster with two grilles and a handle, labeled with number 7 (no text or symbols on the device itself)- Toast slots
- Carriage lever
- Browning control knob (1-6)
- △ Stop button
- Reheating button
- Defrosting button
- Crumb tray
BEFORE FIRST USE
Remove all packaging materials and wipe the outside of the appliance with a damp cloth.
Before using the appliance for the first time, it is recommended to let the appliance complete a few toasting cycles without slices of bread on the highest browning setting in a properly ventilated room.
OPERATION
- Plug the toaster into the mains socket.
- Put the bread slice/slices into the slot(s) at the top of the appliance.
- Make sure the crumb tray is fully in place by pushing it firmly into the appliance before using.
- Turn the browning control knob to the desired setting.
- There are 6 settings: "1" for the lightest setting, "6" for the darkest setting.
- You will need to experiment with this setting depending on your browning colour preference and the thickness of the bread.
- Press carriage lever down vertically until it locks in the down position to switch the appliance on.
• The indicator light on the stop button will illuminate. - Toasting process can be terminated at any time by pressing. The carriage lever will spring up.
- Once the bread has been toasted to the selected setting, the bread will automatically pop up and the carriage lever will automatically spring up to switch off the appliance.
- During toasting, you may observe the toasting colour, if the browning setting is higher than
EN
required, press △ to stop the operation at any time.
• The indicator light on the stop button will go out.
- Remove the bread from the slot.
IMPORTANT: If the bread gets stuck inside the appliance, do not attempt to dislodge the bread when the appliance is plugged in. Remove the plug from the mains socket, allow the appliance to cool down and carefully remove bread using wooden tongs.
- Repeat steps 2 to 6 for additional toast as desired.
- When all toasting is complete, unplug the toaster from the mains socket.
Caution:
* Do not toast the food with extremely runny ingredients such as butter.
* The toast slot is only able to toast regular bread slice. Do not try to insert slices that are too thick.
Reheating
To reheat cold toasted bread, press

The indicator light on the reheating button will illuminate to indicate the appliance is in the reheating cycle.
In this mode toasting time is fixed, after the time runs out, the carriage lever will automatically spring up to end the reheating process.
Defrosting
-
To toast frozen bread, turn the browning control knob to your desired setting.
-
Press the carriage lever down vertically until it latches in the down position.
-
Press

- The indicator light on the defrosting button will illuminate to indicate the appliance is in the defrosting cycle.
CLEANING AND MAINTENANCE
- Unplug the appliance and allow it to cool completely before cleaning.
- Clean the outside of the appliance with a damp cloth. Dry thoroughly.
- Do not use abrasive or chemical cleaning agents.
Surfaces in contact with food should be cleaned regularly to avoid cross contamination from different types of food, the use of a dry cloth is advisable when dealing with surfaces that come into contact with food.
Correct food hygiene practices should always be followed at all times to avoid possibility of food poisoning /cross contamination.
- Pull out the crumb tray located at the bottom of the appliance and empty it with a dry cloth. Make sure the crumb tray is fitted correctly before using the appliance again.
- To remove any pieces of bread remaining in the toaster, turn the toaster upside down and gently shake.
SPECIFICATIONS
Ratings: 220-240V\~, 50/60Hz 860-1050W
DISPOSAL

As a responsible company we care about the environment.
As such we urge you to follow the correct disposal procedure for the appliance and packaging materials. This will help conserve natural resources and ensure that it is
recycled in a manner that protects health and the environment.
You must dispose of this appliance and its packaging according to local laws and regulations.
Because this appliance contains electronic components, the appliance and its accessories must be disposed of separately from household waste when the appliance reaches its end of life.
Contact your local authority to learn about disposal and recycling.
EN
The appliance should be taken to your local collection point for recycling. Some collection points accept appliance free of charge.
We apologise for any inconvenience caused by minor inconsistencies in these instructions, which may occur as a result of product improvement and development.
ELECTROLUX 25/10/2018
MERCI DE BIEN VOULOIR LIRE LES CONSIGNES DE SÉCURITÉ ATTENTIVEMENT AVANT L'UTILISATION DE L'APPAREIL ET DE LES CONSERVER POUR CONSULTATION ULTERIEURE:
ATTENTION
text_image
Labeled diagram of a toaster with numbered parts for identification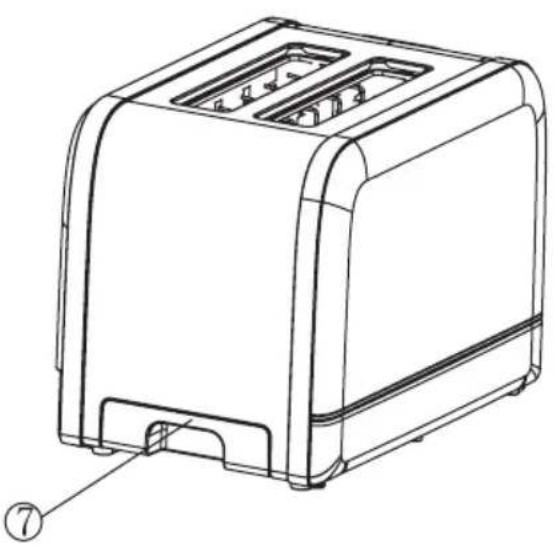
natural_image
Line drawing of a modern toaster with two grilles and a handle (no text or symbols)Hotline Darty France
text_image
Labeled diagram of a toaster with numbered parts for identification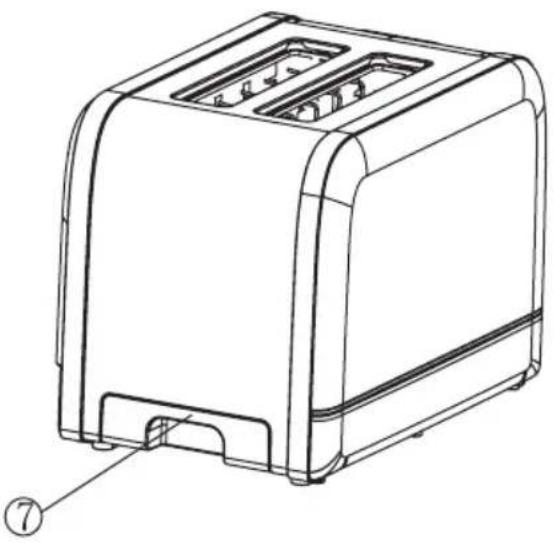
natural_image
Line drawing of a toaster with handle and front panel (no text or symbols)- Toastsleuven
- Broodrooster hendels
- Bruinkleurknoppen (1-6)
- Stopknop
- 0owarmknop
- Defesting button
- Kruimellade
VOOR DE EERSTE INGEBRUIKNAME
Downloaded from www.vandenborre.be
ELECTROLUX 25/10/2018
POR FAVOR, LEA ESTE MANUAL DE INSTRUCCIONES DETENIDAMENTE ANTES DE USAR EL APARATO Y GUARDELO PARA FUTURAS CONSULTAS.
ADVERTENCIAS
text_image
Labeled diagram of a toaster with numbered parts for identification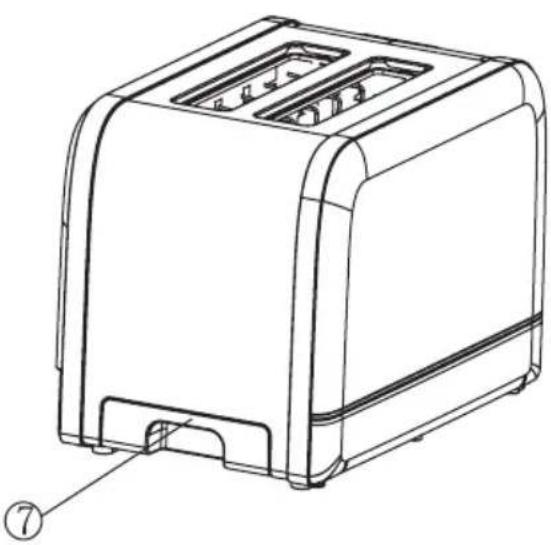
natural_image
Line drawing of a modern toaster with two grilles and a handle (no text or symbols)text_image
Labeled diagram of a toaster with numbered parts for identification
natural_image
Line drawing of a toaster with handle and front panel (no text or symbols)Downloaded from www.vandenborre.be
Downloaded from www.vandenborre.be

natural_image
Abstract geometric design with two white petal-like shapes on a black background (no text or symbols)3484 E EAT978 02 01 1018
Share more of our thinking at www.electrolux.com
electrolux.com/shop Electrolux Floor Care AB
