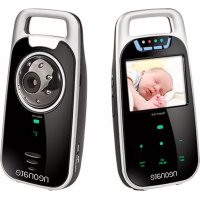
N65 - Baby monitors Neonate - Free user manual and instructions
Find the device manual for free N65 Neonate in PDF.

User questions about N65 Neonate
0 question about this device. Answer the ones you know or ask your own.
Ask a new question about this device
Download the instructions for your Baby monitors in PDF format for free! Find your manual N65 - Neonate and take your electronic device back in hand. On this page are published all the documents necessary for the use of your device. N65 by Neonate.
USER MANUAL N65 Neonate
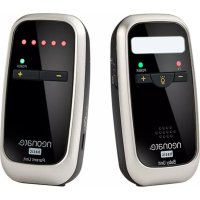
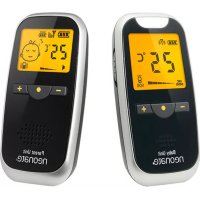
N65LGREY N65DGREY N65BLCK
N65
user manual
neonate
neonate
DECLARATION OF CONFORMITY
Noricon AS
Nandrups vei 1 b
0490 Oslo
NORGE
Declares that the following produkt:
Model Neonate N65 is compliant with
the following relative harmonized
standards:
• EN 300220-1 V3.1.1 (2017-02)
• EN 300220-2 V3.2.1 (2018-06)
• EN 301 489-1 V2.2.3 [2019-11]
• EN 301 489-3 V2.1.2 [2021-03]
• EN 62368-1:2014+A11:2017
• EN 50663:2017
• EN 62479:2010
In accordance with the requirements set forth by
the RED directive [2014/53/EU] regarding radio and
tele communications terminal equipment and mutual
recognition of their conformity.
Name: Glenn Ulverud
Position: CEO
Date: 20.10.2021

www.neonate.no
EU AUTHORISED REPRESENTATIVE
NORICON AS, CVR-NR, DK35493867
THOMAS BERGS GADE 12
DK-9900 FREDERIKSHAVN
DENMARK


Operating frequency : 863-870MHz
Output Power Baby unit : 12dBm
Output Power Parent unit : 12dBm
Page Content
4 Introduction to the Neonate N65
6 Warnings
8 Getting started (Paring units)
9 One parent unit, more than one baby unit
10 How to avoid out-of-range alarm
12 Norsk
16 Dansk
20 Svenska
24 Suomea
28 Deutsch
32 Français
36 Nederlands
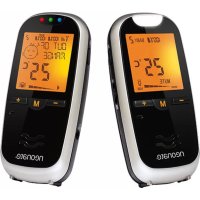
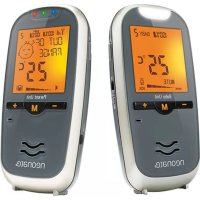
Parent unit
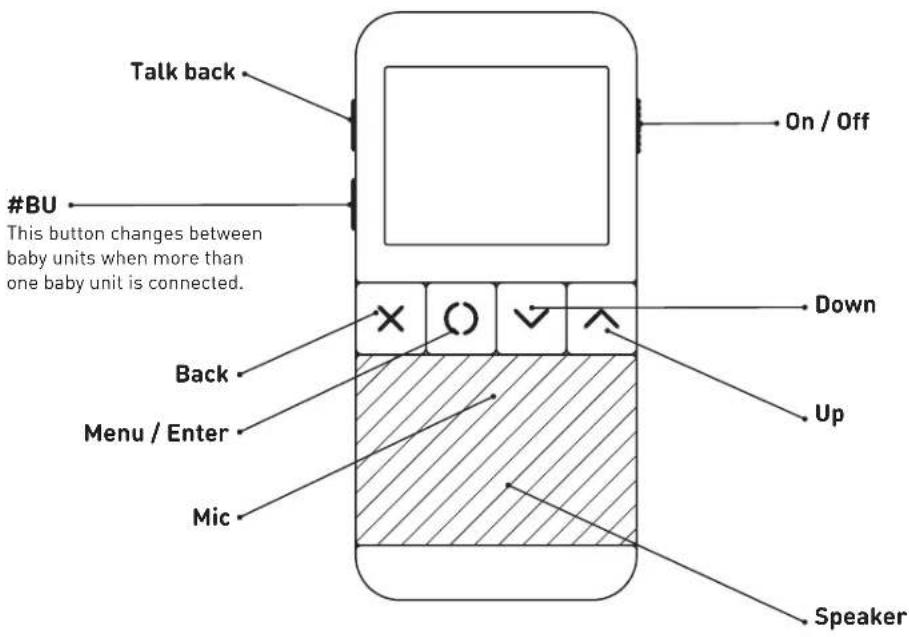
text_image
Talk back #BU This button changes between baby units when more than one baby unit is connected. On / Off Down Back Menu / Enter Mic Up SpeakerBaby unit

text_image
Night light Night light has 3 states. ON, OFF and VOX (voice activated). On / Off Mic Speaker Down UpWarning!
- Read the instructions for the baby monitor and the safety instructions thoroughly before use.
- This baby monitor is only intended as an aid to monitor your baby, it is not a substitute for responsible adult supervision.
- Keep the baby monitor completely out of reach of your baby. The baby monitor is not a toy, and your baby must not play with any of the units or any accessories.
- Be aware of strangulation hazard of the cord/cable and neck strap (when included) and keep cord/cable/neck strap out of reach of your baby.
- Do not expose the baby monitor or battery to direct sunlight, high temperatures, water or excessive moisture or dusty environment.
- Do not cover the baby monitor with towels, clothes, blankets, other fabrics or any other items.
- Only use original batteries in the units. If you need to replace batteries, check instructions or contact local dealer or Neonate who will provide instructions on how to remove and replace batteries.
- Only use original charger when charging the batteries/units. Only charge the batteries/units when you are present and can monitor the charging. Ensure the charger and units/batteries do not get unusually hot when charging. If the units/batteries do not charge, or charging takes longer than usual, stop the charging and contact your local dealer or Neonate. When batteries/units are charged, remove them from charger and unplug electrical connections.
- Do not modify, pierce, damage or dismantle the product or the battery. Dismantling the product invalidates the guarantee of the product. If product or batteries get damaged, stop using them. The same applies if the units or batteries get unusually hot under use, smells or in any way deviate from their normal condition. All repairs must only be done by qualified service personnel. Neonate can, in some circumstances, guide and allow end-users to replace certain parts in the products.
- The baby monitor and batteries contain electrical components and chemicals. This means that any disposal of such products must be done according to local regulations and environmental considerations.

Information concerning the disposal of exhausted batteries
The pictured symbol on the left side on batteries, the packing or the enclosed documents signifies that the batteries should not be disposed of at the end of their life cycle together with the domestic waste. Possible added letters under the waste bin signify that the battery contains lead (Pb), cadmium (Cd) or mercury (Hg). You as consumer are obliged by law to render all kind of batteries (both rechargeable as well as non-rechargeable) inclusive button cells at local places of collection or at the retail market. This is at no charge. The proper disposal enables the recycling of valuable resources and avoids possible negative effects on humans and the environment.

Information concerning the disposal of old electric and electronic products The pictured symbol on the product, the packing or the enclosed documents signifies that the product should not be disposed of after the end of its life cycle together with the domestic waste. You as consumer are obliged by law to render electric and electronic products at a local place of collection for electronic equipment. This is at no charge. Please take out the batteries before disposal of the product. The proper disposal enables the recycling of valuable resources and avoids possible negative effects on humans and the environment. For further information please contact your local authority or the vendor of the product.
Batteries requires caution!
When charging a battery there is always a small risk that a short-circuit or a malfunction can cause the battery to overheat and catch fire. It is highly recommended that you never charge a battery in an unsupervised environment.
Warning!
- Do not charge the battery without regular supervision.
- Do not charge the batteries through the night.
- Avoid charging the batteries in direct sunlight.
- Keep batteries away from moist environments and steam.
- Do not bend, twist, pierce or deform the battery.
The life of your battery will increase if you try to:
• charge the battery between 25-80%
- keep the battery from going to 0% or 100%.
- avoid charging the battery beyond 100% .
It is recommended to replace battery after 600 cycles of charging and discharging.
All Neonate batteries has a 2 year warranty.
Instructions for safe removal of the batteries or accumulators.
Remove the back cover of the device which you intend to remove the battery from. Lift the battery carefully without pulling on the wires. Grasp the wire between the battery and the white battery connector within the battery compartment. Pull gently on the wires so that these are stretched and apply pressure to the white battery connector. Make sure not to pull on the wires placed on the actual battery. The battery connector at the end of the wire should now disconnect from the PCB card within the battery compartment.
The following batteries or accumulators are contained in this electrical device.
Battery type:
Lithium Ion Polymer rechargeable battery
Chemical system:
Lithium Cobalt Dioxide and Graphite
text_image
Diagram showing a mobile phone screen and its left-side layout with checkmarks and an arrow indicating transformation or change.Getting started
Your baby call is ready to use right out of the box. However, we highly advice that you re-establish the connection (pair) between the parent unit and the baby unit. This is to ensure a safe and private connection between the units.
To pair the devices
1 Enter the Menu
2 Choose Pair units
3 Choose Pair new baby unit
4 Choose Go to pair mode
5 Follow the instructions on the screen
When you hear 2 beeps you can restart your parent unit by turning it off and then on again. Your baby monitor should be ready for use now.
You can read more about this product and reach out to our support team at our website.
www.neonate.no
One parent unit, more than one baby unit
With the Neonate N65 baby monitor you can connect up to 3 different baby units to the same parent unit. This makes it the perfect baby monitor for parents with more than one child.
The standard box contains 1 baby unit.
Extra baby units are sold separately.
To add a new baby unit go to Menu and choose Pair units. In the submenu choose Pair new baby unit. Follow the instructions on the screen.
When more baby units are paired, the home screen changes
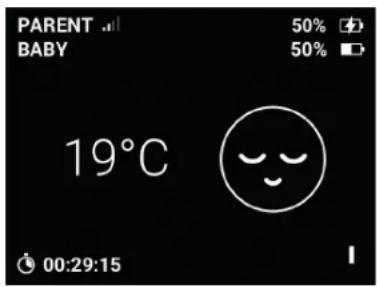
text_image
PARENT .# BABY 50% 50% 19°C 00:29:15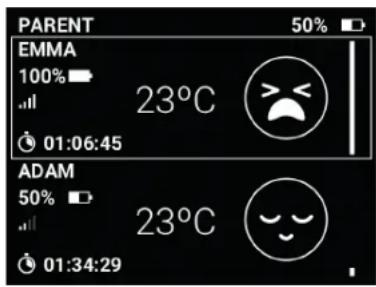
text_image
PARENT 50% EMMA 100% 23°C 01:06:45 ADAM 50% 23°C 01:34:29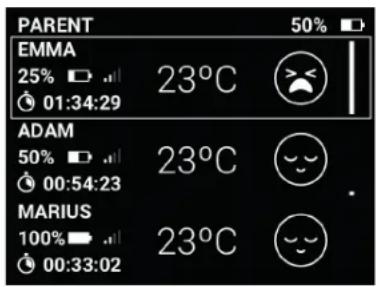
text_image
PARENT 50% EMMA 25% 23°C 01:34:29 ADAM 50% 23°C 00:54:23 MARIUS 100% 23°C 00:33:021 baby unit connected 2 baby units connected 3 baby units connected
One baby unit is always activated (look for the white frame). If you use the talk back function, you will talk only to the baby unit that is chosen. To change between baby units use the #BU button. (This button has no funtion when only 1 baby unit is paired).
How to avoid out-of-range alarm
(When more than one baby unit is connected).
If you have more than one baby unit paired with your parent unit, but only want to use one baby unit, you can set the other baby unit as inactive. An inactive baby unit will be ignored until it is switched on. (It will not trigger the out-of-range alarm).
This is how you set a baby unit as inactive
(This only works if you have more than 1 baby unit connected)
1 The baby unit you want to set as inactive must be switched off. When the baby unit is switched on it will automatically be re-activated.
2 Enter the Menu
3 Choose Baby unit settings
4 Choose the baby unit you want to set as inactive
5 Choose Active / Inactive
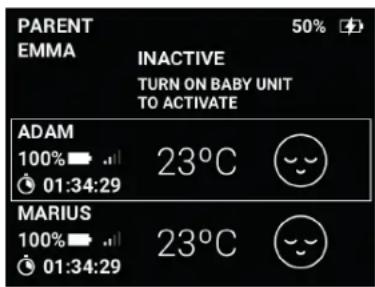
6 The status should change to Inactive, and the home screen will change
text_image
PARENT EMMA INACTIVE TURN ON BABY UNIT TO ACTIVATE ADAM 100% 23°C 01:34:29 MARIUS 100% 23°C 01:34:29Here 3 baby units are paired, but only 2 are being used. (One baby unit is set as inactive).