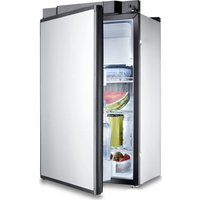
RMV 5305 - Fridge DOMETIC - Free user manual and instructions
Find the device manual for free RMV 5305 DOMETIC in PDF.


User questions about RMV 5305 DOMETIC
0 question about this device. Answer the ones you know or ask your own.
Ask a new question about this device
Download the instructions for your Fridge in PDF format for free! Find your manual RMV 5305 - DOMETIC and take your electronic device back in hand. On this page are published all the documents necessary for the use of your device. RMV 5305 by DOMETIC.
USER MANUAL RMV 5305 DOMETIC
natural_image
Exterior view of a modern stainless steel refrigerator with front-mounted top (no visible text or symbols)RMV5301, RMV5305
EN Absorber refrigerator
Operating manual....14
natural_image
Technical line drawing of a mechanical component with no visible text or symbols9
A
text_image
1. 2. 3.B
text_image
1. 2. 3.C
text_image
1. 2. 3.10
A
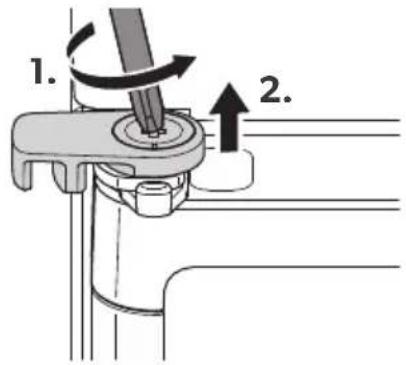
text_image
1. 2.B
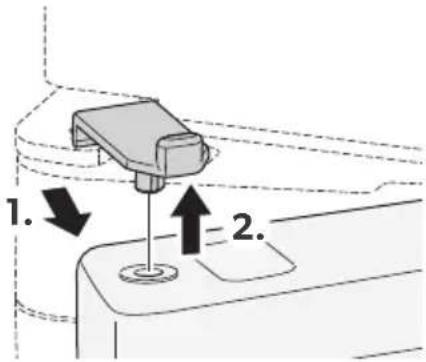
text_image
1. 2.C
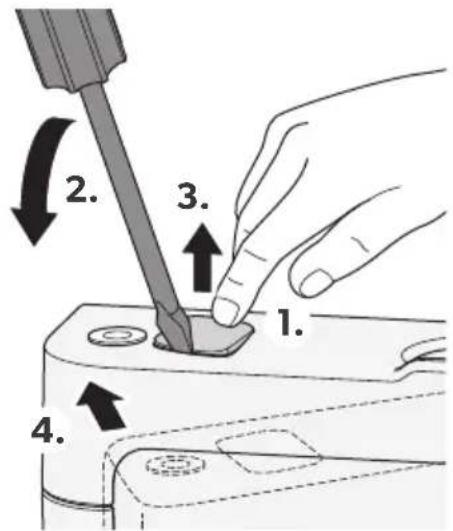
text_image
1. 2. 3. 4.D
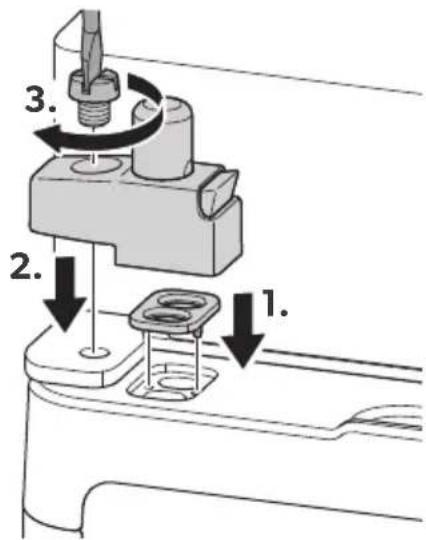
text_image
1. 2. 3.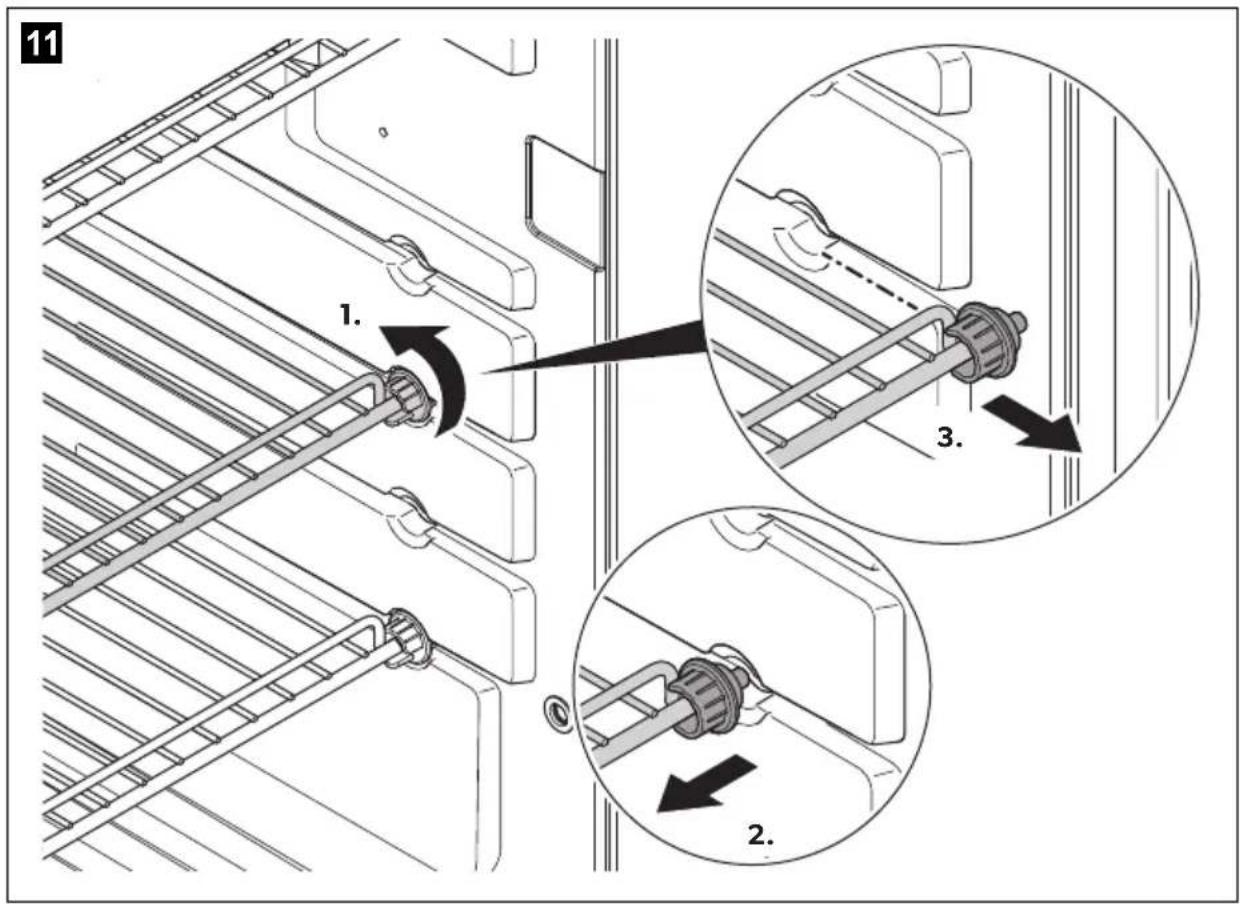
text_image
11 1. 3. 2.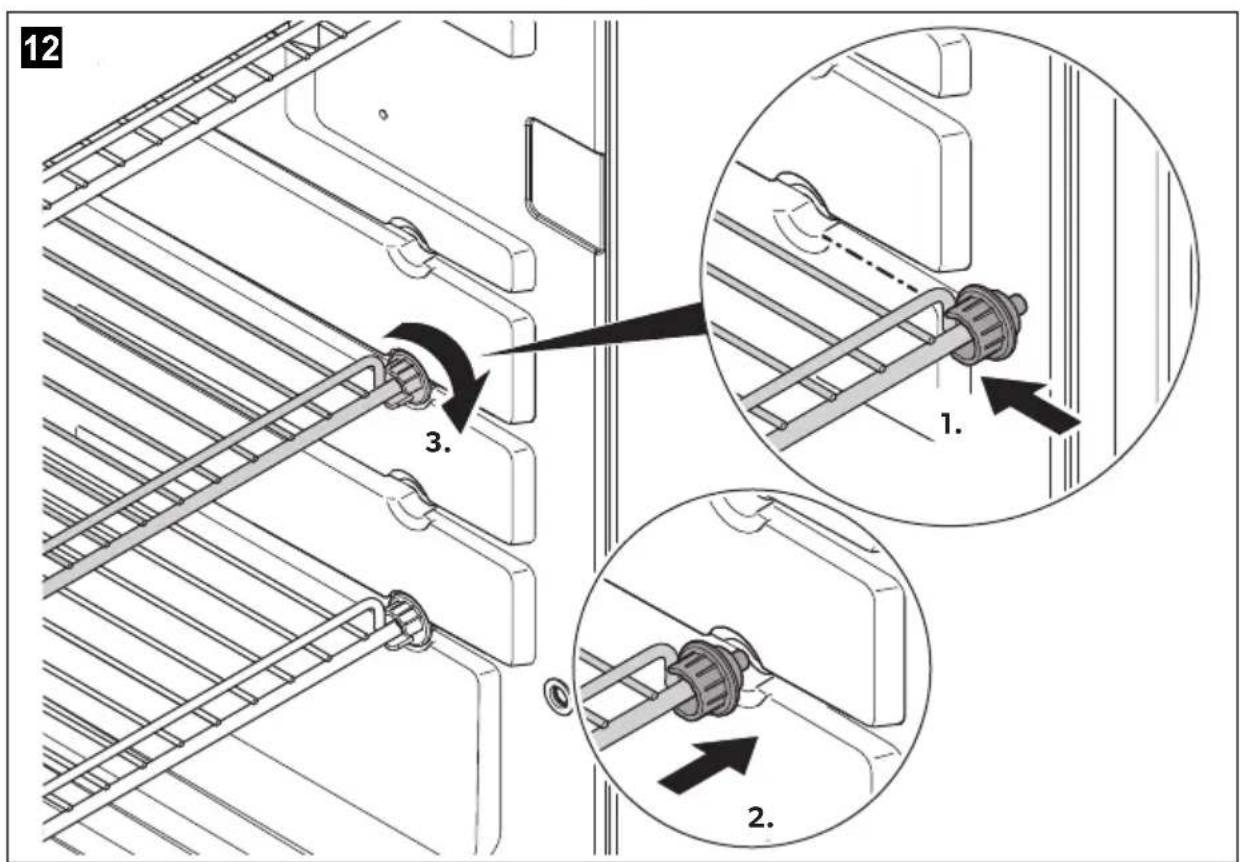
text_image
12 3. 1. 2.13
text_image
A 1. 2. 3.B
natural_image
Illustration of a human leg being adjusted with a curved arrow indicating rotation (no text or symbols)C
natural_image
Diagram of a door handle assembly with a circular valve and directional arrow (no text or symbols)D
text_image
1. 2. 3.E
natural_image
Diagram of a mechanical component with a square component and a downward arrow indicating motion (no text or symbols)F
natural_image
Mechanical assembly diagram showing a rotating component with a cylindrical shaft and curved arrows indicating motion (no text or symbols)G
natural_image
Mechanical assembly diagram showing a rotating shaft and housing (no text or symbols)H
natural_image
Mechanical assembly diagram showing a bracket with a downward arrow indicating force or movement (no text or symbols present)|
natural_image
Diagram of a mechanical component with a rotating shaft and adjustment knob (no text or symbols)J
text_image
J 1. 2. 3.14
text_image
A 1. 2.B
natural_image
Diagram of a human foot pressing down on a mechanical component with a curved arrow indicating rotation (no text or symbols present)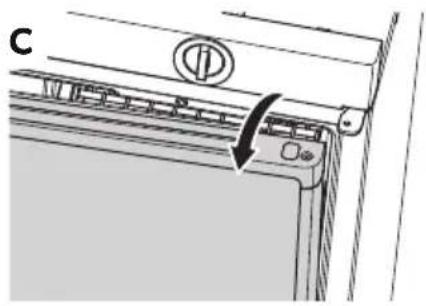
natural_image
Diagram of a door panel with a circular button and an arrow pointing to a component (no text or symbols present)D
natural_image
Simple line drawing of a device with an upward arrow indicating motion (no text or symbols)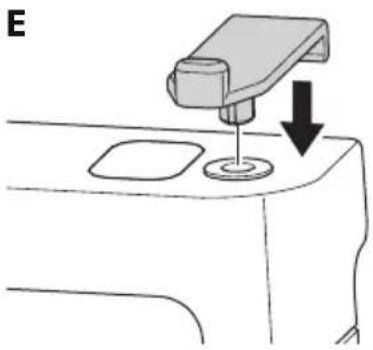
natural_image
Diagram of a mechanical device with a lever and base, showing a downward arrow indicating motion (no text or symbols present)F
natural_image
Diagram of a hand holding a cylindrical object with a rotating arrow, no text or symbols present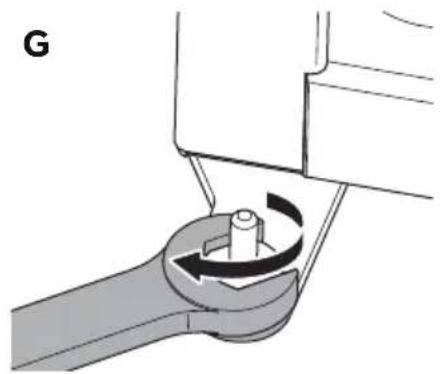
natural_image
Mechanical diagram showing a rotating component with a curved arrow indicating rotation (no text or symbols)H
natural_image
Mechanical assembly diagram showing a tool interacting with a component (no text or symbols visible)I
natural_image
Diagram of a mechanical component with a rotating shaft and adjustment knob (no text or symbols)J
text_image
2. 1.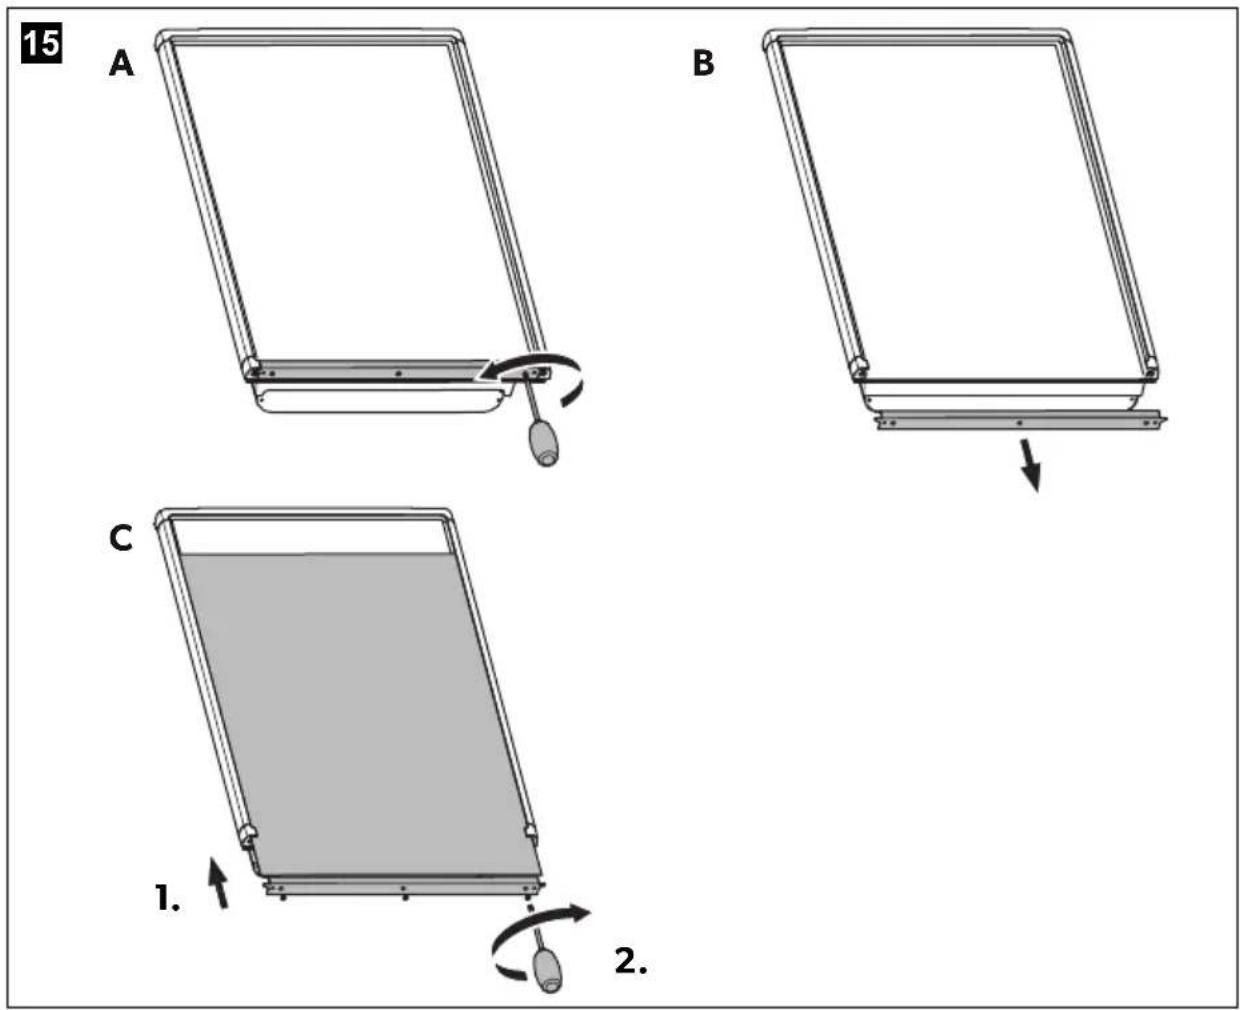
16
text_image
Diagram of a solar panel with labeled components and directional arrows indicating rotation or movement.17
text_image
Diagram illustrating the installation of a wall-mounted air conditioner panel, showing component insertion and assembly steps.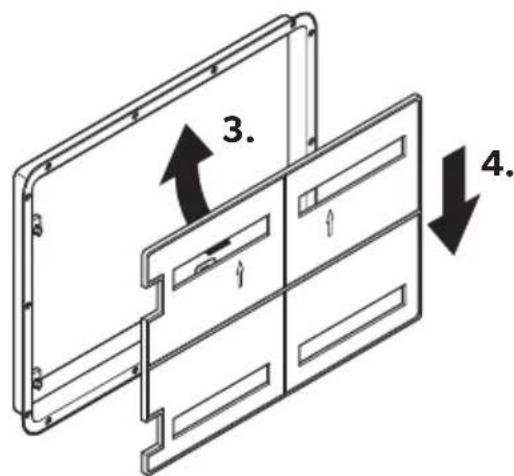
text_image
3. 4.
text_image
7. 5. 6. 1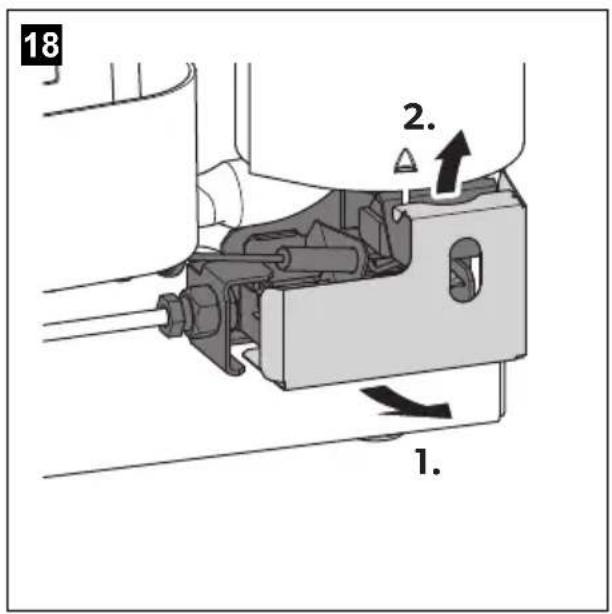
text_image
18 2. 1.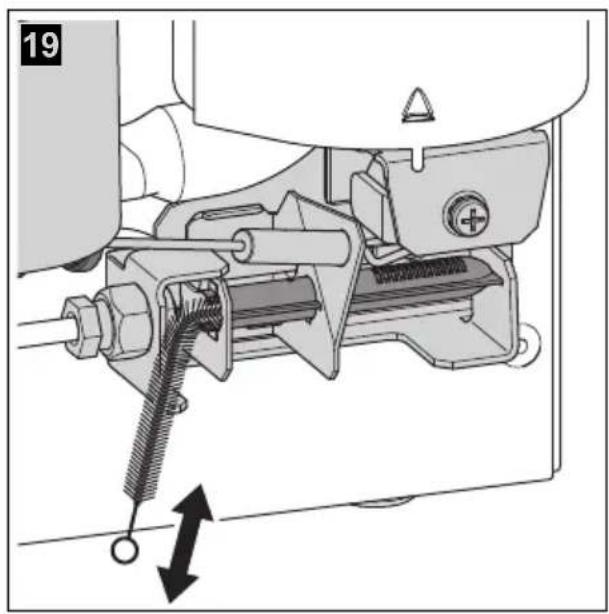
natural_image
Mechanical assembly diagram showing a spring-loaded tool interacting with a motor or engine component (no text or symbols visible)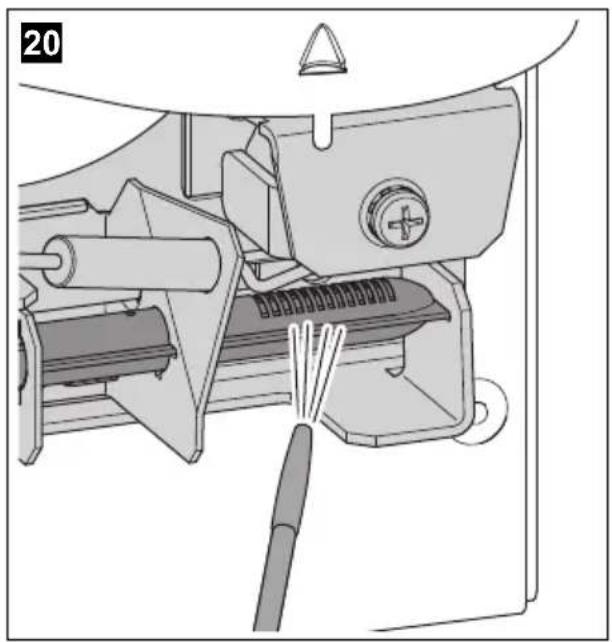
natural_image
Mechanical assembly diagram showing a motor, gear shift, and cable connection (no text or symbols)Please read this instruction manual carefully before first use, and store it in a safe place. If you pass on the product to another person, hand over this instruction manual along with it.
Table of contents
1 Explanation of symbols....14
2 Safety instructions....15
3 Scope of delivery .....19
4 Accessories 20
5 Intended use 20
6 Technical description .....21
7 Using the refrigerator 23
8 Troubleshooting....31
9 Cleaning and maintenance.... 34
10 Maintenance 35
11 Warranty 36
12 Disposal.... 36
13 Technical data 37
1 Explanation of symbols

WARNING!
Safety instruction: Indicates a hazardous situation that, if not avoided, could result in death or serious injury.

CAUTION!
Safety instruction: Indicates a hazardous situation that, if not avoided, could result in minor or moderate injury.

NOTICE!
Indicates a situation that, if not avoided, can result in property damage.

NOTE
Supplementary information for operating the product.
2 Safety instructions
The manufacturer accepts no liability for damage in the following cases:
- Faulty assembly or connection
- Damage to the product resulting from mechanical influences and incorrect connection voltage
• Alterations to the product without express permission from the manufacturer - Use for purposes other than those described in the operating manual
2.1 General safety

WARNING! Failure to obey these warnings could result in death or serious injury.
Electrocution hazard
- Installation and removal of the device may only be carried out by qualified personnel.
- Do not operate the device if it is visibly damaged.
- If this device's power cable is damaged, it must be replaced by the manufacturer, customer service or a similarly qualified person in order to prevent safety hazards.
- This device may only be repaired by qualified personnel. Improper repairs can result in considerable danger or damage to the device.
Fire hazard
- The refrigerant in the refrigerant circuit is highly flammable. In the event of any damage to the refrigerant circuit (smell of ammonia):
- Switch off the device.
- Avoid naked flames and sparks.
- Air the room well.
Explosion hazard
- Do not store any explosive substances, such as spray cans with propellants, in the device.
Health hazard
- Never open the absorber unit. It is under high pressure and can cause injury if it is opened.
- This device can be used by children aged from 8 years and above and persons with reduced physical, sensory or mental capabilities or lack of experience and knowledge if they have been given supervision or instruction concerning use of the device in a safe way and understand the hazards involved.
• Children shall not play with the device. - Cleaning and user maintenance shall not be made by children without supervision.
- Children aged from 3 to 8 years are allowed to load and unload refrigerating devices.

CAUTION! Failure to obey these cautions could result in minor or moderate injury.
Risk of crushing
- Do not put your fingers into the hinge.

NOTICE! Damage hazard
- Keep the condensation opening clean at all times.
- The device lighting may only be replaced by customer service.
- Do not use a high-pressure cleaner near the ventilation grill when cleaning the vehicle.
- Attach the winter covers (accessories) of the ventilation grille when the vehicle is cleaned from the outside or not used for a prolonged period of time.
- Do not open the refrigerant circuit under any circumstances.
- The refrigerator is not suitable for storing substances which are caustic or contain solvents.
- The refrigerator may not be exposed to rain.
2.2 Safe operation

CAUTION! Failure to obey these cautions could result in minor or moderate injury.
Risk of injury
- Close and lock the device door before beginning a journey.
- The cooling aggregate at the back of the device becomes very hot during operation. Protect yourself from coming into contact with hot parts when removing ventilation grills.

NOTICE! Damage hazard
- Do not use electrical devices inside the device unless they are recommended by the manufacturer for that purpose.
- Ensure that the ventilation openings are not covered.
• Danger of overheating!
Always ensure sufficient ventilation so that the heat generated during operation can dissipate. Make sure that the refrigerator is sufficiently far away from walls and other objects so that the air can circulate.
- Do not fill the inner container with ice or fluid.
- Protect the refrigerator and the cable against heat and moisture.
- Make sure that foodstuffs do not touch the walls of the cooling area.
2.3 Safety when operating with gas

WARNING! Failure to obey these warnings could result in death or serious injury.
Explosion hazard
- Only operate the device at the pressure shown on the type plate. Only use pressure controllers with a fixed setting which comply with the national regulations.
- While driving only operate the device with gas if the vehicle manufacturer allows the operation of the gas system while driving (see vehicle's manual).
- Check the national requirements for operating the device with gas during driving.
- Never operate the device with gas:
- At petrol stations
- In parking garages
- On ferries
- While transporting the caravan or mobile home with a transport vehicle or tow truck
- Never use a naked flame to check the device for leaks.
• In case of gas odor:
- Close the gas supply cock and the valve on the cylinder.
- Open all windows and leave the room.
- Do not press an electric switch.
-
Put out any naked flames.
– Have the gas system checked by a specialist. -
Never store liquid gas cylinders in unventilated areas or below ground level (funnel shaped holes in the ground).
- Keep liquid gas cylinders away from direct sunlight. The temperature may not exceed 50 °C.

NOTICE! Damage hazard
- Only use propane or butane gas, not natural gas (see rating plate).

NOTE
- Ignition problems may occur at altitudes above 1000 m. Switch to a different energy source.
2.4 Safety when operating

CAUTION! Failure to obey these cautions could result in minor or moderate injury.
Health hazard
- Make sure that you only put items in the device which may be chilled at the selected temperature.
- Food may only be stored in its original packaging or in suitable containers.
- Opening the door for long periods can cause significant increase of the temperature in the compartments of the device.
- Clean regularly surfaces that can come in contact with food and accessible drainage systems.
- Store raw meat and fish in suitable containers in the device, so that it is not in contact with or can drip onto other food.
- If the device is left empty for long periods:
- Switch off the device.
- Defrost the device.
– Clean and dry the device. - Leave the door open to prevent mould developing within the device.

NOTICE! Damage hazard
- Only store heavy objects such as bottles or cans in the device door, in the vegetable compartment or on the bottom shelf.
2.5 Safety when operating with DC power

NOTICE!
- Only select operation with DC power supply (battery mode) if the vehicle engine is running and providing sufficient voltage to the light system, or if you are using a battery monitor.
2.6 Safety when operating with AC power

NOTICE!
- Check that the voltage specification on the type plate is the same as that of the power supply.
- Only use the cable supplied to connect the refrigerator to the AC mains.
- Never pull the plug out of the socket by the connection cable.
3 S c o p e o f d
- Refrigerator
- l c e - c u b e t r a y
- Operating manual
• Installation manual (optional)
4
A
C
C
e
s
s
0
r
i
Available as accessories (not included in the scope of delivery):
Description
Winter cover for the ventilation grille
All the accessories are available from specialist dealers. If you have any questions, please contact the dealer or your service partner directly.
5 Intended use
The refrigerator is designed for installation in caravans or motorhomes. It is only suitable for cooling, freezing and storing foodstuffs. The refrigerator is not intended for the proper storage of medicine.

CAUTION! Health hazard!
Please check if the cooling capacity of the refrigerator is suitable for storing the food you wish to cool.
The refrigerator is designed to be operated on a DC power supply and an AC socket and can be independently powered by liquid gas (propane or butane). The refrigerator may not be run on natural gas or city gas. The RMV 5305 refrigerator also always requires a permanent DC supply.
6 Technical description
6.1 Description
The refrigerator is an absorption refrigerator. The refrigerator is designed to operate with different types of power and can be run on an AC power supply, a DC power supply or with butane/propane gas. For DC operation, the vehicle battery or a solar system built on the vehicle can be used. For AC and gas operation, the thermostatic control ensures that the refrigerator temperature is kept constant and as little power as possible is consumed.
The refrigerator has
- a locking mechanism to protect it during transport.
- a defrost drain with its opening located on the rear panel of the refrigerator.
- an automatic pilot light which automatically interrupts the gas supply after approx. 30 seconds if the flame goes out.
The RMV5305 refrigerator has an automatic operating mode which selects the most economical power mode connected.
The brightness of the control elements is automatically reduced after a few seconds if no button is pressed. If a button is pressed then the brightness increases again. Pressing the button again performs the required function.
If the door is open for longer than 2 minutes, a beep is emitted.
6.2 Components
| No. in fig. 1, page 3 | Description | ||||
| 1 Control elements | |||||
| 2 Upper trays | |||||
| 3 Bottom tray with bottle holder | |||||
| 4 | S | h | e | l | f |
| 5 Thawed water drainage channel | |||||
| 6 Secondary evaporator for refrigerator | |||||
| 7 Freezer compartment | |||||
Inside the refrigerator, you can see the type plate of the refrigerator. There you can see the model name, product number and serial number. You will need this information whenever you contact the customer service or order spare parts:
| No. in fig. 2, page 3 | Description |
| 1 Model number | |
| 2 Product number | |
| 3 Serial number | |
| 4 Electrical connection value | |
| 5 Gas pressure | |
6.3 Control elements
The refrigerators have the following illuminated control elements:
| No. in fig. 3, page 4 | Description |
| 1 ON/OFF button | |
| 2 Operating with AC power supply | |
| 3 Gas operation | |
| 4 Operating with DC power supply | |
| 5 Automatic mode (RMV5305 only) | |
| 6 Setting the temperature | |
| 7 Temperature indication | |
| 8 Malfunction indicator Reset button for a gas malfunction |
7 Using the refrigerator

NOTICE!
- Make sure that you only put items in the refrigerator which may be kept at the selected temperature.
- Food may only be stored in its original packaging or in suitable containers.

NOTE
- Before starting your new refrigerator for the first time, you should clean it inside and outside with a damp cloth for hygienic reasons.
- The cooling performance can be affected by:
– the ambient temperature
– the amount of food to be conserved
- how often you open the door
– the outside temperature
- the ventilation
- When using the refrigerator for the first time, there may be a mild odour which will disappear after a few hours. Air the living space well.
- Park the vehicle so that it is level, especially when starting up and filling the refrigerator before setting off on a journey.
- The refrigerator unit operates silently.
- Approximately one hour after switching on, the freezer compartment of the refrigerator should be cold. The refrigerator reaches its operating temperature after a few hours.
7.1 Energy saving tips
- Allow hot food to cool down first before you place it into the refrigerator.
- Do not open the refrigerator more often than necessary.
- Do not leave the door open for longer than necessary.
- Arrange the food in the refrigerator so that air can circulate inside.
- Leave a distance of about 10 mm between the contents and secondary evaporator.
7.2 Switching on the refrigerator
▶Press and hold the button for two seconds.
√The refrigerator starts with the last type of power selected.
Operating with AC power supply
▶Press the button.
Operating with DC power supply

NOTE
Only select operation with DC power supply (battery mode) if the vehicle engine is running and providing sufficient voltage to the light system, or if you are using a battery monitor.
▶Press the button.
Gas operation

WARNING! Fire hazard!
Never operate the refrigerator with gas at petrol stations.

NOTE
When operating with LPG, the burner must be cleaned frequently (two or three times a year).
▶Press the button.
√Ignition is automatic.
Automatic mode (RMV5305 only)

NOTE
- To avoid unintentionally switching to gas operation while refuelling, the automatic mode starts the gas operation only once the engine has been off for 15 minutes.
- Turn off the refrigerator or set it to a different operation mode, if refuelling lasts longer than 15 minutes.
In automatic mode, the refrigerator selects the most favourable operating mode available itself.
Priority Operating mode
| 1 Solar (DC power) | |
| 2 AC power | |
| 3 DC power | |
| 4 | Gas |
▶Press the button.
7.3 Selecting the temperature

NOTE
- For ambient temperatures of +15 °C up to +25 °C, select the centre position (fig. 3, page 4). The unit operates in the optimum power range.
- In DC power mode, the refrigerator works without thermostatic control (permanent operation).
▶ Set the required temperature with the ⏻ button. You can see the set temperature in the display 📄
- one bar = lowest cooling capacity
- five bars = highest cooling capacity
7.4 Notes on storing food

CAUTION!
Only store heavy objects such as bottles or cans in the refrigerator door or on the bottom shelf.
The refrigerator compartments are recommended for the following types of food:
No. in fig. 4, page 4
Food
1 Eggs, butter, dressings, ketchup, jam
2 Drinks in bottles or cartons
3 Salad, vegetables, fruit
4 Meat, fish, items for defrosting
5 Dairy products, ready-made meals
The following applies to France: Only store dairy products in this compartment.
6 Frozen food
Please observe the following instructions for storing items:

NOTE
- Do not keep carbonated drinks in the freezer compartment.
- The freezer compartment is suitable for making ice cubes and for keeping frozen food short-term. It is not suitable for long-term food storage.
- If the refrigerator is exposed to a room temperature of below +10 °C for a prolonged period of time, an even temperature of the freezer compartment cannot be guaranteed. This can lead to a possible increase in the freezer compartment temperature and stored goods will defrost.
- Pack raw and cooked items separately.
- Observe the expiry date on the packaging.
- Do not leave refrigerated items outside the refrigerator for too long.
- Clean the inside of the refrigerator at regular intervals.
7.5 Making ice cubes
▶Fill the ice cube tray up to three quarters full with water.
▶ Place the ice tray in the freezer compartment (fig. 1 7, page 3) of the refrigerator.
7.6 Switching off the refrigerator
Proceed as follows:
▶Press and hold the button for three seconds.
√The display goes out and the refrigerator is switched off completely.

NOTE
If you are not going to use the refrigerator for a long time, leave the door slightly ajar as follows:
- 2-button door lock: Lock the door on the rear hole (fig. 7, page 5).
- Rotary door lock: Secure the door with the door lock (fig. 8, page 6).
This prevents mould from forming.
▶ Shut off the gas supply in the vehicle and the valve to the gas cylinder.
7.7 Using the optional battery compartment (RMV5301 only)

NOTICE!
- Do not use different types of batteries.
- Avoid short circuits at the contacts in the battery compartment.
The optional battery compartment is located directly behind the control panel of the refrigerator (fig. 1 1, page 3).
You can insert eight AA batteries to create an autonomous power supply if the voltage cuts out due to the vehicle battery. The battery compartment switches on automatically. While the power is supplied from the battery compartment the refrigerator can only be operated with gas.
Inserting/changing the batteries (fig. 5, page 5)
Switch off the refrigerator as described in chapter "Switching off the refrigerator" on page 27.
▶Open the refrigerator door.
▶Press in the lugs under the control panel.
▶Take out the control panel with the battery compartment.
▶Remove all the batteries.

Protect the environment!
Do not dispose of any batteries with general household waste.
Return defective or used batteries to your retailer or dispose of them at collection points.
▶Insert eight new batteries (type AA). Make sure the polarity is correct.
▶Insert the control panel again until it clicks into place.
7.8 Removing the freezer compartment
Proceed as follows (fig. 6, page 5):
▶ Release the freezer compartment on both sides (A).
▶ Remove the freezer compartment (B).

NOTE
- Keep the freezer compartment in a safe place to prevent any damage.
- When installing, replace the parts in the reverse order.
7.9 Setting the 2-button door lock
▶Close the door.
▶ Press the button (fig. 7 A, page 5) to lock the door.
▶ Press the unlock button (fig. 7 B, page 5) to unlock the door.
7.10 Setting the rotary door lock
▶ Turn the lock forwards to lock the refrigerator door while the vehicle is moving (fig. 8, page 6).
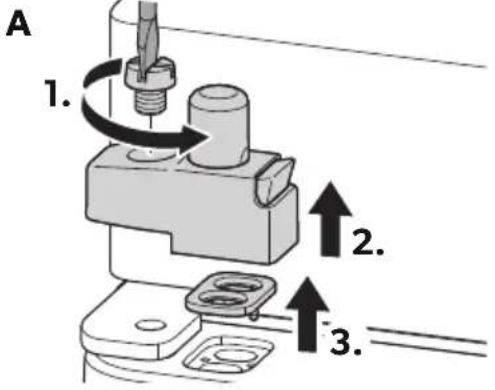
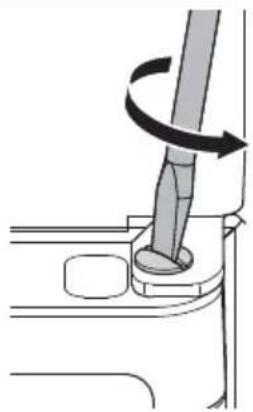
7.11 Changing the door lock
Replacing the 2-button door lock with the rotary door lock
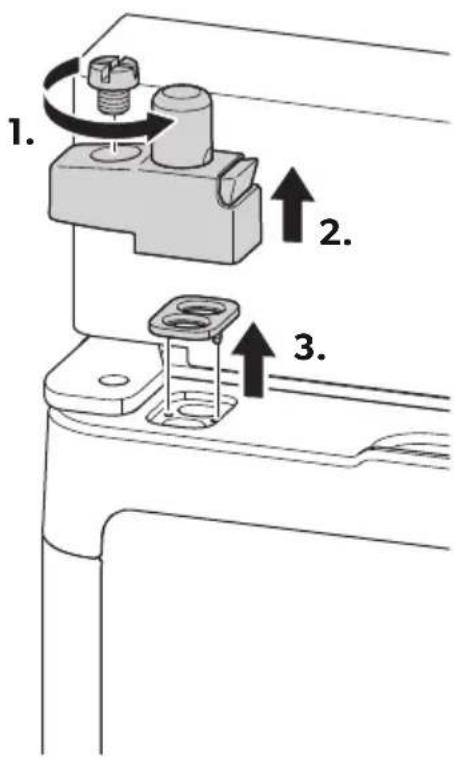
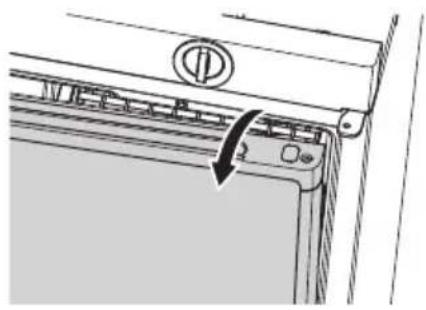
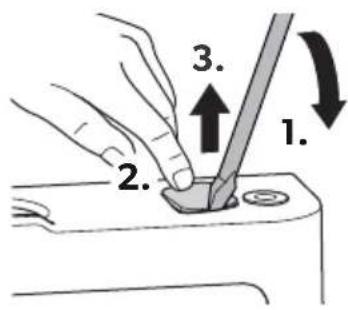
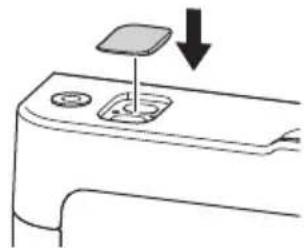
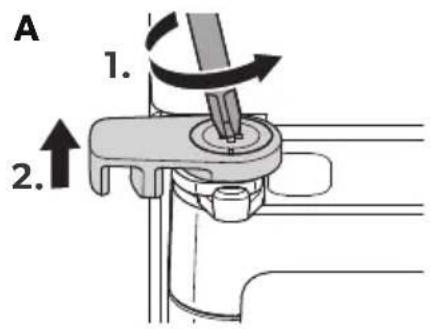
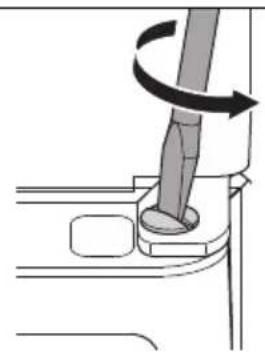
▶ Replace the door lock as shown (fig. 9, page 6).
Replacing the rotary door lock with the 2-button door lock
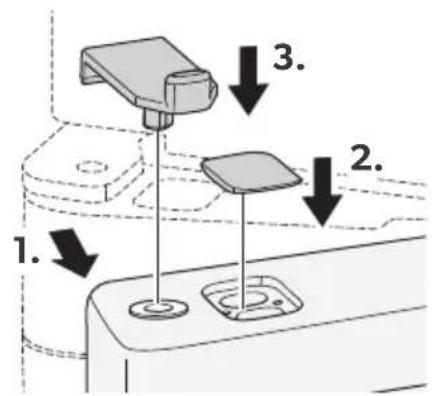
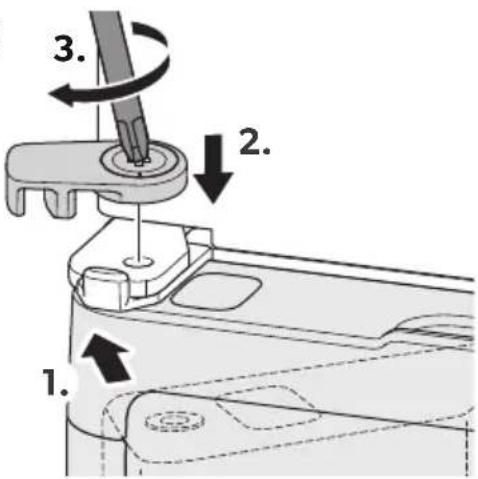
▶ Replace the door lock as shown (fig. 10, page 7).
7.12 Positioning the shelves
▶To remove and insert the shelves, proceed as follows:
- Removing the shelves: fig. 11, page 8
- Inserting the shelves: fig. 12, page 8
7.13 Defrosting the refrigerator

NOTICE!
Never use mechanical tools to remove ice or to loosen objects stuck to the device.

NOTE
Over time, frost builds up on the cooling fins inside the refrigerator. If this layer of frost is about 3 mm thick, you should defrost the refrigerator.
▶Disconnect the voltage and gas supply.
▶Empty the refrigerator.
▶ Put a cloth in the freezer compartment and the refrigerator to absorb any excess water.
▶Leave the door open.
√The thawed water of the main refrigerator runs into a receptacle on the back of the refrigerator where it evaporates.
▶Wipe both compartments dry with a cloth.
7.14 Reversing the door
2-button door lock
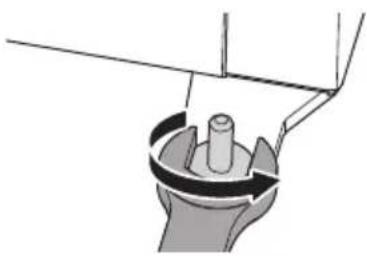
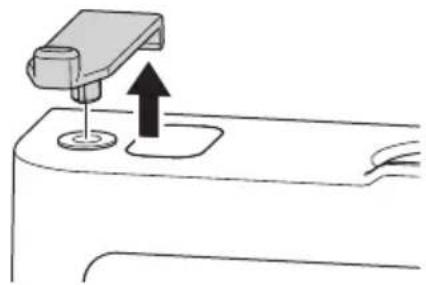
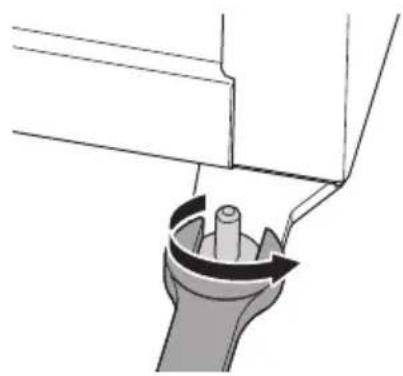
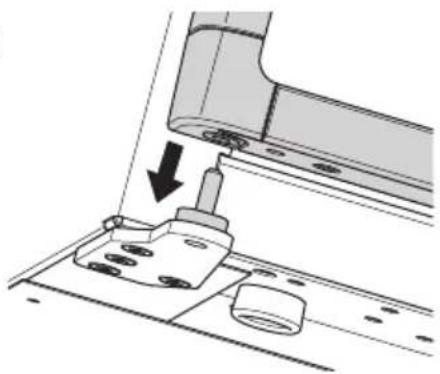
▶ Replace the door as shown (fig. 13, page 9).
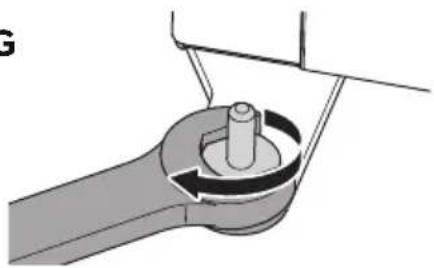
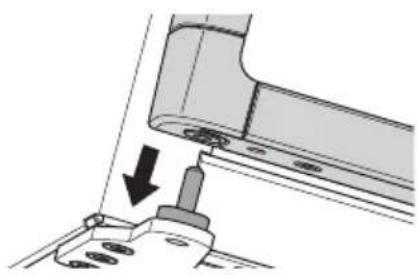
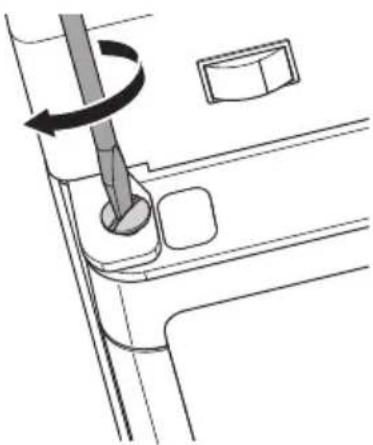
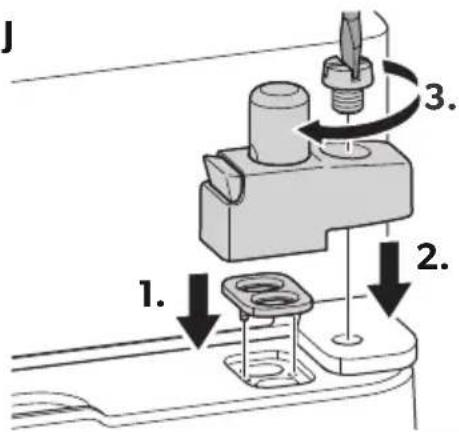
Rotary door lock
▶ Replace the door as shown (fig. 14, page 10).
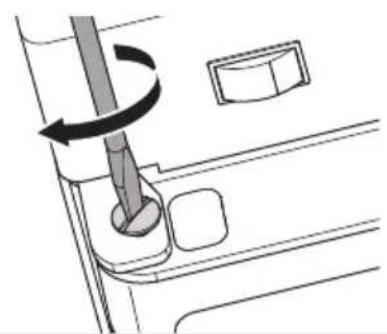
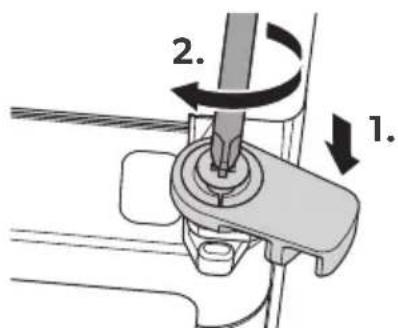
7.15 Putting on the door panel

NOTICE! Beware of damage
Only ever lay the refrigerator on its side and never on its back. Otherwise the unit may be damaged.
The door panel must correspond to the chapter "Technical data" on page 37 specified dimensions.
▶ Put on the door panel as shown (fig. 15, page 11).
7.16 Operating with low ambient temperatures

NOTICE!
For versions without the roof vent:
Do not attach the top winter covers (not in scope of delivery) while operating with gas. This prevents heat from building up and the fumes from the refrigerator can be extracted properly.

NOTE
- Cold air can restrict the performance of the unit. Attach the winter covers if you experience a reduced cooling capacity at low ambient temperatures. This protects the unit from excessively cold air that might otherwise restrict its performance.
- Attach the winter covers when the vehicle is cleaned from the outside or not used for a prolonged period of time.
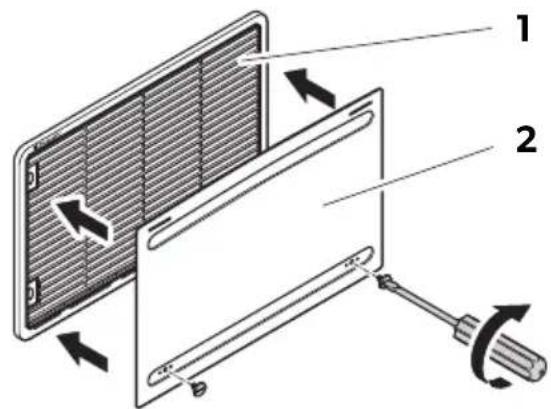
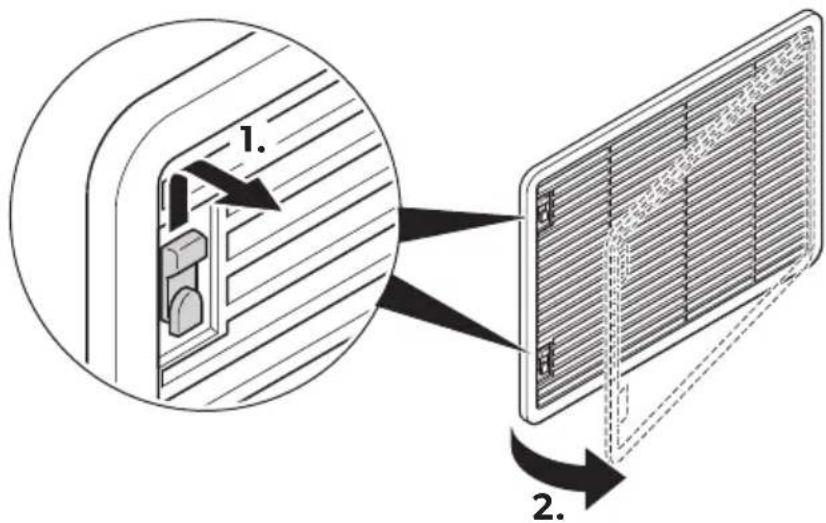
Attach the winter covers to both ventilation grilles. To do this, proceed as follows:
• LS100, LS200, LS330 ventilation grilles: fig. 16, page 11
• LS 230 ventilation grille: fig. 17, page 12

NOTE
You recognise a mounted winter cover on the LS 230 ventilation grille by the bolts protruding from the ventilation grille (fig. 17 1, page 12).
8 Troubleshooting
| Problem Possible cause Suggested remedy | ||
| With AC operation: The refrigerator does not work. | The fuse in the AC mains is defective. | Replace the fuse. |
| The vehicle is not connected to the AC mains. | Connect the vehicle to the AC mains. | |
| The AC heating element is defective. | Contact the authorised customer service. | |
| With DC operation: The refrigerator does not work. | The fuse in the DC supply is defective. | Replace the fuse. |
| The vehicle battery is discharged. | Test the battery and charge it. | |
| The ignition is not turned on. | Switch on the ignition. | |
| The DC heating element is defective. | Contact the authorised customer service. | |
| With gas operation: The refrigerator does not work. | The gas cylinder is empty. Replace the gas cylinder. | |
| The gas valve is closed. Twist the valve open. | ||
| Air is in the supply line. Switch the refrigerator off and on again. Repeat the procedure three or four times if necessary. | ||
| RMV5305 only: In automatic mode: The refrigerator is being operated with gas although it is connected to the AC mains. | The mains voltage is too low. | The refrigerator changes to AC power supply automatically as soon as the mains voltage is sufficient again. |
Problem Possible cause Suggested remedy
| The refrigerator does not cool sufficiently. | The ventilation around the cooling unit is not sufficient. | Check that the ventilation grille is not obstructed. |
| The evaporator is iced up. Check whether the refrigerator door is properly closed. Defrost the refrigerator. | ||
| The temperature is set too high. | Set a lower temperature. | |
| The ambient temperature is too high. | Remove the ventilation grille for a while so that warm air can escape quicker. | |
| Too much food at once was placed in the refrigerator. | Remove an item. | |
| Too much warm food at once was placed in the refrigerator. | Remove the warm food and leave it to cool down before putting it in again. | |
| The refrigerator has not been operating for very long. | Check the temperature again after four or five hours. | |
Displays for faults and beeps
Faults are indicated by the flashing of individual buttons on the control panel, a beep or a combination of both.
Display Problem Suggested remedy
| With AC operation: and flashing, a beep is emitted for 20 seconds | The AC heater element or the cooling unit is defective. | Contact the authorised customer service. |
| With DC operation: and flashing, a beep is emitted for 20 seconds | The DC heater element or the cooling unit is defective. | |
| and flashing, a beep is emitted for 20 seconds | The burner or the cooling unit is defective. | |
| flashes | The temperature sensor has no contact or is defective. | |
| With AC operation: and flashing, a beep is emitted for 20 seconds | The power supply is not available or insufficient. | Check the AC power cable, the power supply and the fuse. |
| With DC operation: and flashing, a beep is emitted for 20 seconds | The power supply is not available or insufficient. | Check the DC power cable, the vehicle battery and the fuse. Check the D+ signal on the vehicle. |
| In gas and automatic mode: and flashing, a beep is emitted for 20 seconds | The burner flame is not ignited. | Check the gas supply (gas cylinder, gas valve). Press the button once the fault is rectified. |
| Beep is emitted for 15 seconds at intervals of two minutes | The interior light is switched on. | Check whether the refrigerator door is properly closed. Close the refrigerator door. |
9 Cleaning and maintenance

WARNING! Electrocution hazard
Always disconnect the refrigerator from the mains before you clean and service it.

NOTICE! Damage hazard
- Do not use abrasive cleaning agents or hard objects during cleaning as these can damage the refrigerator.
- Never use hard or sharp tools to remove ice or to free objects frozen onto the device.
- Do not use any mechanical tools or any other tools to speed up the defrosting process.
▶ Clean the refrigerator regularly and as soon as it becomes dirty with a damp cloth.
▶Make sure that no water drips into the seals. This can damage the electronics.
▶Wipe the refrigerator dry with a cloth after cleaning.
▶Check the condensate drain regularly.
Clean the condensate drain when necessary. If it is blocked the condensate collects on the bottom of the refrigerator.
▶ Make sure that the ventilation grilles of the refrigerator in the outer wall of the caravan or mobile home are free of any dust and dirt so that heat can be released and the refrigerator is not damaged.
10 Maintenance

WARNING!
Working on gas and electrical installations may only be performed by qualified technicians.

NOTE
Have the refrigerator checked if the vehicle has not been used for a long time. To do this, contact the customer service.
▶ Have the gas system and connected flues inspected before initial operation and then every two years by an authorised professional to ensure they comply with the European standard EN 1949.
The gas burner must be cleaned of impurities whenever necessary or at least once a year. When using LPG (tank or refillable cylinders), the maintenance interval is reduced to twice or four times a year, depending on the degree of contamination. This can be determined by a reduced cooling capacity in gas mode.
▶Keep a record of any maintenance performed on your refrigerator.
10.1 Cleaning the gas burner

WARNING!
- Close the gas valve to the refrigerator before cleaning the gas burner.
- Allow the burner to cool down before cleaning it.
- Do not modify the gas equipment.
- The gas burner can be cleaned without removing the gas equipment.
Remove the ventilation grille (fig. 16, page 11 and fig. 17, page 12).
▶Press the catch below the burner cover inwards, and pull off the burner cover (fig. 18, page 13).
▶ Clean the burner pipe of coarse impurities using a suitable cleaning brush with soft bristles (fig. 19, page 13).
▶ Blow out the burner pipe with compressed air through the slots in the burner pipe (fig. 20, page 13).
▶ Attach the burner cover.
√ The burner cover is fixed in place when it audibly clicks into place.
▶ Attach the ventilation grille.
11 Warranty
The statutory warranty period applies. If the product is defective, please contact the manufacturer's branch in your country (see back page) or your retailer.
For repair and warranty processing, please include the following documents when you send in the device:
• A copy of the receipt with purchasing date
- A reason for the claim or description of the fault
12 Disposal

WARNING! Children beware!
Before disposing of your old refrigerator:
Leave the shelves in the refrigerator so that children cannot climb inside.
▶ Place the packaging material in the appropriate recycling waste bins wherever possible.
If you wish to finally dispose of the product, ask your local recycling centre or specialist dealer for details about how to do this in accordance with the applicable disposal regulations.

Protect the environment!
Do not dispose of any batteries with general household waste.
Return defective or used batteries to your retailer or dispose of them at collection points.
13 Technical data
| RMV5301 RMV5305 | ||
| Voltage: 230 V~ | 12 V--- | |
| Connection value: | 135 W (230 V~)130 W (12 V---) | |
| Gross capacity: 78 l (without freezer compartment)73 l (with freezer compartment) | ||
| Net capacity: 75 l (without freezer compartment)70 l (with freezer compartment) | ||
| Freezer compartment: 8 l | ||
| Power consumption: | approx. 2.4 kWh/24 h (230 V~)approx. 260 Ah/24 h (12 V---) | |
| Gas consumption: 270 g/24 h | ||
| Climatic class: SN | ||
| Ambient temperature: | +10 °C to +32 °C | |
| Ignition: | Automatic | Automatic |
| Power choice: | Manual | Automatic |
| Dimensions: | 821 x 486 x 478.5 mm | |
| Dimensions of door panel: | 740 x 455 x 3.8 mm | |
| Weight: | 24.5 kg | |
| Inspection/certification: | CE E1 | |
6 Description technique
6.1 Description
WAARSCHUWING! Brandgevaar!
dometic.com/sales-offices