
DEEBOT Y1 Pro - Vacuum Cleaner ECOVACS - Free user manual and instructions
Find the device manual for free DEEBOT Y1 Pro ECOVACS in PDF.

| Product type | Robotic vacuum cleaner |
| Brand | ECOVACS |
| Model | DEEBOT Y1 Pro |
| Power supply | Lithium battery 2600 mAh, 14.4 V DC |
| Rated power | 25 W |
| Runtime | Varies depending on surface and cleaning mode |
| Cleaning modes | Auto, Spot, Return to charger, Scheduled (via app) |
| Control | Remote control and ECOVACS HOME app |
| Connectivity | Built-in Wi-Fi |
| Filtration | High-efficiency filter, sponge filter, mesh filter |
| Brushes | 2 side brushes, 1 main brush |
| Sensors | Anti-drop, anti-collision (bumper) |
| Charging station | Included, input voltage 19 V DC, output 0.6 A |
| Power adapter | Model DK18-190060H-U, input 100-120 V AC, output 19 V DC 0.6 A |
| Remote control | Model RC1633A, batteries included |
| Package contents | Robot, charging station, adapter, 2 side brushes, remote control, cleaning tool, instruction manual, quick start guide |
| Maintenance | Regular cleaning of the dustbin, filters, and brushes. Frequency indicated in the manual. |
| Safety | Automatic shutdown, drop detection, protection against improper charging |
| App compatibility | iOS 9.0+, Android 4.0+ |
| Wi-Fi deactivation | Possible via rear power switch and long press on AUTO button (10 sec) |
Frequently Asked Questions - DEEBOT Y1 Pro ECOVACS
User questions about DEEBOT Y1 Pro ECOVACS
0 question about this device. Answer the ones you know or ask your own.
Ask a new question about this device
Download the instructions for your Vacuum Cleaner in PDF format for free! Find your manual DEEBOT Y1 Pro - ECOVACS and take your electronic device back in hand. On this page are published all the documents necessary for the use of your device. DEEBOT Y1 Pro by ECOVACS.
USER MANUAL DEEBOT Y1 Pro ECOVACS
Congratulations on the purchase of your ECOVACS ROBOTICS DEEBOT! We hope it brings you many years of satisfaction. We believe that your new robot will help keep your home clean and give you more quality time to do other things.
Live Smart. Enjoy Life.
Should you encounter situations that have not been properly addressed in this Instruction Manual, please contact our Customer Service Center where a technician will be able to help you with your specific problem or question.
For more information, please visit the ECOVACS ROBOTICS official website: www.ecovacs.com
The company reserves the right to make technological and/or design changes to this product for continuous improvement.
Thank you for choosing DEEBOT!
Contents
- Important Safety Instructions....4
- Package Contents ......9
- Operating and Programming....12
- Maintenance....17
- Indicator Light and Alarm Sounds....21
- Troubleshooting....22
- Technical Specifications....24
1. Important Safety Instructions
Household use only
IMPORTANT SAFETY INSTRUCTIONS
When using an electrical appliance, basic precautions should always be followed, including the following:
READ ALL INSTRUCTIONS BEFORE USING THIS APPLIANCE.
WARNING: Read all safety warnings and instructions. Failure to follow the warnings and instructions may result in electric shock, fire or serious injury.
- Do not allow to be used as a toy. Close attention is necessary when used by or near children.
- Clear the area to be cleaned. Remove power cords and small objects from the floor that could entangle the Appliance. Tuck rug fringe under the rug base, and lift items such as curtains and tablecloths off the floor.
- If there is a drop off in the cleaning area due to a
step or stairs, you should operate the Appliance to ensure that it can detect the step without falling over the edge. It may become necessary to place a physical barrier at the edge to keep the unit from falling. Make sure the physical barrier is not a trip hazard.
- Only use as described in this manual. Only use attachments recommended or sold by the manufacturer.
- Please make sure your power supply voltage matches the power voltage marked on the Charging Dock.
- For INDOOR use ONLY. Do not use the Appliance in outdoor, commercial or industrial environments.
- Non-rechargeable batteries are prohibited. For battery information, please refer to Specifications section.
- Do not use without dust bin and/or filters in place.
- Do not operate the Appliance in an area where there are lit candles or fragile objects on the floor to be cleaned.
1. Important Safety Instructions
- Do not use and store in extremely hot or cold environments (below -5^/23^ or above 40^/104^ ). Please charge the robot in temperature above 0^/32^ and below 40^/104^ .
- Keep hair, loose clothing, fingers, and all parts of body away from any openings and moving parts.
- Do not operate the Appliance in a room where an infant or child is sleeping.
- Do not use Appliance on wet surfaces or surfaces with standing water.
- Do not allow the Appliance to pick up large objects like stones, large pieces of paper or any item that may clog the Appliance.
- Do not use Appliance to pick up flammable or combustible materials such as gasoline, printer or copier toner, or use in areas where they may be present.
- Do not use Appliance to pick up anything that is burning or smoking, such as cigarettes, matches, hot ashes, or anything that could cause a fire.
- Do not put objects into the suction intake. Do not use if the suction intake is blocked. Keep the
intake clear of dust, lint, hair, or anything that may reduce air flow.
- Take care not to damage the power cord. Do not pull on or carry the Appliance or Charging Dock by the power cord, use the power cord as a handle, close a door on the power cord, or pull power cord around sharp edges or corners. Do not run Appliance over the power cord. Keep power cord away from hot surfaces. Do not unplug by pulling on cord. To unplug, grasp the plug, not the cord.
- If the power cord is damaged, it must be replaced by the manufacturer or its service agent in order to avoid a hazard.
- Do not use the Charging Dock if it is damaged.
- Do not use with a damaged power cord or receptacle. Do not use the Appliance or Charging Dock if it is not working properly, has been dropped, damaged, left outdoors, or come in contact with water. It must be repaired by the manufacturer or its service agent in order to avoid a hazard.
- Turn OFF the power switch before cleaning or maintaining the Appliance.
1. Important Safety Instructions
- The plug must be removed from the receptacle before cleaning or maintaining the Charging Dock.
- Remove the Appliance from the Charging Dock, and turn OFF the power switch to the Appliance before removing the battery for disposal of the Appliance.
- The battery must be removed and discarded according to local laws and regulations before disposal of the Appliance.
- Please dispose of used batteries according to local laws and regulations.
- Do not incinerate the Appliance even if it is severely damaged. The batteries can explode in a fire.
- When not using the Charging Dock for a long period of time, please unplug it.
- The Appliance must be used in accordance with the directions in this Instruction Manual. ECOVACS ROBOTICS cannot be held liable or responsible for any damages or injuries caused by improper use.
- The robot contains batteries that are only replaceable by skilled persons. To replace or
remove the battery, please contact Customer Service.
- If the robot will not be used for a long time, fully charge the robot and power OFF for storage and unplug the Charging Dock.
- Prevent unintentional starting. Ensure the switch is in the off position before connecting to battery pack, picking up or carrying the appliance. Carrying the appliance with your finger on the switch or energizing appliance that have the switch on invites accidents.
- When battery pack is not in use, keep it away from other metal objects, like paper clips, coins, keys, nails, screws or other small metal objects that can make a connection from one terminal to another. Shorting the battery terminals together may cause burns or a fire.
- Under abusive conditions, liquid may be ejected from the battery; avoid contact. If contact accidentally occurs, flush with water. If liquid contacts eyes, additionally seek medical help. Liquid ejected from the battery may cause irritation or burns.
1. Important Safety Instructions
- Do not use a battery pack or appliance that is damaged or modified. Damaged or modified batteries may exhibit unpredictable behavior resulting in fire, explosion or risk of injury.
- Do not expose a battery pack or appliance to fire or excessive temperature. Exposure to fire or temperature above 130^ C may cause explosion. The temperature of 130^ C can be replaced by the temperature of 265^ F.
- Follow all charging instructions and do not charge the battery pack or appliance outside of the temperature range specified in the instructions. Charging improperly or at temperatures outside of the specified range may damage the battery and increase the risk of fire.
- Have servicing performed by a qualified repair person using only identical replacement parts. This will ensure that the safety of the product is maintained.
-
Do not modify or attempt to repair the appliance or the battery pack (as applicable) except as indicated in the instructions for use and care.
-
Place the cords from other appliances out of the area to be cleaned.
- Do not operate the vacuum in a room that has lit candles on furniture that the vacuum may accidentally hit or bump into.
- Do not allow children to sit on the vacuum.
- Recharge only with the charger specified by the manufacturer. A charger that is suitable for one type of battery pack may create a risk of fire when used with another battery pack.
- Use appliances only with specifically designated battery packs. Use of any other battery packs may create a risk of injury and fire.
- Do not handle plug or appliance with wet hands.
1. Important Safety Instructions
This device complies with Part 15 of the FCC Rules / Industry Canada licence-exempt RSS standard(s). Operation is subject to the following two conditions: (1) this device may not cause harmful interference, and (2) this device must accept any interference received, including interference that may cause undesired operation.
Changes or modifications not expressly approved by the party responsible for compliance could void the user's authority to operate the equipment.
NOTE: This equipment has been tested and found to comply with the limits for a Class B digital device, pursuant to part 15 of the FCC Rules. These limits are designed to provide reasonable protection against harmful interference in a residential installation. This equipment generates uses and can radiate radio frequency energy and, if not installed and used in accordance with the instructions, may cause harmful interference to radio communications. However, there is no guarantee that interference will not occur in a particular installation. If this equipment does cause harmful interference to radio or television reception, which can be determined by turning the equipment off and on, the user is encouraged to try to correct the interference by one or more of the following measures:
— Reorient or relocate the receiving antenna.
— Increase the separation between the equipment and receiver.
— Connect the equipment into an outlet on a circuit different from that to which the receiver is connected.
— Consult the dealer or an experienced radio/TV technician for help.
To satisfy FCC / IC RF exposure requirements, a separation distance of 20 cm or more should be maintained between the antenna of this device and persons during device operation.
To ensure compliance, operations at closer than this distance is not recommended.
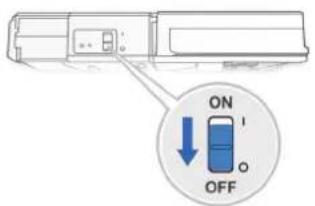
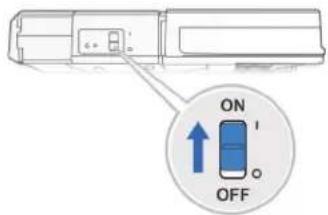
To disable Wi-Fi module on DEEBOT, turn the robot's Bottom Power Switch ON. Place the robot on the Charging Dock making sure the Charging Contacts on DEEBOT and the Charging Dock Pins make a connection. Press and hold the AUTO Mode Button on the robot for 10 seconds until DEEBOT emits 3 beeps.
To enable Wi-Fi module on DEEBOT, turn the robot's Bottom Power Switch OFF and then power ON. The Wi-Fi module is turned on when DEEBOT is restarted.
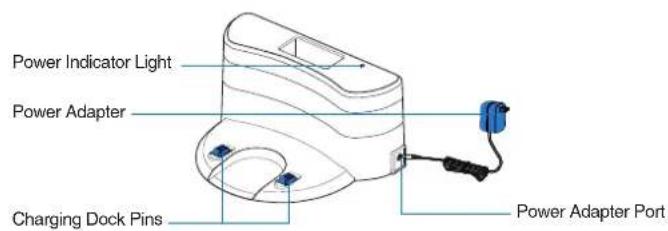
2. Package Contents
2.1 Package Contents

natural_image
Simple circular diagram with two side handles and a small circle containing a plus sign, no text or symbols present.Robot

natural_image
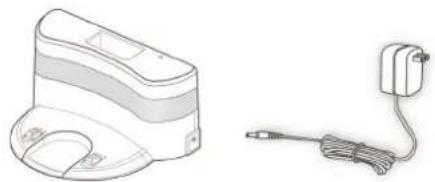
Line drawing of a portable electronic device and a cordless cable (no text or symbols)Charging Dock + Power Adapter
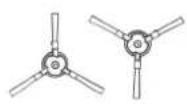
(2) Side Brushes
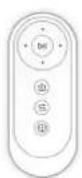
Remote Control with Batteries
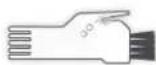
Multi-Function Cleaning Tool

Instruction Manual Quick Start Guide

Note: Figures and illustrations are for reference only and may differ from actual product appearance. Product design and specifications are subject to changes without notice.
2. Package Contents
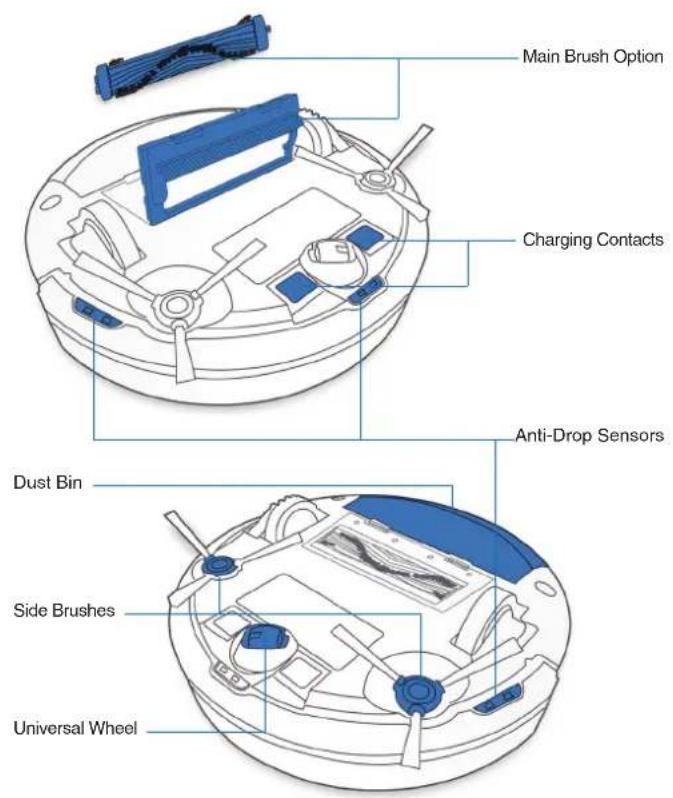
2.3 Product Diagram Robot

Bottom View
2. Package Contents
Charging Dock Remote Control
3. Operating and Programming
3.1 Notes Before Cleaning
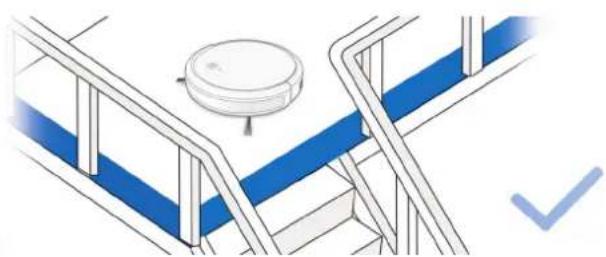
WARNING: Do not use DEEBOT on wet surfaces or surfaces with standing water.
natural_image
Simple line drawing of a circular vacuum cleaner with attached circuit board (no text or symbols)Before using the product on a rug with tasseled edges, please fold the rug edges under.
natural_image
Isometric line drawing of a staircase with blue and white panels, a circular object on top, and a checkmark (no text or symbols)It may be necessary to place a physical barrier at the edge of a drop to stop the unit from falling over the edge.
natural_image
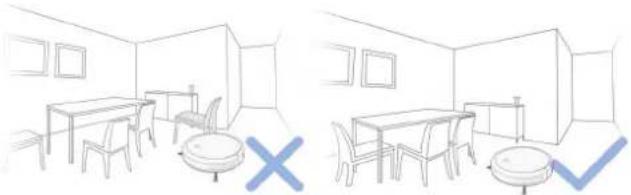
Two hand-drawn line drawings of a room with furniture and a table, no text or symbols present.Tidy up the area to be cleaned by putting furniture, such as chairs, in their proper place.
natural_image
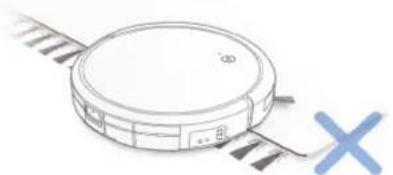
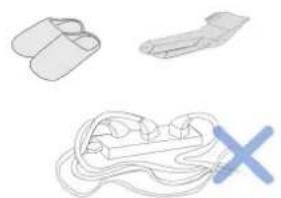
Three abstract line drawings: a pair of flat slippers, a simple open-loop shoe, and a coiled cord with a blue X mark (no text or symbols)Remove power cords and small objects from the floor that the robot could be obstructed by.
3. Operating and Programming
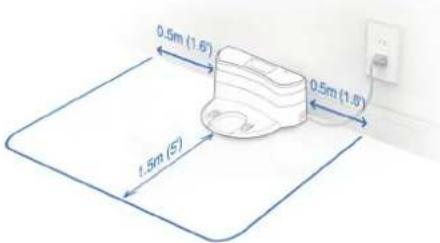
3.2 Preparation
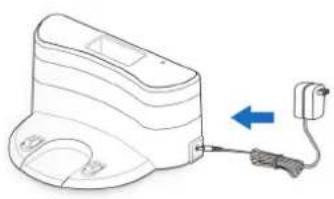
1 Plug in Adapter
natural_image
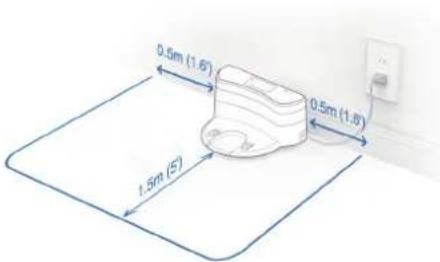
Diagram of a portable electronic device with a cable and connector, no text or symbols present2 Charging Dock Placement
3 Install Side Brushes
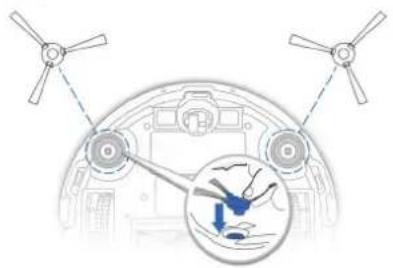
natural_image
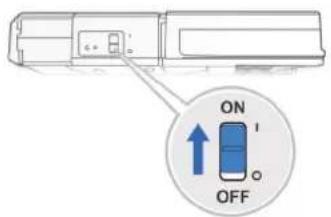
Diagram of a helicopter's cockpit showing propellers and a hand holding a blue object, with no visible text or symbols.4 Power ON
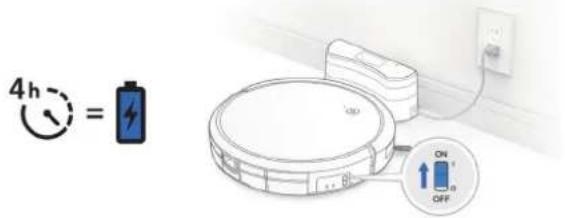
5 Charge DEEBOT
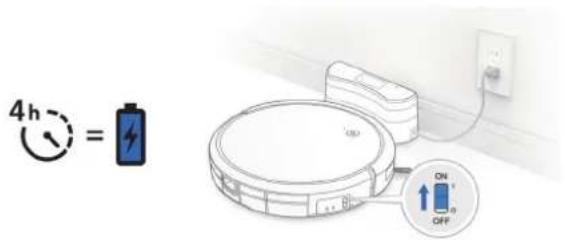
Note: When DEEBOT completes the cleaning cycle or when battery power gets low, DEEBOT automatically returns to the Charging Dock to recharge itself.
3. Operating and Programming
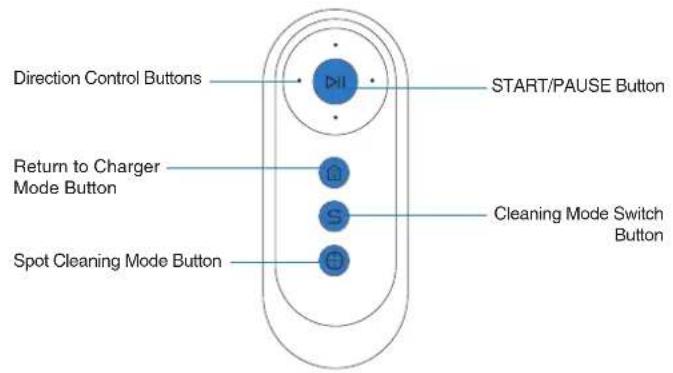
3.3 Selecting Cleaning Mode
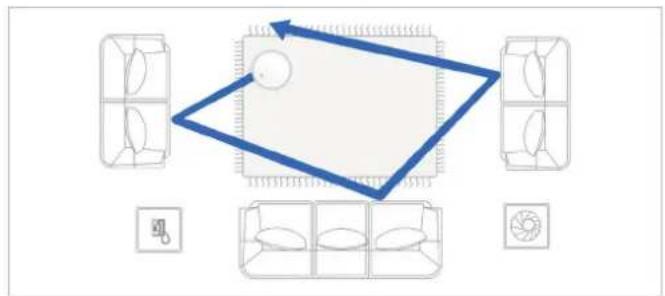
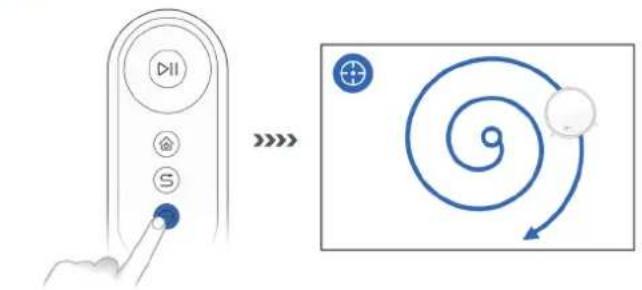
1 AUTO Cleaning Mode
A Random Cleaning Pattern (optimized for carpets) will be selected by default.
To switch to a Programmed Cleaning Pattern (optimized for hard floors) or switch between these two patterns, perform the following action:


natural_image
Top-down diagram of a room layout with furniture and a blue arrow indicating direction (no text or symbols)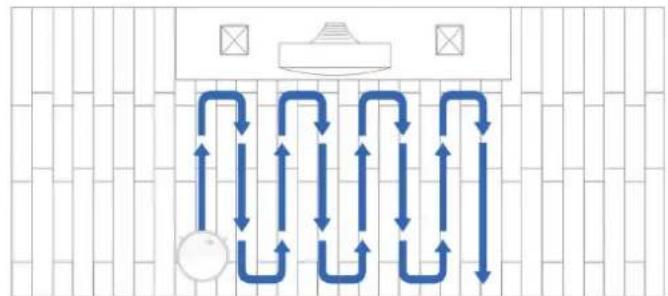
flowchart
graph TD
    A["Central Outlet"] --> B{Air Flow Direction}
    B -->|Upward Up| C["Top Outlet"]
    B -->|Downward Down| D["Bottom Outlet"]
    C --> E["Top Outlet"]
    D --> F["Bottom Outlet"]
Note: Cleaning pattern cannot be switched until DEEBOT is paused or charging. DEEBOT will start a new cleaning cycle once cleaning pattern is switched. S will light up once Programmed Cleaning Pattern is enabled.
3. Operating and Programming
2 Spot Cleaning Mode (Less than 3 minutes)
All the functions mentioned above can be enabled on the App. Download ECOVACS App to access more features, including Edge Cleaning, Scheduled Cleaning, etc.
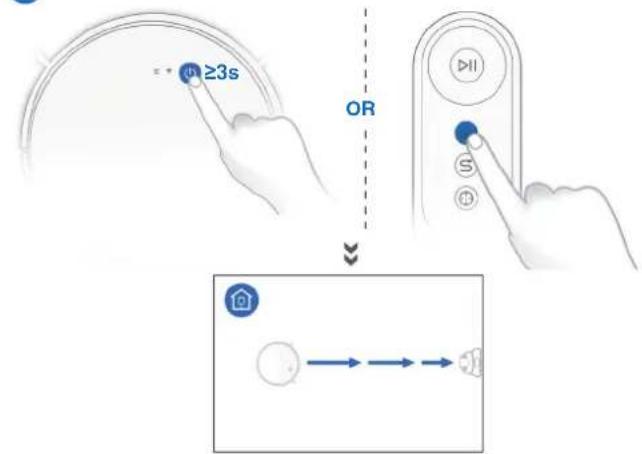
3 Return to Charging Dock

3. Operating and Programming
3.4 Pause, Wake Up, Power Off
1 Pause

Note: The robot's Control Panel stops glowing after the robot is paused for a few minutes. Press the AUTO Mode Button on DEEBOT to wake up the robot.
3 Power OFF
Note: When DEEBOT is not working, it is recommended to keep it switched ON and charging.
2 Wake Up

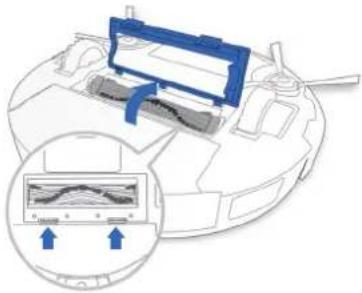
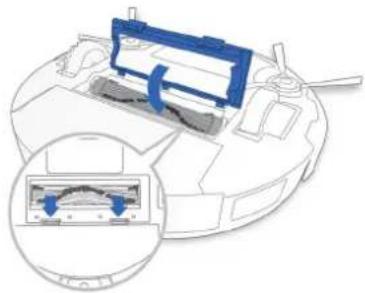
4. Maintenance
Before performing cleaning and maintenance tasks on DEEBOT, turn the robot OFF and unplug the Charging Dock.
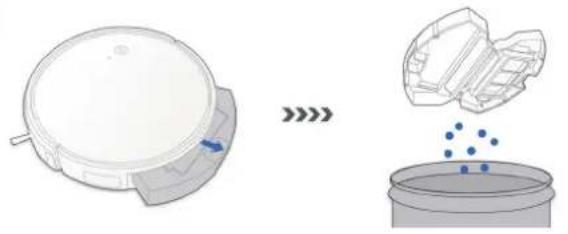
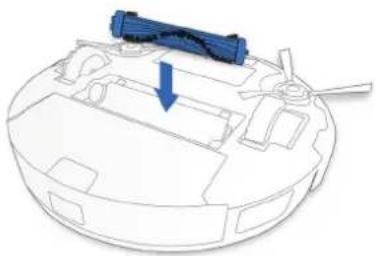
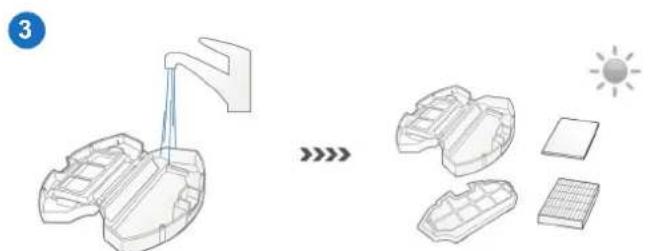
4.1 Dust Bin and Filters
Dust Bin
1
natural_image
Diagram showing a circular device with internal components and a close-up of its interior with blue dots (no text or symbols)2
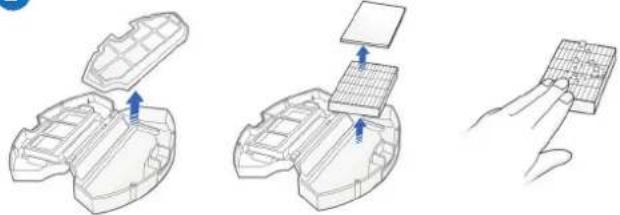
natural_image
Three technical line drawings showing a device's open lid, internal grid structure, and a finger interacting with a grid (no text or symbols)3
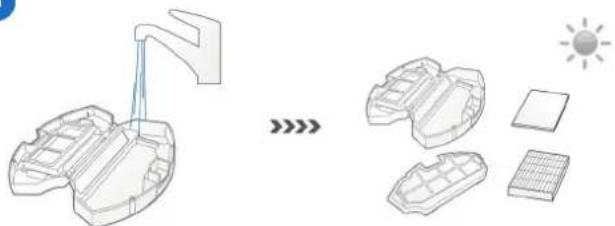
natural_image
Diagram showing a water spray system transitioning to solar panels and components (no text or symbols)4. Maintenance
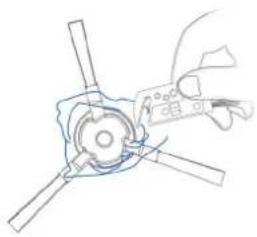
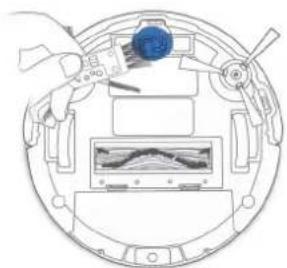
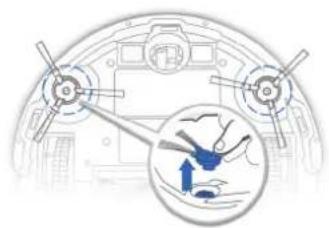
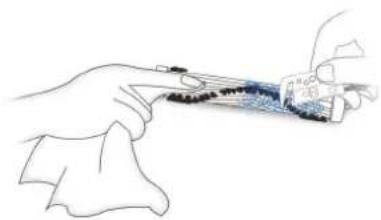
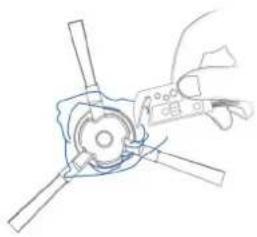
4.2 Main Brush and Side Brushes
Note: A Multi-Function Cleaning Tool is provided for easy maintenance. Handle with care, this cleaning tool has sharp edges.
Main Brush
1
natural_image
Diagram of a vehicle's internal components with a magnified inset showing waveforms (no text or symbols)2

natural_image
3D diagram of a mechanical device with a blue arrow indicating direction, no text or symbols present3

natural_image
Illustration of a hand holding a tool with a small object inside, no text or symbols present4

natural_image
Diagram of a robotic device with a blue arrow pointing to a component (no text or symbols present)5
natural_image
Diagram of a robotic device with a blue control panel and internal component, showing no text or symbols4. Maintenance
Side Brushes
1

natural_image
Diagram of a vehicle interior with two wheels and a magnified inset showing a blue airplane flying over water (no text or symbols)●
natural_image
Line drawing of a hand using a tool to adjust or install a mechanical component (no text or symbols present)●

natural_image
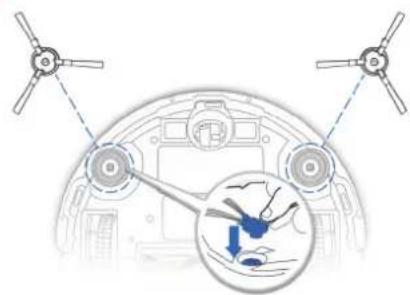
Diagram of a helicopter's cockpit showing two propellers and a highlighted interior view with a blue arrow (no text or symbols)4.3 Other Components
natural_image
Top-down schematic of a circular device with internal components and a central display (no text or symbols)
natural_image
Diagram of a hand adjusting a circular device with a central screen and control knobs (no text or symbols)
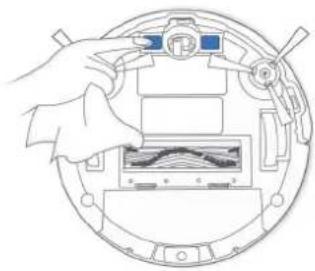
natural_image
Line drawing of a hand cleaning a blue and white robotic vacuum cleaner (no text or symbols)4. Maintenance
Note: Before cleaning the robot's Charging Contacts and Charging Dock Pins, turn the robot OFF and unplug the Charging Dock.
natural_image
Diagram of a hand holding a device inside a circular frame, showing internal components and a waveform display (no text or symbols)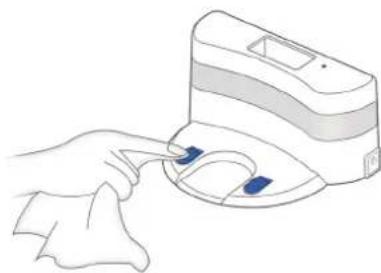
natural_image
Line drawing of a hand holding a medical device with two blue buttons (no text or symbols)4.4 Regular Maintenance
To keep DEEBOT running at peak performance, perform maintenance tasks and replace parts with the following frequencies:
| Robot Part Maintenance | Frequency Replacement Frequency | |
| Side Brush Once every 2 | weeks Every 3-6 months | |
| Main Brush Once per week | Every 6-12 months | |
| Sponge Filter/ High Efficiency Filter | Once per week Every 3-6 months | |
| Universal WheelAnti-Drop SensorsBumperCharging ContactsCharging Dock Pins | Once per week / |
A Multi-Function Cleaning Tool is provided for easy maintenance. Handle with care, this cleaning tool has sharp edges.
Note: ECOVACS manufactures various replacement parts and fittings. Please contact Customer Service for more information on replacement parts.
5. Indicator Light and Alarm Sounds
DEEBOT will tell you something is wrong with an alarm indicator light and sounds. More detailed support is available through the ECOVACS App and online website.
Indicator Light
| Scenario Indicator Light | |
| The robot is charging AUTO Mode Button flashes WHITE | |
| The robot is cleaning AUTO Mode Button glows a solid WHITE | |
| The robot has low battery AUTO Mode Button glows a solid RED | |
| The robot has a problem AUTO Mode Button flashes RED | |
| Programmed Cleaning Pattern is enabled Cleaning Mode Switch Indicator lights up | |
Alarm Sounds
| Alarm Sound Problems | Solution | |
| One Beep Main Brush or Side Brush is tangled. | Clean Main Brush or Side Brush as mentioned in Section 4 Maintenance. | |
| Two Beeps Anti-Drop Sensor Malfunction | Use a cleaning cloth to wipe the Anti-Drop Sensor clean. | |
| Three Beeps Dust Bin is not properly installed. | Make sure the Dust Bin has been installed; if it has, take it out and put it back in properly. | |
| Continuous Beeps | The Robot is suspended or the Driving Wheels are tangled. | Put the Robot back on the ground or gently pat the bumper and clean the Driving Wheel as mentioned in Section 4 Maintenance. |
6. Troubleshooting
| No. | Malfunction Possible Causes Solutions | ||
| 1 | DEEBOT is not charging. | DEEBOT is not switched ON. Switch ON DEEBOT. | |
| DEEBOT has not connected to the Charging Dock. | Be sure that the robot's Charging Contacts have connected to the Charging Dock Pins. | ||
| The battery is completely discharged. | Re-activate the battery. Switch ON DEEBOT. Place DEEBOT on the Charging Dock by hand, remove after charging for 3 minutes, repeat 3 times; then charge normally. | ||
| 2 | DEEBOT cannot return to the Charging Dock. | The Charging Dock is not correctly placed. Refer to section 3.2 to correctly place the Charging Dock. | |
| 3 | DEEBOT gets stuck while working and stops. | DEEBOT is tangled with something on the floor (electrical wires, curtains, carpet fringing, etc.). | DEEBOT will try various ways to free itself. If it is unsuccessful, manually remove the obstacles and restart. |
| 4 | DEEBOT returns to the Charging Dock before it has finished cleaning. | When the battery gets low, DEEBOT automatically switches to Return to Charger Mode and returns to the Charging Dock to recharge itself. | This is normal. No solution necessary. |
| Working time varies according to floor surface, room complexity and the Cleaning Mode selected. | This is normal. No solution necessary. |
6. Troubleshooting
| No. | Malfunction Possible Causes Solutions | ||
| 5 | DEEBOT does not clean automatically at the scheduled time. | Time Scheduling function is cancelled. | Program DEEBOT to clean at specific times using the ECOVACS App. |
| The Continued Cleaning function is turned ON and DEEBOT has just finished cleaning the scheduled cleaning area. | This is normal. No solution necessary. | ||
| DEEBOT is switched OFF. Switch ON DEEBOT. | |||
| The robot's battery is low. | Keep DEEBOT switched ON and connected to the Charging Dock to make sure it has a full battery to work at any time. | ||
| The robot's Suction Intake is blocked and/or there is debris stuck in its components. | Power OFF DEEBOT, clean the Dust Bin and invert the robot. Clean the robot's Suction Intake, Side Brushes and the Main Brush as described in Section 4. | ||
| 6 | DEEBOT does not clean the whole area. | The cleaning area is not tidy. | Remove small objects from the floor and tidy up the cleaning area before DEEBOT starts cleaning. |
| 7 | DEEBOT is not able to connect to the home Wi-Fi network. | Incorrect home Wi-Fi username or password entered. | Enter the correct home Wi-Fi username and password. |
| DEEBOT is not within range of your home Wi-Fi signal. | Make sure DEEBOT is within range of your home Wi-Fi signal. | ||
| Network setup started before DEEBOT was ready. | Turn ON Power Switch. Press the RESET Button for 3 seconds. DEEBOT is ready for network setup when it plays a musical tune and its Wi-Fi Indicator light flashes slowly. | ||
| Your smartphone's operating system needs to be updated. | Update your smartphone's operating system. The ECOVACS App runs on iOS 9.0 and above, Android 4.0 and above. |
7. Technical Specifications
| Model DO3G.11 | |||
| Working voltage 14.4V DC R | Rated power 25W | ||
| Charging Dock | |||
| Rated Input Voltage 19V DC | Rated output current 0.6A | ||
| Power Adapter Model DK18-190060H-U | |||
| Rated Input Voltage 100-120V AC Rated Input Current 0.5A | |||
| Rated output Voltage 19V DC | Rated output current 0.6A | ||
| Remote Control Model RC1633A | Input Voltage 3V DC | ||
| Battery Lithium 2600mAh | |||
Note: Technical and design specifications may be changed for continuous product improvement.
natural_image
Simple circular diagram with two side handles and a central circle containing a symbol (no text or labels)Robot
natural_image
Line drawing of a portable electronic device and a cordless cable (no text or symbols)natural_image
Simple line drawing of a circular vacuum cleaner with attached circuit board (no text or symbols)natural_image
Isometric line drawing of a staircase with blue and white panels, no text or symbols presentnatural_image
Two hand-drawn architectural sketches of a dining room with tables and chairs, one marked with an 'X' and the other with a checkmark (no text or symbols)natural_image
Three gray images of different types of accessories and a blue X symbol, no text or labels present.natural_image
Line drawing of a portable electronic device with a cable and connector, no text or symbols present2 Disposition de la station de charge
natural_image
Diagram of a vehicle interior with two propellers and a magnified inset showing a hand holding a small object (no text or symbols present)4 Mise sous tension


natural_image
Top-down diagram of a room layout with furniture and a blue arrow indicating direction (no text or symbols)
flowchart
graph TD
    A["Central Outlet"] --> B{Air Flow Direction}
    B -->|Upward Up| C["Top Outlet"]
    B -->|Downward Down| D["Bottom Outlet"]
    C --> E["Top Outlet"]
    D --> F["Bottom Outlet"]
natural_image
Diagram showing a circular device with a blue arrow pointing to it, and a container with blue dots falling into the liquid (no text or symbols present)

natural_image
Diagram showing a water spray system transforming into solar panels and components (no text or symbols)4. Entretien
natural_image
Diagram of a vehicle's internal components with a magnified inset showing waveforms (no text or symbols)2

natural_image
3D diagram of a mechanical device with a blue arrow indicating a component (no text or symbols present)3

natural_image
Illustration of a hand holding a tool with a small object inside, no text or symbols present4
natural_image
Diagram of a robotic device with a blue arrow pointing to a component (no text or symbols present)5

natural_image
Diagram of a robotic device with a blue control panel and internal components, showing a close-up inset (no text or symbols)4. Entretien
Brosses latérales
1
natural_image
Diagram of a ship's deck with visible structural components and an inset showing a crane lifting a boat (no text or labels)●

natural_image
Line drawing of a hand holding a tool interacting with a mechanical component (no text or symbols)●

natural_image
Diagram of a helicopter's fuselage showing propeller and rotor components with an inset showing a hand holding a blue object (no text or symbols present)natural_image
Top-down schematic of a circular device with internal components and a central display (no text or symbols)
natural_image
Diagram of a hand adjusting a circular device with a central screen and control knobs (no text or symbols)
natural_image
Line drawing of a hand cleaning a blue and white robotic vacuum cleaner (no text or symbols)4. Entretien
natural_image
Illustration showing two steps of a device cleaning process: top-down view of internal components being cleaned, and bottom-down view with a handheld device (no text or symbols present)natural_image
Simple circular diagram with two side handles and a central circle containing a symbol (no text or labels)Robot

natural_image
Line drawing of a portable electronic device and a cordable power cord (no text or symbols)natural_image
Simple line drawing of a circular vacuum cleaner with attached circuit board (no text or symbols)natural_image
Isometric line drawing of a staircase with blue and white panels, a circular object on top, and a checkmark (no text or symbols)natural_image
Two hand-drawn line drawings of a room with furniture and a table, no text or symbols present.natural_image
Three abstract line drawings: a pair of flat slippers, a simple open-loop shoe, and a coiled cord with a blue X mark (no text or symbols)natural_image
Line drawing of a portable electronic device with a cable and connector, no text or symbols presentnatural_image
Diagram of a vehicle interior with two propellers and a magnified inset showing a hand holding a small object (no text or symbols present)4 Enciéndalo

5 Cargue el DEEBOT
natural_image
Diagram showing a circular device with a blue arrow pointing to it, and a container with blue dots falling into the liquid (no text or symbols present)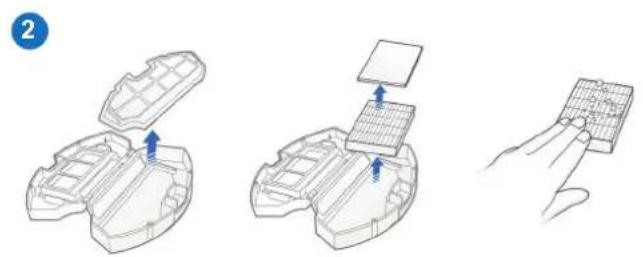
natural_image
Diagram showing a solar panel array and its components, with no visible text or symbols4. Mantenimiento
4.2 Cepillo principal y cepillos laterales
natural_image
Diagram of a vehicle's internal components with a magnified inset showing waveforms (no text or symbols)2

natural_image
3D diagram of a mechanical device with a blue arrow indicating a component (no text or symbols present)3
natural_image
Illustration of a hand holding a tool with a small object inside, no text or symbols present4

natural_image
Diagram of a robotic device with a blue arrow pointing to a component (no text or symbols present)5

natural_image
Diagram of a robotic device with a blue control panel and internal components, showing a close-up inset (no text or symbols)4. Mantenimiento
Cepillos laterales
1

natural_image
Diagram of a ship's deck with visible structural components and an inset showing a crane lifting a boat (no text or labels)●
natural_image
Line drawing of a hand holding a tool interacting with a mechanical component (no text or symbols)●
natural_image
Diagram of a helicopter's fuselage showing propeller and rotor components with an inset showing a hand holding a blue object (no text or symbols present)natural_image
Top-down schematic of a circular device with internal components and a central display (no text or symbols)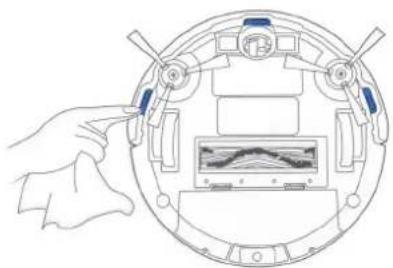
natural_image
Diagram of a hand adjusting a circular device with a central screen and control knobs (no text or symbols)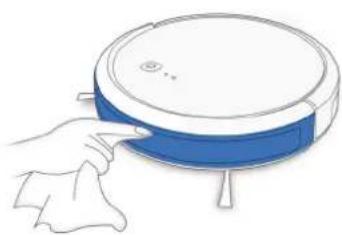
natural_image
Line drawing of a hand cleaning a blue and white robotic vacuum cleaner (no text or symbols)4. Mantenimiento
natural_image
Illustration showing two steps of a device cleaning process: one with hand holding a component, the other with hand adjusting a clip (no text or symbols)No. 18 You Xiang Road, Wuzhong District, Suzhou City,
Jiangsu Province, P.R.China
DO3G.11-050-IM2018R04

- Contents
- Important Safety Instructions
- Household use only
- IMPORTANT SAFETY INSTRUCTIONS
- READ ALL INSTRUCTIONS BEFORE USING THIS APPLIANCE.
- WARNING: Read all safety warnings and instructions. Failure to follow the warnings and instructions may result in electric shock, fire or serious injury.
- Package Contents
- Package Contents
- Operating and Programming
- Notes Before Cleaning
- Preparation
- Selecting Cleaning Mode
- AUTO Cleaning Mode
- Pause, Wake Up, Power Off
- Maintenance
- Dust Bin and Filters
- Main Brush and Side Brushes
- Side Brushes
- Other Components
- Regular Maintenance
- Indicator Light and Alarm Sounds
- Troubleshooting
- Technical Specifications
- Entretien
- Brosses latérales
- Mantenimiento
- Cepillo principal y cepillos laterales
- Cepillos laterales
Brand : ECOVACS
Model : DEEBOT Y1 Pro
Category : Vacuum Cleaner