VILLKORLIG - Dishwasher IKEA - Free user manual and instructions
Find the device manual for free VILLKORLIG IKEA in PDF.

| Product type | Built-in dishwasher |
| Brand | IKEA |
| Model | VILLKORLIG |
| Capacity | 8 place settings |
| Dimensions (W x D x H) | 450 x 575 x 825 mm |
| Weight | Not specified in the manual |
| Power supply | 120 V, 60 Hz, 15 A (20 A if disposer) |
| Wash motor consumption | 100 W |
| Heater consumption | 700 W |
| Water supply pressure | 138 to 827 kPa (20 to 120 psi) |
| Wash cycles | Auto, Heavy, Normal, Fast, Rinse |
| Wash options | Hi Temp (60 °C), Sanitize (69 °C), Heat Dry, Delay (1-24 h), Control Lock |
| Filter system | Multiple filtration (3 mesh filters) |
| Smart wash system | Yes, adjusts cycle according to soil |
| Detergent dispenser | Main compartment with latch |
| Rinse aid dispenser | Reservoir with level indicator window |
| Tub material | Stainless steel |
| Warranty | 5 years (except LAGAN/TILLREDA: 2 years) |
| Customer service | +1 833 337-4006 (Mon-Fri 8:30 AM-8:00 PM EST) |
| Routine maintenance | Clean filter, spray arm, door gasket |
| Child safety | Control lock, door removal for disposal |
| Error codes | i1 (water inlet), i4 (leak), ID (circuit board) |
Frequently Asked Questions - VILLKORLIG IKEA
User questions about VILLKORLIG IKEA
0 question about this device. Answer the ones you know or ask your own.
Ask a new question about this device
Download the instructions for your Dishwasher in PDF format for free! Find your manual VILLKORLIG - IKEA and take your electronic device back in hand. On this page are published all the documents necessary for the use of your device. VILLKORLIG by IKEA.
USER MANUAL VILLKORLIG IKEA
2 Operating Instructions 10
Introduction
3 Care and Cleaning 14
Important Safety Information 4
Troubleshooting 17
Features
6 Limited Warranty 20
Thank you for choosing IKEA.
This User Manual is part of our commitment to customer satisfaction and product quality throughout the service life of your new appliance.
We view your purchase as the beginning of a relationship. To ensure our ability to continue serving you, please use this page to record important product information.

NOTE
The instructions appearing in this User Manual guide are not meant to cover every possible condition and situation that may occur. Common sense and caution must be practiced when installing, operating and maintaining any appliance.
Purchase Date
Model Number
Serial Number

WARNING
For your safety the information in this manual must be followed to minimize the risk of fire or explosion or to prevent property damage, personal injury or loss of life. Do not store or use gasoline or other flammable vapors and liquids in the vicinity of this or any other appliance.
Read all instructions before operating this Dishwasher. Save these instructions for future reference.

WARNING
For your safety, please follow the information in this manual to minimize the risk of fire, explosion, electric shock, and to help prevent property damage or personal injury.
Recognize Safety Symbols, Words and Labels
Safety items throughout this manual are labeled with a WARNING or CAUTION based on the risk type as described below:
Definitions
This is the safety alert symbol. It is used to alert you to potential personal injury hazards. Obey all safety messages that follow this symbol to avoid possible injury or death.

DANGER
DANGER indicates an imminently hazardous situation which, if not avoided, will result in death or serious injury.

WARNING
WARNING indicates a potentially hazardous situation which, if not avoided, could result in death or serious injury.

CAUTION
CAUTION indicates a potentially hazardous situation which, if not avoided, may result in minor or moderate injury.

IMPORTANT
IMPORTANT indicates installation, operation or maintenance information which is important but not hazard-related.

WARNING
To reduce the risk of fire, electrical shock or injury when using your dishwasher, follow all the preceding precautions.
For your safety
- Use your dishwasher only as instructed in this User Manual.
- This Manual does not cover every possible condition and situation that may occur. Use common sense and caution when installing, operating and maintaining any appliance.
- NSF certified residential dishwashers are not intended for licensed food establishments.
- DISHWASHER MUST BE ELECTRICALLY GROUNDED. This appliance must be connected to a ground metal, permanent wiring system, or an equipment-grounding conductor must be run with the circuit conductors and connected to the equipment-grounding terminal or lead on this appliance. Read the Installation Instructions for details.
- This dishwasher is designed to operate on regular house current (120V, 60Hz). Use a circuit equipped with a 15 ampere fuse or circuit breaker. Use a 20 ampere fuse if dishwasher is connected with a food disposer.
- Do not operate dishwasher unless all enclosure panels are in their proper place.
- Use only detergents and rinse agents recommended for use in a dishwasher.
- Store dishwasher detergent and rinse agents out of the reach of children.
- If the dishwasher drains into a food disposer, make sure disposer is completely empty before running dishwasher.
- Do not wash plastic items unless
marked: "Dishwasher Safe" or equivalent. Check with manufacturer for recommendations, if not marked. Items that are not marked dishwasher safe may melt and create a potential fire hazard.
- When loading items to be washed:
- Locate sharp items and knives so that they are not likely to damage the door seal or tub.
- Load sharp items and knives with the handles up to reduce the risk of cut-type injuries.
- Do not tamper with controls.
- Use care unloading the dishware when the SANITIZE option has been selected. Contents may be hot to the touch immediately after the end of cycle.
- Under certain conditions, hydrogen gas may be produced in a hot water system that has not been used for 2 weeks or more. HYDROGEN GAS IS EXPLOSIVE. If hot water system has not been used for such a period, before using dishwasher, turn on all hot water faucets and let water flow from each for several minutes. This will release any accumulated hydrogen gas. HYDROGEN GAS IS FLAMMABLE. Do not smoke or use an open flame during this time.
- Do not store or use combustible materials, gasoline or other flammable vapors and liquids in the vicinity of this or any other appliance.
- Disconnect electrical power to dishwasher before servicing.
• Repairs should be done by a qualified technician.
Child safety
- This appliance is not intended for use by persons (including children) with reduced physical, sensory or mental capabilities, or lack of experience and knowledge, unless they have been given supervision or instruction concerning use of the appliance by a person responsible for their safety.
- Close supervision of children is necessary when the appliance is used near children. As children grow, teach them the proper, safe use of all appliances.
• DO NOT allow children to play in or
on the dishwasher
- DO NOT allow children to abuse, sit, stand or play on door or racks of a dishwasher.
- Destroy the carton, plastic bag and other packing materials after the appliance is unpacked. Children might use them for play. Cartons covered with rugs, bedspreads or plastic sheets can become airtight chambers.
- Keep dishwasher products out of children's reach. To prevent personal injury, observe all warnings on product labels.
- To avoid entrapment and/or suffocation, remove door or door latch mechanism from any dishwasher that is discarded or not in use.
- Failure to comply with these warnings could result in serious personal injuries.
Risk of child entrapment
Child entrapment and suffocation are not problems of the past. Junked or abandoned appliances are still dangerous – even if they will sit for "just a few days". If you are getting rid of your old appliance, please follow the instructions below to help prevent accidents.
We strongly encourage responsible appliance recycling/disposal methods. Contact your State/Provence Energy Office, Local Electric and Water Utilities or Conservation Program Office or visit www.energystar.gov/recycle for more information on recycling your old washer or dryer.
Before you throw away your old appliance:
- Remove doors or door latch.
- Remove the electric power cord
- Secure all hoses and drain pipes to prevent water from leaking out and creating a slip hazard.
Your dishwasher cleans by spraying a mixture of hot water and detergent through the spray arms against soiled surfaces. First, the dishwasher drains for a few seconds to remove soils dropped while loading, then fills with water covering the filter area. Water is then pumped through the spray arms. Soil particles go through and across the filter and down the drain as the water is pumped out. This series of steps are repeated as needed. The number of water fills varies with the cycle being used.
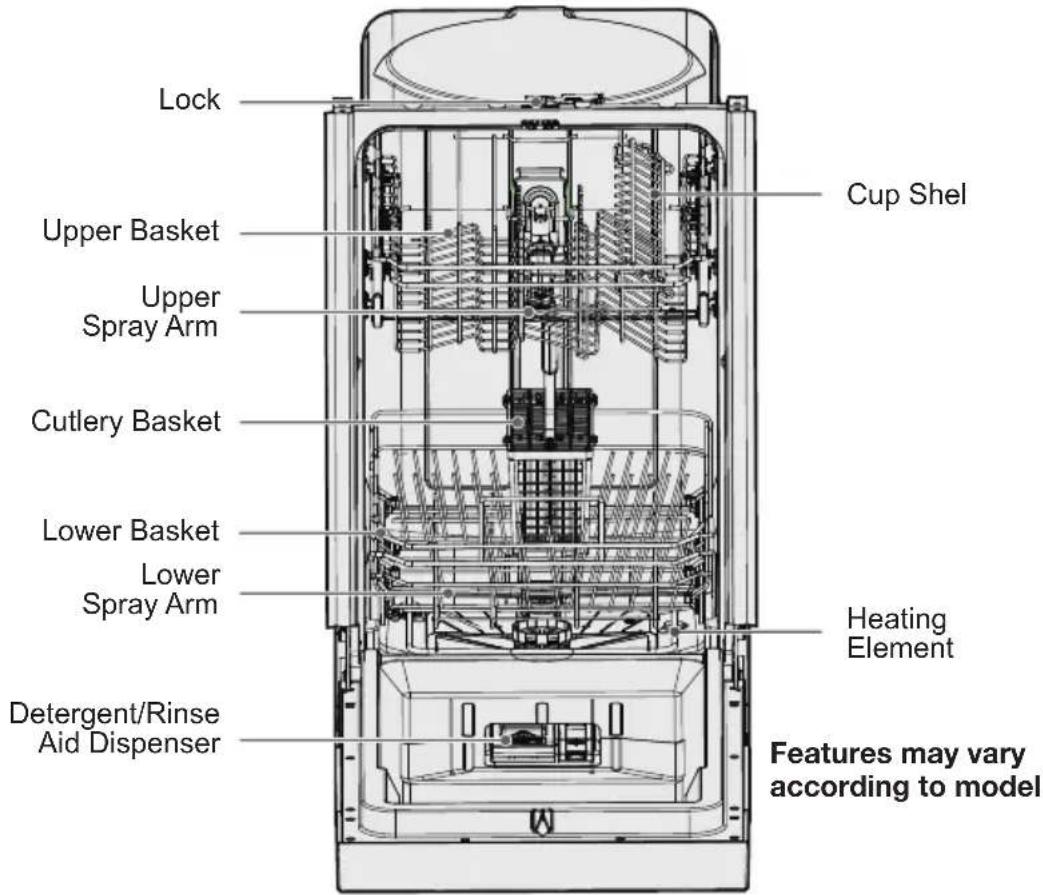
Smart wash system
This dishwasher has a Smart Wash System. It can determine the type of cycle required and automatically adjust the cycle to clean the dishes more efficiently. When a partial load of lightly soiled dishes is placed in the unit, a wash cycle similar to a short wash will automatically be performed. When a full load of heavily soiled dishes is placed in the unit, a heavy wash cycle will automatically be performed.
Multiple filter system
This dishwasher has a multiple Filter System. In the System there are three mesh filters. It can separate soiled water and clean water in different chambers.
The multiple filter system helps to get better performance with less water and less energy.
natural_image
Technical line drawing of a mechanical assembly with no visible text or symbols
natural_image
Technical line drawing of a mechanical component with no visible text or symbolsProduct Specifications:
| CAPACITY 8 PLACE SETTINGS | |
| Dimensions 17 | .6 x 22.6 x 32.4 inches450 x 575 x 825 mm(W x D x H) |
| Power Supply | 120v, 60Hz |
| Rated Power Usage | wash motor 100W, heater 700W |
| Water feed pressure | 20 psi-120 psi(0.14 MPa-0.82 MPa) |
Getting started
- Run the hot water faucet nearest dishwasher until water is hot.
- Load the dishwasher. (See Loading the dishes.)
- Add detergent. (See Detergent and rinse aid dispenser.)
- Add rinse aid, if needed. (See Detergent and rinse aid dispenser.)
- Select desired cycle. (See Wash cycles.)
- Select desired options. The indicator light will illuminate when selected. (See Wash options.)
- To start, press START pad and close door within 4 seconds.

Wash cycle selections
Cycle times are approximate and will vary with the options selected. Hot water is necessary to activate the detergent and melt fatty food soils. An automatic sensor will check the incoming water temperature. If it is not at the appropriate temperature the timer will delay the cycle to allow automatic water heating during the main wash. When the Hi Temp wash is selected an even higher temperature will be assured to handle heavier soil loads.
Wash cycles
AUTO
Auto Cycle uses sensors in the dish washer to determine the soil level of the dish load, then adjusts the wash cycle to optimize the wash performance, water and energy usage.
HEAVY
Recommended for pots, pans, casseroles and dinnerware having heavily soiled loads.
NORMAL
Recommended for lightly to heavily soiled loads.
FAST
A shorter wash recommended for lightly soiled loads.
RINSE
Recommended for pre-rinsing dishes or glasses. This is only a rinse that keeps food from drying on your dishes and reduces odor buildup in your dishwasher until you are ready to wash a full load. Do not use detergent.
Wash options
HI TEMP
When Hi Temp is selected, the temperature of the water will be maintained at 140^ F ( 60^ C) max.
SANITIZE
When Sanitize is selected, the temperature of water will be maintained at 156.2°F (69°C) max. The max temperature may not be reached if the incoming water temperature is not correct. Certified residential dishwashers are not intended for licensed food establishments.

WARNING
The Sanitize option is only available with Heavy and Normal wash cycles.
HEAT DRY
When Heat Dry is selected, the heater will work during the drying process.
Functions
START
Press START and close door within 4 seconds to start a wash cycle.
CANCEL
Press CANCEL to cancel a cycle that is already in progress.
DELAY
The Delay option allows you to automatically delay starting your dishwasher from 1-24 hours. To start 1-24 hour delay, press the Delay button until the desired delay time shows in the display window (1h-24h) and press the START button. A light will come on indicating the delay start has been activated and will remain on until the cycle starts. To cancel the delay option and begin the cycle before the delay period is over, press the Cancel button.
CONTROL LOCK
Use to lock all controls and prevent children from accidentally changing the dishwasher cycle or starting the dishwasher. Press and hold Heat Dry for 3 seconds to lock. After the function is selected the control lock illuminate. Press and hold again for 3 seconds to unlock.
Display window
This LED screen displays the minutes remaining in a running cycle, hours of delay before the unit is set to start, error codes, etc.
- If the machine is in operation, the remaining time (mins) of the selected cycle will be shown in the display window.
- If the Delay option is selected, the number of hours of delay (1h-24h) will be shown in the display window. After the machine starts, the remaining time of the selected cycle will be shown in minutes on the display window.

NOTE
The remaining time could suddenly increase or drop several minutes. This means the Smart Sensor has checked the soil level and adjusted the number of fill cycles.
- If an error occurs which is critical to the machines function and safe operation, the control shall shut down and indicate an error code in the display window. (See Error Codes).
If Error codes are displayed, contact the dealer or qualified service center. They will available to provide assistance in trouble shooting the problem and/or locate and authorized service technician if needed.
Cycle progress indicator
The cycle progress indicator lights will illuminate as each stage of the wash cycle is reached.
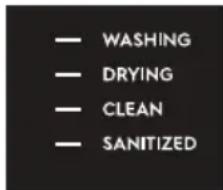
WASHING
When the dishwasher is washing the load, the Washing light will illuminate.
DRYING
When the dishwasher is at drying stage, the Drying light will illuminate.
CLEAN
After the cycle has ended, the Clean light will illuminate until the dishwasher door has been opened.
SANITIZED
When Sanitize is selected, the Sanitized light will illuminate after the cycle has ended.
Cycle Chart
| CYCLE OPTIONS AVAILABLE WATER | USAGE | CYCLE TIME | |
| AUTO Heat | Dry | 2.5–4.9 gal.9.5–18.5 liters | 120–155 mins. |
| HEAVY | Sanitize,Hi Temp, orHeat Dry | 4.9 gal.18.5 liters | 155–160 mins. |
| NORMAL | Sanitize,Hi Temp, orHeat Dry | 2.5–4.9 gal.9.5–18.5 liters | 125–160 mins. |
| FAST Heat | Dry | 3.3 gal.12.5 liters | 60–100 mins. |
| RINSE Heat | Dry | 1.8 gal.6.7 liters | 20–55 mins. |
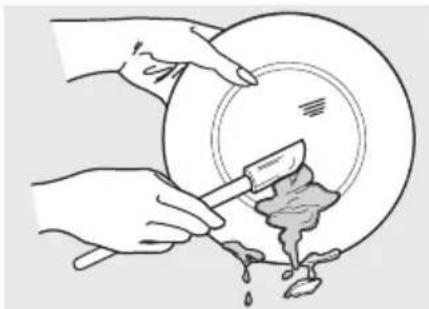
Loading the Dishes
Scrape away large pieces of food, bones, pits, toothpicks, etc. The continuously filtered wash system will remove the remaining food particles. Burned on foods should be loosened before loading. Empty liquids from glasses and cups. Foods such as mustard, mayonnaise, vinegar, lemon juice and tomato based products may cause discoloration of stainless steel and plastics if allowed to sit for a long period of time.
Unless the dishwasher is to be operated at once it is best to rinse off these food soils. If the dishwasher drains into a food disposer, be sure disposer is completely empty before starting dishwasher.
natural_image
Illustration of hands using a spatula to clean or residue liquid in a bowl (no text or symbols)Loading the upper basket
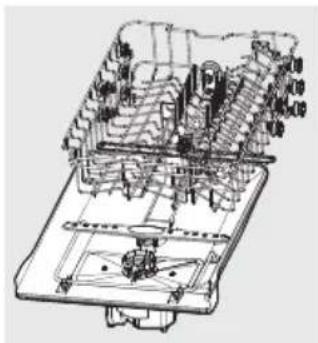
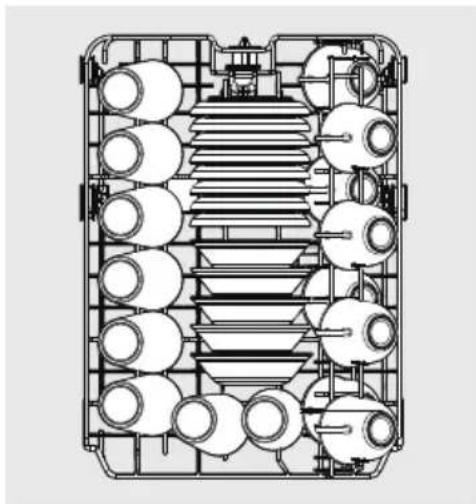
Features and appearance of racks and silverware basket as shown may vary from your model.
natural_image
Technical line drawing of a multi-tiered industrial or mechanical device with circular components and structural brackets (no text or symbols)Standard 8 place setting for upper basket
The upper basket has been designed for small plates, mugs, glasses, and plastic items marked "dishwasher safe", etc. For best results, place the bowls, cups, glasses with soiled surface facing down or toward the center. Tilt slightly for better drainage. Load small plates and bowls in two half rows, so that the front of each plate faces the back of the plate in front of it, and the open sides of the plates at the center of the dishwasher face each other.
When loading dishes, pull the upper basket out sufficiently so you can load it without striking the counter.

WARNING
Make sure the loaded items do not interfere with the rotation of the spray arm located at the bottom of the upper basket. (Check this by rotating the spray arm by hand.)
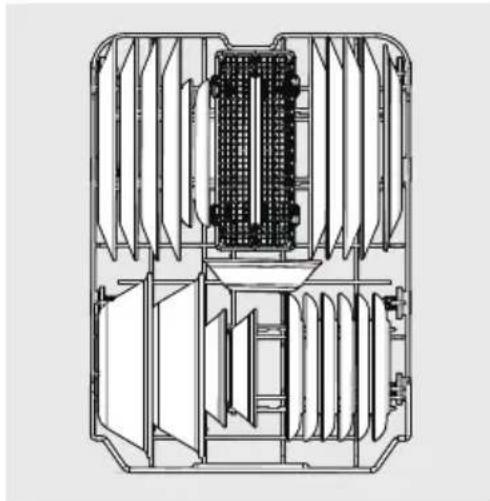
Loading the lower basket
Features and appearance of racks and silverware basket as shown may vary from your model.
natural_image
Technical line drawing of a mechanical or electrical enclosure with internal components and no visible text or symbolsStandard 8 place setting for lower basket.
The bottom basket is designed to load plates, soup bowls, plates, saucers and cookware.
- The adjustable basket space will allow you to load items with a maximum height of 11 inches.
- The fold-down tines in the bottom basket make it easy to load those extra large and hard-to-fit items. The tines may be left up for normal use or folded down for more flexible loading. Fold down for more space to load large pots or pans.
Load your plates into the dishwasher in two half rows, so that the front of each plate faces the back of the plate in front of it, and the open sides of the plates at the center of the dishwasher face each other.
Large items should be turned so that the inside faces downward. Load large items such as pans and pots into the dishwasher so their open sides face downwards. We recommend loading cups, stemware, and small plates into the upper basket.
Larger items should be placed along the edge so they do not interfere with the spray arm rotation. Check to ensure that they do not prevent the detergent dispenser from opening.

WARNING
Make sure the loaded items do not interfere with the rotation of the spray arm located at the bottom of the upper basket. (Check this by rotating the spray arm by hand.)
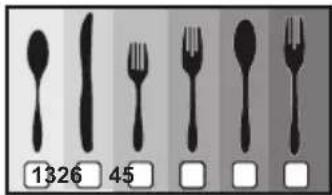
Loading the silverware basket
Features and appearance of racks and silverware basket as shown may vary from your model.
The silverware basket can be divided into three separate modules that can be used in both upper and lower racks.
- Spoons
- Knives
- Salad forks
- Forks
- Large spoons
- Large forks

WARNING
Load sharp items (knives, skewers, etc.) pointing down. Failure to do so may result in injury.

WARNING
Make sure the loaded items do not interfere with the rotation of the spray arm located at the bottom of the upper basket. (Check this by rotating the spray arm by hand.)
Adding a dish
To add or remove items after cycle starts:
- Make sure there is a full wash cycle yet to be completed so that any added items are thoroughly washed and rinsed.
- Open door slightly until wash action stops before completely opening.
- Add the item.
- Close door firmly to latch and press the START button to resume the wash cycle.

WARNING
BURN HAZARD
Slightly open door and wait until spray arms and wash action stop. Hot water may splash out of dishwasher. Failure to do so may result in injury
Detergent and rinse aid dispenser
The detergent and rinse aid dispenser will automatically release the measured amount of detergent and rinse aid at the appropriate time during the dishwasher cycles.
Rinse aid greatly improves drying and reduces water spots and filming. Without rinse aid your dishes and dishwasher interior will have excessive moisture.
The HEAT DRY option will not perform as well without rinse aid. The rinse aid dispenser, located next to the detergent cup, automatically releases a measured amount of rinse aid during the last rinse.
Check the viewing port over rinse aid dispenser to determine if the rinse aid is low. Fill as needed.

NOTE
Your dishwasher is designed to use a liquid rinse aid. The use of rinse greatly improves drying performance after the final rinse. Do not use a solid or bar-type rinse aid. Under normal conditions, the rinse aid will last approximately one month. It is best to keep it full, but do not over fill.
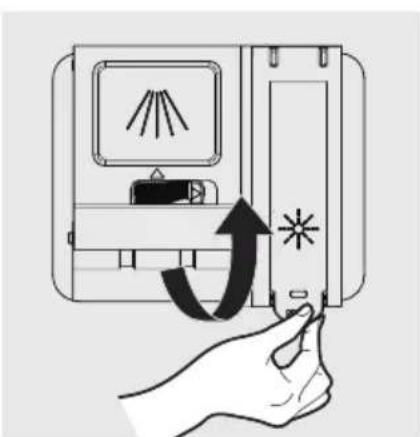
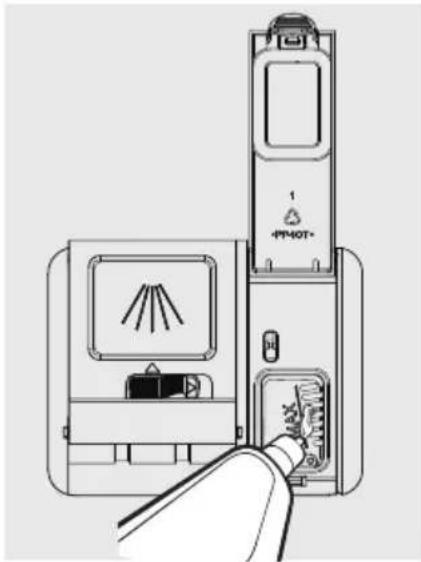
Filling the detergent dispenser
- Push the dispenser cover release catch to open the main wash detergent compartment.
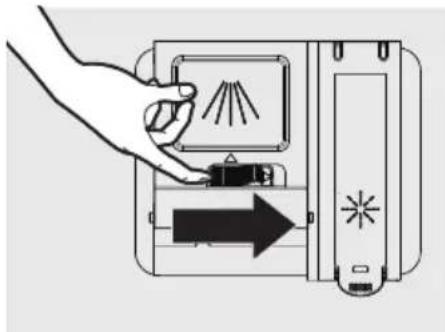
natural_image
Hand placing a device into a device with a right-pointing arrow (no text or symbols visible)
NOTE
Visually check viewing port to determine if rinse aid is low. Fill as needed.
- Add the recommended amount of detergent to the detergent compartment.
natural_image
Illustration of a hand cleaning a clean air conditioner unit with a cloth (no text or symbols)- Press down on the top of the cover to secure.
natural_image
Illustration of a hand interacting with an air conditioner unit, showing heat transfer and warning symbol (no text or labels)Filling the rinse aide dispenser
Rinse aid improves the drying performance of the dishwasher.
This dishwasher has been designed to use liquid rinse aid only. Using a powdered rinse aid will clog the reservoir opening and cause the dishwasher to malfunction.

WARNING
- Do not add regular detergent to the rinse aid dispenser.
- Do not use powdered rinse aid in the rinse aid dispenser.
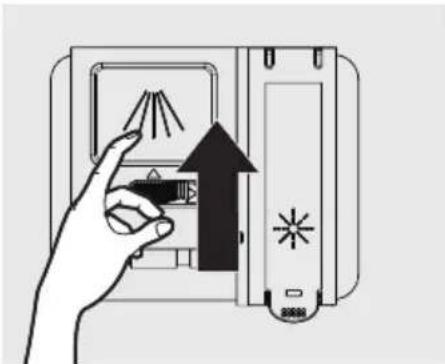
To refill the rinse aid dispenser:
- Lift up the end tab of rinse aid cover to open.
natural_image
Illustration of a hand pressing down on a device with an arrow indicating motion (no text or symbols)- Fill the rinse aid dispenser with liquid rinse aid until full. DO NOT overfill.

NOTE
Use the viewing port when filling the rinse aid reservoir.

WARNING
Do not fill the reservoir above the full level indicator. Excess rinse aid can overflow during the wash cycle.
- Press the rinse aid cover down firmly to close.
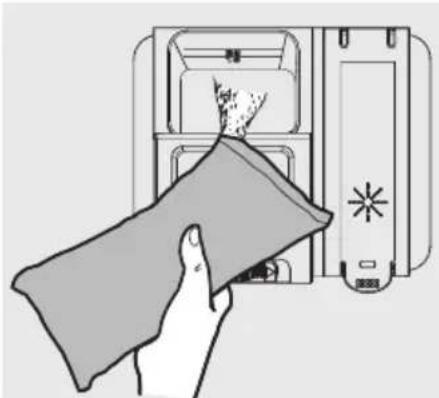
Cleaning the dishwasher
Keeping your dishwasher clean improves its performance, reduces unnecessary repairs, and lengthens its life.
Cleaning the exterior
It's best to clean spills on the outside of your dishwasher as they occur. Use a soft, damp cloth on the control panel to gently wipe away spills and dust. Do not use benzene, wax, thinner, chlorine bleach, or alcohol. These materials may discolor the inner walls and cause stains. Do not clean the dishwasher by sprinkling water over it and avoid letting water come into contact with any of the electrical parts.

NOTE
If your dishwasher has a stainless steel door panel, you can clean it with a stainless steel cleaner for Home Appliances or a similar product using a clean, soft cloth.
Cleaning the interior

WARNING
BURN HAZARD
Allow heating element to cool before cleaning the interior. Failure to do so can result in burns.
Clean the interior of your dishwasher periodically to remove any dirt or food particles. Wipe the inside of the dishwasher and the inner part of the door with a wet dishcloth. We recommend filling the detergent dispenser with dish detergent, and then running the dishwasher empty periodically using either the NORMAL or FAST cycle with the SANITIZE option. This will keep your dishwasher clean.
If white spots and odor are still present in your dishwasher after initial cleaning:
- Run the NORMAL cycle with the dishwasher empty and without detergent until it flushes.
-
Then, interrupt the cycle and put an 8 ounce cup of white vinegar into the lower basket.
-
Close the dishwasher and let the cycle finish.

WARNING
Do not remove the tub front seal (the long rubber seal enclosing the opening of the dishwasher).
Cleaning the filter
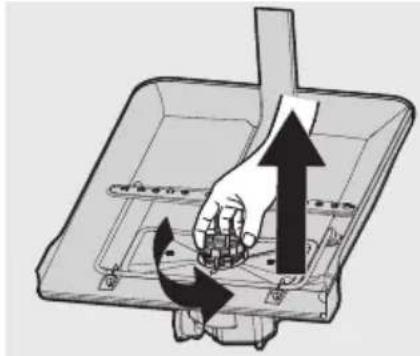
To clean the filters:
- Turn off the dishwasher.
natural_image
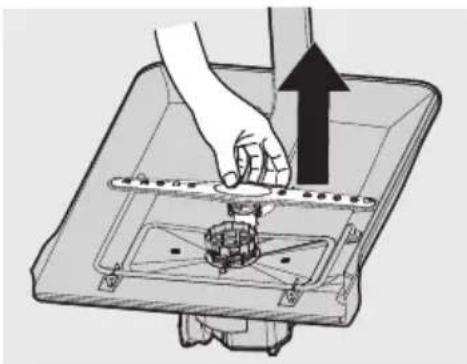
Diagram of a hand pressing down on a tray with arrows indicating motion (no text or symbols)- Rotate the filter insert counterclockwise to unfasten and then detach the filter insert.
natural_image
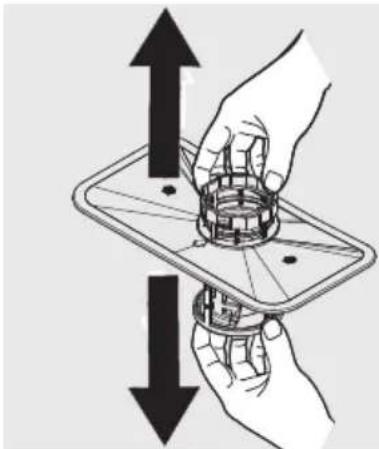
Illustration of two hands holding a tray with a mechanical component, showing upward and downward arrows (no text or symbols)- Remove the fine filter (flat, rectangular).
natural_image
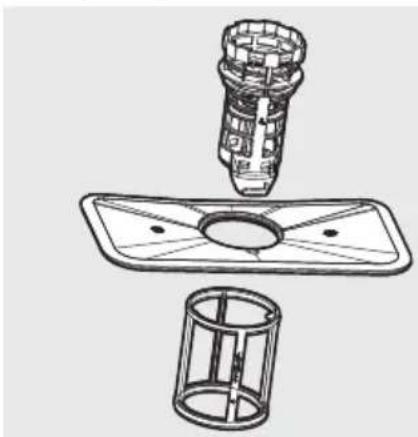
Technical line drawing of a mechanical assembly with a cylindrical component and a rectangular base (no text or symbols)-
Remove any dirt or other remains from the filters, and then rinse them under running water.
-
Reassemble the filters in the reverse order of the disassembly, replace the filter insert, and rotate clockwise to the close arrow.

CAUTION
If the filter insert is not closed properly, its performance will be decreased.
Cleaning the lower spray arm
If your dishwasher does not seem to be cleaning adequately or the spray arm nozzles seem clogged, the lower spray arm can be removed and cleaned. Remove spray arm carefully to avoid damage.
To remove lower spray arm:
-
Check whether the nozzle holes are clogged by food particles.
-
If cleaning is needed, remove the spray arm by pulling it upwards.
-
Clean the nozzles, and then push the spray arm back into place.
-
Rotate the spray arm to check that it is properly in place.
natural_image
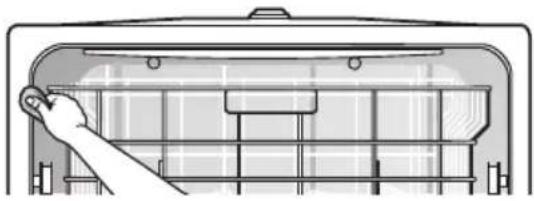
Illustration of a hand pressing down on a mechanical component with an upward arrow (no text or symbols)Cleaning the door gasket
If the dishwasher door is not closing properly or if water is leaking from the door during the cycle, check that door gasket is clear of debris. If needed, clean the door gasket with a damp cloth to remove food particles and ensure a tight seal.
natural_image
Technical line drawing of a mechanical component with a hand adjusting a slot (no text or symbols)Winterizing
A dishwasher left in an unheated place should be protected from freezing. Have a qualified person do the following.
To disconnect service:
-
Turn off electrical power to the dishwasher at the supply source by removing fuses or tripping circuit breaker.
-
Shut off water supply.
-
Place a pan under the inlet valve. Disconnect water line from the inlet valve and drain into pan.
-
Disconnect drain line from pump and drain water into pan.
To Restore Service:
-
Reconnect the water, drain, and electrical power supply.
-
Turn on water and electrical power supply
-
Fill detergent cup and run the dishwasher through a HEAVY wash cycle.
-
Check connections to make sure they do not leak.

CAUTION
Freezing temperatures may cause water lines to rupture. Be sure all supply lines to and circulating lines within your dishwasher are protected. Failure to do so could result in property damage.

NOTE
See Installation Instructions for more details.
Normal operating sounds
Your dishwasher uses energy efficient motors for the wash and drain portions of the cycle you select. Each cycle has a series of water fills and drains for washing and rinsing dishes. As each cycle begins, you may or may not hear the drain motor. You may also hear the splashing of water as it enters the tub and the spray arms as they rotate and circulate water. The wash motor often pulsates throughout the cycle, which varies water pressure and optimizes performance.
Loud ticking can mean that something is hitting wash arm. Vibrating or rattling sounds can mean dishes are touching each other. See Preparing and Loading Dishes.
Removing spots and film
Hard water can cause lime deposit buildup on the interior of the dishwasher. Dishes and glasses may also get spots and film for a number of reasons. (See Glassware/Flatware Spotted or Cloudy section). To remove buildup, and film, clean using the following instructions:
- Load clean dishes and glasses in normal manner. Do not load any metal utensils or silverware.
- Do not add detergent.
- Select the NORMAL cycle. Press START. Close and latch the door.
- Allow dishwasher to run until it starts the second water fill (approximately 10 minutes).
- Unlatch an and open door and pour 2 cups of white vinegar into the bottom of dishwasher.
- Close and latch door and allow cycle to finish.
Factors affecting performance
Water Pressure
The hot water line to dishwasher must provide water pressure between 20 and 120 psi.
Low water pressure may occur when laundry or showers are in operation. If you experience poor wash performance you may need to wait until water use is reduced before starting dishwasher.
Water temperature
Hot water is needed for best dishwashing and drying results. Water entering dishwasher should be at least 120^ F ( 49^ C) to give satisfactory results.
To check water temperature entering dishwasher:
- Turn on hot water faucet nearest dishwasher for several minutes to clear cool water from pipes.
- Hold a candy or meat thermometer in the water stream to check the temperature.
- If temperature is below 120^ F ( 49^ C), have a qualified person raise the hot water heater thermostat setting.

NOTE
Before starting a cycle, run hot water to clear cool water from pipes.
Before calling for service, review this list. If may save you both time and expense. This list includes common experiences that are not the result of defective workmanship or material in your dishwasher.
To achieve the best results from your dishwasher, visit www.dishwashingexpert.com for general tips regarding the performance and operation of your dishwasher.
| PROBLEM POSSIBLE CAUSES SOLUTIONS | ||
| Dishwasher won't start | ·Dishwasher door is open.·Power supply or power line is not connected.·Delay option has been selected.·Control Lock activated (select models). | |
| Dishwasher beeps at the end of the cycle | ·The wash cycle will beep to indicate the end of the cycle. | |
| Dishwasher operates too long | ·The dishwasher is connected to cold water.·The cycle time will vary due to the soil.·The sanitize option is selected. | |
| Dishes are not clean enough | ·Water pressure is temporarily low.·The inlet water temperature is low.·Dishes are loaded too close together.·Improper use of detergent.·The selected cycle is not suitable for food soil condition.·Spray arms is blocked by some items. | |
| PROBLEM POSSIBLE CAUSES SOLUTIONS | ||
| Dishes not dry enough | Rinse aid dispenser is empty.Improper loading of dishes.The cycle you chose did not included the drying. | Fill rinse aid dispenser or increase the amount of rinse aid.Load the dishes again as the manual instructs.Choose the proper cycle with drying. |
| Spots and film on dishes | Water hardness is too high.Improper loading of dishes.Old rinse aid is used.Rinse dispenser empty. | For extremely hard water install a water softener.Load the dishes again as the manual indicates.Use fresh rinse aid.Add rinse aid to the dispenser. |
| Etching Using too much detergent.The inlet water temperature exceeds 158°F (70°C). | Use less detergent if you have soft water.Lower the inlet water temperature. | |
| Detergent left in dispenser cup | Detergent may be too old.Spray arm is blocked. | Use fresh detergent.Load the dishes, making sure the spray arms are not blocked. |
| Detergent dispenser will not shut | Improper operation of the detergent cover. | Add the detergent and rinse aid as indicated by the manual. |
| Water remains in the dishwasher | Previous cycle has not finished or has been interrupted. | Select the proper cycle explained in the manual. |
| Dishwasher does not drain properly | Drain is clogged.Drain hose is kinked. | Check the air gap if you have one.Make sure the disposer is empty if dishwasher is connected to disposer.Make sure the drain hose is properly connected to the sink. |
| Suds in the tub | Improper detergent is used. | Make sure to use only the automatic dishwasher detergent. |
| Dishwasher leaks | Excessive suds caused by using the improper detergent.Dishwasher is not level. | Make sure to use only the proper dishwasher detergent.Level the dishwasher. |
| Black or gray marks on dishes | Aluminum utensils have rubbed against dishes. | Rearrange the dishes. |
| Stained tub interior | Coffee and tea soil.Reddish stain. | Using an approved spot cleaner to remove the soil.Some tomato-based foods will cause this, use of the rinse only cycle right after loading this will decrease the staining. |
| Noises • Detergent cup opening\ Drain pump sound.A hard object has entered the wash module. When the object is ground up, the sound should stop. | This is normal.If the noise persists after a complete cycle, call for service.X | |
| Dishwasher won't fill with water | Water valve is turn off.Door latch may not be properly seated. | Check if the water valve is turn on.Make sure the door is closed. |
Error codes
Error codes will display on the display window when the following errors occur:
| CODE MEANING POSSIBLE CAUSES | ||
| i1 Longer inlet time | Faucets is not opened, or water intake is restricted, or water pressure is too low. | |
| i4 Unit leaking Some element of dishwasher leaks. | ||
| id PCB communication error | PCB issue, or wire connected to the board issue. | |

CAUTION
- If overflow occurs, turn off the main water supply before calling a service provider.
- If there is water in the base pan because of an overfill or small leak, the water should be removed before restarting the dishwasher.
How long is the IKEA guarantee valid?
This guarantee is valid for five (5) years from the original date of purchase of Your appliance at IKEA, unless the appliance is named LAGAN or TILLREDA in which case two (2) years of guarantee apply. The original sales receipt is required as proof of purchase. If service work is carried out under guarantee, this will not extend the guarantee period for the appliance.
Who will execute the service?
IKEA "Service Provider" will provide the service through its own service operations or authorized service partner network.
What does this guarantee cover?
The guarantee covers faults of the appliance which have been caused by faulty construction or material faults from the date of purchase from IKEA. This guarantee applies to domestic use only. Some exceptions not guaranteed are specified under the headline "What is not covered under this guarantee?" Within the guarantee period, the costs to remedy the fault (e.g., repairs, parts, labour and travel) will be covered, provided that the appliance is accessible for repair without special expenditure. On these conditions the local regulations are applicable. Replaced parts become the property of IKEA.
What will IKEA do to correct the problem?
IKEA appointed Service Provider will examine the product and decide, at its sole discretion, if it is covered under this guarantee. If considered covered, IKEA Service Provider or its authorized service partner through its own service operations, will then, at its sole discretion, either repair the defective product or replace it with the same or a comparable product.
What is not covered under this guarantee?
• Normal wear and tear.
- Deliberate or negligent damage, damage caused by failure to observe operating instructions, incorrect installation or by connection to the wrong voltage, damage caused by chemical or electrochemical reaction, rust, corrosion or water damage including but not limited to damage caused by excessive lime in the water supply, damage caused by abnormal environmental conditions.
- Consumable parts including batteries and lamps.
- Non-functional and decorative parts which do not affect normal use of the appliance, including any scratches and possible colour differences.
- Accidental damage caused by foreign objects or substances and cleaning or unblocking of filters, drainage systems or soap drawers.
- Damage to the following parts: ceramic glass, accessories, crockery and cutlery baskets, feed and drainage pipes, seals, lamps and lamp covers, screens, knobs, casings and parts of casings. Unless such damages can be proved to have been caused by production faults.
- Cases where no fault could be found during a technician's visit.
- Repairs not carried out by our appointed service providers and/or an authorized service contractual partner or where non-original parts have been used.
- Repairs caused by installation which is faulty or not according to specification.
- The use of the appliance in a non-domestic environment i.e. professional use.
- Transportation damages. If a customer transports the product to his home or another address, IKEA is not liable for any damage that may occur during transport. However, if IKEA delivers the product to the customer's delivery address, then damage to the product that occurs during this delivery will be covered by IKEA.
- Cost for carrying out the initial installation of the IKEA appliance. However, if an IKEA appointed Service Provider or its authorized service partner repairs or replaces the appliance under the terms of this guarantee, the appointed Service Provider or its authorized service partner will reinstall the repaired appliance or install the replacement, if necessary.
How country law applies
The IKEA guarantee gives you specific legal rights, and you may also have other rights which vary from state to state or jurisdiction to jurisdiction. However these conditions do not limit in any way consumer rights described in the local legislation.
Area of validity
For appliances which are purchased in United States or Canada, or moved to one of the mentioned countries, the services will be provided in the framework of the guarantee conditions normal in the specified country.
An obligation to carry out services in the framework of the guarantee exists only if the appliance complies and is installed in accordance with:
- the technical specifications of the country in which the guarantee claim is made;
- the Assembly Instructions and User Manual Safety Information.
The dedicated AFTER SALES for IKEA appliances
Please don't hesitate to contact IKEA appointed After Sales Service Provider to:
• make a service request under this guarantee;
- ask for clarifications on installation of the IKEA appliance in the dedicated IKEA kitchen furniture;
- ask for clarification on functions of IKEA appliances.
To ensure that we provide you with the best assistance, please read carefully the Assembly Instructions and/or the User Manual before contacting us.
How to reach us if you need our service

Phone number:
(833) 337-4006
Opening hours:
Monday - Friday
8:30 am - 8:00 pm EST
In order to provide you a quicker service, we recommend to use the specific phone numbers listed on this manual. Always refer to the numbers listed in the booklet of the specific appliance you need an assistance for.
Please also always refer to the IKEA article number (8 digit code) placed on the rating plate of your appliance.
SAVE THE SALES RECEIPT!
It is your proof of purchase and required for the guarantee to apply. The sales receipt also reports the IKEA name and article number (8 digit code) for each of the appliances you have purchased.
Do you need extra help?
For any additional questions not related to After Sales of your appliances please contact your nearest IKEA store call centre. We recommend you read the appliance documentation carefully before contacting us.
VILLKORLIG

ÍNDICE
natural_image
Technical line drawing of a mechanical assembly or architectural component (no visible text or symbols)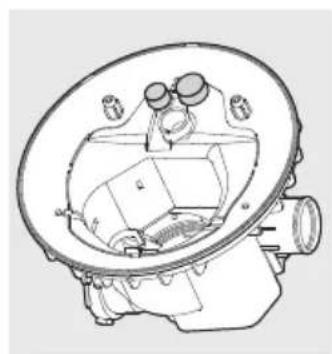
natural_image
Technical line drawing of a mechanical component with no visible text or symbols| CICLO OPCIONES DISPONIBLES | USO DE AGUA | TIEMPO DEL CICLO | |
| AUTOMÁTICO Heat Dry | 2.5–4.9 gal.9.5–18.5 litros | 120–155 mins. | |
| HEAVY | Sanitize,Hi Temp, oHeat Dry | 4.9 gal.18.5 litros | 155–160 mins. |
| NORMAL | Sanitize,Hi Temp, oHeat Dry | 2.5–4.9 gal.9.5–18.5 litros | 125–160 mins. |
| FAST Heat Dry | 3.3 gal.12.5 litros | 60–100 mins. | |
| RINSE Heat Dry | 1.8 gal.6.7 litros | 20–55 mins. | |
natural_image
Illustration of hands using a spatula to clean or residue liquid into a bowl (no text or symbols)natural_image
Technical line drawing of a mechanical assembly with multiple circular components and internal channels (no text or symbols)natural_image
Technical line drawing of a mechanical or electrical component assembly (no text or symbols visible)natural_image
Hand placing a small object into a device with a starburst symbol, no text or labels present
NOTA
natural_image
Illustration of a hand cleaning a clean air conditioner unit (no text or symbols visible)natural_image
Illustration of a hand interacting with an air conditioner unit, showing heat transfer and warning symbol (no text or labels)natural_image
Illustration of a hand pressing a button on a device with a star symbol (no text or labels)natural_image
Diagram of a device with a labeled component and a hand pointing to it (no readable text or symbols)natural_image
Illustration of a hand pressing down on a tray with arrows indicating motion (no text or symbols)natural_image
Illustration of two hands holding a tray with a mechanical component, showing upward and downward arrows (no text or symbols)natural_image
Technical line drawing of a mechanical assembly with a cylindrical component and a rectangular base (no text or symbols)natural_image
Illustration of a hand pressing down on a mechanical component with an upward arrow (no text or symbols)natural_image
Technical line drawing of a mechanical component with a hand adjusting a grid structure (no text or symbols)natural_image
Technical line drawing of a mechanical assembly with gears and housing (no text or symbols)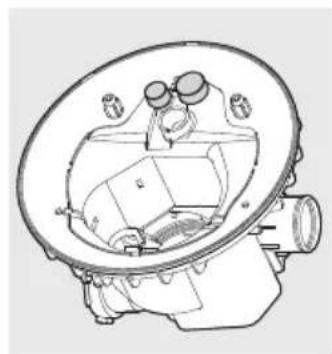
natural_image
Technical line drawing of a mechanical component with no visible text or symbolsnatural_image
Illustration of hands using a spatula to clean or residue liquid in a bowl (no text or symbols)natural_image
Technical line drawing of a mechanical assembly with multiple circular components and internal channels (no text or symbols)natural_image
Technical line drawing of a mechanical assembly with internal components (no text or symbols)natural_image
Illustration of a hand pressing down on a device with a right-pointing arrow (no text or symbols)