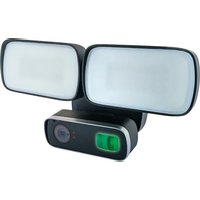
LED300 - Surveillance Camera Schwaiger - Free user manual and instructions
Find the device manual for free LED300 Schwaiger in PDF.


| Brand | Schwaiger |
| Model | LED300 |
| Product type | Outdoor surveillance camera with LED floodlight |
| Housing material | Metal / plastic |
| Protection class | IP65 (dust-tight and protected against water jets) |
| Power supply | 110-240 V ~, 50/60 Hz |
| Power consumption (total) | 26 W max. |
| Power consumption (without LED) | 3 W max. |
| Ambient temperature | -28 °C to +65 °C |
| Ambient humidity | ≤ 95% |
| WLAN frequency band | 2.4 GHz (2400 - 2483.5 MHz) |
| WLAN transmission power | < 100 mW |
| WLAN standard | 802.11 b/g/n |
| Alarm volume | 110 dB max. |
| Application | IOTLiving (iOS 10.0+ / Android 4.4+) |
| LED floodlight | 2 x 12 W, 1800 lm, 5000 K, lifespan ~20,000 h |
| Camera resolution | Full HD (1920 x 1080 pixels) |
| Vision modes | Normal and infrared (night vision) |
| Detection angle (PIR and camera) | 120° |
| Detection distance | 8 to 12 m |
| Storage | Micro SD card up to 64 GB (not included) |
| Mounting | Wall mount, electrical installation by a qualified electrician |
| Maintenance | Clean with a soft, dry cloth; do not use aggressive cleaning agents |
| Safety | Do not disassemble; dangerous glare; keep out of reach of children |
| Repairability | No user-serviceable parts; modification voids warranty |
Frequently Asked Questions - LED300 Schwaiger
User questions about LED300 Schwaiger
0 question about this device. Answer the ones you know or ask your own.
Ask a new question about this device
Download the instructions for your Surveillance Camera in PDF format for free! Find your manual LED300 - Schwaiger and take your electronic device back in hand. On this page are published all the documents necessary for the use of your device. LED300 by Schwaiger.
USER MANUAL LED300 Schwaiger
GB USER GUIDE AND SAFETY INSTRUCTIONS
WLAN CAMERA WITH FLOODLIGHT
MODE D'EMPLOI ET CONSIGNES DE SÉCURITÉ
CAMÉRA WLAN AVEC PROJECTEUR
GUIDA PER L'UTENTE E AVVERTENZE DI SICUREZZA
natural_image
Two black rectangular head-mounted devices with white screens and a green LED display (no text or symbols visible)INHALTSVERZEICHNIS
Einleitung
Schritt 2
natural_image
Diagram of a square device with four circular components and red directional arrows indicating orientation (no text or symbols)Schritt 3
Schritt 4
Schritt 7
natural_image
Technical line drawing of a mechanical device with red arrows indicating components (no text or symbols)Schritt 8
Schritt 9
natural_image
Technical line drawing of a mechanical assembly with two views showing internal components and directional arrows (no text or symbols)Schritt 10
Schritt 11
natural_image
Line drawing of a handheld device with a hand holding a remote control (no text or symbols)Schritt 12
natural_image
Blue square icon with concentric circles and a red curved shape inside (no text or symbols)IOTLiving
Downloadlink zur APP Apple® App Store
Downloadlink zur APP Google Play Store
3
4
Option 1
Option 2
5
6
natural_image
Diagram showing two devices with wireless signals: a front-mounted device and a smartphone (no text or symbols present)max. 3 m
7
natural_image
Line drawing of a hand interacting with a device (no text or symbols)- Intended use.... 16
- Package contents.... 16
- General safety and warning instructions.... 16
- Initial operation.... 17
4.1. Legal information on the use of surveillance cameras.... 17
4.2. Choice of mounting location.... 18
4.3. Mounting the camera.... 19
4.4. Download the "IOTLiving" app.... 23
4.5. Setting up the camera 23
4.6. Troubleshooting / Factory settings 26
4.7. Basic functions ...... 26
4.8. Memory card 27
- Technical data 28
- Cleaning 29
- Disposal 29
- Legal information.... 29
Congratulations and thank you for purchasing this Schwaiger product.
This user guide is designed to help you use and operate the device.
Read the User guide carefully. Store this guide safely throughout the product's entire service life and pass it on to any subsequent users or owners.
1. INTENDED USE
This information electronics product is used for automatic surveillance of indoor & outdoor areas of private property. In order to guarantee an optimal image even in low light conditions, the camera has a special night mode and an additionally activatable floodlight. The complete control of the camera is done exclusively via the App (IOTLiving). This product may only be used permanently mounted (wall mounting). The power supply of the camera may only be established via the electrical system of the building. In addition, this product is intended for private use only.
2. PACKAGE CONTENT
Check that the supplied package is complete and ensure that none of the parts are defective or damaged. Please compare the contents of the package with the enclosed extra page.
3. GENERAL SAFETY & WARNING INSTRUCTIONS!
- This product is intended for private, non-commercial household use!
- This product is an electronic product that must be kept away from children. Therefore, keep it out of reach of children.
- The product is not intended for use by children, or by adults with visual or other impairments preventing them from using it safely. In such cases, it should be used under supervision.
- Never expose the product to very high temperatures or extreme cold. Please observe the operating temperatures specified in the technical data.
- Do not intentionally drop the product or expose it to extreme vibrations.
- Do not disassemble the product into its individual parts. The unit does not contain any user serviceable parts. Incorrect assembly can cause electric shocks or malfunctions.
- The product is not user serviceable, and any attempt to do so will invalidate the guarantee.
-
Do not introduce any objects into the product's connections or openings.
-
Never dazzle other people or animals with the light.
- Misuse of the lamp can lead to eye injuries as it is very bright.
For safety reasons and reasons related to official approvals (CE), you must not convert and/or modify the product. The product may become damaged if you use it for purposes other than the one previously described. In addition, improper use may result in hazards such as short circuits, fire, electric shock, etc.

DANGER!
Electrical devices should not be handled by children. Never allow children to use electrical devices without supervision. Children cannot always assess possible risks or dangers correctly. Also keep possible packaging foils away from children. There is a possible danger of suffocation!

DANGER!
Never use optical instruments such as a magnifying glass to look directly into the light beam of the floodlight. This can cause eye damage due to the high brightness of the lamp!

DANGER!
Do not damage the housing of the camera. If the housing is damaged, there is a risk of electric shock!

DANGER!
If you notice smoke, unusual noises or smells with the product, disconnect the product directly from the power supply or switch the corresponding breaker off immediately. In this case the product should be checked immediately by a specialist.
4.1. Legal information on the use of surveillance cameras

IMPORTANT NOTES ON THE MONITORED AREA!
Do not use the camera in prohibited places or areas! This includes, for example, public buildings / squares or private areas of third parties. This also applies to areas that are used by a community (e.g. owner or tenant communities), especially entrance areas or access routes that are used by several people. The surveillance of third parties is not permitted without their respective express permission and may result in legal action.
Please follow the local regulations and laws in this regard!

IMPORTANT NOTE ON LABELLING AREAS WITH SURVEILLANCE!
All persons who are or could be affected by the video surveillance must be informed about the surveillance carried out!
To comply with this obligation it is sufficient to affix appropriate signs or stickers at the place of surveillance. Classical examples here are signs such as: "This area is under video surveillance!" or "Warning - Video surveillance!".
4.2. Choice of mounting location
i IMPORTANT!
When selecting the mounting location, make sure that the camera is within the range of the WLAN network used! In addition, the signal strength should also be sufficiently high to avoid any problems during subsequent use.
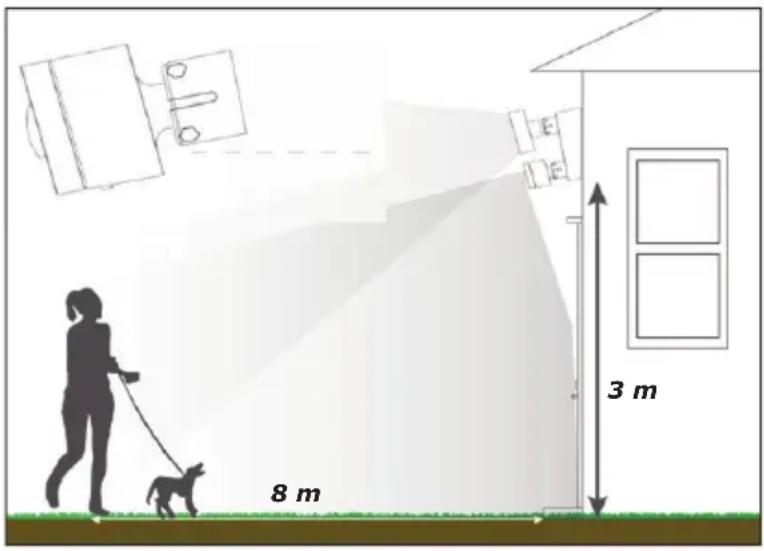
Optimal mounting height

TIP!
At a mounting height of 3 metres, the motion sensor should be set at an angle of 30^ to the ground to detect objects (higher than 90 cm) at a distance of up to 8 metres.
NOTES ON THE MOUNTING SITE
- This product has been specially developed for wall mounting and may only be installed on stable surfaces.
- The power supply may only be established via the electrical system of the building.
- Do not mount the product over a heat source (e.g. heater or oven) or close to other light sources.
- Before installing the product, check the suitability of the mounting site and also the mounting material. Ensure that no electrical, water, gas or other wires/pipes are present at the mounting site.
- Depending on your mounting site, additional mounting accessories may be required for installing the product.
- Do not hang any objects on the product. The housing is not designed to carry loads. This may damage the product.
- Do not cover the product!
i INFORMATION ON THE PROTECTION CLASS
This product is certified and protected according to IP65.
The first code digit indicates that the product is fully protected against contact and dust penetration. The second digit indicates that the product is protected against water jets from all directions.
What does this mean?
It means that products with this degree of protection can be installed in various places outdoors or in the garden. The protection against water jets from all directions implies that the product is protected against rain. The dustproof design also prevents insects from entering the inside of the camera and soiling or damaging it.
TIP!
However, we recommend that you choose a location where the product is protected from direct rain, wind and dirt to ensure long-term optimal use and image quality.
4.3. Mounting the camera

DANGER!
This product must be connected to the 230V mains supply and installed only by a qualified electrician! This product belongs to protection class I, i.e. the protective earth conductor must be connected to the camera.
Step 1
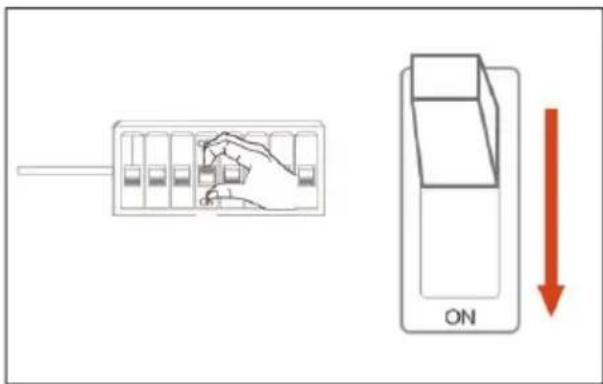
Deactivate the corresponding electric circuit. To do this, switch the corresponding circuit breaker off in the fuse box. (OFF position)

DANGER!
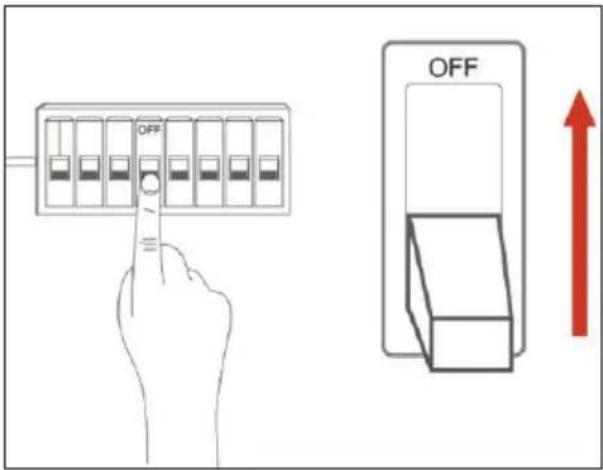
The electric circuit must be disconnected during installation!
Step 2
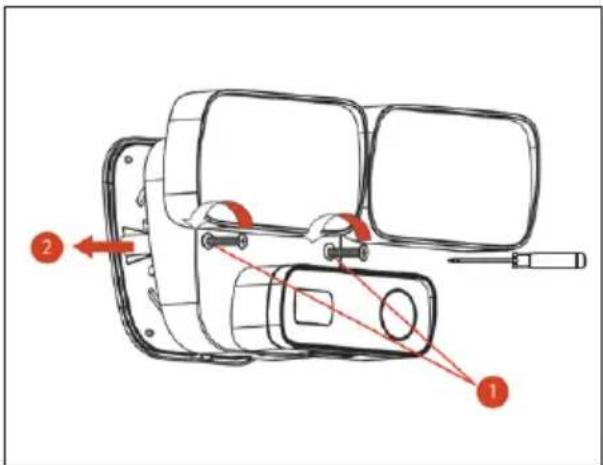
Remove the rear mounting plate of the camera.
- To do this, unscrew the screws (1) with a screwdriver.
- Remove the cover plate (2) on the back.
natural_image
Diagram of a square device with four circular components and red directional arrows indicating orientation (no text or symbols)Step 3
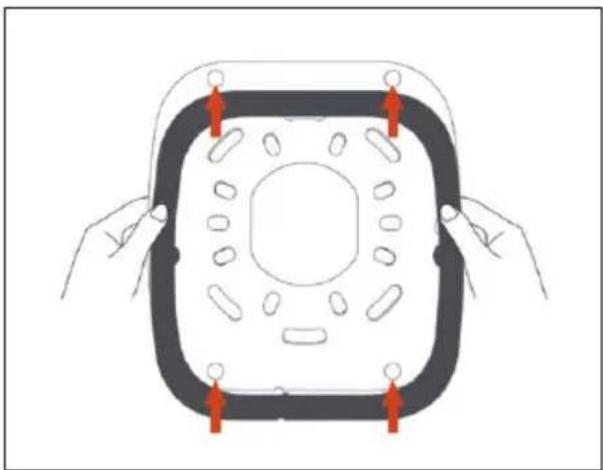
Fix the waterproof rubber seal on the back of the product by carefully pressing the corresponding lugs into the respective fixing holes (6 pieces).

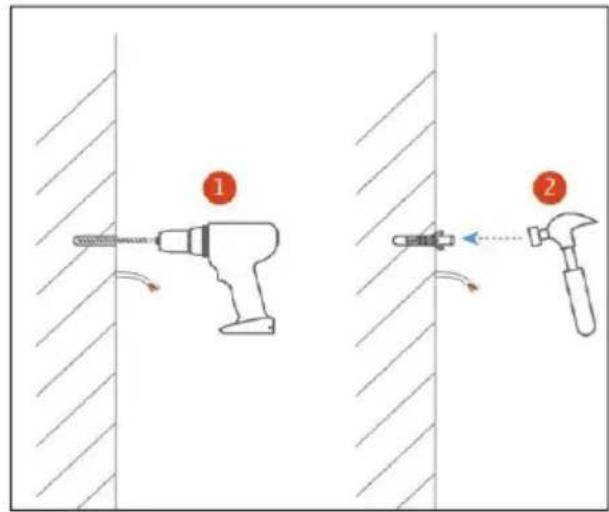
Step 4
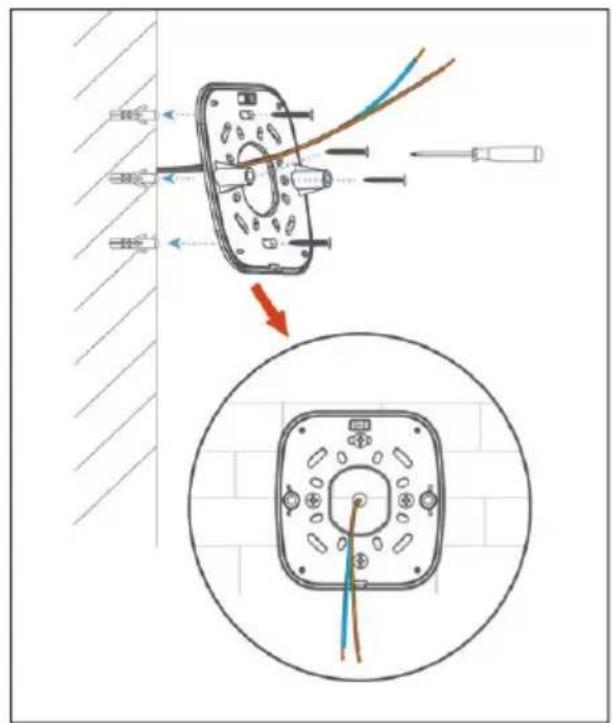
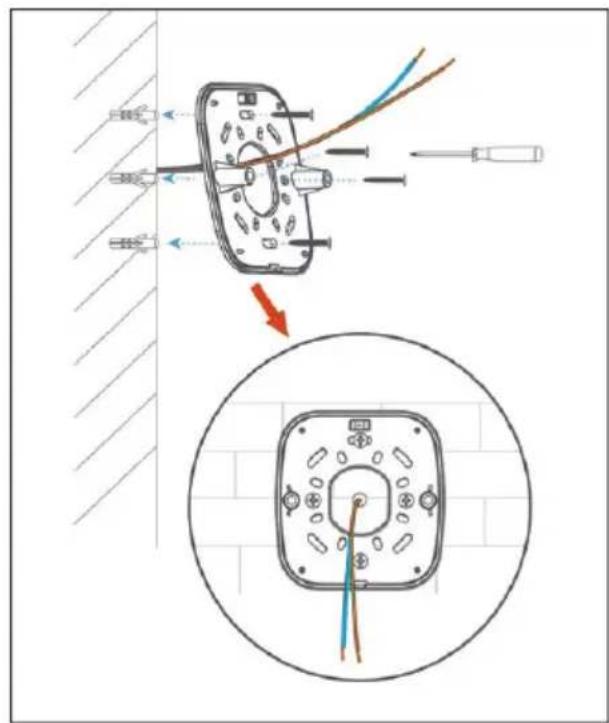
Take the mounting plate and choose the desired position on the wall.
Mark with a pencil the position of the holes to be drilled later.
Make sure that the mounting plate is horizontal.
A spirit level integrated into the top edge of the mounting plate helps you to check the level.

NOTE
For an optimal hold, we recommend to drill at least 4 holes for mounting the camera. Depending on the condition of the surface, more can be needed.
Step 5
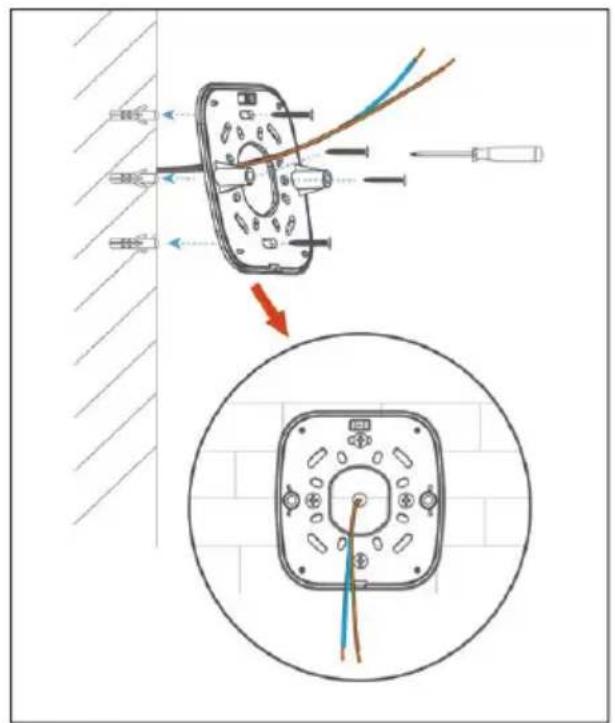
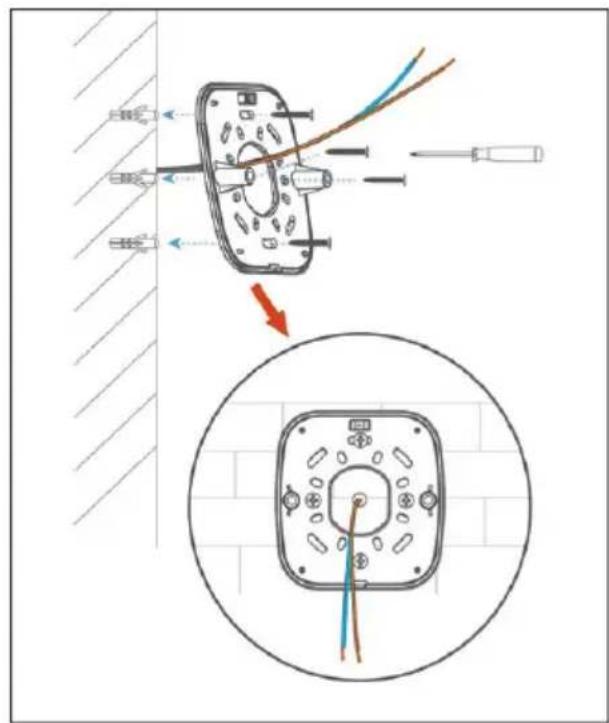
Drill the previously marked holes in the wall and then insert the plugs into the drilled holes.

WARNING!
Make sure that there are no electric wires or pipes in the wall at the points where you drill the holes.
Step 6
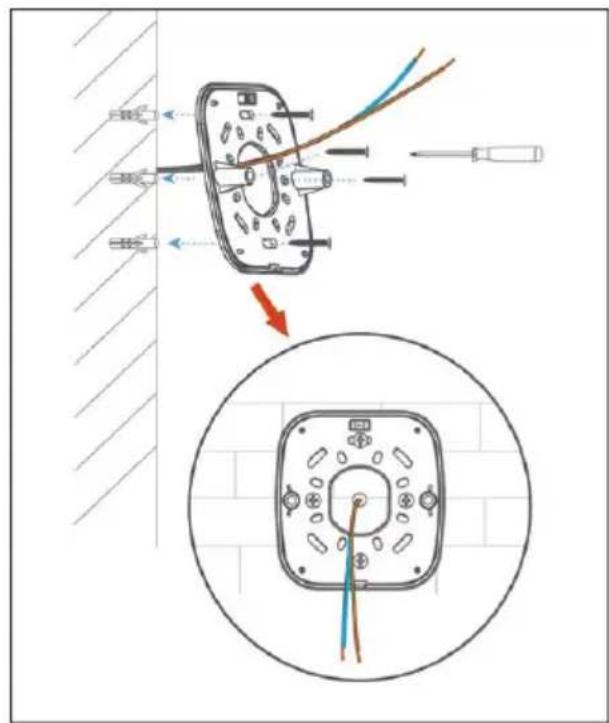
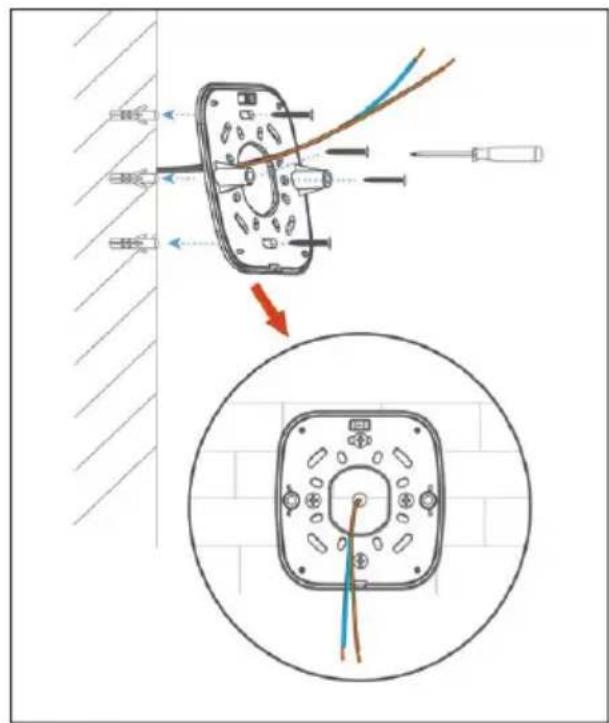
Carefully push all wires through the large central opening of the mounting plate.
Then tighten the screws to fix the mounting plate to the wall.

NOTE
When tightening the screws, make sure that the top edge of the mounting plate is level.
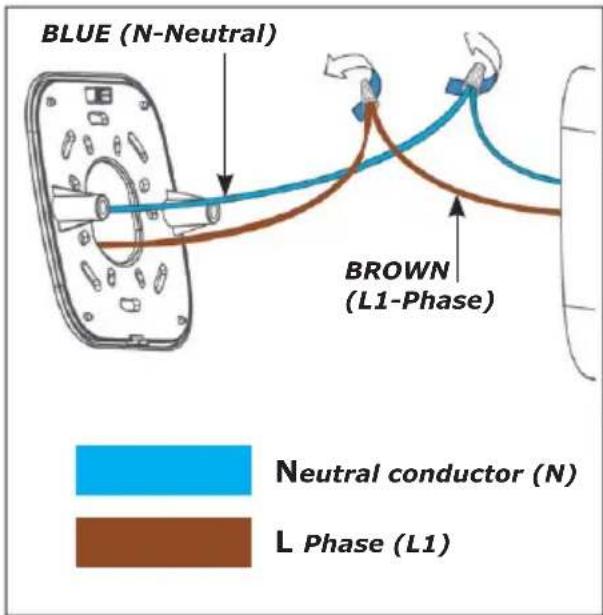
Step 7
Connect the respective cables using the terminals.

DANGER!
If you are unfamiliar with the electrical wiring or have any doubts about the connection, please contact an electrician to connect the product.

IMPORTANT:
When wiring, make sure that the primary side is sufficiently separated from the secondary side.
natural_image
Technical line drawing of a device with labeled components and red arrows indicating directional indicators (no text or symbols present)Step 8
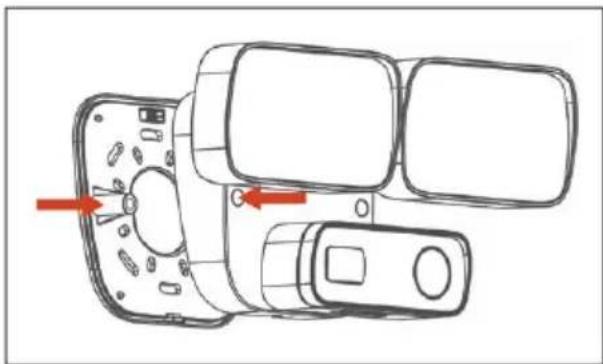
Carefully put the camera back onto the mounting plate. Use two bars on the left and right side of the mounting plate serve as guides.
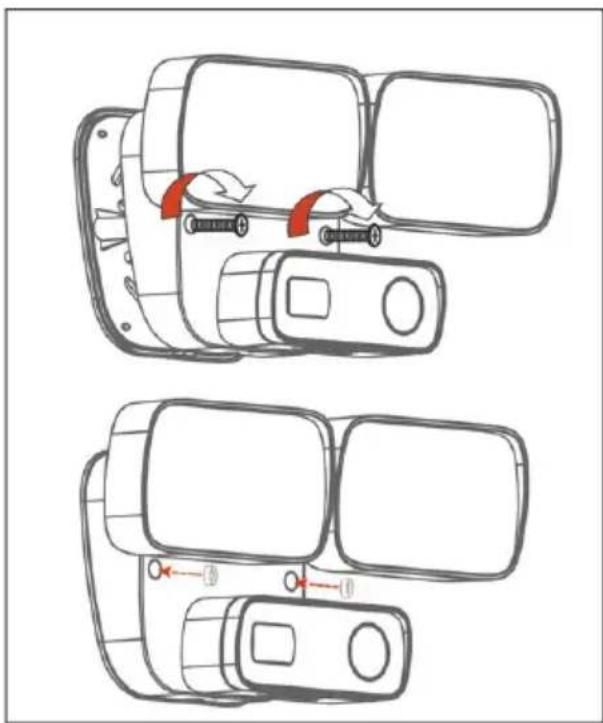
natural_image
Diagram showing two views of a vehicle's front-mounted device with red arrows indicating motion or change (no text or symbols present)Step 9
Tighten the two screws with a screwdriver and then place the waterproof rubber covers on the two screw holes.
natural_image
Technical line drawing of a mechanical assembly with two views showing internal components and directional arrows (no text or symbols)Step 10
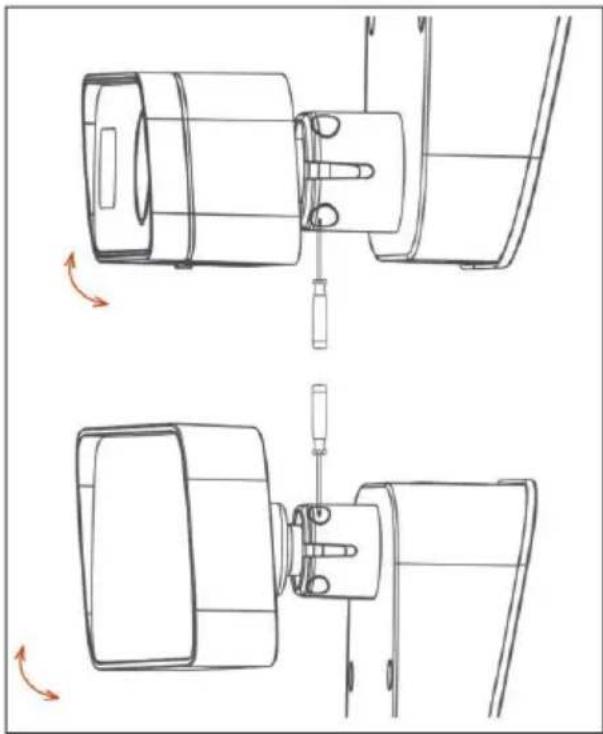
The tilt angles of both the floodlight and the camera unit can be adjusted.
To do this, carefully loosen the screws shown on the picture and position the units as you wish.
Then tighten both screws again.

IMPORTANT!
Tighten the screws for angle adjustment only slightly! Do not attempt to remove the units from the ball heads.
Step 11
Now that the camera has been successfully mounted, you can reset the breaker or reactivate the corresponding electric circuit. (ON position)
natural_image
Line drawing of a handheld device with a hand holding a remote control (no text or symbols)Step 12
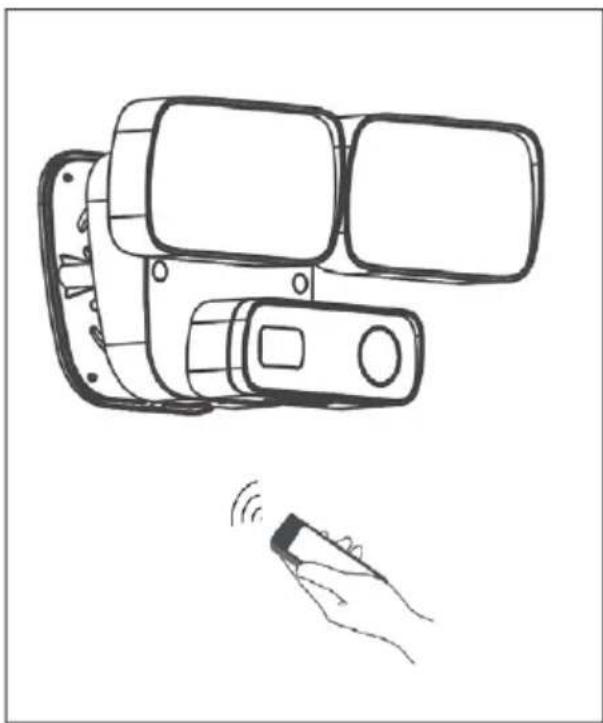
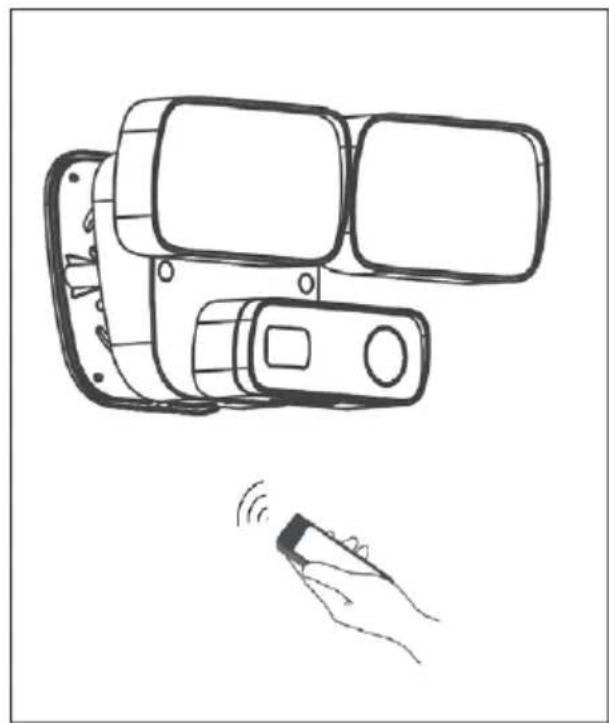
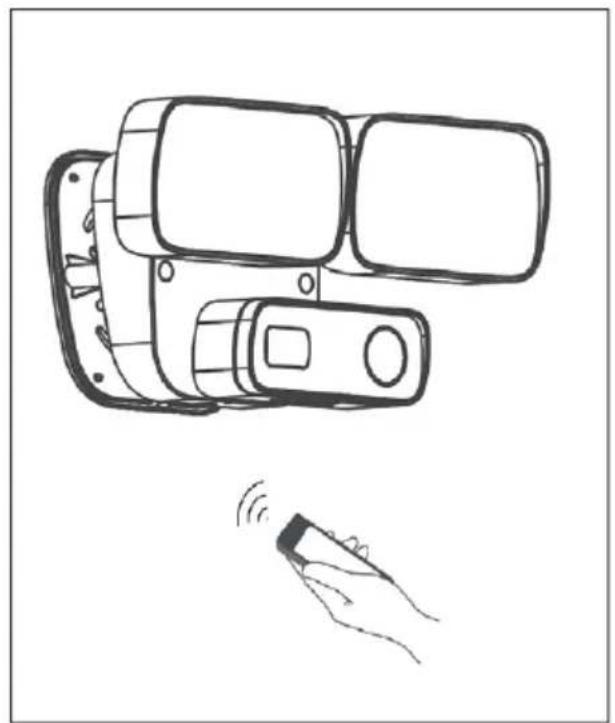
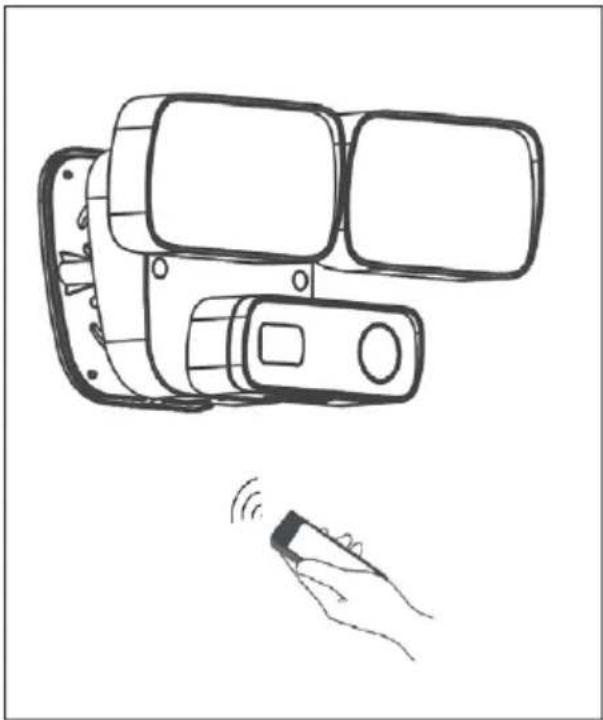
Now the camera can be added to the app for later control.
4.4. Download the "IOTLiving" app

natural_image
Blue square icon with concentric circular design and a red curved shape at center (no text or symbols)IOTLiving
For setup and later use, please download the free "IOTLiving" app from the App Store.
This app is available for devices with Apple ^® iOS as well as devices with an Android operating system.
Minimum requirement:
- Apple ^ iOS 10.0 or higher
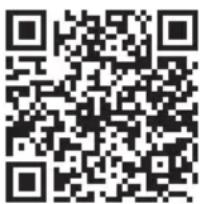
Download link to the APP Apple® App Store
- Android 4.4 or higher
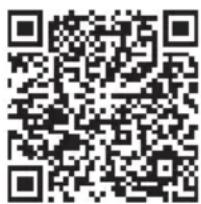
Download link to the APP Google Play Store
4.5. Setting up the camera
To set up the camera, open the "iOTLiving" app on your device.
The app used is intuitively designed and in addition to this quick start guide, it guides the user through the process of adding/learning. As the app is constantly being developed further, there may be slight changes to the process described here or slight differences in the images.
NOTE
Make sure that your device (smartphone or tablet) is in the same Home Network (WLAN) during setup.
NOTE
The camera works exclusively in a 2.4 GHz network!
NOTE INSTALLATION OF SEVERAL CAMERAS
Do not try to set up several cameras at the same time! Each WLAN camera must be set up separately! Do not add more than one camera per search run.
Sequence of operations
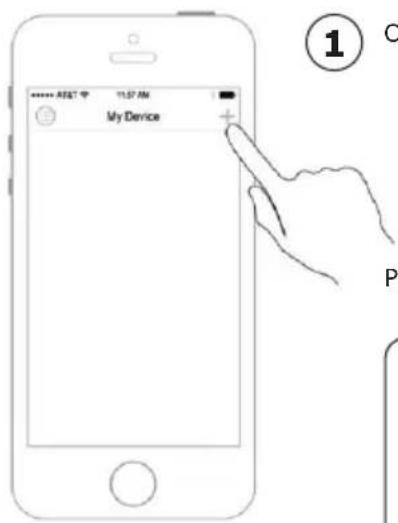
1
Open the "IOTLiving" app on your device.
Press "+" in the upper right corner
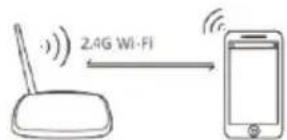
i
Make sure that your smartphone is connected to the 2.4 Ghz network.
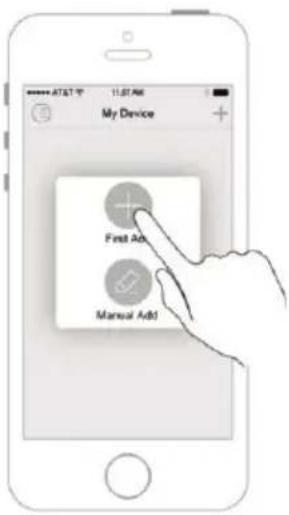
2
Press "+" again or press "Add" and then select the appropriate model from the list.
The app will now show you additional warnings, please pay attention to them!
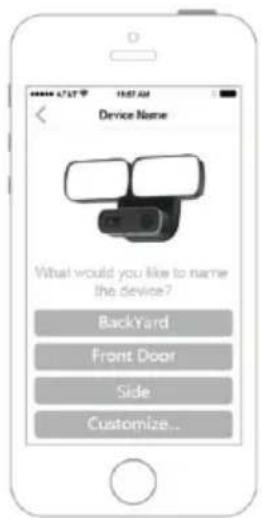
3
Select a name for the camera. Some names have been predefined based on possible locations, but you can also define a name yourself.
Follow then the instructions of the app.
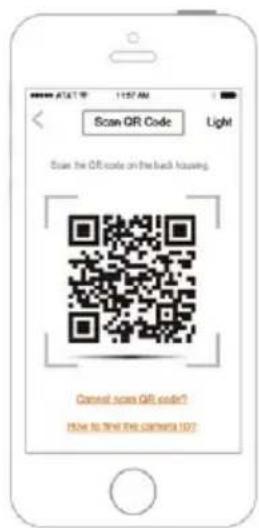
4
Scan the QR Code of the camera with your smartphone or tablet.
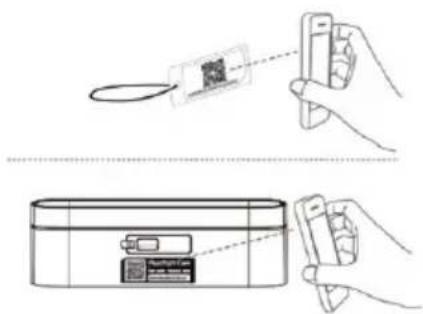
Option 1
Option 2
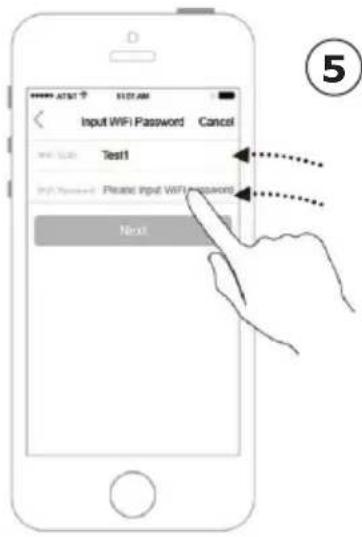
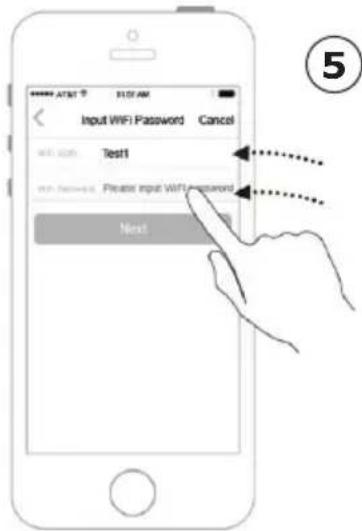
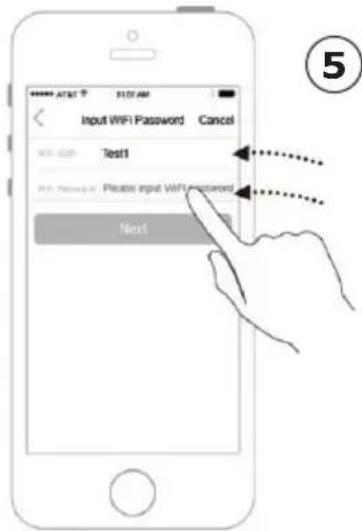
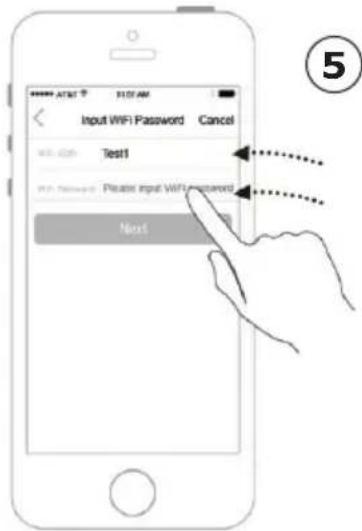
Now enter the WLAN name and WLAN password of your home network and press next.

NOTE
You may found it a bit difficult if your password contains special characters or e.g. Chinese, Arabic or Cyrillic letters.
6
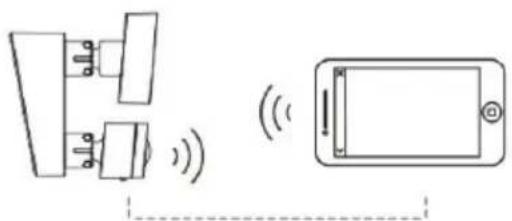
Make sure that your mobile device is within 3 meters of the camera.

NOTE
Make sure that the volume of your smartphone / tablet is turned on at the highest possible level.
A melody is played while in connection mode. (Communication between the camera and the smartphone / tablet)
natural_image
Diagram showing two devices with wireless signals, one with a rectangular panel and the other a smartphone with a screen (no text or symbols)max. 3m
7
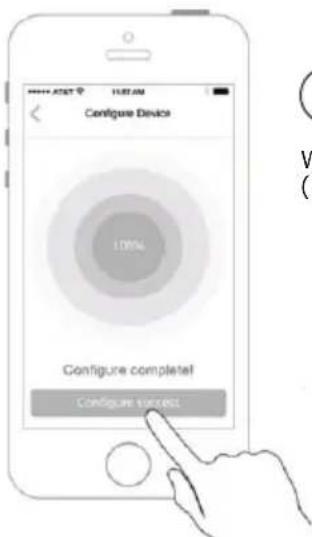
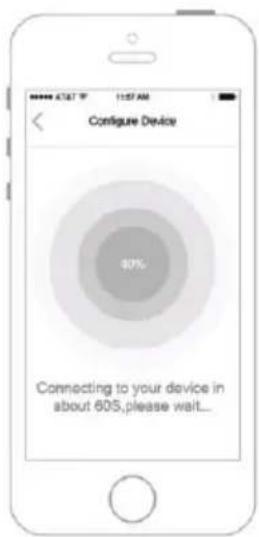
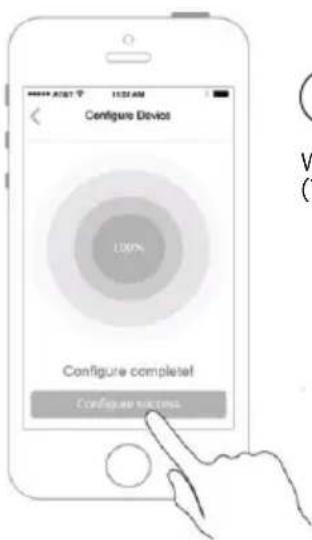
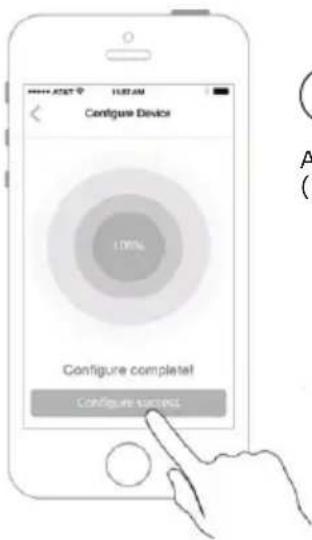
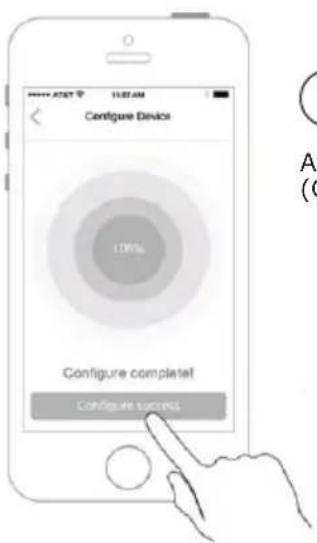
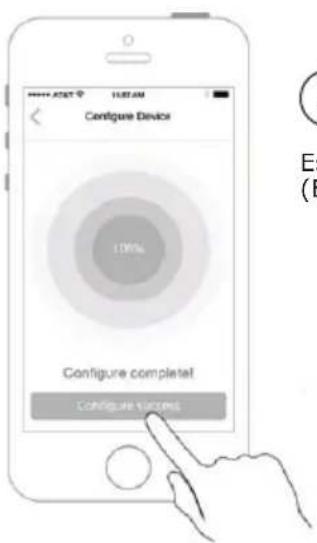
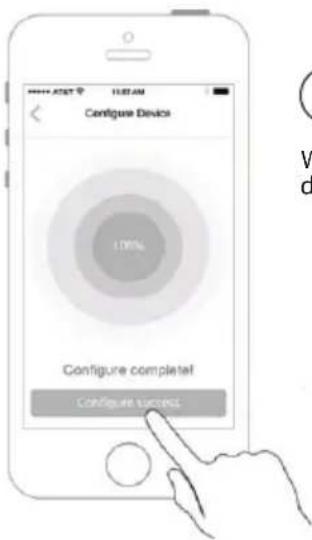
Wait until configuration is complete. (This can take up to 60 seconds).
The camera should now be successfully added.
4.6. Troubleshooting / Factory Settings
natural_image
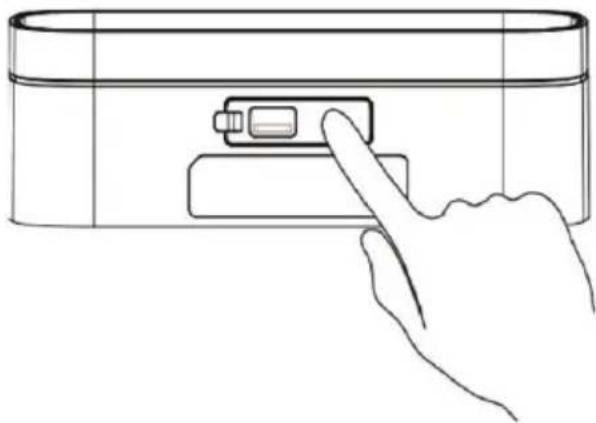
Line drawing of a hand interacting with a battery (no text or symbols)If the configuration has failed, proceed as follows: Press and hold the "RESET" button for 5 seconds and wait until the unit is reset to factory defaults. Perform the learning mode again.
NOTE
• Make sure the correct password is entered.
- Make sure that the distance between the device and the WLAN router does not exceed 5 m.
- Make sure that your smartphone / tablet is in the correct WLAN network.
4.7. Basic functions
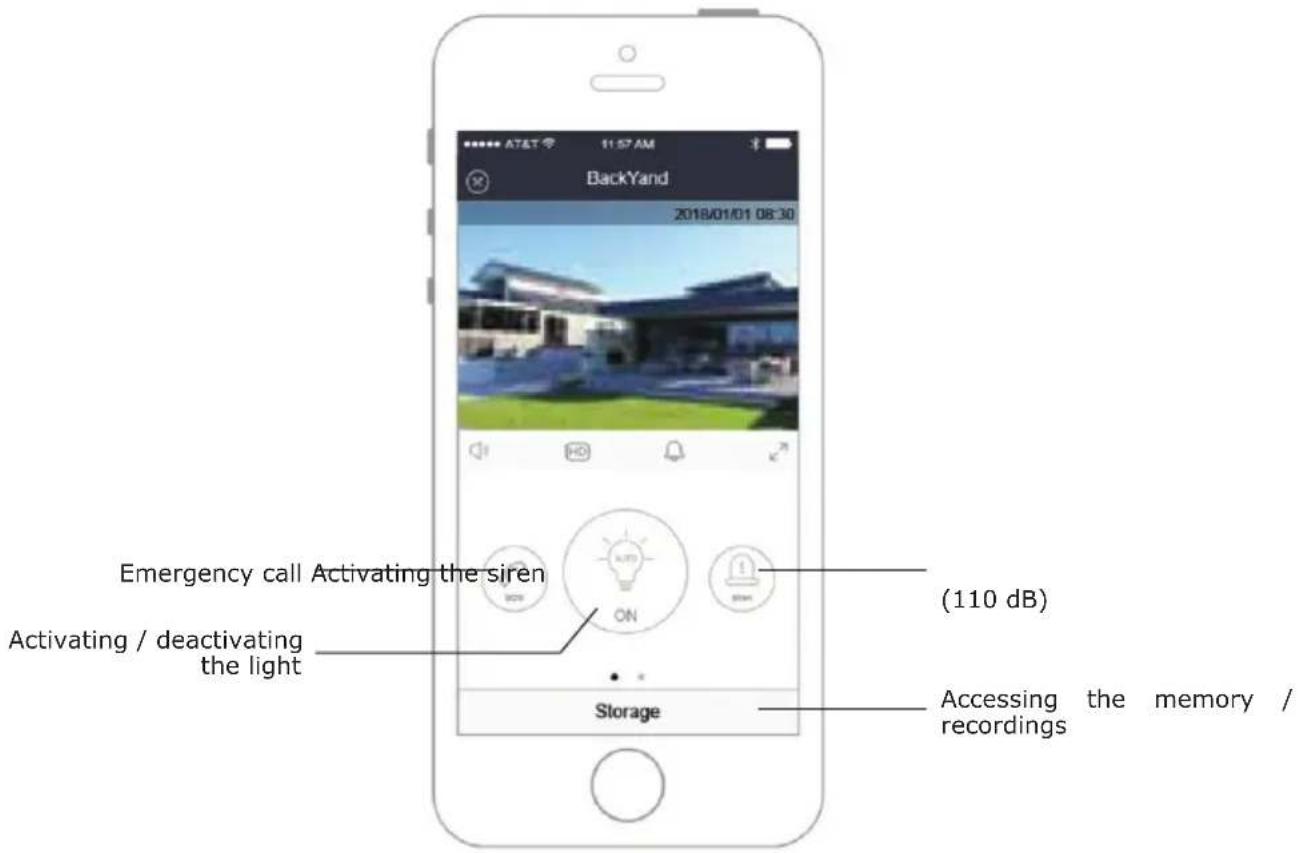
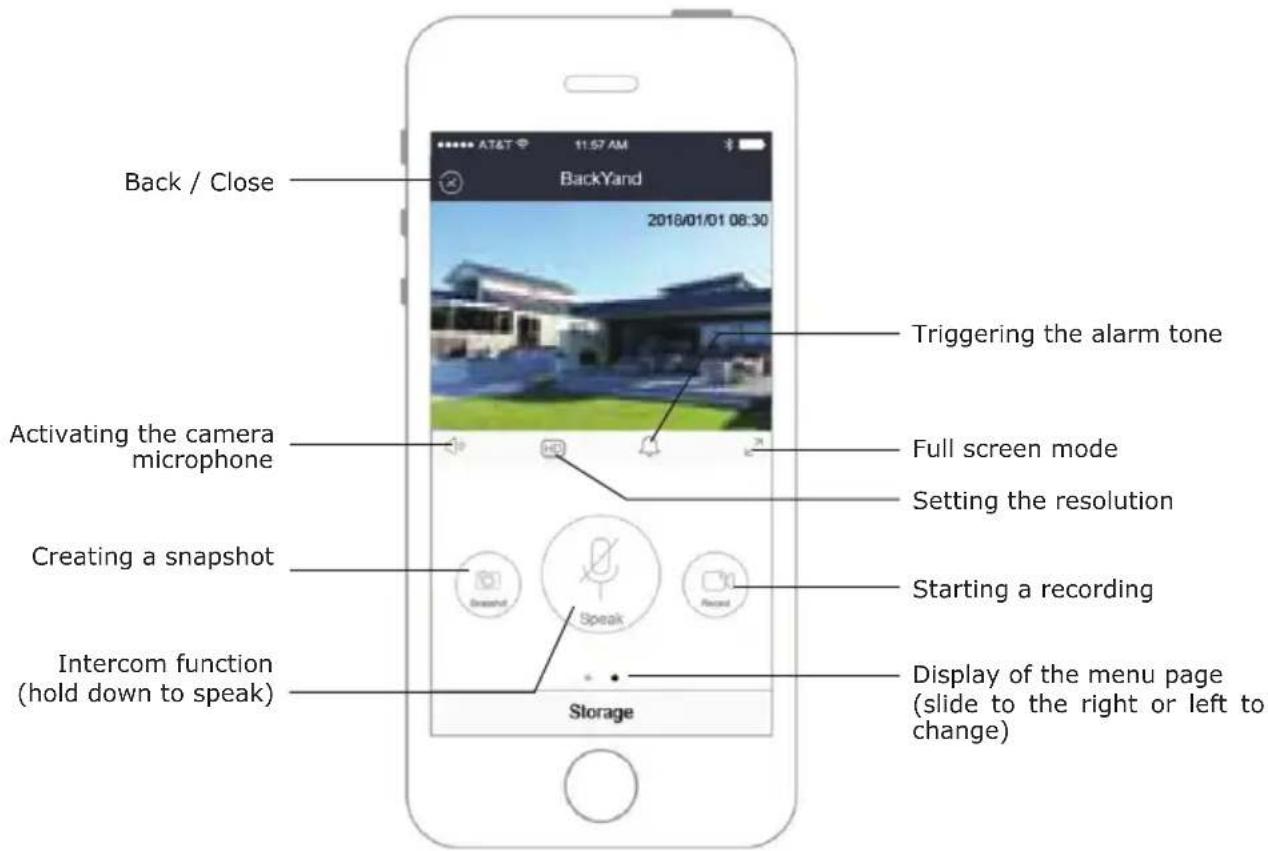
4.8. Memory card
The camera has a Micro SD card slot, which is used for direct recording onto a memory card. The camera supports memory cards of up to 64 GB.
Control and recall of recordings are done via the app.
5. TECHNICAL DATA
| General | |
| Model description LED300 513 | |
| Housing material Metal / plastic | |
| Protection Degree IP65 | |
| Operating Voltage 110 - 240 V 50/60 Hz | ~ |
| Power consumption (total) 26.0 W (max.) | |
| Power consumption (without LED) 3.0 W (max.) | |
| Ambient temperature -28% to +65° | |
| Ambient humidity ≤ 95% | |
| WLAN frequency band 2.4 Ghz (2400 - 2483,5 MHz) | |
| WLAN transmission power < 100 mW | |
| WLAN standard 802.11 b/g/n | |
| Alarm volume max. 110 dB | |
| App name IOTLiving | |
| App Compatibility iOS 10.0 (or higher) / Android 4.4 (or higher) | |
| Floodlight | |
| Illuminants 2x 12W LEDs | |
| Lumen | 1800 lm (900 lm per light) |
| Luminosity adjustable (in the app) | |
| Colour temperature | 5000 K |
| Service life (illuminants) | approx. 20,000 hours |
| Camera | |
| Resolution | Full HD (max. 1920*1080p) |
| Modes | Normal, infrared |
| Memory card | Max. 64 GB |
| PIR sensor detection angle | 120° |
| Camera detection angle | 120° |
| Coverage range | 8 - 12 m |
6. CLEANING

DANGER!
During cleaning, the electric circuit must be disconnected! Otherwise there is a danger of electric shock! Ensure that no liquids get into the product while you are cleaning it. The use of solvent-containing or aggressive cleaning agents as well as alcohol or thinners is prohibited as it could damage the coating or the surface of the product. You should therefore clean the product with a lint-free, ever so slightly damp soft cloth only.
For cleaning do not use hard brushes or sponges which could scratch the surface!

NOTE LED
This product is maintenance free, and the illuminants are not replaceable.
7. DISPOSAL
The product is delivered in packaging made of recyclable materials to protect against damage during transport. Sort and dispose of these materials in the designated containers. Ask your local disposal company or local council about how to dispose of the product in an environmentally correct way.
Do not dispose of batteries or electric and electronic devices in the normal household waste. The consumer is legally obliged to return electrical and electronic devices, and batteries that are at the end of their useful life to the point of sale or public collection points that have been set up for this purpose. The details are regulated by the respective national law. The symbol on the product, user guide or the packaging indicates this legal requirement.
8. LEGAL NOTES
Disclaimer
Schwaiger GmbH does not accept any liability or warranty for damages that are sustained due to improper installation or mounting, improper use of the product or non-compliance with the safety instructions.
Manufacturer's information
Please contact our Technical Support if you need technical advice and your retailer is unable to help you. Our technical support is available in English or German.
Simplified declaration of conformity as per the RED Directive
Schwaiger GmbH hereby declares that the described radio system product complies with Directive 2014/53/EU and other directives applicable to the product. The complete EU declaration of conformity is available online at: http://konform.schwaiger.de
Legal notes
Apple ^® , iPhone ^® and iPad ^® are trademarks, App Store is a service mark of Apple Inc. registered in the U.S. and other countries.
Google ^® and Android ^® are trademarks of Google Inc.
Other names or designations mentioned may be trademarks or registered trademarks of their respective owners.
License Statement / GPL Code Statement
This product contains software code developed by third parties, including software code under the GNU General Public License Version 2 ("GPLv2").
For the complete statement, go to:
Étape 2
natural_image
Diagram of a square device with four circular components and red directional arrows indicating movement or force (no text or symbols)Étape 3
Étape 4
natural_image
Technical line drawing of a mechanical device with red arrows indicating components (no text or symbols)Étape 8
Étape 9
natural_image
Technical line drawing of a mechanical assembly with two views showing internal components and directional arrows (no text or symbols)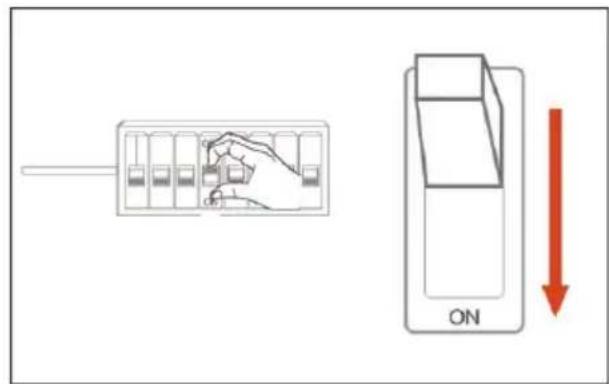
natural_image
Line drawing of a handheld device with a hand holding a remote control (no text or symbols)Étape 10
natural_image
Blue square icon with concentric circular design and a red-to-blue gradient swirl (no text or symbols)IOTLiving
3
4
Option 1
Option 2
5
6
natural_image
Diagram showing two devices with wireless signals, one with a switch and the other a smartphone (no text or symbols)max. 3 m
7
natural_image
Line drawing of a hand interacting with a battery (no text or symbols)Fase 2
natural_image
Diagram of a square device with four circular components and red directional arrows indicating movement or force (no text or symbols)Fase 3
Fase 4
Fase 7
natural_image
Technical line drawing of a mechanical device with red arrows indicating components (no text or symbols)Fase 8
natural_image
Diagram showing two identical car door lockers with red arrows indicating clockwise motion (no text or symbols)Fase 9
natural_image
Technical line drawing of a mechanical assembly with two views showing internal components and directional arrows (no text or symbols)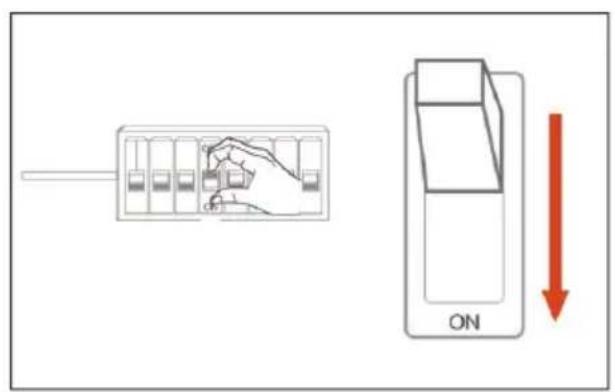
natural_image
Line drawing of a handheld device with a hand holding a remote control (no text or symbols)Fase 10
natural_image
Blue square icon with concentric circles and a red curved shape inside (no text or symbols)IOTLiving
3
4
Opzione 1
Opzione 2
6
natural_image
Diagram showing two devices with wireless signals, one with a switch and the other a smartphone (no text or symbols)max. 3 m

natural_image
Line drawing of a hand pressing a button on a cylindrical device (no text or symbols)Paso 2
natural_image
Diagram of a square device with four circular components and red directional arrows indicating movement or force (no text or symbols)Paso 3
Paso 4
natural_image
Technical line drawing of a device with labeled components and directional arrows (no text or symbols)Paso 8
natural_image
Diagram showing two identical car door lockers with red arrows indicating clockwise motion (no text or symbols)Paso 9
natural_image
Technical line drawing of a mechanical assembly with two views showing internal components and directional arrows (no text or symbols)Paso 10
Paso 11
natural_image
Line drawing of a handheld device with a hand holding a remote control (no text or symbols)Paso 12
natural_image
Blue square icon with concentric circular design and a red curved shape inside (no text or symbols)IOTLiving
3
4
5
6
natural_image
Diagram showing two devices with wireless signals, one with a switch and the other a smartphone (no text or symbols)max. 3 m
7
natural_image
Line drawing of a hand pressing a button on a cylindrical device (no text or symbols)Stap 2
natural_image
Diagram of a square device with four circular components and red directional arrows indicating movement or force (no text or symbols)Stap 3
Stap 4
natural_image
Technical line drawing of a handheld device with control panel and buttons (no text or symbols)Stap 8
natural_image
Diagram showing two views of a device with red arrows indicating motion or movement, no text or symbols present.Stap 9
natural_image
Technical line drawing of a mechanical assembly with two views showing internal components and directional arrows (no text or symbols)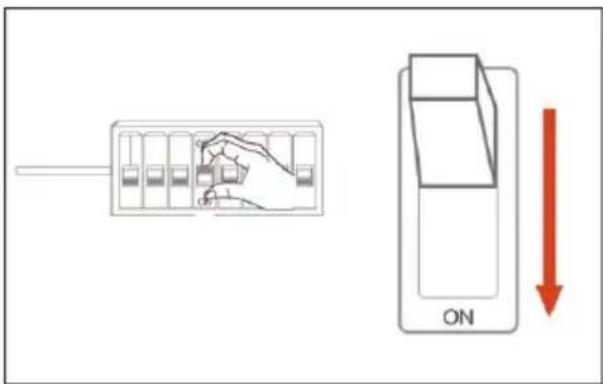
natural_image
Line drawing of a handheld device with a hand holding a remote control (no text or symbols)Stap 10
natural_image
Blue square icon with concentric circular design and a red curved shape inside (no text or symbols)IOTLiving
① Open de app „IOTLiving“ op uw apparaat.
3
4
5
6
natural_image
Diagram showing two devices with wireless signals, one with a switch and the other a smartphone (no text or symbols)max. 3 m
7
natural_image
Line drawing of a hand pressing a button on a cylindrical device (no text or symbols)natural_image
Exterior view of a black and white smart security camera with dual lenses (no text or symbols visible)
All technical data and illustrations are subject to errors, deviations & modifications.
- GB USER GUIDE AND SAFETY INSTRUCTIONS
- MODE D'EMPLOI ET CONSIGNES DE SÉCURITÉ
- GUIDA PER L'UTENTE E AVVERTENZE DI SICUREZZA
- INHALTSVERZEICHNIS
- Einleitung
- Schritt 2
- Schritt 3
- Schritt 4
- Schritt 7
- Schritt 8
- Schritt 9
- Schritt 10
- Schritt 11
- Schritt 12
- 3
- 4
- 5
- 6
- 7
- INTENDED USE
- PACKAGE CONTENT
- GENERAL SAFETY & WARNING INSTRUCTIONS!
- DANGER!
- Legal information on the use of surveillance cameras
- IMPORTANT NOTES ON THE MONITORED AREA!
- IMPORTANT NOTE ON LABELLING AREAS WITH SURVEILLANCE!
- Choice of mounting location
- i IMPORTANT!
- Optimal mounting height
- TIP!
- NOTES ON THE MOUNTING SITE
- i INFORMATION ON THE PROTECTION CLASS
- What does this mean?
- Mounting the camera
- Step 1
- Step 2
- Step 3
- Step 4
- NOTE
- Step 5
- WARNING!
- Step 6
- Step 7
- IMPORTANT:
- Step 8
- Step 9
- Step 10
- IMPORTANT!
- Step 11
- Step 12
- Download the "IOTLiving" app
- Minimum requirement:
- Setting up the camera
- NOTE INSTALLATION OF SEVERAL CAMERAS
- Sequence of operations
- 1
- i
- 2
- Troubleshooting / Factory Settings
- Basic functions
- Memory card
- TECHNICAL DATA
- CLEANING
- NOTE LED
- DISPOSAL
- LEGAL NOTES
- Disclaimer
- Manufacturer's information
- Simplified declaration of conformity as per the RED Directive
- Legal notes
- License Statement / GPL Code Statement
- Étape 2
- Étape 3
- Étape 4
- Étape 10
- Fase 2
- Fase 3
- Fase 4
- Fase 10
- Paso 2
- Paso 3
- Paso 4
- Paso 8
- Paso 9
- Paso 10
- Paso 11
- Paso 12
- Stap 2
- Stap 3
- Stap 4
- Stap 8
- Stap 9
- Stap 10
Brand : Schwaiger
Model : LED300
Category : Surveillance Camera