
AF140EU - Deep fryer NINJA - Free user manual and instructions
Find the device manual for free AF140EU NINJA in PDF.

| Product type | Hot air fryer |
| Brand | Ninja |
| Model | AF140EU |
| Supply voltage | 220-240 V ~ 50/60 Hz |
| Power | 1750 W |
| Temperature range | 60 °C to 210 °C |
| Cooking functions | Air Fry, Roast, Reheat, Dehydrate |
| Display | Digital screen with temperature and time settings |
| Removable basket | Yes |
| Cooking grid | Included |
| Cleaning basket and grid | Dishwasher safe |
| Main unit maintenance | Wipe with a damp cloth, do not immerse |
| Safety: auto-off | When basket is removed |
| Safety: overheating protection | Yes (unplug in case of black smoke) |
| Warranty | 2 years (legal and commercial warranty) |
| Intended use | Household use only |
| Required ventilation space | 15 cm above and on the sides |
| Optional accessories | Tier rack (sold separately) |
| Product registration | Via QR code or website |
Frequently Asked Questions - AF140EU NINJA
User questions about AF140EU NINJA
0 question about this device. Answer the ones you know or ask your own.
Ask a new question about this device
Download the instructions for your Deep fryer in PDF format for free! Find your manual AF140EU - NINJA and take your electronic device back in hand. On this page are published all the documents necessary for the use of your device. AF140EU by NINJA.
USER MANUAL AF140EU NINJA
ninjakitchen.eu/register-guarantee
Read all the instructions before using your Ninja Air Fryer.
natural_image
Illustration of a hand pressing down on a square container with a mesh pattern (no text or symbols)2 TrykpaROAST-kneppen. Standardtemperaturen vises. Brug piene op og ned for at justere temperaturen til det, du onsker.
natural_image
Line drawing of hands using a griddle to cut food items from a net (no text or symbols)SÅDAN BRUGER DU KOGEFUNKTIONERNE
REHEAT (Genopvarm)
BEMAERK: Temperaturen er forudindstiliet tll 170 °C.
natural_image
Illustration of a hand pressing down on a square plate with a downward arrow (no text or symbols)2 TrykpaREHEAT-knappen. Standardtemperaturen vises. Brug pilene op og ned for at justere temperaturen til det, du onsker.
3 Klik på TID op- og nedpilene for at indstille opvarmningstid
natural_image
Line drawing of two hands handling a tray with food items, one holding a tool and the other handling a package (no text or symbols)DEHYDRATE (Dehydrering)
BEMAERK: Temperaturen er forudindstillet til 60 °C.
1 Lag det første lag ingredienser i bunden af panden. Sat derefter risten ned i panden, og lag det neste lag ingredienser på den.

ninjakitchen.eu/register-guarantee

natural_image
Illustration of a hand pressing down on a grid-patterned plate into a square container (no text or symbols)natural_image
Illustration of two hands using a tool to cut or press a piece of wood or paper (no text or symbols present)natural_image
Illustration of a hand pressing down on a square container with a grid pattern (no text or symbols)natural_image
Line drawing of a hand using a tool to cut wood or wood shavings into a box, with another hand holding a tool (no text or symbols present)DEHYDRATE (Dörren)
for purchasing the Ninja® Air Fryer CONTENTS

REGISTER YOUR PURCHASE

ninjakitchen.eu/register-guarantee

n QR code using mobile device
RECORD THIS INFORMATION
Model Number: ____
Serial Number: ____
Date of Purchase:
(Keep receipt)
Store of Purchase: ____
TECHNICAL SPECIFICATIONS
Voltage: 220-240V-, 50-60Hz
Watts: 1750W
TIP: You can find the model and serial numbers on the QR code label located on the back of the unit by the power cord.

This marking indicates this product should not be disposed of with other household wastes throughout the EU. To prevent possible harm to the environment or human
health from uncontrolled waste disposal, recycle it responsibly to promote the sustainable reuse of material sources. To return your used device, please use the return and collection systems or contact the retailer where this product was purchased. They can take this product for environmentally safe recycling.
Important Safeguards 31
Parts & Accessories 33
Getting to Know Your Air Fryer 34
Function Buttons 34
Operating Buttons 34
Before First Use....34
Using the Cooking Functions .... 35
Air Fry 35 Roast 36 Reheat 37 Dehydrate 38
Cleaning & Maintenance 39
Cleaning Your Air Fryer 39
Helpful Tips 39
Troubleshooting Guide 40
Product Registration 41
IMPORTANT SAFEGUARDS HOUSEHOLD USE ONLY
Read all instructions before using your Ninja ^® Air Fryer.
When using electrical appliance, basic safety precautions should always be followed, including the following:
⚠️WARNINGS
1 This appliance can be used by persons with reduced physical, sensory or mental capabilities or lack of experience and knowledge if they have been given supervision or instruction concerning use of the appliance in a safe way and understand the hazards involved.
2 Keep the appliance and its cord out of reach of children. DO NOT allow the appliance to be used by children. Close supervision is necessary when used near children
3 To eliminate a choking hazard for young children, remove and discard the protective cover fitted on the power plug of this appliance.
4 Children shall not play with the appliance.
5 To prevent fire, DO NOT place appliance on or near a gas or electric stovetop, or in a heated oven
6 NEVER use electrical socket below counter.
7 NEVER connect this appliance to an external timer switch or separate remote-control system.
8 DO NOT use an extension cord. A short power-supply cord is used to reduce the risk of children less than 8 years grabbing the cord or becoming entangled and to reduce the risk of people tripping over a longer cord.
9 To protect against electrical shock DO NOT immerse cord, plugs, or main unit housing in water or other liquid. Cook only in the drawer provided.
10 Regularly inspect the appliance and power cord. DO NOT use the appliance if there is damage to the power cord or plug. If the appliance malfunctions or has been damaged in
any way, immediately stop use and call Customer Service.
11 ALWAYS ensure the appliance is properly assembled before use.
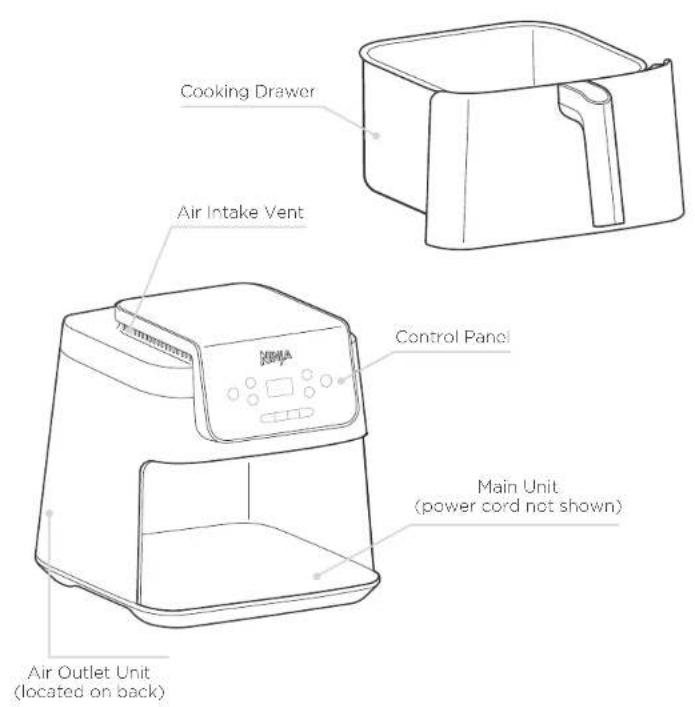
12 DO NOT cover the air intake vent or air socket vent while unit is operating. Doing so will prevent even cooking and may damage the unit or cause it to overheat.
13 Before placing removable drawer into the main unit, ensure drawer and unit are clean and dry by wiping with a soft cloth.
14 This appliance is for household use only. DO NOT use this appliance for anything other than its intended use. DO NOT use in moving vehicles or boats. DO NOT use outdoors. Misuse may cause injury.
15 Intended for worktop use only. Ensure the surface is level, clean and dry. DO NOT move the appliance when in use.
16 DO NOT place the appliance near the edge of a worktop during operation.
17 DO NOT use accessory attachments not recommended or sold by SharkNinja. Do not place accessories in a microwave, toaster oven, convection oven, or conventional oven or on a ceramic cooktop, electric coil, gas burner range, or outdoor grill. The use of accessory attachments not recommended by SharkNinja may cause fire, electric shock, or injuries.
18 When using this appliance, provide at least 6 inches (15 cm) of space above and on all sides for adequate air circulation.
19 ALWAYS ensure drawer is properly closed before operating.
20
SAVE THESE INSTRUCTIONS
21 DO NOT use the appliance without the removable cooking drawer installed.
22 DO NOT use this appliance for deep-frying.
23 Prevent food contact with heating elements. DO NOT overfill when cooking. Overfilling may cause personal injury or property damage or affect the safe use of the appliance.
24 Socket voltages can vary, affecting the performance of your product. To prevent possible illness, use a thermometer to check that your food is cooked to the temperatures recommended.
25 Should the unit emit black smoke, unplug immediately. Wait for smoking to stop before removing any cooking accessories.
26 DO NOT touch hot surfaces. Appliance surfaces are hot during and after operation. To prevent burns or personal injury, ALWAYS use protective hot pads or insulated oven mitts and use available handles.
27 Extreme caution must be used when the appliance contains hot food. Improper use may result in personal injury.
28 Spilled food can cause serious burns. Keep appliance and cord away from children. DO NOT let cord hang over edges of tables or counters or touch hot surfaces.
29 The drawer and crisper plate become extremely hot during the cooking process. Avoid physical contact while removing the drawer or plate from the appliance. ALWAYS place drawer or plate on a heat-resistant surface after removing. DO NOT touch accessories during or immediately after cooking.
30 Cleaning and user maintenance shall not be made by children.
31 Unplug from socket when not in use and before cleaning. Allow to cool before cleaning, disassembly, putting in or taking off parts and storage.
32 DO NOT clean with metal scouring pads. Pieces can break off the pad and touch electrical parts, creating the risk of electric shock.
33 Please refer to the Cleaning & Maintenance section for regular maintenance of the appliance.

Indicates to read and review instructions to understand operation and use of product.

Indicates the presence of a hazard that can cause personal injury, death or substantial property damage if the warning included with this symbol is ignored.

Take care to avoid contact with hot surface. Always use hand protection to avoid burns.

For indoor and household use only.
To order additional parts and accessories, visit ninjakitchen.eu.
GETTING TO KNOW YOUR AIR FRYERPARTS & ACC
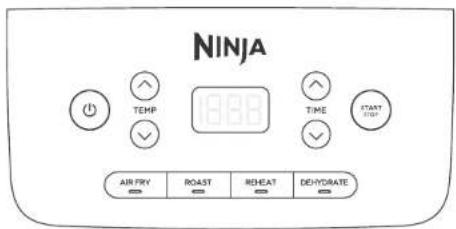
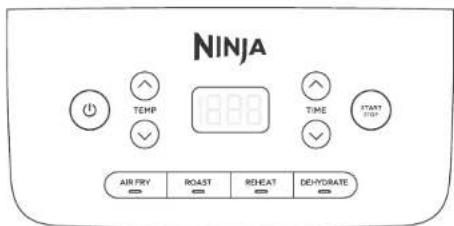
When setting time, the digital display shows HH:MM.
FUNCTION BUTTONS
AIR FRY: Use this function to give your food crispiness and crunch with little to no oil.
ROAST: Use the unit as a roaster oven for tender meats, vegetables and more.
REHEAT: Revive leftovers by gently warming them, leaving you with crispy results.
DEHYDRATE: Dehydrate meats, fruits, and vegetables for healthy snacks.
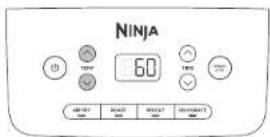
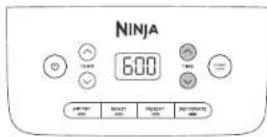
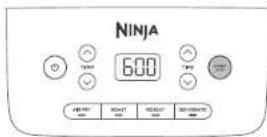
OPERATING BUTTONS
TEMP arrows: Use the up and down TEMP arrows to adjust the cook temperature for any function before or during cooking.
TIME arrows: Use the up ▲ and down ▲ TIME arrows to adjust the cook time in any function before or during cooking.
START/STOP button: After selecting the time and temperature, start cooking by pressing the START/STOP button. You can stop cooking at any time by pressing the button again.
The Power button shuts off the unit and stops all cooking modes.
NOTE: After 10 minutes with no interaction with the control panel, the unit will enter standby mode. The Power button will be dimly lit.
BEFORE FIRST USE
1 Remove and discard all packaging material, promotional labels, and tape from the unit.
2 Remove all accessories from the package and read this manual carefully. Please pay particular attention to operational instructions, warnings, and important safeguards to avoid any injury or property damage.
3 Wash the pan and crisper plate in hot, soapy water, then rinse and dry thoroughly. The pan and crisper plate are also dishwasher safe. NEVER clean the main unit in the dishwasher.
4 When using this appliance, provide at least 6 inches (15 cm) of space above and on all sides for adequate air circulation.
USING THE COOKING FUNCTIONS
To turn on the unit, first plug the power cord into a wall socket. Press the power button ⓞ.
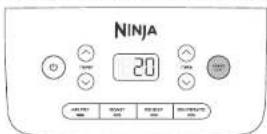
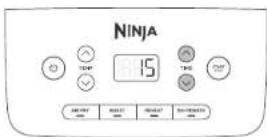
AIR FRY
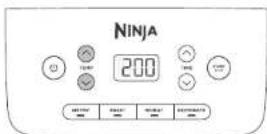
NOTE: The temperature is preset to 200°C.
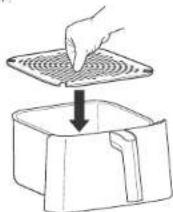
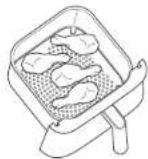
1 Ensure the crisper plate is in the drawer.
2 PresstheAIR FRY button. The default temperature setting will display. Use the TEMP up and down arrow buttons to set your desired temperature.
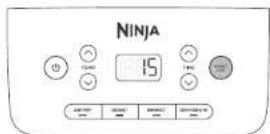
3 PresstheTIME up and down arrow buttons to set your desired cook time.
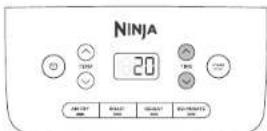
4 Add ingredients to the drawer. Insert the drawer in the unit.
5 Press START/STOP to begin cooking.
NOTE: To toss the ingredients during cooking, remove the drawer and shake back and forth. The unit will automatically pause when the drawer is removed. Reinsert the drawer and cooking will resume.
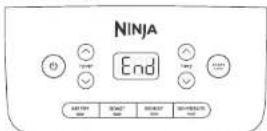
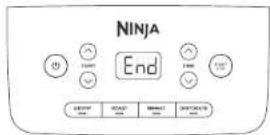
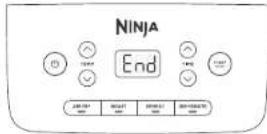
6 When cooking is complete, the unit will beep and END will appear on the control panel display.
7 Remove ingredients by tipping them out or by using oven gloves or silicone-tipped tongs/utensils.
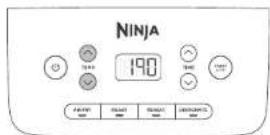
ROAST
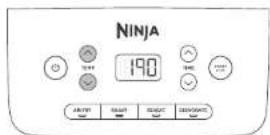
NOTE: The temperature is preset to 190°C.
1 Ensure the crisper plate is inserted into the lower position in the drawer, if needed.

natural_image
Illustration of a hand pressing down on a textured surface into a container (no text or symbols)2 Press the ROAST button. The default temperature setting will display. Press the TEMP up and down arrow buttons to set your desired temperature.
3 PresstheTIME up and down arrow buttons to set your desired cook time.

4 Add ingredients to the drawer. Insert the drawer in the unit.
5 Press START/STOP to begin cooking.
6 When cooking is complete, the unit will beep and END will appear on the control panel display.
7 Remove ingredients by tipping them out or by using oven gloves or silicone-tipped longs/ulensils.
natural_image
Line drawing of hands using a griddle to cut food items from a paper tray (no text or symbols)USING THE COOKING FUNCTIONS - CONT
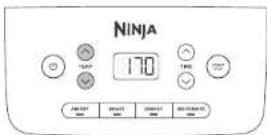
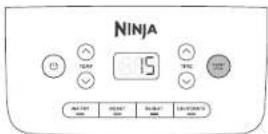
REHEAT
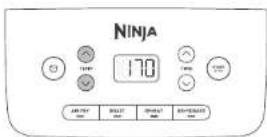
NOTE: The temperature is preset to 170°C.
1 Ensure the crisper plate is in the drawer.

natural_image
Illustration of a hand pressing down on a textured surface into a container (no text or symbols)2 Press the REHEAT button. The default temperature setting will display. Press the TEMP up and down arrow buttons to set your desired temperature.
3 Press the TIME up and down arrow buttons to set the reheating time.
4 Add ingredients to the drawer, Insert the drawer in the unit.
5 Press START/STOP to begin reheating.
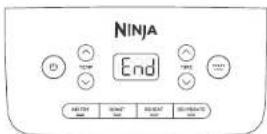
6 When reheating is complete, the unit will beep and END will appear on the control panel display.
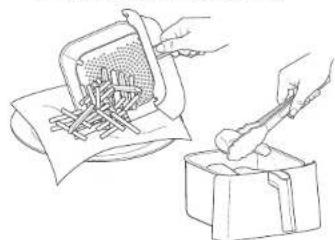
7 Remove ingredients by tipping them out or by using oven gloves or silicone-tipped tongs/utensils.

natural_image
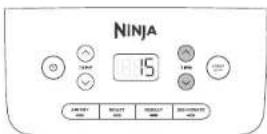
Line drawing of hands using a tool to cut food items from a griddle or scraper (no text or symbols present)DEHYDRATE
NOTE: The temperature is preset to 60°C.
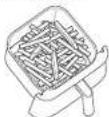
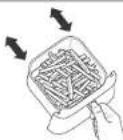
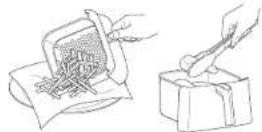
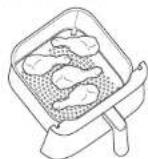
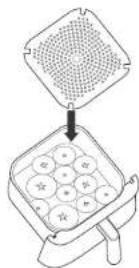
1 Place your first layer of ingredients in the bottom of the drawer. Then install the crisper plate inside the drawer and set a second layer of ingredients on the crisper plate.
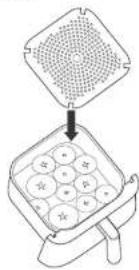
NOTE: You can increase your dehydrating capacity with the mid-level rack. If the rack is not included with your model, it is available for purchase at ninjakitchen.eu,
2 Insert the drawer in the unit.
3 PresstheDEHYDRATE button. The default temperature will display. Use the TEMP up and down arrow buttons to set your desired temperature.
4 PresstheTIME up and down arrow buttons to set your desired denydrating time.
5 PressSTART/STOP to start denydrating.
6 When dehydrating is complete, the unit will beep and END will appear on the control panel display.
Cleaning Your Air Fryer
NOTE: NEVER immerse the main unit in water or any other liquid. NEVER clean the main unit in a dishwasher.
The unit should be cleaned thoroughly after every use.
1 Unplug the unit from the wall socket before cleaning.
2 To clean the main unit and the control panel, wipe them clean with a damp cloth. Do not use a scouring pad.
HELPFUL TIPS
1 For consistent browning, make sure ingredients are arranged in an even layer on the bottom of the pan with no overlapping. If ingredients are overlapping, make sure to shake them halfway through the set cook time.
2 Cook time and temperature can be adjusted at any time during cooking. Simply press the up and down TIME or TEMP arrows to adjust the time or temperature.
3 To convert recipes from your conventional oven, reduce the temperature of the Air Fryer by 10°C. Check food frequently to avoid overcooking.
4 We recommend 3 minutes of preheating. You can use the built-in timer to set a 3-minute countdown.
5 Occasionally, the fan from the air fryer will blow lightweight foods around. To alleviate this, secure foods (like the top slice of bread on a sandwich) with cocktail sticks.
3 The drawer and crisper plate can be washed in the dishwasher.
4 If food residue is stuck on the crisper plate or pan, place them in a sink filled with warm, soapy water and allow to soak.
5 Air-dry or towel-dry all parts after use.
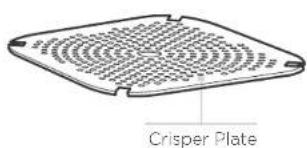
6 The crisper plate elevates ingredients in the pan so air can circulate under and around them for even, crisp results.
7 After a cooking function is selected, you can press the START/STOP button to begin cooking immediately. The unit will run at the default temperature and time.
8 For best results, remove food immediately after the cook time is complete to avoid overcooking.
9 For best results with fresh vegetables and potatoes, use at least 1 tablespoon of oil. Add more oil as desired to achieve the preferred level of crispiness.
10 For best results, check progress throughout cooking, and remove food when desired level of brownness has been achieved. We recommend using an instant-read thermometer to monitor internal temperature of foods. After the cook time is complete, remove food immediately to avoid overcooking.
TROUBLESHOOTING GUIDECLEANING & MAINTEN.
- Why won't the temperature go any higher?
The max temperature is 210°C for all functions. - Do I need to defrost frozen foods before air frying?
It depends on the food. Follow package instructions.
• How do I pause the countdown?
The countdown timer will pause automatically when you remove the drawer from the unit. Pressing START/STOP during cooking will stop the cooking function and reset the timer.
• Is the drawer safe to put on my worktop?
The drawer will heat during cooking. Use caution when handling, and place on heat-safe surfaces only.
• How do I know when to use the crisper plate?
Use the crisper plate when you want food to come out crispy. The plate elevates the food in the drawer so that air can flow under it to cook ingredients evenly.
• My food didn't cook.
Make sure the drawer is fully inserted during cooking. For consistent, browning, make sure ingredients are arranged in an even layer on the bottom of the drawer with no overlapping. Shake to toss loose ingredients for consistent crispiness. Cook time and temperature can be adjusted at any time during cooking. Simply use the
TEMP arrows to adjust the temperature or the TIME arrows to adjust the time.
• My food is over-cooked.
For best results, check progress throughout cooking, and remove food when desired level of brownness has been achieved. Remove food immediately after the cook time is complete to avoid overcooking.
• Why do some ingredients blow around when air frying?
Occasionally, the fan from the air fryer will blow lightweight foods around. To alleviate this, secure foods (like the top slice of bread on a sandwich) with cocktail sticks.
- Can I air fry fresh battered Ingredients?
Yes, but use the proper breaded coating technique. It is important to coat foods first with flour, then with egg, and then with bread crumbs. Be sure to press the bread crumbs onto the food so they stick in place. Loose coating may be blown off by the unit's powerful fen.
• The unit is beeping.
Your food is done cooking
• The screen went black.
The unit is in standby mode. Press the power button to turn it back on.
- An "E" message appears on display screen.
The unit is not functioning properly. You can find online support at ninjakitchen.eu.
TWO (2) YEAR LIMITED GUARANTEE
When you buy a product in Europe as a consumer, you get the benefit of legal rights relating to the quality of the product (your "statutory rights"). You can enforce these statutory rights against your retailer. However, at Ninja we are so confident about the quality of our products (the "Products") that we give you a manufacturer's guarantee of two years. This guarantee only applies to the Product if it is bought in new and unused condition. These terms and conditions relate to our guarantees only - your statutory rights as a buyer are unaffected. Please note that the 2 year guarantee is available in the original country of purchase.
The conditions below describe the prerequisites and scope of our guarantees which are issued by SharkNinja Germany GmbH, Rottfeder-Ring 9, 60327 Frankfurt am Main (Germany) ("us", "our" or "we"). They do not affect your statutory rights or the obligations of your retailer and your contract with them. The same applies if you have purchased the product directly from Ninja.
Ninja\* Guarantees
A household kitchen appliance constitutes a sizeable investment. Your new machine needs to work properly for as long as possible. The guarantee it comes with is an important consideration - and reflects how much confidence the manufacturer has in its product and manufacturing quality.
You'll find online support at www.ninjakitchen.eu.
How do I register my guarantee?
You can register your guarantee online within 28 days of purchase. To save time, you'll need the following information about your machine:
- Model no.
- Serial Number (only if available)
• Date of purchase of the Product (receipt or delivery note)
To register online, please visit www.ninjakitchen.eu
IMPORTANT
- The guarantee covers your Product for 2 years starting on the date of purchase.
- Please keep the receipt at all times. Should you need to use your guarantee we will need the receipt to verify the information supplied to us is correct. The inability to produce a valid receipt will invalidate your guarantee.
What are the benefits of registering my guarantee?
When you register your guarantee, you can choose to receive our newsletter containing tips, advice and competitions. Hear the latest news about new Ninja technology and launches. If you register your guarantee online, you'll get instant confirmation that we've received your details.
For details of our privacy policy please visit www.ninjakitchen.eu
How long are our Products guaranteed for?
Our confidence in our design and quality control means that your Product is guaranteed for two years.
PRODUCT REGISTRATIONPRODUCT REGISTRATIO
What Is covered by the guarantee?
Repair or replacement (at Ninja's discretion) of your Product, including all parts and labour in case of any defect in design, materials and workmanship (including transport and shipping costs). Our guarantee is in addition to your legal rights as a consumer.
What is not covered by the guarantee?
• Normal wear and tear.
- Accidental damage, faults caused by negligent use or care, misuse, neglect, careless operation or handling of the kitchen appliance which is not in accordance with the Ninja® Instruction Manual supplied with your machine.
- Use of the kitchen appliance for anything other than normal domestic household purposes
- Use of parts not assembled or installed in accordance with the operating instructions.
- Use of parts and accessories which are not Ninja® Genuine Components.
- Faulty installation (except where installed by Ninja®).
- Repairs or alterations carried out by parties other than Ninja or its agents, unless you can show that the repairs or alterations carried out by others are not related to the defect for which you exercise the guarantee.
Where can I buy genuine Ninja spares and accessories?
Ninja spares and accessories are developed by the same engineers who developed your Ninja kitchen appliance. You'll find a full range of Ninja spares, replacement parts and accessories for all Ninja machines at www.ninjakitchen.eu
Please remember that using non-Ninja spares may invalidate your manufacturer's guarantee. However, your statutory rights are unaffected.
GRACIAS POR COMPRAR LA NINJA® FREIDORA DE AIRE ÍNDICE

REGISTRE SU PRODUCTO

ninjakitchen.eu/register-guarantee

natural_image
Illustration of a hand using a tool to cut food items from a tray (no text or symbols)ROAST (Asar)
NOTA: La temperatura viene preajustada a 190°C.
natural_image
Illustration of a hand pressing down on a textured surface into a container (no text or symbols)natural_image
Line drawing of hands using a tool to cut wood or wood shavings into a container (no text or symbols)natural_image
Illustration of a hand pressing down on a textured surface into a container (no text or symbols)natural_image
Line drawing of a hand using scissors to cut a piece of food into a gift box (no text or symbols)DEHYDRATE (Deshidratar)
NOTA: La temperatura viene preajustada a 60°C.
ninjakitchen.eu/register-guarantee

Reheat (Réchauffer)....65
Dehydrate (Déshydrater)....66
natural_image
Illustration of a hand pressing down on a textured surface into a container (no text or symbols)natural_image
Line drawing of hands using a griddle to cut wood or wood shavings on a sheet, with a box and paper nearby (no text or symbols)UTILISATION DES FONCTIONS DE CUISSON
REHEAT (Réchauffer)
natural_image
Illustration of a hand pressing down on a square container with a mesh plate above (no text or symbols)natural_image
Line drawing of hands using a griddle to cut food items from a tray (no text or symbols)DEHYDRATE (Déshydrater)
ninjakitchen.eu/register-guarantee

natural_image
Illustration of a hand pressing down on a grid-patterned plate above a container (no text or symbols)natural_image
Illustration of a hand using a tool to cut or press a piece of wood or metal, with another hand holding a small box nearby (no text or symbols present)natural_image
Illustration of a hand pressing down on a textured surface into a container (no text or symbols)natural_image
Line drawing of a hand using scissors to cut wood strips into a box, with another hand holding a tool (no text or symbols)ninjakitchen.eu/register-guarantee

natural_image
Diagram showing a hand pressing down on a textured surface into a container (no text or symbols)natural_image
Line drawing of a hand using a tool to cut wood or wood fragments into a container (no text or symbols)DE KOOKFUNCTIES GEBRUIKEN
REHEAT (Opwarmen)
natural_image
Illustration of a hand pressing down on a textured surface into a container (no text or symbols)natural_image
Line drawing of hands using a tool to cut or spread materials on a tray, with no visible text or symbols.DEHYDRATE (Uitdrogen)
ninjakitchen.eu/register-guarantee

Reheat (Varme Opp)....107
Dehydrate (Dehydrere)....108
natural_image
Illustration of a hand pressing down on a square container with a grid pattern (no text or symbols)2 Trykk knappen ROAST. Standardtemperaturen vises på displayet. Juster temperat med TEMP-pilene opp og ned

natural_image
Line drawing of a hand using a tool to cut wood or wood shavings into a container (no text or symbols)SLIK BRUKEAR DU STEKEFUNKSJONENE
REHEAT (Varme Opp)
natural_image
Illustration of a hand pressing down on a textured surface into a container (no text or symbols)natural_image
Line drawing of two hands using a tool to cut or press a piece of food, with no visible text or symbols.DEHYDRATE (Dehydrere)
MERK: Temperaturen er forhårdsinnslit til 60 °C.
1 Legg det første laget med ingredienser i bonnen av pannen. Deretter setter du stekeplaten på plass i pannen og enda et lag med ingredienser på stekeplaten.
akitchen.eu/register-guarantee

Reheat (Reaquecer) 121
Dehydrate (Desidratar) 122
APENAS PARA USO DOMÉSTICO
natural_image
Illustration of a hand pressing down on a grid-patterned plate into a container (no text or symbols)natural_image
Line drawing of hands using a tool to cut wood or wood fragments into a box, with no visible text or symbols.USAR AS FUNÇÕES DE COZEDURA - CONT
REHEAT (Reaquecer)
natural_image
Illustration of a hand pressing down on a textured surface into a container (no text or symbols)natural_image
Illustration of hands using a tool to cut or remove a piece of wood or debris into a container (no text or symbols present)DEHYDRATE (Desidratar)
ninjakitchen.eu/register-guarantee

natural_image
Illustration of a hand pressing down on a textured surface into a container (no text or symbols)natural_image
Line drawing of hands using a tool to cut wood or wood shavings into a box (no text or symbols)KYPSENNYSTOIMINTOJEN KÄYTTÖ
natural_image
Illustration of a hand pressing down on a textured surface into a container (no text or symbols)natural_image
Line drawing of two hands handling a tray with tools and a box, no text or symbols presentDEHYDRATE (Kuivaus)
ninjakitchen.eu/register-guarantee
Dehydrate (Torkning)....150
GETTING TO KNOW YOUR AIR FRYERDELAR OCH
When setting time, the digital display shows I:1:MM Display currently reads 23 minutes.
FUNKTIONSKNAPPAR
natural_image
Illustration of a hand pressing down on a textured surface into a container (no text or symbols)natural_image
Line drawing of a hand using a hammer to cut a piece of wood or metal on paper, with another hand holding a small box nearby (no text or symbols)ANVÄND TILLAGNINGSFUNKTIONERNA
natural_image
Illustration of a hand pressing down on a textured surface into a container (no text or symbols)natural_image
Line drawing of a hand using a tool to cut a piece of wood or metal on a sheet, with another box nearby (no text or symbols)DEHYDRATE (torkning)
© 2024 SharkNinja Operating LLC. TRYKT | KINA
DEUTSCH
© 2024 SharkNinja Operating LLC. GEDRUCKT IN CHINA
ENGLISH
Illustrations may differ from actual product. We are constantly striving to improve our products, therefore the specifications contained herein are subject to change without notice.
NINJA is a registered trademark of Shark Ninja Operating LLC.
© 2024 SharkNinja Operating LLC. PRINTED IN CHINA
ESPAÑOL
© 2024 SharkNinja Operating LLC. IMPRESO EN CHINA
FRANÇAIS
© 2024 SharkNinja Operating LLC. IMPRIMÉ EN CHINE
ITALIANO
© 2024 SharkNinja Operating LLC. STAMPATO IN CINA
NEDERLANDS
© 2024 SharkNinja Operating LLC. GEDRUKT IN CHINA
NORSK
© 2024 SharkNinja Operating LLC. TRYKKET I KINA
PORTUGUÊS
© 2024 SharkNinja Operating LLC. IMPRESSO NA CHINA
SUOMI
© 2024 SharkNinja Operating LLC. PAINETTU KIINASSA
SVENSKA
© 2024 SharkNinja Operating LLC. TRYCKT I KINA
SharkNinja Germany GmbH, Rotfeder-Ring 9,
60327 Frankfurt am Main, Germany
ninjakitchen.eu
AF140EU_IB_MP_240103_Mv1
SharkNinja Europe Ltd, 1st/2nd Floor Building 3150, Thorpe Park, Century Way, Leeds, England, LS15 8ZB
ninjakitchen.eu
- SÅDAN BRUGER DU KOGEFUNKTIONERNE
- REHEAT (Genopvarm)
- DEHYDRATE (Dehydrering)
- DEHYDRATE (Dörren)
- for purchasing the Ninja® Air Fryer CONTENTS
- REGISTER YOUR PURCHASE
- RECORD THIS INFORMATION
- TECHNICAL SPECIFICATIONS
- IMPORTANT SAFEGUARDS HOUSEHOLD USE ONLY
- ⚠️WARNINGS
- SAVE THESE INSTRUCTIONS
- GETTING TO KNOW YOUR AIR FRYERPARTS & ACC
- FUNCTION BUTTONS
- OPERATING BUTTONS
- BEFORE FIRST USE
- USING THE COOKING FUNCTIONS
- AIR FRY
- ROAST
- USING THE COOKING FUNCTIONS - CONT
- REHEAT
- DEHYDRATE
- Cleaning Your Air Fryer
- HELPFUL TIPS
- TROUBLESHOOTING GUIDECLEANING & MAINTEN.
- TWO (2) YEAR LIMITED GUARANTEE
- Ninja\* Guarantees
- How do I register my guarantee?
- IMPORTANT
- What are the benefits of registering my guarantee?
- How long are our Products guaranteed for?
- PRODUCT REGISTRATIONPRODUCT REGISTRATIO
- What Is covered by the guarantee?
- What is not covered by the guarantee?
- Where can I buy genuine Ninja spares and accessories?
- GRACIAS POR COMPRAR LA NINJA® FREIDORA DE AIRE ÍNDICE
- REGISTRE SU PRODUCTO
- ROAST (Asar)
- DEHYDRATE (Deshidratar)
- UTILISATION DES FONCTIONS DE CUISSON
- REHEAT (Réchauffer)
- DEHYDRATE (Déshydrater)
- DE KOOKFUNCTIES GEBRUIKEN
- REHEAT (Opwarmen)
- DEHYDRATE (Uitdrogen)
- SLIK BRUKEAR DU STEKEFUNKSJONENE
- REHEAT (Varme Opp)
- DEHYDRATE (Dehydrere)
- APENAS PARA USO DOMÉSTICO
- USAR AS FUNÇÕES DE COZEDURA - CONT
- REHEAT (Reaquecer)
- DEHYDRATE (Desidratar)
- KYPSENNYSTOIMINTOJEN KÄYTTÖ
- DEHYDRATE (Kuivaus)
- GETTING TO KNOW YOUR AIR FRYERDELAR OCH
- FUNKTIONSKNAPPAR
- ANVÄND TILLAGNINGSFUNKTIONERNA
- DEHYDRATE (torkning)
- DEUTSCH
- ENGLISH
- ESPAÑOL
- FRANÇAIS
- ITALIANO
- NEDERLANDS
- NORSK
- PORTUGUÊS
- SUOMI
- SVENSKA
Brand : NINJA
Model : AF140EU
Category : Deep fryer