303528 - Bread maker Arendo - Free user manual and instructions
Find the device manual for free 303528 Arendo in PDF.


| Product Type | Bread Maker |
| Brand | Arendo |
| Model | 303528 |
| Power Supply | 220-240 V ~ 50/60 Hz |
| Power Consumption | 550 W |
| Weight | 4018 g |
| Bread Capacities | 700 g or 1000 g |
| Number of Programs | 12 preset programs |
| Available Programs | Normal, French, Whole Wheat, Rapid, Sweet, Super Rapid 1, Super Rapid 2, Dough, Gluten Free, Cake, Sandwich Bread, Bake |
| Delay Timer Function | Yes, up to 13 hours |
| Keep Warm Function | Yes, up to 1 hour |
| Crust Degree | Light, Medium, Dark |
| Pan Material | Non-stick coating |
| Included Accessories | Kneading hook, pan, measuring cup, hook remover tool, measuring spoon, scraper |
| Safety | Overheat protection, automatic shut-off, lid locked during operation |
| Cleaning | Pan and kneading hook dishwasher safe; housing cleanable with damp cloth |
| Display | LCD screen with phase indicators (kneading, rising, baking, keep warm) |
| Special Features | Anti-slip supports, thermal insulation, viewing window |
Frequently Asked Questions - 303528 Arendo
User questions about 303528 Arendo
0 question about this device. Answer the ones you know or ask your own.
Ask a new question about this device
Download the instructions for your Bread maker in PDF format for free! Find your manual 303528 - Arendo and take your electronic device back in hand. On this page are published all the documents necessary for the use of your device. 303528 by Arendo.
USER MANUAL 303528 Arendo
5
6
7
8
9
10
Nummer Beschreibung
natural_image
Illustration of two hand positions demonstrating a massage technique (no text or symbols present)Important safety instructions....31
- Scope of delivery 34
- Technical data....35
- Product details....35
- Before first use ....37
- Display and Controls ....37
- Default settings....38
- Start /Stop 38
- Programs 39
- Size of the bread and degree of browning 40
- Time delay 40
- Interval 41
- Memory 41
- Keep-warm function....41
- Display warnings .... 41
- Baking bread 42
- Special notes ....45
16.1 Program 4 (Fast) 45
16.2 program 9 (Ultra fast) 45 - Measuring the ingredients 45
- Sequence of ingredients 46
- Cleaning and Care....46
- Troubleshooting....47
- Tips about possible ingredients ....49
- Sample recipes .... 52
- Safety instructions and Disclaimer .... 55
- Disposal instructions .... 55

IMPORTANT SAFETY GUIDELINES FOR THIS APPLIANCE
- Before connecting the appliance, ensure that the mains voltage matches the specification on the nameplate of the appliance!
- This appliance should not be operated if the cable or plug is damaged or defective!
- The product should not be used if it has fallen down or has been damaged!
- Do not touch any hot surfaces! Always use the knobs or handles provided!
- Never immerse the appliance, plug or cable in water or any other liquid!
- Turn off the appliance after use. Disconnect the mains plug before cleaning it or removing the baking mould.
- Do not allow the cable and the plug to protrude over an edge or over hot surfaces!
- Use only accessories recommended by the appliance manufacturer! There is a risk of injury!
- Monitor the product constantly, if children or invalid persons are nearby.
- Do not place the bread machine near other hot appliances such as a gas, electric or backing oven.
-
Never move the product when it is filled with hot fluid, such as jam!
-
Do not touch any moving or rotating parts of the appliance when it is switched on!
- Do not turn on the bread machine if the baking attachment has not been properly filled with ingredients.
- Never remove the baking mould during operation!
- To remove the bread, the baking mould should never be struck against an edge or work surface! This may damage the baking mould!
- Do not cover the appliance during use! Heat and steam should be able to escape. It mat result in a fire if it is covered with flammable material.
- Metal foils or other materials should not be used in the baking machine, as this increases the risk of fire or short circuit!
- To disconnect the bread baking machine from the mains, remove the plug from the socket!
- Use the appliance only for the intended purposes described in this user manual!
- Do not use it outdoors!
- This appliance may be operated by children from 8 years of age and above, as well as by people with reduced physical, sensory or mental capacities and/or who lack knowledge or experience, if they are su-
pervised or instructed with regard to safe use of the appliance, and have understood the resultant dangers. The appliance is not a toy. Cleaning and maintenance of the appliance should not be done by children without supervision!
- Children should always be supervised to ensure that they do not play with the appliance!
- If the power cable is damaged, it should be replaced by the manufacturer, his customer service personnel or an equally qualified person
- This appliance should not be operated with an external timer or a separate remote control system!
- Ensure that you do not exceed the maximum quantity specified in this manual!
- Never open the housing of the appliance. There is a risk of electric shock!
- The product is only suitable for domestic use and not for commercial use.

CAUTION: This appliance becomes very hot during use! There is a risk of burns!
Thank you for choosing an Arendo product. Please read the following user manual carefully so that you can get the most from the product you have purchased. Before using the product, first check that the delivered item is complete, accurate and undamaged.
1. Scope of delivery
- Bread machine
- Kneader
- Baking mould
- Measuring cup
- Kneader remover
- Measuring spoon
2. Technical data
| Power supply 220-240 V | AC 50/60 Hz |
| Power consumption 550 | W |
| Weight 4018 g | |
| Features • Non-slip base | Overheating protectionTime delay functionNon-stick baking mouldConstant temperatureKeep-warm function (1 hour)Optimised heating function (energy-saving)12 predefined programsHeat-insulated design |
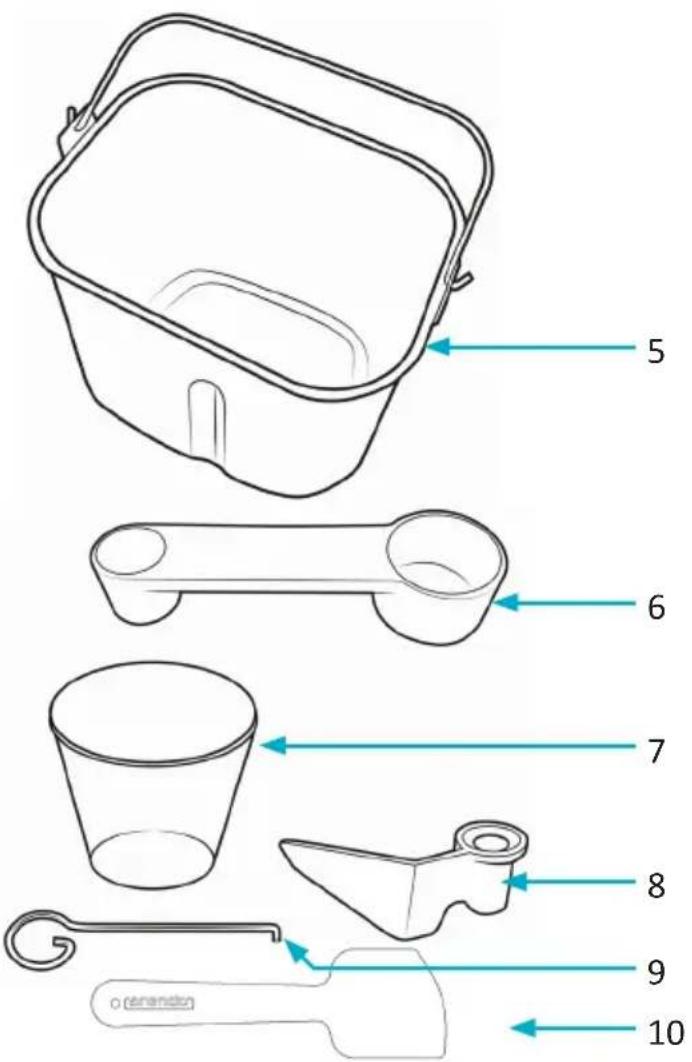
3. Product details
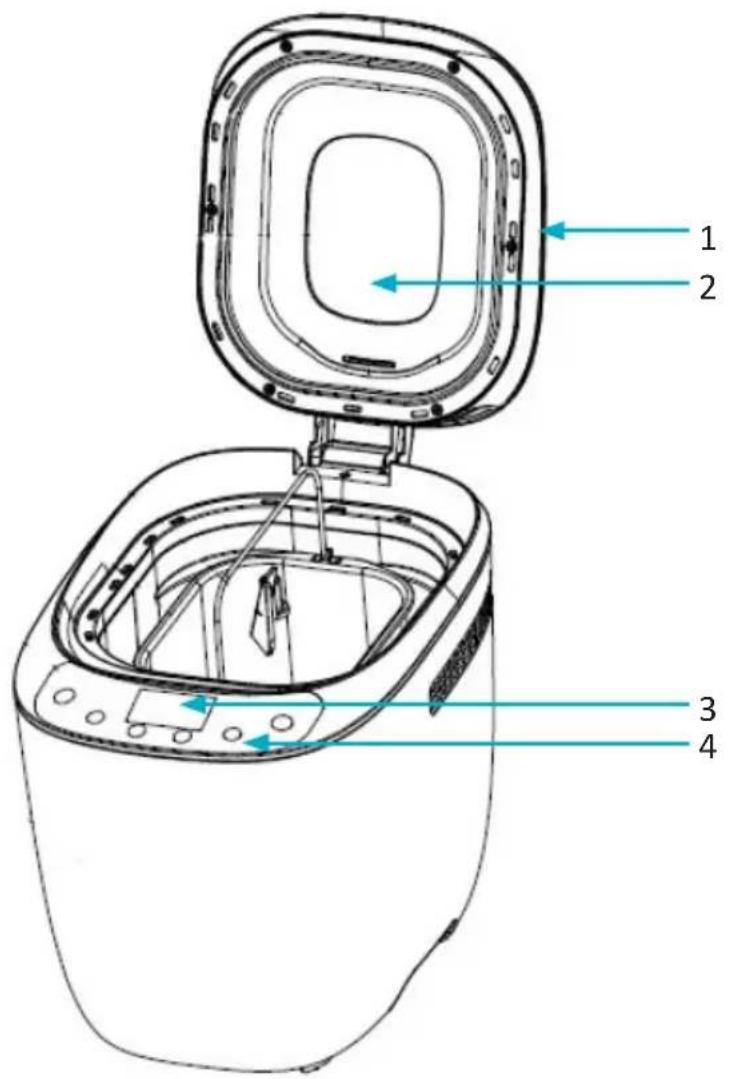
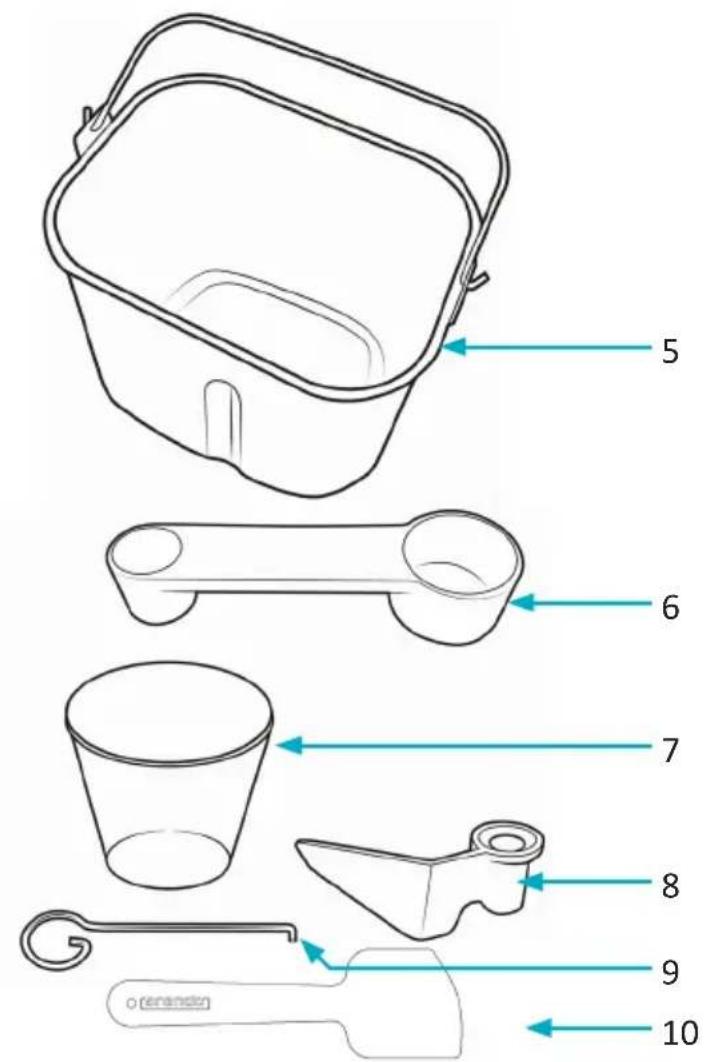
| Number Description | |
| 1 Lid | |
| 2 Window | |
| 3 Display | |
| 4 Operating controls | |
| 5 Baking mould | |
| 6 Measuring spoon | |
| 7 Measuring cup | |
| 8 Kneader | |
| 9 Kneader remover | |
| 10 Scraper | |
4. Before first use
- Check that the accessories and all parts are complete as per the scope of supply and are not damaged.
- Clean all the parts as described in the chapter "Cleaning and care" of this user manual.
- Adjust the operating mode to "Bake". Bake without anything inside for about 10-15 minutes. Then allow the appliance to cool down completely. Remove the baking mould and the kneader and clean the appliance and the accessories again.
- Finally dry all the parts thoroughly. Place them back in the appliance. The bread machine is now ready for use.
5. Display and Controls
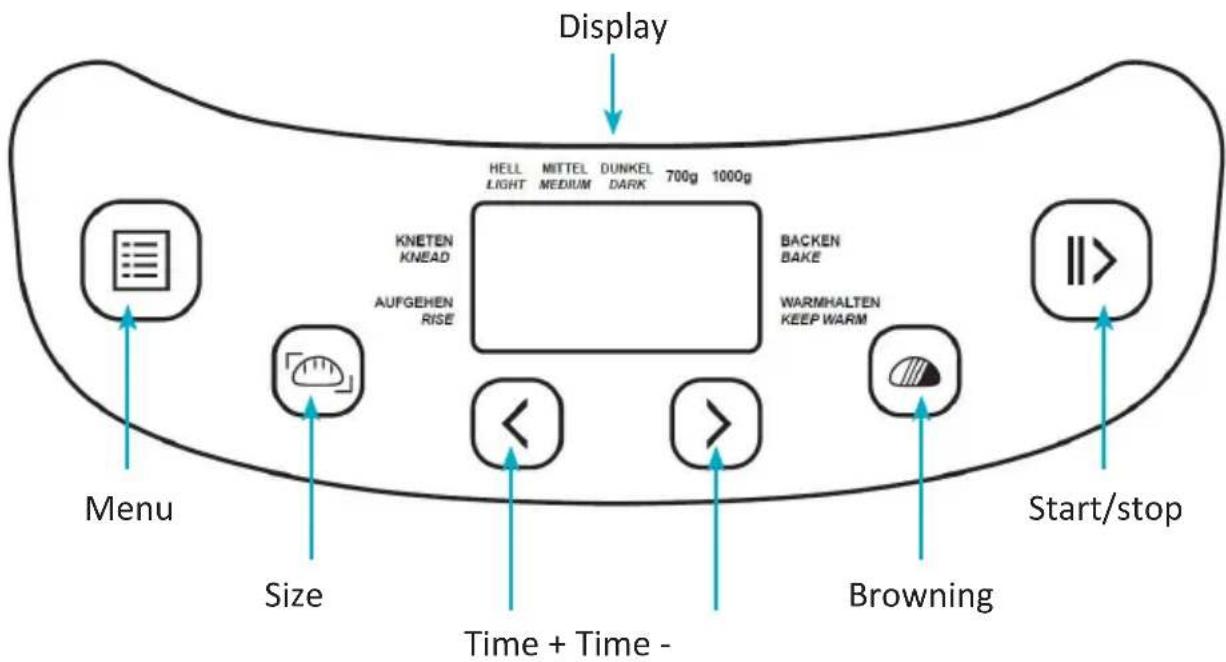
flowchart
graph TD
    A["Display"] --> B["Menu"]
    B --> C["Size"]
    C --> D["Time + Time -"]
    D --> E["Browning"]
    E --> F["Backen Bake"]
    F --> G["WARMHALTEN KEEP WARM"]
    G --> H["<<"]
    H --> I["AUFGEHEN RISE"]
    I --> J["KNETEN KNEAD"]
    J --> K["HELL LIGHT MEDIUM DUNKEL DARK 700g 1000g"]
6. Default settings
The default settings are displayed once you insert the plug into the socket.
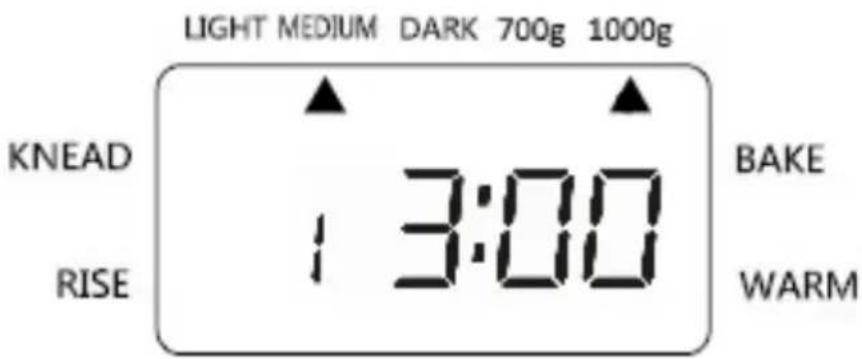
The explanations about the information on the display are given in the following table.
| KNEAD1KNEAD2 | This symbol is displayed if the bread machine is in the kneading phase. |
| RISE1RISE2RISE3 | If the bread machine is in one of the three rising phases, then this is indicated by "RISE". |
| BAKE | The contents of the baking mould are being baked. |
| WARM The baked item is kept warm for the configured time. | |
7. START/STOP
To start the program sequences, press the "START / STOP" button until you hear a beep and the colon between the hour and minute display starts flashing. Only the "START / STOP" button is functional in switched-on condition.
To end the program sequences, press the "START / STOP" button for about 2 seconds. A long beep indicates that the current program has been switched off.
You can pause the program sequences for 10 minutes by pressing the "START / STOP" button once briefly during operation. The time starts flashing. The program then resumes automatically. You can resume the program by pressing the button.
8. Programs
You can select the desired program by pressing the menu button. The program display changes each time you press the MENU button. The various programs and their functions are summarized below.
| Normal (1) | "Standard program": Kneading, allow it to rise and baking |
| French (2) | Kneading, allowing it to rise and baking bread with longer rising time |
| Whole wheat (3) | Kneading, allowing it to rise and baking bread with wholemeal flour |
| Fast (4) | Kneading, allowing it to rise and baking in less time compared to the standard program |
| Sweet (5) Kneading, allowing it to rise and baking sweet pastries | |
| Ultra fast 1, 2 (6, 7) | Kneading, allowing it to rise and baking in very short time |
| Dough (8) | Kneading and allowing it to rise. There is no baking process in this program. The finished dough is suitable, for example, for pizza, sandwiches etc. |
| Gluten free (9) | Kneading, allowing it to rise and baking gluten-free bread. This setting has a longer preheating time to allow the grain to absorb the water and expand. It is not advisable to use the time delay function, as this may lead to inadequate results. |
| Cake (10) Kneading, allowing it to rise and baking cakes | |
| Sandwich bread (11) | Kneading, allowing it to rise and baking white bread (e.g. toast bread) |
| Baking (12) | Only baking is possible in this program. The program can be used to extend a specific baking time. Press the time button to set the backing time. |
9. Selection of bread size and degree of browning
Press the "size" button to adjust the size or weight of the bread. You can choose between the following values:
700 g (small) or 1000 g (large)
Your selection is shown on the display at the top right with an arrow. Note that the baking time can vary depending on the weight and size of the bread. The "size" function works only in the following programs: Normal, Whole wheat, French, Sweet, Ultra fast, Gluten free and Sandwich bread. Using the "browning" button, you can select the desired browning between "LIGHT", "MEDIUM" and "DARK". Your selection is displayed at the top of the display with an arrow.
10. Time delay
If you want the bread machine to start only at a specific time, you can adjust this by using the time delay. Please ensure that you do not use perishable ingredients such as eggs, fruit or onions in the "time delay" mode.
- First select the desired program.
- Adjust the bread weight and degree of browning.
- Then press the "time" button and select the desired time delay. The time shown on the display includes the time required for baking.
Note: If you want, for example, your bread to be ready in exactly 6 hours and 30 minutes, then press the "Time" button till 6:30 is shown on the display. The maximum adjustable time is 13 hours. - Then press and hold the "Start / Stop" button until you hear a beep and the colon starts flashing. The elapsed time is shown in the display.
11. Pause
Once the program begins, the operation can be paused at any time using the "START / STOP" button. The previously adjusted times are retained.
The program will resume automatically after 10 minutes or when the "START / STOP" button is pressed again.
12. Memory
If the power supply to the appliance is interrupted, the operation that was previously active can be automatically resumed within 10 minutes. The bread machine can not store the data if the interruption lasts for more than 10 minutes. In this case it is advisable to remove the ingredients from the baking mould, dispose of them and to use new ingredients.
13. Keep-warm function
The contents of the bread machine can be automatically kept warm up to an hour after baking. If you want to remove the contents during the keep-warm phase, first turn off the program that is currently active by pressing and holding the "Start / Stop" button until the program ends.

14. Display warnings
If the display shows the code "HH: H", then the temperature inside the bread machine is too high. The current program needs to be terminated. Open the lid of the appliance and allow the machine to cool down completely. The code "LL:L" means that the temperature inside the appliance is too low. Allow the appliance to warm up to room temperature.
But if the display shows "E E0", "E E1", or "E E2" after you press the "Start / Stop" button, then the temperature sensor is damaged and has to be checked by a qualified service technician.
15. Baking bread
Place the baking mould on the drive shaft and turn it clockwise until the baking mould locks into place. Then place the kneader on the drive shaft. It is advisable, for example, to apply margarine to the kneader so that it can be removed easily after baking.
Add the desired ingredients to the baking mould. It is important to follow the sequence given in the recipe. Generally, the liquid is added first, then sugar, salt or flour and finally the baking powder or yeast.

Once the ingredients are added to the baking mould, close the lid of the bread machine. Connect the plug to the power socket.
Next select the desired program using the "MENU" button and then the size of the bread using the "size" button. Then select the desired degree of browning by pressing the "browning" button.
You can then select whether the bread baking process has to begin immediately or with a time delay. If you select time delay, adjust the desired time using the "Time +" and "Time -" button. If you want to start immediately, skip this step and press the "Start / Stop" button till you hear a beep and the baking process starts.
The duration of the baking process depends on the selected program, the size, the weight and the desired browning. You can monitor the progress of the baking process through the window at the top of the appliance. Never open the lid of the bread machine during the baking process!
Once the entire process is completed, you will hear a beep. Press the "Start / Stop" button for about 2 seconds to end the current program. Once the program is complete, you can remove the bread by opening the lid, turning the baking mould anticlockwise wearing oven gloves and then removing it. Use the scraper to separate the bread from the edges of the baking mould. Never use a knife or such sharp objects for this purpose. The non-stick coating can be damaged! Place the baking mould upside down, so that the bread can be shaken out easily.
Caution! The housing, the baking mould, the kneader and the bread may be very hot! Therefore, be very careful always!
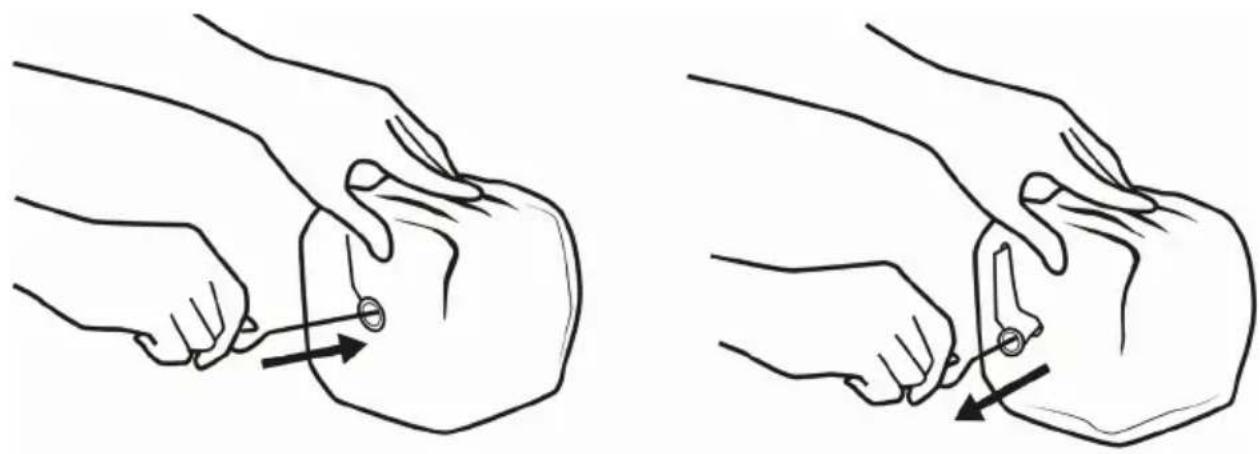
Separate the kneader from the bottom of the bread using the kneader remover for this purpose.
natural_image
Line drawings showing two hand positions on a patient's abdomen, one with finger placement and arrow indicating pressure direction (no text or symbols)Allow the bread to cool for about 20 minutes. If you are not near the bread machine when the process is completed, the keep-warm mode is automatically turned on for an hour. Beeps indicate the end of the keep-warm mode.
Manufacturer's recommendation: Use mineral water instead of normal water because this makes the bread fluffier!
Bread made of ready-mixes
You can use almost any commercially available bread mixes in this bread machine. However, we do not recommend pure rye bread, as these are not baked satisfactorily.
Read the quantity information on the package and follow these steps:
- Turn the bread machine on and add the liquid as recommended on the ready-mix.
- Select the appropriate program and the desired browning and then press the "Start / Stop" button till your hear a beep and the appliance starts.
16. Special notes
16.1 Program 4 (Fast)
Bread is normally made using baking soda or baking powder. These ingredients are activated by liquid and heat. It is likewise advisable for this program to first add the liquid in the baking mould and then the remaining ingredients.
During the first kneading phase, it is possible that the dry ingredients accumulate in the corners of the baking mould. If this is the case, the ingredients need to be stirred. Use only wooden kitchen tools to avoid scratching the baking mould. Press the "Start / Stop" button before opening the lid.
16.2 Program 9 (Ultra fast)
The bread machine can bake more quickly in the "Ultra fast" program compared to the other programs. Please note that the water temperature has to be between 48°C and 50°C for this purpose. The temperature is crucial for the final quality of the bread. If the water temperature is below this value, it is possible that the bread may not rise properly and the baking quality is adversely affected.
17. Measuring the ingredients
A significant step for making good bread is the correct number and quantity of ingredients. For this purpose, use the measuring spoon and the measuring cup. Measure each ingredient and liquid accurately. On the other hand, it cannot be ruled out that the final product is adversely affected.
- Water, milk or milk powder solution should be measured using the measuring cup provided. Keep the cup straight or place it on a flat surface.
- If cooking oil or other ingredients were measured with the cup, clean it thoroughly afterwards.
- Dry ingredients should be measured with the measuring cup or measuring spoon. The large side of the measuring spoon corresponds to a tablespoon, while the small side corresponds to a teaspoon. Make sure that you do not press the ingredients, as this may give you the incorrect measurement.
18. Sequence of ingredients
The sequence in which the ingredients are added, should always be followed. The following sequence applies in general: Liquid (milk, water, etc.), eggs, salt and milk powder etc.
When adding, make sure that the flour is not be completely soaked by liquid. Yeast has to be then added to the dry flour and should not come in contact with salt.
Once the dough has been kneaded for a few minutes, you will hear a series of beeps. Once you hear this beep, you can add the other ingredients, such as fruit. If you add fruit too early to the dough, the flavour will be affected after being kneaded for a long time. If time delay is being used, then perishable ingredients such as eggs or fruit should not be added.
19. Cleaning and Care
Disconnect the plug from the mains socket and allow the appliance to cool down completely. Remove the baking mould and kneader, by turning them anti-clockwise. Then lift the components out using the handle.
Wipe the baking mould and kneader using a damp cloth.
Do not use abrasive or aggressive cleaning agents or sharp objects! Optionally, you can place the baking mould and kneader in the dishwasher to clean them. Dry the baking mould and kneader completely. Put them back in the bread machine by placing the baking mould on the shaft and turn it clockwise until the baking mould locks into place.
If the kneader does not come out of the bread easily, use the kneader remover.
Use a damp cloth to clean the rest of the housing and the lid. Gently wipe the housing, the window and the lid. Do not use any aggressive cleaning agents or sharp objects. Never immerse the appliance in water or other liquids for cleaning.
20. Troubleshooting
| Error Error | reason Troubleshooting | |
| The finished bread is very heavy and the internal structure is extremely dense | - Too much flour and too little water has been used- Too many fruits or too much whole wheat flour has been used | - Use less flour and more water- Reduce the quantity of fruits and whole wheat flour |
| The bread collapses at the middle when baking | - The flour is not strong enough to allow the dough to rise- The temperature is too high or the yeast is acting too quickly- Too much water makes the dough very heavy | - Use bread flour or cornstarch in case of doubt- Always use the yeast at room temperature- Adjust the quantity of water if necessary |
| Smoke comes out of the vent during baking | Some ingredients are too close to the heating elements or sticking to them | Disconnect the plug from the socket, allow the appliance to cool down completely and clean the heating elements. |
| The crust of the bread is too thick | The bread was kept warm for too long and left in the mould | Remove the bread as soon as possible and keep it warm only when needed. |
| The ingredients are mixed unevenly and the bread is not baked satisfactorily. | - Inappropriate program selected- The lid was opened too often- The rotation resistance is too high, and the kneader cannot rotate properly | - Select the correct program.- Do not open the lid when the program is running.- Check if the kneader is seated properly. If you detect a problem, do not hesitate to contact our customer service. |
| The bread is so large that it is pushing against the lid | -Too much yeast, water or flour has been used- Ambient temperature too high. | Check the quantity of yeast, water or flour, adjust the quantity if necessary. |
| The bread is too small and has not risen | Not enough yeast was used. It is possible that the yeast is old and inactive. Another reason may be very high water temperature. | Use more yeast and check the water temperature. |
| The display shows "H HH" after pressing the "Start / Stop" button | The inside temperature of the bread machine is too high. | Open the lid of the appliance and allow the machine to cool down completely. |
| The motor has switched on audibly but the dough is not kneaded | The baking mould is not fixed properly or the quantity of dough is too much to be kneaded | Check the attachment of the baking mould or the quantity of dough and the quantity specified in the recipe. |
21. Notes on possible ingredients
Different types of flour
Whole grain
Whole wheat flour is ground from grain. This flour is usually heavier than normal flour and also has more nutrients. It is especially well suited to be mixed with other flours.
Flour without baking powder
Flour without baking powder is also known as white flour. It is suitable for fast baking or for different biscuits.
Gluten flour
Gluten flour has high gluten and protein content. This type of flour gives the dough a certain elasticity. It helps the dough to retain its shape. The type of flour is particularly well suited for baking bread.
Dark wheat flour
Dark wheat flour is rich in fibre. It is comparable to whole wheat flour. In order to maintain the shape after baking, it should be mixed with other flours.
Self drying flour
This flour contains baking powder and is ideal for making cakes.
Corn or oatmeal flour
These types of flour are made from corn or oats. These are additional ingredients for making coarse bread such as rye bread and also help in improving the taste and texture.
Sugar
Sugar is an important component and gives the sweet taste and colour to the bread. White sugar is mostly used, but brown sugar or powdered sugar can also be used.
Eggs
Eggs make the bread nutritious and more full. Remove the eggs completely from the shell before mixing them evenly.
Baking soda
Baking soda is very similar to baking powder. Baking soda can be used along with baking powder.
Baking powder
Baking powder is used, for example, to bake cakes or breads in "Program - 9 Ultra fast". Baking powder does not require any "Rising phase".
Salt
Salt is used to improve the taste of the bread and the colour of the bread crust. Always stick to the recipe when adding salt! Too much salt will stop the yeast from acting. Remember that the bread becomes smaller if salt is used.
Fat, butter and vegetable oil
Fat increases the shelf life of the bread. The bread becomes softer. If you want to add butter, make sure that it has been previously cut into small pieces.
Water and other liquids
Water is an important ingredient for making bread. In general, a water temperature between 20^ C and 25^ C is optimal. You can replace water with fresh milk or water mixed with 2% milk powder. This improves the flavour and colour of the crust. Some recipes require different juices such as apple or orange juice.
Yeast
In the rising phase, the yeast releases carbon dioxide. The carbon dioxide makes the bread rise more and provides the soft inner structure. However, yeast needs sugar and flour as nutrient.
Store fresh yeast only in your refrigerator, since high temperature can kill the yeast fungi. Pay attention to the expiry date when you buy yeast. Put the yeast back in the refrigerator immediately after each use.
If the bread does not rise properly, this is mostly due to the yeast! This is how you can check whether your yeast is fresh and active:
- Pour half a measuring cup of warm water (45-50 °C).
- Add a teaspoon of white sugar to the measuring cup and stir the contents. Then add two teaspoons of yeast to the water.
- Place the measuring cup for about 10 minutes in a warm place, and do not stir the water!
- After 10 minutes, you should get about a cup of foam. If this is not the case, then the yeast is inactive.
22. Sample recipes
Tips:
- Use mineral water to make the bread fluffier and lighter.
- Water and / or milk powder can also be replaced with the same amount of milk.
Bread recipes
| Brown bread | |
| Bread size 850 g | |
| Lukewarm water | 350 ml |
| Salt 1 14 teaspoon | |
| Honey | 1 teaspoon |
| Whole wheat flour | 550 g |
| Dry yeast | ^3/_4 teaspoon |
| Program: | 3 - Whole wheat,Colour: Dark |
| Protein bread | |
| Bread size 750 g | |
| Quark | 250 g |
| Protein 4 | |
| Salt 1 teaspoon | |
| Wheat bran | 4 tablespoons |
| Baking powder | 1 small packet |
| Linseed (whole or crushed) | 100 g |
| Spelt bran or oat bran | 30 g |
| Program: | 1 - Normal,Colour: Dark |
| White bread | |
| Bread size 1000 g | |
| Lukewarm water | 350 ml |
| Flour 500 g | |
| Yeast 1/2 packet | |
| Sea salt | 1 tablespoons |
| Sugar | 1 tablespoons |
| Olive oil | 1 tablespoons |
| Program: | 1 - Normal,Colour: Light |
| Farmhouse bread | |
| Bread size 1000 g | |
| Lukewarm water | 360 ml |
| Flour type 1050 600 g | |
| Dry yeast 1 pack | |
| Salt | 1 teaspoon |
| Sugar | 1 teaspoon |
| Dried wheat sour-dough | 30 g |
| Program: | 1 - Normal,Colour: Medium |
Dough
| Pizza dough | |
| Flour 300 g | |
| Salt | 1/2 teaspoon |
| Fresh yeast | 1/2 cube |
| Olive oil | 2 tablespoons |
| Water, lukewarm 200ml | |
| Sugar A pinch of sugar | |
| Program 8 - Dough | |
| Preparation:Dissolve the yeast in the water. Add this along with the other ingredients to the bread machine. Select Program "8 - Dough" and turn on the appliance. After kneading, roll out the dough. Add some flour on the dough. Before garnishing as desired, the dough needs to rise for about 10 minutes after rolling. | |
Cake
| Pound cake | |
| Eggs 3 | |
| Sugar | 125 g |
| Butter / Margarine 125 g | |
| Vanilla sugar 1 small packet | |
| Milk 14 cup | |
| White flour 300 g | |
| Baking powder 1 small packet | |
| Program: 10 - Cake | |
| Preparation:First add eggs, butter, sugar and vanilla sugar to a bowl and stir the mixture until it becomes fluffy. Add the flour and baking powder to the mixture and mix everything evenly. You can then refine the dough with a little milk. Then apply butter or oil to the baking mould. Add the final mixture to the baking mould and start the "cake" program. | |
Note: The quantity of sugar can vary depending on the requirement.
Time phases of the various programs and processes
| Program / process | 1. Normal 2. French 3. Whole wheat 4. | Fast | 5. Sweet 6. Ultra | fast 1 | ||||||
| Bread size in g | 750 100 | 0 750 10 | 00 750 | 1000 750 | 750 1000 | 750 | ||||
| KNEAD1 (in minutes) | 9 | 10 | 16 | 18 | 9 | 10 | 7 | 10 | 10 | 12 |
| RISE1 (in minutes) | 20 | 20 | 40 | 40 | 25 | 25 | 5 | 5 | 5 | N/A |
| KNEAD2 (in minutes) | 14 | 15 | 19 | 22 | 18 | 20 | 8 | 20 | 20 | N/A |
| Rise2 (in minutes) | 25 | 25 | 30 | 30 | 35 | 35 | N/A | 30 | 30 | N/A |
| RISE3 (in minutes) | 40 | 40 | 45 | 45 | 60 | 60 | 15 | 40 | 40 | 11 |
| BAKE (in minutes) | 65 | 70 | 70 | 75 | 65 | 70 | 65 | 65 | 70 | 35 |
| KEEP WARM | Yes | Yes | Yes | Yes | Yes | Yes | Yes | Yes | Yes | Yes |
| Total time (in hours: minutes) | 02:53 | 03:00 | 03:40 | 03:50 | 03:32 | 03:40 | 01:40 | 02:50 | 02:55 | 00:58 |
| Program / process | 7. Ultra-fast 2 | 8. Dough | 9. Gluten-free 10. | Cake 11. Sandwich bread | 12. Baking | |||
| Bread size in g | 1000 | N/A | 750 | 1000 | N/A | 700 | 1000 | N/A |
| KNEAD1 (in minutes) | 9 | 20 | 12 | 12 | 10 | 15 | 15 | N/A |
| RISE1 (in minutes) | N/A | N/A | 20 | 20 | 5 | 40 | 40 | N/A |
| KNEAD2 (in minutes) | N/A | N/A | 13 | 13 | 20 | 5 | 5 | N/A |
| Rise2 (in minutes) | N/A | 30 | 45 | 45 | 30 | 25 | 25 | N/A |
| RISE3 (in minutes) | 9 | 40 | 45 | 45 | 35 | 40 | 40 | N/A |
| BAKE (in minutes) | 40 | N/A | 60 | 65 | 70 | 50 | 55 | 10-60 |
| KEEP WARM (in minutes) | N/A | N/A | Yes | Yes | Yes | Yes | Yes | Yes |
| Total time (in hours: minutes) | 00:58 | 01:30 | 03:15 | 03:20 | 02:50 | 02:55 | 03:00 | 0:10 to 0:60 |
23. Safety instructions and disclaimer
Please do not try to open the appliance to carry out repairs or modifications. Avoid contact with the mains voltage. Do not short-circuit the product. The appliance is not waterproof, hence please use it only in dry surroundings. Protect it from high humidity, water and snow. Keep the appliance away from high temperatures.
Do not expose the appliance to sudden changes in temperature or strong vibrations, as this could damage the electronic components. Check the appliance for any damage before using it. The appliance should not be used if it was subject to impact or has been damaged in some other manner. Please comply with the local regulations and restrictions. Do not use the appliance for purposes other than those described in the user manual. This product is not a toy.
Keep it out of the reach of children or mentally disabled persons.
Any repair or modifications to the appliance, which is not carried out by the original supplier will void any warranty and guarantee claims. The appliance should only be used by those who have read and understood this user manual. The specifications of the appliance may be changed without prior intimation.
24. Disposal instructions
In line with the European WEEE directive, electrical and electronic appliances should not be disposed of along with domestic waste. Their components have to be separately sent for recycling or disposal, because improper disposal of toxic and dangerous components may permanently damage the environment.
According to the Electrical and Electronic Equipment Act (ElektroG), you are obliged (as a consumer) to return (free of charge) all electrical and electronic appliances to the manufacturer, the point of sale, or public collection points at the end of their service life. The relevant
local laws regulate the details in this regard. The symbol displayed on the product, in the user manual or/and on the packaging refers to these regulations. With this manner of sorting, recycling and disposal of used appliances, you make an important contribution towards protecting our environment.

WEEE directive 2012/19/EU
WEEE Register no.: DE 67896761
The company WD Plus GmbH hereby certifies that the appliance 303528/20190108FS002 complies with the fundamental requirements and all other relevant stipulations. A complete conformity statement can be obtained from: WD Plus GmbH, Wohlenbergstraße 16, 30179 Hanover
Indice
natural_image
Line drawings showing two hand positions on a patient's abdomen, one with finger placement and arrow indicating pressure direction (no text or symbols)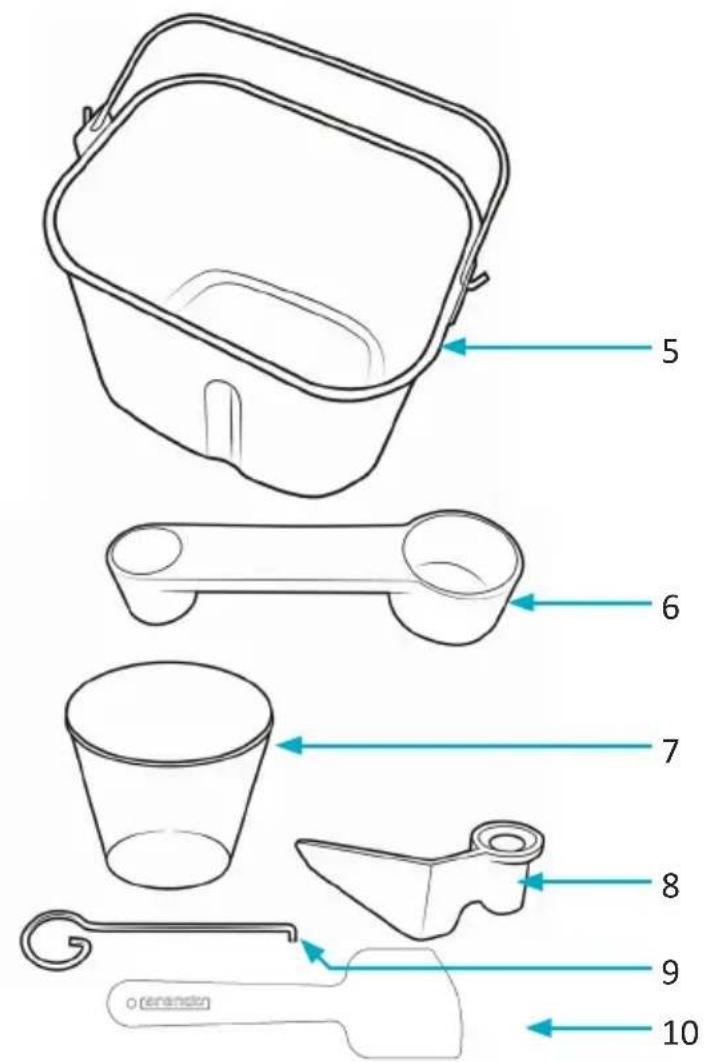
natural_image
Illustration of two hand positions demonstrating a massage technique (no text or symbols present)
natural_image
Illustration of two hand positions demonstrating a massage technique (no text or symbols present)
- Nummer Beschreibung
- Important safety instructions....31
- IMPORTANT SAFETY GUIDELINES FOR THIS APPLIANCE
- CAUTION: This appliance becomes very hot during use! There is a risk of burns!
- Scope of delivery
- Technical data
- Product details
- Before first use
- Display and Controls
- Default settings
- START/STOP
- Programs
- Selection of bread size and degree of browning
- g (small) or 1000 g (large)
- Time delay
- Pause
- Memory
- Keep-warm function
- Display warnings
- Baking bread
- Bread made of ready-mixes
- Special notes
- Program 4 (Fast)
- Program 9 (Ultra fast)
- Measuring the ingredients
- Sequence of ingredients
- Cleaning and Care
- Troubleshooting
- Notes on possible ingredients
- Different types of flour
- Whole grain
- Flour without baking powder
- Gluten flour
- Dark wheat flour
- Self drying flour
- Corn or oatmeal flour
- Sugar
- Eggs
- Baking soda
- Baking powder
- Salt
- Fat, butter and vegetable oil
- Water and other liquids
- Yeast
- Sample recipes
- Tips:
- Safety instructions and disclaimer
- Disposal instructions
- Indice
Brand : Arendo
Model : 303528
Category : Bread maker