
Boreal 16CR Silence - Fan TAURUS - Free user manual and instructions
Find the device manual for free Boreal 16CR Silence TAURUS in PDF.

| Product type | Pedestal fan with adjustable column |
| Brand | Taurus |
| Model | Boreal 16CR Silence |
| Blade diameter | 40 cm (16 inches) |
| Adjustable height | Yes (approx. 110-140 cm) |
| Weight | Approximately 5 kg |
| Power supply | 220-240 V ~ 50/60 Hz |
| Power | 50 W (estimated) |
| Number of speeds | 3 speeds |
| Ventilation modes | Normal, Breeze, Night |
| Timer | 1 to 12 hours |
| Oscillation | Yes (75°) |
| Remote control | Yes (AAA 1.5V batteries not included) |
| Ambient temperature display | Yes |
| Blade material | ABS plastic |
| Protection grille | Metal (front and rear) |
| Noise level | Silent (Silence technology) |
| Maintenance | Damp cloth, no solvents |
| Recommended use | Indoor only |
| Certifications | CE, recyclable (WEEE) |
Frequently Asked Questions - Boreal 16CR Silence TAURUS
User questions about Boreal 16CR Silence TAURUS
0 question about this device. Answer the ones you know or ask your own.
Ask a new question about this device
Download the instructions for your Fan in PDF format for free! Find your manual Boreal 16CR Silence - TAURUS and take your electronic device back in hand. On this page are published all the documents necessary for the use of your device. Boreal 16CR Silence by TAURUS.
USER MANUAL Boreal 16CR Silence TAURUS
EN. Instructions for use
FR. Mode d'emploi
natural_image
Line drawing of a standard office desk fan with adjustable arm and base (no text or symbols)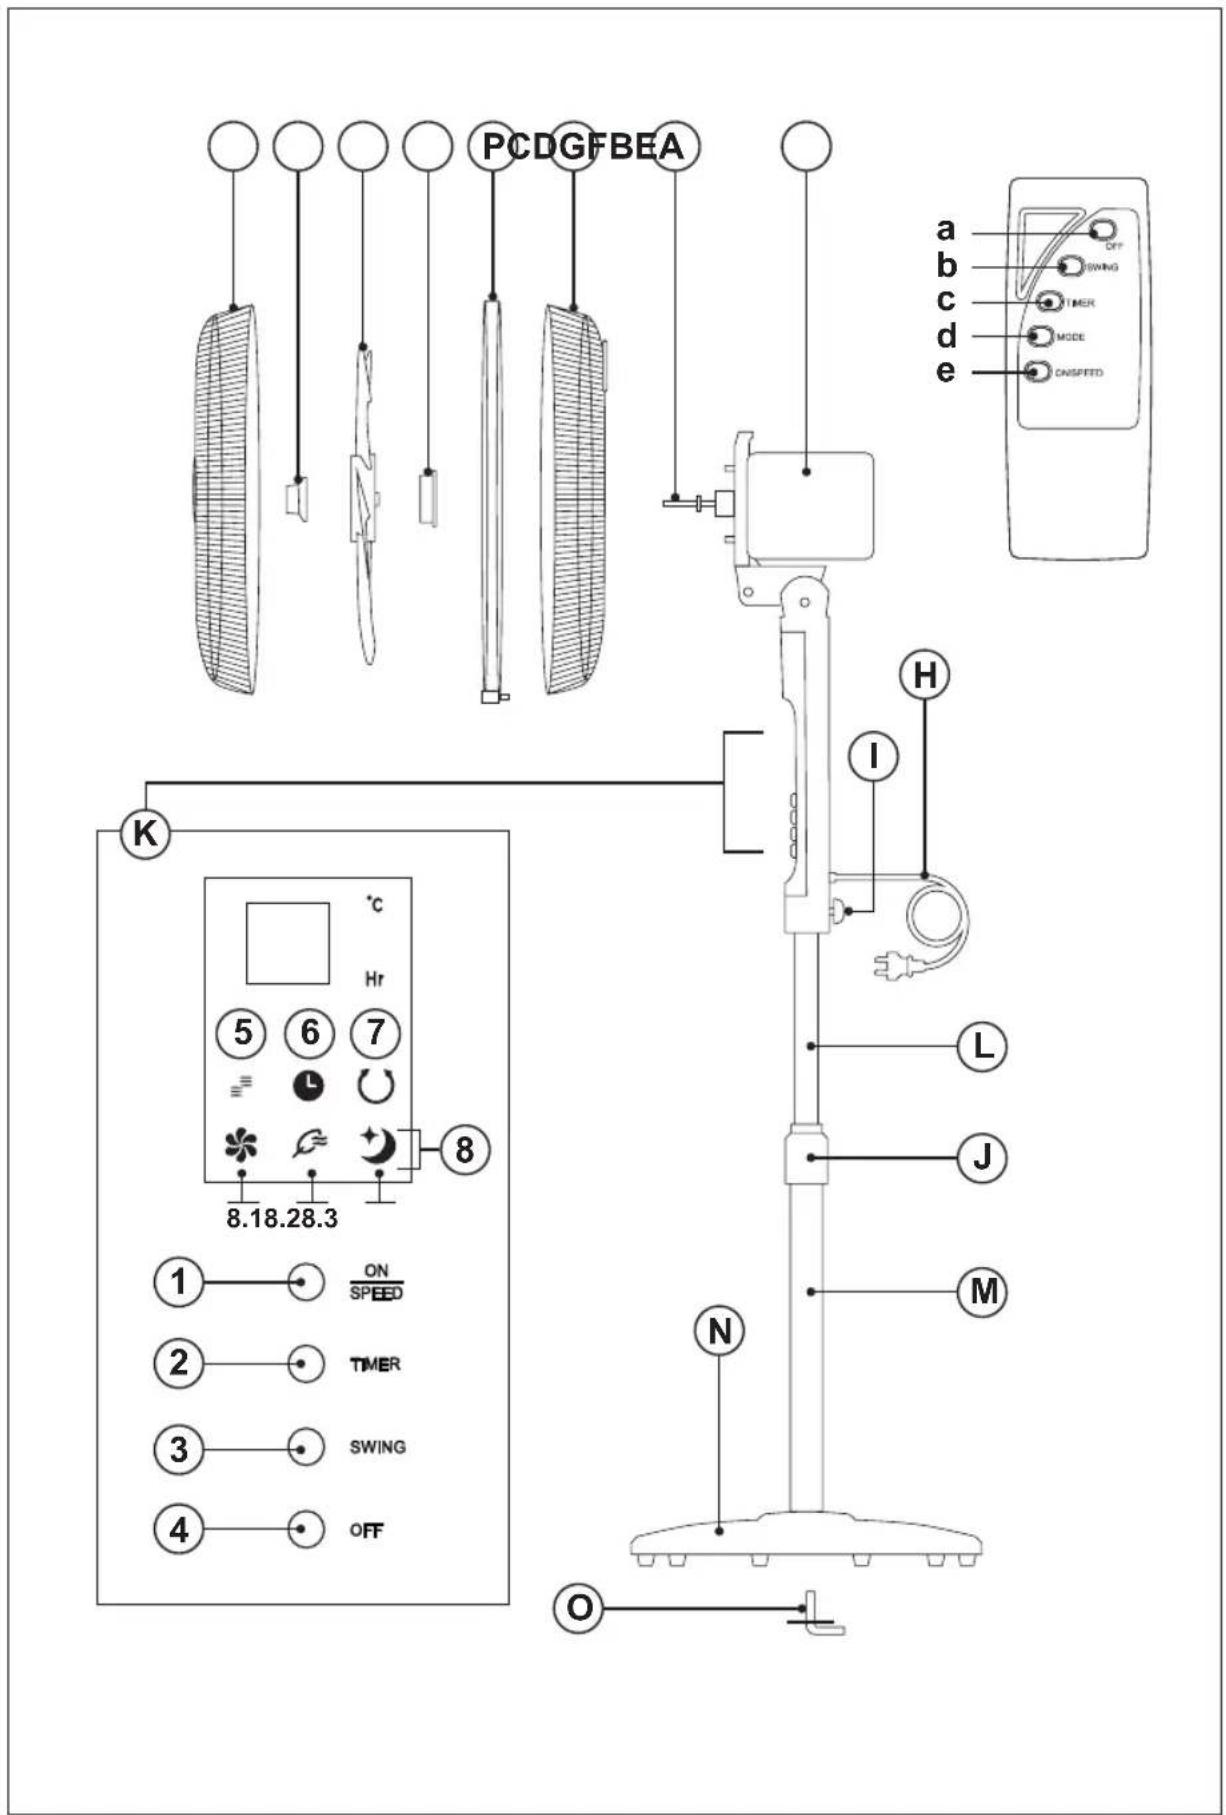
natural_image
Technical line drawing of a mechanical assembly with a cylindrical component and three supporting components (no text or symbols)Fig. 2
natural_image
Technical line drawing of a mechanical device with a grid-patterned panel and a separate vertical component (no text or symbols)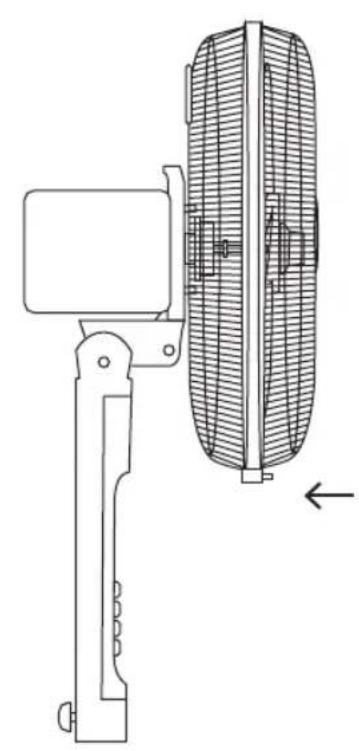
natural_image
Technical line drawing of a mechanical device with a side view showing internal components (no text or symbols)ES
VENTILADOR DE PIE BOREAL SILENCE
DESCRIPCIÓN
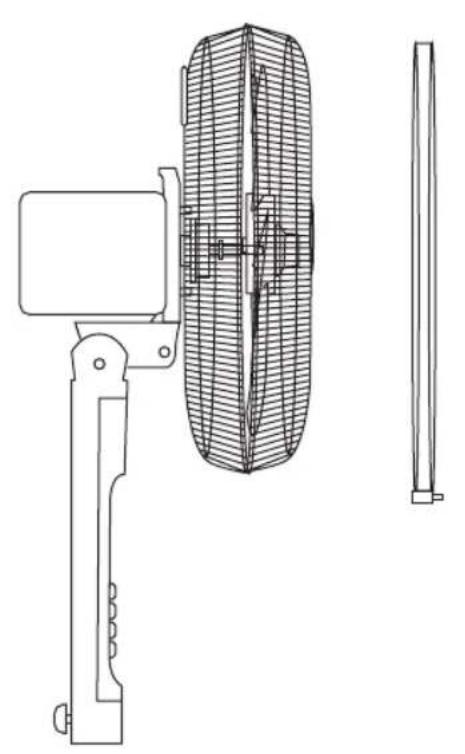
A Rejilla delantera
English (Original instructions)
STAND FAN BOREAL SILENCE
DESCRIPTION
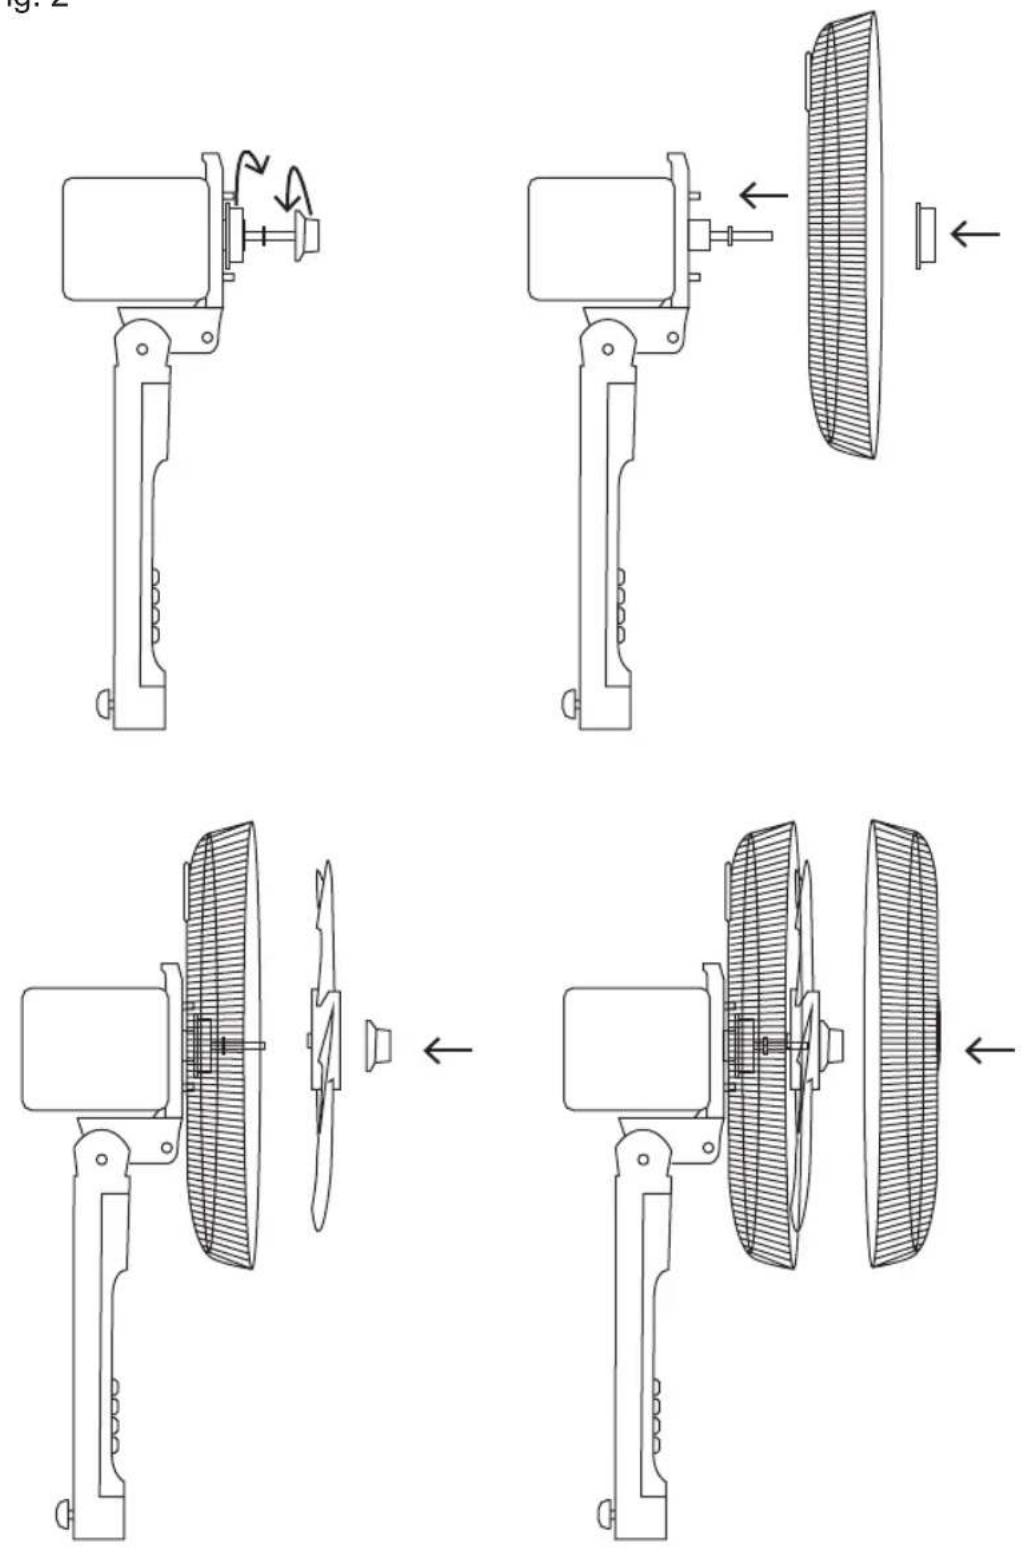
A Front Grill
B Propeller nut
C Propeller
D Grill Nut
E Rear Grill
F Motor Shaft
G Motor Housing
H Supply Cord
I Upper lock nut
J Lower lock clamp
K Control panel
L Inner Pipe
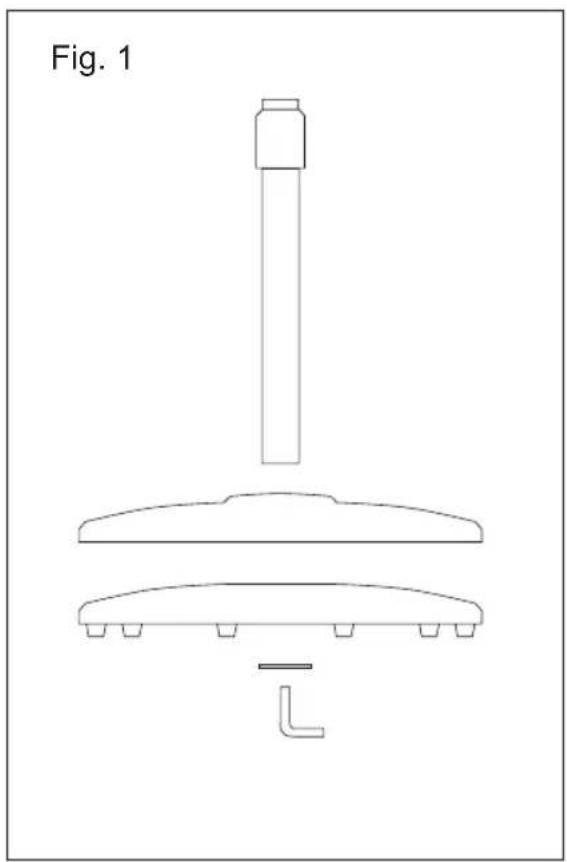
M Base Pipe
N Base
O Base Screw
P Fixing belt
Control Panel (K)
1 ON/Speed Change button
2 Timer button
3 Swing button
4 Off button
5 Fan Working Indicator
6 Timer Indicator
7 Oscillation Indicator
8 Mode Indicators
8.1 Normal Mode Indicator
8.2 Breeze Mode Indicator
8.3 Night Mode Indicator
Remote Control
a Off button
b Swing button
c Timer button
d Mode button
e On/Speed change button
USE AND CARE
- Fully extend the appliance's supply cord before each use.
- Do not use the appliance if the on/off buttons do not work.
- Do not use the appliance if the speed selection buttons do not work.
- Do not move the appliance while in use.
- Do not use the appliance if it is tipped up and do not turn it over.
- Do not turn the appliance over while it is in use or connected to the mains.
- Disconnect the appliance from the mains when not in use and before undertaking any cleaning task.
- Store this appliance out of reach of children and/or persons with physical, sensory or reduced mental or lack of experience and knowledge.
- Keep the appliance in a dry, dust-free place, out of direct sunlight.
- Make sure that dust, dirt or other foreign objects do not block the fan grill on the appliance.
- Keep the appliance in good condition. Check that the moving parts are not misaligned or jammed and make sure there are no broken parts or anomalies that may prevent the appliance from operating correctly.
- Never leave the appliance connected and unattended if is not in use. This saves energy and prolongs the life of the appliance.
- Do not use the appliance to dry pets or animals.
- Do not use the appliance to dry textiles of any kind.
INSTALLATION
- Be sure to remove all packaging material from inside the appliance.
- Ensure that the fan is switched off from the supply mains before start any installation or assembly operation.
- Do not remove the support base of the appliance.
- Ensure that the appliance is level with respect to the floor.
- Do not cover or obstruct the sides of the appliance and leave a minimum space of 40cm front other walls, ceiling...
- The plug must be easily accessible so it can be disconnected in an emergency.
- The appliance should be used with its base fitted.
ASSEMBLING THE BATTERY/S
- This appliance uses a pair of 1,5V AAA batteries.
- Caution: During the handling of batteries, do not touch both poles at the same time, as this will provoke the
partial discharge of the stocked energy therefore affecting longevity.
- Remove the cover of the battery compartment.
- Check that the plastic covering that protects the battery has been removed (some batteries are sold with a protective covering).
- Put the battery in its compartment, respecting the polarity.
- Replace the cover of the battery compartment.
- It is essential that the batteries should always be the same kind and the same charge. Never mix alkaline batteries with Carbon-Zinc ones and/or rechargeable ones.
• Non-rechargeable batteries are not to be recharged. - DO NOT charge rechargeable batteries while they are still in the appliance as it may cause internal gas or heat generation, resulting in an explosion or possibly a fire that could cause serious injury or property damage.
- To preserve battery life, remove the batteries when it's not being used, and is not expected to be used for extended periods of time.
ASSEMBLING THE BASE
- Fit the base with the column and secure it with the base screw provided. (Fig. 1).
- Couple the appliance to the base inserting the inner pipe in it and fixing it by using the upper lock nut.
- Stand the appliance up again so as to check that the base works properly.
ASSEMBLING THE GRILL AND THE PROPELLER (FIG. 2).
- Remove the rear grill nut and the propeller nut from the motor shaft if they are attached to it when removing the appliance from its packaging.
- Fit the rear grill (E) on the motor housing (G), matching their fitting points.
- Tight the grill nut (D) that attaches the grill, make sure of a correct setting.
- Fit the propeller (C) On the motor shaft (F) fitting in its right position.
- Tight the propeller nut (B) that attaches the propeller. Make sure of a correct setting.
- Fit the front grill (A) front the rear grill (E). Fix the front and rear grills turning around its fixing belt (P) and tight the security screw by using a screwdriver.
- Check the correct rotation of the propeller.
INSTRUCTIONS FOR USE
BEFORE USE
- Make sure that all product's packaging has been removed.
- Please read carefully the "Safety advice and warnings" booklet before first use.
- Prepare the appliance according to the function you wish to use:
USE
- Extend the supply cord completely before plugging it in.
- Connect the appliance to the mains.
- Guide the appliance to direct the flow of air in the desired direction.
- Turn the appliance on, by using the ON/Speed Change button.
• The Fan Working Indicator (5) comes on. - Select the desired speed by pressing ON/Speed Change button again.
FAN FUNCTION
- Select the desired ventilation speed.
- Select the desired mode of ventilation (d).
TIMER FUNCTION
- The appliance's operating time can be controlled. (1-12h)
- To program the operating time simply select it using the (c) button on the remote control.
• Each time the button is pressed, an hour is added. - The programmed time will appear on the display.
- Once the selected time has elapsed, the device will turn off automatically.
- The oscillation function makes it possible to direct the flow from the apparatus so that it automatically alternates over a range of 75^ .
- To activate this function, press the (b) button on the control remote or (3) in the control panel.
- To deactivate this function, press one of these two buttons again.
ROOM TEMPERATURE
- In standby mode or after 5 seconds without manipulation, the fan will display the room temperature.
HEIGHT ADJUSTMENT
- The appliance height can be adjusted, it's just necessary to unlock the lower lock clamp (J) place the appliance at the desired height and lock again the lock clamp (J).
ONCE YOU HAVE FINISHED USING THE APPLIANCE
- Turn the appliance off, using the Off button.
- Unplug the appliance from the mains.
- Clean the appliance.
CLEANING
- Disconnect the appliance from the mains and allow it to cool before undertaking any cleaning task.
- Clean the equipment with a damp cloth with a few drops of washing-up liquid and then dry.
- Do not use solvents, or products with an acid or base pH such as bleach, or abrasive products, for cleaning the appliance.
- Never immerse the appliance in water or any other liquid or place it under running water.
- If the appliance is not in good condition of cleanliness, its surface may degrade and inexorably affect the duration of the appliance's useful life and could become unsafe to use.
FR
ΘΕΡΜΟΚΡΑΣΙΑ ΔΩΜΑΤΙΟΥ
1 ON/SpeedChange-painike
2 Ajastinpainike
3 Kääntöpainike
4 Pois-painike
הכלה pH is transpiration, transpiration is the first state of the second state of the third state of the fourth state of the fifth state of the sixth state of the seventh state of the eighth state of the sixth state of the seventh state of the eighth state of the sixth state of the sixth state of the sixth state of the sixth state of the sixth state of the sixth state of the sixth state of the sixth state of the sixth state of the sixth state of the sixth state of the sixth state of the sixth state of the sixth state of the sixth state of the sixth state of the sixth state of the sixth state of the sixth state of the sixth state of the sixth state of the sixth state of the sixth state of the sixth state of the sixth state of the fourth state
תְבָרִיֹתְבָרִיֹתְבָרִיֹתְבָרִיֹתְבָרִיֹתְבָרִיֹתְבָרִיֹתְבָרִיֹתְבָרִיֹתְגּוֹת
(K) בְּרָה בְּרָה
הכלהה/הכלהה 1
הכלה 2
3
הכלה 4
תְרָה בַעּוֹת 5
הכלה 6
7
8
8.1
הכלה 8.2
הכלה 8.3
הכלה