DWBL700 - Blower DEWALT - Free user manual and instructions
Find the device manual for free DWBL700 DEWALT in PDF.

| Product Type | Corded Electric Blower |
| Brand | DeWALT |
| Model | DWBL700 |
| Power Supply | Corded, 120 V, AC |
| Double Insulation | Yes |
| Included Nozzles | Wide, Narrow, Flared |
| Variable Speed | Yes, via trigger and lock lever |
| Weight | 2.6 kg (approx.) |
| Tube Length | Approx. 90 cm |
| Limited Warranty | 3 years |
| Intended Use | Professional outdoor blowing |
| Required Safety Gear | Safety glasses, hearing protection, dust mask |
| Cleaning | Dry compressed air on vents, damp cloth with water and mild soap |
| Repairs | Authorized DEWALT service center only |
| Replacement Parts | Identical original parts, exclusive to DEWALT |
| Recommended Accessories | DEWALT only |
Frequently Asked Questions - DWBL700 DEWALT
User questions about DWBL700 DEWALT
0 question about this device. Answer the ones you know or ask your own.
Ask a new question about this device
Download the instructions for your Blower in PDF format for free! Find your manual DWBL700 - DEWALT and take your electronic device back in hand. On this page are published all the documents necessary for the use of your device. DWBL700 by DEWALT.
USER MANUAL DWBL700 DEWALT
English (original instructions) 1
Definitions: Safety Alert Symbols and Words
This instruction manual uses the following safety alert symbols and words to alert you to hazardous situations and your risk of personal injury or property damage.
DANGER: Indicates an imminently hazardous situation which, if not avoided, will result in death or serious injury.
WARNING: Indicates a potentially hazardous situation which, if not avoided, could result in death or serious injury.
CAUTION: Indicates a potentially hazardous situation which, if not avoided, may result in minor or moderate injury.
(### without word) Indicates a safety related message.
NOTICE: Indicates a practice not related to personal injury which, if not avoided, may result in property damage.
Fig. A
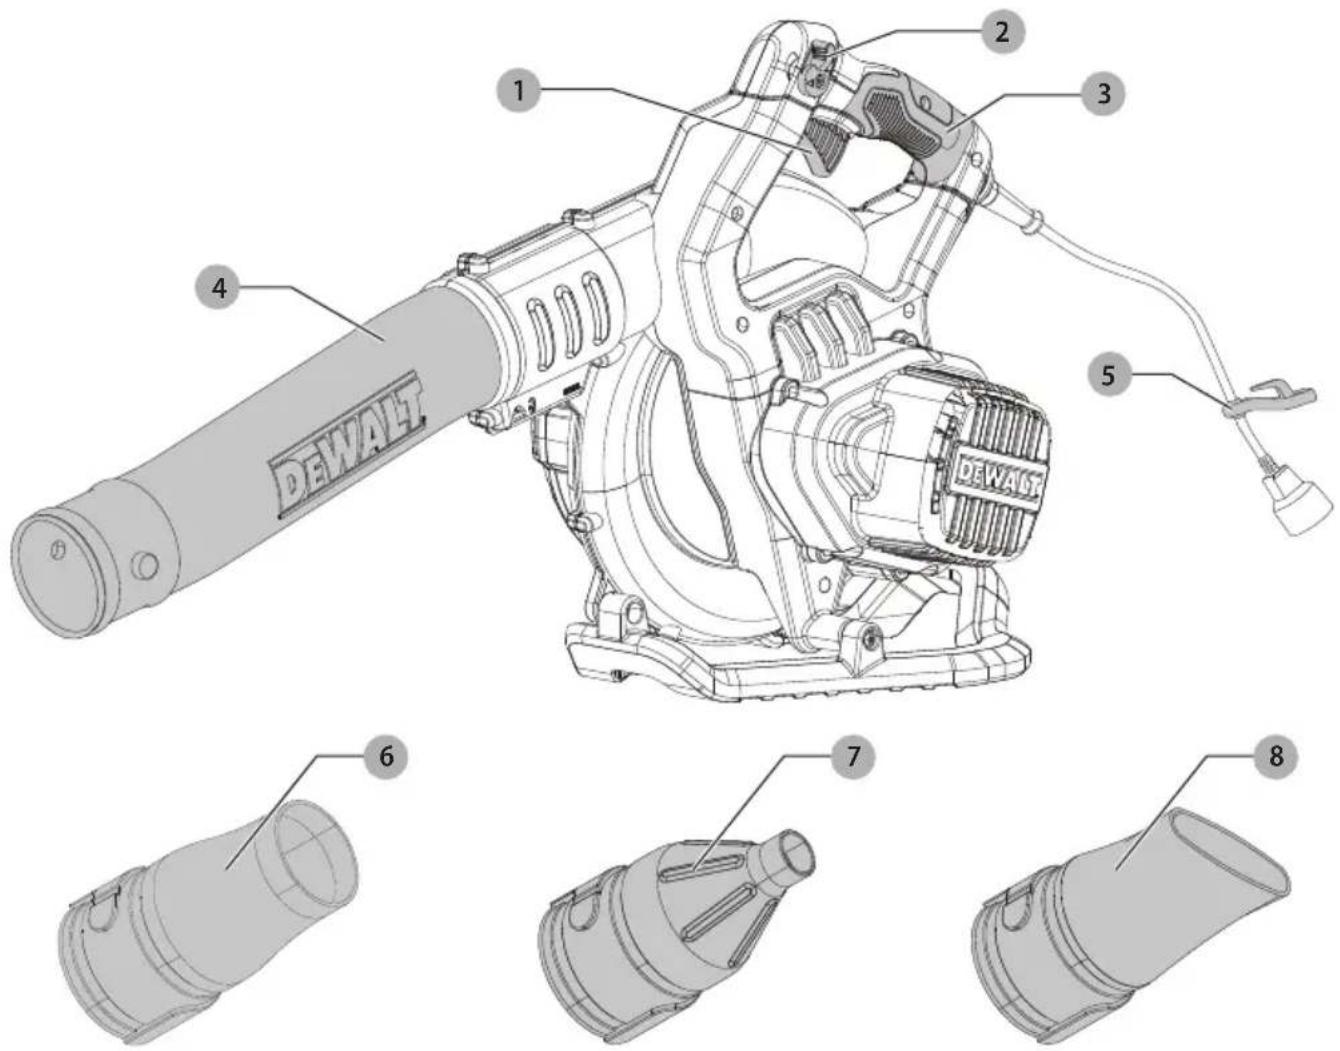
1 Trigger switch
2 Speed lock lever
3 Handle
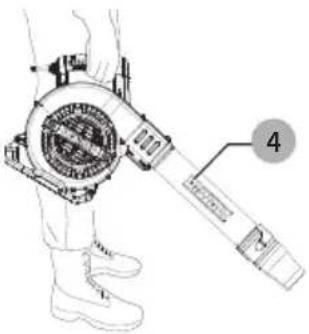
4 Tube
5 Cord retainer
6 Large end nozzle
7 Narrow end nozzle
8 Wide end nozzle
WARNING! Read all safety warnings and all
instructions. Failure to follow the warnings and instructions may result in electric shock, fire and/or serious injury.

WARNING: To reduce the risk of injury, read the
instruction manual.
If you have any questions or comments about this or any DEWALT tool, call us toll free at:
1-800-4-DeWALT (1-800-433-9258).
English
IMPORTANT SAFETY WARNINGS
WARNING: When using an electric tool, basic safety precautions should always be followed to reduce risk of fire, electric shock, and personal injury, including the following.
WARNING: To reduce risk of injury:
- Before any use, be sure everyone using this unit reads and understands all safety instructions and other information contained in this manual.
- Save these instructions and review frequently prior to use and in instructing others.
- Do not point unit discharge at self or bystanders.
- Keep long hair and loose clothing away from openings and moving parts.
• This appliance is intended for commercial use.
WARNING: Some dust created by this product contains chemicals known to the State of California to cause cancer, birth defects or other reproductive harm. Some examples of these chemicals are:
- compounds in fertilizers
- compounds in insecticides, herbicides and pesticides
- arsenic and chromium from chemically treated lumber
To reduce your exposure to these chemicals, wear approved safety equipment such as dust masks that are specially designed to filter out microscopic particles.
READ ALL AND UNDERSTAND ALL INSTRUCTIONS BEFORE USING
General Safety Warnings and Instructions for All Tools
WARNING:
Read all safety
Warnings and all instructions. Failure to follow the warnings and instructions may result in electric shock, fire and/or serious injury.
- ALWAYS WEAR EYE PROTECTION – Wear safety glasses or goggles that conforms to ANSI Z87.1 (CAN/CSA Z94.3) at all times when this unit is in use. Also use face or dust mask. Safety glasses are available at extra cost at your localDEWALT Service Center or authorized service facility.
- DO NOT place outlet of blower near eyes or ears when operating.
- STORE IDLE UNITS. When not in use, the unit should be stored in a dry, high or locked-up place - out of reach of children.
- DON'T OVERREACH. Keep proper footing and balance at all times.
- MAINTAIN UNIT WITH CARE. Keep unit clean for best and safest performance. Follow instructions for proper maintenance.
- DO NOT attempt to repair the blower. To assure product safety and reliability, repairs, maintenance, and
adjustments should be performed by DrWALT service centers or authorized service centers, always using DrWALT replacement parts.
- DO NOT operate blower in a gaseous or explosive atmosphere. Motors in these units normally spark, and the sparks might ignite fumes.
- AVOID DANGEROUS ENVIRONMENTAL CONDITIONS – Do not use electric units in damp or wet locations. Don't use the unit in the rain.
- STAY ALERT - Watch what you are doing. Use common sense. Do not operate unit when you are tired.
- USE THE RIGHT UNIT – Do not use this unit for any job except that for which it is intended.
- USE EXTRA CARE when cleaning on stairs.
- DO NOT allow to be used as a toy. Close attention is necessary when used by or near children. Not recommended for use by children.
- DO NOT attempt to clear clogs from unit without first unplugging.
- USE ONLY as described in this manual. Use only manufacturer's recommended attachments.
- DO NOT put any objects into openings. Do not use with any opening blocked; keep free of dust, lint, hair and everything that may reduce air flow.
- KEEP hair, loose clothing, fingers, and all parts of body away from openings and moving parts.
• DO NOT immerse any part of the unit in liquid.
- KEEP CHILDREN, BYSTANDERS AND ANIMALS AWAY from the work area a minimum of 30 feet (10 meters) when starting or operating the unit.
- INSPECT THE AREA before using the unit. Remove all debris and hard objects such as rocks, glass, wire, etc. that can ricochet, be thrown, or otherwise cause injury or damage during operation.
- DO NOT leave appliance when plugged in. Unplug from outlet when not in use and before servicing.
- DO NOT use with damaged cord or plug. If appliance is not working as it should, has been dropped, damaged, left outdoors, or dropped into water, return it to a service center.
- DO NOT pull or carry by cord, use cord as a handle, or pull cord around sharp edges or corners. Keep cord away from heated surfaces.
- DO NOT unplug by pulling on cord. To unplug, grasp the plug, not the cord.
- Do not handle plug or appliance with wet hands.
- Turn off all controls before unplugging.
- This appliance is provided with double insulation. Use only identical replacement parts. See instructions for Servicing of Double-Insulated Appliances.
- To reduce the risk of electric shock, use only with an extension cord intended for outdoor use, such as SJW or SJTW.
- Make sure your extension cord is in good condition and is the correct size for your appliance. The Minimum Gauge for Cord Sets chart below shows the correct size to use depending on cord length and nameplate ampere rating. If in doubt, use the next heavier gage. The smaller
the gage number, the heavier the cord. An undersized extension cord will cause a drop in line voltage resulting in loss of power and overheating
- Maintain Appliance With Care – Inspect extension cords periodically and replace if damaged.
- To reduce the risk of disconnection of appliance cord from the extension cord during operating:
i) Make a knot as shown in figure B; or
ii) Use one of the plug-receptacle retaining straps or connectors described in this manual.
OR
iii) Secure the extension cord to the appliance plug as shown or described in the Operating Instructions.
fig. B
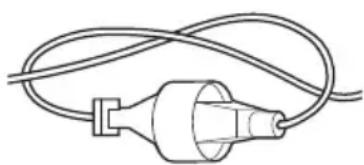
natural_image
Simple line drawing of a plug with coiled wires (no text or symbols)WARNING: To reduce the risk of personal injury due to a loose electrical connection between the appliance's plug and extension cord, firmly and fully attach the appliance plug to the extension cord. Periodically check the connection while operating to ensure it is fully attached. Do not use an extension cord that provides a loose connection. A loose connection may result in overheating, fire, and increases the risk of a burning.
WARNING: Always wear proper personal hearing protection that conforms to ANSI S12.6 (S3.19)
during use. Under some conditions and duration of use, noise from this product may contribute to hearing loss.
WARNING: ALWAYS use safety glasses. Everyday eyeglasses are NOT safety glasses. Also use face or dust mask if operation is dusty. ALWAYS WEAR CERTIFIED SAFETY EQUIPMENT:
- ANSI Z87.1 eye protection (CAN/CSA Z94.3),
- ANSI S12.6 (S3.19) hearing protection,
- NIOSH/OSHA/MSHA respiratory protection.
WARNING: To reduce the risk of electrical shock; do not expose to rain. Store indoors.
WARNING: Cut Hazard. Turn off and unplug unit, then wait until fan stops or at least 10 seconds before removing the blower or vacuum tube assemblies.
Servicing of Double Insulated Appliances
Your Blower/Vac is double-insulated to give you added safety. In a double insulated appliance, two systems of insulation are provided instead of grounding. No grounding means is provided on a double insulated appliance, nor should a means for grounding be added to the appliance. Servicing a double insulated appliance requires extreme care and knowledge of the system and should be done only by qualified service personnel. Replacement parts for a double insulated appliance must be identical to the parts they replace. A double insulated appliance is marked with the words double insulated or "double insulation". The symbol (square within a square) may also be marked on the appliance.
Safety Rules and Instructions: Extension Cords
Double insulated tools have 2-wire cords and can be used with 2-wire or 3-wire extension cords. Only round jacketed extension cords should be used, and we recommend that they be listed by Underwriters Laboratories (U.L.) (C.S.A. in Canada). If the extension will be used outside, the cord must be suitable for outdoor use. Any cord marked as outdoor can also be used for indoor work.
An extension cord must have adequate wire size (AWG or American Wire Gauge) for safety, and to prevent loss of power and overheating. The smaller the gauge number of the wire, the greater the capacity of the cable, that is 16 gauge has more capacity than 18 gauge. When using more than one extension to make up the total length, be sure each individual extension contains at least the minimum wire size. Before using an extension cord, inspect it for loose or exposed wires, damaged insulation, and defective fittings. Make any needed repairs or replace the cord if necessary.
Minimum Gauge for Cord Sets
| Volts | Total Length of Cord in Feet (meters) | ||||
| 120 V 25 (7.6) | 50 (15.2) 100 | (30.5) 150 | (45.7) | ||
| 240 V 50 (15.2) | 100 (30.5) | 200 (61.0) | 300 (91.4) | ||
| Ampere Rating | American Wire Gauge | ||||
| More Than | Not More Than | ||||
| 0 6 18 | 16 16 14 | ||||
| 6 10 18 | 16 14 12 | ||||
| 10 12 16 | 16 14 12 | ||||
| 12 16 14 | 12 Not Recommended | ||||
Safety Rules and Instructions: Polarized Plug
To reduce the risk of electric shock, this equipment has a polarized plug (one blade is wider than the other). This equipment must be used with a suitable polarized 2 wire or 3 wire extension cord. Polarized connections will fit together only one way. Make sure that the receptacle end of the extension cord has large and small blade slot widths. If the plug does not fit fully into the extension cord, reverse the plug. If it still does not fit, obtain a suitable extension cord. If the extension cord does not fit fully into the outlet, contact a qualified electrician to install the proper outlet. Do not change the tool plug or extension cord in any way.
The label on your tool may include the following symbols. The symbols and their definitions are as follows:
| V......voltsHz......hertzmin......minutes————or DC......direct current | Class I Construction(grounded).../min......per minuteBPM......beats per minute |
English
⚠️ ...... safety alert symbol
▲......visible radiation
......wearrespiratory
protection
weareye
protection
O....wearhearing
protection
SAVE THESE INSTRUCTIONS FOR FUTURE USE
COMPONENTS (FIG. A)
WARNING: Never modify the power tool or any part of the damage or personal injury could result.
Refer to Figure A at the beginning of this manual for a complete list of components.
INTENDED USE
This appliance is designed for professional outdoor blower applications.
DO nOT use under wet conditions or in presence of flammable liquids or gases.
This appliance is a professional power tool. DO nOT let children come into contact with the tool. Supervision is required when inexperienced operators use this tool.
ASSEMBLY AND ADJUSTMENTS
WARNING: To reduce the risk of serious personal injury, turn unit off and unplug before making any adjustments or removing/installing attachments or accessories. An accidental start-up can cause injury.
CAUTION: The tube must be attached to the housing 9 before use.
1. TUBE AssEMBIY:
To attach the tube to the blower, line up the pegs 10 on the bottom of the tube with the notch 11 on the bottom of the housing opening as shown in
fig. C
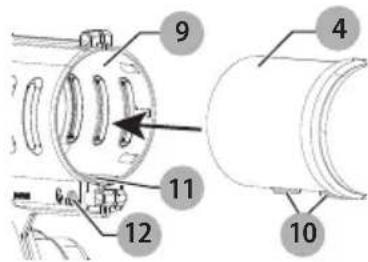
figure C. Push the tube into the blower housing until the lock engages the tube.
-
Pull on the tube to ensure it is securely in place.
-
To remove the tube, insert a screwdriver into the unlocking hole 12 on the side of the housing. Lift the tab inside and pull tube out.
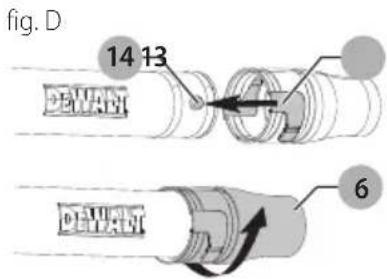
Attaching Nozzles (Fig. D)
-
Line up the channels 13 of the desired nozzle 6, 7, or 8 with the nubs 14 on the tube 4.
-
Slide the nozzle onto the tube.
-
Firmly twist the nozzle to lock the nubs completely into the recesses of the nozzle. Ensure the nozzle is securely attached.
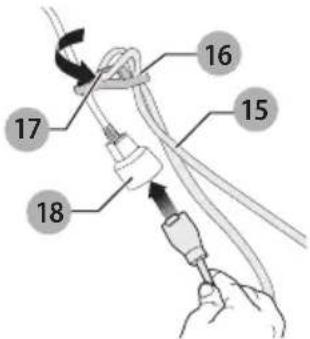
Attaching Extension Cord To Blower (Fig. A, E)
WARNING: Do not use with tube removed.
WARNING: Ensure the trigger switch is not engaged to reduce the risk of starting the appliance accidentally.
-
Near the end of the extension cord 15, fold the extension cord to create a loop.
-
Feed the loop into the bottom hole 16 of the cord retainer 5 as shown in figure E.
-
Slide the loop over the hook 17 of the cord retainer so it rests fully in the cord retainer.
-
Plug the extension cord into the power head 18.
fig. E
OPERATION
WARNING: Do not operate blower without tube solely in place. Never reach down into housing through tube hole.
Proper Hand Position (Fig. F)
WARNING: To reduce the risk of serious personal injury, ALWAYS use proper hand position as shown.
WARNING: To reduce the risk of serious personal injury, ALWAYS hold securely in anticipation of a sudden reaction.
Proper hand position requires one hand on the main handle 4.
fig.F
natural_image
Technical line drawing of a mechanical device with labeled component '4' (no text or symbols beyond label)Switching On (Fig. A, F, G)
CAUTION: Do not point unit discharge at self or by banders.
CAUTION: Always wear safety glasses. Wear a filter mask of the operation is dusty. Use of gloves, long pants and substantial footwear is recommended. Keep long hair and loose clothing away from openings and moving parts.
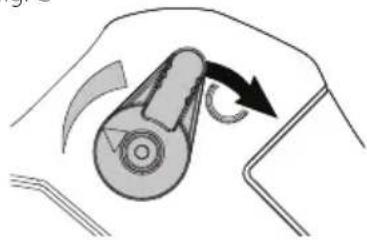
To turn the blower on, depress the trigger switch 1.
To lock the blower on, pull back on the speed lock lever 2, as shown in figure G. The blower runs at higher speeds as the lever is moved further. The speed lock lever can also be pulled back to start the blower without needing to first depress the trigger switch.
fig. G
natural_image
Diagram of a mechanical device with rotating arm and curved arrows indicating motion (no text or symbols)- Hold the blower with one hand as shown in figure F and sweep from side to side with the tube 4 several inches above the hard surface. Slowly advance keeping the accumulated pile of debris in front of you.
MAINTENANCE
WARNING: To reduce the risk of serious personal injury, turn unit off and unplug before making any adjustments or removing/installing attachments or accessories. An accidental start-up can cause injury.
Cleaning
WARNING: Blow dirt and dust out of all air vents with clean, dry air at least once a week. To minimize the risk of eye injury, always wear ANSI Z87.1 approved eye protection when performing this.
WARNING: Never use solvents or other harsh chemicals for cleaning the non-metallic parts of the tool. These chemicals may weaken the plastic materials used in these parts. Use a cloth dampened only with water and mild soap. Never let any liquid get inside the tool; never immerse any part of the tool into a liquid.
Accessories
WARNING: DO NOT use the blower with any type of accessory or attachment. Such usage might be hazardous.
WARNING: Since accessories, other than those offered by DEWALT, have not been tested with this product, use of such accessories with this tool could be hazardous. To reduce the risk of injury, only DEWALT recommended accessories should be used with this product.
Recommended accessories for use with your tool are available at extra cost from your local dealer or authorized service center. If you need assistance in locating any accessory, please contact DEWALT Industrial Tool Co., 701 East Joppa Road, Towson, MD 21286, call 1-800-4-DFWALT (1-800-433-9258) or visit our website: www.dewalt.com.
Repairs
WARNING: To assure product SAFETY and ABILITY, repairs, maintenance and adjustment (including brush inspection and replacement) should be performed by a DeWALT factory service center or a DeWALT authorized service center. Always use identical replacement parts.
Register Online
Thank you for your purchase. Register your product now for:
- WARRANTY sERViCE: Registering your product will help you obtain more efficient warranty service in case there is a problem with your product.
- COnFiRMATiOn OF OWnERshiP: In case of an insurance loss, such as fire, flood or theft, your registration of ownership will serve as your proof of purchase.
• FOR YOUR SAFETY: Registering your product will allow us to contact you in the unlikely event a safety notification is required under the Federal Consumer Safety Act.
Register online at www.dewalt.com/register.
English
Three Year Limited Warranty
DEWALT will repair, without charge, any defects due to faulty materials or workmanship for three years from the date of purchase. This warranty does not cover part failure due to normal wear or tool abuse. For further detail of warranty coverage and warranty repair information, visit www.dewalt.com or call 1-800-4-DEWALT (1-800-433-9258). This warranty does not apply to accessories or damage caused where repairs have been made or attempted by others. This warranty gives you specific legal rights and you may have other rights which vary in certain states or provinces. In addition to the warranty, DEWALT tools are covered by our:
1 YEAR FREE sERViCE
DeWALT will maintain the tool and replace worn parts caused by normal use, for free, any time during the first year after purchase.
90 DAY MOnEY BACK gUARAnTEE
If you are not completely satisfied with the performance of your DeWALT Power Tool, Laser, or Nailer for any reason, you can return it within 90 days from the date of purchase with a receipt for a full refund – no questions asked.
IATin AMERiCA: This warranty does not apply to products sold in Latin America. For products sold in Latin America, see country specific warranty information contained in the packaging, call the local company or see website for warranty information.
FREE WARning IABEL REPIACEMENT: If your warning labels become illegible or are missing, call 1-800-4-DrWALT (1-800-433-9258) for a free replacement.

natural_image
Simple line drawing of a plug with wires, no text or symbols presentfabrication classe I (double isolation)
natural_image
Diagram of a mechanical device with directional arrows indicating motion (no text or symbols)MAINTENANCE
natural_image
Simple line drawing of a plug with coiled wires (no text or symbols)Encendido (Fig. A, F, G)
natural_image
Diagram of a mechanical device with rotating arrow and circular motion indicator (no text or symbols)MANTENIMIENTO
Eje Central Lázaro Cárdenas No. 18 - Local (55) 5588 9377 D, Col. Obrera
MERIDA, YUC
Calle 63 #459-A - Col. Centro (999) 928 5038
MONTERREY, N.L.
Av. Francisco I. Madero 831 Poniente - Col. (818) 375 23 13 Centro
PUEBLA, PUE
17 Norte #205 - Col. Centro (222) 246 3714
QUERETARO, QRO
Av. San Roque 274 - Col. San Gregorio (442) 2 17 63 14
SAN LUIS POTOSI, SLP
Chargers/Charge Time (Minutes)
| Battery Cat # | Output Voltage | 120 Volts 12 Volts | DCB119 | DW0249 | |||||||||||||
| DC9000 | DC9310 | DC9320 | DCB095 | DCB101 | DCB102 | DCB103 | DCB107 | DCB112 | DCB113 | DCB114 | DCB115 | DCB118 | DCB132 | ||||
| DCB606 | 60/20 | X | X | X | X | 100 | 100 | 100 | 272 | 170 | 140 | X | 90 | 60 | 90 | X | X |
| DCB404 40 | XXXXXXXXXXXXXXXXXX | 90 | XXXXXXXXXX | ||||||||||||||
| DCB406 40 | XXXXXXXXXXXXXXXXXX | 130 | XXXXXXXXXX | ||||||||||||||
| DC9360 36 | 45 | XXXXXXXXXXXXXXXXXX | |||||||||||||||
| DCB361 36 | 45 | XXXXXXXXXXXXXXXXXX | |||||||||||||||
| DC9280 28 | 60 | XXXXXXXXXXXXXXXXXX | |||||||||||||||
| DW0242 | 24 | XXXXXXXXXXXXXXXXXX | 60 | ||||||||||||||
| DCB200 | 20 | X | X | X | X | 60 | 60 | 60 | 140 | 90 | 67 | X | 45 | 45/30** | 45 | 90 | X |
| DCB201 | 20 | X | X | X | X | 30 | 30 | 30 | 70 | 45 | 35 | X | 22 | 22 | 22 | 45 | X |
| DCB203 | 20 | X | X | X | X | 35 | 35 | 35 | 90 | 60 | 45 | X | 30 | 30 | 30 | 60 | X |
| DCB203BT* | 20 | X | X | X | X | 35 | 35 | 35 | 90 | 60 | 45 | X | 30 | 30 | 30 | 60 | X |
| DCB204 | 20 | X | X | X | X | 70 | 70 | 70 | 185 | 120 | 90 | X | 60 | 60/40** | 60 | 120 | X |
| DCB204BT* | 20 | X | X | X | X | 70 | 70 | 70 | 185 | 120 | 90 | X | 60 | 60 | 60 | 120 | X |
| DCB205 | 20 | X | X | X | X | 95 | 95 | 95 | 240 | 150 | 112 | X | 75 | 75/47** | 75 | 150 | X |
| DCB207 | 20 | X | X | X | X | 30 | 30 | 30 | 60 | 40 | 30 | X | 22 | 22 | 22 | X | X |
| DC9182 | 18 | X | 40 | 40 | X | X | X | 40 | X | X | X | X | X | X | X | X | 40 |
| DCB120 | 12 | X | X | X | X | 30 | 30 | 30 | 60 | 45 | 35 | X | 20 | X | X | 45 | X |
| DCB127 | 12 | X | X | X | X | 35 | 35 | 35 | 90 | 60 | 50 | X | 30 | X | X | 60 | X |
| DCB080 8 | XXXXXXXXXXXXXXXX | ||||||||||||||||
*BT - Bluetooth® NOTE: The Bluetooth® word mark and logos are registered trademarks owned by the Bluetooth®, SIG, Inc. and any use of such marks by DeWALT is under license. Other trademarks and trade names are those of their respective owners.
**Battery Datecode 201536 or later.
"X" Indicates that the battery pack is not compatible with that specific charger. All charge times are approximate. Actual charge time may vary. Read the instruction manual for more specific information.
"X" indique que le bloc-piles n'est pas compatible avec ce chargeur. Les durées de charge sont approximatives; la durée de charge rélle peut varier. Lire le manuel d'utilisation pour obtenir des renseignements plus précis.
Una "X" indica que el paquete de baterías no es compatible con ese determinado cargador. El tiempo de duración de carga es aproximado; la duración de carga real puede variar. Lea el manual de instrucciones para obtener información más precisa.