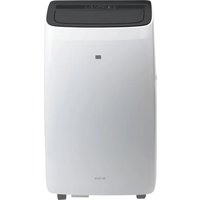
BC16KL2201FW - Air Conditioning Be Cool - Free user manual and instructions
Find the device manual for free BC16KL2201FW Be Cool in PDF.


| Product Type | Monoblock portable air conditioner |
| Brand | Be Cool |
| Model | BC16KL2201FW |
| Cooling Power | 16,000 BTU/h (4.617 kW) |
| Power Consumption (Cooling) | 1,740 W |
| Maximum Power Consumption | 2,000 W |
| Supply Voltage | 220-240 V ~ 50 Hz |
| Maximum Current | 9.8 A |
| Refrigerant | R290 (flammable, 0.270 kg) |
| Dimensions (W × D × H) | 450 × 396 × 745 mm |
| Weight | 35.9 kg |
| Noise Level | 65 dB(A) |
| Airflow | 520 m³/h |
| Energy Class | A (EER 2.78) |
| Operating Modes | Cooling, fan, dehumidification, automatic (Smart) |
| Special Functions | 24-hour timer, oscillation, sleep mode, °C/°F switch |
| Number of Filters | 3 air filters (washable) |
| Filter Cleaning | At least once a week (vacuum or water at max 40 °C) |
| Water Drainage | Manual (2 L tank) or continuous (12.7 mm hose) |
| Included Accessories | Remote control (2 AAA batteries), air exhaust hose, adapters, window kit, water hose |
| Safety | Anti-freeze protection, automatic shutdown when tank full (Ft), IPX0 class |
| Spare Parts / Repairability | Filters, remote control, hoses – repairs only by authorized service center |
| Warranty | 2 years (Austria) – see manual for conditions |
| Country of Manufacture / Brand | Austria (Schuss Home Electronic GmbH) |
Frequently Asked Questions - BC16KL2201FW Be Cool
User questions about BC16KL2201FW Be Cool
0 question about this device. Answer the ones you know or ask your own.
Ask a new question about this device
Download the instructions for your Air Conditioning in PDF format for free! Find your manual BC16KL2201FW - Be Cool and take your electronic device back in hand. On this page are published all the documents necessary for the use of your device. BC16KL2201FW by Be Cool.
USER MANUAL BC16KL2201FW Be Cool
natural_image
White portable air conditioner unit with black lid and 'BE COOL' branding (no visible text beyond label)Current operating instructions and other languages
Download the latest operating instructions in various languages via the link www.schuss-home.at/downloads or scan the QR code shown. Follow the instructions on the website.

BE COOL

Inhaltsverzeichnis
www.becool.at/downloads
natural_image
Pure technical line drawing of a coiled pipe or hose assembly without any text, numbers, or symbols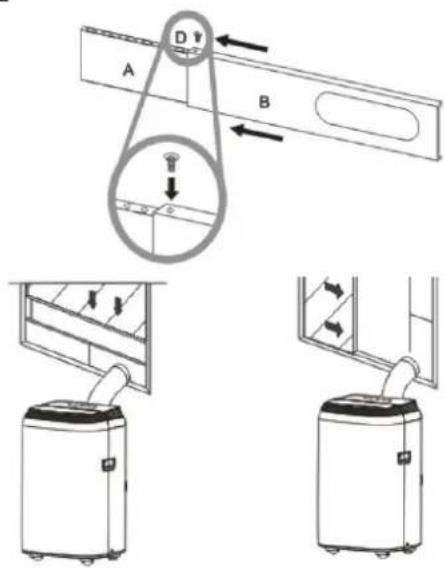
HINWEIS
natural_image
Interior view of a room with a white PVC hose and a small appliance on a counter, overlooking a window with trees and plants (no visible text or symbols)BE COOL
natural_image
Line drawing of hands inserting a mobile phone into a mobile device (no text or symbols)flowchart
graph LR
    A["Grid with arrows and dashed lines"] --> B["Grid with arrow and dashed lines"]
    B --> C["Grid with arrows and dashed lines"]
    C --> D["Rectangular Grid with arrows and dashed lines"]
natural_image
Line drawing of an air conditioner unit with cooling fan and heat exchanger (no text or symbols)natural_image
White portable air conditioner unit with black lid and 'BE COOL' branding (no visible text or symbols on body)FÉLICITATIONS! MERCI D'AVOIR CHOISI UN PRODUIT BE COOL.
BE COOL

Table des matières
DÉCLARATION DE CONFORMITÉ
natural_image
Pure technical line drawing of a coiled cable or pipe connection without any text, numbers, or symbolsREMARQUE
natural_image
Interior view of a room with a white hose and a small device on the floor, overlooking a window and trees (no visible text or symbols)BE COOL
PANNEAU DE COMMANDE ET TÉLÉCOMMANDE
BE COOL
TÉLÉCOMMANDE
natural_image
Illustration of hands holding a mobile phone with a device and arrow indicating direction (no text or symbols)flowchart
graph LR
    A["Rectangular Block"] --> B["Dashed Rectangle with Arrow"]
    B --> C["Arrow Down"]
    C --> D["Rectangular Block with Arrow"]
    D --> E["Dashed Rectangle with Arrow"]
    E --> F["Arrow Up"]
    F --> G["Rectangular Block with Arrow"]
natural_image
Diagram of an air conditioner unit with cooling panel and fan assembly (no text or labels)ACTIVITÉS DE DÉBUT/FIN DE SAISON
ACTIVITÉS DE FIN DE SAISON
natural_image
White portable air conditioner unit with black lid and 'BE COOL' branding (no visible text or symbols on body)CONGRATULAZIONI! GRAZIE PER AVER SCELTO UN PRODOTTO BE COOL.
BE COOL

natural_image
Pure technical line drawing of a coiled cable or pipe connection without any text, numbers, or symbolsNOTA
natural_image
Interior view of a room with a large white hose and window, showing outdoor trees and a small device (no visible text or symbols)BE COOL
PANNELLO DI CONTROLLO E TELECOMANDO
BE COOL
CONTROLLO REMOTO
natural_image
Line drawing of hands holding a mobile phone with an arrow indicating the right-hand rule (no text or symbols present)flowchart
graph LR
    A["Rectangular Grid with arrows"] --> B["Dashed Square with arrows"]
    B --> C["Rectangular Grid with arrows"]
    C --> D["Dashed Square with arrows"]
BE COOL
natural_image
Line drawing of an air conditioning unit with cooling fan and heat exchanger (no text or symbols)RIMEDIARE AI PROBLEMI
Mobiele airconditioner BC16KL2201FW
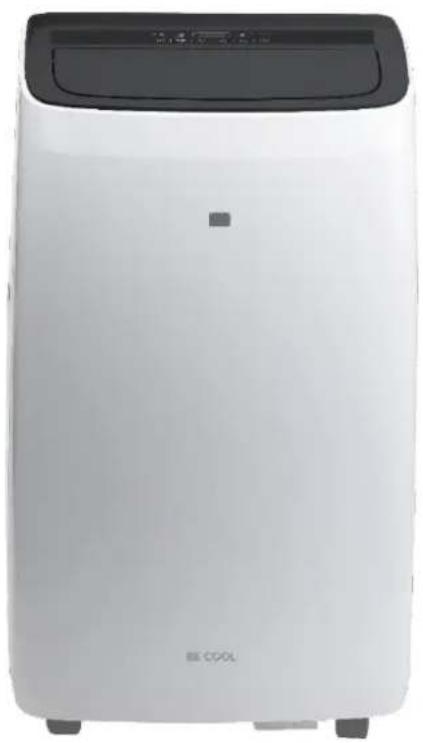
natural_image
White portable air conditioner unit with black top and control panel, no visible text or symbols on bodyGEFELICITEERD! BEDANKT VOOR HET KIEZEN VAN EEN PRODUCT VAN BE COOL.
BE COOL

Inhoudsopgave
natural_image
Pure technical line drawing of a coiled pipe or hose assembly without any text, numbers, or symbolsOPMERKING
natural_image
Interior view of a room with a large white duct being opened, overlooking a window and trees (no text or symbols visible)BE COOL
BEDIENINGSPANEELE EN AFSTANDSBEDIENING
natural_image
Illustration of hands holding a handheld device with an arrow indicating motion (no text or symbols)SCHAKEL HET APPARAAT IN
natural_image
Simple line drawing of a car window with an arrow indicating rotation (no text or symbols)OPMERKING
TIPS VOOR CORRECTE TOEPASSING
Hier vind je enkele tips om de airconditioner optimaal te laten presteren:
natural_image
Diagram of an air conditioning unit with cooling fan and heat exchanger (no text or labels)PERMANENTE WATERAFVOER
natural_image
White portable air conditioner unit with black lid and 'BE COOL' branding (no visible text or symbols on body)www.becool.at/downloads
natural_image
Pure technical line drawing of a coiled cable or pipe connection without any text, numbers, or symbolsNOTA
natural_image
Interior view of a room with a white hose and door, showing outdoor plants and trees in the background (no text or symbols visible)BE COOL
PANEL DE CONTROL Y MANDO A DISTANCIA
BE COOL
MANDO A DISTANCIA
natural_image
Line drawing of hands holding a mobile phone with an arrow indicating the right-hand rule (no text or symbols present)flowchart
graph LR
    A["Initial State"] --> B["Intermediate State"]
    B --> C["Final State"]
natural_image
Diagram of an air conditioning unit with cooling fan and heat exchanger (no text or labels)ACTIVIDADES AL PRINCIPIO/FINAL DE LA TEMPORADA
ACTIVIDADES DE FIN DE TEMPORADA
BE COOL
natural_image
White portable air conditioner unit with black lid and 'BE COOL' branding (no visible text or symbols on body)GRATULUJEME!
DĚKUJEME, ŽE JSTE SI VYBRALI PRODUKT OD SPOLEČNOSTI BE COOL.
BE COOL

Obsah
natural_image
Pure technical line drawing of a coiled pipe or hose assembly without any text, numbers, or symbolsnatural_image
Interior view of a room with a white hose and adjacent equipment, no visible text or symbolsBE COOL
OVLÁDACÍ PANEL A DÁLKOVÉ OVLÁDÁNÍ
natural_image
Line drawing of hands holding a mobile phone with an arrow indicating the right-hand rule (no text or symbols present)flowchart
graph LR
    A["Rectangular Box"] --> B["Dashed Rectangle with Arrow"]
    B --> C["Rectangular Box with Arrow"]
    C --> D["Dashed Rectangle with Arrow"]
    D --> E["Rectangular Box with Arrow"]
    E --> F["Dashed Rectangle with Arrow"]
natural_image
Line drawing of an air conditioning unit with cooling fan and heat exchanger (no text or symbols)AKTIVITY NA ZAČÁTKU/KONCI SEZÓNY
AKTIVITY NA KONCI SEZÓNY
natural_image
White portable air conditioner unit with black lid and 'BE COOL' branding (no visible text or symbols on body)GRATULUJEME! ĎAKUJEME, ŽE STE SI VYBRALI PRODUKT OD SPOLOČNOSTI BE COOL.
BE COOL

Obsah
natural_image
Pure technical line drawing of a coiled pipe or hose assembly without any text, numbers, or symbolsPOZNÁMKA
natural_image
Interior view of a room with a large white duct being lifted by a window, overlooking trees and a window (no text or symbols visible)BE COOL
OVLÁDACÍ PANEL A DIAL'KOVÉ OVLÁDANIE
BE COOL
DIAL'KOVÉ OVLÁDANIE
natural_image
Line drawing of hands holding a mobile phone with an arrow indicating the change (no text or symbols present)flowchart
graph LR
    A["Rectangular Frame"] --> B["Grid State"]
    B --> C["Arrow Up/Down"]
    C --> D["Arrow Down/Up"]
    D --> E["Arrow Left/Right"]
    E --> F["Arrow Up/Down"]
natural_image
Line drawing of an air conditioning unit with cooling fan and ventilation slots (no text or symbols)AKTIVITY NA ZAČIATKU/KONCI SEZÓNY
AKTIVITY NA KONCI SEZÓNY
natural_image
White portable air conditioner unit with black lid and 'BE COOL' branding (no visible text or symbols on body)FELICITĂRI! VĂ MULȚUMIM CĂ AȚI ALES UN PRODUS BE COOL.
BE COOL

Cuprins
www.becool.at/downloads
natural_image
Pure technical line drawing of a coiled cable or pipe connection without any text, numbers, or symbolsNOTĂ
natural_image
Black-and-white photo of a person hanging from a window with a white hose, near a wall and outdoor trees (no text or symbols visible)BE COOL
PANOU DE CONTROL ŞI TELECOMANDĂ
natural_image
Line drawing of hands holding a mobile phone with a device, no text or symbols presentflowchart
graph LR
    A["Rectangular Object"] --> B["Rectangular Shape"]
    B --> C["Rectangular Shape with Arrow Direction"]
    C --> D["Rectangular Shape with Arrow Direction"]
    D --> E["Rectangular Shape with Arrow Direction"]
natural_image
Line drawing of an air conditioning unit with cooling panel and fan (no text or symbols)ACTIVITĂȚI LA ÎNCEPUTUL/FINALUL SEZONULUI
ACTIVITĂȚI DE SFÂRȘIT DE SEZON
natural_image
White portable air conditioner unit with black lid and 'BE COOL' branding (no visible text or symbols on body)GRATULACJE! DZIEKUJEMY ZA WYBRANIE PRODUKTU OD BE COOL.
BE COOL

Spis treści
www.becool.at/downloads
natural_image
Pure technical line drawing of a coiled pipe or hose assembly without any text, numbers, or symbolsUWAGA
natural_image
Interior view of a room with a white hose and wooden scale, overlooking a window and trees (no text or symbols visible)BE COOL
natural_image
Line drawing of hands holding a mobile phone with an arrow indicating the device (no text or symbols present)flowchart
graph LR
    A["Grid with arrowheads"] --> B["Grid with dashed arrowheads"]
    B --> C["Rectangular Region with arrows indicating direction"]
    C --> D["Rectangular Region with dashed arrowheads"]
natural_image
Simple line drawing of a car window with an arrow indicating rotation (no text or symbols)UWAGA
natural_image
Line drawing of an air conditioning unit with cooling fan and heat exchanger (no text or symbols)DZIAŁANIA NA POCZĄTKU/KOŃCU SEZONU
DZIAŁANIA NA KONIEC SEZONU
natural_image
Exterior view of a white BE COOL air conditioner unit (no visible text or symbols on body)ČESTITAMO! HVALA, KER STE IZBRALI IZDELEK BE COOL.
BE COOL

Vsebina
natural_image
Pure technical line drawing of a coiled cable or wire connection without any text, numbers, or symbolsOPOMBA
natural_image
Interior view of a room with a white hose and air conditioner unit, overlooking a window and trees (no text or symbols visible)BE COOL
NADZORNA PLOŠČA IN DALJINSKI UPRAVLJALNIK
natural_image
Line drawing of hands holding a handheld device with an arrow indicating motion (no text or symbols)Varnostna navodila za zamenjavo baterije:
natural_image
Diagram of an air conditioning unit with cooling fan and heat exchanger (no text or labels)DEJAVNOSTI NA ZAČETKU/KONCU SEZONE
DEJAVNOSTI OB KONCU SEZONE
natural_image
White portable air conditioner unit with black lid and 'BE COOL' branding (no visible text or symbols on body)ČESTITAMO! HVALA VAM ŠTO STE ODABRALI PROIZVOD BE COOL.
BE COOL

Sadržaj
natural_image
Pure technical line drawing of a coiled cable or pipe connection without any text, numbers, or symbols4. Montaža na rolete i klizne prozore pomoću prozorskog nosača
OBAVIJEST
Ako je otvor prozora manji od minimalne duljine kompleta klizača prozora, odrežite kraj bez otvora dok ne stane u prozor.
Nikada nemojte rezati rupu na setu klizača prozora.
BE COOL
natural_image
Interior view of a room with a large white duct and window, showing outdoor trees and a window (no text or symbols visible)BE COOL
UPRAVLJAČKA PLOČA I DALJINSKI UPRAVLJAČ
natural_image
Line drawing of hands holding a mobile phone with an arrow indicating the device (no text or symbols present)Sigurnosne upute za zamjenu baterije:
- Kada se daljinski upravljač zamijeni ili odloži, baterije se moraju ukloniti i odložiti u skladu s važećim zakonima jer su štetne za okoliš.
- Stare i nove baterije ne smiju se miješati. Ne miješajte alkalne, standardne (ugljik-cink) ili punjive (nikl-kadmij) baterije.
- Ne bacajte baterije u vatru. Baterije mogu eksplodirati ili iscuriti.
- Ako se daljinski upravljač neće koristiti dulje vrijeme, izvadite baterije.
OBAVIJEST
flowchart
graph LR
    A["Square with arrow"] --> B["Grid with arrow"]
    B --> C["Grid with arrow"]
    C --> D["Grid with arrow"]
- Pomoću gumba odaberite željenu razinu ventilatora ✿.
- Uređaj sada automatski radi u režimu ventilacije kada je temperatura ispod 23°C i automatski se prebacuje u režim hlađenja kada sobna temperatura prijeđe 23°C.
BE COOL
mjerač vremena
natural_image
Line drawing of an air conditioning unit with a side panel and cooling fan (no text or symbols)-
Za uklanianje prašine nakupliene u zračnim filtrima koristite usisivač.
-
Ako je filtar za zrak jako zaprljan, možete ga uroniti u toplu vodu i nekoliko puta isprati – međutim, temperatura vode ne smije prelaziti 40°C.
-
Nakon pranja, ostavite filtar zraka da se temeljito osuši i zatim ga ponovno umetnite.
OBAVIJEST
AKTIVNOSTI NA POČETKU/KRAJU SEZONE
AKTIVNOSTI ZA KRAJ SEZONE
- Pažljivo potpuno ispraznite spremnik kondenzirane vode u odgovarajući spremnik kako je opisano u odieliku "Pražnienie spremnika za vodu".
Mobile air conditioner BC16KL2201FW
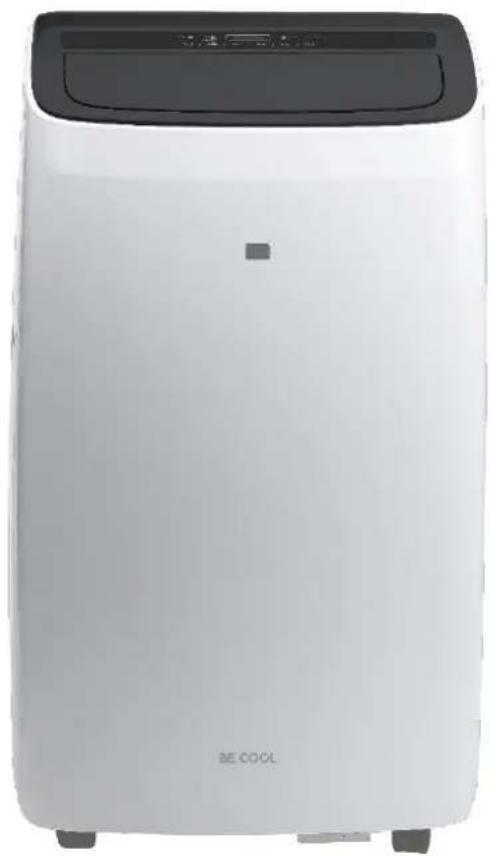
natural_image
White portable air conditioner unit with black LCD screen and 'BE COOL' branding (no visible text beyond label)CONGRATULATIONS! THANK YOU FOR CHOOSING A BE COOL PRODUCT.
BE COOL

Table of contents
| Important informations on safety, location and electrical connection |
| Recycling, Disposal and declaration of confirmity |
| Technical description and delivery content |
| Start Up |
| Description of the display |
| Operating Panel and Remote Control |
| Setting Functions |
| Tips for correct use |
| Maintenance and cleaning |
| Tasks at beginning and end of the season |
| Self Diagnose |
| Troubleshooting |
| Technical Informations |
| Warranty |
PLEASE READ THE INSTRUCTION MANUAL CAREFULLY BEFORE STARTING ASSEMBLY, INSTALLATION, OPERATION OR MAINTENANCE. PROTECT YOURSELF AND OTHERS BY FOLLOWING THE SAFETY INSTRUCTIONS. FAILURE TO COMPLY WITH INSTRUCTIONS COULD RESULT IN PERSONS AND / OR PROPERTY DAMAGES AND / OR LOSS OF THE WARRANTY CLAIM!
IMPORTANT INFORMATION ON SAFETY, LOCATION AND ELECTRICAL CONNECTION.

- Read all instructions carefully before using the device.
- Use this device only in accordance with the instructions in the manual. Any other use not recommended by the manufacturer could result in fire, electric shock, or personal injury.
- This device is intended for cooling in households and may not be used for any other purpose.
- The device is not suitable for continuous and precision operation and should not be used for cooling electrical systems (e.g: in server rooms).
- It is forbidden to modify the characteristics of this device in any way and only use replacement parts and accessories recommended by the manufacturer (failure to do so will void the warranty).
- For any repairs to the device, power plug or cable, always and exclusively contact authorized service centers. The customer service centers can be accessed online at www.becool.at.

-
Remove the packaging and make sure the air conditioner is not damaged. If in doubt, do not use the air conditioner and contact the service center or your seller.
-
Keep children away from packaging material. If swallowed there is danger of suffocation!
-
If the power cord is damaged, it must be replaced by the manufacturer or an authorized service center to avoid all possible risks.
-
The device must be installed in accordance with local electrical system installation and operating instructions.
BE COOL
- The electrical socket in which you connect the device must not be defective or loose and must be suitable for the required current load and above all be reliably earthed. If in doubt, have your electrical installation checked by a qualified electrician.
- Before connecting to the device to the electrical socket, you must check whether the type of current and the mains voltage comply with the information given on the back of the device.
- Avoid using an extension cord as it could overheat and cause a fire.
- Do not twist or bend the power cord.
- This device may only be used by adults.
- Children under the age of 8 and persons with limited physical, mental, sensory or mental abilities, and lack of experience and knowledge may only use this device if it is under appropriate supervision and provide detailed instructions for use of the device in a safe manner and how the existing dangers have been described.
- Do not let children play with the packaging and make sure that children do not play with the device.
- Do not use the air conditioner outdoors.
- Do not use the device with wet hands.
- Never operate the device in areas where gas, oil or sulfur are present.
- Do not place the device near sources of heat (e.g.: near heating systems and gas heaters) and avoid direct sunlight.
- Keep a minimum distance of at least 50cm to combustible materials (e.g., alcohol, etc.) or pressurized vessels (e.g., spray containers).
- Do not use the air conditioner near water or high humidity, e.g.: in the wet basement, next to swimming pool, bath or shower. Make sure that no water gets into the device.
- Do not place heavy or hot objects on the unit and never cover the unit.
- Never insert fingers, pins or other objects into the unit, being careful not to block the air inlet and outlet.
- Always turn off the power before unplugging the power cord.
- Do not pull the power cord to disconnect the device from the mains. Always pull on the plug to pull out the power cord. Do not handle the plug with wet hands to avoid electric shock.
- Unplug the device when not in use before cleaning, servicing or moving it from one location to another.
- If the device has a defect, switch it off with the on / off button on the control panel and contact the customer hotline.
- Maintain the air conditioner in good condition by caring for and cleaning the unit.
- The air filter should be cleaned at least once a week.
- Store the device vertically in a safe place, dry and out of the reach of children, when not in use. Do not cover the device with plastic packaging.
- Store the unit in a room with no ignition sources in operation (e.g.: open fire, service gas appliance or electric heater with open heat source).
- The air conditioner should be transported in an upright position or slightly sideways position. Empty the internal condensate tank first. Wait at least one hour after transporting the device before turning on the device.
- Always contact authorized service centers for repairs to the device, power plug, or cable.
- Do not use any means to accelerate or eliminate the defrost process, the device will do it on its own.
- If you have any questions about maintenance, you can contact the manufacturer's authorized hotline / service center.
WARNING
The main power switch and the on / off switch should not be used as the sole means of power disconnection. Always unplug the power cord before servicing or moving the unit.
To avoid the risk of electric shock, disconnect the plug from the power outlet when not in use - as well as before each cleaning.
BE COOL
SPECIFIC INFORMATION ON REFRIGERANT R290
- R290 is a refrigerant according to the EC environmental guidelines.
- The refrigerant is odorless.
- The appliance should be installed in a room where there are no ignition sources in operation (e.g.: open fire, gas and electrical appliances in operation with open heat source)
- Do not perforate or burn the air conditioner.
-
Make sure that the cooling circuit is not drilled.
-
Non-ventilated rooms in which the appliance is installed, operated or stored must be designed in such a way that any loss of refrigerant does not build up. This avoids the risk of fire or explosion caused by ignition of the refrigerant caused by electric ovens, cookers or other sources of ignition. The device must be stored in such a way that no mechanical damage can occur.
- Persons operating or intervening on a refrigeration circuit shall be in possession of a valid certificate issued by an authorized authority certifying their expertise in the handling of refrigerants by a rating specification recognized by the industry associations.
- The repair work must be carried out according to the instructions of the manufacturer of the device. Repair and maintenance operations that require the use of additional specialist personnel are to be carried out under the supervision of a specialist who is responsible for the handling of flammable refrigerants.

RECYCLING
The packaging materials can be recycled. Therefore it is recommended to dispose of them in sorted waste.
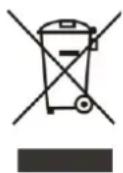
DISPOSAL
The crossed-out bin symbol requires the separate disposal of waste electrical and electronic equipment (WEEE). Electrical and electronic equipment may contain hazardous and environmentally hazardous substances. Therefore, do not dispose of it in unsorted residual waste, but at a designated collection point for waste electrical and electronic equipment. This helps to protect resources and the environment. For more information, contact your dealer or the local authorities.
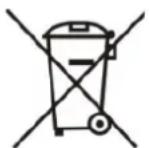
DISPOSAL OF THE BATTERIES
The crossed-out bin symbol requires the separate disposal of batteries. Please dispose the batteries in an environmentally friendly way. DO NOT dispose batteries in the residual waste. Please use the return and collection systems in your area or contact your dealer.
DECLARATION OF CONFIRMITY
We hereby confirm that this article complies with the essential requirements, regulations and directives of the EU.
The detailed declaration of conformity can be viewed at any time under the following link: www.becool.at/downloads

Errors and technical changes reserved.
www.becool.at
BE COOL
DESCRIPTION OF THE DEVICE AND SCOPE
| 1. Control element2. Carrying handle (both sides)3. Track rollers4. Air outlet5. Remote control receiver | 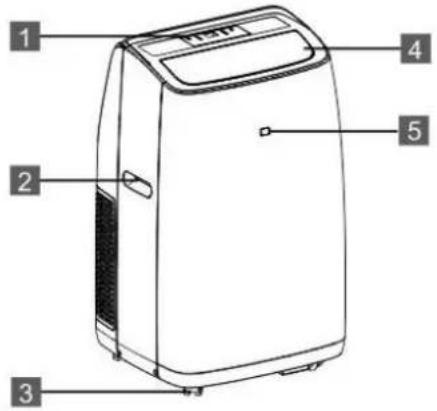 |
| 6. Air inlet grille7. Exhaust air outlet8. Air inlet grille9. Power plug10. Cable holder11. Air inlet grille12. Condensation water outlet | 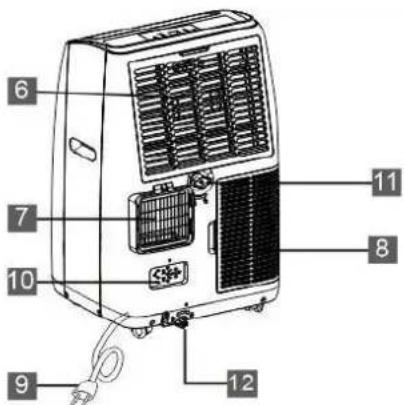 |
| Exhaust air hose with adapterPlease assemble the parts by turning the two adapters onto the air hose. | 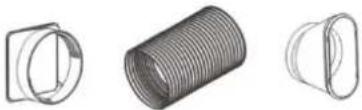 |
| Window bracket (B) + extension rail (A) Window holder for roller shutter and sliding windows. | 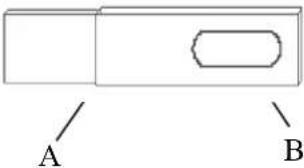 |
| Remote control | 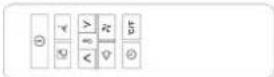 |
| condense water hose | 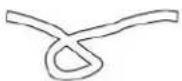 |
BE COOL
COMMISSIONING
PREPARATION FOR USE
IMPORTANT!
Allow the appliance to stand upright for at least 2 hours before using it for the first time and make sure that the condensation outlet is properly closed.
- If the power outlet is properly earthed, place the appliance on a level surface near the window.
• The distance to walls or other objects must be at least 50 cm. - Before using the unit, make sure that both the air inlet and air outlet are free of obstacles and not blocked.
- Observe the instructions in the chapter "Important information on safety, location and electrical connection".
INSTALLATION
You can start up your air conditioner in just a few steps:
| 1. assemble the exhaust air hose Extend the hose on both sides by pulling it apart. Then screw on the adapters | 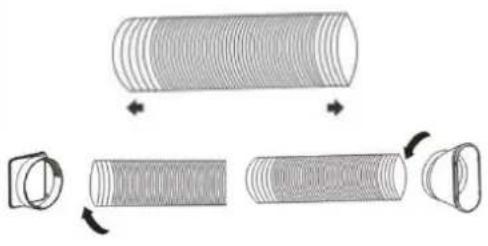 |
| 2. install the exhaust air hose on the unit Slide the exhaust hose into the opening provided on the back of the machine. (from top to bottom) | 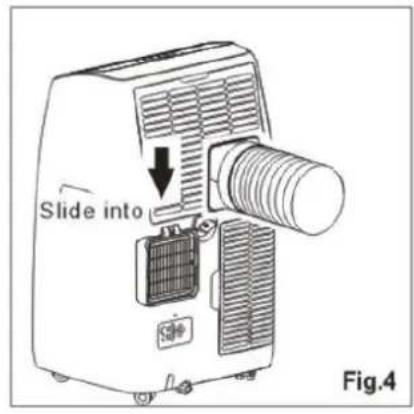 |
BE COOL
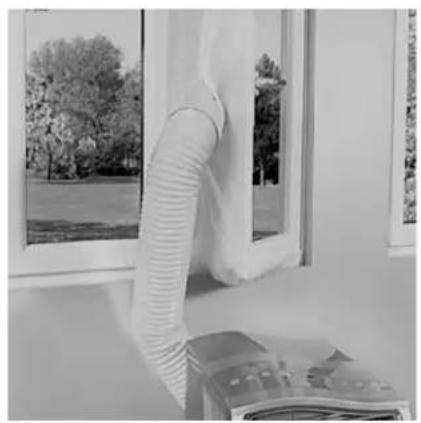
| 3. installation on a window/balcony withoutwindow bracketNow place the air conditioner near a window or balcony door.Adjust the length of the hose so that it reaches to the window/balcony door.Check that the air in the hose can flow freely.Open the window a little and fit the exhaust hose taper there. | 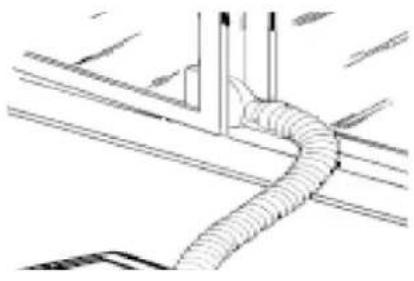 |
| 4. installation on roller shutter and slidingwindows using the window bracketPlace the window bracket on/in the window frame, slide it out over the entire window width/height by pulling the extension rail (A) out of the window bracket (B). Then screw the screws (D) into the appropriate holes corresponding to the width of your window to ensure that there are no gaps in the installed window bracket after fixing.Lower or push the window onto the now on the bracket and push the exhaust hose taper into the cut-out. | 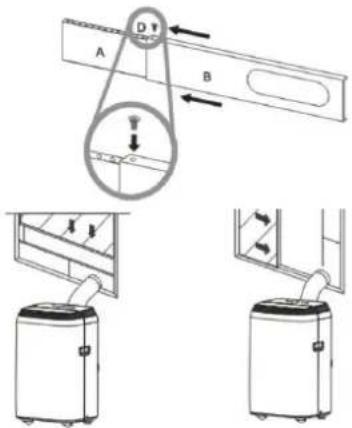 |
| NOTEIf the window opening is smaller than the minimum length of the window slide set, cut the end without the hatch until it fits into the window.Never cut into the hole of the window slide set. |
| ATTENTION!!Please note the following instructions for both installations: | The exhaust hose must be as short as possible and bent as little as possible to allow the air to flow freely. |
| The air conditioner should be placed on a solid floor to minimise noise and vibrations. Place the unit on a straight, level surface that is strong enough to support the unit. | |
| The appliance must be installed within reach of a correctly earthed socket. Never obstruct the air intake or exhaust openings of the unit. | |
| The exhaust air hose is precisely matched to this unit. Do not lengthen it or replace it with another hose, otherwise you could damage the appliance. |
BE COOL
BE COOL RECOMMENDATION
We recommend a SHE Hot-Air Stop when installing on windows, balcony doors or sliding doors.
These offer the following advantages:
- No warm air flows into the living space therefore energy saving
- Simple and quick installation
• Durable, water repellent material - Opening and closing possible
- Washable
Available from your air conditioning supplier.
natural_image
Interior view of a room with a white hose and air conditioner unit, overlooking a window and trees (no text or symbols visible)CONTROL PANEL AND REMOTE CONTROL
Description of the control panel and remote control:
The buttons on the control panel and the remote control have the same functions:
CONTROL PANEL
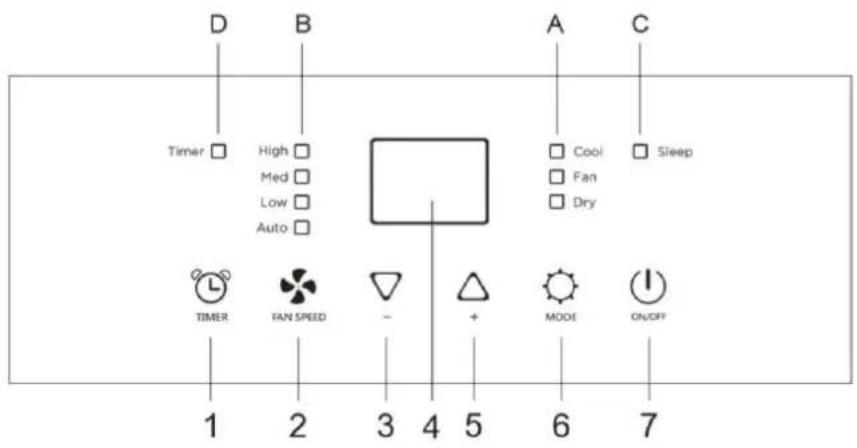
- → timer key
- → fan speed key
- → - key
- → display
- → + key
- → mode key
- → on/off key
A → Mode indicator
B → Fanspeed indicator
C → Sleep indicator
D → Timer indicator
BE COOL
REMOTE CONTROL
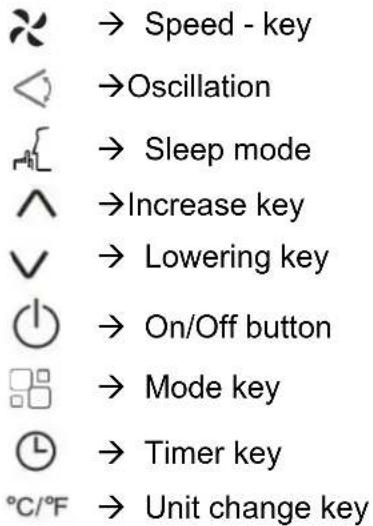
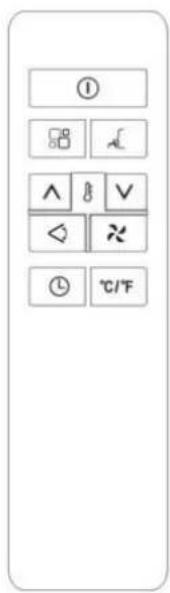
REMOTE CONTROL
Preparing the remote control - Inserting or replacing batteries
First use of the remote control or replacement of the batteries:
- Remove the cover on the back of the remote control.
- Insert two "AAA" 1.5V batteries in the correct position (see instructions in the battery compartment)
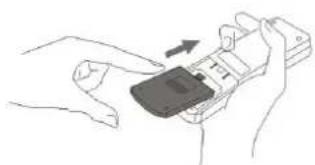
natural_image
Line drawing of a hand holding a mobile phone with an arrow indicating the right-hand rule (no text or symbols present)Safety instructions for battery replacement:
- When replacing or disposing of the remote control, the batteries must be removed and disposed of in accordance with current legislation, as they are harmful to the environment.
- Old and new batteries must not be mixed. Do not mix alkaline, standard (carbon zinc) or rechargeable (nickel cadmium) batteries.
- Do not dispose of batteries in fire. Batteries may explode or leak.
• If the remote control will not be used for a long time, remove the batteries.
NOTE
If the remote control needs to be replaced or disposed of, remove the batteries and dispose of them properly according to the applicable regulations!
Even if the remote control is not used for a long time, remove the batteries to prevent corrosion damage.
If the batteries need to be replaced, always replace both with the same type and state of charge.
BE COOL
SETTING THE FUNCTIONS
You can set all functions directly on the unit or by using the remote control. Depending on the function set, the indicator lamps on the control panel display light up. Point the remote control directly at the front of the appliance and make sure that there are no obstacles between the remote control and the appliance.
SWITCH ON THE DEVICE
- Connect the machine to the grounded power outlet.
- Press the ⏻ key to switch on the machine.
NOTE
Never switch off the air conditioner by pulling the plug directly from the mains. Always press the on/off button to switch off the appliance and wait a few minutes before disconnecting the appliance from the mains. This allows the appliance to go through a cycle of checks to verify its functionality.
SETTING MODES
Cooling mode
Ideal for warm and humid weather to cool the room down.
- Press the ⚙ key until the COOL LED on the display lights up.
- Now use the and key to select the desired target temperature (18°C - 32°C/64°F - 90°F).
- Use the key to select one of the four fan speeds.
NOTE
In summer, it is recommended to set a room temperature between 24^ and 27^ . In any case, it is not recommended to select a temperature far below the outside temperature.
Ventilation/Fan mode
In this mode, only the fan runs.
- Press the key until the "Ventilation LED" on the control element lights up.
- Now use the key to select from the four speed levels.
- The screen displays "——" as high speed, "——" as medium speed & "——" as low speed.
Dehumidify/dry mode
Ideal for reducing humidity in the room (e.g.: in spring and autumn, for humid rooms, during rainy periods, etc.).
BE COOL
- Press the key repeatedly until the drying mode LED on the control panel lights up. The dehumidifier symbol "appears on the display.
- The unit automatically sets the temperature according to the Current ambient temperature.
- The fan speed is also automatically set to the lowest level.
Smart Mode
In smart mode, the device decides whether to run in cooling or ventilation mode - this mode reduces power consumption.
- Press the key a few times until the display shows the following:

flowchart
graph LR
    A["Grid with arrows and dashed lines"] --> B["Grid with arrow and dashed lines"]
    B --> C["Grid with arrows and dashed lines"]
    C --> D["Grid with arrows and dashed lines"]
- Use the key to select the desired fan speed.
- The unit now automatically operates in ventilation mode if the temperature is below 23^ C and automatically switches to cooling mode if the room temperature exceeds 23^ C.
TIMER
This function allows you to switch the unit on and off at a set time.
Programmed switch-on
-
Switch on the machine and select the desired modes (e.g.: cooling mode, 25^ C, medium speed).
-
Switch off the machine and then press the key.
-
The TIMER LED on the control panel flashes and the number of hours is shown on the display.
-
Press the key repeatedly until the desired number of hours appears on the display. Wait approx. 5 seconds until the timer is automatically set and the TIMER_LED is lit continuously.
-
After the programmed time has elapsed, the machine switches on automatically and operates according to the settings you have selected.
-
To switch off the timer, press the key again.
Programmed switch off
- While the machine is switched on, press the key.
- The TIMER LED on the control panel flashes and the number of hours is shown on the display.
BE COOL

- Press the key until the desired number of hours appears on the display. Wait approx. 5 seconds until the timer is automatically set and the TIMER symbol is permanently lit up.
- After the programmed time has elapsed, the unit switches off automatically.
Changing the temperature unit
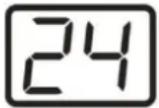
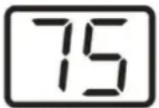
You can choose between GRAD and FAHRENHEIT:
| DEVICE | REMOTE CONTROL |
| Press and hold the and key simultaneously for about 3 seconds to change the temperature unit: | Press the °C/°E key to change the temperature unit: |
 |  |
The following functions can only be set using the Remote Commander:
SWING
- Use the key to activate the oscillation function of the machine
- Press the key again to deactivate the function.

PLEASE NOTE:
With this function, the blown out air is distributed vertically. In this way a horizontal air distribution is achieved.
SLEEP
This function is particularly useful for operating the device during the night, as it gradually reduces its power.
PLEASE NOTE:
This function can only be set in COOL mode.
- Press the key to start or stop the function.
- The unit now operates automatically as follows:
- It reduces the screen brightness.
- It decreases the volume.
- It reduces the fan speed and maintains the low speed.
- The temperature gradually increases by 1^ C per hour in a 2-hour period and is maintained for 5 hours until the unit switches off automatically.
BE COOL
TIPS FOR CORRECT USE
Here are a few tips to help you achieve the optimum performance of the air conditioner:
| Close all windows and doors in the room to be air-conditioned. | 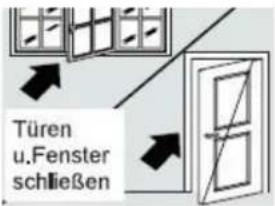 |
| Protect the room from direct sunlight with curtains, blinds or shutters. In this way you save energy. | 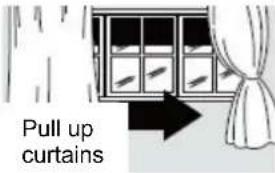 |
| Do not place any objects on the unit and do not cover the air inlet and outlet. Keep the grilles clear. | |
| Make sure that no heat sources are operated in the room. | |
| Never use the machine in very damp rooms (e.g. laundry rooms). | |
| Do not use the device outdoors. | |
| Make sure that the air conditioner is placed on a level floor. | |
MAINTENANCE AND CLEANING
CLEAN AIR FLITER
To ensure efficient operation of the air conditioner, you should clean the air filter after each week of operation.
- Before cleaning, switch off the machine, wait a few minutes and then unplug the machine to disconnect it from the electrical supply.
- Pull off the exhaust hose.
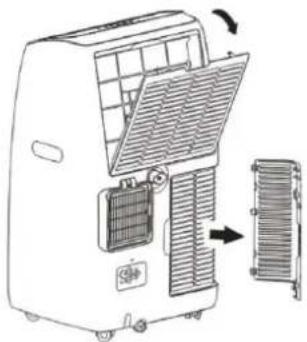
- The air conditioning unit has a total of 3 air filters:
Open the two air intake grilles on the back and remove the filter underneath, as shown in the picture:
natural_image
Diagram of an air conditioning unit with cooling fan and ventilation slots (no text or labels)- Use a hoover to remove the dust accumulated in the air filters.
- If the air filter is very dirty, you can dip it in warm water and rinse it several times - but the water temperature should not exceed 40^ C.
- Allow the air filter to dry out well after washing, and then put it back in place.
NOTE
Never use the appliance without the filters.
BE COOL
CLEANING THE HOUSING
Before cleaning, switch off the appliance, wait a few minutes and then always unplug the appliance to disconnect it from the electrical supply.
- Clean the machine with a moderately damp cloth and then wipe it with a dry cloth.
- For safety reasons, never clean the appliance with water. This could be dangerous.
- Never use petrol, alcohol or solvents for cleaning.
- Do not spray insecticides or similar agents on the air conditioner.
EMPTY WATER TANK MANUALLY
The unit has an automatic water evaporation system. The circulation of the condensed water cools the compressor, which not only improves the cooling capacity but also saves energy.
If the water tank is still full, Fc" " appears on the display on the control panel and the air conditioner switches off automatically. The unit is locked until the water tank is emptied.
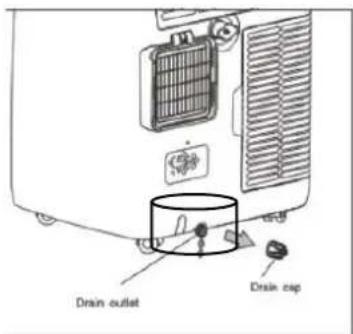
To empty the condensation water tank, follow the steps below:
- Unplug the power cord from the wall outlet.
- Place a collecting vessel under the condensation water outlet at the rear of the appliance, carefully remove the cap from the outlet and allow the water to drain into the collecting vessel.
- In the end you can tilt the air conditioner slightly - but not more than 30^ .
- When the tank is completely empty, carefully reinsert the plug into the water outlet.
- Insert the mains plug and restart the machine.
PERMANENT WATER DRAIN
You have the option of installing a permanent water drain so that you do not have to empty the water tank manually each time you intend to use the appliance for a longer period of time (or the water pump fails).
To install the permanent water drain, please proceed as follows:
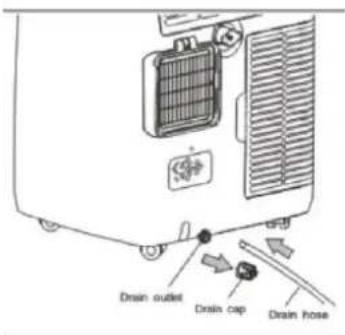
- The water tank must be completely emptied before attaching a suitable water drain hose (12.7mm) to the respective outlet.
- Remove the plug of the permanent condensation water outlet and attach the water drainage hose.
- Insert the other end of the hose into a collecting vessel or drain. The hose must not be laid higher than the drain valve and must not be kinked.
- If the permanent drain is removed, be sure to reinsert the plug carefully.
BE COOL
ACTIVITIES AT SEASON START/END
ACTIVITIES AT THE END OF THE SEASON
- Carefully empty the condensation water tank completely into a suitable container as described in the section "Emptying the water tank".
- Let the air conditioner run in fan/fan mode for 2 hours until the inside is completely dry.
- Switch off the unit and unplug the power cord.
- Clean the filter and reinsert it after drying (see section "Cleaning the air filter").
- Remove the exhaust hose and accessories and stow them carefully. Remove the batteries from the remote control
• Pack the unit and store it in a cool, dry place.
CHECKS AT THE BEGINNING OF THE SEASON
- Check that the power supply cable and socket are in good condition and that the grounding is functional.
- Ensure that the plug is carefully fitted in the condensation outlet and that the filters are inserted.
- Follow the installation and safety instructions carefully.
SELF DIAGNOSIS
The air conditioner has a self-diagnosis system to identify some malfunctions. The error messages are displayed on the screen:
| DISPLAY | ACTION |
LOW TEMPERATURE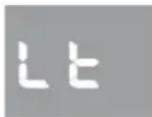 LOW TEMPERATURE (frost prevention) LOW TEMPERATURE (frost prevention) | The unit is equipped with an anti-freeze mechanism equipped to prevent excessive formation of ice to prevent.The unit switches off and starts automatically again as soon as the defrosting process is completed. |
FULL TANK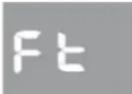 FULL TANK(water tank is full) FULL TANK(water tank is full) | Empty the water tank as described in the „Empty water tank" is described. |
SAMPLE FAILURE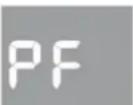 EXPLORATORY ERROR (sensor damaged ) EXPLORATORY ERROR (sensor damaged ) | If the display shows this error message is displayed, please contact the Serviceline or inform yourself on the homepagewww.becool.atvia the service points. |
BE COOL
REMEDYING THE PROBLEMS
Before contacting our customer hotline/ service centre, please check whether the error can be rectified using the instructions below.
| PROBLEM | POSSIBLE CAUSE | SOLUTION |
| The air conditioner does not switch on. | Power outage | Wait for the power supply to be restored. |
| The unit is not connected to the power supply. | Connect the unit to the power supply | |
| An automatic protection function has been activated. | Wait 30 minutes. If the problem persists, contact your service centre | |
| The air conditioner only works for a short time. | Restricted passage of air through the hose. | Attach the exhaust air hose correctly and keep it as short as possible without bending. |
| Air outlet is blocked by something. | Check and remove all obstacles blocking the airway. | |
| Unpleasant odours occur in the room during operation. | Air filter dirty | Clean the air filter according to the description. |
| The air conditioner works, but the room does not cool down. | Open windows, doors and/or curtains that have not been drawn. | Close windows and doors and draw the curtains. Follow the "Tips for correct use" mentioned above |
| The temperature you have set is too high. | Set a lower temperature. | |
| The air intake grille is blocked/polluted. | Make sure that the air intake grille is clear/clean the air filter. | |
| There are heat sources in the room (oven, hair dryer, etc.). | Switch off heat sources: | |
| Exhaust air hose is disconnected from the unit. | Attach the exhaust air hose to the opening on the back of the unit. | |
| The technical specifications of the device are not adequate for the room in which it is installed. | ||
| While the appliance is in operation, there is an unpleasant smell. | Ventilation filter is clogged | Clean the filter as described above. |
| The unit will not operate for about 3 minutes after you restart it. | An automatic protection function prevents the unit from being restarted earlier than 3 minutes after the last shutdown. | Wait. This waiting period is part of the normal operation of the machine. |
| The following appears on the LE/ /PFFE screen: | The unit has a self-diagnostic system that can identify some faults. | See the SELF DIAGNOSIS chapter for details on how to proceed. |
BE COOL
| Technical information | |
| Item number | BC16KL2201F |
| Cooling capacity | 16.000Btu |
| Power consumption (cooling) | 1740W |
| Max. power consumption | 2000W |
| Input voltage | 220-240V~ |
| Frequency | 50Hz |
| Max. Current cooling mode | 7,8A |
| Max. amperage | 9,8A |
| WIFI transmission frequency | 2,4GHz |
| Transmitting power: | max. 100mW |
| Refrigerant/charge | R290/0.270kg/3 |
| Energy efficiency EER | 2,6 |
| Energy efficiency class | A |
| Air Circulation | 520m3/h |
| Noise level (sound power) | 65dB |
| LRA of the compressor | 30A |
| Splash water protection class | IPX0 |
| Max. permissible pressure | 1.2Mpa(L)/2.3Mpa(H) |
| Weight | 35.9kg |
| Dimensions | 450x396x745mm |
| Contact address for further information | Schuss Home Electronic GmbHScheringgasse 3,A-1140 WienTel : +43 (1) 97 0 21 - 0Service line: +43 (1) 97 0 21 - 502www.becool.atFB-Nr: 236974 t / FB Court: Vienna |
BE COOL
| Information requirements for single duct and double duct air conditionier | P | ||
| Information to identify the model(s) to which the information relates to: | |||
| Description | Symbol | Value | Unit |
| Description | P_rated for cooling | 4,617 | kW |
| Rated capacity for cooling | P_rated for heating | - | KW |
| Rated capacity for heating | P_EER | 1,661 | kW |
| Rated power input for cooling | P_COP | - | kW |
| Rated power input for heating | EER_d | 2,78 | - |
| Rated Energy efficiency ratio | COP_d | - | - |
| Information identifying the model(s) to which the information relates: | |||
| Description | Symbol | Value | Unit |
| Power consumption in thermostat-off mode | P_TO | N/A | W |
| Power consumption in standby P mode | P_SB | 0.5 | W |
| Electricity consumption of single/double duct appliances (indicate for cooling and heating separately) | Q_SD | SD: 0.980 (cooling) | kWh/h |
| Sound power level | L_WA | 64,8 | dB(A) |
| Global warming potential | GWP | 3 | kgCO2 eq. |
| Contact details for obtaining more information | Schuss Home Electronic GmbH Scheringgasse 31140 Vienna, AustriaTel.: +43 (1) 97 0 21 - 0www.becool.at | ||
BE COOL
WARRANTY
By purchasing a BE COOL quality product you have acquired an innovative, long lasting and reliable item.
For this BE COOL device we grant a warranty of 2 years from the date of purchase, valid in Austria only. In the unlikely event that service work is required on your device in this period we warrant free repair (spare parts and labour) or (subject to Schuss's decision) to replace the product. In the event that neither repair nor exchange make sense from an economical perspective we reserve the right to issue a credit based on current value.
When dealing with air conditioning devices you should always contact the customer hotline first (see label on the device or the title page of the instruction manual), in case of fans contact your dealer or us directly. Please note that repair not performed by the authorised workshop in Austria immediately renders this warranty void.
This warranty does not include:
• Repair of replacement of parts due to normal wear
- Damage due to non-compliance with the instruction manual
• Devices that are used commercially – even in part
• Devices damaged by external forces (falling, impact, cracking, improper use etc.) as well as aesthetic wear
• Devices that have been used improperly
• Devices that were not opened by our authorised workshop.
- Damages caused by improperly closed condensation drains on air conditioning devices or improperly inserted water container.
- Unfulfilled customer expectations.
- Damage caused by force majeure, water, lightning and overvoltage.
- Devices on which type denomination and/or serial number on the device have been erased, rendered illegible or removed.
- Service work not performed by our authorised workshops, transport costs to an authorised workshop or us and back as well as associated risks.
Please note that within the warranty period we charge a flat rate of 60 € (indexed as per consumer price index 2010, June 2015) in case of operating errors or if no fault can be found.
The total warranty period of 2 years is not extended if warranty service is performed (repair or device replacement).
The 2 year warranty is only valid if the original invoice (must contain name and address of the dealer as well as full device name) and the respective warranty certificate are produced, on which the device type and serial number (can be found on the box and the device's rear or bottom) are to be noted! Only the statutory warranty coverage applies if the warranty certificate cannot be produced!
Please note that the statutory warranty coverage is not altered by this warranty and that it applies in full regardless.
Schuss Home Electronic GmbH and its vicarious agents are only liable for damages in case of gross negligence or intent. Liability for loss of profit, expected but not incurred savings, consequential damages and damages from third party claims is excluded in any case. Damages to or for recorded data are always excluded from the liability for damages.
Congratulations on your choice. We hope you will enjoy using your BE COOL device!
ADDRESS
BE COOL Sales
Schuss Home Electronic GmbH
1140 Vienna, Scheringgasse 3
Tel.: +43 (0)1/ 970 21
Type designation:
Serial number:......
Together with the device, this warranty certificate must be handed to the authorised workshop or dealer you bought the device from in the event of a warranty claim!
BE COOL
WICHTIG!

These instructions are only for the BE COOL-Service center!
A Service or repairing of the device must only be performed by a qualified technician who is allowed to handle the R290 refrigerant.
Do not attempt to repair or open the case of the air conditioner yourself → this leads to the immediate loss oft he warranty.
INSTRUCTIONS FOR REPAIRING APPLIANCES CONTAINING R290
1 GENERAL INSTRUCTIONS
1.1 Checks to the area
Prior to beginning work on systems containing flammable refrigerants, safety checks are necessary to ensure that the risk of ignition is minimized. For repair to the refrigerating system, the following precautions shall be complied with prior to conducting work on the system.
1.2 Work procedure
Work shall be undertaken under a controlled procedure so as to minimize the risk of a flammable gas or vapor being present while the work is being performed.
1.3 General work area
All maintenance staff and others working in the local area shall be instructed on the nature of work being carried out. Work in confined spaces shall be avoided. The area around the workspace shall be sectioned off. Ensure that the conditions within the area have been made safe by control of flammable material.
1.4 Checking for presence of refrigerant
The area shall be checked with an appropriate refrigerant detector prior to and during work, to ensure the technician is aware of potentially flammable atmospheres. Ensure that the leak section equipment being used is suitable for use with flammable refrigerants, i.e. non sparking, adequately sealed or intrinsically safe.
1.5 Presence of fire extinguisher
If any hot work is to be conducted on the refrigeration equipment or any associated parts, appropriate fire extinguishing equipment shall be available to hand. Have a dry powder or CO 2 fire extinguisher
BE COOL
adjacent to the charging area.
1.6 No ignition sources
No person carrying out work in relation to a refrigeration system which involves exposing any pipe work that contains or has contained flammable refrigerant shall use any sources of ignition in such a manner that it may lead to the risk of fire or explosion. All possible ignition sources, including e-cigarette smoking, should be kept sufficiently far away from the site of installation, repairing, removing and disposal, during which flammable refrigerant can possibly be released to the surrounding space. Prior to work taking place, the area around the equipment is to be surveyed to make sure that there are no flammable hazards or ignition risks. "No Smoking" signs shall be displayed.
1.7 Ventilated area
Ensure that the area is in the open or that it is adequately ventilated before breaking into the system or conducting any hot work. A degree of ventilation shall continue during the period that the work is carried out. The ventilation should safely disperse any released refrigerant and preferably expel it externally into the atmosphere.
1.8 Checks to the refrigeration equipment
Where electrical components are being changed, they shall be fit for the purpose and to the correct specification. At all times the manufacturer's maintenance and service guidelines shall be followed. If in doubt consult the manufacturer's technical department for assistance. The following checks shall be applied to installations using flammable refrigerants: the charge size is in accordance with the room size within which the refrigerant containing parts are installed; the ventilation machinery and outlets are operating adequately and are not obstructed; if an indirect refrigerating circuit is being used, the secondary circuit shall be checked for the presence of refrigerant; marking to the equipment continues to be visible and legible. Markings and signs that are illegible shall be corrected; refrigeration pipe or components are installed in a position where they are unlikely to be exposed to any substance which may corrode refrigerant containing components, unless the components are constructed of materials which are inherently resistant to being corroded or are suitably protected against being so corroded.
1.9 Checks to electrical devices
Repair and maintenance to electrical components shall include initial safety checks and component inspection procedures. If a fault exists that could compromise safety, then no electrical supply shall be connected to the circuit until it is satisfactorily dealt with. If the fault cannot be corrected immediately but it is necessary to continue operation, an adequate temporary solution shall be used. This shall be reported to the owner of the equipment so all parties are advised.
Initial safety checks shall include: Those capacitors are discharged: this shall be done in a safe manner to avoid possibility of sparking; that there no live electrical components and wiring are exposed while charging, recovering or purging the system; that there is continuity of earth bonding.
2 REPAIRS TO SEALED COMPONENTS
2.1 During repairs to sealed components, all electrical supplies shall be disconnected from the equipment being worked upon prior to any removal of sealed covers, etc. If it is absolutely necessary to have an electrical supply to equipment during servicing, then a permanently operating form of leak detection shall be located at the most critical point to warn of a potentially hazardous situation.
2.2 Particular attention shall be paid to the following to ensure that by working on electrical components, the casing is not altered in such a way that the level of protection is affected.
This shall include damage to cables, excessive number of connections, terminals not made to original specification, damage to seals, incorrect fitting of glands, etc. Ensure that apparatus is mounted securely. Ensure that seals or sealing materials have not degraded such that they no longer serve the purpose of preventing the ingress of flammable atmospheres. Replacement parts shall be in accordance with the manufacturer's specifications.
NOTE The use of silicon sealant may inhibit the effectiveness of some types of leak detection equipment. Intrinsically safe components do not have to be isolated prior to working on them.
BE COOL
3 REPAIR TO INTRINSICALLY SAFE COMPONENTS
Do not apply any permanent inductive or capacitance loads to the circuit without ensuring that this will not exceed the permissible voltage and current permitted for the equipment in use.
Intrinsically safe components are the only types that can be worked on while live in the presence of a flammable atmosphere. The test apparatus shall be at the correct rating. Replace components only with parts specified by the manufacturer. Other parts may result in the ignition of refrigerant in the atmosphere from a leak.
4 CABLING
Check that cabling will not be subject to wear, corrosion, excessive pressure, vibration, sharp edges or any other adverse environmental effects. The check shall also take into account the effects of aging or continual vibration from sources such as compressors or fans.
5 DETECTION OF FLAMMABLE REFRIGERANTS
Under no circumstances shall potential sources of ignition be used in the searching for or detection of refrigerant leaks. A halide torch (or any other detector using a naked flame) shall not be used.
6 LEAK DETECTION METHODS
The following leak detection methods are deemed acceptable for systems containing flammable refrigerants. Electronic leak detectors shall be used to detect flammable refrigerants, but the sensitivity may not be adequate, or may need recalibration. (Detection equipment shall be calibrated in a refrigerant-free area.) Ensure that the detector is not a potential source of ignition and is suitable for the refrigerant used. Leak detection equipment shall be set at a percentage of the LFL of the refrigerant and shall be calibrated to the refrigerant employed and the appropriate percentage of gas (25 % maximum) is confirmed. Leak detection fluids are suitable for use with most refrigerants but the use of detergents containing chlorine shall be avoided as the chlorine may react with the refrigerant and corrode the copper pipe-work. If a leak is suspected, all naked flames shall be removed/extinguished. If a leakage of refrigerant is found which requires brazing, all of the refrigerant shall be recovered from the system, or isolated (by means of shut off valves) in a part of the system remote from the leak. Oxygen free nitrogen (OFN) shall then be purged through the system both before and during the brazing process.
7 REMOVAL AND EVACUATION
When breaking into the refrigerant circuit to make repairs – or for any other purpose – conventional procedures shall be used. However, it is important that best practice is followed since flammability is a consideration. The following procedure shall be adhered to: remove refrigerant; purge the circuit with inert gas; evacuate; purge again with inert gas; open the circuit by cutting or brazing. The refrigerant charge shall be recovered into the correct recovery cylinders. The system shall be “flushed” with OFN to render the unit safe. This process may need to be repeated several times. Compressed air or oxygen shall not be used for this task. Flushing shall be achieved by breaking the vacuum in the system with OFN and continuing to fill until the working pressure is achieved, then venting to atmosphere, and finally pulling down to a vacuum. This process shall be repeated until no refrigerant is within the system. When the final OFN charge is used, the system shall be vented down to atmospheric pressure to enable work to take place. This operation is absolutely vital if brazing operations on the pipework are to take place.
Ensure that the outlet for the vacuum pump is not close to any ignition sources and there is ventilation available.
8 CHARGING PROCEDURES
In addition to conventional charging procedures, the following requirements shall be followed.
- Ensure that contamination of different refrigerants does not occur when using charging equipment. Hoses or lines shall be as short as possible to minimize the amount of refrigerant contained in them.
- Cylinders shall be kept upright.
- Ensure that the refrigeration system is earthed prior to charging the system with refrigerant.
- Label the system when charging is complete (if not already).
- Extreme care shall be taken not to overfill the refrigeration system.
- Prior to recharging the system it shall be pressure tested with OFN. The system shall be leak Tested on completion of charging but prior to commissioning. A follow up leak test shall be
BE COOL
Carried out prior to leaving the site.
9 DECOMMISSIONING
Before carrying out this procedure, it is essential that the technician is completely familiar with the equipment and all its detail. It is recommended good practice that all refrigerants are recovered safely. Prior to the task being carried out, an oil and refrigerant sample shall be taken in case analysis is required prior to re-use of reclaimed refrigerant. It is essential that electrical power is available before the task is commenced.
- Become familiar with the equipment and its operation.
- Isolate system electrically.
- Before attempting the procedure ensure that: mechanical handling equipment is available, if required, for handling refrigerant cylinders; all personal protective equipment is available and being used correctly; the recovery process is supervised at all times by a competent person; recovery equipment and cylinders conform to the appropriate standards.
- Pump down refrigerant system, if possible.
- If a vacuum is not possible, make a manifold so that refrigerant can be removed from various parts of the system.
- Make sure that cylinder is situated on the scales before recovery takes place.
- Start the recovery machine and operate in accordance with manufacturer's instructions.
- Do not overfill cylinders. (No more than 80 % volume liquid charge).
- Do not exceed the maximum working pressure of the cylinder, even temporarily.
- When the cylinders have been filled correctly and the process completed, make sure
- that the cylinders and the equipment are removed from site promptly and all isolation
- valves on the equipment are closed off.
- Recovered refrigerant shall not be charged into another refrigeration system
- unless it has been cleaned and checked.
10 LABELLING
Equipment shall be labelled stating that it has been de-commissioned and emptied of refrigerant. The label shall be dated and signed. Ensure that there are labels on the equipment stating the equipment contains flammable refrigerant.
11 RECOVERY
When removing refrigerant from a system, either for servicing or decommissioning, it is recommended good practice that all refrigerants are removed safely. When transferring refrigerant into cylinders, ensure that only appropriate refrigerant recovery cylinders are employed. Ensure that the correct number of cylinders for holding the total system charge is available. All cylinders to be used are designated for the recovered refrigerant and labelled for that refrigerant (i.e. special cylinders for the recovery of refrigerant). Cylinders shall be complete with pressure relief valve and associated shut-off valves in good working order. Empty recovery cylinders are evacuated and, if possible, cooled before recovery occurs.
The recovery equipment shall be in good working order with a set of instructions concerning the equipment that is at hand and shall be suitable for the recovery of flammable refrigerants. In addition, a set of calibrated weighing scales shall be available and in good working order. Hoses shall be complete with leak-free disconnect couplings and in good condition. Before using the recovery machine, check that it is in satisfactory working order, has been properly maintained and that any associated electrical components are sealed to prevent ignition in the event of a refrigerant release. Consult manufacturer if in doubt.
The recovered refrigerant shall be returned to the refrigerant supplier in the correct recovery cylinder, and the relevant Waste Transfer Note arranged. Do not mix refrigerants in recovery units and especially not in cylinders.
If compressors or compressor oils are to be removed, ensure that they have been evacuated to an acceptable level to make certain that flammable refrigerant does not remain within the lubricant. The evacuation process shall be carried out prior to returning the compressor to the suppliers. Only electric heating to the compressor body shall be employed to accelerate this process. When oil is drained from a system, it shall be carried out safely.
BE COOL
Competence of service personnel
General
Special training additional to usual refrigerating equipment repair procedures is required when equipment with flammable refrigerants is affected.
In many countries, this training is carried out by national training organizations that are accredited to teach the relevant national competency standards that may be set in legislation.
The achieved competence should be documented by a certificate.
Training
The training should include the substance of the following:
Information about the explosion potential of flammable refrigerants to show that flammables may be dangerous when handled without care.
Information about potential ignition sources, especially those that are not obvious, such as lighters, light switches, vacuum cleaners, electric heaters.
Information about the different safety concepts:
Unventilated – (see Clause GG.2) Safety of the appliance does not depend on ventilation of the housing. Switching off the appliance or opening of the housing has no significant effect on the safety. Nevertheless, it is possible that leaking refrigerant may accumulate inside the enclosure and flammable atmosphere will be released when the enclosure is opened.
Ventilated enclosure – (see Clause GG.4) Safety of the appliance depends on ventilation of the housing. Switching off the appliance or opening of the enclosure has a significant effect on the safety. Care should be taken to ensure a sufficient ventilation before.
Ventilated room – (see Clause GG.5) Safety of the appliance depends on the ventilation of the room.
Switching off the appliance or opening of the housing has no significant effect on the safety. The ventilation of the room shall not be switched off during repair procedures.
Information about the concept of sealed components and sealed enclosures according to IEC 60079-15:2010.
Information about the correct working procedures:
1. Commissioning
- Ensure that the floor area is sufficient for the refrigerant charge or that the ventilation duct is assembled in a correct manner.
○ Connect the pipes and carry out a leak test before charging with refrigerant. - Check safety equipment before putting into service.
2. Maintenance
- Portable equipment shall be repaired outside or in a workshop specially equipped for servicing units with flammable refrigerants.
o Ensure sufficient ventilation at the repair place.
- Be aware that malfunction of the equipment may be caused by refrigerant loss and a refrigerant leak is possible.
- Discharge capacitors in a way that won't cause any spark. The standard procedure to short circuit the capacitor terminals usually creates sparks.
- Reassemble sealed enclosures accurately. If seals are worn, replace them.
- Check safety equipment before putting into service.
3. Repair
- Portable equipment shall be repaired outside or in a workshop specially equipped for servicing units with flammable refrigerants.
- Ensure sufficient ventilation at the repair place.
- Be aware that malfunction of the equipment may be caused by refrigerant loss and a refrigerant leak is possible.
- Discharge capacitors in a way that won't cause any spark.
-
When brazing is required, the following procedures shall be carried out in the right order:
-
Remove the refrigerant. If the recovery is not required by national regulations, drain the refrigerant to the outside. Take care that the drained refrigerant will not cause any danger. In doubt, one person should guard the outlet. Take special care that drained refrigerant will not float back into the building.
• Evacuate the refrigerant circuit. - Purge the refrigerant circuit with nitrogen for 5 min.
BE COOL
- Evacuate again.
- Remove parts to be replaced by cutting, not by flame.
- Purge the braze point with nitrogen during the brazing procedure.
- Carry out a leak test before charging with refrigerant.
- Reassemble sealed enclosures accurately. If seals are worn, replace them.
- Check safety equipment before putting into service.
4. Decommissioning
If the safety is affected when the equipment is put out of service, the refrigerant charge shall be removed before decommissioning.
- Ensure sufficient ventilation at the equipment location.
- Be aware that malfunction of the equipment may be caused by refrigerant loss and a refrigerant leak is possible.
- Discharge capacitors in a way that won't cause any spark.
○ Remove the refrigerant. If the recovery is not required by national regulations, drain the refrigerant to the outside. Take care that the drained refrigerant will not cause any danger. In doubt, one person should guard the outlet. Take special care that drained refrigerant will not float back into the building.
- Evacuate the refrigerant circuit.
o Purge the refrigerant circuit with nitrogen for 5 min.
- Evacuate again.
- Fill with nitrogen up to atmospheric pressure.
- Put a label on the equipment that the refrigerant is removed.
5. Disposal
o Ensure sufficient ventilation at the working place.
○ Remove the refrigerant. If the recovery is not required by national regulations, drain the refrigerant to the outside. Take care that the drained refrigerant will not cause any danger. In doubt, one person should guard the outlet. Take special care that drained refrigerant will not float back into the building.
- Evacuate the refrigerant circuit.
o Purge the refrigerant circuit with nitrogen for 5 min.
- Evacuate again.
- Cut out the compressor and drain the oil.
Transportation, marking and storage for units that employ flammable refrigerants Transport of equipment containing flammable refrigerants
Attention is drawn to the fact that additional transportation regulations may exist with respect to equipment containing flammable gas. The maximum number of pieces of equipment or the configuration of the equipment, permitted to be transported together will be determined by the applicable transport regulations.
Marking of equipment using signs
Signs for similar appliances used in a work area generally are addressed by local regulations and give the minimum requirements for the provision of safety and/or health signs for a work location. All required signs are to be maintained and employers should ensure that employees receive suitable and sufficient instruction and training on the meaning of appropriate safety signs and the actions that need to be taken in connection with these signs.
The effectiveness of signs should not be diminished by too many signs being placed together. Any pictograms used should be as simple as possible and contain only essential details.
Disposal of equipment using flammable refrigerants
See national regulations.
Storage of equipment/appliances
The storage of equipment should be in accordance with the manufacturer's instructions. Storage of packed (unsold) equipment Storage package protection should be constructed such that mechanical damage to the equipment inside the package will not cause a leak of the refrigerant charge. The maximum number of pieces of equipment permitted to be stored together will be determined by local regulations.
DECLARATION OF CONFORMITY
(I) Schuss Home Electronic GmbH
Scheringgasse 3, 1140 Wien, AUSTRIA
(II)
Declares, that the product
Bezeichnung
Description
is conformity with following directives, norms and/or regulations:
(III)
EMV Richtlinie / EMC directive 2014/30/EU
EN 55014-1: 2017 + A11: 2020
EN 55014-2: 2015
EN 61000-3-2: 2019
EN 61000-3-3: 2013 + A1: 2019
EN 301 489-1 2.1.1
EN 301 489-17 V3.1.
LVD Richtlinie / LVD directive 2014/35/EU
EN 60335-1: 2012 + A11: 2014 + A13: 2017 + A1: 2019 + A14: 2019 + A2: 2019
EN 60335-2-40: 2003 + A11: 2004 + A12: 2005 + A1: 2006 + A2: 2009 + A13: 2012
EN 62233: 2008
IEC 60335-2-40: 2002 + A1: 2005 + A2: 2005
ErP Richtline / ErP directive 2009/125/EC
Authorized representative of manufacture
BE COOL
| English [En] | EU DECLARATION OF CONFORMITYManufacturer [I] declares under its sole responsibility that the products [II] are in conformity with the requirements of the EU Directives, Regulations and Harmonised standards [III]. |
| German [De] | EU-KONFORMITÄTSERKLÄRUNGDer Hersteller [I] erklärt in alleiniger Verantwortung, dass die Produkte [II] allen Anforderungen der EU-Richtlinien, Verordnungen und harmonisierten Normen [III] entsprechen. |
| French [Fr] | DÉCLARATION UE DE CONFORMITÉLe fabricant [I] déclare sous sa seule responsabilité que les produits [II] sont conformes aux exigences des directives, règlements et normes harmonisées [III] de l’UE. |
| Spanish [Es] | DECLARACIÓN DE CONFORMIDAD UEEl fabricante [I] declara bajo su exclusiva responsabilidad que los productos [II] están en conformidad con los requisitos de las directivas, regulaciones y normas armonizadas de la UE [III]. |
| Italian [It] | DICHIARAZIONE DI CONFORMITÀ UEl produttore [I] dichiara sotto la sua unica responsabilità che i prodotti [II] sono conformi ai requisiti delle direttive, dei regolamenti e degli standard armonizzati della UE [III]. |
| Greek [EI] | ΔΗΛΩΣΗ ΣΥΜΜΟΡΦΩΣΗΣ EEΟ κατασκευαστής [I] δηλώνει αποκλειστικά με δική του ευθύνη ότι τα προϊόντα [II] συμμορφώνονται με τις απαιτήσεις των Οδηγιών, των Κανονισμών και των Εναρμονισμένων προτύπων της ΕΕ [III]. |
| Portuguese [Pt] | DECLARAÇÃO DE CONFORMIDADE UEO fabricante [I] declara sob sua inteira responsabilidade que os produtos [II] estão em conformidade com os requisitos das diretivas, regulamentos e normas harmonizadas da UE [III]. |
| Croatian [Hr] | EU IZJAVA O USKLAĐENOSTIProizvođač [I] izjavljuje pod punom materijalnom odgovornošću da su proizvodi [II] u skladu sa zahtjevima EU direktiva, propisa i harmoniziranih standarda [III]. |
| Czech [Cs] | EU PROHLÁŠENÍ O SHODÉVýrobce [I] prohlašuje na vlastní výlučnou odpovědnost, že výrobky [II] jsou ve shodě s požadavky směrnic, předpisů a harmonizovaných norem EU [III]. |
| Danish [Da] | EU OVERENSSTEMMELSESERKLÆRINGProducenten [I] erklærer under eget ansvar, at produkterne [II] er i overensstemmelse med kravene i direktiverne, forordningerne og de harmoniserede standarder fra EU [III]. |
| Dutch [NI] | EU-CONFIRMITEITSVERKLARINGFabrikant [I] verklaart op eigen verantwoordelijkheid dat de producten [II] in overeenstemming zijn met de eisen van de EG-richtlijnen, voorschriften en geharmoniseerde normen [III]. |
| Estonian [Et] | EL-i VASTAVUSDEKLARATSIOONTootja [I] kinnitab ja kannab ainuisikuliselt vastutust selle eest, et tooted [II] on toodetud kooskõlas Euroopa Liidu direktiivide, standardite ja muude normatiivdokumentidega [III]. |
| Finnish [Fi] | EU-VAATIMUSTENMUKAISUUSVAKUUTUSValmistaja [I] vakuuttaa omalla vastuullaan, että tuotteet [II] ovat EU:n direktiivien, asetusten ja yhdenmukaistettujen standardien [III] vaatimusten mukaisia. |
| Hungarian [Hu] | EU MEGFELELŐSÉGI NYILATKOZATA Gyártó [I] nyilatkozza, hogy kizárólagos felelősséget vállal a termékek [II] EU irányelveknek, szabályozásoknak és harmonizált szabványoknak való megfeleléséről [III]. |
| Latvian [Lv] | ES ATBILSTĪBAS DEKLARĀCIJARAžotājs [I] deklarē uz savu atbildību, ka produkti [II] atbilst ES direktīvu, regulu un saskaņoto standartu [III] prasībām. |
| Lithuanian [Lt] | ES ATITIKTIES DEKLARACIJAGamintojas [I] savo išskirtine atsakomybe pareiškia, kad gaminiai [II] atitinka ES direktyvų, reglamentų ir darniųjų standartų reikalavimus [III]. |
| Norwegian [No] | EU-SAMSVARSERKLÆRINGProdusent [I] erklærte under sitt eget ansvar at sine produkter [II] er i samsvar med kravene i EU-direktivene, forskrifter og harmoniserte standarder [III]. |
| Polish [PI] | DEKLARACJA ZGODNOŚĆI UEProducent [I] deklaruje z pełną odpowiedzialnością, že produkty [II] są zgodne z postanowieniami dyrektyw, regulacji oraz norm zharmonizowanych UE [III]. |
| Romanian [Ro] | DECLARAȚIA DE CONFORMITATE UEProducătorul [I] declară pe propria răspundere că produsele [II] sunt în conformitate cu cerințele Directivelor, Normelor și Standardelor armonizate UE [III]. |
| Slovak [Sk] | VYHLÁSENIE O ZHODE EUVýrobca [I] vyhlasuje na svoju vlastnú zodpovednosť, že výrobky [II] sú v súlade s požiadavkami smerníc, nariadení a harmonizovaných noriem EÚ [III]. |
| Slovenian [SI] | IZJAVA EU O SKLADNOSTIProizvajalec [I] s polno odgovornostjo izjavlja, da so izdelki [II] v skladu z zahtevami direktiv, uredb in usklajenih standardov EU [III]. |
| Swedish [Sv] | EU FÓRKLARING OM ÖVERENSSTÄMMELSETillverkaren [I] deklarerar å eget ansvar att produkterna [II] efterlever kraven enligt EU-direktiven, förordningarna och harmoniserade normer [III]. |


- Current operating instructions and other languages
- BE COOL
- Inhaltsverzeichnis
- HINWEIS
- Table des matières
- DÉCLARATION DE CONFORMITÉ
- REMARQUE
- PANNEAU DE COMMANDE ET TÉLÉCOMMANDE
- TÉLÉCOMMANDE
- ACTIVITÉS DE DÉBUT/FIN DE SAISON
- ACTIVITÉS DE FIN DE SAISON
- NOTA
- PANNELLO DI CONTROLLO E TELECOMANDO
- CONTROLLO REMOTO
- RIMEDIARE AI PROBLEMI
- Mobiele airconditioner BC16KL2201FW
- Inhoudsopgave
- OPMERKING
- BEDIENINGSPANEELE EN AFSTANDSBEDIENING
- SCHAKEL HET APPARAAT IN
- TIPS VOOR CORRECTE TOEPASSING
- PERMANENTE WATERAFVOER
- PANEL DE CONTROL Y MANDO A DISTANCIA
- MANDO A DISTANCIA
- ACTIVIDADES AL PRINCIPIO/FINAL DE LA TEMPORADA
- ACTIVIDADES DE FIN DE TEMPORADA
- Obsah
- OVLÁDACÍ PANEL A DÁLKOVÉ OVLÁDÁNÍ
- AKTIVITY NA ZAČÁTKU/KONCI SEZÓNY
- AKTIVITY NA KONCI SEZÓNY
- POZNÁMKA
- OVLÁDACÍ PANEL A DIAL'KOVÉ OVLÁDANIE
- DIAL'KOVÉ OVLÁDANIE
- AKTIVITY NA ZAČIATKU/KONCI SEZÓNY
- Cuprins
- NOTĂ
- PANOU DE CONTROL ŞI TELECOMANDĂ
- ACTIVITĂȚI LA ÎNCEPUTUL/FINALUL SEZONULUI
- ACTIVITĂȚI DE SFÂRȘIT DE SEZON
- Spis treści
- UWAGA
- DZIAŁANIA NA POCZĄTKU/KOŃCU SEZONU
- DZIAŁANIA NA KONIEC SEZONU
- Vsebina
- OPOMBA
- NADZORNA PLOŠČA IN DALJINSKI UPRAVLJALNIK
- DEJAVNOSTI NA ZAČETKU/KONCU SEZONE
- DEJAVNOSTI OB KONCU SEZONE
- Sadržaj
- Montaža na rolete i klizne prozore pomoću prozorskog nosača
- OBAVIJEST
- UPRAVLJAČKA PLOČA I DALJINSKI UPRAVLJAČ
- Sigurnosne upute za zamjenu baterije:
- mjerač vremena
- AKTIVNOSTI NA POČETKU/KRAJU SEZONE
- AKTIVNOSTI ZA KRAJ SEZONE
- Mobile air conditioner BC16KL2201FW
- Table of contents
- IMPORTANT INFORMATION ON SAFETY, LOCATION AND ELECTRICAL CONNECTION.
- WARNING
- SPECIFIC INFORMATION ON REFRIGERANT R290
- RECYCLING
- DISPOSAL
- DISPOSAL OF THE BATTERIES
- DECLARATION OF CONFIRMITY
- DESCRIPTION OF THE DEVICE AND SCOPE
- COMMISSIONING
- PREPARATION FOR USE
- IMPORTANT!
- INSTALLATION
- BE COOL RECOMMENDATION
- These offer the following advantages:
- CONTROL PANEL AND REMOTE CONTROL
- REMOTE CONTROL
- Preparing the remote control - Inserting or replacing batteries
- NOTE
- SETTING THE FUNCTIONS
- SWITCH ON THE DEVICE
- SETTING MODES
- Cooling mode
- Ventilation/Fan mode
- Dehumidify/dry mode
- Smart Mode
- TIMER
- Programmed switch-on
- Programmed switch off
- Changing the temperature unit
- The following functions can only be set using the Remote Commander:
- SWING
- SLEEP
- TIPS FOR CORRECT USE
- MAINTENANCE AND CLEANING
- CLEAN AIR FLITER
- CLEANING THE HOUSING
- EMPTY WATER TANK MANUALLY
- PERMANENT WATER DRAIN
- ACTIVITIES AT SEASON START/END
- ACTIVITIES AT THE END OF THE SEASON
- CHECKS AT THE BEGINNING OF THE SEASON
- SELF DIAGNOSIS
- REMEDYING THE PROBLEMS
- WARRANTY
- This warranty does not include:
- ADDRESS
- WICHTIG!
- INSTRUCTIONS FOR REPAIRING APPLIANCES CONTAINING R290
- GENERAL INSTRUCTIONS
- Checks to the area
- Work procedure
- General work area
- Checking for presence of refrigerant
- Presence of fire extinguisher
- No ignition sources
- Ventilated area
- Checks to the refrigeration equipment
- Checks to electrical devices
- REPAIRS TO SEALED COMPONENTS
- REPAIR TO INTRINSICALLY SAFE COMPONENTS
- CABLING
- DETECTION OF FLAMMABLE REFRIGERANTS
- LEAK DETECTION METHODS
- REMOVAL AND EVACUATION
- CHARGING PROCEDURES
- DECOMMISSIONING
- LABELLING
- RECOVERY
- Competence of service personnel
- General
- Training
- Commissioning
- Maintenance
- Repair
- Decommissioning
- Disposal
- Transportation, marking and storage for units that employ flammable refrigerants Transport of equipment containing flammable refrigerants
- Marking of equipment using signs
- Disposal of equipment using flammable refrigerants
- Storage of equipment/appliances
- DECLARATION OF CONFORMITY
- Schuss Home Electronic GmbH
Brand : Be Cool
Model : BC16KL2201FW
Category : Air Conditioning