AMPRP13 - Food Processor ARTHUR MARTIN - Free user manual and instructions
Find the device manual for free AMPRP13 ARTHUR MARTIN in PDF.

User questions about AMPRP13 ARTHUR MARTIN
0 question about this device. Answer the ones you know or ask your own.
Ask a new question about this device
Download the instructions for your Food Processor in PDF format for free! Find your manual AMPRP13 - ARTHUR MARTIN and take your electronic device back in hand. On this page are published all the documents necessary for the use of your device. AMPRP13 by ARTHUR MARTIN.
USER MANUAL AMPRP13 ARTHUR MARTIN
natural_image
Line drawing of a kitchen mixer with handle and control panel (no text or symbols)Robot pâtissier
Modèle:
AMPRP13
MANUEL D'INSTRUCTIONS
text_image
Technical diagram of a kitchen mixer with labeled parts including bowl, fan, and mesh componentsnatural_image
Line drawing of a kitchen mixer with control panel and side sink (no text or symbols)FIG1

natural_image
Line drawing of a kitchen blender with handle and control panel (no text or symbols)FIG2

text_image
Step ① Step ②FIG3

natural_image
Line drawing of a kitchen mixer with a stand mixer and control panel (no text or symbols)FIG4

natural_image
Line drawing of a kitchen mixer with a side bowl and control panel (no text or symbols)FIG5

natural_image
Line drawing of a kitchen mixer with control panel and side-mounted stand (no text or symbols)FIG6
natural_image
Line drawing of a kitchen mixer with handle and control panel (no text or symbols)Stand Mixer Model:
AMPRP13
INSTRUCTION MANUAL
Read this manual thoroughly before using and save it for future reference
Technical Data
Model: AMPRP13
Rated voltage: 220-240V\~ 50/60Hz
Power consumption: 1300W
Protection class: II
General Safety Instructions
Read the operating instructions carefully before putting the appliance into operation and keep the instructions including the warranty, the receipt and, if possible, the box with the internal packing. If you give this device to other people, please also pass on the operating instructions.
- The appliance is designed exclusively for private use and for the envisaged purpose. This appliance is not fit for commercial use. Do not use it outdoors (except if it is designed to be used outdoors). Keep it away from sources of heat, direct sunlight, humidity (never dip it into any liquid) and sharp edges. Do not use the appliance with wet hands. If the appliance is humid or wet, unplug it immediately.
- When cleaning or putting it away, switch off the appliance and always pull out the plug from the socket (pull on the plug, not the cable) if the appliance is not being used and remove the attached accessories.
- Do not operate the machine without supervision. If you should leave the workplace, always switch the machine off or remove the plug from the socket (pull the plug itself, not the lead).
- Check the appliance and the cable for damage on a regular basis. Do not use the appliance if it is damaged. Do not try to repair the appliance on your own. Always contact an authorized technician. To avoid the exposure to danger, always have a faulty cable be replaced only by the manufacturer, by our customer service or by a qualified person and with a cable of the same type.
- Use only original spare parts.
- Pay careful attention to the following "Special Safety Instructions".
Children and Frail Individuals
- In order to ensure your children'safety, please keep all packaging (plastic bags, boxes, polystyrene etc.) out of their reach.
Caution! Do not allow small children to play with the foil as there is a danger of suffocation!
- This appliance shall not be used by children. Keep the appliance and its cord out of reach of children.
- This device is not a toy. Children shall not play with the appliance.
- Appliances can be used by persons with reduced physical, sensory or mental capabilities or lack of experience and knowledge if they have been given supervision or instruction concerning use of the appliance in a safe way and if they understand the hazards involved.
Special safety Instructions for this Machine
- Always disconnect the appliance from the supply if it is left unattended and before assembling, disassembling or cleaning.
- Switch off the appliance and disconnect from supply before changing accessories or approaching parts that move in use.
- Do not use appliance for other than intended purpose.
- CAUTION: In order to avoid a hazard due to inadvertent resetting of the thermal cut-out, this appliance must not be supplied through an external switching device, such as a timer, or connected to a circuit that is regularly switched on and off by the utility.
- Only operate this machine under supervision.
- Do not interfere with any safety switches.
- Do not insert anything into the rotating hooks while the machine is working.
- Place the machine on a smooth, flat and stable working surface.
- Do not insert the mains plug of the machine into the power socket without having installed all the necessary accessories.
- If the supply cord is damaged, it must be replaced by the manufacturer, its service agent or similarly qualified persons in order to avoid a hazard.
- Warning: Potential injury from misuse. Care shall be taken when handling the sharp cutting blades, emptying the bowl and during cleaning.
- Be careful if hot liquid is poured into the food processor or blender as it can be ejected out of the appliance due to a sudden steaming.
- Regarding the instructions for operation times and speed settings, thanks
to refer to the below paragraphs.
- Regarding the instructions for cleaning surfaces in contact with food, thanks to refer to the below paragraph "cleaning" in manual.
Overview of the Components
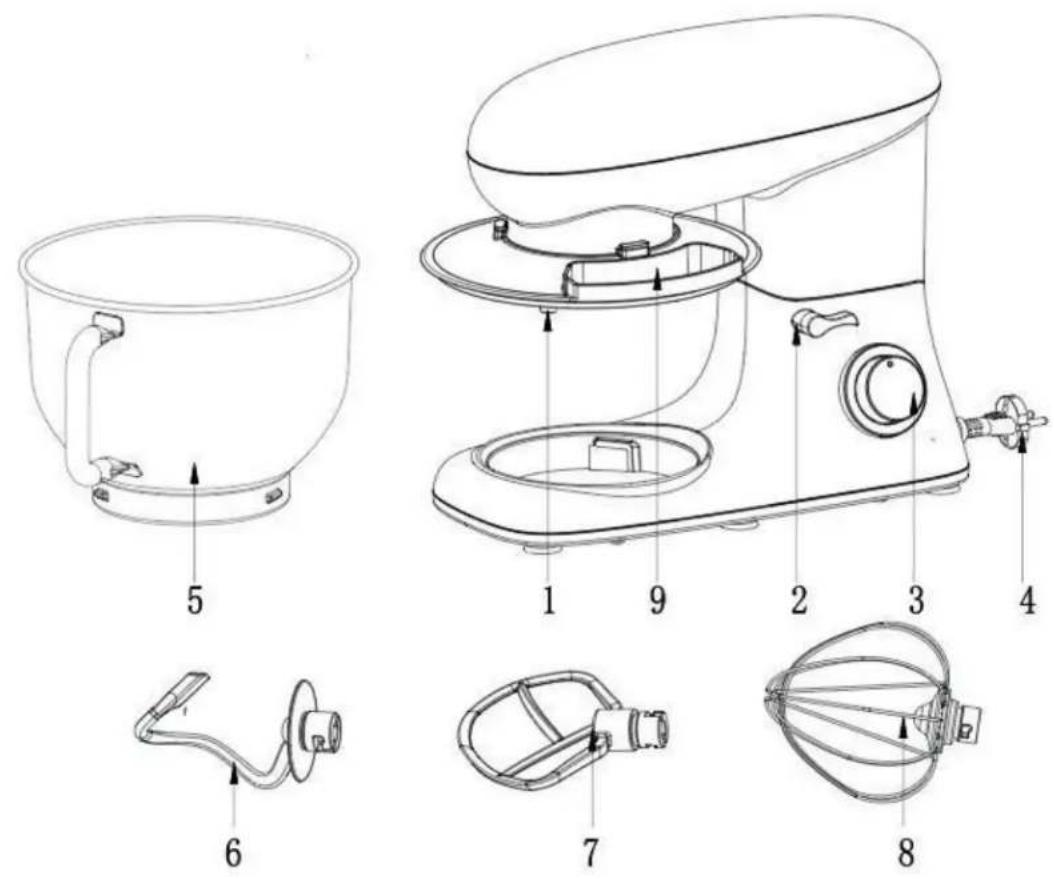
Main Components and Standard Accessories:
| 1 | Output shaft | 6 | Dough hook |
| 2 | Rise knob | 7 | Beater |
| 3 | Speed knob | 8 | Whisk |
| 4 | Power Cord | 9 | Pot cover |
| 5 | Mixing bow |
Using the Mixing Bowl
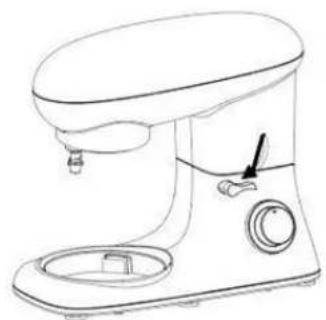
- In order to lift the arm, clockwise rotation the Rise knob (2). The arm will now move upwards. (FIG1)
- Place the pot cover into its body. (FIG2)
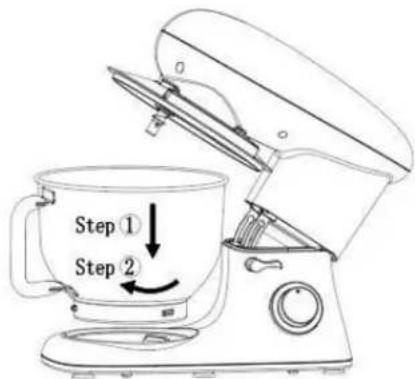
- Place the mixing bowl into its holding device(Step①) and turn the bowl clockwise until it locks into place(Step ②). (FIG3)
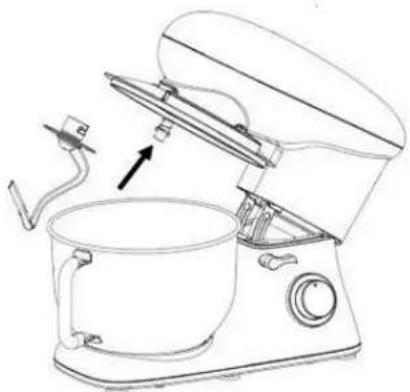
- Mount the required utensil (Dough hook or Beater or Whisk) by inserting the top into the
output shaft,
- and turn anti-clockwise until it locks into place. (FIG4&FIG5)
- Now fill in your ingredients.
- Do not overfill the machine - the maximum quantity of ingredients is 1.5kg.
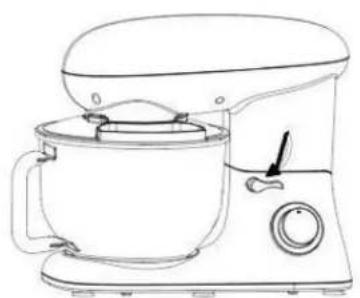
- Lower the arm using the rise knob (2). (FIG6)
- Insert the mains plug into a properly installed 220-240V 50/60 Hz safety power socket.
- Switch the machine using the speed knob to a speed between 1 and 10 (corresponding to the mixture).
- For pulse operation (kneading at short intervals), turn the switch to the "PULSE" position. The switch has to be held in this position according to the desired interval length. When the switch is released it returns automatically to the "0" position.
- After kneading/stirring turn the speed knob (3) back to the "0" position as soon as the mixture has formed a ball. Then remove the mains plug.
- Push the rise knob (2) downwards and the arm will be raised.
- The mixture can now be released with the help of a spatula and removed from the mixing bowl.
- The mixing bowl can now be removed.
- Clean the parts as described under "Cleaning".
natural_image
Line drawing of a kitchen mixer with control panel and side mount (no text or symbols)FIG1

natural_image
Line drawing of a kitchen blender with handle and control knob (no text or symbols)FIG2
text_image
Step ① Step ②FIG3
natural_image
Line drawing of a kitchen mixer with a stand mixer and fan (no text or symbols)FIG4

natural_image
Line drawing of a kitchen mixer with a pot and handle (no text or symbols)FIG5
natural_image
Line drawing of a kitchen mixer with control panel and handle (no text or symbols)FIG6
Adjusting the Levels and Using the Dough Hook for not more than 1.5kg of Mixture
| Use | Picture | Levels | Time(Min) | Maximum | Operation method |
| Dough hook |  | 1-5 | 3-5 | 1000g flour and 538g water | 1 speed run for 30s, the 2 speed run for 30s, and then the 5 speed run for 2 min to 4 min to form a cluster. |
| Beater |  | 1-7 | 3-10 | 660g flour and 840g water | 1-2 speed run for30s, the 7 speed run for more than 2min30s |
| Whisk |  | 8-10 | 3-10 | 3 egg whites (Minimum) | Open 8 or 10 speed to run 3min above. |
Troubleshooting
| NO. | Troubles | Solution |
| 1 | The machine doesn't work | ·Check if the plug is in good contact with the socket.·Check if the rise button spring back in place.·Check if the machine works continuously more than 10 minutes, and wait until the motor cool down. |
| 2 | Noise in the mixing bowl when working (the accessory scraped the bowl) | ·Check if the mixing bowl is properly installed.·Check if the accessory installed properly on machine. |
| 3 | The pot cover doesn't fit the mixing bowl properly | ·Check if the pot cover placed on the machine properly.·Check if the mixing bowl installed properly on machine and locked correctly. |
| 4 | The machine doesn’t work on certain speed | ·Check if the mark on speed knob correspond to the speed silkscreen on housing.·Rotate speed knob to 0 ,and re-check if the machine works . |
| 5 | Movements when the machine working | ·Check if the anti-slip feet fall off.·Check if the machine is placed on a smooth and flat tabletop. |
| 6 | The rise button didn’t springback in place after installing the mixing bowl and pot cover | ·Check if the pot cover placed on the machine properly.·Check if the mixing bowl is properly installed. |
Suggested Recipes
Sponge Mixture (Basic Recipe), Level 1-4
Ingredients:
200grams soft butter or margarine, 200grams sugar, 1 packet vanilla sugar or 1 bag Citro-Back, 1 pinch of salt, 4 eggs, 400grams wheat flour, 1 packet baking powder, approx. 1/8 litre milk.
Preparation:
Transfer the wheat flour and the remaining ingredients to the mixing bowl, stir with the beater for 3 seconds on level 1, then for approximately 3 minutes on level 2. Grease a tin or cover with baking paper. Fill in the mixture and bake. Before the cake is removed from the oven, test to see if it is done. With a sharp wooden stick pierce the centre of the cake. If no mixture sticks to it, the cake is cooked. Turn the cake on to a cake grid and allow to cool.
Traditional Oven
Insertion height: 2
Heating: electric oven, top and bottom heat 175-200°C; gas oven: level 2-3
Baking time: 50-60 minutes
Depending on taste, this recipe can be changed, for example with 100g raisins or 100g nuts or 100g grated chocolate. In fact, the possibilities are endless.
Linseed Bread Rolls, Level 1-4
Ingredients:
500-550g wheat flour, 50g linseed, 3/8 litre water, 1 cube of yeast (40g), 100g low-fat curds, well drained, 1 tsp salt. For coating: 2 tbsp of water.
Preparation:
Soak the linseed in 1/8 litre of lukewarm water. Transfer the remaining lukewarm water (1/4 litre) into the mixing bowl, crumble in the yeast, add the curds and mix with the dough hook on level 2. The yeast must be completely dissolved. Put the flour with the soaked linseed and the salt into the mixing bowl. Knead thoroughly on level 1, then switch to level 3 and continue kneading for 3-5 minutes. Cover the mixture and allow to rise in a warm place for 45-60 minutes. Knead thoroughly once more, remove from the bowl and form sixteen rolls. Cover the baking tin with
wet baking paper. Place the rolls on this and allow to rise for 15 minutes. Coat with lukewarm water and bake.
Traditional Oven:
Insertion height: 2
Heating: electric oven: top and bottom heat 200-220°C (preheated for 5 minutes), gas oven level 2-3
Baking time: 30-40 minutes
Chocolate Cream, Level 5-6
Ingredients:
200ml sweet cream, 150g semi-bitter chocolate coating, 3 eggs, 50-60g sugar, 1 pinch of salt, 1 packet of vanilla sugar, 1 tablespoon cognac or rum, chocolate flakes.
Preparation:
Beat the cream in the mixing bowl with the whisk until stiff. Remove from the bowl and place somewhere to cool. Melt the chocolate coating in accordance with the instructions on the packet or in the microwave at 600W for 3 minutes. In the meantime, beat the eggs, sugar, vanilla sugar, cognac or rum and salt in the mixing bowl with the whisk on speed 2 to form a foam. Add the melted chocolate and stir in evenly on speed 5-6. Leave a little of the cream for decoration. Add the remaining cream to the creamy mixture and stir in briefly using the pulse function. Decorate the chocolate cream and serve well cooled.
Pizza dough, Level 1-4
Ingredients
400g plain flour, 250ml warm water, 1/2 tsp sugar, 1sacher active dried yeast (about 2-1/2 tsp), 1-1/2 tsp olive oil and 1 tsp salt.
Preparation:
Put the flour in the bowl. Mix the remaining ingredients in a bowl or jug. Run the mixer at speed 1-2, and gradually add the liquid. As the ingredients incorporate, and the dough ball becomes more formed, increase the speed to 3-4. Knead for a couple of minutes on this speed, till the dough ball is smooth. Remove from the bowl and split into 2-4 pieces. Roll into pizza bases (circles or rectangles) on a floured surface, then lay them on a baking sheet or pizza tray. Spread the pizza bases with tomato purée and add toppings – mushrooms, ham, olives, sun dried tomatoes, spinach, artichoke, etc. Top with dried herbs, pieces of mozzarella, and a drizzle of olive oil. Bake in a preheated oven at 200^ C/ 400^ F/gas 6 for 15-20 minutes, till the toppings are bubbling and golden brown.
Basic White Bread, Level 3-6
Ingredients:
600g strong white bread flour 1 sachet active dried yeast (about 2 12 tsp) 345ml warm water 1 tbsp sunflower oil or butter 1 tsp sugar 2 tsp salt
Preparation:
Use the mixing instructions for pizza dough, then put the dough in a bowl, cover and leave in a warm place till it's doubled in size (30-40 minutes). Remove the dough and punch down to remove air. Knead lightly on a floured board, shape it into a loaf, or put it in a tin, cover, and leave in a warm place to rise for another 30 minutes. Bake in a preheated oven at 200°C/400°F/gas 6 for 25-30 minutes, till golden brown and hollow sounding on the bottom.
Soft Poppy Seed Rolls, Level 1-3
Ingredients:
570g strong white bread flour 1 sachet active dried yeast (about 2 12 tsp) 300ml milk (warmed slightly) 2 eggs (room temperature) 1 tbsp sunflower oil 1 12 tsp sugar 2 tsp salt 75g poppy seeds
Preparation:
Mix the milk, eggs, oil, sugar, salt and yeast in a jug or bowl, and leave for 5 minutes. Put the flour and poppy seeds in the bowl, and mix at speed 1, gradually adding the liquid, then increase the speed to 2, and mix for five minutes. Remove the dough to a floured surface, cut into 8-10 pieces, roll into shape, then put on a greaseproof baking sheet. Leave in a warm place till doubled in size. Brush with a little egg or milk, and bake in a preheated oven at 220^ C/ 425^ F/gas 7 for 20-25 minutes, till golden brown and hollow sounding on the base.
Italian Herb Bread
Ingredients:
575g strong white bread flour, 1 sachet active dried yeast (about 2 12 tsp), 290ml water 2 tbsp olive oil, 2 tsp sugar 2 tsp salt, 4 tbsp mixed dried herbs
Preparation:
Mix the water, oil, sugar, salt and yeast in a jug or bowl, and leave for 5 minutes. Put the flour and dried herbs in the bowl, and mix at speed 1, gradually adding the liquid, then increase the speed to 2, and mix for 5 minutes. Put the dough in a bowl, cover and leave in a warm place till doubled in size (20-30 minutes). Put on a floured surface, knead gently to knock out the air, then shape, put on a baking sheet, and leave in the warm till doubled in size. Bake in a preheated oven at 200^ C/400°F/gas 6 for 25 minutes or till golden brown and hollow sounding on the bottom.
Coffee & Brandy Ice Cream, Level 5-6
Ingredients:
3 eggs 75g caster sugar, 300ml single cream 2 tbsp instant coffee powder, 300ml double cream 2½ tbsp brandy.
Preparation:
Add the sugar and eggs to the bowl and process at speed 6 till smooth in texture. In a saucepan, bring the single cream and coffee just to the boil and stir in the egg and sugar mixture. Put in a heatproof bowl over a simmering pan of water and cook gently, stirring well, till thick enough to coat the back of a spoon. Strain into a bowl and leave to cool. Whip the double cream at speed 6 till soft peaks form, then fold into the cold egg and
sugar mixture, with the brandy. Pour into a container, cover, and freeze for 2½-3 hours, till partially frozen. Remove, stir well and then freeze again, till the desired texture is achieved.
Basic Meringues, Level 5-6
Ingredients:
4 egg whites, 100g caster sugar, 100g icing sugar Combine
Preparation:
Put the egg whites in the bowl and process at speed 6 till fairly stiff. Add half the sugar and whisk again till the mixture is smooth, and stiff peaks have formed. Remove the bowl, and lightly fold in the remaining sugar with a metal spoon. Line a baking sheet and spoon or pipe the meringue mixture into ovals. Sprinkle with the remaining sugar A and put on the lowest shelf of a cool oven (120°C/250°F/gas 12 ) for 1½ hours. Cool on a wire rack. Top with soft fruits, chocolate, and sweetened cream.
Cleaning
- Before cleaning remove the mains lead from the socket.
- Never immerse the housing with motor in water!
- Do not use any sharp or abrasive detergents.
Motor Housing
- Only a damp rinsing cloth should be used to clean the outside of the housing.
Mixing Bowl, Mixing Equipment
CAUTION:
- The components are not suitable for cleaning in a dishwasher. If exposed to heat or caustic cleaners they might become misshapen or discolored.
- Components that have come into contact with food can be cleaned in soapy water.
- Allow the parts to dry thoroughly before reassembling the device.
- Please apply a small quantity of vegetable oil likely to the screens after they have dried.
REMOVAL OF APPLIANCES USED

Directive 2012/19/EU on waste electrical and electronic Equipment (WEEE) requires that the appliance uses are not disposed of using the normal municipal waste. Old appliances must be collected separately in order to optimize the recovery and recycling of materials they contain and reduce the impact on human health and the environment.
The symbol of the dustbin is used on all products to remind the obligations for separate collection. Consumers should contact their local authorities or dealer regarding the steps to follow for the removal of their old appliance. If you proceed with the scrapping of old equipment, be sure to render useless what could be dangerous: disconnect the power cable flush with the device.
Danger:
Never attempt to use your appliance, if it shows signs of damage or the power cord or plug is damaged. If the power cord is defective it is important to have it replaced with the after sales service to eliminate any danger.
Only qualified and authorized persons are authorized to carry out repairs to your appliance. Any repairs not in accordance with standards could significantly increase the level of risk for the user!
Defect resulting from improper handling, degradation or attempted repairs by third parties voids the warranty on the product. This also applies in case of normal wear and accessories from the appliance.
Important!
We recommend that you keep the packaging of your device at least for the duration of the warranty. The guarantee does not apply without the original packaging.
Warranty:
Your device has two years warranty. The warranty does not cover wear and breakage following a wrong use of the product. The customer is responsible for all returns. You remain responsible for the costs and risks associated with the product shipment; it is therefore recommended to ship the product with an acknowledgement of receipt and transport insurance in case of significant value of the product.
KEEP OUT OF REACH OF CHILDREN
Children should be supervised to ensure that they do not play with the appliance.
Service E-mail : sav@gmtfrance.fr
ARTHUR MARTIN
GMT: Global Market Technology