YT-82770 - Drill Yato - Free user manual and instructions
Find the device manual for free YT-82770 Yato in PDF.


User questions about YT-82770 Yato
0 question about this device. Answer the ones you know or ask your own.
Ask a new question about this device
Download the instructions for your Drill in PDF format for free! Find your manual YT-82770 - Yato and take your electronic device back in hand. On this page are published all the documents necessary for the use of your device. YT-82770 by Yato.
USER MANUAL YT-82770 Yato
natural_image
Exterior view of a YATO 18V electric drill put tool (no signage or text overlays)CE
PL EN DE RU UA LT LV CZ SK HU RO ES FR IT NL GR
text_image
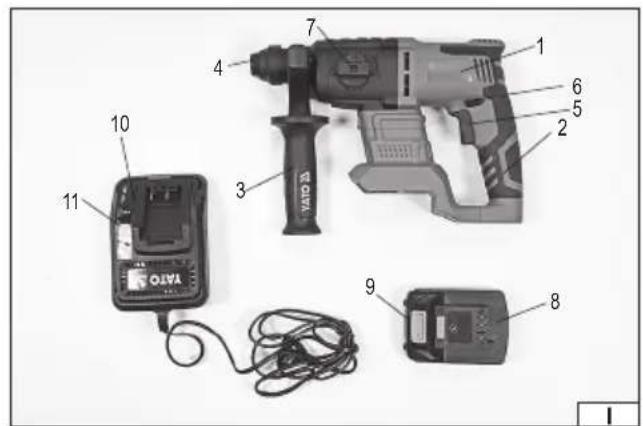
VATO 10 11 3 4 7 6 5 2 8 9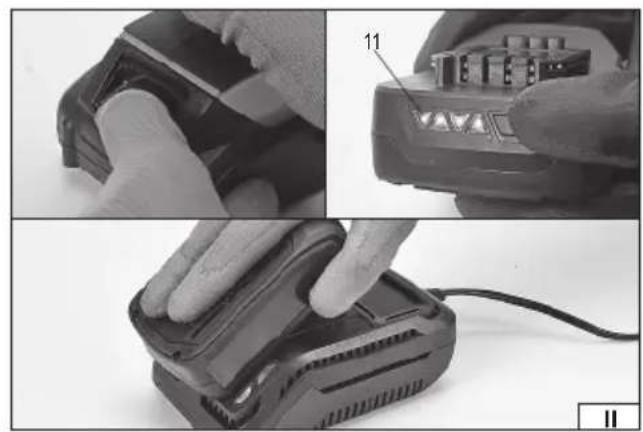
natural_image
Three-panel photo showing hands operating a battery pack and a charging case, with no visible text or symbols.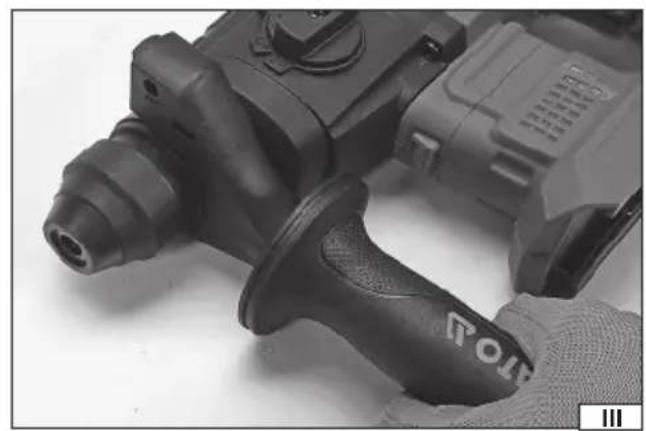
natural_image
Close-up of a black drill bit with a hand strap and control knob (no visible text or symbols)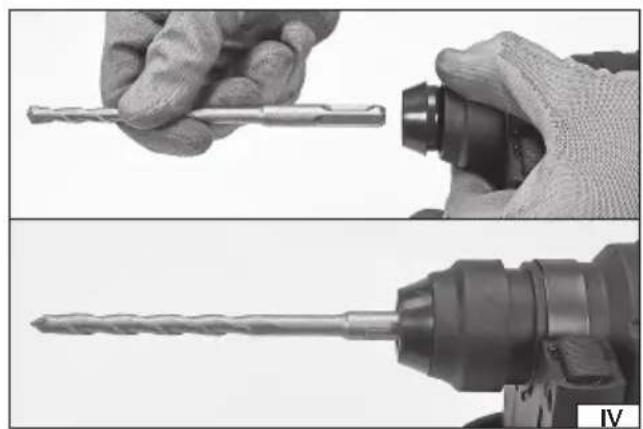
natural_image
Two black-and-white images showing hands holding a drill bit and a drill bit with a drill bit being inserted (no text or symbols visible)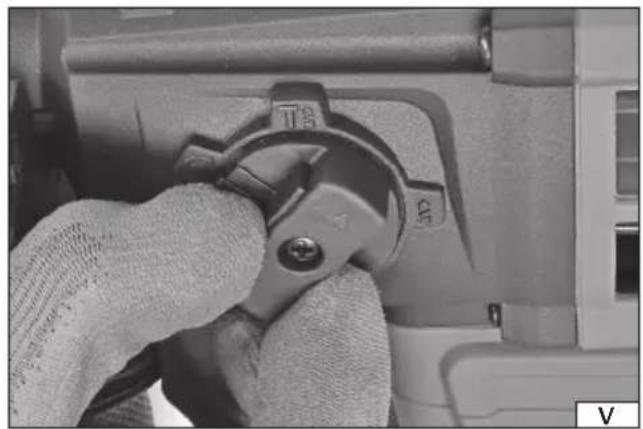
natural_image
Close-up of hands cleaning a mechanical component with a cloth (no visible text or symbols)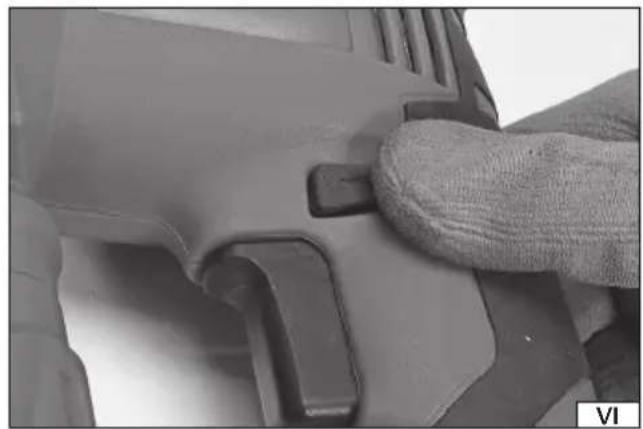
natural_image
Close-up of a hand holding a small mechanical component, no visible text or symbols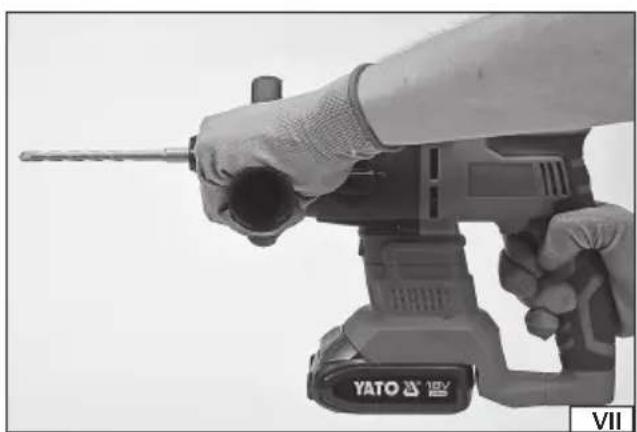
natural_image
Close-up of hands operating a YATO drill bit with a drill bit being inserted (no visible text or symbols)Working tool attaching system
Electronic adjustment of the rotation
Read the operating instruction
Wear protective goggles
Schutzbrille tragen
Wear hearing protectors
Gehörschutz tragen
This symbol indicates that waste electrical and electronic equipment (including batteries and storage cells) cannot be disposed of with other types of waste. Waste equipment should be collected and handed over separately to a collection point for recycling and recovery, in order to reduce the amount of waste and the use of natural resources. Uncontrolled release of hazardous components contained in electrical and electronic equipment may pose a risk to human health and have adverse effects for the environment. The household plays an important role in contributing to reuse and recovery, including recycling of waste equipment. For more information about the appropriate recycling methods, contact your local authority or retailer.
PRODUCT CHARACTERISTICS
A drill driver is a universal portable device that does not need any external source of power supply, intended for handymen for making holes in various materials (e.g. wood and wood-related materials, metals), for screwing and unscrewing various screws and bolts, and also for impact drilling in hard ceramic materials (e.g. concrete). Its particular advantages will be appreciated by handymen performing various assembly and finishing works. This product is not designed for commercial applications. Correct, reliable and safe operation of this power tool depends on proper operation, therefore:
Before starting the work with this tool, please read this manual and keep it properly.
The supplier does not assume any liability for damages resulting from failure to follow safety regulations and recommendations specified in this manual.
EQUIPMENT
The device is delivered complete and does not require assembly. This drill driver is supplied with: battery, charger.
TECHNICAL PARAMETERS
| Parameter Measuring unit Value | ||
| Catalogue number YT-82770 | ||
| Operating voltage [V] 18 DC | ||
| Rotation (idle running) [min | -1] 0 - 1850 | |
| Impact frequency [min | -1] 0 - 4800 | |
| Max. torque [Nm] 2 | ||
| Noise level | ||
| - acoustic pressure L_pA ± K_pA | [dB] 95,6 ± 3,0 | |
| - acoustic power L_wA ± K_wA [dB] | 104,0 ± 3,0 | |
| Protection class | IPX0 | |
| Insulation class | III | |
| Oscillation level a_h ± K | [m/s2] | 5,677 ± 1,5 / 6,334 ± 1,5 |
| Weight | [kg] | 2,0 |
| Tool chuck | SDS+ | |
| Maximum drilling diameter | ||
| - in wood | [mm] | 40 |
| - in concrete | [mm] | 18 |
| - in steel | [mm] | 13 |
| Battery type | Li-Ion | |
| Battery capacity | [Ah] | 3 |
| Battery energy | [Wh] | 54 |
| Charger | ||
| Input voltage: | [V~] 100 - 240 | |
| Mains frequency [Hz] | 50 - 60 | |
| Rated power | [W] 50 | |
| Output voltage: | [V] 21 DC | |
| Output current: | [A] 1,5 | |
| Charging time | [h] | 1,5 |
GENERAL WARNINGS FOR THE SAFETY OF POWER TOOLS
Warning! Read all safety warnings, illustrations and specifications provided with this power tool. Failure to do so may result in electric shock, fire or serious injury.
Keep all warnings and instructions for future reference.
The term "power tool" used in warnings applies to all tools driven by power both wired and wireless.
Workplace safety
Keep the workplace well-lit and clean. Disorder and poor lighting can be causes of accidents.
Do not work with power tools in an environment with an increased risk of explosion, containing flammable liquids, gases or vapors. Power tools generate sparks that can ignite dust or fumes.
Children and third persons should not be allowed to enter the workplace. Loss of concentration can result in loss of control.
Electrical safety
The plug of the electric cable must match the power socket. You must not modify the plug in any way. Do not use any plug adapters with earthed power tools. An unmodified plug that fits the outlet reduces the risk of electric shock.
Avoid contact with earthed surfaces such as pipes, radiators and coolers. Grounding the body increases the risk of electric shock.
Do not expose power tools to contact with atmospheric precipitation or moisture. Water and moisture that gets inside the power tool increases the risk of electric shock.
Do not overload the power cable. Do not use the power cord to carry, pull or unplug the power plug from the power outlet.
Avoid contact of the power cable with heat, oils, sharp edges and moving parts. Damage or entanglement of the power cord increases the risk of electric shock.
In the case of working outside closed rooms, use extension cords intended for work outside closed rooms. The use of an extension cord adapted for outdoor use reduces the risk of electric shock.
When using a power tool in a humid environment is unavoidable as a protection against supply voltage use a residual current device (RCD). The use of RCD reduces the risk of electric shock.
Personal safety
Stay alert, pay attention to what you do and keep common sense while working with the power tool. Do not use a power tool when you are tired or under the influence of alcohol or medication. Even a moment of inattention while working can lead to serious personal injury.
Use personal protective equipment. Always wear eye protection. The use of personal protective equipment such as dust masks, anti-slip safety shoes, helmets and hearing protection reduce the risk of serious personal injury.
Prevent accidental operation. Make sure that the electric switch is in the “off” position before connecting to the power supply and / or battery, lifting or moving the power tool. Moving the power tool with the finger on the switch or powering the power tool, when the switch is in the “on” position can lead to serious injuries.
Before turning on the power tool remove any keys and other tools that were used to adjust it. The key left on the rotating parts of the power tool can lead to serious injuries.
Do not reach and do not lean too far. Keep the right attitude and balance all the time. This will allow easier control over the power tool in case of unexpected work situations.
Dress accordingly. Do not wear loose clothing or jewelry. Keep your hair and clothing away from moving parts of the power tool. Loose clothing, jewelry or long hair can be caught by moving parts.
If the devices are fitted for the connection of dust extraction or dust collection, make sure that they are connected and used properly. The use of dust extraction reduces the risk of dust hazards.
Do not let the experience acquired from frequent use of the tool resulted in carelessness and ignoring safety rules.
Carefree action can cause serious injuries in a fraction of a second.
Use and care of the power tool
Do not overload the power tool. Use the power tool appropriate for the selected application. The right power tool will provide a better and safer job if used according to the designed load.
Do not use the power tool, if the electric switch does not allow switching on and off. Power tool, which cannot be controlled by means of a power switch is dangerous and must be returned for repair.
Disconnect the plug from the power socket and / or remove the battery if it is detachable from the power tool before adjusting, changing accessories or storing the tool. Such preventive measures will allow you to avoid accidentally turning on the power tool.
Keep the tool out of the reach of children, do not let people who do not know how to operate the power tool or these instructions use a power tool. Power tools are dangerous in the hands of untrained users.
Maintain power tools and accessories. Check the tool for mismatches or jams of moving parts, damage to parts and any other conditions that may affect the operation of the power tool. Damage must be repaired before using the power tool. Many accidents are caused by incorrectly maintained tools.
Keep cutting tools sharp and clean. Properly maintained cutting tools with sharp edges are less prone to jamming and are easier to control when working.
Use power tools, accessories and inserted tools etc. in accordance with these instructions, taking into account the type and conditions of work. The use of tools for work other than designed is likely to result in a dangerous situation.
Handles and gripping surfaces must be dry, clean and free from oil and grease. Slippery handles and gripping surfaces do not allow for safe operation and control of the tool in dangerous situations.
Repairs
Repair the power tool only in authorized facilities using only original spare parts. This ensures proper operation safety of the power tool.
ADDITIONAL SAFETY CONDITIONS
Wear hearing protection. Exposure to sound may come from the auditory pathway.
EN
Tools from molding and workmanship with handles from the assembly. Losing control can be the boss of the place.
Use dust masks. The use of dust masses reduces the risk of layer breakage.
While doing your job, for security advice, you may come across a hidden security feature that prevents you from monitoring or reviewing information about the security of an electronic device with technology. Restricting access to a tool that could be guided through the handling process could make the tool handling tools operable.
Warnings related to drilling with drill bits
It is always checked whether an equal limit is set to double check or check the date. At higher speed, the drill is likely to bend, if allowed to freely contact the rotary tool, it will accumulate trauma.
Apply only in-line with a drill and do not apply to the application. The drill bit may bend, causing it to break and lose control, resulting in injury.
PRODUCT HANDLING
Product preparation to work
Note! All actions mentioned in this chapter should be carried out with supply voltage off - the battery must be disconnected from the tool!
Safety recommendations for battery loading
Attention! Before loading may start make sure the body of the charger, the cable and the plug are not broken or damaged. It is prohibited to use a damaged loading dock and charger! For the purpose of loading batteries only the charging dock and the charger provided may be used. Using another charger may be a cause of fire or damage the tool. Batteries may be charged only in a dry room, protected from unauthorised persons, particularly children. Do not use the charging dock and the charger without permanent supervision of an adult! If it is necessary to leave the room where loading is taking place, it is required to disconnect the charger from the mains, removing the charger from the mains socket. In case when smoke comes out of the charger, or a strange smell is emitted, etc., it is required to immediately remove the plug of the charger from the mains socket!
The drill and automatic return screwdriver is provided with an unloaded battery, so before work may commence, it is required to charge it following the procedure below, using the charger and charging dock provided. Li-ION batteries do not show the so called “memory effect”, so it is allowed to charge them at any moment. However, it is recommended to discharge them during normal work, and then load them to their full capacity. If due to the nature of the task it is not possible to do so each time, then it is required to do it at least from time to time. Under no circumstances is it allowed to discharge the batteries short-circuiting the electrodes, since this would cause irreversible damage! It is also prohibited to check the load of the batteries, short-circuiting the electrodes for sparking.
Storage of the battery
In order to prolong the life of the battery, it is required to provide adequate storage conditions. The batteries can go through approximately 500 „loading - discharging” cycles. The battery must be stored between 0 and 30°C, at the relative humidity of 50%. In order to store the battery for a prolonged period, it is required to charge it to approximately 70% of its capacity. In case of prolonged storage, it is required to recharge the battery once a year. Do not permit excessive discharging of the battery, since this would reduce its life and may cause irreversible damage.
During storage, the battery will be gradually unloading due to leakage conductance. The process of automatic unloading depends on the temperature of storage, since the higher the temperature, the fastest the process. In case of incorrect storage of batteries, there is a danger of electrolyte leakage. In case of leakage, it is required to protect the leakage with neutralizing agent. In case of contact of electrolyte with the eyes, it is required to rinse the eyes abundantly, and then immediately seek medical assistance. It is prohibited to use a tool with a damaged battery.
In case the battery is completely worn out, it is required to deposit it at a special point dedicated to disposal of such waste.
Transport of the batteries
Lithium-ion batteries are in accordance with legal regulations treated as dangerous waste. The user of the tool may transport the tool with the battery or only batteries by land. Then no additional conditions must be complied with. In transport is realised by third parties (for example dispatch through courier service), then it is required to proceed in accordance with regulations for transport of dangerous materials. Before shipment, contact an authorised person.
It is prohibited to transport damaged batteries. During transport the battery must be removed from the tool, and the exposed contacts protected, e.g. with insulating tape. Protect the batteries so that they do not move inside the package during transport. It is also required comply with the national regulations for transport of dangerous materials.
Charging the battery
Attention! Before charging you should disconnect the charger from the mains by unplugging the power supply plug from the mains. In addition, you should clean the battery and its terminals of dirt and dust with a soft, dry cloth.
The battery has a built-in charge indicator. When you press the button, LEDs will light up (II), the more LEDs will light up, the more fully the battery pack is charged. If the button is pressed and the LEDs are off it means that the battery is discharged.
EN
Disconnect the battery from the tool.
Push the battery in the charger socket (II).
Plug the charger into a mains socket.
When the red LED lights up, it means the loading process.
When charging is complete, the red LED goes off, and green LED lights up, indicating a full charge of the battery.
Unplug the charger from the mains outlet.
Remove the battery from the charging station, by pressing the battery latch button.
Attention! If, when the charger is connected to the power supply, the green LED is on, this indicates a fully charged battery. In this case, the charger does not start charging.
Installation of the additional handle (III)
Install the additional handle in the desired position and tighten it, turning the grip of the handle.
Assembly and disassembly of a tool inserted in drill chuck (IV)
The product has been fitted with SDS+ drill chuck which cannot be dismantled.
The assembly of a tool inserted fitted with SDS+ chuck should be carried out as follows.
SDS+ chuck of the inserted tool should be thoroughly cleaned and then lubricated with a thin layer of solid oil of general use.
The rear part of the tool should be pulled in direction of product's grip handle and held in this position. Slide the tool inserted into the chuck. Check whether the tool inserted slides out by itself during the work. The tool should be able to move forward and backward to a slight extent, however it should not slide out completely from the chuck.
Otherwise, it should be assembled again.
Disassembly of the tool inserted from the drill chuck should be carried out in reverse order.
Setting the operation mode (V)
The hammer action operation facilitates drilling in concrete, walls and hard ceramic materials (hard bricks, stones, marble). The hammer action selector must be set to hammer action indicated with a symbol of a drill and a hammer.
It is also possible to set the hammering function. In this mode rotation is stopped, but the hammer action is still on.
In order to do so, set the operating mode selector to the hammer symbol.
Setting direction of rotation (VI)
Set the switch of rotation direction to a position marked with direction symbol or letters. The symbol directed towards the drill chuck or R letter indicates rotation to right - drilling with right-handed drill bit, screwing right-handed screws, unscrewing left-handed screws. The symbol directed opposite to the drill chuck or L letter indicates rotation to left - drilling with left-handed drill bit, screwing right-handed screws, unscrewing left-handed screws. Note! Reversing the direction of rotation can only be done when the spindle rotation is stopped.
Next to the battery charge indicator also was placed a rotation direction indicator, which indicates the setting by means of highlighting the direction of rotation as soon as the product has been started.
Setting the speed and torque
The ;product does not have separate regulators that allow setting the speed and torque. Increasing pressure on the switch will result in increase of rotational speed and torque until maximum rotational speed and maximum torque. For impact drilling, an increase of pressure on the switch also results in increase of impact frequency.
Preparatory activities
Before starting the work:
Affi x the workpiece to the vice or using carpenter's clamps.
Use work tools appropriate for the specific job. Make sure the work tools are sharpened and in good condition.
Wear working clothes as well as eye and ear protection.
Mount the battery in the product.
Using both hands grab the drill driver using a grip handle and auxiliary handle (VII).
Adopt a firm and stable posture.
Turn on the drill driver by pressing on the electric switch with a finger.
Note! Should any suspicious noise, cracks, suspicious odour, etc. were observed, immediately switch off the drill driver and detach the battery from the tool.
Switching off the drill driver is done by releasing the pressure on the switch. The tool inserted may rotate for some time after switching off the product. You may put the product aside or attend to other activities connected with the product only after the tool inserted stops completely.
EN
PRODUCT USE
Using right or left rotation direction
Right rotation to be applied when drilling with commonly used right-hand drill bits.
Left rotation to be applied in case the right-hand drill bit is cogged in the material and when unscrewing screws.
When unscrewing the screws, use minimum rotation.
Drilling in wood
Before drilling a bore it is recommended to fix the workpiece with a carpenter's clamp or in the vice, and then mark the place of drilling using a punch or nail. Attach the drill bit to the drill chuck, fix the speed, connect the drill to the mains and start drilling. In case of drilling through bores, it is recommended to place a wooden pad under the material, to prevent the bore edge at the outlet from being jagged.
When making large diameter bores, it is recommended to drill a smaller guiding bore earlier.
Drilling in metals
It is required to secure the work piece firmly.
In case of thin sheet metal, it is advisable to place a piece of wood beneath to avoid unwanted bends etc. Then mark the place of bores to be drilled with the punch and start drilling. Use drill bits for steel. When drilling in white cast iron, it is recommended to use drill bits with self-bonded carbide tips. When drilling larger bores, it is recommended to make a smaller guiding bore earlier. When drilling in steel use machine oil for cooling the drill bit. For aluminium, use turpentine or paraffin as a coolant.
Never use coolants when boring in brass, copper or cast iron. In order to cool it down, often remove the drill bit from the material to let it cool.
Drilling in ceramic materials
Drilling in hard, compact materials (concrete, hard brick, stone, marble, etc.)
Prior to drilling the right bore, drill a smaller bore without hammer function. Make the right bore with the hammer function on. Use hammer self-bonded carbide tips in good condition.
Drilling in glaze, soft brick, plaster, etc.
Drill as specified above but with hammer function off.
Occasionally remove the drill bit from the drilled bore in order to get rid of dust and waste. When drilling, press the tool strongly with constant force.
In case of drilling, where the drill chuck is directed upwards it is recommended to use a cover of a drill chuck (offered separately), which protects the dust from penetration into a tool chuck. A cover is made of flexible plastic and has a slot through which a drill bit mounted in a drill chuck should be inserted.
Adjustments of the angle of the chisel
Certain hammering tools require adjustments to a certain angle, in order to guarantee a safe and ergonomic operation, for example chisels and cutters. It is possible to use for this purpose an adequate operating mode selector. Install the tool in the chuck in accordance with the recommendations indicated in the manual. Set the selector to the hammer symbol with an arrow, and then press the switch. The tool will start to rotate in accordance with the selected direction of rotation. Release the switch, once the tool has reached the required position. Set the operating mode selector to the hammering position – hammer symbol, and then start work
Cutting out holes
Drill can be used for drilling larger bores in wood using a special fixed-diameter drill bits or replaceable tips from a set of jigsaws for holes.
To prevent burrs, jagged edges of the bore at the bore outlet, place a piece of waste wood beneath the material.
Using attachments
Drills with variable rotation direction should not be used to drive attachments.
Additional notes
Do not exert too much pressure on the processed material during operation and do not make any sudden movements to prevent damage to the tool inserted and the product.
Make regular breaks during the work.
Do not overload the tool - temperature of outside surfaces can never exceed 60 °C.
After the work is complete switch off the product, dismount the battery and perform maintenance and inspection operations.
Declared total value of vibration was measured by means of standardized test method and can be used to compare one tool with the other. Declared total value of vibration can be used in the initial exposure assessment.
Note! Emission of vibration when working with the tool may vary from the declared value, depending on how the tool is used.
EN
Note! It is required to determine safety measures to protect the operator, which are based on the exposure assessment in real conditions of use (including all elements of work cycle, such as for example time when tool is switched off or idling and time of activation).
MAINTENANCE AND OVERHAUL
ATTENTION! Before any adjustment, technical service or maintenance operations unplug the tool. Once the operations have been finished, the technical conditions of the tool must be assessed by means of external evaluation and inspection of the following elements: body and handle, conductor with a plug and deflection, functioning of the electric switch, patency of ventilation slots, sparking of brushes, noise level of functioning of bearings and gears, start-up and smoothness of operation. During the guarantee period, the user cannot dismantle the electric tools or change any sub-assemblies or elements, since it will cancel any guarantee rights. All irregularities detected at overhaul or during functioning of the tools are a signal to have the tool repaired at a service shop. Once the functioning has been concluded, the casing, ventilation slots, switches, additional handle and protections must be cleansed with a stream of air (at a pressure not exceeding 0.3 MPa), with a brush or a cloth without any chemical substances or cleaning liquids. Tools and handles must be cleansed with a clean cloth.
DE
PRODUKTBESCHREIBUNG
PRODUKTA RAKSTUROJUMS
PRODUKTA APKALPOŠANA
Produkta sagatavošana darbam
CARACTERISTIQUES DU PRODUIT
EN IEC 62841-2-6:2020 + A11:2020
EN IEC 55014-1:2021
EN IEC 55014-2:2021
DECLARATION OF CONFORMITY
0623/YT-82770/EC/2023
We declare and guarantee with full responsibility that the following products:
Cordless rotary hammer 18 V d.c.; 0 - 1850 min ^-1 ; SDS+; item no. YT-82770
meet requirements of the following European Standards / Technical Specifications:
EN 62841-1:2015 + A11:2022
EN IEC 62841-2-6:2020 + A11:2020
EN IEC 55014-1:2021
EN IEC 55014-2:2021
and fulfill requirements of the following European Directives:
2006/42/EC Machinery and safety elements
2014/30/EU Electromagnetic compatibility (EMC) Directive
2011/65/EU Restriction of the Use of Certain Hazardous Substances
Serial number: concern all serials numbers of item(s) mentioned in this declaration
The last two digits of the year in which the CE marking was affixed: 18
Year of production: 2023
The person authorized to compile the technical file:
Tomasz Zych
(Place and date of issue)

text_image
TOTA SPICKA SCIENCE SPECIALISTA DS. TECHNICZNYCH TOMASZ ZYCH(Name and signature of authorized person)
TOYA S.A.
EN IEC 62841-2-6:2020 + A11:2020
EN IEC 55014-1:2021
EN IEC 55014-2:2021