NF-CC600AXE - Deep fryer PANASONIC - Free user manual and instructions
Find the device manual for free NF-CC600AXE PANASONIC in PDF.

| Product type | Oil-free fryer |
| Model | NF-CC600AXE |
| Brand | Panasonic |
| Dimensions (W x D x H) | 267 x 357 x 355 mm |
| Weight | 5.4 kg |
| Rated capacity | 6.0 L |
| Rated voltage | 220-240 V~ |
| Rated frequency | 50 / 60 Hz |
| Rated input power | 1450 W |
| Power cord length | 1 m (approx.) |
| Cooking functions | Chicken, Fish, Seafood, Steaks, Sausages, Vegetables, Fries, Pizza, Cake, Toast, + Water (moisture) |
| Settings | Time: 1-60 min, Temperature: 80-200 °C |
| Display | LED screen with time and temperature icons |
| Materials | Plastic body, frying basket and cooking plate with non-stick coating |
| Safety | Automatic shut-off in case of overheating, short-circuit protection, basket lock |
| Maintenance and cleaning | Basket, plate and water tank dishwasher safe (except main body) |
| Included accessories | Frying basket, cooking plate, water tank with cap |
| Repairability | Repair only by a Panasonic authorized center |
| Usage | For household use only |
| Country of origin | Made in China |
Frequently Asked Questions - NF-CC600AXE PANASONIC
User questions about NF-CC600AXE PANASONIC
0 question about this device. Answer the ones you know or ask your own.
Ask a new question about this device
Download the instructions for your Deep fryer in PDF format for free! Find your manual NF-CC600AXE - PANASONIC and take your electronic device back in hand. On this page are published all the documents necessary for the use of your device. NF-CC600AXE by PANASONIC.
USER MANUAL NF-CC600AXE PANASONIC
natural_image
Front view of a Panasonic computer mouse with a white vertical scroll on a gray screen (no text or symbols on the mouse itself)All pictures in this instruction manual are in reference to the model NF-CC600AXE.
Thank you very much for purchasing Panasonic products
● This product is for home use only.
Before using the product, please read this instruction manual carefully to ensure correct and safe use of the product.
● Pay special attention to [Safety Precautions] (page 2-3).
- Please keep this instruction manual in a safe place for future reference.
Table of contents
| Safety Precautions .....2-3Operation Instructions .....4PartsMain body .....4Control panel .....5 | Before use |
| PreparationCooking time and temperature adjustment ...5Start cooking .....6Cleaning and maintenance ....7Recipes .....8-11 | Instructions |
| Trouble shooting.....12Error codes.....12Specification.....13 | When in doubt |
The final interpretation right of this instruction manual belongs to our company
Safety Precautions Please comply!
To prevent personal injury and property damage, please be sure to observe the following safety precautions:
The following icons indicate the degree of damage that can be caused by incorrect handling.

WARNING: Indicates a potentially hazardous situation which, if not avoided, could result in death or serious injury.

CAUTION: Indicates a potentially hazardous situation which, if not avoided, could result in minor or moderate injury.
■ The symbols are classified and explained as follows.

This symbol indicates what cannot be done, i.e. "prohibited".

This symbol indicates what must be implemented, i.e. "the mandatory" requirements.

WARNING

- Do not use the product if the power cord or plug is damaged or if the connection between the power outlet and the power plug is loose. (To avoid causing electric shock or fire due to short circuit.) → If the power cord is damaged, it must be replaced by the manufacturer, its service department or similarly qualified persons to avoid a hazard.
- Do not damage the power cord or power plug. The following is strictly prohibited: Damaging it, altering it, exposing it to or near high heat, forcibly bending it, twisting it, pulling on it, hanging it on a corner, placing a heavy object on it, bundling it, pinching it, or dragging the power cord. (To avoid electric shock due to damage to the power cord and power plug, or fire due to short circuit.)
- Do not insert or unplug the power plug with wet hands. Always make sure your hands are dry before handling the power plug or product. (To avoid causing electric shock or injury.)
- Do not let anyone lick the power plug. (To avoid causing electric shock or injury.) Pay special attention to infants and young children.
- Do not fill the water tank with liquids other than purified or filtered water. (To avoid clogging the internal water outlets.)
-
Do not pour water over the product, wash it directly with water, or immerse it in water (not applicable to the frying basket, baking tray, water tank, and water tank cap). (To avoid causing electric shock or fire due to short circuit.) → If water gets inside the product, please contact a Panasonic Authorised Repair Centre.
-
Do not alter, disassemble or repair the product by yourself. (To avoid causing fire, electric shock, or injury.) → For repairs, please contact Panasonic Authorised Repair Centre.
- During use or just after use, do not put your face or hands near the exhaust port, and pay extra attention to children. (To avoid causing burns.)
- Do not use the product for any purposes other than those described in the instruction manual. (Otherwise it may cause fire, burns, injury or electric shock.) → Panasonic will not be held responsible for conditions resulting from improper use or failure to follow the instruction manual.
- Do not move the main body while cooking. (To avoid burns.)
- Do not splash water or other liquids on the power plug (to avoid electric shock or fire due to short circuit.)

- Be sure to use an AC power socket with a specification of 220 V-240 V / 10 A on its own. (To avoid sharing power supply with other electrical appliances and causing a fire due to overheating.)
- Be sure to use a terminal strip of at least 10 A.
- Be sure to insert the power plug firmly all the way. (To avoid causing smoke, fire or electric shock.)
- Single-phase bipolar grounded power outlet should be used for this appliance to ensure reliable grounding. If grounding device is not installed, it may cause electrostatic induction of other metal parts such as housing.(So as not to cause the risk of electric shock due to failure or electric leakage.)

WARNING

- Clean the power plug regularly. (To prevent the power plug from being poorly insulated due to the accumulation of moisture and foreign objects, which may cause a fire.) Unplug the power plug and wipe it with a dry cloth.
- This product is not suitable for use by the following persons (including children): persons with reduced physical or mental abilities, or persons lacking experience and knowledge of use, unless they are supervised or instructed by a person responsible for their safety. Please be careful not to let children play with this product.
(To avoid causing burns, injury or electric shock.)
- Be sure to keep the product out of the reach of children. (To avoid causing burns, injury or electric shock.)
- In case of abnormality or failure, please stop using it immediately and unplug the power plug. (To avoid causing smoke, fire or electric shock.) Abnormalities and examples of failure.
• The power plug and power cord are abnormally hot.
- The power cord is damaged or intermittent power loss occurs after the power cord is touched.
• The main body is deformed or abnormally heated
• The main body emits smoke or burnt smell.
- The main body is cracked, loosened, or making abnormal noises.
- When cooking, there is no air coming from the exhaust port.
→ Immediately contact a Panasonic Authorised Repair Centre to inquire about inspection and repair.

CAUTION

- Do not use any non-exclusive or deformed frying basket.
(To avoid causing burns or injuries due to overheating or malfunction.)
- Do not use this product in the following places.
- Near heat sources or in high humidity.
(To avoid causing electric shock or fire.)
- On an uneven surface or non-heat-resistant mat.
(To avoid causing injury, burns or fire.)
- Near any walls or furniture.
(To avoid causing discolouration, deformation, and damage to the furniture due to the heat discharged from the exhaust port.)
- When moving the product, make sure that the frying basket is firmly in place. Do not carry the product at an angle.
(To prevent the frying basket from falling out and damaging it)
- Do not touch where the temperature is high during use or immediately after cooking. The main body has a high temperature. Especially the metal parts such as the exhaust port, frying basket, bottom heating plate, and protective grid.
(To avoid causing burns.)
- Do not aim the exhaust port at the power plug.
(To avoid deforming the plug or causing a fire due to a short circuit.)
→ When using this machine, it should be placed in an open area. If it is placed in a cabinet, please ensure that there is enough space for heat dissipation to avoid overheating and malfunctioning.

- Do not run the product with an empty basket. (To avoid malfunctioning or burns.)
- Do not connect this product to an external timer or run it with an independent remote control system. (To avoid malfunctioning or injuries.)
- Please ensure that there is more than 8 cm of space around the product.
(To prevent the power cord from being too close to other objects which might damage it.)
- When unplugging the power plug, be sure to do it by pulling on the plug itself.
(To avoid causing electric shock, or fire due to short circuit.)
- Always turn off and unplug the appliance when removing the basket or when not in use.
(To avoid causing burns, injuries, or electric shock, leakage, or fire due to insulation aging.)
- Please wait until the main body has cooled down sufficiently before cleaning it.
(To avoid causing burns.)
When a power outage occurs during use
Including when unplugging the power plug during cooking, the circuit breaker tripping, etc.:
- If it occurs during cooking and the power is on again within 10 minutes, the product will resume cooking.
- If it occurs in standby or menu mode, the product will return to being switched off after the power comes back on.
Correct Disposal of this product
This marking indicates that this product should not be disposed with other household wastes throughout the EU/UK. To prevent possible harm to the environment or human health from uncontrolled waste disposal, recycle it responsibly to promote the sustainable reuse of material resources. To return your used device, please use the return and collection systems or contact the retailer where the product was purchased. They can take this product for environmentally safe recycling.
Operation Instructions
About the main body
■ Do not use the air fryer where its bottom (suction port) may be blocked.
For example: on top of a carpet, plastic bag, aluminium foil, or cloth, etc.
(To avoid damaging the product.)
■ Do not cover the exhaust port with cloths or other objects during use. (In case the hot air cannot be released, resulting in poor heat dissipation, deformation of the casing, or malfunction.)
■ Please clean the food residues and other foreign objects stuck to the frying basket (the walls of the basket or the baking tray) in time. (To avoid corrosion and damage to the coating of the metal parts.)
■ After the "+Water" function was in use, press and hold the "+ Water" button to perform max draining to ensure that the water in the pipe is completely drained. Then, open the water tank cap and take out the water tank. (To prevent water in the water tank outlet from leaking onto the product and the counter top.)
■ Regularly check the suction port and exhaust port on the bottom of the empty frying basket and remove dust.
(0 P7 Cleaning and maintenance)
■ Do not use on sliding surfaces such as pull-out tables. (To avoid dropping the product.)
■ Do not use the product on an induction hob. (To avoid damaging the induction hob or causing the product to operate abnormally.)
■ Do not use the product outdoors. (An unstable power supply may cause the product to malfunction.)
■ Do not use in direct sunlight. (To avoid causing discolouration.)
■ Do not put water in the frying basket. (To prevent the frying basket from leaking.)
To ensure the best result, the "+ Water" mode is not set up for the baked foods menu. When using the baked foods menu (pizza, cake, sandwiches), please be assured that it is normal that the "+ Water" button cannot be selected.
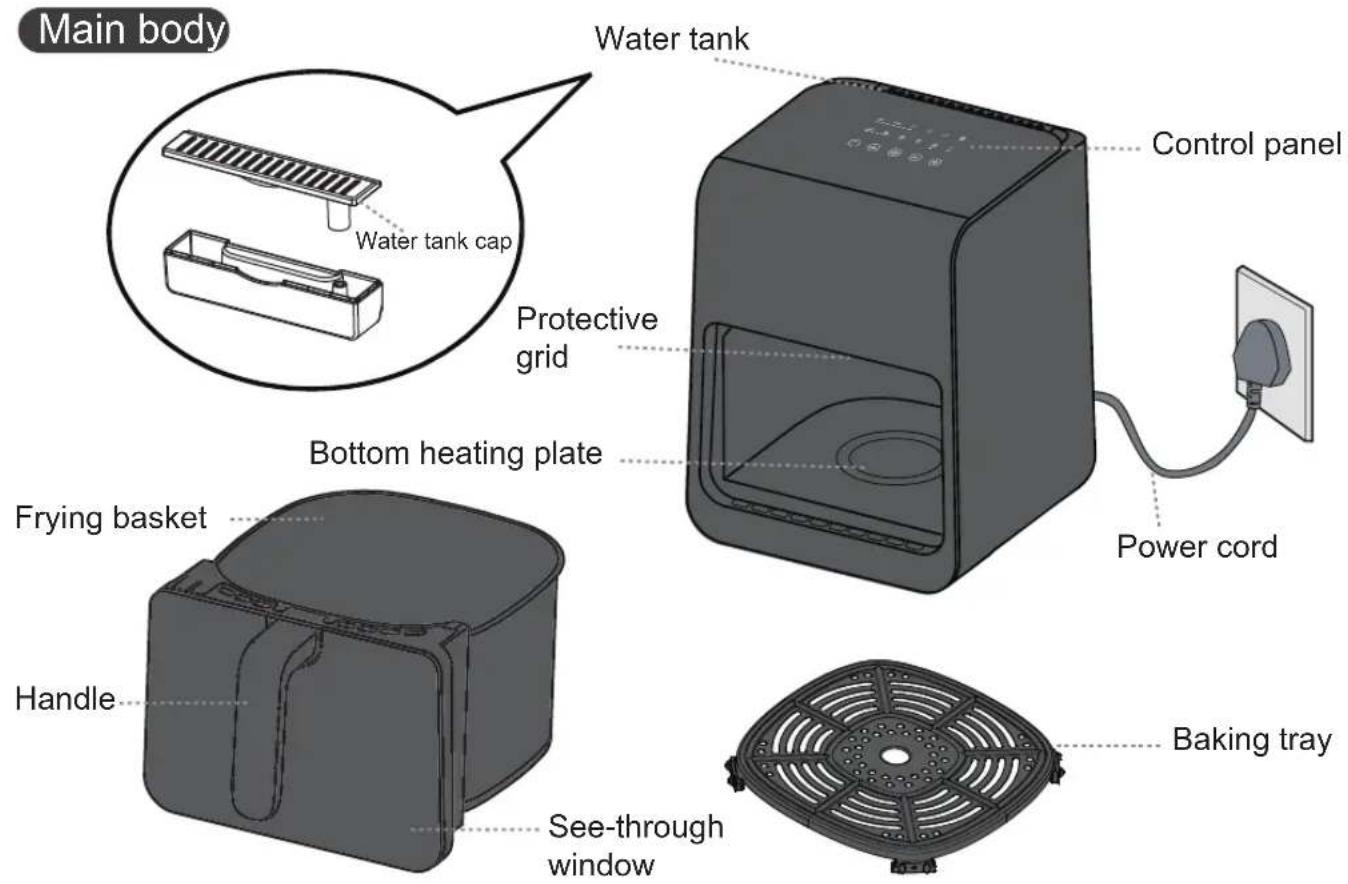
Parts - Main Body
When using the product for the first time, please clean the frying basket, baking tray and water tank. ( P7)
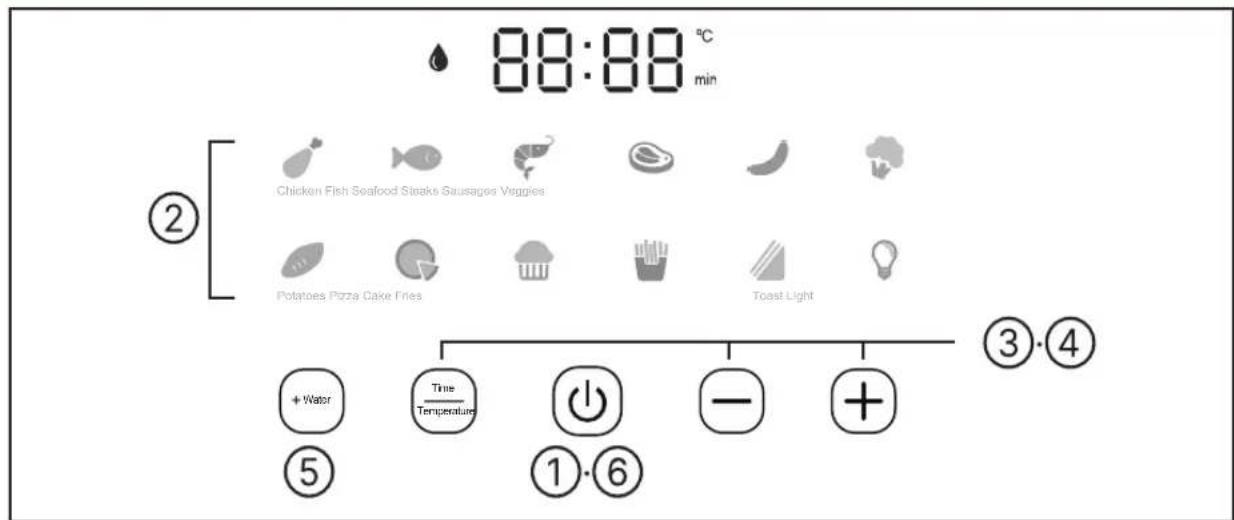
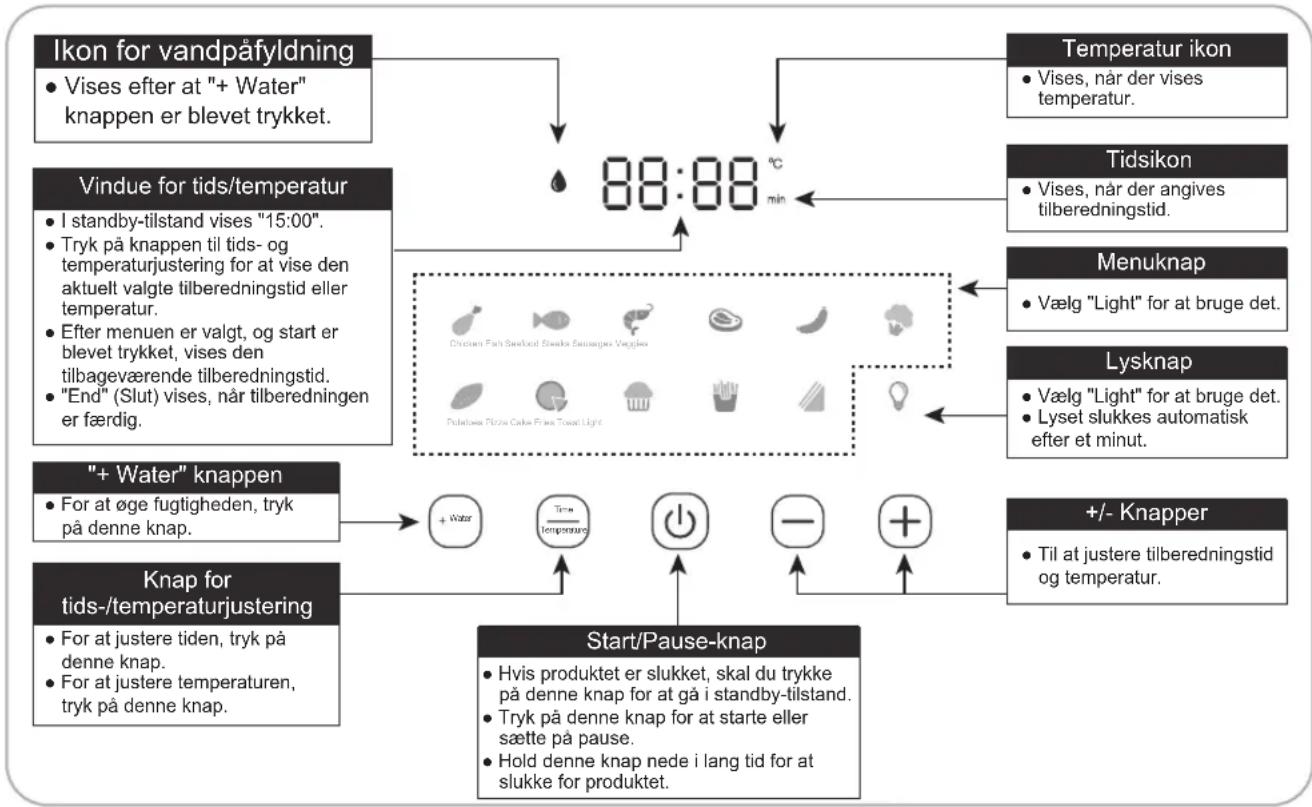
Parts - Control Panel
Control panel

flowchart
graph TD
    A["Water refill icon"] --> B["88:88 min"]
    C["Time/temperature display window"] --> D["Chicken Fish Seafed Steaks Sausages Veggies"]
    E["Menu button"] --> F["Potato Box Cake Press"]
    G["Light button"] --> H["Select light to use. The light will be automatically extinguished after one minute."]
    I[" "+Water button" "] --> J["+Water"]
    K[" Time/temperature adjustment button "] --> L["To adjust the time, press this button."]
    K --> M["To adjust the temperature, press this button."]
    N[" Start/Pause button "] --> O["If the product is switched off, press this button to enter the standby mode."]
    N --> P["Press this button to start or pause."]
    N --> Q["Long press this button to switch off the product."]
    R[" Temperature icon "] --> S["Displayed when indicating temperature."]
    T[" Time icon "] --> U["Displayed when indicating cooking time"]
    V[" Time/temperature display window"] --> W["In standby mode, "15:00" is displayed."]
    V --> X["Press the time and temperature adjustment button to display the currently selected cooking time or temperature."]
    V --> Y["After the menu is selected and Start is pressed, the remaining cooking time is displayed."]
    V --> Z[""End" is displayed when cooking is finished."]
Preparation Cooking time and temperature adjustment
Table 1
| Cooking category | Default time (Minute) | Default temperature (°C) | Adjustable time (Minute) | Adjustable temperature (°C) |
| Chicken | 22 | 200 80-200 | 1-60 | |
| Fish | 20 | 180 | 1-60 | 80-200 |
| Seafood | 10 | 180 | 1-60 80-200 | |
| Steaks | 10 | 200 | 1-60 80-200 | |
| Sausages | 15 | 180 | 1-60 80-200 | |
| Veggies | 10 | 200 | 1-60 80-200 | |
| Potatoes | 30 | 200 | 1-60 80-200 | |
| Pizza | 15 | 170 | 1-60 80-200 | |
| Cake | 20 | 150 | 1-60 80-200 | |
| Fries | 20 | 180 | 1-60 80-200 | |
| Toast | 8 | 170 | 1-60 80-200 |
1 After power on, press to enter standby mode.
2 Select the Menu icon.
3 Press + or - to set the cooking time.
- The selected time "min" icon lights up.
- Refer to Table 1 on P5 for the range of cooking time that can be set.
- After the temperature is set, if you want to adjust the cooking time again, please press the ⏻ first, second press 📄, finally press + or - to adjust.
4 Press , then press or to set the cooking temperature.
- The selected temperature “°C” icon lights up.
- Refer to Table 1 on P5 for the temperature range that can be set.
5 Press + Value to cancel or set humidity.
- By default (except in the baked foods menu), the icon is on. If you want to cancel,
please press
6 Press ⏻ to start cooking.
- The selected menu changes from flashing to a solid light.
7 Halfway through cooking, pull out the frying basket to flip the ingredients inside. Then, push the basket back in to continue cooking.
- Whether the ingredients need to be flipped depends on the type of ingredients, serving size, and cooking time.
- When the frying basket is pulled out, the machine will enter the standby mode and the heating will stop. When the frying basket is pushed back in place, the machine will continue working.
- The frying basket, see-through window, and baking tray in the working mode are hot. Please do not touch them to avoid burns.
- It is normal that the light will be automatically extinguished after one minute.
8 After cooking, pull out the frying basket, place it on a stable high-temperature resistant counter top, and use utensils to remove the food.
- Do not touch it directly with your hands to avoid burns.
- After the cooking is finished, the display window will display "End", the heating tube will stop heating, and the cooling fan will continue to work for 40 seconds to cool down the machine as quickly as possible.
- After cooking, the temperature of the fryer is high, so please do not place it directly on the table to avoid scalding it.
- When using the "+Water" function, please long press to drain the residual moisture in the water pipe. Then, replace the purified water or filtered water in the water tank.
Cleaning and maintenance
Attention
- Before cleaning, be sure to unplug the power plug and wait for the main body to cool.
- When cleaning, do not immerse the main body in water. Do not use lacquer thinner, gasoline, alcohol, cleaning powder, stiff brushes, etc. to clean.
- Do not put any parts other than the baking tray, water tank, and water tank cap in the dishwasher or dryer.
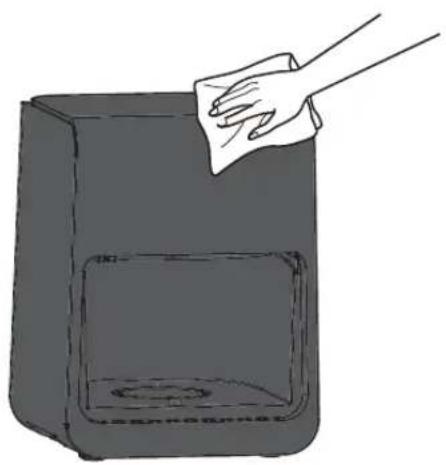
Casing exterior/Internal walls Fry
- Wipe with a wrung damp cloth.
natural_image
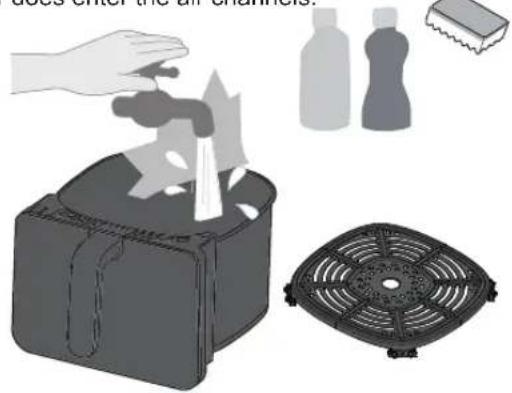
Illustration of a hand cleaning a rectangular container with a cloth (no text or symbols)basket and baking tray
- Wash with diluted dish soap and a sponge and water. Wipe any moisture off the exterior of the basket.
- Do not use the basket as a cleaning container.
- There may be discoloration or streaks on the fluorine-coated surface, but it does not affect health and use.
- There are air channel holes in the top of the frying basket. Water must not enter these air channels. Please drain the basket promptly after cleaning if any water does enter the air channels.
natural_image
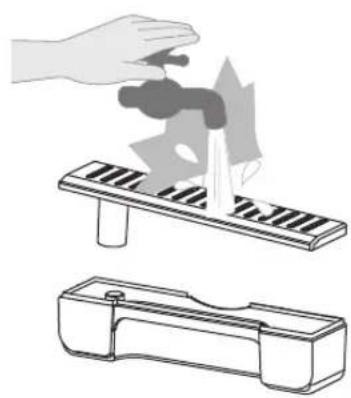
Illustration of a hand cleaning air ducts and a fan blade (no text or symbols)Water tank and water tank cap
• Take them apart and rinse. • Check it about once a
natural_image
Illustration of a hand using a tool to press down a component, with a smaller view of the same tool (no text or symbols present)Regular inspection
month, if there is dirt, please clean it in a timely manner.
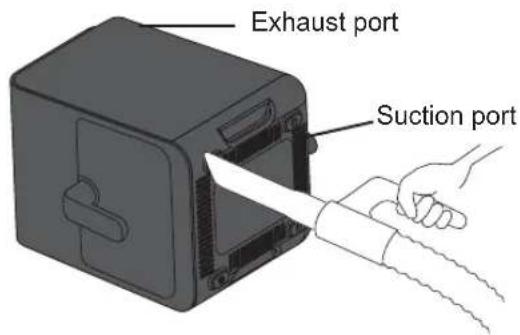
Vacuum to remove rubbish and foreign objects.
Recipes
Reminder: The recommended amount of ingredients needed, temperature, and cooking time in the recipes can be adjusted according to personal preference, the size of the ingredients and the usage of the product.
Seasoned Chicken Drumsticks
Ingredients: Chicken drumsticks 4 piece Seasoning: Cooking wine 20 ml
Salt
1/2 tsp
Ginger powder
1 tsp
Turmeric
1 tsp
Instructions:
- Wash the chicken drumsticks, make three slits on the front and back sides to better absorb the flavours.
2 Mix the cooking wine and spice mix and spread it evenly on the chicken drumsticks, then cover them with cling film to marinate overnight. - Put the marinated chicken drumsticks on the baking tray, select the【💡】 function, set the temperature to 200°C, set the cooking time to 25 minutes. Flip the drumsticks over after 15 minutes.
Grilled Sole
Ingredients: Sole (fresh) 1 piece Dressing: Juice of one lemon
A pinch of salt
Freshly ground black pepper
Butter 15 g
Instructions:
- Clean the sole, pat it dry, and cut it into small fillets. Add salt, pepper, and 1 tbsp of lemon juice to marinate for 20 minutes.
- Melt the butter, add remaining lemon juice, and brush the mixture evenly on both sides of the sole.
- Put the fish fillets on the baking tray, select the 【▶】 function, set the temperature to 200^ C, set the cooking time to 15 minutes. Flip the fillets after 5 minutes, brush them with butter and roast for another 5 minutes.
Deep Fried King Prawns
Ingredients: Raw King Prawns 200 g
Ginger slices
Seasoning: Oil 1 tsp
Cooking wine 20 ml
Instructions:
- Wash and de-vein the prawns. Add to the cooking wine and ginger slices to marinate the prawns for 10 minutes.
- Grease the baking tray with oil and put the prawns on it. Select the 【】 menu, set the temperature to 180°C and the cooking time to 10 minutes. Flip the prawns over halfway through.
Ribeye Steak
Ingredients: Steak
1 piece
Seasoning: Oil 1 tsp
Instructions:
- Brush a layer of oil on the baking tray, add the steak in.
- Select the【】menu, set the temperature to 200°C and the cooking time to 6 to 10 minutes.
Flip the steak over halfway through.
* You can choose the doneness of the steak according to your personal preference.
Sausages
Ingredients: Sausages
6
Seasoning: Oil 1 tsp
Instructions:
- Make a few slits on the surface and place the sausages on the baking tray.
- Select the 【】 function, set the temperature to 160°C and the cooking time to 10 minutes.
* If you prefer them to be crispy, you can extend the time accordingly.
Aubergine with Garlic
Ingredients: Aubergine 1 piece
Garlic clove 1 (minced)
Spring onions 4
Chilli 1 (chopped)
Seasoning Soy sauce 15 ml
Oyster sauce 15 ml
Sugar 1 tsp
Oil 1 tsp
Instructions:
- Wash and pat dry the aubergine. In a small bowl, add all the seasoning sauce ingredients except the oil
- Put tin foil on the baking tray and place the aubergine on the tin foil. Brush the aubergine with oil, select the 【】 menu, set the temperature to 200^ C and the cooking time to 20 minutes.
- After 20 minutes, take out the aubergine and cut it in half. Brush the sauce on the flesh sides of the aubergine. Roast for another 5 minutes according to the menu setting and temperature in Step 2. Sprinkle the aubergine with the chopped spring onion after cooking.
Baked Sweet Potatoes
Ingredients: Sweet potato 3-4 (medium size)
Instructions:
- Wash the sweet potatoes and pat them dray with kitchen towels.
- Put the sweet potatoes on the baking tray, select the 【】 menu, set the temperature to 200^ C and the cooking time to 30 minutes. Shake the sweet potatoes occasionally during cooking.
*Depending on the size of sweet potatoes, you can cut the large ones in half.
Vegetable Pizza with Mozarella
Ingredients: Pizza dough 1x15 cm Vegetables (green peppers, mushrooms, onions) Shredded Mozzarella Cheese 50 g Seasoning: Tomato sauce 1 tbs
Instructions:
- Dice the vegetables and set them aside.
- Brush the dough with tomato sauce, sprinkle half of the cheese on top, add the vegetables, and sprinkle the remaining half of the cheese.
- Put the dough on the baking tray, select the 【】 function, set the temperature to 180°C and the cooking time to 12 minutes.
Cake
Ingredients: Egg tart shell 4
Egg tart filling Egg 1 pcs Sugar 10g Milk 100mL
Instructions:
- Whisk 1 egg in a bowl.
- Add 100ml milk and 10g sugar to the bowl. Stir well until the sugar is melted.
- Seperate the egg liquid into 4 egg tart shells.
- Put the shells on the baking tray, select the 【】 menu, set the temperature to 180^ C and the bake time to 12 minutes.
French Fries
Ingredients: Frozen French fries 250 g Seasoning: Tomato sauce to serve
Instructions:
- Place the frozen french fries in the baking tray.
- Select the 【 kWh 】 function, set the temperature to 200^ C and the cooking time to 20 minutes. Give the fries a shake halfway through.
- After cooking, serve them with tomato sauce
Cheese and Ham Toastie
Ingredients: Ham or Bacon 2 slices of ham
Sliced bread (buttered) 3 pieces
Cheese slice 2 pieces
Instructions:
- Put the ham and cheese on the unbuttered side of the bread slices and sandwich together.
- Put the stacked sandwiches on the baking tray, select the 【】 menu, set the temperature to 200^ C and the cooking time to 5 minutes.
Delicious Barbecue
Ingredients:
Pork belly
300g
Spring Onions
Ginger slices
4 pieces
Seasoning:
Soy sauce
5 ml
Dark soy sauce
5 ml
Cooking wine
5 ml
Salt
2 g
Sugar
10 g
Instructions:
- Cut the pork belly into slices. Add the spring onions, ginger slices and seasoning. Marinate for 10 minutes.
- Place the pork belly slices on the baking tray. Select the 【💡】 menu, set the temperature to 200^ C and the cooking time to 12 minutes. Flip the pork belly slices over halfway through for the best results.
Troubleshooting
The following is not a malfunction, please check before requesting repairs.
| Symptom | Cause | Solution |
| No response when connected to power | The power plug is not inserted in place | Plug it in again or find another outlet. |
| Cannot start | The frying basket is not inserted in place. | Pull out the frying basket and push it back in place. |
| The motor does not turn or there is an abnormal sound | There is foreign matter stuck to the fan blade or the suction port is blocked | After power is switched off, check whether there are any foreign objects in the suction port and the inside of the main body. If there is still a fault, please contact a Panasonic Authorised Repair Centre for repair. |
| The see-through window is fogging or a small amount of water is leaking from the frying basket below the see-through window. | The frying basket is not fully drained after being cleaned and there is residual moisture in the air duct | This is normal. Please use the product as usual. (If a large amount of water leaks from the bottom of the main body, please contact a Panasonic Authorised Repair Centre.) |
Error codes
Check the below before commissioning repairs.
| Error display | Please try |
| U01 | Try unplugging the power plug and plugging it back in. If "U01" still appears, it means that there is a fault in the power supply circuit. Please try again after the fault in the power supply circuit is repaired. |
| U02 | Try unplugging the power plug, cooling the main body and plugging the power plug back in again. If "U02" still appears, please contact a Panasonic Authorised Repair Centre for repair. |
If it still does not return to normal after trying the above measures, please request repair from a Panasonic Authorised Repair Centre.
| E 88 | Try unplugging the power plug and plugging it back in. If "E**" still appears, it means there is a fault. → Please consult a Panasonic Authorised Repair Centre and inform them of the error code (two digits after "E") |
Specification
| Model | NF-CC600AXE |
| Rated voltage | 220-240 V~ |
| Rated frequency | 50 / 60 Hz |
| Rated input power | 1450 W |
| Rated capacity | 6.0 L |
| Power cord length (approx.) | 1 m |
| Dimensions (approx.) (W x D x H) | 267 mm × 357 mm × 355 mm |
| Weight (approx.) | 5.4 kg |
Disposal of Old Equipment and Batteries Only for European Union and countries with recycling systems
These symbols on the products, packaging, and/or accompanying documents mean that used electrical and electronic products must not be mixed with general house hold waste.
■ proper treatment, recovery and recycling of old products, please take them to applicable collection points in accordance with your national legislation.
By disposing of them correctly, you will help to save valuable resources and prevent any potential negative effects on human health and the environment.
For more information about collection and recycling, please contact your local authority. Penalties may be applicable for incorrect disposal of this waste, in accordance with national legislation.
Manufactured by:
Panasonic Marketing Europe GmbH,
Hagenauer Straße 43, Wiesbaden, Germany
Authorised Representative in Europe:
Panasonic Testing Centre,
Winsbergring 15, 22525 Hamburg, Germany


natural_image
Panasonic smartphone with a white vertical screen on a gray button (no text or symbols visible)natural_image
Illustration of a hand cleaning a rectangular container with a cloth (no text or symbols)natural_image
Illustration of a hand using a tool to press down a mechanical component, with no visible text or symbols.Panasonic Testing Centre
natural_image
Close-up of a Panasonic computer mouse with a white vertical button on a gray screen (no text or symbols on the mouse itself)Pièces - Corps principal
natural_image
Illustration of a hand cleaning a rectangular container with a cloth (no text or symbols)natural_image
Illustration of a hand cleaning a small container with steam rising, alongside a fan and two plastic bottles (no text or symbols)natural_image
Illustration of a hand using a tool to press down a mechanical component, with no visible text or symbols.Panasonic Testing Centre
natural_image
Front view of a Panasonic computer mouse with a white vertical button (no text or symbols on the device itself)natural_image
Illustration of a hand cleaning a rectangular container with a circular hole (no text or symbols)natural_image
Illustration of a hand pressing down on a mechanical component, showing the process (no text or symbols present)Panasonic Testing Centre
Winsbergring 15, 22525 Amburgo, Germania


natural_image
Front view of a Panasonic computer mouse with a white vertical screen (no text or symbols on the device itself)natural_image
Illustration of a hand cleaning a rectangular container with a cloth (no text or symbols)natural_image
Illustration of a hand cleaning a plastic bag with a fan, accompanied by bottles and a small block (no text or symbols)natural_image
Illustration of a hand using a tool to press down a mechanical component, with no visible text or symbols.Panasonic Testing Centre
natural_image
Panasonic smartphone with a white vertical screen on a gray button (no text or symbols visible)natural_image
Illustration of a hand cleaning a rectangular container with a cloth (no text or symbols)natural_image
Illustration of a hand cleaning a kitchen appliance with a fan and plastic bottle nearby (no text or symbols)Watertank en deksel watertank
natural_image
Illustration of a hand using a tool to press down a mechanical component, with no visible text or symbols.Regelmatig inspecteren
Panasonic Testing Centre
natural_image
Panasonic smartphone with a white vertical screen on a gray background (no text or symbols visible)natural_image
Illustration of a hand cleaning a rectangular container with a cloth (no text or symbols)natural_image
Illustration of a hand cleaning a small container with a filter, alongside a plastic bag and fan (no text or symbols)natural_image
Illustration of a hand using a tool to press down a mechanical component, with no visible text or symbols.Panasonic Testing Centre
Winsbergring 15, 22525 Hamburg, Tyskland


natural_image
Panasonic smartphone with a white vertical screen on a gray button (no text or symbols visible)Dele - Betjeningspanel
Betjeningspanel
natural_image
Illustration of a hand cleaning a rectangular container with a cloth (no text or symbols)natural_image
Illustration of a hand cleaning a plastic bag with a fan, accompanied by bottles and a cloth (no text or symbols)natural_image
Illustration of a hand using a tool to press down a mechanical component, with no visible text or symbols.natural_image
Front view of a Panasonic computer mouse with a white vertical button (no text or symbols on the device itself)natural_image
Illustration of a hand cleaning a rectangular container with a cloth (no text or symbols)natural_image
Illustration of a hand cleaning a plastic bag with a fan, accompanied by bottles and a cloth (no text or symbols)natural_image
Illustration of a hand using a tool to press down a mechanical component, with no visible text or symbols.natural_image
Panasonic smartphone with a white vertical screen on a gray button (no text or symbols visible)natural_image
Illustration of a hand cleaning a rectangular container with a cloth (no text or symbols)natural_image
Illustration of a hand using a tool to press down a tray, and finally adding a component into a smaller container (no text or symbols)Regularna kontrola
Hagenauer Straße 43, Wiesbaden, Germany
Panasonic Testing Centre
Winsbergring 15, 22525 Hamburg, Germany


natural_image
Panasonic smartphone with a white vertical screen on a gray button (no text or symbols visible)natural_image
Illustration of a hand cleaning a rectangular container with a cloth (no text or symbols)natural_image
Illustration of a hand cleaning a small container with a brush, alongside a fan-shaped filter and two plastic bottles (no text or symbols)natural_image
Illustration of a hand using a tool to press down a mechanical component, with no visible text or symbols.Pravidelná kontrola
Ingredience: lilek 1 kus
Ingredience: Büček 300 g
Jarní cibulka
Panasonic Testing Centre
natural_image
Front view of a Panasonic computer mouse with a white vertical slot on a gray screen (no text or symbols on the mouse itself)natural_image
Illustration of a hand cleaning a rectangular container with a cloth (no text or symbols)natural_image
Illustration of a hand using a tool to press down a mechanical component, with no visible text or symbols.Panasonic Testing Centre
Scan the QR codes for more recipes and full version of the Operating Instructions.