FC46-BL - Oven SIGNATURE - Free user manual and instructions
Find the device manual for free FC46-BL SIGNATURE in PDF.

| Brand | SIGNATURE |
| Model | FC46-BL |
| Product type | Oven |
| Capacity | 46 L |
| Rated voltage | 220-240 V~ |
| Frequency | 50-60 Hz |
| Input power | 1800 W |
| Temperature range | 50-230 °C (depending on function) |
| Timer | 1-120 min (up to 15 h for fermentation/dried fruits) |
| Cooking functions | Grill, Broil, Toast, Bake, Pizza, Cookies, Steak, Defrost, Fermentation, Dried fruits, DIY |
| Temperature control | Separate for upper and lower elements |
| Interior light | Yes |
| Built-in fan | Yes |
| Preheating | Yes, adjustable |
| Accessories included | Baking tray, metal grid |
| Door material | Tempered glass |
| Dimensions (W x D x H) approx. | 55 x 45 x 35 cm |
| Net weight approx. | 12 kg |
| Maintenance | Clean with a damp cloth, avoid abrasive products |
| Safety | Automatic shutdown, overheating protection, tempered glass door |
| Repairability | Parts not user-serviceable, contact after-sales service |
| Warranty | 2 years (legal warranty of conformity) |
| After-sales service | BUT, phone 09 78 97 97 97 |
| Environmental information | Do not dispose of with household waste, recycle according to WEEE directive |
Frequently Asked Questions - FC46-BL SIGNATURE
User questions about FC46-BL SIGNATURE
0 question about this device. Answer the ones you know or ask your own.
Ask a new question about this device
Download the instructions for your Oven in PDF format for free! Find your manual FC46-BL - SIGNATURE and take your electronic device back in hand. On this page are published all the documents necessary for the use of your device. FC46-BL by SIGNATURE.
USER MANUAL FC46-BL SIGNATURE
natural_image
Black signature microwave oven with digital display and control knobs (no visible text or symbols on main body)SIGNATURE®
MINI FOUR
F C 4 6 - B L
TABLE DES MATIÈRES
- MESURES DE SECURITE IMPORTANTES - 1 -
- DESCRIPTION DES COMPOSANTS - 8 -
- INSTRUCTIONS D'UTILISATION -13-
- NETTOYAGE ET ENTRETIEN -25-
- DÉPANNAGE -26-
- AVERTISSEMENT SPÉCIAL -27-

CET APPAREIL EST DESTINE A UN USAGE DOMESTIQUE UNIQUEMENT!
natural_image
Illustration of a tray with radiating lines and a central object, no text or symbols present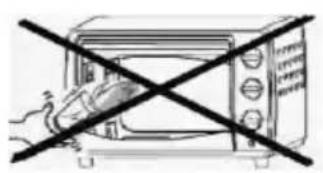
natural_image
Simple line drawing of a microwave oven with a diagonal black X mark (no text or symbols)
natural_image
Hand holding a pen with a square lens, no visible text or symbols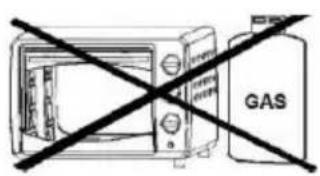
natural_image
Illustration of a hand holding a tool near a square object, with no visible text or symbolsnatural_image
Circular diagram with concentric rings and a central solid black circle (no text or symbols)Gril
Grillade
Toast
Cuisson
Pizza
Cookies
Steak
Décongélation
Fermentation
Fruits secs
natural_image
Black signature microwave oven with digital display and control knobs (no visible text or symbols on main body)SIGNATURE®
MINI OVEN
F C 4 6 - B L
TABLE OF CONTENT
- IMPORTANT SAFE GUARDS - 1 -
- PARTS IDENTIFICATION -6-
- OPERATING INSTRUCTIONS -11 -
- CLEANING AND MAINTENANCE -21-
- TROUBLESHOOTING -22-
- SPECIAL WARNING -23-

THIS PRODUCT IS FOR HOUSEHOLD USE ONLY!
Please read these instructions carefully before the first use of this product and save this manual for your future reference.
1. IMPORTANT SAFE GUARDS
Follow basic safety precautions, Including:
- Read all instructions.
- Do not touch hot surfaces. Use handles or knobs.
- To protect against risk of electrical shock, do not immerse cord, plugs or cooking unit in water or other liquid.
- Close supervision is necessary when any appliance is used by or near children.
-
Unplug from outlet when not in use and before cleaning. Allow to cool before putting on or taking off parts and before cleaning the appliance.
-
Do not operate any appliance with a damaged cord or plug or after the appliance malfunctions, or is dropped or damaged in any manner. Return appliances to the nearest authorized service facility for examination, repair, electrical or mechanical adjustment.
- The use of accessory attachments, not recommended or sold by the appliance manufacturer, may cause hazards.
- Do not use outdoors.
- Do not allow the cord to hang over the edge of a table or counter, or touch hot surfaces.
- Do not place on or near a hot gas or electric burner, or in a heated oven.
- Extreme caution must be used when moving an appliance containing hot oil or other hot substances.
- To disconnect, remove plug from wall outlet. Always hold the plug to remove, never pull the cord.
- Do not use appliance other than for its
intended use.
- This appliance is not intended to be operated by means of an external timer or separate remote-control system.
- This appliance is for household use only.
- No user-serviceable parts inside.Refer servicing to qualified service personnel.
- A short power-supply cord is provided to reduce the hazards resulting from entanglement or tripping over a long cord. An extension cord may be used with care, however, the marked electrical rating should be at least as great as the electrical rating of this appliance.
The extension cord should not be allowed to drape over the counter or tabletop where it can be pulled by children or tripped over.
- This appliance can be used by children aged from 8 years and above and persons with reduced physical, sensory or mental capabilities or lack of experience and knowledge if they have been given
supervision or instruction concerning use of the appliance in a safe way and understand the hazards involved. Children shall not play with the appliance.Cleaning and user maintenance shall not be made by children unless they are older than 8 and supervised.Keep the appliance and its cord out of reach of children less than 8 years.
- Warning: Do not immerse in water or any liquid.
- If the supply cord is damaged, it must be replaced by the manufacturer, its service agent or similarly qualified persons in order to avoid a hazard.
-
This appliance has a tempered, safety glass door. The glass is stronger than ordinary glass and will be more resistant to breakage. Be aware that tempered glass can still break, especially around the edges. Avoid scratching the door surface or nicking the edges.
-
Do not put any of the following materials in or on the top of the unit: cardboard, plastic, paper, candle or flammable materials.
-
When operating the Oven, the rear surface of appliances shall be placed against a wall, keep at least 10cm of free space on both and front sides of the oven to allow for adequate air circulation.
-
This appliance is intended to be used in household and similar applications such as:
- staff kitchen areas in shops, offices and other working environments;
- farm houses;
- by clients in hotels, motels and other residential type environments;
- bed and breakfast type environments.
-
The temperature of accessible surfaces may be high when the appliance is operating.
-
Regarding the instructions for cleaning surfaces in contact with food thanks to refer to the "CLEANING AND MAINTENANCE".
2. PARTS IDENTIFICATION
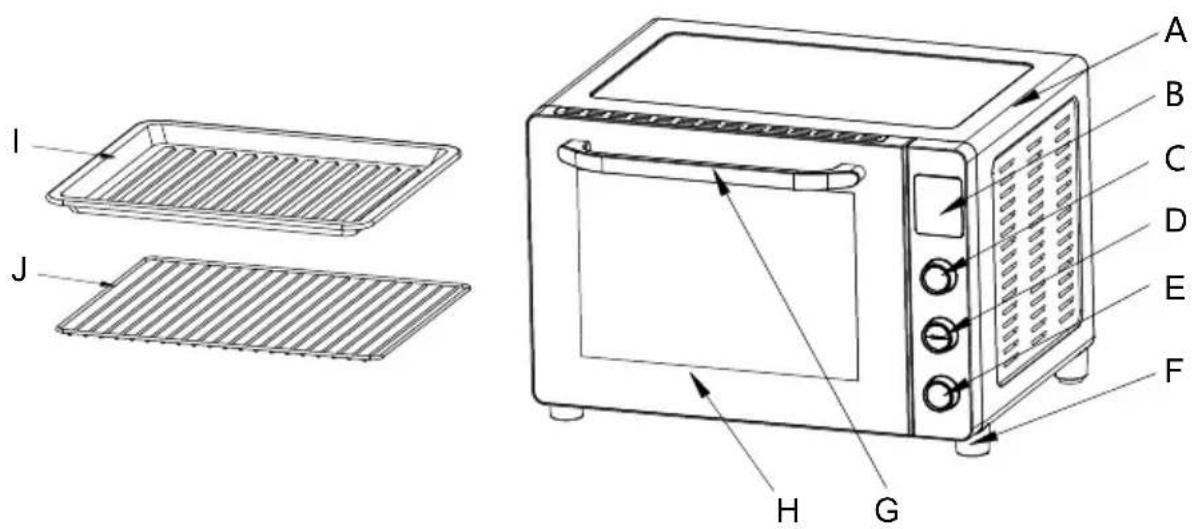
A. Housing
B. LED display window
C. Function control knob
D. Temperature control knob
E. Timer/Start/Stop control knob
F. Oven feet
G. Door handle
H. Door glass
I. Bake tray
J. Wire rack
PARAMETER DATA
| MODEL NO. FC46-BL | |
| CAPACITY 46L | |
| RATED VOLTAGE | 220-240V~ |
| FREQUENCE | 50-60Hz |
| INPUT POWER 1800W | |
CAUTIONS

natural_image
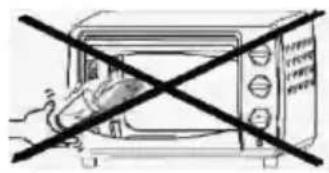
Abstract illustration of a glowing object with radiating lines, no text or symbols presentAlways use the tray handle or an oven mitt when inserting and removing the tray. Touching these will cause severe burns.
natural_image
Simple line drawing of a microwave oven with a diagonal black X mark (no text or symbols)When hot, do not apply water to the glass window. It may cause the glass to break.
natural_image
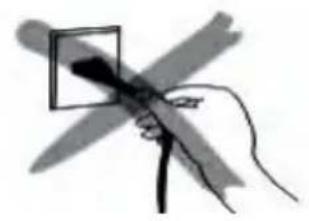
Hand holding a pen with a square lens, crossed by a diagonal line (no text or symbols)When unplugging the cord, always take hold of the plug itself. Never pull on the cord. Doing so could break the wires inside the cord.
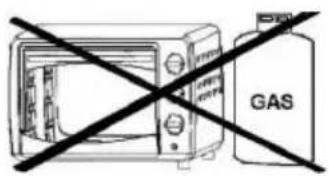
Do not position the unit close to a gas burner or other source of high temperature or do not direct an electric fan,etc,at the unit during USE.Doing so could prevent correct temperature control.
natural_image
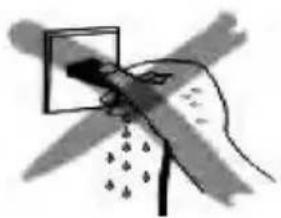
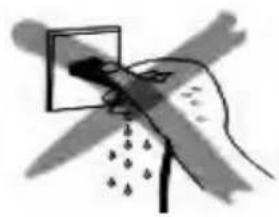
Illustration of a hand holding a tool with a magnified view, no text or symbols presentDo not wet the power cord, nor handle the unit with wet hands. Always unplug the cord after use, or whenever the unit is to be left unattended a malfunction while the plug is inserted into the outlet could cause a fire.
When cooking oil-splashing dishes such as roast, it is recommended to put 2 sheets of aluminum foils on a tray in order to diminish oil splashing. Put one on a tray. Then oil will drip to a gap between foils.

Bake tray and Wire rack
Bake tray: For use when broiling or roasting meat, poultry, fish or various other foods. It can also used as a drip tray to collect grease, oil, and liquid which come from the food being cooked.
The maximum weight that can be placed on the bake tray is 3.5kg (This includes total weight of food and dish).
Wire rack: For toasting, baking and general cooking in casserole dishes and standard pans.
Wire rack cannot be used individually. Always put with bake tray. Place the bake tray in the shelf position under wire rack.
The maximum weight that can be placed on the wire rack is 3.5kg (This includes total weight of food and dish).
Positioning the Wire Racks:
Cookies – Use the bottom and middle support guides.
Layer Cakes – Use the bottom support guide only (bake one at a time).
Pies – Use bottom and middle support guides.
Note:
Be careful when removing pudding and other hot liquids. You can adjust the rack/tray at different positions according to the dishes you want to cook.

LED display/ Lamp/Fan/Preheat button
Function control knob
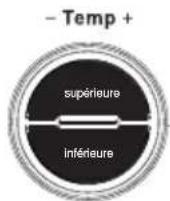
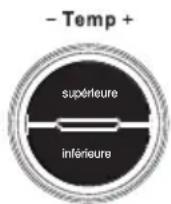
Temperature control knob
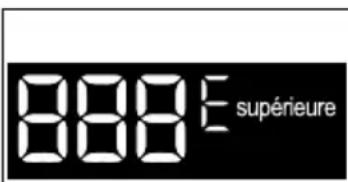
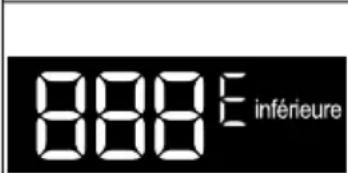
a. To set the desired temperature of upper heating elements, press supérieure and then turn this knob until the desired temperature is displayed.
b. To set the desired temperature of lower heating elements, press inférieure and then turn this knob until the desired temperature is displayed.
NOTE: The temperature difference between the upper and lower heating elements should not be more than 30^ C.
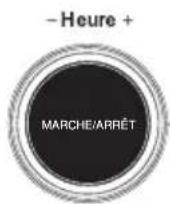
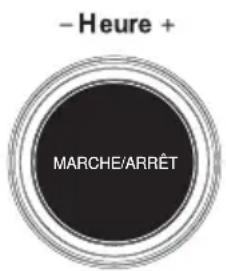
Time knob /START/STOP button
LED Display
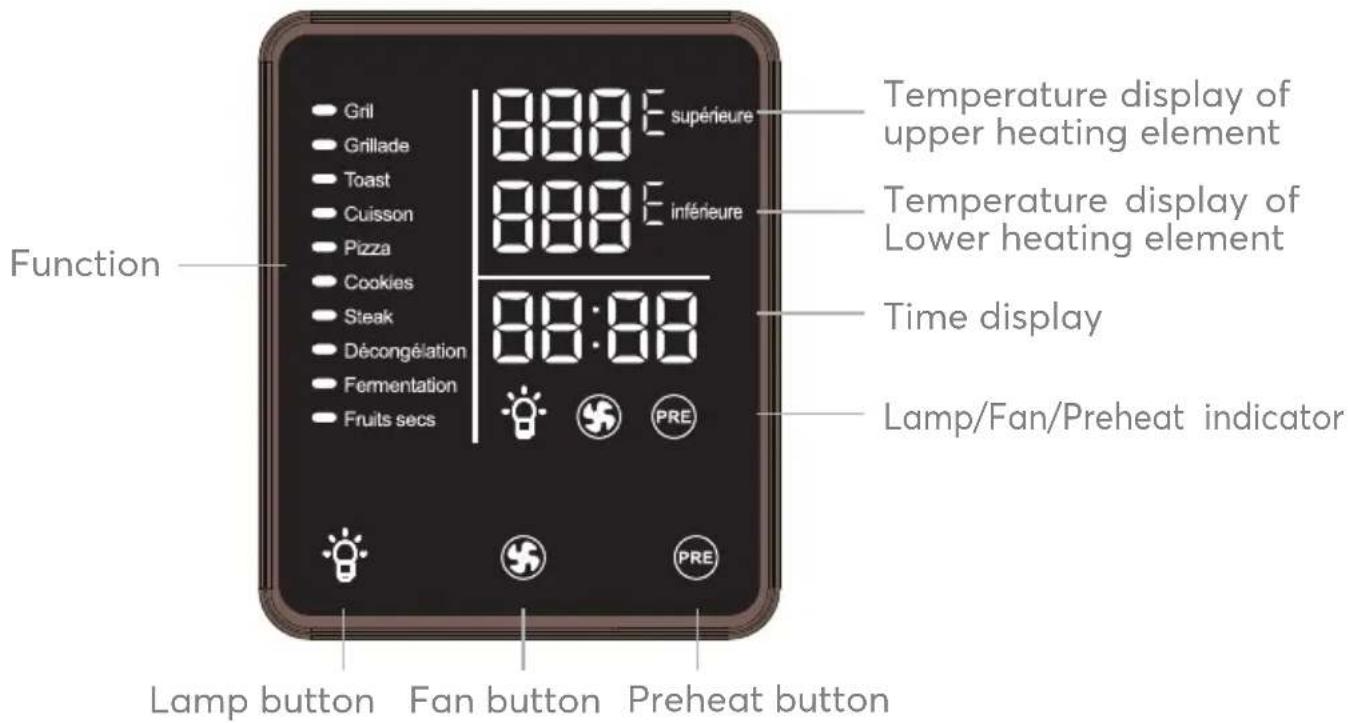

Press this button to turn on or off the interior light.

Press this button to turn on or off the fan.

Press this button to turn on or off the preheat.
Default Menu
| NO | Function | Default Setting Adjustable Range | ||||
| Upper Temp. | Lower Temp Time | Temp. Time | ||||
| 1 | Grill - | 160°C | 30min | 50-180°C | 1-120min | |
| 2 | Broil | 160°C | - | 30min | 50-180°C | 1-120min |
| 3 | Toast | 200°C 200°C | 6min | 150-230°C | 1-120min | |
| 4 | Bake | 170°C | 170°C | 30min | 120-230°C | 1-120min |
| 5 | Pizza | 200°C | 200°C | 18min | 150-230°C | 1-120min |
| 6 | Cookies | 170°C | 165°C | 17min | 120-230°C | 1-120min |
| 7 | Steak | 170°C | 170°C | 20min | 45-230°C | 1-120min |
| 8 | Defrost | 65°C | 65°C | 60min | Fixed | Fixed |
| 9 | Ferment | 35°C | 35°C | 60min | 25-50°C | 0.5Hour-15Hour |
| 10 | Dry Fruit | 68°C | 68°C | 5Hour | 30-120°C | 0.5Hour-15Hour |
| 11 | DIY | 180°C | 180°C | 30min | 50-230 °C /60-200 | °C1-120min |
NOTE : Please adjust the cooking time based on the type of food to be cooked as well as the food weight or size.
3. OPERATING INSTRUCTIONS
BEFORE FIRST USE
Before using your oven for the first time, be sure to:
- Read all instructions in the manual.
• Make sure the oven is unplugged. - Wash all accessories in warm soapy water. Thoroughly dry all accessories.
- Plug the oven in the mains socket and then you are ready to use the oven.
- Before cooking food, it recommends that you run the oven at the highest temperature (230°C) for 15 minutes to allow the manufacturer's protective coating of oil to burn off.
- Wipe the inside of the oven with a damp cloth or sponge after this burning-off cycle. Dry with paper towels and make sure the oven is dry before using.
Please Note: When using the oven for the first time, the oven may produce an odor and emit smoke. The oven is burning off the excess oils in the heating elements and this is normal.
CAUTION: Always use extreme care when removing bake tray, wire rack or any hot container from a hot oven.
Always use the rack handle, or an oven mitt when removing hot items from the oven.
OPERATION
1 Place the oven on a clean, flat and heat resistant surface.
- Ensure that the oven is used in an area with good air circulation.
- Ensure that the oven is completely dry before use.
- The oven should not be placed on untreated wooden surface.
2 Plug inthe oven.
3 Select the oven accessory for your recipe. Place the food to be cooked on the accessory.
4 Place the accessory with food into the appropriate shelf position in the oven and close the door.
5 Select a preset cooking function.
Turn the Function knob to select the desired cooking function.
The corresponding indicator light will flash.
Fonction
natural_image
Circular object with a solid black center and concentric ring patterns (no text or symbols)Gril
Grillade
Toast
Cuisson
Pizza
Cookies
Steak
Décongélation
Fermentation
Fruits secs
NOTE: When the oven is switched on, it enters the DIY function automatically.
6 Set the temperature.
Your oven has a separate temperature control for upper and lower heating elements. The temperature tolerance between upper and lower heating elements is 30^ C.
Press supérieure to set the temperature for upper heating elements. Turn the knob until the desired temperature is displayed.
Press inférieure to set the temperature for lower heating elements. Turn the knob until the desired temperature is displayed.
7 Set the time.
Turn the knob to increase or decrease the cooking time.
The maximum cooking time varies with different functions. See the table "Default Menu" for related parameters.
8 Start cooking.
Press MARCHE/ARRÊT to start cooking cycle. To cancel cooking, press MARCHE/ARRÊT in.
Your oven will preheat for around 3-5 minutes, the preheat indicator will be displayed. When the preheat is complet, the preheat indicator will turn off and the time starts to count down, indicating that the oven starts to run.
NOTE: If you don't need preheat function, press to cancel this function before the cooking start.
9 When the cooking process is complete and the cooking time has elapsed, your oven will beep and "00:00" will flash on the time display.
You can also press and hold MARCHE/ARRÊT for a while to turn off the oven.
USING THE GRILL FUNCTION
- Place the food to be cooked on the wire rack or bake tray.
- Insert the rack or tray into the lower position of the oven. Close the door.
- Tturn the Function knob until the indicator light Gril displayed.
- The default temperature and time will be displayed.
- You can set the desired temperature and cooking time using the temperature control and time knob.
- Press MARCHE/ARRÊT to start cooking.
- When the cooking is finished, the oven will beep and the display will show "00:00".
- Open the door. Always remove food with oven mitts as the food and oven are very hot.
USING THE BROIL FUNCTION
- Place the food to be cooked on the wire rack or bake tray.
- Insert the rack or tray into the upper position of the oven. Close the door.
- Turn the Function knob until the indicator light Grillade is displayed.
- The default temperature and time will be displayed.
- You can set the desired temperature and cooking time using the temperature control and time knob.
- Press MARCHE/ARRÊT to start cooking.
- When the cooking is finished, the oven will beep and the display will show "00:00".
- Open the door. Always remove food with oven mitts as the food and oven are very hot.
USING THE TOAST FUNCTION
- Place the food to be cooked on the wire rack or bake tray.
- Insert the rack or tray into the middle position of the oven. Close the door.
- Turn the Function knob until the indicator light Toast is displayed.
- The default temperature and time will be displayed.
- You can set the desired temperature and cooking time using the temperature control and time knob.
- Press MARCHE/ARRÊT to start cooking.
- When the cooking is finished, the oven will beep and the display will show "00:00".
- Open the door. Always remove food with oven mitts as the food and oven are very hot.
USING THE BAKE FUNCTION
- Place the food to be cooked on the wire rack or bake tray.
- Insert the rack or tray into the middle position of the oven. Close the door.
- Turn the Function knob until the indicator light Cuisson is displayed.
-
The default temperature and time will be displayed.
-
You can set the desired temperature and cooking time using the temperature control and time knob.
-
Press MARCHE/ARRÊT to start cooking.
-
When the cooking is finished, the oven will beep and the display will show "00:00".
-
Open the door. Always remove food with oven mitts as the food and oven are very hot.
USING THE PIZZA FUNCTION
- Place the pizza to be cooked on the wire rack.
- Insert the wire rack into the middle position of the oven. Close the door.
- Turn the Function knob until the indicator Pizza is light displayed.
- The default temperature and time will be displayed.
- You can set the desired temperature and cooking time using the temperature control and time knob.
- Press MARCHE/ARRÊT to start cooking.
- When the cooking is finished, the oven will beep and the display will show "00:00".
- Open the door. Always remove food with oven mitts as the food and oven are very hot.
- Place the food to be cooked on the wire rack or bake tray.
- Insert the rack or tray into the middle position of the oven. Close the door.
- Turn the Function knob until the indicator light Cookies is displayed.
- The default temperature and time will be displayed.
- You can set the desired temperature and cooking time using the temperature control and time knob.
- Press MARCHE/ARRÊT to start cooking.
- When the cooking is finished, the oven will beep and the display will show "00:00".
- Open the door. Always remove food with oven mitts as the food and oven are very hot.
USING THE STEAK FUNCTION
- Place the food to be cooked on the wire rack or bake tray.
- Insert the rack or tray into the middle position of the oven. Close the door.
- Turn the Function knob until the indicator light Steak is displayed.
- The default temperature and time will be displayed.
- You can set the desired temperature and cooking time using the temperature control and time knob.
- Press MARCHE/ARRÊT to start cooking.
- When the cooking is finished, the oven will beep and the display will show "00:00".
- Open the door. Always remove food with oven mitts as the food and oven are very hot.
USING THE DEFROST FUNCTION
- Place the food to be defrosted on the bake tray.
- Insert the bake tray into the middle position of the oven. Close the door.
-
Turn the Function knob until the indicator light Décongélation is displayed.
-
The default defrosting temperature is 65^ and cannot be adjusted.
-
The default defrosting time is 60 minutes and cannot be adjusted.
-
Press MARCHE/ARRÊT to start defrosting.
-
When the defrosting is finished, the oven will beep and the display will show "00:00".
-
Open the door. Always remove food with oven mitts as the food and oven are hot.
USING THE FERMENT FUNCTION
- Place the food to be cooked on the wire rack or bake tray.
- Insert the rack or tray into the middle position of the oven. Close the door.
- Turn the Function knob until the indicator light Fermentation is displayed.
- The default temperature and time will be displayed.
•The fan can not be turned on. - You can set the desired temperature and cooking time using the temperature control and time knob.
- Press MARCHE/ARRÊT to start cooking.
- When the cooking is finished, the oven will beep and the display will show "00:00".
- Open the door. Always remove food with oven mitts as the food and oven are very hot.
USING THE DRY FRUIT FUNCTION
-
Place the food to be cooked on the wire rack or bake tray.
-
Insert the rack or tray into the middle position of the oven. Close the door.
-
Turn the Function knob until the indicator light Fruits secs is displayed.
-
The default temperature and time will be displayed.
•The fan is automatically turn on. -
You can set the desired temperature and cooking time using the temperature control and time knob.
-
Press MARCHE/ARRÊT to start cooking.
-
When the cooking is finished, the oven will beep and the display will show "00:00".
-
Open the door. Always remove food with oven mitts as the food and oven are very hot.
USING THE DIY FUNCTION
When the power is switched on, the display is fully light up, all the cooking function are dispalyed, the upper and lower heating elements work at the same time, and enter the DIY function.
- Place the food to be cooked on the wire rack or bake tray.
- Insert the rack or tray into the middle position of the oven. Close the door.
- The default temperature and time will be displayed.
- You can set the desired temperature and cooking time using the temperature control and time knob.
- When using the DIY function, the upper and lower tubes can work at the same time or separately. When the upper and lower tubes work at the same time, the temperature adjustable range is 50-230°C. When the upper and lower tubes work separately, the temperature adjustable range is 60-200°C (long press supérieure/inférieure to cancel or select upper/lower tubes).
- There is no need to turn the Function knob to select the cooking function. And no corresponding Function indicator light will flash.
- Press MARCHE/ARRÊT to start cooking.
- When the cooking is finished, the oven will beep and the display will show "00:00".
- Open the door. Always remove food with oven mitts as the food and oven are very hot.
USING THE FAN FUNCTION
You can use this function for cooking a variety of toast, steaks, and bread.
- Place the food to be cooked on the wire rack or bake tray.
- Insert the rack or tray into the middle position of the oven. Close the door.
- Select a preset function and set desired temperature and time.
- Press 📋 to activate this function and the fan indicator 🌐 will be displayed.
- Press MARCHE/ARRÊT to start cooking.
- When the cooking is finished, the oven will beep and the display will show "00:00".
- Open the door. Always remove food with oven mitts as the food and oven are very hot.
To deactivate this function, press 📋 again. The fan indicator will disappear from the display.
INSIDE LIGHT
Your oven has an interior light and it will automatically turn on when plugging in the oven.
This facilitates easy viewing of the inside of your oven.
You can press 🙏 to turn on or off the interior light.
PREHEAT FUNCTION
During preheating, the PRE indicator light is displayed, and after the preheating is completed, the PRE indicator light is turn off.
DEFROST/PERMENT/DRY FRUIT function default without preheat function.
You can press PRE to turn on or off the preheat function.
NOTE: This function can not be selected or canceled during working.
4. CLEANING AND MAINTENANCE
Turn off and unplug the appliance and allow it to cool before cleaning.
Do not immerse the appliance in water.
After each use, use a damp cloth to clean the interior and exterior of the oven and door, then dry them thoroughly.
Wash all the accessories in warm soapy water with a sponge or cloth. Rinse and dry thoroughly.
Never use abrasive or chemical cleaning agents.
Surfaces in contact with food should be cleaned regularly to avoid cross contamination from different types of food, the use of a damp cloth is advisable when dealing with surfaces that come into contact with food.
Correct food hygiene practices should always be followed at all times to avoid possibility of food poisoning /cross contamination.
Dry all parts and surfaces thoroughly before use.
Make sure that all parts and surfaces are completely dry before plugging in the appliance.
5. TROUBLESHOOTING
If you experience a problem with your appliance or are concerned that the appliance is not functioning correctly, you can carry out some easy checks before calling for service, please see below. You can carry out some easy checks according to this section before calling for service.
Warning! Don't try to repair the appliance yourself. If the problem persists after you have made the checks mentioned below, contact a qualified electrician, authorized service engineer or the shop where you purchased the product.
| Problem Cause | Solution | |
| The appliance is not working. | The main plug is not connected to the mains power. | Insert the plug into a mains power socket. |
| The mains power socket is defective. | Use a different mains power socket. | |
| The appliance is defective. | Contact Customer Services. | |
| Display Screen does not light up | The main plug is not connected to the mains power. | Insert the plug into a mains power socket. |
| Power cord is damaged. | Contact Customer Services. | |
| The LED Display is abnormal | Display screen damaged. | Contact Customer Services. |
| Parts in electronic board damaged. | Contact Customer Services. | |
| The cooking time of the food seems very long. | The glass door has been opened often to check the cooking progress. | Do not open the glass door any more often than is absolutely necessary. |
| The wrong temperature level has been set. | Check the temperature settings. | |
| Smoke and smells develop during use. | There is detergent or food residue on the heating elements. | Remove the food from the appliance and continue cooking process with the glass door open until the smoke stops. |
| E1 | Temperature sensor(NTC) anomaly | Unplug the appliance,then re-power in,if still have problem,contact Customer Services. |
| E3 | The cavity temperature is exceeded 280°C | Unplug the appliance,then re-power in,if still have problem,contact Customer Services. |
6. SPECIAL WARNING
CORRECT DISPOSAL OF THIS PRODUCT

natural_image
Symbol of a trash bin crossed with a diagonal line, no text or labels presentEuropean directive 2012/19/EU on Waste from Electrical and Electronic Equipment (WEEE), requires that used household appliances are not thrown into the normal municipal waste stream. Used appliances must be collected separately in order to optimize the rate of recovery and recycling of materials that compose them, and to reduce the impact on human health and on the environment. The crossed bin symbol is affixed to all the products to remind you of the obligations of separated collection.
We decline liability for any damage or accident derived from any use of this product which is not in conformity with the instructions contained in this booklet.
In accordance with Article L. 217 of the Consumer Code, your product benefits from a legal guarantee of conformity of 2 years.
To contact our After-Sales Service, before going to your BUT store, call 09 78 97 97 97 Monday to Friday from 9:00 am to 19:00 pm Saturday from 9:00 am to 18:00 pm (local call price).

LE TRI

FACILE