301812 - Clock Brandson - Free user manual and instructions
Find the device manual for free 301812 Brandson in PDF.


| Product type | Radio-controlled projection alarm clock |
| Brand | Brandson |
| Model | 301812 |
| Dimensions (H x W x D) | 102 x 187 x 72 mm |
| Main power supply | 230 V AC, 50 Hz |
| Backup battery | CR2032 (3 V DC) |
| Radio frequency range | 87.5 - 108 MHz (FM) |
| Display | LED with date, 12/24 h |
| Number of alarms | 2 (Alarm 1 and Alarm 2) |
| Alarm modes | Beep, radio, 4 different modes |
| Snooze function | Yes, 9 minutes |
| Nap function | Yes, from 10 to 90 minutes |
| Radio sleep timer | From 15 to 90 minutes |
| Projection | Time and date, adjustable focus, swiveling, 180° inversion |
| Radio station memory | Up to 10 presets (P01-P10) |
| Auto search | Yes |
| Display dimmer | Multiple levels |
| Automatic alternating display | Yes (time/date/year) |
| Automatic display off | Yes |
| Antenna | Cable antenna, extendable |
| Package contents | Projection alarm clock, instruction manual |
Frequently Asked Questions - 301812 Brandson
User questions about 301812 Brandson
0 question about this device. Answer the ones you know or ask your own.
Ask a new question about this device
Download the instructions for your Clock in PDF format for free! Find your manual 301812 - Brandson and take your electronic device back in hand. On this page are published all the documents necessary for the use of your device. 301812 by Brandson.
USER MANUAL 301812 Brandson
natural_image
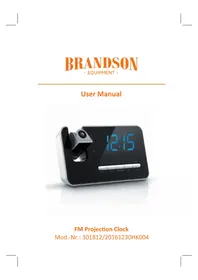
Digital alarm clock with blue digital display showing 12:15, no visible text or symbols on the device itself.FM Projection Clock
Thank you for having chosen this product from Brandon and for placing your trust in our company. Before using the product for first time, please read this manual carefully to ensure your long-term enjoyment of this product. For future reference, please keep this manual.
1 Scope of supply
- Projection alarm clock
- User manual
2 Technical specifications
| Power supply | 230 V AC; 50Hz3V DC (backup "CR2032" battery) |
| Frequency range 87.5 - | 108 MHz |
| Dimensions Approx. 10 | 2mm x 187mm x 72mm (H x W x D) |
| Features | Date display12/24-hours displayTwo alarm settings (beep and radio)Four different alarm modesSleep functionSwivelling projection armFocusable projection180° flip projection displayAutomatic station searchNap mode function |
3 Functions
The projection alarm clock allows you to project the current time onto a wall or ceiling. Thanks to the different alarm modes and the dual alarm, you can make two different alarm settings. You have the option of setting either a "beep" tone or your favourite radio broadcast as the wake-up call. Due to the swivelling projection arm, the projection can be displayed on any desired position.
4 Product details

5 Getting started
Take the device out of the package and remove all the packaging material. Insert a "CR2032" battery (not included in the scope of supply) into the battery compartment on the lower side. Pay attention to the correct polarity of the contacts. This battery is used for saving a backup of the time and date.
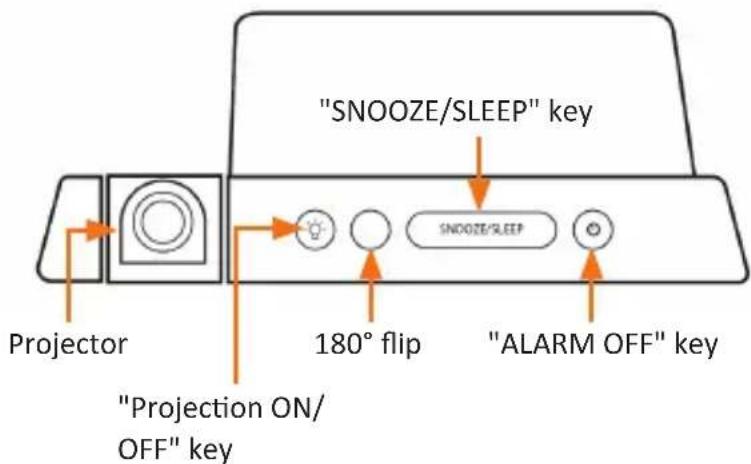
Press the "Y-M-D" key to switch between the clock and the date. Press the "Projection ON/OFF" key to easily switch on or switch off the projection in a flexible manner.
6 Setting the time and date
Once the device is connected to an appropriate socket, press and hold the "MEM/M+/NAP" key to set the time and date. Use the "Station forward" and "Station back" keys to increase or decrease the digits. Once again, press "MEM/M+/NAP" to continue with the settings. The setting cycle is as follows:
- Year
- Month / Day
- 12/24 Hours
- Hour / Minute
Note: The enable the summer time (DST), press and hold the "MEM/M+/NAP" key in Standby mode.
7 Setting the wake-up time
Press one of the two "Alarm" keys to show the wake-up time. Press and hold the key once again to go to the wake-up time settings. To do this, once again press the "Station forward" and "Station back" keys to set the wake-up time. The setting cycle is as follows:
- Hour/minute
- Weekdays
- Alarm tone (beep or radio function)
- Alarm tone radio volume
The following table shows the weekday settings.
| 1-5 Monday - Friday | |
| 1-7 Entire week | |
| 6-7 Saturdays and Sundays | |
| 1-1 One day per week |
8 Activating the alarm
Press and hold the "Alarm 1" or "Alarm 2" key to switch on or switch off the respective alarm. As soon as the desired alarm is enabled or disabled, this is displayed.
9 Sleep function
As soon as the alarm tone sounds, press the "Snooze/Sleep" key to postpone the alarm to a later time. The alarm tone or radio wake-up tone sounds after approx. 9 minutes.
10 Projection
Press the "Projection ON/OFF" key on the top of the device to switch on and switch off the projection. You can focus with the help of the wheel on the projection arm. To turn the projected display by 180°, press the "180°Flip" key, which is also located on the upper side of the device.
11 Radio function
Press the "Alarm off" key to switch off the alarm and activate the radio function. Use the "Station forward" and "Station back" keys to increase or decrease the frequency. Hold one of the keys to start the automatic station search. The radio automatically sets the next available station automatically and plays it.
Note: For an optimal radio reception, it is recommended that the cable antenna is completely rolled out.
12 Activating and changing the radio transmitter default settings
Enable the radio function and simultaneously press and hold the "MEM/M+/NAP" key till "P01" appears on the display. Press the "Station forward" and "Station back" key to select between the presets (P01 - P10). Once you have reached the desired default setting, once again press the "MEM/M+/NAP" key to save the current station as the default setting.
To select the saved station, press the "MEM/M+/NAP" key briefly while you are in the radio mode and select amongst the presets.
13 Dimming the display
To dim the alarm clock display, press the "SNOOZE/SLEEP" key repeatedly in the standby mode to select between the three different level of brightnes.
14 Radio-sleep-function
If you press the "SNOOZE/SLEEP" key while listening to the radio, you can select a sleep timer. Press the "SNOOZE/SLEEP" key repeatedly to select between a sleep timer ranging from 90 minutes to 15 minutes. If the timer is enabled, the radio will switch off automatically after period of time set.
15 Nap mode function
In the Standby mode, press the "MEM/M+/NAP" key to enable the nap mode function. Here, you can select between 90 minutes and 10 minutes. The alarm will sound for approx. 30 minutes after your set time and then switch off automatically. To switch off the alarm before, press the "Alarm ON/OFF" key on the upper side of the device.
16 Switching off the display automatically
Press and hold the "Station forward" key for three seconds in Standby mode. The display LED " 🔊 " indicates whether the function is enabled. If the display LED does not glow, it means that the function is disabled. Once again, keep the key pressed for three seconds to disable the function. The display LED goes out.
17 Automatic display change
Press and hold the "Station back / Y-M-D" key for approx. three seconds. The "ON" text appears on the display. From now on your radio will alternate between the time, date and year displays. To disable this function once again, press and hold the "Station back / Y-M-D" key once again for three seconds. The "OFF" text appears on the display.

Attention!
18 Safety instructions and disclaimer
Do not attempt to service this product by yourself as opening or removing covers may result in fire, electric shock or equipment damage. Please avoid any contact to the electric current. This product is only licensed for indoor use and dry areas. Please protect it from water, rain, snow or high humidity and keep it away from high temperatures and direct sunlight. Do not expose this product to extreme and sudden changes of temperature or heavy vibrations; this may lead to damage of the internal electronic part of this unit. Check this product for signs of damage before putting it in operation. In case the device received any damage, it should not be used. Please contact our customer support. Please observe the relevant national provisions and legal restrictions. Do not use this product for anything other than intended and as described in the manual.
Any attempt of repairs or alterations by someone other than the original supplier will invalidate the guarantee and result in refusal of warranty claims. Persons who are familiar with the operating manual and the applicable regulations concerning working safety and accident prevention may only use the network card. This unit is not intended to be used by persons (including children) with limited physical, sensory or mental aptitude or lack of experience and/or knowledge unless they are supervised by a person responsible for their safety or have received instructions as to how the device is used properly. The technical specifications of this product may change without prior notice.

19 Disposal Instructions
The European Directive (WEEE) requires that old electrical and electronic appliances shall be disposed of separately from normal household garbage for optimal recycling. The component parts must be separated, collected and sent for recycling or disposal in an environment-friendly manner.
Otherwise, toxic and dangerous substances could cause enduring damage to the environment if disposed of incorrectly. As a consumer you are legally obligated (Electrical and Electronic Equipment Act-ElektroG) to return electronic equipment at the end of its lifetime to their manufacturer, point of sale, public collection points or importer free of charge. The relevant local laws apply here. The symbol on the product, in the instructions or on its packing indicates these regulations. The reuse or recycling of materials and old units makes an important contribution towards protecting the environment.


WEEE guideline: 2012/19/EU
WEEE register number: DE 94495668
WD Plus GmbH, herewith declares that this product 301812/20161230HK004 conforms to the principle requirements and other relevant stipulations of Directive 1999/5/EG. The complete Declaration of Conformity can be obtained from: WD Plus GmbH, Wohlenbergstraße 16, 30719 Hanover


- Scope of supply
- Technical specifications
- Functions
- Getting started
- Setting the time and date
- Setting the wake-up time
- Activating the alarm
- Sleep function
- Projection
- Radio function
- Activating and changing the radio transmitter default settings
- Dimming the display
- Radio-sleep-function
- Nap mode function
- Switching off the display automatically
- Automatic display change
- Attention!
- Safety instructions and disclaimer
- Disposal Instructions
Brand : Brandson
Model : 301812
Category : Clock