Aroma Diffuser - Aroma diffuser LANAFORM - Free user manual and instructions
Find the device manual for free Aroma Diffuser LANAFORM in PDF.

User questions about Aroma Diffuser LANAFORM
0 question about this device. Answer the ones you know or ask your own.
Ask a new question about this device
Download the instructions for your Aroma diffuser in PDF format for free! Find your manual Aroma Diffuser - LANAFORM and take your electronic device back in hand. On this page are published all the documents necessary for the use of your device. Aroma Diffuser by LANAFORM.
USER MANUAL Aroma Diffuser LANAFORM
Thank you for purchasing Aroma from LANAFORM.
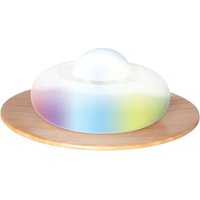
Thanks to its fan system, the device permits the diffusion of a scented cold vapour. This vapour is typified by a gentle perfumed mist dispensed via the diffuser.
PLEASE READ ALL THE INSTRUCTIONS BEFORE USING YOUR DIFFUSER, ESPECIALLY THESE FEW BASIC SAFETY INSTRUCTIONS:
- Always stand the Aroma on a hard, flat and level surface, slightly away from walls and sources of heat such as stoves, radiators, etc. (If you don't place it on a level surface, the Aroma may not work correctly).
- Check that the voltage of your electricity supply corresponds to that of the device.
- Do not plug the Aroma in or unplug it with wet hands.
- Never completely dismantle the device.
- If the power supply cord is damaged it must be replaced by a special or similar cord available from your supplier or his after sales service department.
- Don't leave the diffuser in the sun for long periods.
- Unplug the device before cleaning it or removing the reservoir.
- Don't switch the diffuser on when there is no water in the reservoir.
- Never scratch the transducer with a hard tool; please refer to the cleaning instructions.
- Don't wash the complete unit in water and don't submerge it.
- The Aroma must be cleaned regularly. To do this, please refer to the cleaning instructions in this manual.
- This device is not designed to be used by people, including children, whose physical, sensory or mental capacities are not fully developed, or people who lack the experience or knowledge to use it properly unless they are monitored by someone who is responsible for their safety or they are able to follow prior instructions concerning the use of the device. Children should be watched to ensure they do not play with the device.
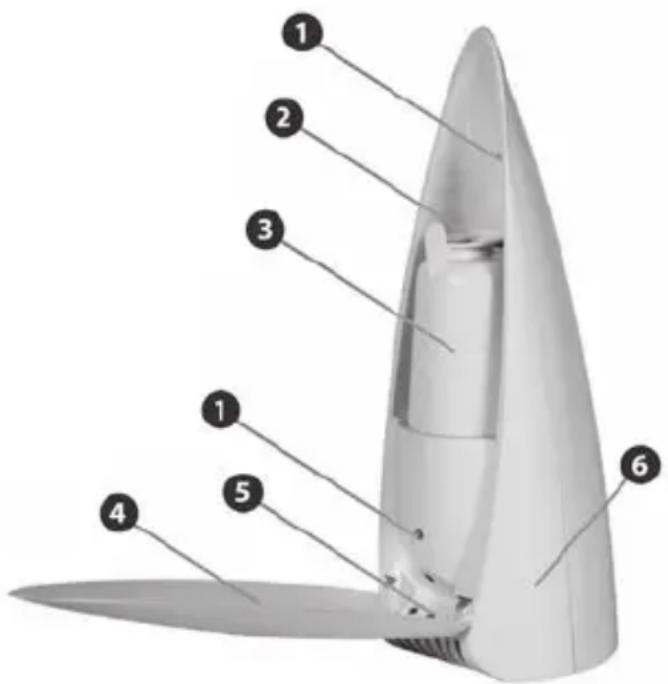
COMPONENTS
1 - Blue mood light
2 - Nozzles
3 - Reservoir
4 - Folding cover
5 - Indicator lights (on/off/30sec)
6 - Base
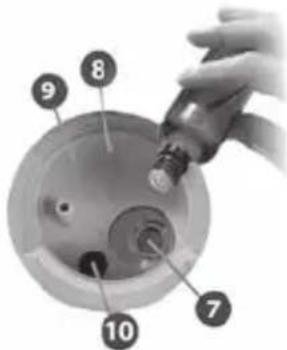
7 - Transducer
8 - Maximum water level
9 - Base reservoir
10 - Water level check
11 - Transformer connection
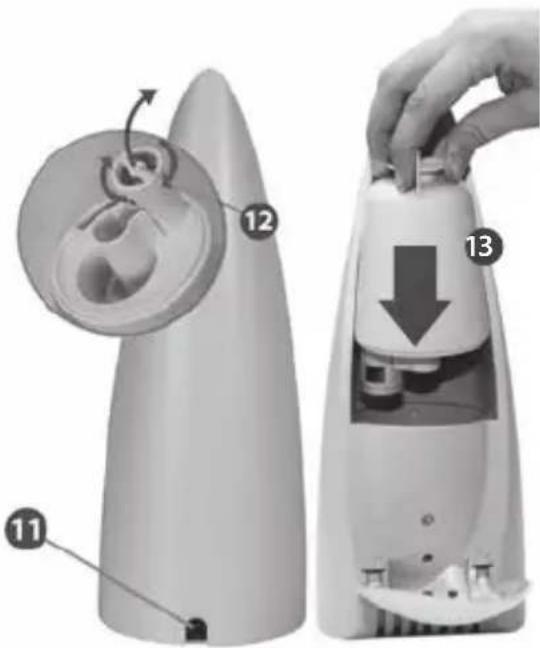
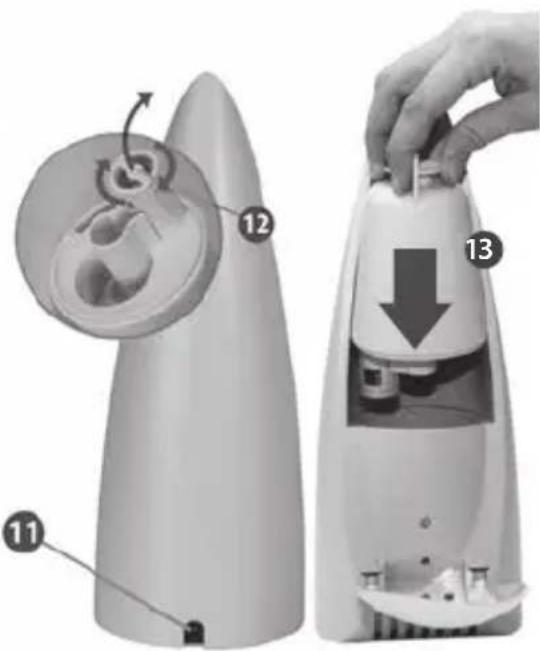
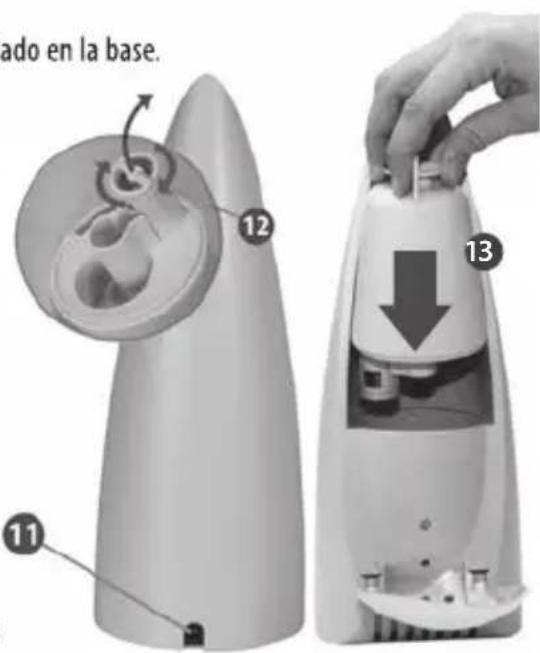
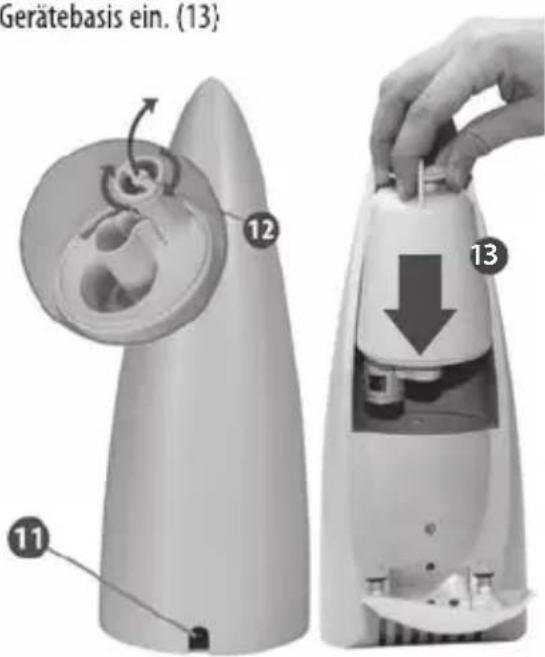
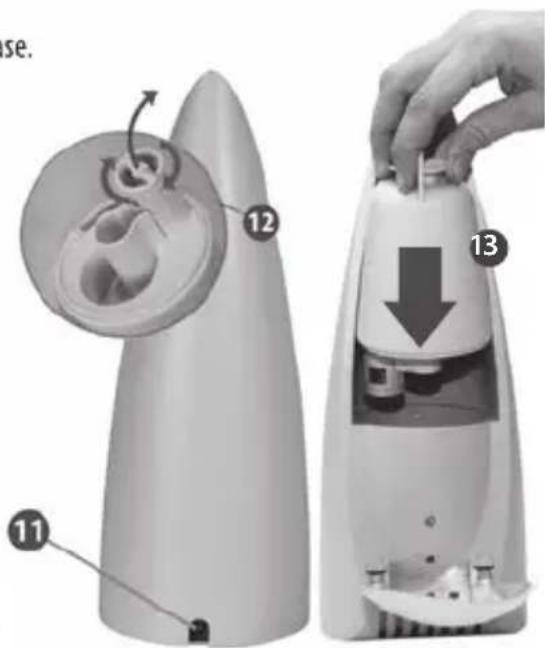
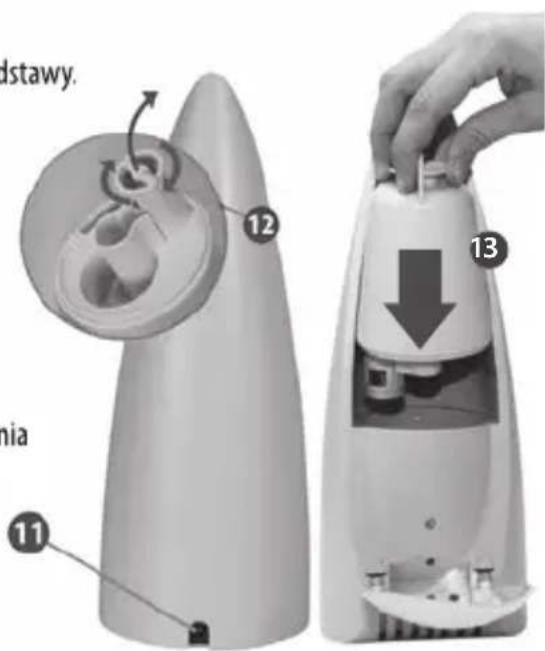
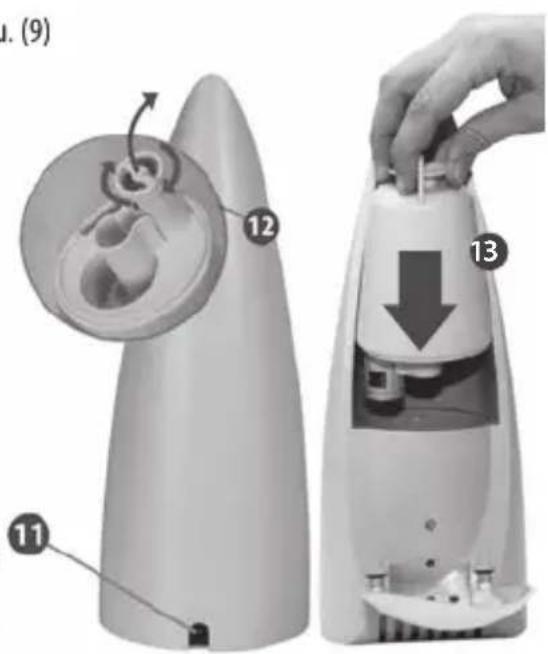
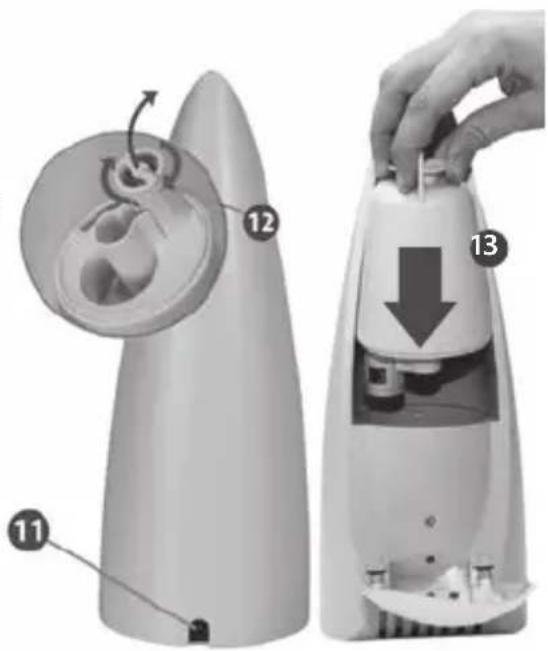
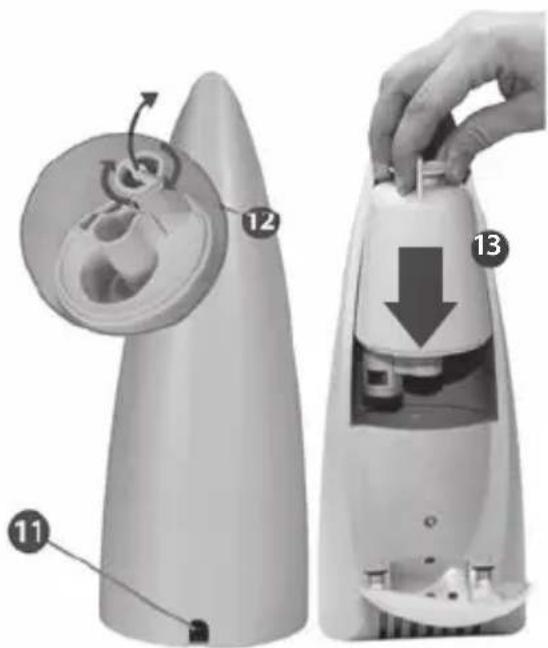
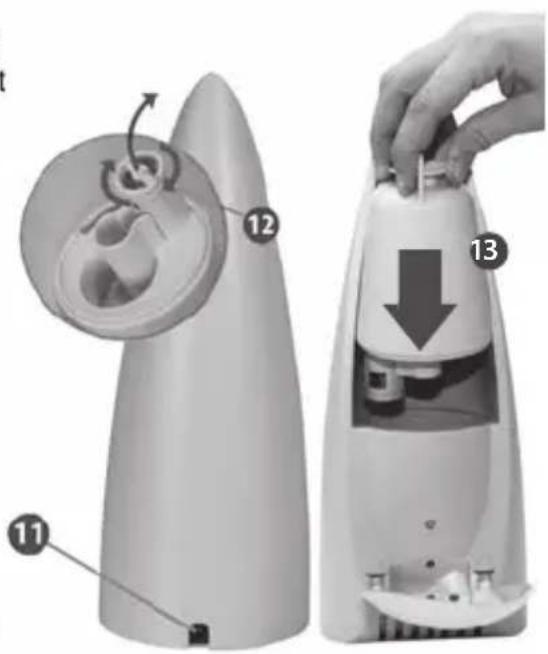
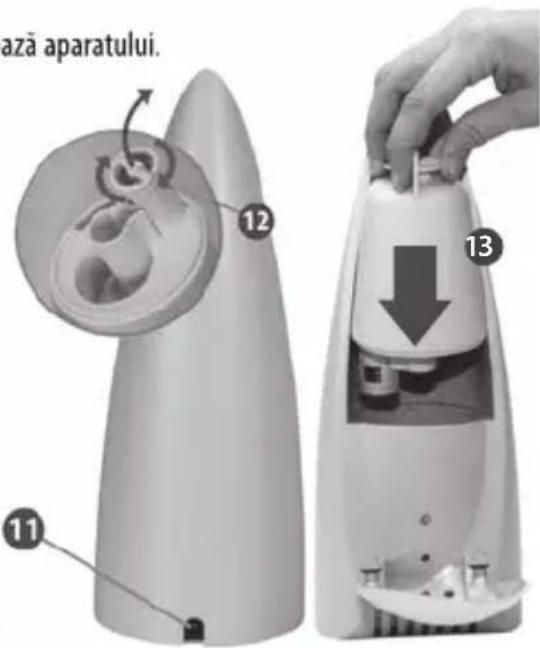
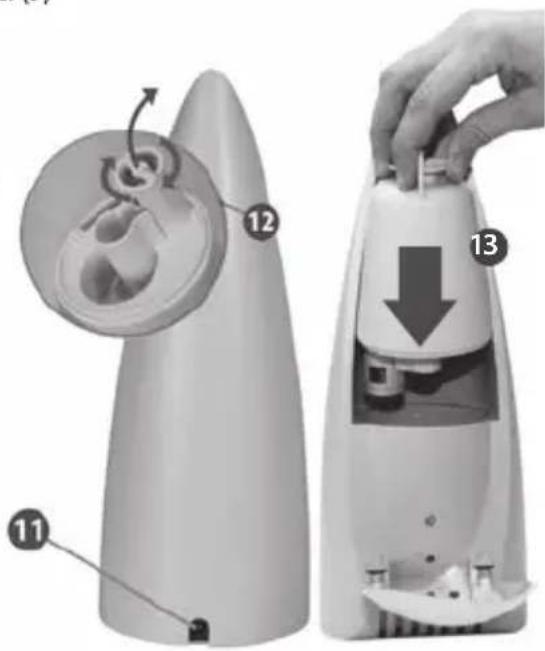
12 - Stopper
Details:
- 130 ml capacity.
- 6 hours diffusion.
- Programme permitting intermittent operation every 30 seconds.
- Releases 5471 ions/cubic metre.
• Water reservoir easy to fill. - A safety cut-out switches the diffuser off automatically when the water reservoir is empty, even if the indicator lights remain on.
- Silent and economical.
• Consumption 25 ml/hr
Functions:
• Diffuses essential oils.
- Eliminates electrostatic charges.
- Improves ambient air quality.
Instructions:
- Place the Aroma in the room half an hour before switching it on so that it can adjust to the ambient temperature.
• We recommend using the device at temperatures between 5 and 40°C. - Remove the water reservoir from the device and unscrew the stopper.
- Fill the reservoir with clean water at a maximum of 40^ C. Check that the seal is in place properly and close the reservoir again. (12)
- Pour a few drops of essential oil into the base reservoir.(9)
- Make sure that it is clean and watertight. Then position the reservoir and fit it to the base unit. (13)
- Please make sure that the tank is firmly secured to the base.
- With dry hands, plug in the transformer plug, a red light (OFF) comes on. You can then switch the device on by pressing "ON", a green light comes on as well as two blue mood lights. The Aroma starts to operate.
- You have the choice of two options: - Either leave the Aroma to diffuse in continuous mode ("on" BUTTON). - Or you have the option of synchronizing the Aroma so that it operates intermittently every 30 seconds. To do this, press the "30 SEC" button.
- To turn off the two blue mood lights, you just need to press the "ON" or the "30 SEC" button once, depending on the chosen mode of operation. To switch these two lights on again, press the "ON" or "30 SEC" buttons once.
Warning: DESPITE THE SAFETY CUT-OUT DEVICE THAT TURNS THE TRANSDUCER OFF, AVOID LEAVING THE POWER SWITCHED ON TO THE DEVICE WHEN YOU ARE NOT USING IT.
MAINTENANCE AND STORAGE:
If the water contains too much calcium and too much magnesium it can leave a “white powder” in the device. If this scum is deposited on the transducer (metal disk producing the ultrasound), the Aroma will be prevented from operating properly.
We recommend:
1) Using boiled and cooled water or distilled water each time you use the diffuser.
2) Cleaning the reservoir every 2 days and cleaning the transducer each week.
3) Changing the water in the reservoir regularly. Don't leave it there for more than 2 days.
4) Cleaning the whole Aroma (see the explanation below) and making sure that all the parts are completely dry when it is not being used.
Cleaning the transducer:
1) Place 2 to 5 drops of vinegar on the surface and leave for from 2 to 5 minutes.
2) Brush the scum off the surface using a soft brush. Don't use a hard tool to scratch the surface.
3) Rinse the base reservoir in clean water.
4) Do not use soap, solvent or a spray on cleaning agent to clean the transducer.
To clean the water tank:
1) Clean the water tank using a soft cloth and with vinegar if there is scum OR limescale inside.
2) If the safety cut-out is covered in scum, put a few drops of vinegar on it and clean it with the soft brush.
3) Rinse the water tank in clean water.
Storage:
Store the device in a clean, dry place, out of the reach of children, having cleaned and dried it.
BREAKDOWNS AND SOLUTIONS
If the Aroma does not operate properly under normal conditions of use, consult the following table:
| Problem Possible causes Corrective action | ||
| Unit neither blows nor produces mist | No indicator light. Check that the unit is plugged in. | |
| Main switch turned off. Switch on the main switch. | ||
| The water level in the groove is too high. Remove the water from the groove. | ||
| Water reservoir leaking. Check that the cover is closed correctly | ||
| Unit blows but with no mist production | No water in the reservoir Fill up the reservoir | |
| The temperature of the unit is too low. Place the unit in the room at ambient temperature for half an hour before use. | ||
| Mist with unusual smell | The water has been left in the reservoir for too long. | Clean out the reservoir and add fresh water. |
| Low power | Excess water in the groove. Remove the water from the groove and replace the reservoir. | |
| Deposits on the transducer. Clean the transducer. | ||
| The water is too cold. Use water at ambient temperature. | ||
| The water is not clean. | Clean out the reservoir and add fresh water. | The mist does not rise |
| The reservoir and the base are not perfectly aligned. | Check that they are aligned. | |
| The fan unit is not operating correctly. Ask a specialist to check the fan unit in the base. | ||
| Noise | Resonance due to the water level in the reservoir being too low. | Add water to the reservoir. |
| Resonance due to an unstable surface. Place the unit on a stable surface. | ||
LIMITED GUARANTEE:
LANAFORM ^® guarantees this product against any material or manufacturing defect for a period of two years from the date of purchase, except in the circumstances described below.
The LANAFORM ^® guarantee does not cover damage caused as a result of normal wear to this product. In addition, the guarantee covering this LANAFORM ^® product does not cover damage caused by abusive or inappropriate or incorrect use, accidents, the use of unauthorized accessories, changes made to the product or any other circumstance, of whatever sort, that is outside LANAFORM ^® 's control.
LANAFORM ^® may not be held liable for any type of circumstantial, indirect or specific damage.
All implicit guarantees relating to the suitability of the product are limited to a period of two years from the initial date of purchase as long as a copy of the proof of purchase can be supplied.
On receipt, LANAFORM ^® will repair or replace your appliance at its discretion and will return it to you. The guarantee is only valid through LANAFORM ^® 's Service Centre ^® . Any attempt to maintain this product by a person other than LANAFORM ^® 's Service Centre will render this guarantee void.

MANUEL D'INSTRUCTION


ENTRETIEN ET RANGEMENT :
Opgelet: ONDANKS DE VEILIGHEIDSVOORZIENING DIE DE WERKING VAN DE OMZETTER ONDERBREEKT, VERMIJD HET TOESTEL ONDER SPANNING TE LATEN WANNEER U HET NIET GEBRUIKT.
ONDERHOUD EN OPBERGING:
2 ۱۴۶۰۹۵
3
4 چوش قابل فشار


ZALECENIA DOTYCZĄCE UŻYTKOWANIA
Dane techniczne:
PL
KONSERWACJA I PRZECHOWYWANIE:
UPUTE ZA KORIŠTENJE
Značajke:
- Kapacitet 3,5 litara
- 6 sati raspršivanja
- Program koji omogućuje rad naizmjence od 30 sekundi.
- Oslobađa 5471 iona/kubičnom metru
• Spremnik za vodu koji se lako puni - Sigurnosna naprava automatski prekida rad raspršivača kada je spremnik vode prazan, čak i ako svjetlosni indikatori ostanu upaljeni.
• Tih i štedljiv - Potrošnja 25 ml/hr
Funkcije:
- raspršuje esencijalna ulja;
- uklanja statički elektricitet;
- poboljšava kvalitetu okolnog zraka.
Upute za korištenje:

ODRŽAVANJE I SPREMANJE:

NAPOTKI ZA UPORABO
Karakteristike:

VZDRŽEVANJE IN SHRANJEVANJE:
HU
HASZNÁLATI ELŐÍRÁSOK
Tulajdonságok:
Figyelem: ANNAK ELLENÉRE, HOGY A REZONÁTOR BIZTONSÁGI BERENDEZÉSSEL VAN ELLÁTVA, NE HAGYJA A KÉSZÜLÉKET FESZÜLTSÉG ALATT, AMÍG NEM HASZNÁLJA!
المكونات
- م생활 أزرق للزينة
.2 نضاحات
.3. خزان
- عطاء للغلق

ΟΔΗΓΙΕΣ ΧΡΗΣΗΣ
Χαρακτηριστικά: .
Důležité upozornění: I KDYŽ JE SOUČÁSTÍ VÝBAVY PŘÍSTROJE BEZPEČNOSTNÍ ZAŘÍZENÍ, KTERÉ VYPNE TRANSDUKTOR, NENECHÁVEJTE PŘÍSTROJ ZAPNUTÝ, POKUD HO NEPOUŽÍVÁTE.
ÚDRŽBA A USKLADNĚNÍ:
MANUAL DE INSTRUCTIUNI
POKYNY NA POUŽITIE
Vlastnosti:
Pozor: HOCI JE PRÍTOMNÉ BEZPEČNOSTNÉ ZARIADENIE, KTORÉ PRERUŠÍ CHOD TRANSDUKTORA, DÁVAJTE SI POZOR NA TO, ABY STE PRÍSTROJ NENECHALI POD ELEKTRICKÝM NAPÄTÍM VTEDY, KEĐ HO NEPOUŽÍVATE.