
Nespresso Vertuo Pop+ - Coffee machine BREVILLE - Free user manual and instructions
Find the device manual for free Nespresso Vertuo Pop+ BREVILLE in PDF.

| Product type | Nespresso Vertuo Pop+ Coffee Machine |
| Brand | Breville |
| Model | Nespresso Vertuo Pop+ |
| Dimensions (W x D x H) | 219 x 356 x 265 mm |
| Weight | 3.7 kg (Vertuo Pop+) |
| Water tank capacity | 0.75 L (Vertuo Pop+), 1.1 L (Vertuo Pop+ Deluxe) |
| Capsule container capacity | Not specified (see manual) |
| Connectivity | Bluetooth and Wi-Fi (2.402–2.480 GHz) |
| Power supply | 220-240 V, 50-60 Hz (common estimate) |
| Power | Approximately 1260 W (estimate) |
| Capsule type | Nespresso Vertuo capsules |
| Concentrated extraction function | Yes, for barista recipes (double press button) |
| Volume programming | Yes, from 20 ml to 535 ml per capsule type |
| Automatic shut-off | Yes, after 2 minutes of inactivity |
| Descaling | Necessary when the indicator blinks orange 3 times |
| Cleaning | Automatic 7-minute cycle (3 presses on button) |
| Drainage | Yes, for frost protection or before repair |
| Factory reset | Yes, 5 presses within 3 seconds with lever unlocked |
| Deactivation of connectivity module | Yes, via button held during power-up |
| Compatible accessories | Cup supports, Aeroccino, welcome kits |
| Warranty | Included (see manual) |
Frequently Asked Questions - Nespresso Vertuo Pop+ BREVILLE
User questions about Nespresso Vertuo Pop+ BREVILLE
0 question about this device. Answer the ones you know or ask your own.
Ask a new question about this device
Download the instructions for your Coffee machine in PDF format for free! Find your manual Nespresso Vertuo Pop+ - BREVILLE and take your electronic device back in hand. On this page are published all the documents necessary for the use of your device. Nespresso Vertuo Pop+ by BREVILLE.
USER MANUAL Nespresso Vertuo Pop+ BREVILLE
natural_image
Abstract white logo design resembling a stylized letter 'N' on black background (no text or symbols)VERTUO POP+

natural_image
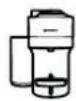
Exterior view of a Nespresso coffee maker with clear glass and orange juice, no visible text or symbols on the device itself.CLICK AND CHOOSE YOUR LANGUAGE
EN FR ES


SAFETY PRECAUTIONS
OVERVIEW
CONNECTIVITY
FIRST USE
COFFEE PREPARATION
ADAPT YOUR COFFEE VOLUME
CLEANING
DESCALING
EMPTYING
MACHINE SETTINGS
BLINKING SUMMARY
TROUBLESHOOTING
SPECIFICATIONS
SAFETY PRECAUTIONS
CAUTION: Before operating your coffee machine, please refer to the safety instructions leaflet to avoid any possible harm and damage.

OVERVIEW
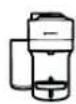
MACHINE OVERVIEW
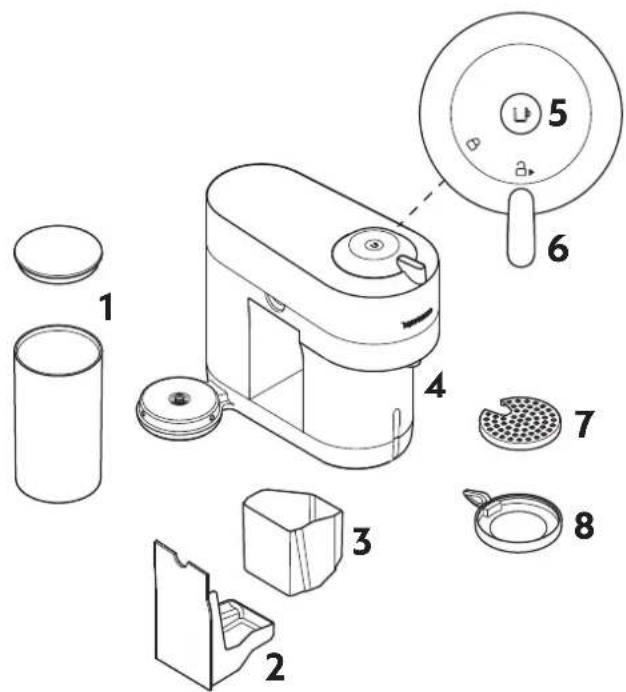
1 Water tank and lid
2 Drip tray
3 Container for used capsules
4 Coffee outlet
5 ON/OFF and coffee button
6 Locking/Unlocking lever
7 Drip grid
8 Adjustable cup support
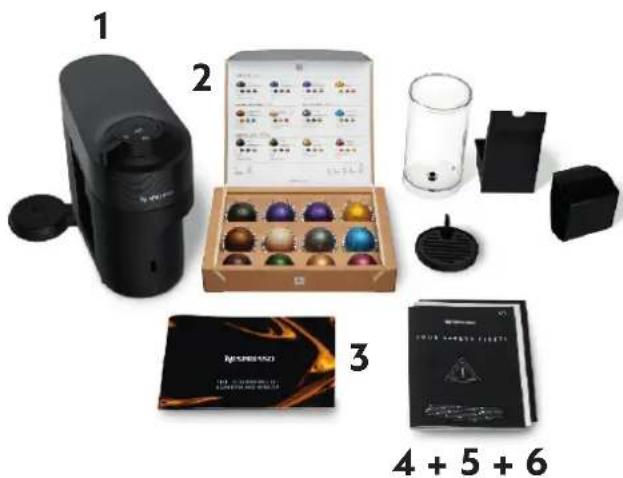
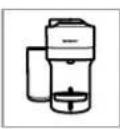
PACKAGING CONTENT
natural_image
Product display of a coffee machine with various accessories and packaging (no visible text or symbols)1 Coffee machine
2 Nespresso capsules set
3 Nespresso welcome booklet
4 Safety instructions
5 Quick Start Guide
6 Warranty
i Unboxing: Some dust may be present on the surface of the machine due to the recycled materials used in the packaging. This is not dangerous, simply clean with a soft tissue.
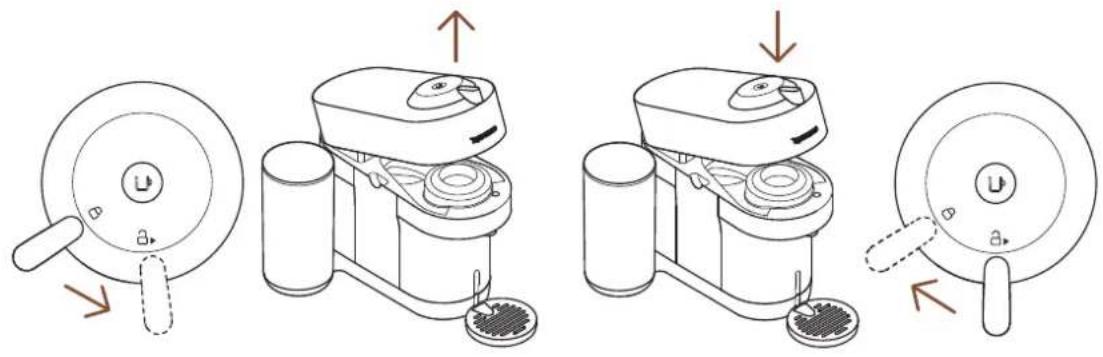
OPEN / CLOSE
OPEN CLOSE
THE VERTUO SYSTEM
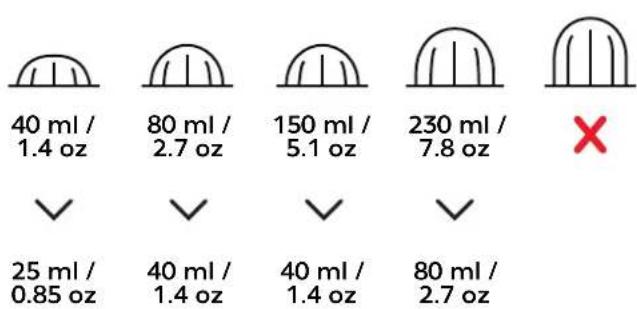
SUITABLE CAPSULES

S
Espresso
(40 ml / 1.4 oz)

M
Double Espresso
(80 ml / 2.8 oz)
Gran Lungo
(150 ml / 5.1 oz)

L
Mug
(230 ml / 7.8 oz)

XL
Alto, Cold Brew Style
(355 ml / 12.5 oz)
Carafe
(535 ml / 18.8 oz)
ACCESSORIES

Suitable accessories
Espresso Double

Espresso

Gran Lungo Mug Reveal Glass

Not suitable accessories
Alto Carafe
Discover our full accessory collection on www.nespresso.com


CONNECTIVITY
WHY SHOULD YOU PAIR YOUR VERTUO POP+ MACHINE?
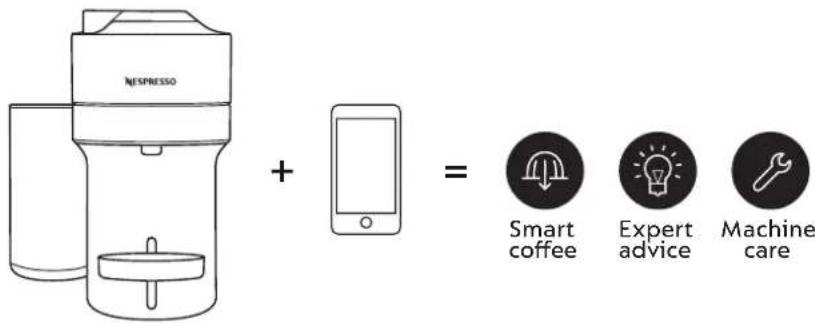
BENEFITS OF CONNECTING YOUR VERTUO POP+ MACHINE
• Smart Coffee: Enjoy the latest coffee innovations from Nespresso by always keeping your machine up to date.
- Expert advices: Receive real-time tips with step by step instructions for descaling, rinsing and cleaning your machine.
• Machine care: Get support and tutorials for your machine care via your smartphone.
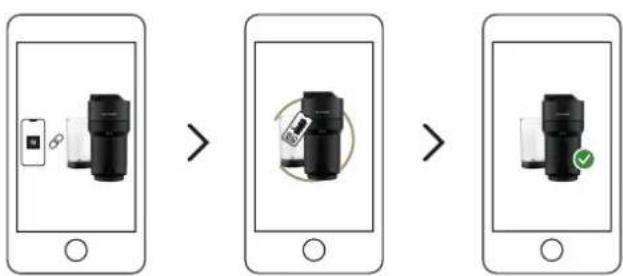
HOW TO CONNECT YOUR VERTUO POP+ MACHINE?

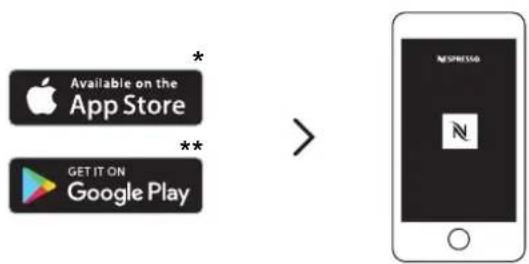
1 Download or update the Nespresso App.

2 LaunchtheNespresso App on your smartphone or your tablet.
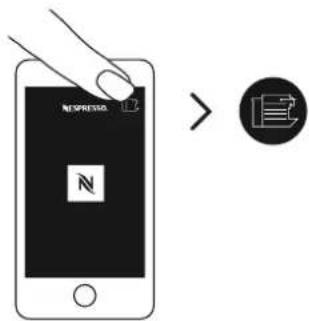
3 Click on the machine icon at the top right of your screen.
flowchart
graph LR
    A["Mobile Phone"] --> B["Device with LCD screen"]
    B --> C["Rotation with mouse icon"]
    C --> D["Close-up of device with green checkmark"]
    D --> E["Clean device with green checkmark"]
4 Follow the instructions via the Nespresso App.
*AppStore ^® is a trademark of Apple Inc., registered in the U.S. and other countries.
** Google Play and the Google Play logo are trademarks of Google LLC.
FIRST USE
ON / OFF
ON
Once the machine is plugged in, turn on by pressing once on the button or by closing the lever in the lock position (with the head closed).
The light will blink for approximatively 30 seconds while the machine is heating up. Once the light is steady, the machine is ready to be used.
OFF
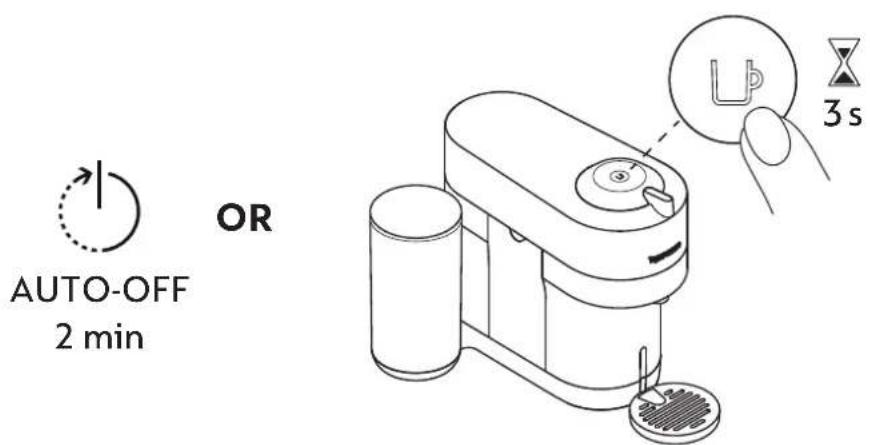
To save energy, the machine will turn off automatically after 2 minutes of non-use.
The machine can be turned "OFF" manually at any time (when not in use) by pressing and holding the button for 3 seconds.
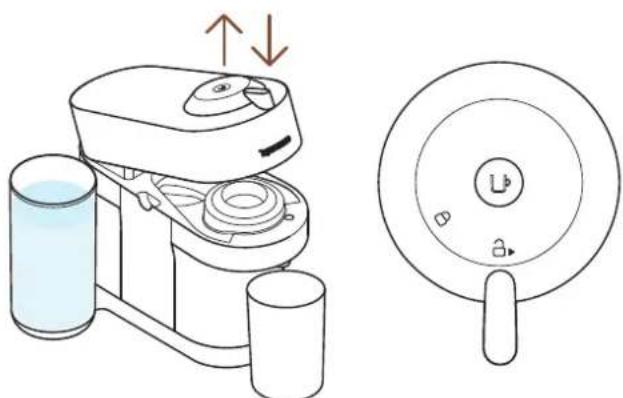
FIRST RINSING
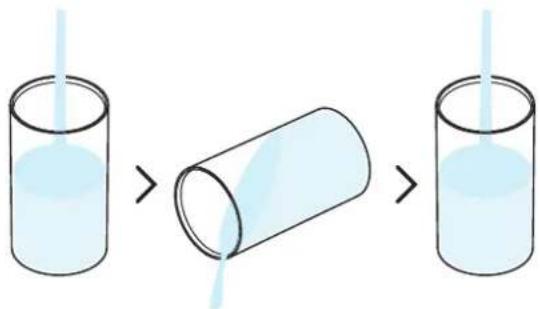
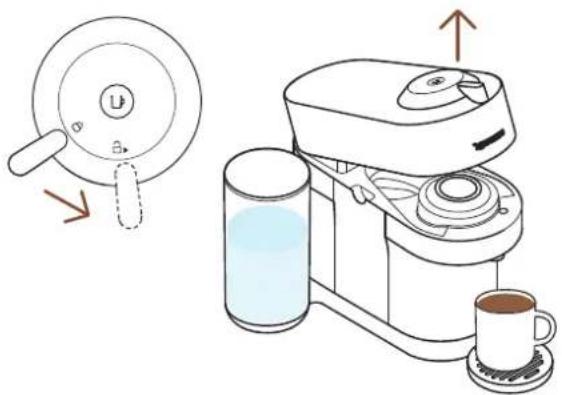
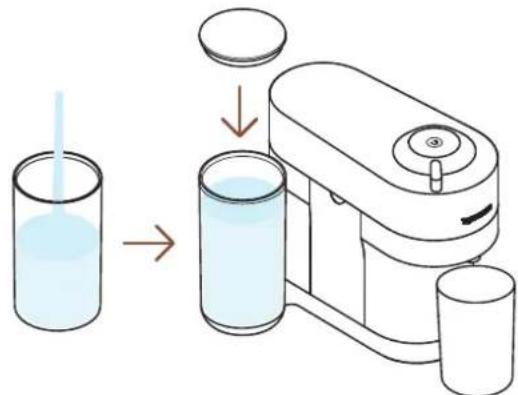
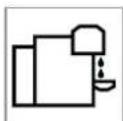
1 Rinse the water tank before filling it with only fresh potable water.
natural_image
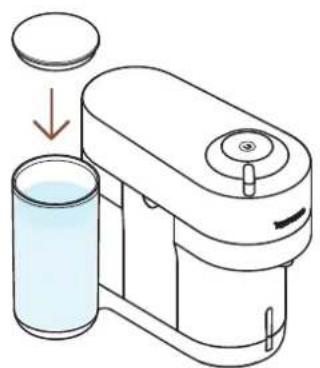
Illustration of a hand washing a small water dispenser with liquid, showing mechanical components and a drop-down arrow (no text or symbols)2 Close the water tank with the lid and put the water tank back in position on the machine.
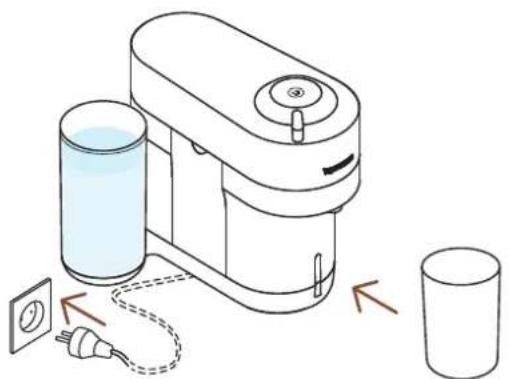
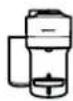
natural_image
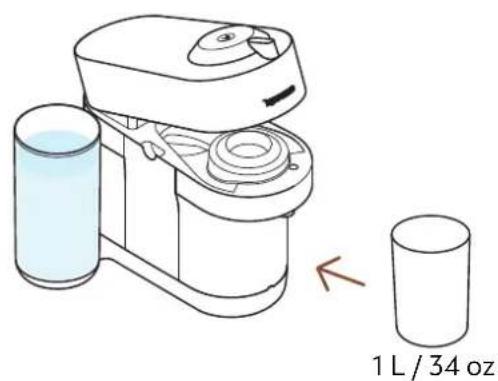
Diagram of a water purifier with two connected components and a separate cylindrical container (no text or symbols)3 Plug the power cord, remove the cup support and place an empty container (at least 1 L / 34 oz) under the coffee outlet.
4 Open and close the machine. Ensure the lever is in lock position.

5 Turn on the machine by clicking on the button once.
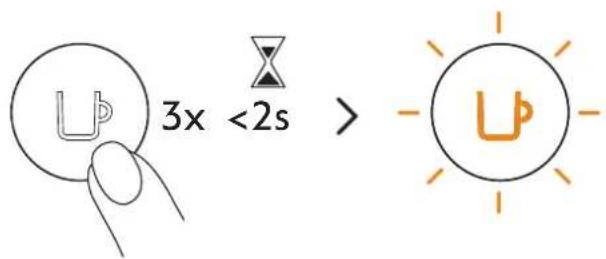
6 Press the button 3 times within 2 seconds.
The machine will start rinsing. This procedure may take up to 7 minutes.
CAUTION: First read the safety precautions to avoid risks of fatal electrical shock and fire. Please ensure ground continuity when plugging the machine in the power outlet.
When unpacking the machine, remove the plastic films.
COFFEE PREPARATION

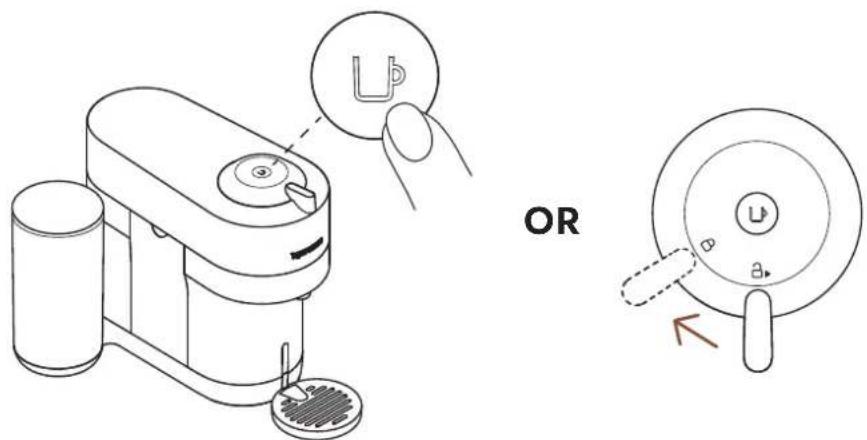
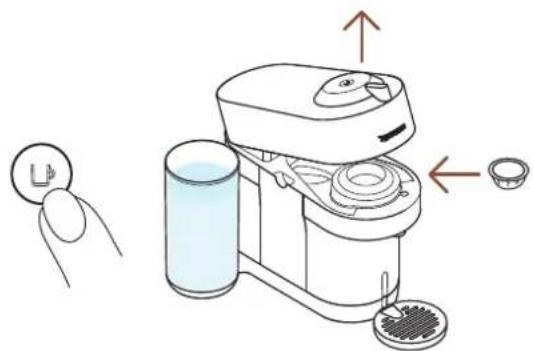
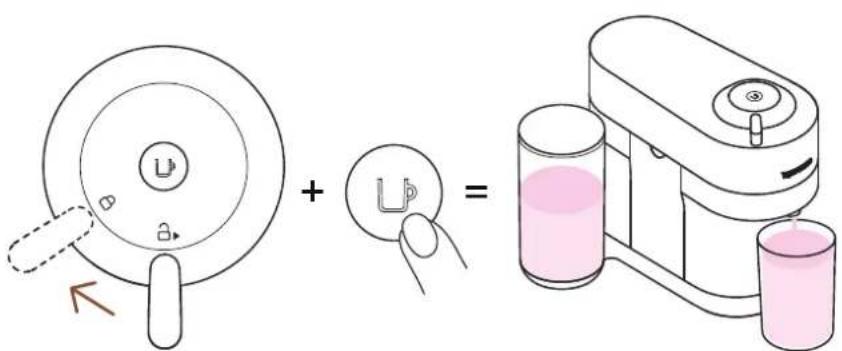
1 Turn on your machine by clicking once on the button or by closing the lever towards the lock position.
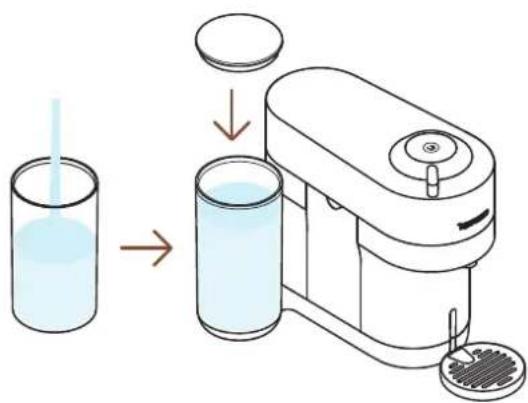
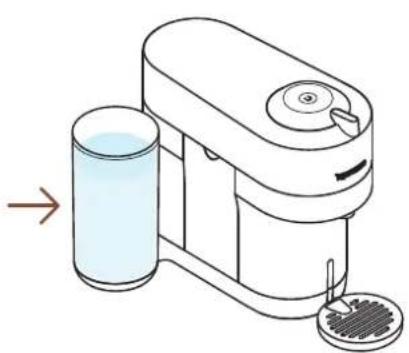
2 Fill the water tank with fresh potable water and put it back in position.
natural_image
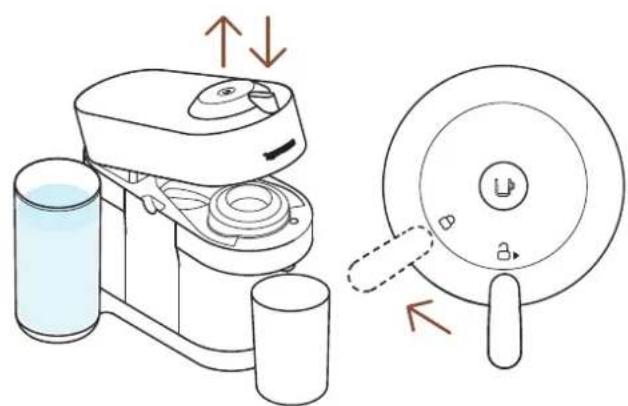
Diagram showing two views of a kitchen appliance with a side view of a glass and a small bowl (no text or symbols)3 Open the machine and insert a Vertuo capsule.
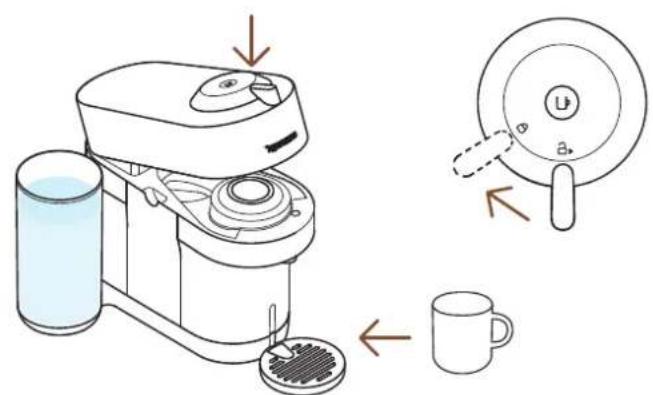
4 Close the machine by turning the lever until the lock position and place a cup. The cup support can be adjusted to accommodate your cup size.
5 Start brewing by clicking on the button once.
NOTE: water may accumulate inside the machine's head, please dry visible parts with a clean dry cloth.
6 When the coffee stops brewing, open the machine by turning the lever towards the unlock position, eject the capsule and enjoy your coffee.
DISCOVER OUR CONCENTRATED EXTRACTION FOR BARISTA RECIPES
With this machine, Nespresso offers you a specific function to concentrate your coffee extractions to create your own recipes.
With your machine on, quickly click 2 times on the coffee button. It will blink turquoise and your coffee brew will be concentrated, enhancing the coffee taste in recipes with add-ons (milk, creamer, over ice...).
other
| Category | Value | |---|---| | 40 ml / 1.4 oz | ✓ | | 80 ml / 2.7 oz | ✓ | | 150 ml / 5.1 oz | ✓ | | 230 ml / 7.8 oz | ✓ | | 25 ml / 0.85 oz | ✓ | | 40 ml / 1.4 oz | ✓ | | 40 ml / 1.4 oz | ✓ | | 80 ml / 2.7 oz | ✓ | X (Red X)
Discover how to upgrade your machine with our Aeroccino range on www.nespresso.com
ADAPT YOUR COFFEE VOLUMES
1 Turn on the machine by clicking on the button once, open the machine and insert the capsule you want to brew.

2 Close the machine, turn the lever towards the lock position and place a cup.

3 Press and hold the button until the desired volume is reached. The new water volume is now programmed for the capsule type used during the setting.
The programming is specific to each capsule type. Cup sizes may be programmed from 20 ml / 0.7 oz to 535 ml / 18 oz.
NOTE: Once a customer-specific volume is programmed by the user, every time that capsule type is inserted in the machine, the preparation will stop at the user-programmed cup size. If you wish to come back to the default parameters see the paragraph "Reset to factory settings".
CLEANING
Clean your machine on a monthly basis, when you start having coffee residue inside the machine head or after a long period of non-use.

natural_image
Product photo of coffee machines with yellow and red models, featuring a play button overlay (no visible text or symbols)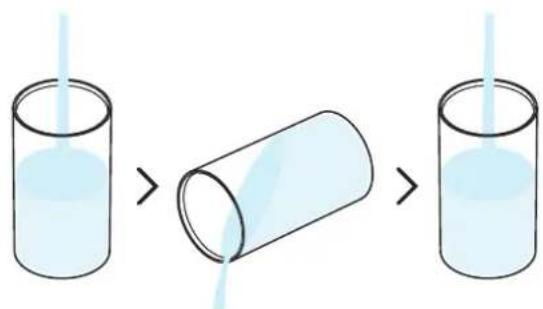
1 Rinse and clean the water tank and the lid before filling it with fresh potable water.
natural_image
Illustration of a handwashing machine with a glass and a lid, showing liquid level (no text or symbols)2 Put the water tank back in position on the machine.
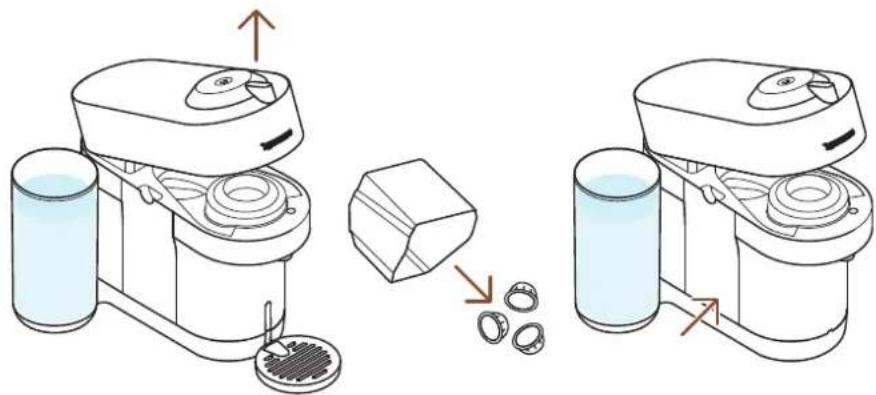
3 Open the machine and let the used capsule be ejected. Empty the capsule container and put it back in place.
4 Remove the cup support and place an empty container (at least 1 L / 34 oz) under the coffee outlet.

5 Close the machine head and turn the lever left towards lock position.
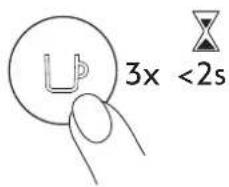
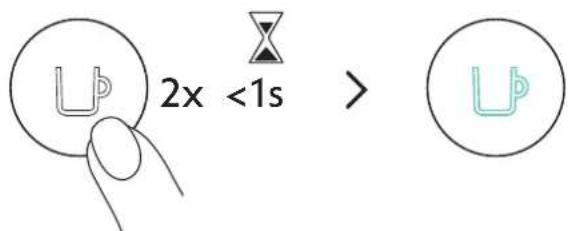
6 With the machine on, press the button 3 times within 2 seconds.

7 The cleaning procedure will run automatically for \~7 minutes. A steady light appears when the cleaning is done.
It takes \~2 minutes before water begins to flow out of the coffee outlet. The procedure can be stopped at any time by pressing the button.
natural_image
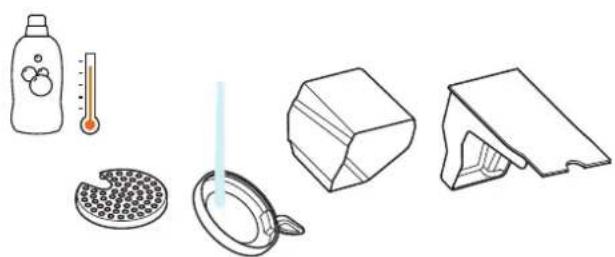
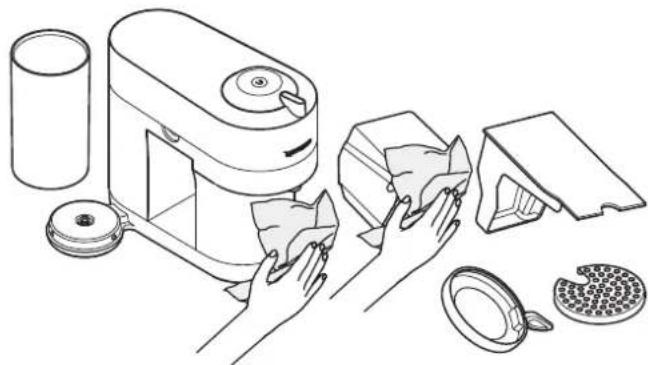
Illustration of household items including a bottle, thermometer, plate with filter, and 3D-printed box (no text or symbols)8 Wash the capsule container, the cup support and the drip tray with hot water and mild odourless detergent.
CAUTION: Do not use any strong or abrasive cleaning agent or solvent cleaner. Do not put the machine in a dishwasher. Never immerse the appliance or part of it in water.
natural_image
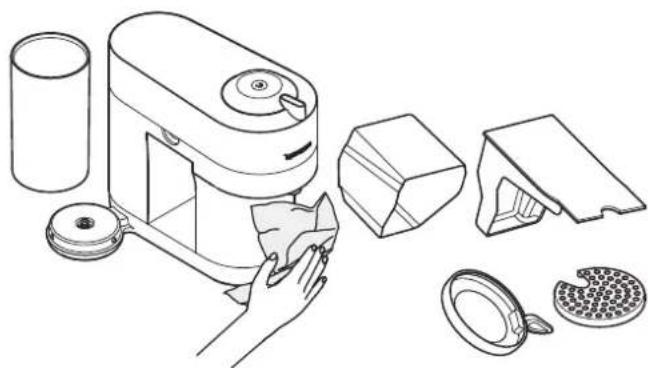
Line drawing of a kitchen appliance with cutaway views showing components like a lid, tray, and washer (no text or labels)9 Dry the machine with a clean and fresh towel.
CAUTION: Clean the coffee outlet regularly with a clean damp cloth. Always use soft cloths to clean the machine.
NOTE: Water may accumulate inside the machine's head during cleaning. If this happens, please dry visible parts with a clean dry cloth.
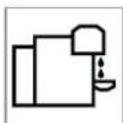
DESCALING
Descaling your machine will ensure that it functions properly throughout its lifetime and will make your coffee experience as incomparable as it was the first day. Your machine will indicate when descaling is needed by blinking orange 3 times before steady white.

natural_image
Two modern coffee machines with black and yellow tops, each emitting dark liquid, arranged in a circle with a play button (no visible text or symbols)The descaling procedure takes \~20 minutes and cannot be interrupted.
You will need:
• A descaling kit available on www.nespresso.com
• An empty container (1L / 34 oz)
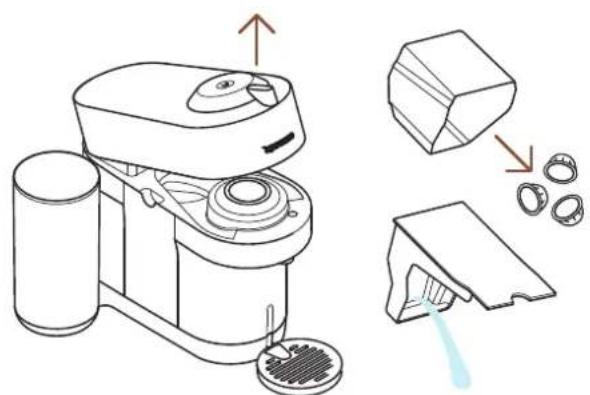
natural_image
Line drawing of a blender with labeled components and a water droplet (no text or symbols)1 Open the machine and let the used capsule be ejected. Empty the capsule container and the drip tray and place them back in position on the machine.
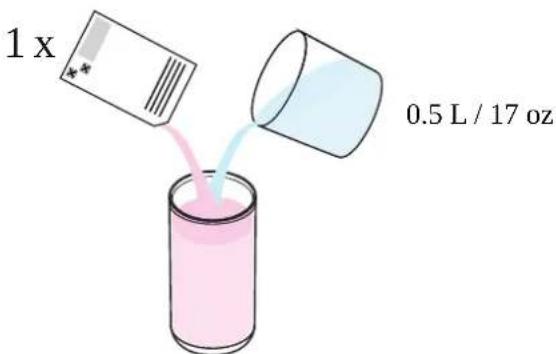
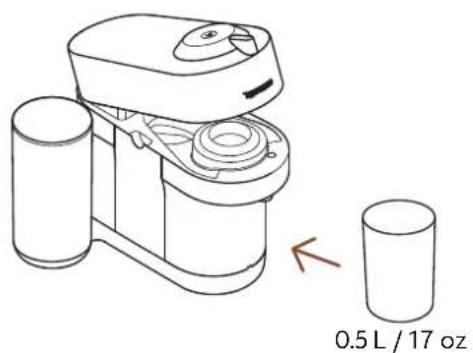
2 Fill the water tank with 0.5 L / 17 oz of water and add 1 unit of Nespresso descaling liquid.
CAUTION: Please note that the descaling solution can be harmful. Avoid contact with eyes, skin and surfaces.
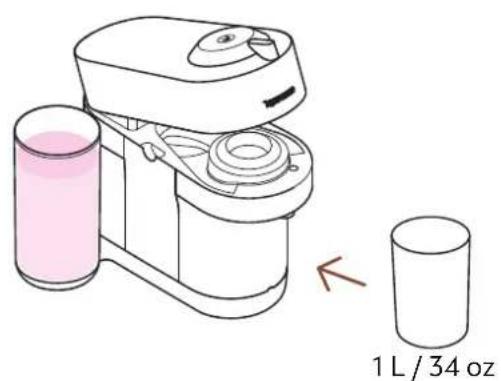
3 Remove the cup support and place an empty container (at least 1 L / 34 oz) under the co-ee outlet.

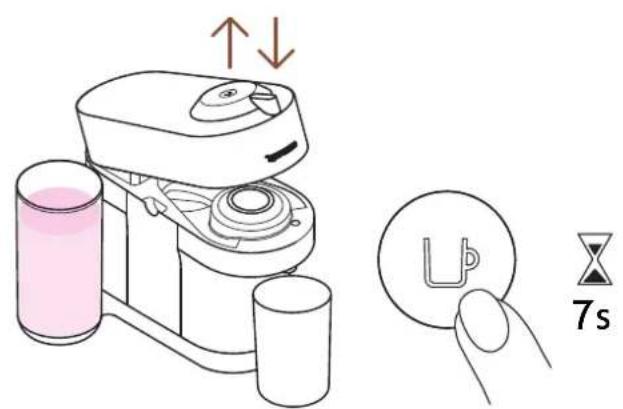
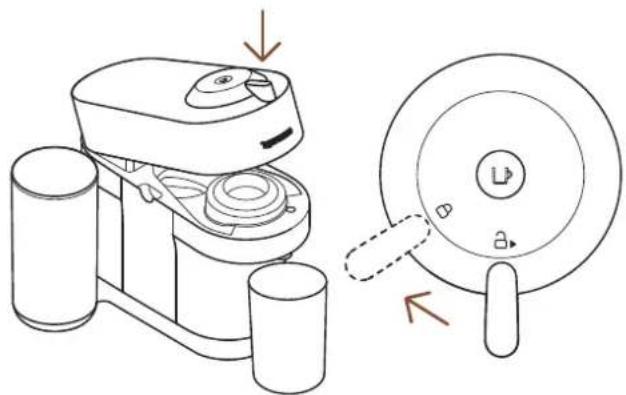
4 With machine on, close the machine head and leave the lever in unlock position.

5 Hold the button for at least 7 seconds. The button starts blinking orange rapidly.
CAUTION: You now have 45 seconds to enter the descaling mode, otherwise the machine will return to the brewing mode.
6 Open and close the machine head and leave the lever in unlock position. Hold the button again for at least 7 seconds.
7 Turn the lever left towards the lock position and press on the button once.
The machine will stop automatically when the first phase of descaling is completed.
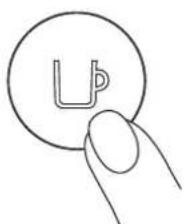
8 Now, it's time to rinse the machine. Rinse the water tank and fill it with fresh potable water. Put it back in place.
natural_image
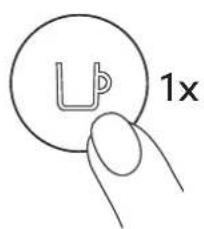
Simple line drawing of a finger pressing a circular button with an 'U' symbol (no text or numbers present)9 Push the button to rinse the machine. When the button stops blinking rapidly, the descaling procedure is completed.
The machine will stop automatically when the procedure is completed.

natural_image
Illustration of household items including a bottle, thermometer, plate with filter, cube, and 3D model (no text or symbols)10 Wash the capsule container, the cup support and the drip tray with hot water and mild odourless detergent.
CAUTION: Do not use any strong or abrasive cleaning agent or solvent cleaner. Do not put the machine in a dishwasher. Never immerse the appliance or part of it in water.
natural_image
Line drawing of a kitchen appliance with hands cleaning it, showing components like a brush, lid, and tray (no text or symbols)11 Dry the machine with a clean and fresh towel.
CAUTION: Do not use any strong or abrasive cleaning agent or solvent cleaner. Do not put the machine in a dishwasher. Never immerse the appliance or part of it in water.
NOTE: Water may accumulate inside the machine's head during cleaning. If this happens, please dry visible parts with a clean dry cloth.
EMPTYING
Emptying the system is a process that could be done before a period of non-use, for frost protection or prior to sending the machine for a repair.
natural_image
Product photo of coffee machines with yellow and red models, featuring a play button overlay (no visible text or symbols)
natural_image
Diagram of a cleaning machine with labeled components and motion arrows (no text or symbols)1 Empty the water tank, open the machine head, and let the used capsule be ejected. Empty the capsule container and the drip tray.
2 Place them back in position on the machine, remove the cup support and place an empty container (0.5 L / 17 oz) under the coffee outlet.
natural_image
Technical line drawing of a device with a close-up view showing internal components (no text or symbols)3 With machine plugged, open and close the machine head and turn the lever towards the lock position.
natural_image
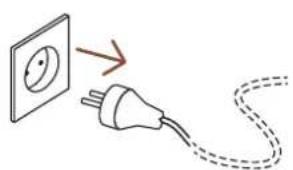
Simple line drawing of an electrical plug connected to a wall socket, with a dashed cord indicating wire (no text or symbols)4 Unplugthemachine.
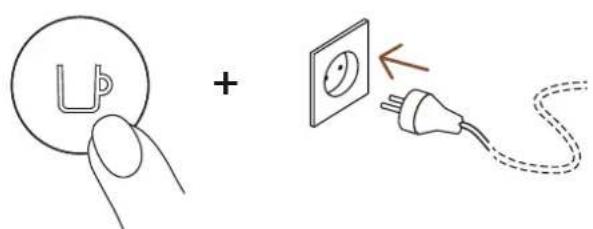
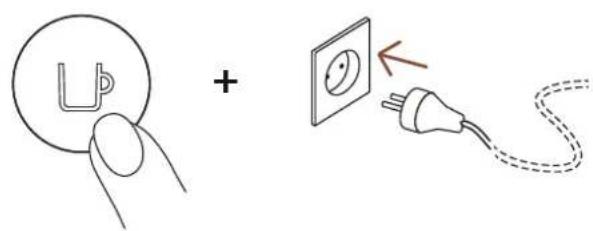
5 Press and hold the button while plugging the machine.

6 Release the button. It will blink orange and the emptying process will start.
It will take approximatively 30 seconds for the machine to complete the emptying process. The machine turns off automatically when it is empty.
MACHINE SETTINGS
RESET TO FACTORY SETTINGS
natural_image
Illustration of a coffee maker with water and cups, alongside its close-up view showing its lid (no text or symbols)1 With the machine plugged, open then close the machine head before leaving the lever on the unlock position.
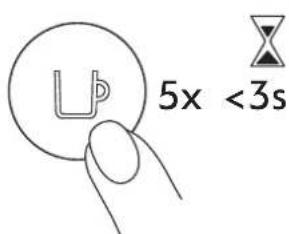
2 Press the button 5 times within 3 seconds. The machine is now programmed with the factory settings.
MACHINE BLUETOOTH AND WI-FI
The machine comes with a connectivity module, enabled by default. It gives access to additional features, enhancing your coffee experience. To disable the connectivity module, follow these steps:
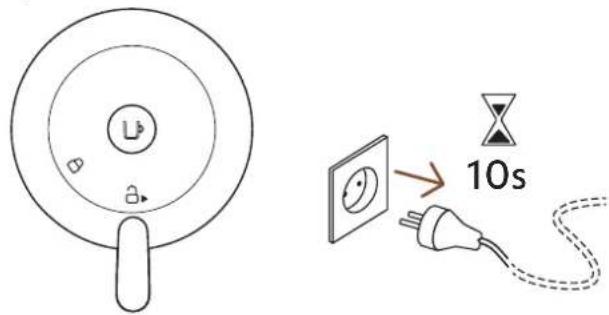
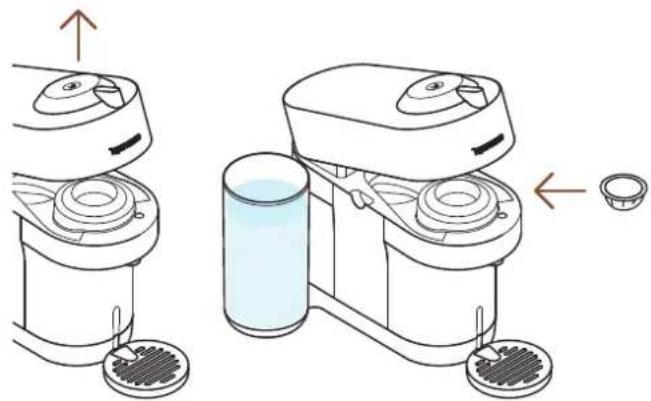
1 With the machine closed and the lever in unlocked position, unplug the machine for at least 10 seconds.
2 Press and hold the button whilst plugging the machine. The button will blink orange to confirm that the connectivity module has now been disabled.
Follow the same steps to set the connectivity module back on again. The button will blink white to confirm that the module has been reactivated.
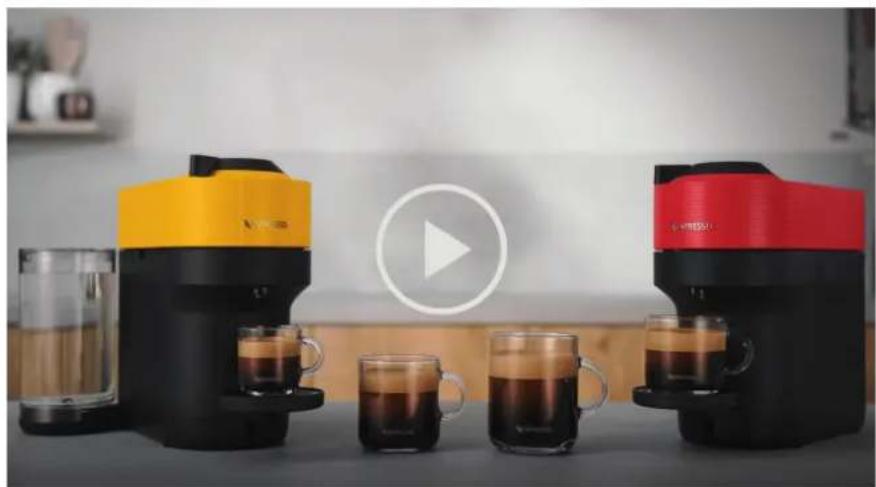
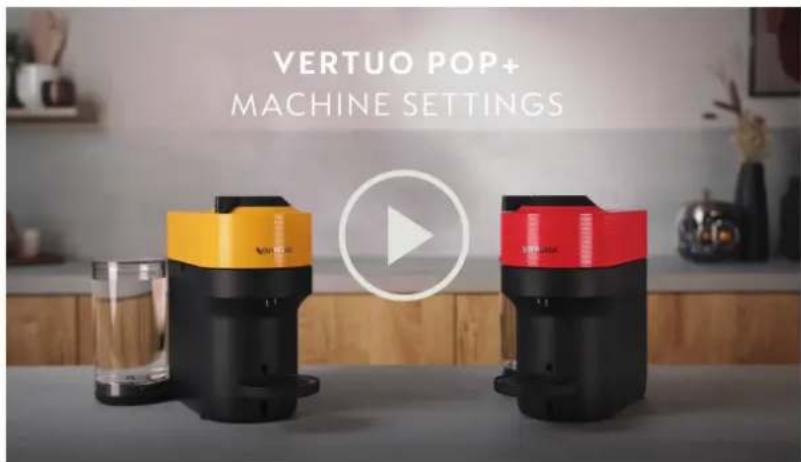
BLINKING SUMMARY
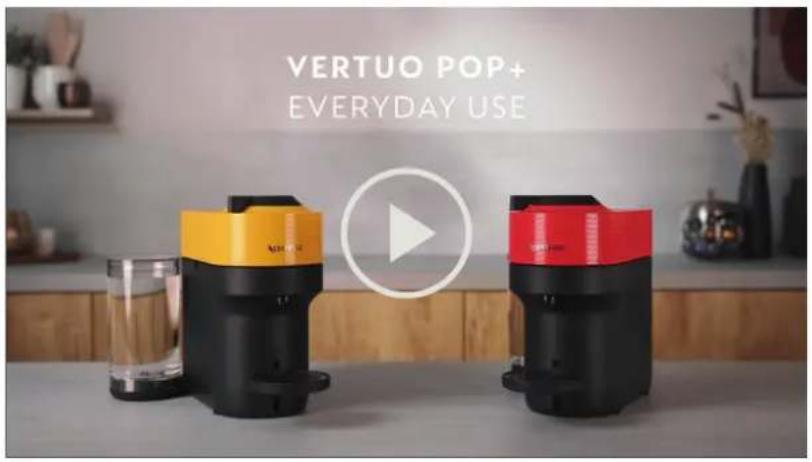
You want to learn more about the Vertuo Pop+ blinkings? Check out the following video:

TROUBLESHOOTING
No light on the button. • The machine has turned OFF automatically; push the button or "UNLOCK" the machine.
- Check the mains, plug, voltage, and fuse.
No coffee, no water. • Check that the water tank is filled.
- Check that a fresh capsule is inserted in the correct position, that the lever is properly locked and push the button to start.
- Descale if necessary.
- Open the machine head and let the capsule be ejected. Then perform a cleaning as per cleaning section.
Coffee is not hot enough.
- Preheat the cup with hot drinking water from the tap.
- Descale if necessary.
Leakage or unusual coffee flow.
- Check that the water tank is well positioned.
- Descale if necessary.
Machine turns to "OFF mode".
• To save energy the machine will turn off after 2 minutes of non-use.
- The machine can be turned "OFF" manually at any time (when not in use) by pressing and holding the button for 3 seconds.
Coffee grounds in the cup.
• Perform the cleaning procedure twice.
• See paragraph on "Cleaning".
The machine doesn't start and has light steady on. If blinking, see next points.
- Check that the lever is properly locked.
- If you want to brew a Coffee, check that a fresh capsule is inserted in the correct position, that the lever is properly locked and push the button to start.
- If you are cleaning, descaling or emptying the system, check that no capsule is inserted then close, lock the machine and push the button to start one of these operations.
The machine doesn't start and light blinks alternately; 1 blink and 1 pause.
- Fill the water tank and push the button to start.
- Check that the lever is properly locked.
Light blinks while machine is running.
• If the coffee is flowing normally, this indicates the machine is working properly.
- If only water is flowing, the machine is executing a user request for either cleaning, descaling or emptying the system. Refer to the corresponding section in this user manual.
- Turn the machine to "OFF mode" by pushing the button for 3 seconds and then push it again to turn the machine ON. Now wait approximately 20 minutes to allow the machine to cool down after extensive use.
Light blinks and machine is not running.
- It will take some time before the coffee flow comes out (due to code reading and pre-wetting the coffee).
- Check that a fresh capsule is inserted in the correct position, that the lever is properly locked and push the button to start.
- Fill the water tank and push the button to start.
- Turn the machine to "OFF mode" by pushing the button for 3 seconds and then push it again to turn the machine ON. Now, wait approximately 20 minutes to allow the machine to cool down after extensive use.
Light blinks alternately 2 blinks and 1 pause continuously. Machine is not running.
• During regular Coffee preparation:
1) Unlock the lever and open the machine head to check that a fresh undamaged capsule is inserted in the correct position.
2) Check that the lever is in "LOCKED" position.
3) Check that the water tank is filled.
• During Descaling, Emptying and Cleaning:
1) Check that the capsule is ejected. 2) Check that the lever is in "LOCKED" position.
• During Programming Volume:
1) Check if a capsule has been well inserted. 2) Please refer to the corresponding chapter.
Light alternately blinking 3 times and then steady on.
• If the problem persists:
1) Unlock the lever and open the machine head.
2) Replace the capsule (if needed).
3) Disconnect the power cord from the outlet and plug the machine back into the outlet after 10 seconds.
4) Close the head and press the button to turn ON and press again to start brewing. If the problem persists, call Nespresso.
- Descaling needed: the machine can be used only a few times after the descaling alert appears before it becomes necessary.
SPECIFICATIONS
Power
US, CA: 120 V, 60 Hz, 1500 W
MX: 127 V\~, 60 Hz, 1650 W
Frequency 2.402–2.480 GHz
RF output power (EIRP)
Bluetooth 4 dBm Max. e.i.r.p. and Wi-Fi <20 dMm max. e.i.r.p.
Dimensions (W x D x H) 219 x 356 x 265 mm / 8.6 x 14 x 10.4 in
Weight
Vertuo Pop+: 3.6 kg / 7.9 lbs
Vertuo Pop+ Deluxe: 3.7 kg / 8.1 lbs
Water tank capacity
Vertuo Pop+: 0.75 L / 25.4 oz
Vertuo Pop+ Deluxe: 1.1 L / 37.2 oz
Capsule container capacity
8 espresso or 5 mug capsules
MACHINE CODES
GCV6 GDV6 BNV520, BNV550,
BNV530, BNV560,
BNV540, BNV570
ENV92B, ENV92BAE,
ENV92Y, ENV92YAE,
ENV92AAE, ENV95S, ENV95SAE


CLIQUEZ POUR SÉLECTIONNER VOTRE LANGUE
EN
FRES


MESURES DE SÉCURITÉ
VUE D'ENSEMBLE
CONNECTIVITÉ
PREMIÈRE UTILISATION
PRÉPARATION DU CAFÉ
ADAPTER LE VOLUME DE VOTRE CAFÉ
NETTOYAGE
DÉTARTRAGE
VIDAGE
RÉGLAGES DE LA MACHINE
RÉSUMÉ DES CLIGNOTEMENTS
DÉPANNAGE
SPÉCIFICATIONS
MESURES DE SÉCURITÉ
VUE D'ENSEMBLE
APERÇU DE LA MACHINE

natural_image
Product display of a coffee machine with various accessories and packaging (no visible text or symbols)LE SYSTÈME VERTUO
CAPSULES DISPONIBLES

P
Espresso
(40 ml / 1,4 oz liq)

M
Double Espresso
(80 ml / 2,8 oz liq)
Gran Lungo
(150 ml / 5,1 oz liq)

G
Tasse
(230 ml / 7,8 oz liq)
flowchart
graph LR
    A["Smartphone with printer"] --> B["Device selecting a device"]
    B --> C["Conversion to device"]
    C --> D["Device selecting a device with a green checkmark"]
4 Suivez les instructions via l'application Nespresso.
natural_image
Illustration of a hand washing machine with a glass of liquid and a lid, showing fluid flow direction (no text or symbols)natural_image
Illustration of a water purifier with a glass, connected to a power outlet and a cylinder (no text or symbols)natural_image
Diagram showing two views of a kitchen appliance with a side view of a glass tube and a small bowl (no text or symbols)natural_image
Product photo of coffee machines with yellow and red models, featuring a play button overlay (no visible text or symbols)
natural_image
Illustration of a handwashing machine with a glass and a side dish, showing no text or symbols.natural_image
Line drawing of a blender with liquid and a glass, showing no text or symbols1 L / 34 oz liq
natural_image
Illustration of household items including a thermometer, a plate with filter, a cube, and a folded shirt (no text or symbols)natural_image
Line drawing of a kitchen appliance with cutaway views showing components like a lid, tray, and washer (no text or labels)natural_image
Product photo of a coffee machine with yellow and red models, surrounded by glass cups and a play button (no visible text or symbols)natural_image
Line drawing of a blender with labeled components and a water droplet (no text or symbols)natural_image
Simple line drawing of a finger pressing a circular button with an 'Up' symbol (no text or numbers present)natural_image
Illustration of household items including a thermometer, a plate with filter, a cube, and a folded shirt (no text or symbols)natural_image
Line drawing of a kitchen appliance with hands cleaning it, showing components like a cylindrical container, lid, and filter (no text or symbols)natural_image
Product photo of coffee machines with yellow and red models, featuring a play button overlay (no visible text or symbols)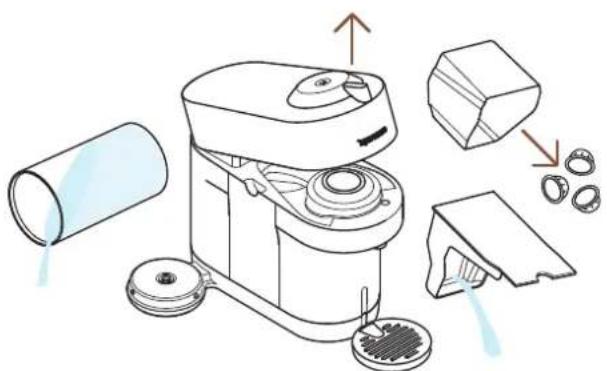
natural_image
Line drawing of a microwave oven with components and parts, no text or symbols presentnatural_image
Technical line drawing of a device with a close-up view showing internal components (no text or symbols)natural_image
Simple line drawing of an electrical plug connected to a wall socket, with a dashed cord indicating wire (no text or symbols)natural_image
Illustration of a coffee maker with water and cups, alongside its close-up view showing its lid (no text or symbols)SPÉCIFICATIONS
Puissance
US, CA: 120 V, 60 Hz, 1500 W
MX: 127 V\~, 60 Hz, 1650 W
| GCV6 GDV6 BNV520, BNV550,BNV530, BNV560,BNV540, BNV570 | ENV92B, ENV92BAE,ENV92Y, ENV92YAE,ENV92AAE, ENV95S,ENV95SAE |
DA CLIC Y SELECCIONA TU IDIOMA
EN
FR
ES


VISIÓN GENERAL
natural_image
Product display of a coffee machine with various accessories and packaging (no visible text or symbols)EL SISTEMA VERTUO
CÁPSULAS COMPATIBLES

S
Espresso
(40 ml)

M
Double Espresso
(80 ml)
Gran Lungo
(150 ml)

L
Mug
(230 ml)

XL
Alto, Cold Brew Style
(355 ml)
Carafe
(535 ml)
ACCESORIOS
BENEFICIOS DE CONECTAR SU MÁQUINA VERTUO POP+
1 Descargue o actualice la App de Nespresso.
2 Ejecute la App de Nespresso en su smartphone o su tableta.

flowchart
graph LR
    A["Smartphone with printer"] --> B["Device selecting"]
    B --> C["Device selecting with a green checkmark"]
    C --> D["Device selecting with a circular arrow"]
ENCENDIDO (ON)
natural_image
Illustration of a hand mixer with liquid inside, showing a drop and partial view (no text or symbols)natural_image
Illustration of a water purifier with a glass, connected to a power outlet and a cylinder (no text or symbols)natural_image
Diagram showing two views of a kitchen appliance with a side view of a glass tube and a small bowl (no text or symbols)
natural_image
Illustration of a hand holding a small circular object next to a cleaning machine with a lid and base (no text or symbols)natural_image
Product photo of coffee machines with black and yellow models, featuring a play button overlay (no visible text or symbols)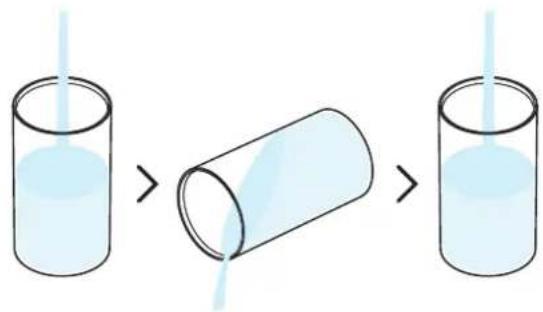
natural_image
Illustration of a handwashing machine with a glass and a side sink, showing a handwashing brush (no text or symbols present)natural_image
Illustration of a kitchen mixer with a glass and a 1L volume beside it (no text or symbols on the main diagram)natural_image
Illustration of household items including a thermometer, a plate with filter, a cube, and a folded shirt (no text or symbols)natural_image
Line drawing of a kitchen appliance with cutaway views and accessories (no text or symbols)natural_image
Two modern coffee machines with black and yellow tops, each emitting dark liquid, arranged in a circle with a play button (no visible text or symbols)natural_image
Line drawing of a blender with labeled parts and a water droplet, showing mechanical components and cleaning steps (no text or symbols)natural_image
Illustration of a blender with liquid and a 1L volume beside it (no text or symbols)natural_image
Hand holding a circular button with an 'U' symbol, no text or numbers presentnatural_image
Illustration of household items including a thermometer, a plate with filter, a cube, and a 3D object (no text or symbols)natural_image
Line drawing of a kitchen appliance with hands cleaning it, showing components like a brush, lid, and tray (no text or symbols)natural_image
Product photo of two coffee machines with yellow and black designs, surrounded by glass cups and a play button (no visible text or symbols)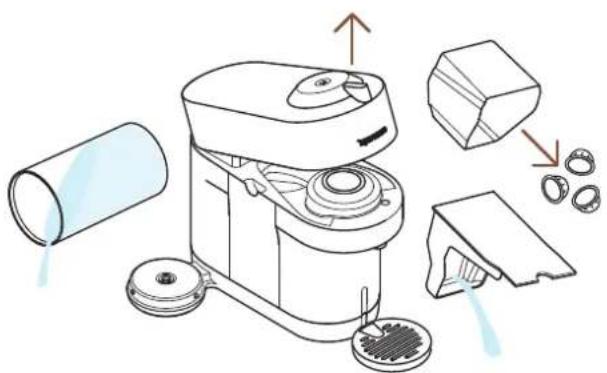
natural_image
Illustration of a cleaning machine with components and parts, showing no text or symbolsnatural_image
Technical line drawing of a device with a close-up view showing internal components (no text or symbols)natural_image
Simple line drawing of an electrical plug connected to a wall socket, with a dashed cord indicating wire (no text or symbols)natural_image
Illustration of a coffee maker with water and cups, alongside its close-up view showing its lid (no text or symbols)US, CA: 120 V, 60 Hz, 1500 W
MX: 127 V\~, 60 Hz, 1650 W
GCV6 GDV6 BNV520, BNV550,
BNV530, BNV560,
BNV540, BNV570
ENV92B, ENV92BAE,
ENV92Y, ENV92YAE,
ENV92AAE, ENV95S, ENV95SAE


- VERTUO POP+
- CLICK AND CHOOSE YOUR LANGUAGE
- EN FR ES
- SAFETY PRECAUTIONS
- OVERVIEW
- MACHINE OVERVIEW
- PACKAGING CONTENT
- OPEN / CLOSE
- THE VERTUO SYSTEM
- SUITABLE CAPSULES
- ACCESSORIES
- CONNECTIVITY
- WHY SHOULD YOU PAIR YOUR VERTUO POP+ MACHINE?
- BENEFITS OF CONNECTING YOUR VERTUO POP+ MACHINE
- HOW TO CONNECT YOUR VERTUO POP+ MACHINE?
- FIRST USE
- ON / OFF
- ON
- OFF
- FIRST RINSING
- COFFEE PREPARATION
- DISCOVER OUR CONCENTRATED EXTRACTION FOR BARISTA RECIPES
- ADAPT YOUR COFFEE VOLUMES
- CLEANING
- DESCALING
- You will need:
- Dry the machine with a clean and fresh towel.
- EMPTYING
- MACHINE SETTINGS
- MACHINE BLUETOOTH AND WI-FI
- BLINKING SUMMARY
- TROUBLESHOOTING
- Light blinks while machine is running.
- Light blinks and machine is not running.
- Light blinks alternately 2 blinks and 1 pause continuously. Machine is not running.
- SPECIFICATIONS
- Power
- RF output power (EIRP)
- Weight
- Water tank capacity
- Capsule container capacity
- MACHINE CODES
- CLIQUEZ POUR SÉLECTIONNER VOTRE LANGUE
- EN
- FRES
- MESURES DE SÉCURITÉ
- VUE D'ENSEMBLE
- APERÇU DE LA MACHINE
- LE SYSTÈME VERTUO
- CAPSULES DISPONIBLES
- SPÉCIFICATIONS
- Puissance
- DA CLIC Y SELECCIONA TU IDIOMA
- FR
- ES
- VISIÓN GENERAL
- EL SISTEMA VERTUO
- CÁPSULAS COMPATIBLES
- ACCESORIOS
- BENEFICIOS DE CONECTAR SU MÁQUINA VERTUO POP+
- ENCENDIDO (ON)
Brand : BREVILLE
Model : Nespresso Vertuo Pop+
Category : Coffee machine